Unity使用LineRender实现签名效果
本文为大家分享了Unity制作签名功能的具体代码,供大家参考,具体内容如下
前言:项目中需要做一个签名的功能,同时需要两个两个屏幕进行显示,但是都是在UI上,从网上查了大量资料。
找到两种方法:
1、修改图片像素点 但是是马赛克效果,不满足需求
2、使用LineRenderer 的3D签名制作出2D效果
改像素点:
先上代码
using System.Collections;
using System.Collections.Generic;
using UnityEngine;
using UnityEngine.UI;

public class Test : ObjBase
{

    public GameObject m_obj;
    private Texture2D m_tex;
    public Color m_color;
    public int size = 3;
    private Color[] m_textureColorsStart;


    public RawImage showImg;
    void Start()
    {
        if (Display.displays.Length > 1)
            Display.displays[1].Activate();
        if (Display.displays.Length > 2)
            Display.displays[2].Activate();
        m_tex = m_obj.GetComponent<MeshRenderer>().material.mainTexture as Texture2D;
        //从纹理中获取像素颜色
        m_textureColorsStart = m_tex.GetPixels();
        Debug.Log(m_tex.name);
    }


    void Update()
    {
        //Vector3 oldPos=Vector3.zero;
        //oldPos = Input.mousePosition;
        //Ray ray = uiCam.ScreenPointToRay(Input.mousePosition);
        Ray ray = Camera.main.ScreenPointToRay(Input.mousePosition);
        RaycastHit hit;
        if (Input.GetMouseButton(0))
        {
            // float m_magnitude = (Input.mousePosition - oldPos).magnitude;
            // Vector3 dir = Input.mousePosition - oldPos;
            if (Physics.Raycast(ray, out hit))
            {
                //在碰撞位置处的UV纹理坐标。
                Vector2 pixelUV = hit.textureCoord;
                //以像素为单位的纹理宽度
                pixelUV.x *= m_tex.width;
                pixelUV.y *= m_tex.height;
                //贴图UV坐标以右上角为原点
                for (float i = pixelUV.x - 1; i < pixelUV.x + size; i++)
                {
                    for (float j = pixelUV.y - 1; j < pixelUV.y + size; j++)
                    {
                        m_tex.SetPixel((int)i, (int)j, m_color);
                    }
                }
                Debug.Log(pixelUV);
                m_tex.Apply();
                showImg.texture = m_tex;
            }
        }
        if (Input.GetKeyDown(KeyCode.Space))
        {
            //还原
            m_tex.SetPixels(m_textureColorsStart);
            m_tex.Apply();
        }


        //在处理鼠标按下的记录下位置,抬起的时候记录下位置,取2个位置中间的位置发射射线
        //if (Input.GetMouseButtonDown(0))
        //{

        //}
        //if (Input.GetMouseButtonUp(0))
        //{

        //}
    }

    public void OnClick()
    {

        showImg.texture = m_tex;
    }
}
using System.Collections;
using System.Collections.Generic;
using UnityEngine;

public class ObjBase : MonoBehaviour
{


    public bool IsShow
    {
        get { return gameObject.activeSelf; }
    }

    // Use this for initialization
    void Start()
    {

    }

    /// <summary>
    /// 显示
    /// </summary>
    /// <param name="parameter"></param>
    public virtual void Show(object parameter = null)
    {

        gameObject.SetActive(true);
    }

    /// <summary>
    /// 隐藏
    /// </summary>
    /// <param name="parameter"></param>
    public virtual void Hide(object parameter = null)
    {
        gameObject.SetActive(false);
    }


}
Test脚本是用来修改像素点的,ObjBase只是一个根父类,控制显示和隐藏。
测试场景用的Quad,通过读取他的mainTexture对应的像素,进行修改,UI中的话就是将一张图片转成Texture2D形式,通过读取像素点,进行修改即可,同时还可以实现同步效果。
项目中的Hierarchy窗口设置:
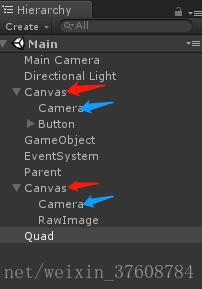
项目需求:使用了两个画布,MainCamera照射Quad,两个UI相机分别照射两个画布,画布的Render Mode设置为Screen Space -Camera格式。GameObject挂载脚本,Quad用来修改其上的图片的像素点。
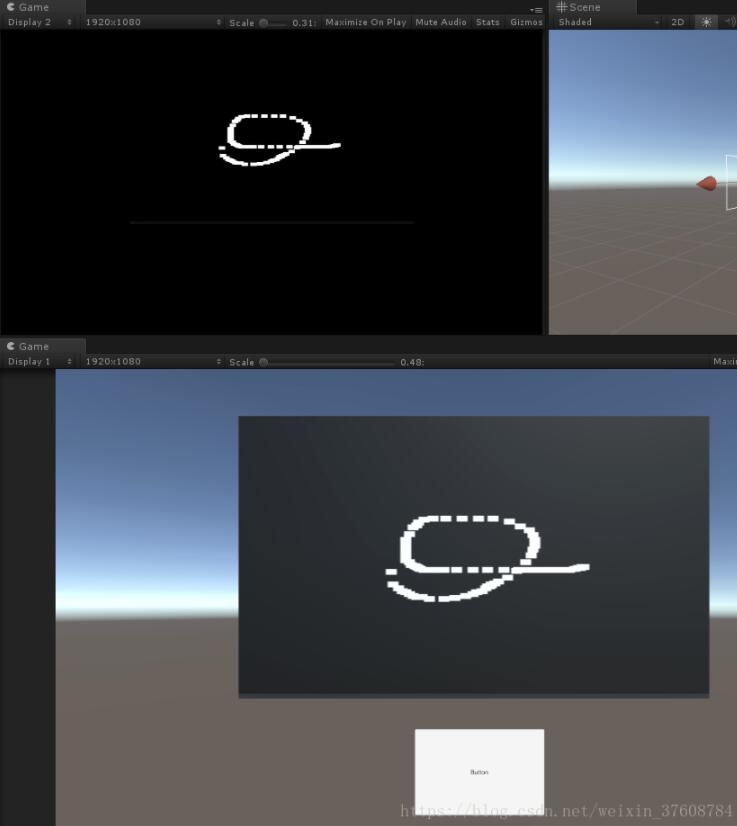
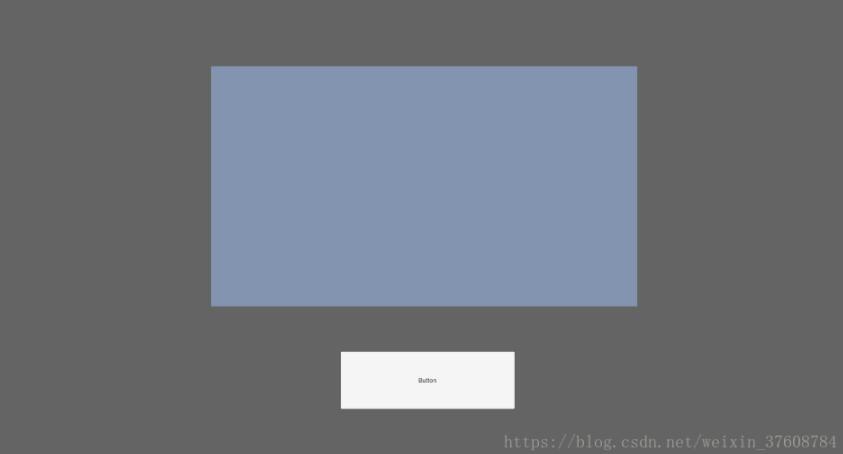
效果图:
使用LineRenderer 3D划线方法实现2D签名效果:
先上代码:
using System.Collections;
using System.Collections.Generic;
using UnityEngine;
using UnityEngine.UI;
using System.Text;
using System.IO;
using UnityEngine.EventSystems;

public class Test5 : MonoBehaviour {

    public GameObject drawObj;
    private bool beginDraw;
    private GameObject obj;
    public Transform parent;
    public RawImage rawImg;
    public Camera UICam;
    public Camera main;//主相机和UI相机共同照射到的地方进行截图
    Color[] colors;
    Texture2D myTexture2D;
    public RawImage photo;

    public RawImage showImg;
    [SerializeField] private string _name;

    public RectTransform canvas1;

    public void SaveFile()
    {
        Camera mainCam;
        GameObject cam = Camera.main.gameObject;

        if (cam)
        {
            mainCam = cam.GetComponent<Camera>();
        }
        else
        {
            return;
        }

        RenderTexture renderTex;

        renderTex = new RenderTexture(Screen.width, Screen.height, 24);
        mainCam.targetTexture = renderTex;
        mainCam.Render();

         myTexture2D = new Texture2D(renderTex.width, renderTex.height);
        RenderTexture.active = renderTex;
        myTexture2D.ReadPixels(new Rect(0, 0, renderTex.width, renderTex.height), 0, 0);


        myTexture2D.Apply();
        byte[] bytes = myTexture2D.EncodeToJPG();

        myTexture2D.Compress(true);
        myTexture2D.Apply();
        RenderTexture.active = null;

        File.WriteAllBytes(Application.dataPath + "/StreamingAssets/TextureTemp.png", bytes);
        mainCam.targetTexture = null;
        GameObject.Destroy(renderTex);
    }

    public void OnClick()
    {

        main.rect = new Rect(0, 0, 1, 1);
       CaptureCamera( main,new Rect(Screen.width * 0f, Screen.height * 0f, Screen.width * 1f, Screen.height * 1f));


    }


    /// <summary>
    /// 对相机截图。
    /// </summary>
    /// <returns>The screenshot2.</returns>
    /// <param name="camera">Camera.要被截屏的相机</param>
    /// <param name="rect">Rect.截屏的区域</param>
    Texture2D CaptureCamera(Camera camera,Rect rect)
    {
        // 创建一个RenderTexture对象
        RenderTexture rt = new RenderTexture((int)rect.width, (int)rect.height, 0);
        // 临时设置相关相机的targetTexture为rt, 并手动渲染相关相机
        camera.targetTexture = rt;
        camera.Render();
        //ps: --- 如果这样加上第二个相机,可以实现只截图某几个指定的相机一起看到的图像。
         //camera2.targetTexture = rt;
        // camera2.Render();
        //ps: -------------------------------------------------------------------

        // 激活这个rt, 并从中中读取像素。
        RenderTexture.active = rt;
        Texture2D screenShot = new Texture2D((int)rect.width, (int)rect.height, TextureFormat.RGB24, false);
        screenShot.ReadPixels(rect, 0, 0);// 注:这个时候,它是从RenderTexture.active中读取像素
        screenShot.Apply();

        // 重置相关参数,以使用camera继续在屏幕上显示
        camera.targetTexture = null;
       // camera2.targetTexture = null;
        //ps: camera2.targetTexture = null;
        RenderTexture.active = null; // JC: added to avoid errors
        GameObject.Destroy(rt);
        // 最后将这些纹理数据,成一个png图片文件
        byte[] bytes = screenShot.EncodeToPNG();
        string filename = Application.dataPath + string.Format("/Screenshot_{0}.png", _name);
        System.IO.File.WriteAllBytes(filename, bytes);
        Debug.Log(string.Format("截屏了一张照片: {0}", filename));
        showImg.texture = screenShot;
        main.rect = new Rect(0.25f, 0.35f, 0.5f, 0.5f);
        return screenShot;
    }


    void Start () {
        if (Display.displays.Length > 1)
            Display.displays[1].Activate();
        if (Display.displays.Length > 2)
            Display.displays[2].Activate();
    }

 // Update is called once per frame
 void Update () {
        if (Input.GetMouseButtonDown(0))
        {
            beginDraw = true;
            obj = Instantiate(drawObj) as GameObject;
            obj.transform.parent = parent;
        }
        if (Input.GetMouseButtonUp(0))
        {
            beginDraw = false;
        }

        if (beginDraw)
        {
            Vector3 position = new Vector3(Input.mousePosition.x, Input.mousePosition.y, 10f);
            position = Camera.main.ScreenToWorldPoint(position);
            //Vector3 localPoint;
            //if(RectTransformUtility.ScreenPointToWorldPointInRectangle(canvas1, position, null, out localPoint))
            //{
            //    position = localPoint;
            //}


            DrawText dt = obj.GetComponent<DrawText>();
            dt.points.Add(position);
            dt.Draw();
            dt.line.startColor = Color.yellow;
            dt.line.endColor = Color.yellow;
            dt.line.startWidth = 0.03f;
            dt.line.endWidth = 0.03f;
        }

    }
}
Test5是划线和截取签名的操作,绑定在空物体上,OnClick函数绑定在按钮上
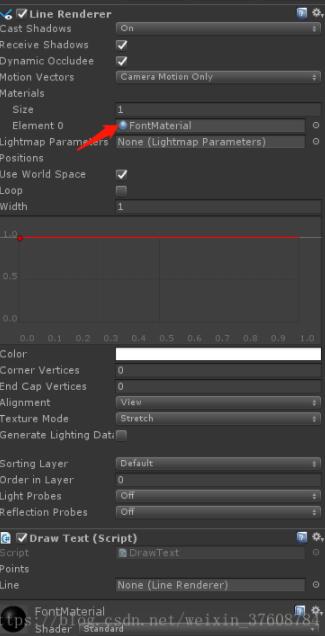
Line:制作签名预制体
using System.Collections;
using System.Collections.Generic;
using UnityEngine;

public class DrawText : MonoBehaviour {


    public List<Vector3> points = new List<Vector3>();
    public  LineRenderer line;
    private void Awake()
    {
        line = GetComponent<LineRenderer>();
    }
    public  void Draw()
    {
        line.positionCount = points.Count;
        for (int i = 0; i < points.Count; i++)
        {
            line.SetPosition(i, points[i]);
            line.startWidth =2f;
            line.endWidth =2f;
        }
    }
    // Use this for initialization
    void Start () {

 }

 // Update is called once per frame
 void Update () {

 }
}
Draw Text脚本挂在预制体Line上,Line 添加LineRenderer组件,同时Material中加入自己创建的材质球
项目需求:Hierarchy窗口设置
和上面一种方法一样,也是两个画布,两个UI相机,同时需要一个MainCamera
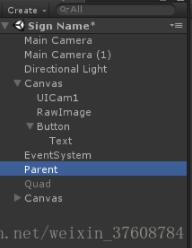
parent为空物体,用来作为根节点,将签名时实时生成的预制体放在其下面,作为子节点,方便后面进行销毁,重新签名。
重点:
第二种方法使用的是特定相机照射画面进行截图,Test5中的CaptureCamera方法就是截取主相机照射到的画面。由于签名不能进行全屏进行截图,只能部分截图,类似相面的画面
下面会有一些常规的功能按钮,重新签名,保存签名等等操作,这些操作就是在UI上进行签名。
所以,通过修改MainCamera的Viewport Rect窗口来进行截图,同时能够实现正常的签名操作。
MainCamera的Viewport Rect设置:
运行刚开始:

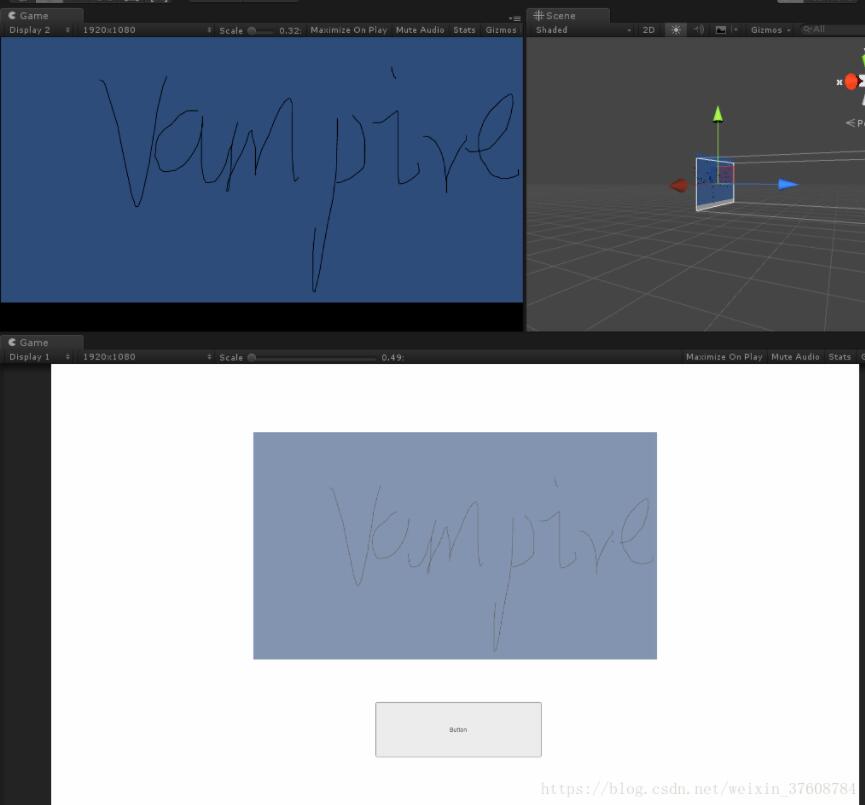
通过设置这个属性,可以使签名界面呈现上一个图的效果,前面是UI层,后面是3D层。
然而在截屏图的时候如果始终保持Viewport Rect是上面的设置,则截图的时候仍把周围的黑色部分也截取出来,刚开始以为特定相机照射截图只截取Viewport Rect中的图像,后来测试是周围的所有黑色部分也截取了,这样就不满足要求。
所以,在代码中签字 的时候保持上面的设置,截图之前main.rect = new Rect(0, 0, 1, 1);设置成全屏,截好之后重新回复成原来的设置 main.rect = new Rect(0.25f, 0.35f, 0.5f, 0.5f);,截图完成之后将签名图片赋值给第二个屏幕画布中的RawImage进行展示。
达到效果。结合UI实际签名过程中

中间的白色部分,通过设置MainCamera中的Camera组件中的Background(设置为白色)以及天空盒(Windows->Lighting->Settings->Scene->Skybox Material设置为空),设置为需要的颜色。UI制作的时候需要签名的部分制作成透明的即可。
效果图:
以上就是本文的全部内容,希望对大家的学习有所帮助,也希望大家多多支持猪先飞。
相关文章
- 这篇文章主要给大家分享的是TypeScript 索引签名的理解,索引签名由方括号中的索引名称及其类型组成,后面是冒号和值类型:{ [indexName: KeyType]: ValueType }, KeyType 可以是一个 string、number 或 symbol,而ValueType 可以是任何类型,下面就俩简单了解一下吧...2021-10-15
- 这篇文章主要为大家详细介绍了Unity时间戳的使用方法,文中示例代码介绍的非常详细,具有一定的参考价值,感兴趣的小伙伴们可以参考一下...2020-06-25
- 本文章来为各位介绍一篇利用PS制作“签名”GIF小动画的例子,希望这个制作过程能够帮助到各位朋友,各位进入看看吧。 先给大家看下效果,有兴趣的童鞋→_→可以...2016-09-14
Unity中 ShaderGraph 实现旋涡传送门效果入门级教程(推荐)
通过Twirl 旋转节点对Gradient Noise 梯度噪声节点进行操作,就可得到一个旋转的旋涡效果。具体实现代码跟随小编一起通过本文学习下吧...2021-07-11- 本文主要介绍了4种延时执行的方法,主要包括Update计时器,Invoke,协程,DoTween,具有一定的参考价值,感兴趣的小伙伴们可以参考一下...2021-07-07
- 这篇文章主要为大家详细介绍了iOS实现电子签名,文中示例代码介绍的非常详细,具有一定的参考价值,感兴趣的小伙伴们可以参考一下...2020-12-08
- 这篇文章主要为大家详细介绍了Unity shader实现遮罩效果,文中示例代码介绍的非常详细,具有一定的参考价值,感兴趣的小伙伴们可以参考一下...2020-06-25
- 这篇文章主要介绍了unity 判断鼠标是否在哪个UI上的两种实现方法,具有很好的参考价值,希望对大家有所帮助。一起跟随小编过来看看吧...2021-04-10
- 这篇文章主要为大家详细介绍了Unity实现换装系统,文中示例代码介绍的非常详细,具有一定的参考价值,感兴趣的小伙伴们可以参考一下...2021-04-11
- 这篇文章主要给大家介绍了关于利用unity代码C#封装为dll的相关资料,文中通过图文将实现的方法介绍的非常详细,对大家的学习或者工作具有一定的参考学习价值,需要的朋友们下面随着小编来一起学习学习吧...2020-06-25
- 这篇文章主要为大家详细介绍了Unity Shader实现径向模糊效果,文中示例代码介绍的非常详细,具有一定的参考价值,感兴趣的小伙伴们可以参考一下...2021-08-09
- 这篇文章主要介绍了unity 实现摄像机绕某点旋转一周,具有很好的参考价值,希望对大家有所帮助。一起跟随小编过来看看吧...2021-04-12
- 这篇文章主要为大家详细介绍了Unity实现截图功能,文中示例代码介绍的非常详细,具有一定的参考价值,感兴趣的小伙伴们可以参考一下...2020-06-25
- 1、打开下图所示的人物素材,用钢笔工具把人物抠出来,复制到新的图层。 ...2016-09-14
- 这篇文章主要介绍了Unity中EventTrigger的几种使用操作,具有很好的参考价值,希望对大家有所帮助。一起跟随小编过来看看吧...2021-04-10
- 这篇文章主要为大家详细介绍了Unity Shader实现2D水流效果,文中示例代码介绍的非常详细,具有一定的参考价值,感兴趣的小伙伴们可以参考一下...2020-06-25
- 这篇文章主要介绍了Unity 按钮添加OnClick事件操作,具有很好的参考价值,希望对大家有所帮助。一起跟随小编过来看看吧...2021-04-10
- 这篇文章主要为大家详细介绍了Unity使用EzySlice实现模型多边形顺序切割,文中示例代码介绍的非常详细,具有一定的参考价值,感兴趣的小伙伴们可以参考一下...2020-11-03
- 这篇文章主要为大家详细介绍了Unity Shader实现描边OutLine效果,文中示例代码介绍的非常详细,具有一定的参考价值,感兴趣的小伙伴们可以参考一下...2020-06-25
- 这篇文章主要为大家详细介绍了Unity Shader实现裁切效果,文中示例代码介绍的非常详细,具有一定的参考价值,感兴趣的小伙伴们可以参考一下...2020-06-25