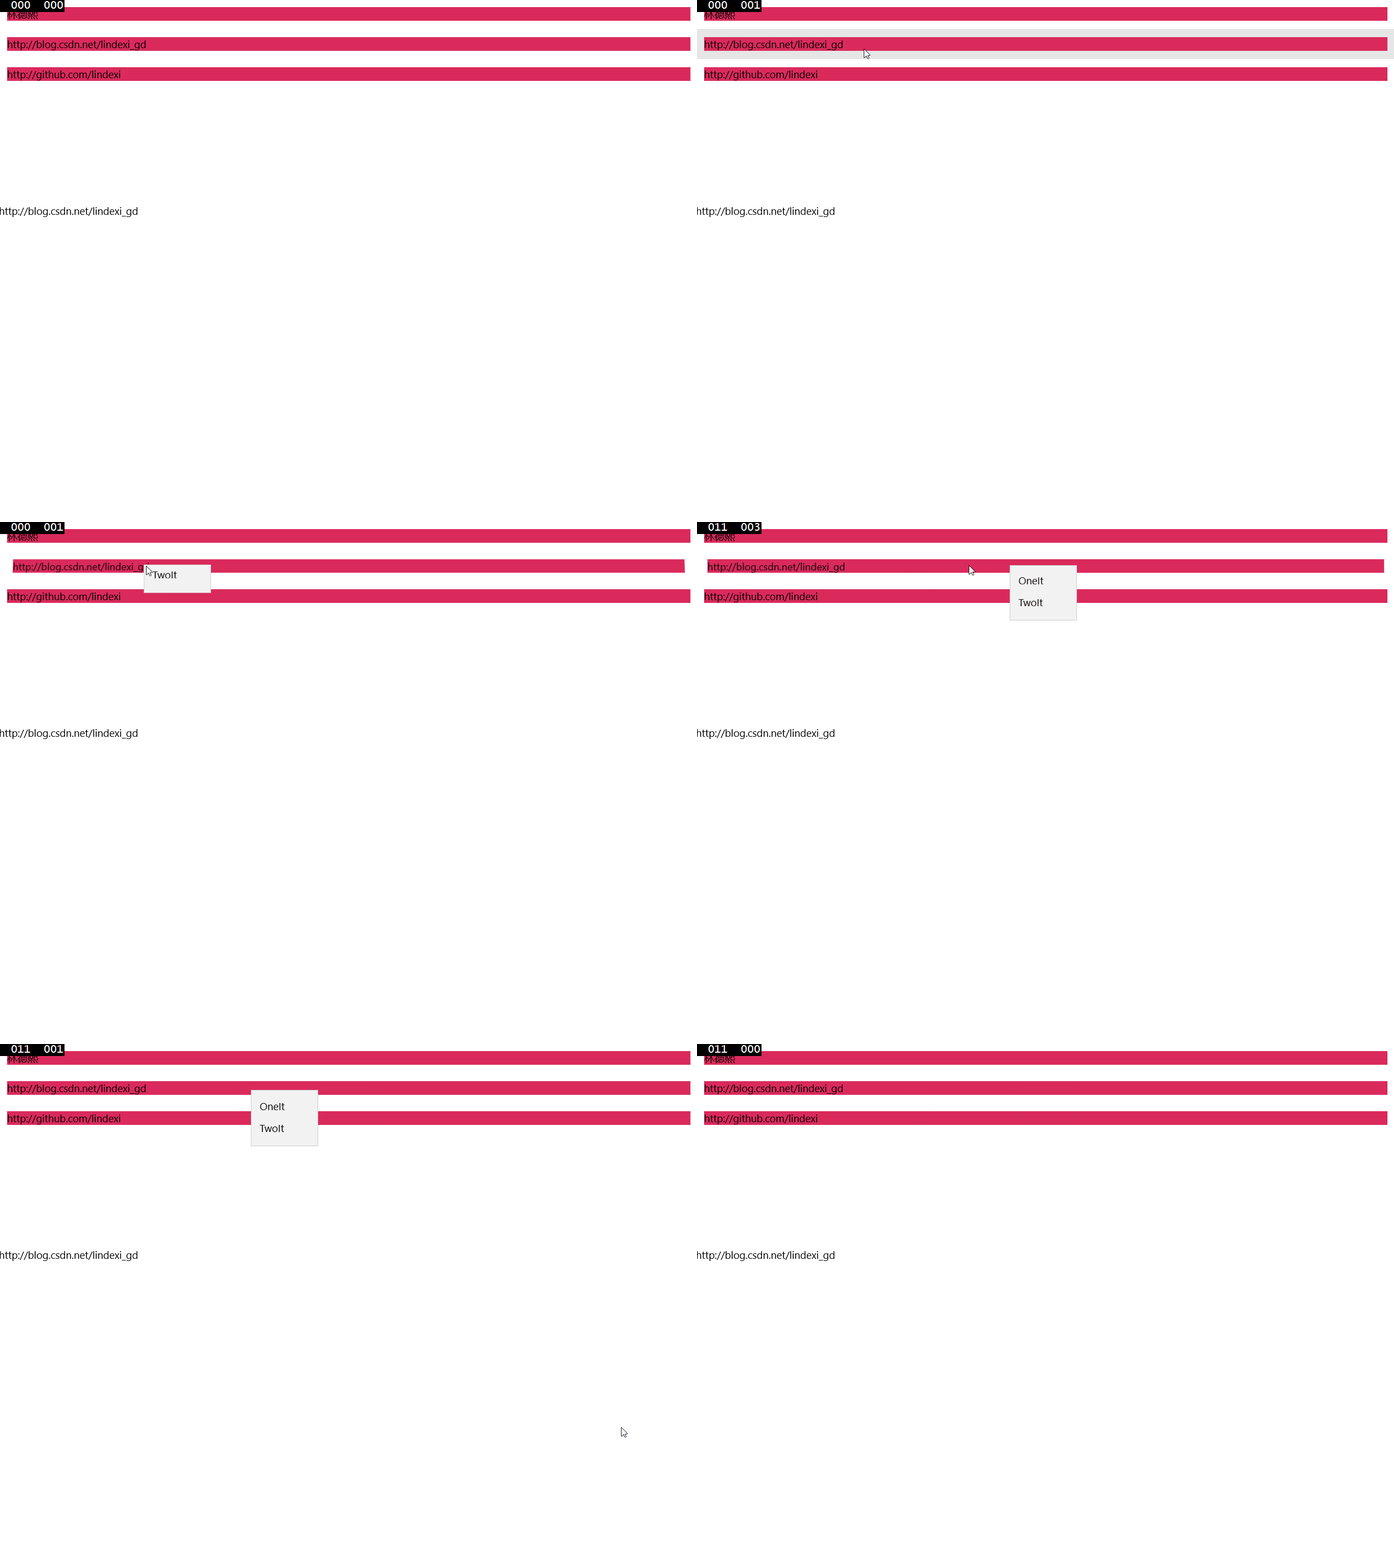
C#实现win10 uwp 右击浮出窗在点击位置
本文主要让MenuFlyout出现在我们右击位置。
我们一般使用的MenuFlyout写在前台,写在Button里面,但是可能我们的MenuFlyout显示的位置和我们想要的不一样。
通过使用后台写ShowAt的方法,我们可以通过e.GetPosition获得鼠标点击位置,需要对函数传入相对的元素,这个元素一般可以用我们点击使用的元素,也可以使用我们的最外层Grid,这样我们就可以获得了鼠标位置,也就可以显示我们的MenuFlyout在点击位置。
我们建一个ListView,然后绑定后台,在我们ListView要右击显示我们的浮出,要求我们的浮出在我们点击位置。
MenuFlyout可以在后台写,当然写在前台也可以。
我们这写在后台,我们可以选择Placement 显示在我们元素的位置,但这不是我们鼠标点击的位置,要显示我们鼠标点击的位置,其实也很简单。我们可以从e.GetPosition(sender as UIElement)获得鼠标位置,把这个给MenuFlyout我们的浮出显示在我们鼠标点击位置
<ListView ItemsSource="{x:Bind View.Str}">
<ListView.ItemContainerStyle>
<Style TargetType="ListViewItem">
<Setter Property="HorizontalContentAlignment"
Value="Stretch" />
<Setter Property="VerticalContentAlignment" Value="Center"></Setter>
</Style>
</ListView.ItemContainerStyle>
<ListView.ItemTemplate>
<DataTemplate>
<Grid Background="#FFda2a5c" RightTapped="GridColection_OnRightTapped">
<TextBlock Text="{Binding}"></TextBlock>
</Grid>
</DataTemplate>
</ListView.ItemTemplate>
</ListView>
后台写
private void GridColection_OnRightTapped(object sender, RightTappedRoutedEventArgs e)
{
MenuFlyout myFlyout = new MenuFlyout();
MenuFlyoutItem firstItem = new MenuFlyoutItem { Text = "OneIt" };
MenuFlyoutItem secondItem = new MenuFlyoutItem { Text = "TwoIt" };
myFlyout.Items.Add(firstItem);
myFlyout.Items.Add(secondItem);
//if you only want to show in left or buttom
//myFlyout.Placement = FlyoutPlacementMode.Left;
FrameworkElement senderElement = sender as FrameworkElement;
//the code can show the flyout in your mouse click
myFlyout.ShowAt(sender as UIElement, e.GetPosition(sender as UIElement));
}

以上所述是小编给大家介绍的C#实现win10 uwp 右击浮出窗在点击位置,希望对大家有所帮助,如果大家有任何疑问请给我留言,小编会及时回复大家的。在此也非常感谢大家对猪先飞网站的支持!
相关文章
- 这篇文章主要介绍了Win10 IIS 安装及.net 4.5及Win10安装IIS并配置ASP.NET 4.0的方法,本文给大家介绍的非常详细,具有一定的参考借鉴价值,需要的朋友可以参考下...2021-09-22
Windows10安装Oracle19c数据库详细记录(图文详解)
这篇文章主要介绍了Windows10安装Oracle19c数据库详细记录,文中给大家介绍了修改密码的方法,本文通过实例代码给大家介绍的非常详细,对大家的学习或工作具有一定的参考借鉴价值,需要的朋友可以参考下...2020-07-11Windows10安装MongoDB4.0详细步骤及启动配置教程
这篇文章主要介绍了Windows10安装MongoDB4.0详细步骤及启动配置教程 ,本文通过图文并茂的形式给大家介绍的非常详细,具有一定的参考借鉴价值,需要的朋友可以参考下...2020-07-11win10安装tensorflow-gpu1.8.0详细完整步骤
这篇文章主要介绍了win10安装tensorflow-gpu1.8.0详细完整步骤,本文给大家介绍的非常详细,具有一定的参考借鉴价值,需要的朋友可以参考下...2020-04-22powershell解决win10开始菜单和通知中心无法打开
这篇文章主要介绍了powershell解决win10开始菜单和通知中心无法打开的相关资料,需要的朋友可以参考下...2020-06-30- 这篇文章主要介绍了在windows10上安装mysql详细图文教程,本文介绍的非常详细,具有参考借鉴价值,感兴趣的朋友一起看看吧...2016-09-18
- 这篇文章主要为大家详细介绍了win10下两个MySQL5.6.35数据库安装教程,具有一定的参考价值,感兴趣的小伙伴们可以参考一下...2017-05-19
win10下安装mysql8.0.23 及 “服务没有响应控制功能”问题解决办法
这篇文章主要介绍了win10下安装mysql8.0.23 及 “服务没有响应控制功能”问题解决办法,本文给大家介绍的非常详细,对大家的学习或工作具有一定的参考借鉴价值,需要的朋友可以参考下...2021-03-01解决Win10无法安装.Net Framework 3.5提示错误代码0x800F081F
这篇文章主要介绍了Win10无法安装.Net Framework 3.5提示错误代码0x800F081F的完美解决方法,需要的朋友可以参考下...2021-09-22- 这篇文章主要为大家详细介绍了mysql 5.7.17 64bit解压缩版安装配置方法图文教程,具有一定的参考价值,感兴趣的小伙伴们可以参考一下...2017-01-15
- 这篇文章主要介绍了IDEA Java win10环境配置,本文通过图文并茂的形式给大家介绍的非常详细,对大家的学习或工作具有一定的参考借鉴价值,需要的朋友可以参考下...2020-07-13
- 本文主要让MenuFlyout出现在我们右击位置。我们建一个ListView,然后绑定后台,在我们ListView要右击显示我们的浮出,要求我们的浮出在我们点击位置...2020-06-25
windows 10 下安装mysql 5.7.17的简单笔记
之前一直在Linux下用MySQL,安装也很简单,今天试一下windows下安装,发现有很多坑,今天小编通过本教程给大家记录下,一起看看吧...2017-01-09- 这篇文章主要介绍了Win10配置redis服务实现过程详解,文中通过示例代码介绍的非常详细,对大家的学习或者工作具有一定的参考学习价值,需要的朋友可以参考下...2021-01-15
- 这篇文章主要给大家介绍了关于Win10系统下配置java环境变量的相关资料,文中通过图文介绍的非常详细,对大家的学习或者工作具有一定的参考学习价值,需要的朋友们下面随着小编来一起学习学习吧...2020-11-23
- 这篇文章主要为大家详细介绍了win10免安装版本的MySQL的下载安装和配置,具有一定的参考价值,感兴趣的小伙伴们可以参考一下...2017-01-26
- 本文通过文字和图片相结合的形式给大家介绍了win10 下安装 mysql 5.7.14的教程的,非常不错,具有参考借鉴价值,需要的朋友可以参考下...2016-09-18
- 留意微软最近对Windows 10的系统更新内容就会发现,对Edge的功能完善和提升一直都是重点。...2016-07-04
VMware Workstation安装并安装WIN10操作系统连接外网步骤指导(超详细教程)
这篇文章主要介绍了VMware Workstation安装并安装WIN10操作系统连接外网步骤指导(超详细教程),本文给大家介绍的非常详细,对大家的学习或工作具有一定的参考借鉴价值,需要的朋友可以参考下...2021-01-22win10 Mobile预览版最新截图:系统级调节字体、画面大小
之前为大家介绍了Win10 Mobile预览版10549系统截图,今天小编继续为大家带来in10 Mobile预览版最新:系统级调节字体、画面大小功能...2016-07-04
