C# winform 模拟键盘输入自动接入访问网络的实例
背景:
由于所在办公室网络限制,笔者每天都使用网络都要先连接无线网。如下图,输入授权用户信息登录后才能使用WIFI。
丧心病狂的是该网页Cookie 过期时间为24小时,所以每天重复以下动作:打开浏览器 -> 手动输入 工号密码、密码 -> 点击“登录”按钮。
作为一个懒出天际的程序员,逃避这种重复劳动是必须滴~~
解决方案:
创建一个C# 应用程序,使用WebBrowser控件加载该页面,模拟键盘输入账号、密码,把用户配置分别赋值给两个控件,然后调用按钮的点击事件。
具体步骤:
1. 打开登录页面,按F12查看网页源码,可以看到2个输入控件名分别为 "user", "password",登录按钮名为"Login",如下图: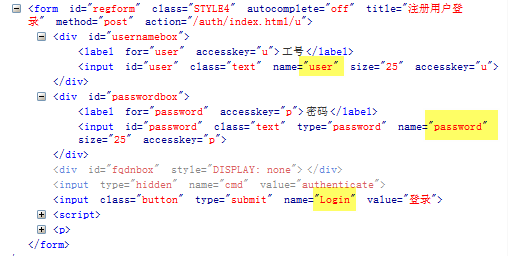
2. 模拟事件
模拟过程具体又可分为以下4个步骤:
step 1. 读取配置文件中的 登录网址
step 2. 加载网页
step 3. 模拟键盘操作
step 4. 退出程序
关键部分代码
/// <summary>
/// 加载网页,模拟登录动作处理
/// </summary>
private void ProcessLogin()
{
// 验证配置文件
if (string.IsNullOrEmpty(url))
{
ShowMsg("配置文件错误");
return;
}
ShowMsg("正在加载登录网页...");
// 加载网页
webBrowser1.Navigate(url);
//等待浏览器控件加载完成
while (webBrowser1.ReadyState != WebBrowserReadyState.Complete)
{
Application.DoEvents();
}
ShowMsg("加载完毕!");
//模拟登录事件
LoginSimulation(webBrowser1);
}
//模拟登录事件
private void LoginSimulation(WebBrowser wb)
{
try
{
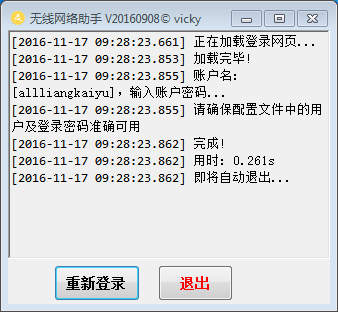
ShowMsg(string.Format("账户名:[{0}],输入账户密码...", userName));
ShowMsg(string.Format("请确保配置文件中的用户及登录密码准确可用"));
// 网页元素
HtmlDocument doc = wb.Document;
HtmlElement emuser = doc.GetElementById("user");
SetHtmlValue(emuser, userName);//设置账户
HtmlElement empassword = doc.GetElementById("password");
SetHtmlValue(empassword, password);//设置密码
HtmlElement btn = doc.GetElementById("Login");
InvokeMethod(btn, "click");//调用 登录按钮的 Click 事件 提交配置
ShowMsg("完成!");
TimeSpan used = DateTime.Now - begin;//用时
ShowMsg(string.Format("用时: {0}.{1}s" , used.Seconds, used.Milliseconds));
ShowMsg("即将自动退出...");
//启动计时器,4s 后自动退出当前程序
Timer timer = new Timer();
timer.Interval = 4000;
timer.Tick += new EventHandler(timer_Tick);
timer.Start();
}
catch (Exception ex)
{
ShowMsg(ex.Message);
}
}
编译应用程序,把快捷方式添加到开机启动项。这样开机时就会自动运行程序接入网络啦!!!
不足之处:
1. 接入网络成功后网页会弹出如下的对话框,因此模拟登录成功后也会启动浏览器打开页面。如果能禁用就更好了。
2. 只能简单地提示模拟操作完成,调用登录按钮事件后没有检测是否登录成功。
关于以上2点不足,如果有人找到解决办法,就请大胆大意地私信笔者或留言吧 ^_^
适用场景:
本应用演示了如何在客户端加载页面并模拟键盘鼠标操作,适用于用户访问许可配置保存于服务器的登录网站,那些配置要保存到 Session(会话)的网站访问 例如淘宝登录 就不适用了,除非继续使用应用程序中的 WebBrowser 控件操作而不用外部浏览器。
附 界面全部代码及运行截图
(代码有点乱,将就着看 -_-|||)
后台代码:
using System;
using System.IO;
using System.Text;
using System.Windows.Forms;

namespace LoginAssistant
{
  public partial class MainForm : Form
  {
    public MainForm()
    {
      InitializeComponent();
      readConfigFile();
      ProcessLogin();
    }

    /// <summary>
    /// 加载网页,模拟登录动作处理
    /// </summary>
    private void ProcessLogin()
    {
      // 验证配置文件
      if (string.IsNullOrEmpty(url))
      {
        ShowMsg("配置文件错误");
        return;
      }

      ShowMsg("正在加载登录网页...");
      // 加载网页
      webBrowser1.Navigate(url);
      //等待浏览器控件加载完成
      while (webBrowser1.ReadyState != WebBrowserReadyState.Complete)
      {
        Application.DoEvents();
      }
      ShowMsg("加载完毕!");
      //模拟登录事件
      LoginSimulation(webBrowser1);
    }

    //模拟登录事件
    private void LoginSimulation(WebBrowser wb)
    {
      try
      {
        ShowMsg(string.Format("账户名:[{0}],输入账户密码...", userName));
        ShowMsg(string.Format("请确保配置文件中的用户及登录密码准确可用"));

        // 网页元素
        HtmlDocument doc = wb.Document;
        HtmlElement emuser = doc.GetElementById("user");
        SetHtmlValue(emuser, userName);//设置账户
        HtmlElement empassword = doc.GetElementById("password");
        SetHtmlValue(empassword, password);//设置密码
        HtmlElement btn = doc.GetElementById("Login");
        InvokeMethod(btn, "click");//调用 登录按钮的 Click 事件 提交配置

        ShowMsg("完成!");
        TimeSpan used = DateTime.Now - begin;//用时
        ShowMsg(string.Format("用时: {0}.{1}s" , used.Seconds, used.Milliseconds));
        ShowMsg("即将自动退出...");

        //启动计时器,4s 后自动退出当前程序
        Timer timer = new Timer();
        timer.Interval = 4000;
        timer.Tick += new EventHandler(timer_Tick);
        timer.Start();
      }
      catch (Exception ex)
      {
        ShowMsg(ex.Message);
      }
    }
    //自动退出
    void timer_Tick(object sender, EventArgs e)
    {
      this.Close();
    }
    /// <summary>
    /// 调用 Html 元素的方法
    /// </summary>
    /// <param name="em"></param>
    /// <param name="methodname"></param>
    private void InvokeMethod(HtmlElement em, string methodname)
    {
      if (em == null) return;
      object response = em.InvokeMember(methodname); //触发submit事件
    }

    //赋值于 Html 元素
    private void SetHtmlValue(HtmlElement em, string valueStr)
    {
      if (em == null) return;
      em.SetAttribute("value", valueStr);
    }

    //读取配置文件
    private void readConfigFile()
    {
      try
      {
        if(!File.Exists(fileName))return;
        using (FileStream fs = new FileStream(fileName, FileMode.Open, FileAccess.Read))
        {
          StreamReader m_streamReader = new StreamReader(fs);
          m_streamReader.BaseStream.Seek(0, SeekOrigin.Begin);
          string strLine = m_streamReader.ReadLine();
          while (strLine != null)
          {
            string[] data = strLine.Split('=');
            switch (data[0])
            {
              case "user":
                userName = getValue(data);
                break;
              case "password":
                password = getValue(data);
                break;
              case "url":
                url = getValue(data);
                break;
              default:
                break;
            }
            strLine = m_streamReader.ReadLine();
          }
          m_streamReader.Close();
          fs.Close();
        }
      }
      catch (Exception ex)
      {
        ShowMsg(ex.Message);
      }
    }

    /// <summary>
    /// 获取取配置文件节点值
    /// </summary>
    /// <param name="arrays"></param>
    /// <returns></returns>
    private string getValue(string[] arrays)
    {
      StringBuilder sb = new StringBuilder();
      sb.Append(arrays[1]);
      for (int i = 2; i < arrays.Length; i++)
      {
        sb.Append("=" + arrays[i]);
      }
      return sb.ToString();
    }

    /// <summary>
    /// 显示信息
    /// </summary>
    /// <param name="p"></param>
    private void ShowMsg(string p)
    {
      rtbStatus.AppendText(string.Format("[{0}] {1}\r\n",DateTime.Now.ToString("yyyy-MM-dd HH:mm:ss.fff"), p));
    }

    #region variables

    //账号、密码
    private string userName = "allliangkaiyu"; // default
    private string password = "vicky";

    private string url = string.Empty; //登录页面

    string fileName = "WirelessAssistantConfig.ini"; //配置文件名
    WebBrowser webBrowser1 = new WebBrowser();//浏览器控件
    private DateTime begin = DateTime.Now;//当前时刻

    #endregion

    #region 按钮事件

    //登录
    private void btnRegister_Click(object sender, EventArgs e)
    {
      ProcessLogin();
    }

    //退出
    private void btnExit_Click(object sender, EventArgs e)
    {
      this.Close();
    }
    #endregion

  }
}
designer.cs 代码:
namespace LoginAssistant
{
  partial class MainForm
  {
    /// <summary>
    /// Required designer variable.
    /// </summary>
    private System.ComponentModel.IContainer components = null;

    /// <summary>
    /// Clean up any resources being used.
    /// </summary>
    /// <param name="disposing">true if managed resources should be disposed; otherwise, false.</param>
    protected override void Dispose(bool disposing)
    {
      if (disposing && (components != null))
      {
        components.Dispose();
      }
      base.Dispose(disposing);
    }

    #region Windows Form Designer generated code

    /// <summary>
    /// Required method for Designer support - do not modify
    /// the contents of this method with the code editor.
    /// </summary>
    private void InitializeComponent()
    {
      System.ComponentModel.ComponentResourceManager resources = new System.ComponentModel.ComponentResourceManager(typeof(MainForm));
      this.btnInput = new System.Windows.Forms.Button();
      this.rtbStatus = new System.Windows.Forms.RichTextBox();
      this.btnExit = new System.Windows.Forms.Button();
      this.SuspendLayout();
      //
      // btnInput
      //
      this.btnInput.Font = new System.Drawing.Font("Consolas", 10F, System.Drawing.FontStyle.Bold, System.Drawing.GraphicsUnit.Point, ((byte)(134)));
      this.btnInput.Location = new System.Drawing.Point(46, 235);
      this.btnInput.Margin = new System.Windows.Forms.Padding(4, 3, 4, 3);
      this.btnInput.Name = "btnInput";
      this.btnInput.Size = new System.Drawing.Size(86, 36);
      this.btnInput.TabIndex = 0;
      this.btnInput.Text = "重新登录";
      this.btnInput.UseVisualStyleBackColor = true;
      this.btnInput.Click += new System.EventHandler(this.btnRegister_Click);
      //
      // rtbStatus
      //
      this.rtbStatus.BackColor = System.Drawing.SystemColors.Control;
      this.rtbStatus.Dock = System.Windows.Forms.DockStyle.Top;
      this.rtbStatus.Location = new System.Drawing.Point(0, 0);
      this.rtbStatus.Margin = new System.Windows.Forms.Padding(4, 3, 4, 3);
      this.rtbStatus.Name = "rtbStatus";
      this.rtbStatus.Size = new System.Drawing.Size(322, 229);
      this.rtbStatus.TabIndex = 1;
      this.rtbStatus.Text = "";
      //
      // btnExit
      //
      this.btnExit.Font = new System.Drawing.Font("Consolas", 10F, System.Drawing.FontStyle.Bold, System.Drawing.GraphicsUnit.Point, ((byte)(134)));
      this.btnExit.ForeColor = System.Drawing.Color.Red;
      this.btnExit.Location = new System.Drawing.Point(150, 235);
      this.btnExit.Name = "btnExit";
      this.btnExit.Size = new System.Drawing.Size(75, 36);
      this.btnExit.TabIndex = 2;
      this.btnExit.Text = "退出";
      this.btnExit.UseVisualStyleBackColor = true;
      this.btnExit.Click += new System.EventHandler(this.btnExit_Click);
      //
      // MainForm
      //
      this.AutoScaleDimensions = new System.Drawing.SizeF(7F, 13F);
      this.AutoScaleMode = System.Windows.Forms.AutoScaleMode.Font;
      this.ClientSize = new System.Drawing.Size(322, 274);
      this.Controls.Add(this.btnExit);
      this.Controls.Add(this.rtbStatus);
      this.Controls.Add(this.btnInput);
      this.Font = new System.Drawing.Font("Consolas", 10F, System.Drawing.FontStyle.Regular, System.Drawing.GraphicsUnit.Point, ((byte)(134)));
      this.Icon = ((System.Drawing.Icon)(resources.GetObject("$this.Icon")));
      this.Margin = new System.Windows.Forms.Padding(4, 3, 4, 3);
      this.Name = "MainForm";
      this.Text = "无线网络助手 V20160908© vicky";
      this.ResumeLayout(false);

    }

    #endregion

    private System.Windows.Forms.Button btnInput;
    private System.Windows.Forms.RichTextBox rtbStatus;
    private System.Windows.Forms.Button btnExit;
  }
}
运行截图:
原文链接:http://www.cnblogs.com/EasyInvoice/p/6070563.html
以上就是本文的全部内容,希望对大家的学习有所帮助,也希望大家多多支持猪先飞。
相关文章
- 我们在使用C#做项目的时候,基本上都需要制作登录界面,那么今天我们就来一步步看看,如果简单的实现登录界面呢,本文给出2个例子,由简入难,希望大家能够喜欢。...2020-06-25
- 这篇文章主要介绍了C# 字段和属性的的相关资料,文中示例代码非常详细,供大家参考和学习,感兴趣的朋友可以了解下...2020-11-03
- 这篇文章主要介绍了C#中截取字符串的的基本方法,文中通过示例代码介绍的非常详细,对大家的学习或者工作具有一定的参考学习价值,需要的朋友们下面随着小编来一起学习学习吧...2020-11-03
- 这篇文章主要介绍了C#实现简单的Http请求的方法,以实例形式较为详细的分析了C#实现Http请求的具体方法,需要的朋友可以参考下...2020-06-25
- 本文给大家分享C#连接SQL数据库和查询数据功能的操作技巧,本文通过图文并茂的形式给大家介绍的非常详细,需要的朋友参考下吧...2021-05-17
- 本文主要介绍了C#中new的几种用法,具有很好的参考价值,下面跟着小编一起来看下吧...2020-06-25
使用Visual Studio2019创建C#项目(窗体应用程序、控制台应用程序、Web应用程序)
这篇文章主要介绍了使用Visual Studio2019创建C#项目(窗体应用程序、控制台应用程序、Web应用程序),小编觉得挺不错的,现在分享给大家,也给大家做个参考。一起跟随小编过来看看吧...2020-06-25- 这篇文章主要介绍了C#开发Windows窗体应用程序的简单操作步骤,具有很好的参考价值,希望对大家有所帮助。一起跟随小编过来看看吧...2021-04-12
- 这篇文章主要介绍了C#从数据库读取图片并保存的方法,帮助大家更好的理解和使用c#,感兴趣的朋友可以了解下...2021-01-16
- 最近做一个小项目不可避免的需要前端脚本与后台进行交互。由于是在asp.net中实现,故问题演化成asp.net中jiavascript与后台c#如何进行交互。...2020-06-25
- 本文通过例子,讲述了C++调用C#的DLL程序的方法,作出了以下总结,下面就让我们一起来学习吧。...2020-06-25
- 轻松学习C#的基础入门,了解C#最基本的知识点,C#是一种简洁的,类型安全的一种完全面向对象的开发语言,是Microsoft专门基于.NET Framework平台开发的而量身定做的高级程序设计语言,需要的朋友可以参考下...2020-06-25
- 本文主要介绍了C#变量命名规则小结,文中介绍的非常详细,具有一定的参考价值,感兴趣的小伙伴们可以参考一下...2021-09-09
- 这篇文章主要介绍了C#绘制曲线图的方法,以完整实例形式较为详细的分析了C#进行曲线绘制的具体步骤与相关技巧,具有一定参考借鉴价值,需要的朋友可以参考下...2020-06-25
- 本文主要介绍了C# 中取绝对值的函数。具有很好的参考价值。下面跟着小编一起来看下吧...2020-06-25
- 这篇文章主要介绍了c#自带缓存使用方法,包括获取数据缓存、设置数据缓存、移除指定数据缓存等方法,需要的朋友可以参考下...2020-06-25
- 这篇文章主要介绍了c#中(&&,||)与(&,|)的区别详解,文中通过示例代码介绍的非常详细,对大家的学习或者工作具有一定的参考学习价值,需要的朋友们下面随着小编来一起学习学习吧...2020-06-25
- 这篇文章主要用实例讲解C#递归算法的概念以及用法,文中代码非常详细,帮助大家更好的参考和学习,感兴趣的朋友可以了解下...2020-06-25
- 下面小编就为大家带来一篇C#学习笔记- 随机函数Random()的用法详解。小编觉得挺不错的,现在就分享给大家,也给大家做个参考。一起跟随小编过来看看吧...2020-06-25
- 这篇文章主要介绍了C#中list用法,结合实例形式分析了C#中list排序、运算、转换等常见操作技巧,具有一定参考借鉴价值,需要的朋友可以参考下...2020-06-25