php 动态输出图片 http header 304 状态
什么是304 状态
如果客户端发送了一个带条件的GET 请求且该请求已被允许,而文档的内容(自上次访问以来或者根据请求的条件)并没有改变,则服务器应当返回这个304状态码。简单的表达就是:客户端已经执行了GET,但文件未变化。
php 动态输出图片为什么要输入304
客户端是怎么知道这些内容没有更新的呢?其实这并不是客户端的事情,而是你服务器的事情,大家都知道服务器可以设置缓存机制,这个功能是为了提高网站的访问速度,当你发出一个GET请求的时候服务器会从缓存中调用你要访问的内容,这个时候服务器就可以判断这个页面是不是更新过了,如果没有更新过那么他会给你返回一个304状态码。
有时候需要是用php动态生成图片,比如 多个比例的缩略图
但是是用php生成的图片的header 头部状态都是200,不能被缓存,这显然也不太合适。
可以如何通过缓存PHP生成的图像。此功能只检查头,看看图像是否是最新的,并发送304代码,如果是这样,那么浏览器将使用缓存的版本,而不是下载新的。否则新的图像输出到浏览。
php 动态输出图片 http header 304 代码
<?php
// return the browser request header
// use built in apache ftn when PHP built as module,
// or query $_SERVER when cgi
function getRequestHeaders()
{
if (function_exists("apache_request_headers"))
{
if($headers = apache_request_headers())
{
return $headers;
}
}
$headers = array();
// Grab the IF_MODIFIED_SINCE header
if (isset($_SERVER['HTTP_IF_MODIFIED_SINCE']))
{
$headers['If-Modified-Since'] = $_SERVER['HTTP_IF_MODIFIED_SINCE'];
}
return $headers;
}
// Return the requested graphic file to the browser
// or a 304 code to use the cached browser copy
function displayGraphicFile ($graphicFileName, $fileType='jpeg')
{
$fileModTime = filemtime($graphicFileName);
// Getting headers sent by the client.
$headers = getRequestHeaders();
// Checking if the client is validating his cache and if it is current.
if (isset($headers['If-Modified-Since']) &&
(strtotime($headers['If-Modified-Since']) == $fileModTime))
{
// Client's cache IS current, so we just respond '304 Not Modified'.
header('Last-Modified: '.gmdate('D, d M Y H:i:s', $fileModTime).
' GMT', true, 304);
}
else
{
// Image not cached or cache outdated, we respond '200 OK' and output the image.
header('Last-Modified: '.gmdate('D, d M Y H:i:s', $fileModTime).
' GMT', true, 200);
header('Content-type: image/'.$fileType);
header('Content-transfer-encoding: binary');
header('Content-length: '.filesize($graphicFileName));
readfile($graphicFileName);
}
}
//example usage
displayGraphicFile("./images/image.png");
?>
树输出
function get_array($user_id,$top=0){
global $mysql,$_G;
$sql = "select user_id as name from `{spreads_users}` where p1.spreads_userid='{$user_id}'";
$rows= $mysql->db_fetch_arrays($sql);
if($top==1){
$arr[0]['name']=$user_id;
$arr[0]['children']=array();
}
$top=$top+1;
foreach ($rows as $key=>$value)
{
$r = get_array($value['name']); //调用函数,传入参数,继续查询下级
$arr[0]['children'][$key]['name']= $value['username']; //组合数组
if(is_array($r)){
$arr[0]['children'][$key]['children']= $r[0]['children'];
}
$i++;
}
return $arr;
}
$list = get_array("1000",1); //调用函数 1000是顶级ID
echo 'var data='.json_encode($list);
这个是输出 Array 然后转让为 json 本教程由岑溪网站开发提供! 实测
例子
表结构:id字段为分类标识,name字段为分类名,father_id字段为所属父分类的id,path字段为分类路径(储存该分类祖先的集合),isdir判断是否是目录(1为是,0为否)。
显示函数:
代码如下://$count为分类等级
sort_list($str,$fatherid,$count)
{
$rs = $this->sql->re_datas("select * from sort where father_id = fatherid");
$num = $this->sql->sql_numrows();
$i=0;
$n = 1;
while(isset($rs[$i]))
{
$name = "";
for($n = 1 ; $n < $count ; $n )
{
$name.="│ ";
}
if($i 1==$num)
{
$name.="└─".$rs[$i][name];
}
else
{
$name.="├─".$rs[$i][name];
}
if($rs[$i][isdir])
{
$str.="<span style='color:#CCCCCC'>".$name."</span>";
}
else
{
$str.=$name";
}
$temp = $count 1;
$str = $this->sort_list($str,$rs[$i][id],$temp);
$i ;
}
return $str;
}
其中$this->sql对象为sql操作类对象,re_datas()函数返回查到的数组,sql_numrows()函数返回查询到的数目
调用方法:$sort_list = sort_list($sort_list,0,1);
例子
表:category
id int 主键,自增
name varchar 分类名称
pid int 父类id,默认0
顶级分类的 pid 默认就是0了。当我们想取出某个分类的子分类树的时候,基本思路就是递归,当然,出于效率问题不建议每次递归都查询数据库,通常的做法是先讲所有分类取出来,保存到PHP数组里,再进行处理,最后还可以将结果缓存起来以提高下次请求的效率。
先来构建一个原始数组,这个直接从数据库中拉出来就行:
$categories = array(
array('id'=>1,'name'=>'电脑','pid'=>0),
array('id'=>2,'name'=>'手机','pid'=>0),
array('id'=>3,'name'=>'笔记本','pid'=>1),
array('id'=>4,'name'=>'台式机','pid'=>1),
array('id'=>5,'name'=>'智能机','pid'=>2),
array('id'=>6,'name'=>'功能机','pid'=>2),
array('id'=>7,'name'=>'超级本','pid'=>3),
array('id'=>8,'name'=>'游戏本','pid'=>3),
);目标是将它转化为下面这种结构
电脑
—笔记本
——-超级本
——-游戏本
—台式机
手机
—智能机
—功能机
用数组来表示的话,可以增加一个 children 键来存储它的子分类:
array(
//1对应id,方便直接读取
1 => array(
'id'=>1,
'name'=>'电脑',
'pid'=>0,
children=>array(
&array(
'id'=>3,
'name'=>'笔记本',
'pid'=>1,
'children'=>array(
//此处省略
)
),
&array(
'id'=>4,
'name'=>'台式机',
'pid'=>1,
'children'=>array(
//此处省略
)
),
)
),
//其他分类省略
)处理过程:
$tree = array();
//第一步,将分类id作为数组key,并创建children单元
foreach($categories as $category){
$tree[$category['id']] = $category;
$tree[$category['id']]['children'] = array();
}
//第二部,利用引用,将每个分类添加到父类children数组中,这样一次遍历即可形成树形结构。
foreach ($tree as $k=>$item) {
if ($item['pid'] != 0) {
$tree[$item['pid']]['children'][] = &$tree[$k];
}
}
print_r($tree);打印结果如下:
Array
(
[1] => Array
(
[id] => 1
[name] => 电脑
[pid] => 0
[children] => Array
(
[0] => Array
(
[id] => 3
[name] => 笔记本
[pid] => 1
[children] => Array
(
[0] => Array
(
[id] => 7
[name] => 超级本
[pid] => 3
[children] => Array
(
)
)
[1] => Array
(
[id] => 8
[name] => 游戏本
[pid] => 3
[children] => Array
(
)
)
)
)
[1] => Array
(
[id] => 4
[name] => 台式机
[pid] => 1
[children] => Array
(
)
)
)
)
[2] => Array
(
[id] => 2
[name] => 手机
[pid] => 0
[children] => Array
(
[0] => Array
(
[id] => 5
[name] => 智能机
[pid] => 2
[children] => Array
(
)
)
[1] => Array
(
[id] => 6
[name] => 功能机
[pid] => 2
[children] => Array
(
)
)
)
)
[3] => Array
(
[id] => 3
[name] => 笔记本
[pid] => 1
[children] => Array
(
[0] => Array
(
[id] => 7
[name] => 超级本
[pid] => 3
[children] => Array
(
)
)
[1] => Array
(
[id] => 8
[name] => 游戏本
[pid] => 3
[children] => Array
(
)
)
)
)
[4] => Array
(
[id] => 4
[name] => 台式机
[pid] => 1
[children] => Array
(
)
)
[5] => Array
(
[id] => 5
[name] => 智能机
[pid] => 2
[children] => Array
(
)
)
[6] => Array
(
[id] => 6
[name] => 功能机
[pid] => 2
[children] => Array
(
)
)
[7] => Array
(
[id] => 7
[name] => 超级本
[pid] => 3
[children] => Array
(
)
)
[8] => Array
(
[id] => 8
[name] => 游戏本
[pid] => 3
[children] => Array
(
)
)
)优点:关系清楚,修改上下级关系简单。
缺点:使用PHP处理,如果分类数量庞大,效率也会降低。
如果你碰到在系统中生成文件数据太长了然后自动截断了,那么会是什么原因呢,这个小编碰到过post数据丢失所导致的问题了,今天我们来看看吧。
在使用xml来导出excel时,发现小数量(1k以下)时能正常导出excel,但将导出数量调大(几K)时,发现导出的excel数据不全。
(在我本地是好的,在线上服务器跑就有问题。。。)
检查导出的xml数据,发现内容被截断了,有时连xml标签都不全。
php-xml-excel
首先怀疑是输出的内容字节过长,超出了环境配置的上限。检查了output_buffering和nginx的fastcgi_buffer相关设置,都没有问题。和我本地的值一样,修改后也没有影响。
之后就Google了下,发现有出现类似情况的,是权限问题,于是去检查nginx的错误日志error.log。
发现在导出操作时有如下错误记录:
2016/02/04 09:47:53 [crit] 19027#0: *967389 mkdir() "/tmp/fastcgi_temp/xxx" failed (13: Permission denied) while reading upstream, client:xxx.xxx.xx.xxx
看来确实是权限有问题,导出时nginx要创建一个/tmp/fastcgi_temp/xxx的目录,但失败了。
跑去/tmp下检查,发现根本没有fastcgi_temp目录!!于是手动新建目录/tmp/fastcgi_temp/,并设置所有者www、权限744。
重新运行导出,xml被截断的问题已解决。
PHPExcel导出大量数据超时及内存错误解决方法
PHPExcel是一个很强大的处理Excel的PHP开源类,但是很大的一个问题就是它占用内存太大,从1.7.3开始,它支持设置cell的缓存方式,但是推荐使用目前稳定的版本1.7.6,因为之前的版本都会不同程度的存在bug,以下是其官方文档:
PHPExcel1.7.6官方文档 写道
PHPExcel uses an average of about 1k/cell in your worksheets, so large workbooks can quickly use up available memory. Cell caching provides a mechanism that allows PHPExcel to maintain the cell objects in a smaller size of memory, on disk, or in APC, memcache or Wincache, rather than in PHP memory. This allows you to reduce the memory usage for large workbooks, although at a cost of speed to access cell data.
PHPExcel 平均下来使用1k/单元格的内存,因此大的文档会导致内存消耗的也很快。单元格缓存机制能够允许PHPExcel将内存中的小的单元格对象缓存在磁盘或者 APC,memcache或者Wincache中,尽管会在读取数据上消耗一些时间,但是能够帮助你降低内存的消耗。
PHPExcel1.76.官方文档 写道
By default, PHPExcel still holds all cell objects in memory, but you can specify alternatives. To enable cell caching, you must call the PHPExcel_Settings::setCacheStorageMethod() method, passing in the caching method that you wish to use.
默认情况下,PHPExcel依然将单元格对象保存在内存中,但是你可以自定义。你可以使用PHPExcel_Settings::setCacheStorageMethod()方法,将缓存方式作为参数传递给这个方法来设置缓存的方式。
Php代码:
$cacheMethod = PHPExcel_CachedObjectStorageFactory::cache_in_memory;
PHPExcel_Settings::setCacheStorageMethod($cacheMethod);
PHPExcel1.7.6官方文档 写道
setCacheStorageMethod() will return a boolean true on success, false on failure (for example if trying to cache to APC when APC is not enabled).
setCacheStorageMethod()方法会返回一个BOOL型变量用于表示是否成功设置(比如,如果APC不能使用的时候,你设置使用APC缓存,将会返回false)
PHPExcel1.7.6官方文档 写道
A separate cache is maintained for each individual worksheet, and is automatically created when the worksheet is instantiated based on the caching method and settings that you have configured. You cannot change the configuration settings once you have started to read a workbook, or have created your first worksheet.
每一个worksheet都会有一个独立的缓存,当一个worksheet实例化时,就会根据设置或配置的缓存方式来自动创建。一旦你开始读取一个文件或者你已经创建了第一个worksheet,就不能在改变缓存的方式了。
PHPExcel1.7.6官方文档 写道
Currently, the following caching methods are available.
目前,有以下几种缓存方式可以使用:
Php代码:
PHPExcel_CachedObjectStorageFactory::cache_in_memory;
PHPExcel1.7.6官方文档 写道
The default. If you don’t initialise any caching method, then this is the method that PHPExcel will use. Cell objects are maintained in PHP memory as at present.
默认情况下,如果你不初始化任何缓存方式,PHPExcel将使用内存缓存的方式。
===============================================
Php代码:
PHPExcel_CachedObjectStorageFactory::cache_in_memory_serialized;
PHPExcle1.7.6官方文档 写道
Using this caching method, cells are held in PHP memory as an array of serialized objects, which reduces the memory footprint with minimal performance overhead.
使用这种缓存方式,单元格会以序列化的方式保存在内存中,这是降低内存使用率性能比较高的一种方案。
===============================================
Php代码:
PHPExcel_CachedObjectStorageFactory::cache_in_memory_gzip;
PHPExcel1.7.6官方文档 写道
Like cache_in_memory_serialized, this method holds cells in PHP memory as an array of serialized objects, but- gzipped to reduce the memory usage still further, although access to read or write a cell is slightly slower.
与序列化的方式类似,这种方法在序列化之后,又进行gzip压缩之后再放入内存中,这回跟进一步降低内存的使用,但是读取和写入时会有一些慢。
===========================================================
Php代码:
PHPExcel_CachedObjectStorageFactory::cache_to_discISAM;
PHPExcel1.7.6官方文档 写道
When using cache_to_discISAM all cells are held in a temporary disk file, with only an index to their location in that file maintained in PHP memory. This is slower than any of the cache_in_memory methods, but significantly reduces the memory footprint.The temporary disk file is automatically deleted when your script terminates.
当使用cache_to_discISAM这种方式时,所有的单元格将会保存在一个临时的磁盘文件中,只把他们的在文件中的位置保存在PHP的内存中,这会比任何一种缓存在内存中的方式都慢,但是能显著的降低内存的使用。临时磁盘文件在脚本运行结束是会自动删除。
===========================================================
Php代码:
PHPExcel_CachedObjectStorageFactory::cache_to_phpTemp;
PHPExcel1.7.6官方文档 写道
Like cache_to_discISAM, when using cache_to_phpTemp all cells are held in the php://temp I/O stream, with only an index to their location maintained in PHP memory. In PHP, the php://memory wrapper stores data in the memory: php://temp behaves similarly, but uses a temporary file for storing the data when a certain memory limit is reached. The default is 1 MB, but you can change this when initialising cache_to_phpTemp.
类 似cache_to_discISAM这种方式,使用cache_to_phpTemp时,所有的单元格会还存在php://temp I/O流中,只把 他们的位置保存在PHP的内存中。PHP的php://memory包裹器将数据保存在内存中,php://temp的行为类似,但是当存储的数据大小超 过内存限制时,会将数据保存在临时文件中,默认的大小是1MB,但是你可以在初始化时修改它:
Php代码:
$cacheMethod = PHPExcel_CachedObjectStorageFactory:: cache_to_phpTemp;
$cacheSettings = array( ’ memoryCacheSize ’ => ’8MB’ );
PHPExcel_Settings::setCacheStorageMethod($cacheMethod, $cacheSettings);
PHPExcel1.7.6官方文档 写道
The php://temp file is automatically deleted when your script terminates.
php://temp文件在脚本结束是会自动删除。
===========================================================
Php代码:
PHPExcel_CachedObjectStorageFactory::cache_to_apc;
PHPExcle1.7.6官方文档 写道
When using cache_to_apc, cell objects are maintained in APC with only an index maintained in PHP memory to identify that the cell exists. By default, an APC cache timeout of 600 seconds is used, which should be enough for most applications: although it is possible to change this when initialising cache_to_APC.
当使用cach_to_apc时,单元格保存在APC中,只在内存中保存索引。APC缓存默认超时时间时600秒,对绝大多数应用是足够了,当然你也可以在初始化时进行修改:
Php代码:
$cacheMethod = PHPExcel_CachedObjectStorageFactory::cache_to_APC;
$cacheSettings = array( ’cacheTime’ => 600 );
PHPExcel_Settings::setCacheStorageMethod($cacheMethod, $cacheSettings);
PHPExcel1.7.6官方文档 写道
When your script terminates all entries will be cleared from APC, regardless of the cacheTime value, so it cannot be used for persistent storage using this mechanism.
当脚本运行结束时,所有的数据都会从APC中清楚(忽略缓存时间),不能使用此机制作为持久缓存。
===========================================================
Php代码:
PHPExcel_CachedObjectStorageFactory::cache_to_memcache
PHPExcel1.7.6官方文档 写道
When using cache_to_memcache, cell objects are maintained in memcache with only an index maintained in PHP memory to identify that the cell exists.
By default, PHPExcel looks for a memcache server on localhost at port 11211. It also sets a memcache timeout limit of 600 seconds. If you are running memcache on a different server or port, then you can change these defaults when you initialise cache_to_memcache:
使 用cache_to_memory时,单元格对象保存在memcache中,只在内存中保存索引。默认情况下,PHPExcel会在localhost和 端口11211寻找memcache服务,超时时间600秒,如果你在其他服务器或其他端口运行memcache服务,可以在初始化时进行修改:
Php代码:
$cacheMethod = PHPExcel_CachedObjectStorageFactory::cache_to_memcache;
$cacheSettings = array( ’memcacheServer’ => ’localhost’,
‘memcachePort’ => 11211,
‘cacheTime’ => 600
);
PHPExcel_Settings::setCacheStorageMethod($cacheMethod, $cacheSettings);
从初始化设置的形式上看,MS还不支持多台memcache服务器轮询的方式,比较遗憾。
PHPExcel1.7.6官方文档 写道
When your script terminates all entries will be cleared from memcache, regardless of the cacheTime value, so it cannot be used for persistent storage using this mechanism.
当脚本结束时,所有的数据都会从memcache清空(忽略缓存时间),不能使用该机制进行持久存储。
===========================================================
Php代码:
PHPExcel_CachedObjectStorageFactory::cache_to_wincache;
PHPExcel1.7.6官方文档 写道
When using cache_to_wincache, cell objects are maintained in Wincache with only an index maintained in PHP memory to identify that the cell exists. By default, a Wincache cache timeout of 600 seconds is used, which should be enough for most applications: although it is possible to change this when initialising cache_to_wincache.
使用cache_towincache方式,单元格对象会保存在Wincache中,只在内存中保存索引,默认情况下Wincache过期时间为600秒,对绝大多数应用是足够了,当然也可以在初始化时修改:
Php代码:
$cacheMethod = PHPExcel_CachedObjectStorageFactory::cache_to_wincache;
$cacheSettings = array( ’cacheTime’ => 600 );
PHPExcel_Settings::setCacheStorageMethod($cacheMethod, $cacheSettings);
PHPExcel官方文档1.7.6 写道
When your script terminates all entries will be cleared from Wincache, regardless of the cacheTime value, so it cannot be used for persistent storage using this mechanism.
PHPExcel还是比较强大的,最大的问题就是内存占用的问题,PHPExcel啥时候能出一个轻量级的版本,不需要那么多花哨的功能,只需要导出最普通的数据的版本就好了!
有序的数组打印或排序对于php来讲非常的简单了这里整理了几个不同语言的做法的实现代码,具体的我们一起来看这篇php中有序的数组打印或排序的例子吧。
最近有个面试题挺火的——把俩个有序的数组打印或排序。刚看到这个题的时候也有点蒙,最优的算法肯定要用到有序的特性。
思考了一会发现也不是很难,假如数组是正序排列的,可以同时遍历俩个数组,将小的值进行排序,最后会遍历完一个数组,留下一个非空数组,而且剩下的值肯定大于等于已经排好序的最大值。
PHP代码之
<?php
function sort_arr($a,$b) {
$temp = array();
while ($a&&$b) {
if($a['0']<$b['0']) {
$temp[] = array_shift($a);
} else {
$temp[] = array_shift($b);
}
}
if(!empty($a)) { $temp = array_merge($temp, $a); }
if(!empty($b)) { $temp = array_merge($temp, $b); }
return $temp;
}
$a = array(1,2,3,4,5,6);
$b = array(2,3,4,10,10,10,10);
sort_arr($a, $b);
?>
Python 代码之
def fib(a,b):
len_a = len(a)
c = []
while len(a) and len(b):
if a[0] > b[0]:
c.append(b.pop(0))
else:
c.append(a.pop(0))
if len(a):
c = c+a
if len(b):
c = c+b
i=0
while i<len(c):
print(c[i])
i = i+1
a = [1,2,3,4,5]
b = [2,3,4,5,6,7,8,9]
fib(a,b)
C代码之
#include &lt;stdio.h&gt;;
int *sort(int a[], int b[], int a_len, int b_len) {
int *temp = malloc(a_len+b_len);
int i=0; //标注a数组
int j=0; //标注b数组
int m=0; //标注新数组
while (i&lt;a_len&amp;&amp;j&lt;b_len) { //重新排序 if(a[i]&lt;b[j]) {
temp[m++] = b[j++];
} else {
temp[m++] = a[i++];
}
}
//将剩余的数字放在新数组后面(剩余的肯定是前面的数字大)
if(i&lt;a_len) {
for (; i&lt;a_len; i++) {
temp[m++] = a[i];
}
}
if(j&lt;b_len) {
for (; j&lt;b_len; j++) {
temp[m++] = b[j];
}
}
return temp;
}
int main(int argc, const char * argv[]) {
int a[4] = {2,3,11,89};
int b[6] = {4,6,9,10,22,55};
int a_len = sizeof(a) / sizeof(a[0]);
int b_len = sizeof(b) / sizeof(b[0]);
int *c = sort(a, b, a_len, b_len);
int y = 0;
for (; y&lt;a_len+b_len; y++) {
printf("%d ", c[y]);
}
return 0;
}
GO代码之
package main
import "fmt"
func main() {
var a = [5]int{1, 2, 3, 4, 5}
var b = [8]int{4, 5, 6, 7, 89, 100, 111, 112}
var len_a = len(a)
var len_b = len(b)
var c = make([]int, len_a+len_b)
var j = 0 //标注a数组
var k = 0 //标注b数组
var h = 0 //标注新数组
for j &lt; len_a &amp;&amp; k &lt; len_b {
if a[j] &gt; b[k] {
c[h] = b[k]
h++
k++
} else {
c[h] = a[j]
h++
j++
}
}
if j &lt; len_a {
for i := j; i &lt; len_a; i++ {
c[h] = a[i]
h++
}
}
if k &lt; len_b {
for i := k; i &lt; len_b; i++ {
c[h] = b[i]
h++
}
}
Print(c, "c")
}
/**
* [Print array]
* @param {[type]} o []int [array]
* @param {[type]} name string [array name]
*/
func Print(o []int, name string) {
fmt.Printf("%s: ", name)
for _, v := range o {
fmt.Printf("%d ", v)
}
fmt.Printf("\n")
}
在Web发展历史中,session与cookie都是伟大的存在,其初衷都是为了记住用户在网站上的浏览信息,如果没有其他替代品的出现,几乎所有web站点都离不开session与cookie。
为什么需要
Http协议是无状态的,也就导致服务器无法分辨是谁浏览了网页。为了维持用户在网站的状态,比如登陆、购物车等,出现了先后出现了四种技术,分别是隐藏表单域、URL重写、cookie、session。
Cookie
为了解决Http协议无法维持状态的问题,1994年网景通讯的一名员工 Lou Montulli将 “magic cookies” 的概念应用到 Web 通讯中。他试图解决 Web 的第一个购物车应用,现在购物车成了购物网站的支柱。他的原始说明文档提供了 cookie 工作原理的基本信息,该文档后来被作为规范纳入到 RFC 2109(大多数浏览器的实现参考文档)中,最终被纳入到 RFC 2965 中。Montulli 也被授予 cookie 的美国专利。网景浏览器在它的第一个版本中就开始支持 cookie,现在所有 Web 浏览器都支持 cookie。(这里只介绍cookie与session)
是什么
cookie是浏览器保存在用户电脑上的一小段文本,用来保存用户在网站上的必要的信息。Web页面或服务器告诉浏览器按照一定的规范存储这些信息,并且在以后的所有请求中,这些信息就会自动加在http请求头中发送给服务器,服务器根据这些信息判断不同的用户。并且cookie本身是安全的。
如何创建
Web 服务器通过发送一个称为 Set-Cookie 的 HTTP 消息头来创建一个 cookie,Set-Cookie消息头是一个字符串,其格式如下(中括号中的部分是可选的):
Set-Cookie: value[; expires=date][; domain=domain][; path=path][; secure]
value
value 部分,通常是一个 name=value 格式的字符串。事实上,这种格式是原始规范中指定的格式,但是浏览器并不会对 cookie 值按照此格式来验证。实际上,你可以指定一个不含等号的字符串,它同样会被存储。然而,最常用的使用方式是按照 name=value 格式来指定 cookie 的值(大多数接口只支持该格式)。
发送回服务器的cookie只包含cookie设置的值,而不包含cookie的其他可选项,而且浏览器不会对cookie做任何更改,会原封不动的发送回服务器。当存在多个cookie时,用分号和空格隔开:
Cookie: name=value; name1=value1; name2=value2/pre>
cookie过期时间
如果不设置cookie过期时间,cookie会在会话结束后销毁,称为会话cookie。如果想将会话cookie设置为持久cookie,只需设置一下cookie的过期时间即可,该选项的值是一个 Wdy, DD-Mon-YYYY HH:MM:SS GMT 日期格式的值。注意这个失效日期则关联了以 name-domain-path-secure 为标识的 cookie。要改变一个 cookie 的失效日期,你必须指定同样的组合。
持久cookie是无法改成会话cookie,除非删除这个cookie,然后重新建立这个cookie。
domain 选项
domian选项设置了cookie的域,只有发向这个域的http请求才能携带这些cookie。一般情况下domain会被设置为创建该cookie的页面所在的域名。
像 Yahoo! 这种大型网站,都会有许多 name.yahoo.com 形式的站点(例如:my.yahoo.com, finance.yahoo.com 等等)。将一个 cookie 的 domain 选项设置为 yahoo.com,就可以将该 cookie 的值发送至所有这些站点。浏览器会把 domain 的值与请求的域名做一个尾部比较(即从字符串的尾部开始比较),并将匹配的 cookie 发送至服务器。
path 选项
path选项和domain选项类似,只有包含指定path的http请求才能携带这些cookie。这个比较通常是将 path 选项的值与请求的 URL 从头开始逐字符比较完成的。如果字符匹配,则发送 Cookie 消息头,例如:
set-cookie:namevalue;path=/blog
所以包含/blog的http请求都会携带cookie信息。
secure 选项
该选项只是一个标记而没有值。只有当一个请求通过 SSL 或 HTTPS 创建时,包含 secure 选项的 cookie 才能被发送至服务器。这种 cookie 的内容具有很高的价值,如果以纯文本形式传递很有可能被篡改。
事实上,机密且敏感的信息绝不应该在 cookie 中存储或传输,因为 cookie 的整个机制原本都是不安全的。默认情况下,在 HTTPS 链接上传输的 cookie 都会被自动添加上 secure 选项。
HTTP-Only
HTTP-Only 的意思是告之浏览器该 cookie 绝不能通过 JavaScript 的 document.cookie 属性访问。设计该特征意在提供一个安全措施来帮助阻止通过 JavaScript 发起的跨站脚本攻击 (XSS) 窃取 cookie 的行为。
JavaScript 操作 cookie
在 JavaScript 中通过 document.cookie 属性,你可以创建、维护和删除 cookie。创建 cookie 时该属性等同于 Set-Cookie 消息头,而在读取 cookie 时则等同于 Cookie 消息头。
删除cookie
会话 cooke (Session cookie) 在会话结束时(浏览器关闭)会被删除。
持久化 cookie(Persistent cookie)在到达失效日期时会被删除。
如果浏览器中的 cookie 数量达到限制,那么 cookie 会被删除以为新建的 cookie 创建空间。
session
session的作用和cookie差不多,也是用来解决Http协议不能维持状态的问题。但是session只存储在服务器端的,不会在网络中进行传输,所以较cookie来说,session相对安全一些。但是session是依赖cookie的,当用户访问某一站点时,服务器会为这个用户产生唯一的session_id,并把这个session_id以cookie的形式发送到客户端,以后的客户端的所有请求都会自动携带这个cookie(前提是浏览器支持并且没有禁用cookie)。
用下面这个图来了解下session的工作原理:
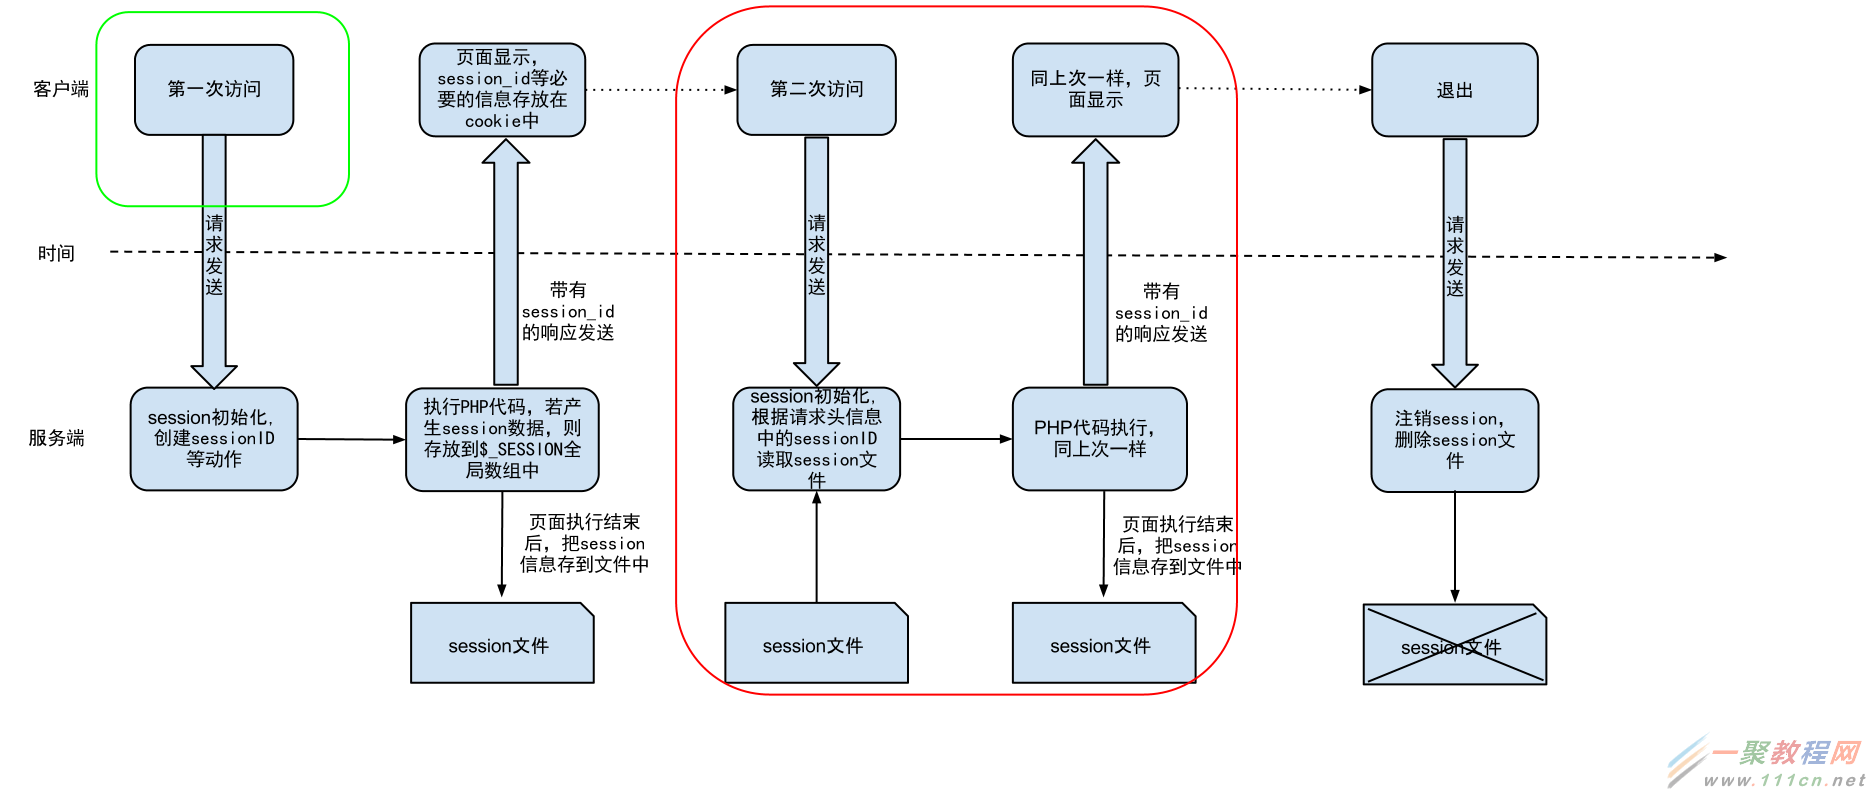
禁用cookie时如何使用session
有些时候,为了安全浏览器会禁用cookie,这时可以用传参的方式将session_id发送到服务器,session可以照常工作。
删除session
会话关闭后,session会自动失效,如果想手动删除session,可以在服务器端编程实现。如PHP是这样做的
$_SESSION = array();
session_destory();
相关文章
- ps动态环绕动画效果是现在很多人都非常喜欢的,大多数人还不知道ps动态环绕动画效果怎么制作下面文章就给大家介绍下ps怎么制作科技感十足的动态环绕动画效果,一起来看看...2017-07-06
使用PHP+JavaScript将HTML页面转换为图片的实例分享
这篇文章主要介绍了使用PHP+JavaScript将HTML元素转换为图片的实例分享,文后结果的截图只能体现出替换的字体,也不能说将静态页面转为图片可以加快加载,只是这种做法比较interesting XD需要的朋友可以参考下...2016-04-19- php如何实现抓取网页图片,相较于手动的粘贴复制,使用小程序要方便快捷多了,喜欢编程的人总会喜欢制作一些简单有用的小软件,最近就参考了网上一个php抓取图片代码,封装了一个php远程抓取图片的类,测试了一下,效果还不错分享...2015-10-30
- 这篇文章主要介绍了C#从数据库读取图片并保存的方法,帮助大家更好的理解和使用c#,感兴趣的朋友可以了解下...2021-01-16
- 今天小编在这里就来给各位Photoshop的这一款软件的使用者们来说说把古装美女图片转为细腻的工笔画效果的制作教程,各位想知道方法的使用者们,那么下面就快来跟着小编一...2016-09-14
- 这篇文章主要介绍了Python 图片转数组,二进制互转操作,具有很好的参考价值,希望对大家有所帮助。一起跟随小编过来看看吧...2021-03-09
- 这篇文章主要介绍了vue 实现动态路由的方法,文中示例代码非常详细,帮助大家更好的理解和学习,感兴趣的朋友可以了解下...2020-07-06
- 下面小编就为大家带来一篇利用JS实现点击按钮后图片自动切换的简单方法。小编觉得挺不错的,现在就分享给大家,也给大家做个参考。一起跟随小编过来看看吧...2016-10-25
jquery左右滚动焦点图banner图片鼠标经过显示上下页按钮
jquery左右滚动焦点图banner图片鼠标经过显示上下页按钮...2013-10-13- 这篇文章主要为大家详细介绍了js实现上传图片及时预览的相关资料,具有一定的参考价值,感兴趣的朋友可以参考一下...2016-05-09
- Photoshop的这一款软件小编相信很多的人都已经是使用过了吧,那么今天小编在这里就给大家带来了用Photoshop软件制作枪战电影海报的教程,想知道制作步骤的玩家们,那么下面...2016-09-14
- 今天我们来给大家介绍下在Vue开发中我们经常会碰到的一种需求场景,本文主要介绍了Vue动态查询规则生成组件,需要的朋友们下面随着小编来一起学习学习吧...2021-05-27
- 最近由于项目的需要,需要动态的添加和删除table中的tr,感觉用JS可以实现,但是在网上找了一下,单纯的自己写JS,感觉太麻烦,而且也不好维护。于是想到了最近学的jQuery。这篇文章给大家用实例介绍了jQuery动态添加与删除tr行的方法,有需要的朋友们可以参考借鉴。...2016-10-20
- 这篇文章主要介绍了Element PageHeader页头的使用方法,文中通过示例代码介绍的非常详细,对大家的学习或者工作具有一定的参考学习价值,需要的朋友们下面随着小编来一起学习学习吧...2020-07-27
- 想在网页中动态地显示当前系统的时间,找了好多,不过都是一些停在那里不动的。。。不过皇天不负有心人,终于让我找到了...2020-06-25
- 图片剪裁是常用的方法,那么如何通过4坐标剪裁图片,本文就详细的来介绍一下,感兴趣的小伙伴们可以参考一下...2021-06-04
- 这篇文章介绍了c#动态调用Webservice的两种方法实例,有需要的朋友可以参考一下...2020-06-25
- 共享一段使用PHP下载CSS文件中的图片的代码 复制代码 代码如下: <?php //note 设置PHP超时时间 set_time_limit(0); //note 取得样式文件内容 $styleFileContent = file_get_contents('images/style.css'); //not...2013-10-04
- 这篇文章主要给大家介绍了关于微信小程序如何获取图片宽度与高度的相关资料,文中通过示例代码介绍的非常详细,对大家的学习或者工作具有一定的参考学习价值,需要的朋友们下面随着小编来一起学习学习吧...2021-03-10
- PHP代码如下:复制代码 代码如下:if (isset($_FILES["Filedata"]) || !is_uploaded_file($_FILES["Filedata"]["tmp_name"]) || $_FILES["Filedata"]["error"] != 0) { $upload_file = $_FILES['Filedata']; $fil...2013-10-04