react实现浏览器自动刷新的示例代码
在单页应用如此流行的今天,曾经令人惊叹的前端路由已经成为各大框架的基础标配,每个框架都提供了强大的路由功能,导致路由实现变的复杂。想要搞懂路由内部实现还是有些困难的,但是如果只想了解路由实现基本原理还是比较简单的。本文针对前端路由主流的实现方式 hash 和 history,提供了原生JS/React/Vue 共计六个版本供参考,每个版本的实现代码约 25~40 行左右(含空行)。
什么是前端路由?
路由的概念来源于服务端,在服务端中路由描述的是 URL 与处理函数之间的映射关系。
在 Web 前端单页应用 SPA(Single Page Application)中,路由描述的是 URL 与 UI 之间的映射关系,这种映射是单向的,即 URL 变化引起 UI 更新(无需刷新页面)。
如何实现前端路由?
要实现前端路由,需要解决两个核心问题:
如何改变 URL 却不引起页面刷新?如何检测 URL 变化了?
下面分别使用 hash 和 history 两种实现方式回答上面的两个核心问题。
hash 实现
- hash 是 URL 中 hash (
#) 及后面的那部分,常用作锚点在页面内进行导航,改变 URL 中的 hash 部分不会引起页面刷新 - 通过 hashchange 事件监听 URL 的变化,改变 URL 的方式只有这几种:通过浏览器前进后退改变 URL、通过
标签改变 URL、通过window.location改变URL,这几种情况改变 URL 都会触发 hashchange 事件
history 实现
- history 提供了 pushState 和 replaceState 两个方法,这两个方法改变 URL 的 path 部分不会引起页面刷新
- history 提供类似 hashchange 事件的 popstate 事件,但 popstate 事件有些不同:通过浏览器前进后退改变 URL 时会触发 popstate 事件,通过
pushState/replaceState或标签改变 URL 不会触发 popstate 事件。好在我们可以拦截 pushState/replaceState的调用和标签的点击事件来检测 URL 变化,所以监听 URL 变化可以实现,只是没有 hashchange 那么方便。
原生JS版前端路由实现
基于上节讨论的两种实现方式,分别实现 hash 版本和 history 版本的路由,示例使用原生 HTML/JS 实现,不依赖任何框架。
基于 hash 实现
运行效果:

HTML 部分:
<body>
  <ul>
ref="">    <!-- 定义路由 -->
    <li><a href="#/home" rel="external nofollow" >home</a></li>
    <li><a href="#/about" rel="external nofollow" >about</a></li>

ref="">    <!-- 渲染路由对应的 UI -->
    <div id="routeView"></div>
  </ul>
</body>
JavaScript 部分:
// 页面加载完不会触发 hashchange,这里主动触发一次 hashchange 事件
window.addEventListener('DOMContentLoaded', onLoad)
// 监听路由变化
window.addEventListener('hashchange', onHashChange)

// 路由视图
var routerView = null

function onLoad () {
  routerView = document.querySelector('#routeView')
  onHashChange()
}

// 路由变化时,根据路由渲染对应 UI
function onHashChange () {
  switch (location.hash) {
    case '#/home':
      routerView.innerHTML = 'Home'
      return
    case '#/about':
      routerView.innerHTML = 'About'
      return
    default:
      return
  }
}
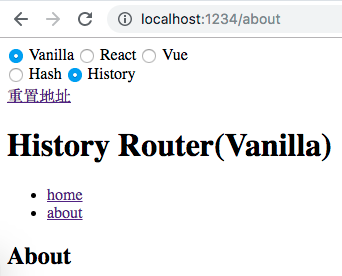
基于 history 实现
运行效果:
HTML 部分:
<body>
  <ul>
    <li><a href='/home'>home</a></li>
    <li><a href='/about'>about</a></li>

    <div id="routeView"></div>
  </ul>
</body>
JavaScript 部分:
// 页面加载完不会触发 hashchange,这里主动触发一次 hashchange 事件
window.addEventListener('DOMContentLoaded', onLoad)
// 监听路由变化
window.addEventListener('popstate', onPopState)

// 路由视图
var routerView = null

function onLoad () {
  routerView = document.querySelector('#routeView')
  onPopState()

 href="">  // 拦截 <a> 标签点击事件默认行为, 点击时使用 pushState 修改 URL并更新手动 UI,从而实现点击链接更新 URL 和 UI 的效果。
  var linkList = document.querySelectorAll('a[href]')
  linkList.forEach(el => el.addEventListener('click', function (e) {
    e.preventDefault()
    history.pushState(null, '', el.getAttribute('href'))
    onPopState()
  }))
}

// 路由变化时,根据路由渲染对应 UI
function onPopState () {
  switch (location.pathname) {
    case '/home':
      routerView.innerHTML = 'Home'
      return
    case '/about':
      routerView.innerHTML = 'About'
      return
    default:
      return
  }
}
React 版前端路由实现
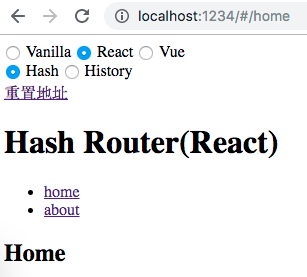
基于 hash 实现
运行效果:
使用方式和 react-router 类似:
  <BrowserRouter>
    <ul>
      <li>
        <Link to="/home">home</Link>
      </li>
      <li>
        <Link to="/about">about</Link>
      </li>
    </ul>

    <Route path="/home" render={() => <h2>Home</h2>} />
    <Route path="/about" render={() => <h2>About</h2>} />
  </BrowserRouter>
BrowserRouter 实现
export default class BrowserRouter extends React.Component {
  state = {
    currentPath: utils.extractHashPath(window.location.href)
  };

  onHashChange = e => {
    const currentPath = utils.extractHashPath(e.newURL);
    console.log("onHashChange:", currentPath);
    this.setState({ currentPath });
  };

  componentDidMount() {
    window.addEventListener("hashchange", this.onHashChange);
  }

  componentWillUnmount() {
    window.removeEventListener("hashchange", this.onHashChange);
  }

  render() {
    return (
      <RouteContext.Provider value={{currentPath: this.state.currentPath}}>
        {this.props.children}
      </RouteContext.Provider>
    );
  }
}
Route 实现
export default ({ path, render }) => (
  <RouteContext.Consumer>
    {({currentPath}) => currentPath === path && render()}
  </RouteContext.Consumer>
);
Link 实现
export default ({ to, ...props }) => <a {...props} href={"#" + to} />;
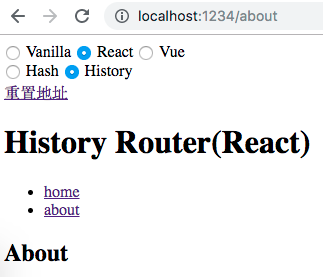
基于 history 实现
运行效果:
使用方式和 react-router 类似:
  <HistoryRouter>
    <ul>
      <li>
        <Link to="/home">home</Link>
      </li>
      <li>
        <Link to="/about">about</Link>
      </li>
    </ul>

    <Route path="/home" render={() => <h2>Home</h2>} />
    <Route path="/about" render={() => <h2>About</h2>} />
  </HistoryRouter>
HistoryRouter 实现
export default class HistoryRouter extends React.Component {
  state = {
    currentPath: utils.extractUrlPath(window.location.href)
  };

  onPopState = e => {
    const currentPath = utils.extractUrlPath(window.location.href);
    console.log("onPopState:", currentPath);
    this.setState({ currentPath });
  };

  componentDidMount() {
    window.addEventListener("popstate", this.onPopState);
  }

  componentWillUnmount() {
    window.removeEventListener("popstate", this.onPopState);
  }

  render() {
    return (
      <RouteContext.Provider value={{currentPath: this.state.currentPath, onPopState: this.onPopState}}>
        {this.props.children}
      </RouteContext.Provider>
    );
  }
}
Route 实现
export default ({ path, render }) => (
  <RouteContext.Consumer>
    {({currentPath}) => currentPath === path && render()}
  </RouteContext.Consumer>
);
Link 实现
export default ({ to, ...props }) => (
  <RouteContext.Consumer>
    {({ onPopState }) => (
      <a
        href=""
        {...props}
        onClick={e => {
          e.preventDefault();
          window.history.pushState(null, "", to);
          onPopState();
        }}
      />
    )}
  </RouteContext.Consumer>
);
Vue 版本前端路由实现
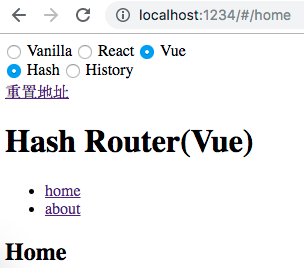
基于 hash 实现
运行效果:
使用方式和 vue-router 类似(vue-router 通过插件机制注入路由,但是这样隐藏了实现细节,为了保持代码直观,这里没有使用 Vue 插件封装):
    <div>
      <ul>
        <li><router-link to="/home">home</router-link></li>
        <li><router-link to="/about">about</router-link></li>
      </ul>
      <router-view></router-view>
    </div>

const routes = {
  '/home': {
    template: '<h2>Home</h2>'
  },
  '/about': {
    template: '<h2>About</h2>'
  }
}

const app = new Vue({
  el: '.vue.hash',
  components: {
    'router-view': RouterView,
    'router-link': RouterLink
  },
  beforeCreate () {
    this.$routes = routes
  }
})
router-view 实现:
<template>
  <component :is="routeView" />
</template>

<script>
import utils from '~/utils.js'
export default {
  data () {
    return {
      routeView: null
    }
  },
  created () {
    this.boundHashChange = this.onHashChange.bind(this)
  },
  beforeMount () {
    window.addEventListener('hashchange', this.boundHashChange)
  },
  mounted () {
    this.onHashChange()
  },
  beforeDestroy() {
    window.removeEventListener('hashchange', this.boundHashChange)
  },
  methods: {
    onHashChange () {
      const path = utils.extractHashPath(window.location.href)
      this.routeView = this.$root.$routes[path] || null
      console.log('vue:hashchange:', path)
    }
  }
}
</script>
router-link 实现:
<template>
  <a @click.prevent="onClick" href=''><slot></slot></a>
</template>

<script>
export default {
  props: {
    to: String
  },
  methods: {
    onClick () {
      window.location.hash = '#' + this.to
    }
  }
}
</script>
基于 history 实现
运行效果:
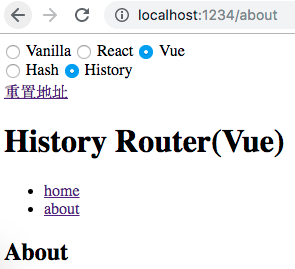
使用方式和 vue-router 类似:
    <div>
      <ul>
        <li><router-link to="/home">home</router-link></li>
        <li><router-link to="/about">about</router-link></li>
      </ul>
      <router-view></router-view>
    </div>

const routes = {
  '/home': {
    template: '<h2>Home</h2>'
  },
  '/about': {
    template: '<h2>About</h2>'
  }
}

const app = new Vue({
  el: '.vue.history',
  components: {
    'router-view': RouterView,
    'router-link': RouterLink
  },
  created () {
    this.$routes = routes
    this.boundPopState = this.onPopState.bind(this)
  },
  beforeMount () {
    window.addEventListener('popstate', this.boundPopState)
  },
  beforeDestroy () {
    window.removeEventListener('popstate', this.boundPopState)
  },
  methods: {
    onPopState (...args) {
      this.$emit('popstate', ...args)
    }
  }
})
router-view 实现:
<template>
  <component :is="routeView" />
</template>

<script>
import utils from '~/utils.js'
export default {
  data () {
    return {
      routeView: null
    }
  },
  created () {
    this.boundPopState = this.onPopState.bind(this)
  },
  beforeMount () {
    this.$root.$on('popstate', this.boundPopState)
  },
  beforeDestroy() {
    this.$root.$off('popstate', this.boundPopState)
  },
  methods: {
    onPopState (e) {
      const path = utils.extractUrlPath(window.location.href)
      this.routeView = this.$root.$routes[path] || null
      console.log('[Vue] popstate:', path)
    }
  }
}
</script>
router-link 实现:
<template>
  <a @click.prevent="onClick" href=''><slot></slot></a>
</template>

<script>
export default {
  props: {
    to: String
  },
  methods: {
    onClick () {
      history.pushState(null, '', this.to)
      this.$root.$emit('popstate')
    }
  }
}
</script>
小结
前端路由的核心实现原理很简单,但是结合具体框架后,框架增加了很多特性,如动态路由、路由参数、路由动画等等,这些导致路由实现变的复杂。本文去粗取精只针对前端路由最核心部分的实现进行分析,并基于 hash 和 history 两种模式,分别提供原生JS/React/Vue 三种实现,共计六个实现版本供参考,希望对你有所帮助。
所有的示例的代码放在 Github 仓库:https://github.com/whinc/web-router-principle
参考
详解单页面路由的几种实现原理
单页面应用路由实现原理:以 React-Router 为例
到此这篇关于react实现浏览器自动刷新的示例代码的文章就介绍到这了,更多相关react 浏览器自动刷新内容请搜索猪先飞以前的文章或继续浏览下面的相关文章希望大家以后多多支持猪先飞!
相关文章
- 本篇文章主要分享了通过window.navigator来判断浏览器及其版本信息的实例代码。具有一定的参考价值,下面跟着小编一起来看下吧...2017-01-23
- 这篇文章主要介绍了js如何实现浏览器打印功能,文中示例代码非常详细,帮助大家更好的理解和学习,感兴趣的朋友可以了解下...2020-07-15
关于React Native报Cannot initialize a parameter of type'NSArray<id<RCTBridgeModule>>错误(解决方案)
这篇文章主要介绍了关于React Native报Cannot initialize a parameter of type'NSArray<id<RCTBridgeModule>>错误,本文给大家分享解决方案,需要的朋友可以参考下...2021-05-12- 其实挺简单的就是if(navigator.userAgent.indexOf('UCBrowser') > -1) {alert("uc浏览器");}else{//不是uc浏览器执行的操作}如果想测试某个浏览器的特征可以通过如下方法获取JS获取浏览器信息 浏览器代码名称:navigator...2015-11-08
js代码判断浏览器种类IE、FF、Opera、Safari、chrome及版本
第一种,只区分浏览器,不考虑版本 复制代码 代码如下:function myBrowser(){ var userAgent = navigator.userAgent; //取得浏览器的userAgent字符串 var isOpera = userAgent.indexOf("Opera") > -1; if (isOp...2014-05-31- 这篇文章主要介绍了详解Vue Cli浏览器兼容性实践,文中通过示例代码介绍的非常详细,对大家的学习或者工作具有一定的参考学习价值,需要的朋友们下面随着小编来一起学习学习吧...2020-06-09
React引入antd-mobile+postcss搭建移动端
本文给大家分享React引入antd-mobile+postcss搭建移动端的详细流程,文末给大家分享我的一些经验记录使用antd-mobile时发现我之前配置的postcss失效了,防止大家踩坑,特此把解决方案分享到脚本之家平台,需要的朋友参考下吧...2021-06-21- 这篇文章主要介绍了React使用高德地图的实现示例(react-amap),文中通过示例代码介绍的非常详细,对大家的学习或者工作具有一定的参考学习价值,需要的朋友们下面随着小编来一起学习学习吧...2021-04-18
使用 React 和 Threejs 创建一个VR全景项目的过程详解
这篇文章主要介绍了使用 React 和 Threejs 创建一个VR全景项目的过程详解,本文通过实例代码给大家介绍的非常详细,对大家的学习或工作具有一定的参考借鉴价值,需要的朋友可以参考下...2021-04-06- 这篇文章主要介绍了如何使用 JavaScript 操作浏览器历史记录 API,帮助大家更好的理解和使用JavaScript,感兴趣的朋友可以了解下...2020-11-24
- 思路其实没有那么复杂,把地图想成一个盒子容器,地图中心点想成盒子中心点;扎点在【地图中心点】不会动,当移动地图时,去获取【地图中心点】经纬度,设置某个位置的时候,将经纬度设置为【地图中心点】即可...2021-06-20
- 这篇文章主要介绍了Python获取浏览器窗口句柄过程解析,文中通过示例代码介绍的非常详细,对大家的学习或者工作具有一定的参考学习价值,需要的朋友可以参考下...2020-07-26
- 这篇文章主要给大家介绍了关于vue如何调用浏览器分享的相关资料,文中通过示例代码介绍的非常详细,对大家的学习或者工作具有一定的参考学习价值,需要的朋友们下面随着小编来一起学习学习吧...2021-03-20
- 在网站前端开发中,浏览器兼容性问题本已让我们手忙脚乱,Chrome的出世不知道又要给我们添多少乱子。浏览器兼容性是前端开发框架要解决的第一个问题,要解决兼容性问题就得首先准确判断出浏览器的类型及其版本。 JavaScrip...2014-05-31
- 这篇文章主要为大家详细介绍了React列表栏及购物车组件使用,文中示例代码介绍的非常详细,具有一定的参考价值,感兴趣的小伙伴们可以参考一下...2021-06-28
- 这篇文章主要介绍了react使用antd表单赋值,用于修改弹框的操作,具有很好的参考价值,希望对大家有所帮助。一起跟随小编过来看看吧...2020-10-29
- 这篇文章主要介绍了JAVA读取文件流,设置浏览器下载或直接预览操作,具有很好的参考价值,希望对大家有所帮助。一起跟随小编过来看看吧...2020-10-09
- 这篇文章主要介绍了React Native 启动流程简析,文以 react-native-cli 创建的示例工程(安卓部分)为例,给大家分析 React Native 的启动流程,需要的朋友可以参考下...2021-08-18
- 由于国内好几个浏览器都是双核浏览器(蛋痛,做一个浏览器壳就说国产,而且使用率高),有时打开网页会出现不兼容模式,在极速模式下是好的,现在我们来用代码实现网页自动调用国内...2016-09-20
- 这篇文章主要介绍了C# 模拟浏览器并自动操作的实例代码,文中讲解非常细致,帮助大家更好的理解和学习,感兴趣的朋友可以了解下...2020-11-03