SpringBoot浅析安全管理之Spring Security配置
在 Java 开发领域常见的安全框架有 Shiro 和 Spring Security。Shiro 是一个轻量级的安全管理框架,提供了认证、授权、会话管理、密码管理、缓存管理等功能。Spring Security 是一个相对复杂的安全管理框架,功能比 Shiro 更加强大,权限控制细粒度更高,对 OAuth 2 的支持也很友好,又因为 Spring Security 源自 Spring 家族,因此可以和 Spring 框架无缝整合,特别是 Spring Boot 中提供的自动化配置方案,可以让 Spring Security 的使用更加便捷。
Spring Security 的基本配置
基本用法
1. 创建项目添加依赖
创建一个 Spring Boot 项目,然后添加 spring-boot-starter-security 依赖即可
<dependency>
  <groupId>org.springframework.boot</groupId>
  <artifactId>spring-boot-starter-web</artifactId>
</dependency>
<dependency>
  <groupId>org.springframework.boot</groupId>
  <artifactId>spring-boot-starter-security</artifactId>
</dependency>
2. 添加 hello 接口
@RestController
public class HelloController {
    @GetMapping("/hello")
    public String hello() {
        return "hello";
    }
}
3. 启动项目测试
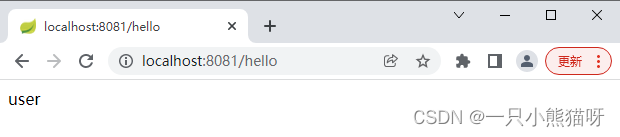
启动成功后,访问 /hello 接口就会自动跳转到登录页面,这个登录页面是由 Spring Security 提供的

默认的用户名是 user ,默认的登录密码则在每次启动项目时随机生成,查看项目启动日志
Using generated security password: 4f845a17-7b09-479c-8701-48000e89d364
登录成功后,用户就可以访问 /hello 接口了
配置用户名和密码
如果开发者对默认的用户名和密码不满意,可以在 application.properties 中配置默认的用户名、密码以及用户角色
spring.security.user.name=tangsan
spring.security.user.password=tangsan
spring.security.user.roles=admin
基于内存的认证
开发者也可以自定义类继承自 WebSecurityConfigurer,进而实现对 Spring Security 更多的自定义配置,例如基于内存的认证,配置方式如下:
@Configuration
public class MyWebSecurityConfig extends WebSecurityConfigurerAdapter {
    @Bean
    PasswordEncoder passwordEncoder() {
        return NoOpPasswordEncoder.getInstance();
    }
    @Override
    protected void configure(AuthenticationManagerBuilder auth) throws Exception {
        auth.inMemoryAuthentication()
                .withUser("admin").password("123123").roles("ADMIN", "USER")
                .and()
                .withUser("tangsan").password("123123").roles("USER");
    }
}
代码解释:
- 自定义 MyWebSecurityConfig 继承自 WebSecurityConfigurerAdapter ,并重写 configure(AuthenticationManagerBuilder auth) 方法,在该方法中配置两个用户,一个用户是 admin ,具备两个角色 ADMIN、USER;另一个用户是 tangsan ,具备一个角色 USER
- 此处使用的 Spring Security 版本是 5.0.6 ,在 Spring Security 5.x 中引入了多种密码加密方式,开发者必须指定一种,此处使用 NoOpPasswordEncoder ,即不对密码进行加密
注意:基于内存的用户配置,在配置角色时不需要添加 “ROLE_” 前缀,这点和后面 10.2 节中基于数据库的认证有差别。
配置完成后,重启项目,就可以使用这里配置的两个用户进行登录了。
HttpSecurity
虽然现在可以实现认证功能,但是受保护的资源都是默认的,而且不能根据实际情况进行角色管理,如果要实现这些功能,就需要重写 WebSecurityConfigurerAdapter 中的另一个方法
@Configuration
public class MyWebSecurityConfig extends WebSecurityConfigurerAdapter {
    @Bean
    PasswordEncoder passwordEncoder() {
        return NoOpPasswordEncoder.getInstance();
    }
    @Override
    protected void configure(AuthenticationManagerBuilder auth) throws Exception {
        auth.inMemoryAuthentication()
                .withUser("root").password("123123").roles("ADMIN", "DBA")
                .and()
                .withUser("admin").password("123123").roles("ADMIN", "USER")
                .and()
                .withUser("tangsan").password("123123").roles("USER");
    }
    @Override
    protected void configure(HttpSecurity http) throws Exception {
        http.authorizeRequests()
                .antMatchers("/admin/**")
                .hasRole("ADMIN")
                .antMatchers("/user/**")
                .access("hasAnyRole('ADMIN','USER')")
                .antMatchers("/db/**")
                .access("hasRole('ADMIN') and hasRole('DBA')")
                .anyRequest()
                .authenticated()
                .and()
                .formLogin()
                .loginProcessingUrl("/login")
                .permitAll()
                .and()
                .csrf()
                .disable();
    }
}
代码解释:
- 首先配置了三个用户,root 用户具备 ADMIN 和 DBA 的角色,admin 用户具备 ADMIN 和 USER 角色,tangsan 用于具备 USER 角色
- 调用 authorizeRequests() 方法开启 HttpSecurity 的配置,antMatchers() ,hasRole() ,access() 方法配置访问不同的路径需要不同的用户及角色
- anyRequest(),authenticated() 表示出了前面定义的之外,用户访问其他的 URL 都必须认证后访问
- formLogin(),loginProcessingUrl(“/login”),permitAll(),表示开启表单登录,前面看到的登录页面,同时配置了登录接口为 /login 即可以直接调用 /login 接口,发起一个 POST 请求进行登录,登录参数中用户名必须命名为 username ,密码必须命名为 password,配置 loginProcessingUrl 接口主要是方便 Ajax 或者移动端调用登录接口。最后还配置了 permitAll,表示和登录相关的接口都不需要认证即可访问。
配置完成后,在 Controller 中添加如下接口进行测试:
@RestController
public class HelloController {
    @GetMapping("/admin/hello")
    public String admin() {
        return "hello admin";
    }
    @GetMapping("/user/hello")
    public String user() {
        return "hello user";
    }
    @GetMapping("/db/hello")
    public String dba() {
        return "hello dba";
    }
    @GetMapping("/hello")
    public String hello() {
        return "hello";
    }
}
根据上文配置,“/admin/hello” 接口 root 和 admin 用户具有访问权限;“/user/hello” 接口 admin 和 tangsan 用户具有访问权限;“/db/hello” 只有 root 用户有访问权限。浏览器中的测试很容易,这里不再赘述。
登录表单详细配置
目前为止,登录表单一直使用 Spring Security 提供的页面,登录成功后也是默认的页面跳转,但是,前后端分离已经成为企业级应用开发的主流,在前后端分离的开发方式中,前后端的数据交互通过 JSON 进行,这时,登录成功后就不是页面跳转了,而是一段 JSON 提示。要实现这些功能,只需要继续完善上文的配置
@Override
protected void configure(HttpSecurity http) throws Exception {
    http.authorizeRequests()
        .antMatchers("/admin/**")
        .hasRole("ADMIN")
        .antMatchers("/user/**")
        .access("hasAnyRole('ADMIN','USER')")
        .antMatchers("/db/**")
        .access("hasRole('ADMIN') and hasRole('DBA')")
        .anyRequest()
        .authenticated()
        .and()
        .formLogin()
        .loginPage("/login_page")
        .loginProcessingUrl("/login")
        .usernameParameter("name")
        .passwordParameter("passwd")
        .successHandler(new AuthenticationSuccessHandler() {
            @Override
            public void onAuthenticationSuccess(HttpServletRequest req,
                                                HttpServletResponse resp,
                                                Authentication auth)
                throws IOException {
                Object principal = auth.getPrincipal();
                resp.setContentType("application/json;charset=utf-8");
                PrintWriter out = resp.getWriter();
                resp.setStatus(200);
                Map<String, Object> map = new HashMap<>();
                map.put("status", 200);
                map.put("msg", principal);
                ObjectMapper om = new ObjectMapper();
                out.write(om.writeValueAsString(map));
                out.flush();
                out.close();
            }
        })
        .failureHandler(new AuthenticationFailureHandler() {
            @Override
            public void onAuthenticationFailure(HttpServletRequest req,
                                                HttpServletResponse resp,
                                                AuthenticationException e)
                throws IOException {
                resp.setContentType("application/json;charset=utf-8");
                PrintWriter out = resp.getWriter();
                resp.setStatus(401);
                Map<String, Object> map = new HashMap<>();
                map.put("status", 401);
                if (e instanceof LockedException) {
                    map.put("msg", "账户被锁定,登录失败!");
                } else if (e instanceof BadCredentialsException) {
                    map.put("msg", "账户名或密码输入错误,登录失败!");
                } else if (e instanceof DisabledException) {
                    map.put("msg", "账户被禁用,登录失败!");
                } else if (e instanceof AccountExpiredException) {
                    map.put("msg", "账户已过期,登录失败!");
                } else if (e instanceof CredentialsExpiredException) {
                    map.put("msg", "密码已过期,登录失败!");
                } else {
                    map.put("msg", "登录失败!");
                }
                ObjectMapper om = new ObjectMapper();
                out.write(om.writeValueAsString(map));
                out.flush();
                out.close();
            }
        })
        .permitAll()
        .and()
        .csrf()
        .disable();
}
代码解释:
- loginPage(“/login_page”) 表示如果用户未获授权就访问一个需要授权才能访问的接口,就会自动跳转到 login_page 页面让用户登录,这个 login_page 就是开发者自定义的登录页面,而不再是 Spring Security 提供的默认登录页
- loginProcessingUrl(“/login”) 表示登录请求处理接口,无论是自定义登录页面还是移动端登录,都需要使用该接口
- usernameParameter(“name”),passwordParameter(“passwd”) 定义了认证所需要的用户名和密码的参数,默认用户名参数是 username,密码参数是 password,可以在这里定义
- successHandler() 方法定义了登录成功的处理逻辑。用户登录成功后可以跳转到某一个页面,也可以返回一段 JSON ,这个要看具体业务逻辑,此处假设是第二种,用户登录成功后,返回一段登录成功的 JSON 。onAuthenticationSuccess 方法的第三个参数一般用来获取当前登录用户的信息,在登录后,可以获取当前登录用户的信息一起返回给客户端
- failureHandler 方法定义了登录失败的处理逻辑,和登录成功类似,不同的是,登录失败的回调方法里有一个 AuthenticationException 参数,通过这个异常参数可以获取登录失败的原因,进而给用户一个明确的提示
配置完成后,使用 Postman 进行测试
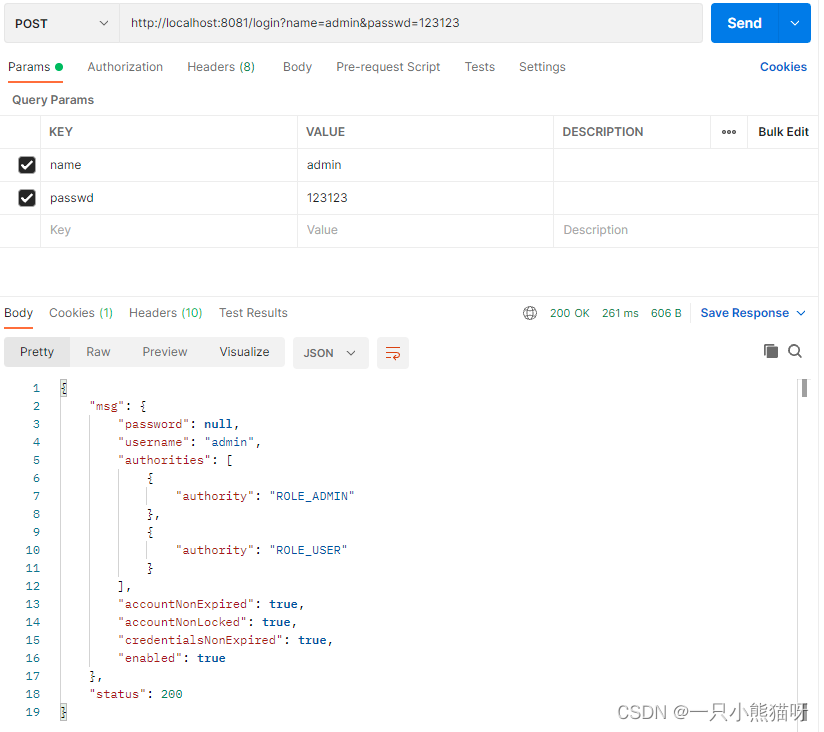
如果登录失败也会有相应的提示

注销登录配置
如果想要注销登录,也只需要提供简单的配置即可
@Override
protected void configure(HttpSecurity http) throws Exception {
    http.authorizeRequests()
        .antMatchers("/admin/**")
        .hasRole("ADMIN")
        .antMatchers("/user/**")
        .access("hasAnyRole('ADMIN','USER')")
        .antMatchers("/db/**")
        .access("hasRole('ADMIN') and hasRole('DBA')")
        .anyRequest()
        .authenticated()
        .and()
        .formLogin()
        .loginPage("/login_page")
        .loginProcessingUrl("/login")
        .usernameParameter("name")
        .passwordParameter("passwd")
        .successHandler(new AuthenticationSuccessHandler() {
            @Override
            public void onAuthenticationSuccess(HttpServletRequest req,
                                                HttpServletResponse resp,
                                                Authentication auth)
                throws IOException {
                Object principal = auth.getPrincipal();
                resp.setContentType("application/json;charset=utf-8");
                PrintWriter out = resp.getWriter();
                resp.setStatus(200);
                Map<String, Object> map = new HashMap<>();
                map.put("status", 200);
                map.put("msg", principal);
                ObjectMapper om = new ObjectMapper();
                out.write(om.writeValueAsString(map));
                out.flush();
                out.close();
            }
        })
        .failureHandler(new AuthenticationFailureHandler() {
            @Override
            public void onAuthenticationFailure(HttpServletRequest req,
                                                HttpServletResponse resp,
                                                AuthenticationException e)
                throws IOException {
                resp.setContentType("application/json;charset=utf-8");
                PrintWriter out = resp.getWriter();
                resp.setStatus(401);
                Map<String, Object> map = new HashMap<>();
                map.put("status", 401);
                if (e instanceof LockedException) {
                    map.put("msg", "账户被锁定,登录失败!");
                } else if (e instanceof BadCredentialsException) {
                    map.put("msg", "账户名或密码输入错误,登录失败!");
                } else if (e instanceof DisabledException) {
                    map.put("msg", "账户被禁用,登录失败!");
                } else if (e instanceof AccountExpiredException) {
                    map.put("msg", "账户已过期,登录失败!");
                } else if (e instanceof CredentialsExpiredException) {
                    map.put("msg", "密码已过期,登录失败!");
                } else {
                    map.put("msg", "登录失败!");
                }
                ObjectMapper om = new ObjectMapper();
                out.write(om.writeValueAsString(map));
                out.flush();
                out.close();
            }
        })
        .permitAll()
        .and()
        .logout()
        .logoutUrl("/logout")
        .clearAuthentication(true)
        .invalidateHttpSession(true)
        .addLogoutHandler(new LogoutHandler() {
            @Override
            public void logout(HttpServletRequest req,
                               HttpServletResponse resp,
                               Authentication auth) {
            }
        })
        .logoutSuccessHandler(new LogoutSuccessHandler() {
            @Override
            public void onLogoutSuccess(HttpServletRequest req,
                                        HttpServletResponse resp,
                                        Authentication auth)
                throws IOException {
                resp.sendRedirect("/login_page");
            }
        })
        .and()
        .csrf()
        .disable();
}
代码解释:
- logout() 表示开启注销登录的配置
- logoutUrl(“/logout”) 表示注销登录请求 URL 为 /logout ,默认也是 /logout
- clearAuthentication(true) 表示是否清楚身份认证信息,默认为 true
- invalidateHttpSession(true) 表示是否使 Session 失效,默认为 true
- addLogoutHandler 方法中完成一些数据清楚工作,例如 Cookie 的清楚
- logoutSuccessHandler 方法用于处理注销成功后的业务逻辑,例如返回一段 JSON 提示或者跳转到登录页面等
多个 HttpSecurity
如果业务比较复杂,也可以配置多个 HttpSecurity ,实现对 WebSecurityConfigurerAdapter 的多次扩展
@Configuration
public class MultiHttpSecurityConfig {
    @Bean
    PasswordEncoder passwordEncoder() {
        return NoOpPasswordEncoder.getInstance();
    }
    @Autowired
    protected void configure(AuthenticationManagerBuilder auth) throws Exception {
        auth.inMemoryAuthentication()
                .withUser("admin").password("123123").roles("ADMIN", "USER")
                .and()
                .withUser("tangsan").password("123123").roles("USER");
    }
    @Configuration
    @Order(1)
    public static class AdminSecurityConfig extends WebSecurityConfigurerAdapter{
        @Override
        protected void configure(HttpSecurity http) throws Exception {
            http.antMatcher("/admin/**").authorizeRequests()
                    .anyRequest().hasRole("ADMIN");
        }
    }
    @Configuration
    public static class OtherSecurityConfig extends WebSecurityConfigurerAdapter{
        @Override
        protected void configure(HttpSecurity http) throws Exception {
            http.authorizeRequests()
                    .anyRequest().authenticated()
                    .and()
                    .formLogin()
                    .loginProcessingUrl("/login")
                    .permitAll()
                    .and()
                    .csrf()
                    .disable();
        }
    }
}
代码解释:
- 配置多个 HttpSecurity 时,MultiHttpSecurityConfig 不需要继承 WebSecurityConfigurerAdapter ,在 MultiHttpSecurityConfig 中创建静态内部类继承 WebSecurityConfigurerAdapter 即可,静态内部类上添加 @Configuration 注解和 @Order注解,数字越大优先级越高,未加 @Order 注解的配置优先级最低
- AdminSecurityConfig 类表示该类主要用来处理 “/admin/**” 模式的 URL ,其它 URL 将在 OtherSecurityConfig 类中处理
密码加密
1. 为什么要加密
略
2. 加密方案
Spring Security 提供了多种密码加密方案,官方推荐使用 BCryptPasswordEncoder,BCryptPasswordEncoder 使用 BCrypt 强哈希函数,开发者在使用时可以选择提供 strength 和 SecureRandom 实例。strength 越大,密码的迭代次数越多,密钥迭代次数为 2^strength 。strength 取值在 4~31 之间,默认为 10 。
3. 实践
只需要修改上文配置的 PasswordEncoder 这个 Bean 的实现即可
 @Bean
PasswordEncoder passwordEncoder() {
    return new BCryptPasswordEncoder(10);
}
参数 10 就是 strength ,即密钥的迭代次数(也可以不配置,默认为 10)。
使用以下方式获取加密后的密码。
public static void main(String[] args) {
    BCryptPasswordEncoder bCryptPasswordEncoder = new BCryptPasswordEncoder(10);
    String encode = bCryptPasswordEncoder.encode("123123");
    System.out.println(encode);
}
修改配置的内存用户的密码
auth.inMemoryAuthentication()
    .withUser("admin")
    .password("$2a$10$.hZESNfpLSDUnuqnbnVaF..Xb2KsAqwvzN7hN65Gd9K0VADuUbUzy")
    .roles("ADMIN", "USER")
    .and()
    .withUser("tangsan")
    .password("$2a$10$4LJ/xgqxSnBqyuRjoB8QJeqxmUeL2ynD7Q.r8uWtzOGs8oFMyLZn2")
    .roles("USER");
虽然 admin 和 tangsan 加密后的密码不一样,但是明文都是 123123 配置完成后,使用 admin/123123,或 tangsan/123123 就可以实现登录,一般情况下,用户信息是存储在数据库中的,因此需要用户注册时对密码进行加密处理
@Service
public class RegService {
    public int reg(String username, String password) {
        BCryptPasswordEncoder encoder = new BCryptPasswordEncoder(10);
        String encodePasswod = encoder.encode(password);
        return saveToDb(username, encodePasswod);
    }
    private int saveToDb(String username, String encodePasswod) {
        // 业务处理
        return 0;
    }
}
用户将密码从前端传来之后,通过 BCryptPasswordEncoder 实例中的 encode 方法对密码进行加密处理,加密完成后将密文存入数据库。
方法安全
上文介绍的认证和授权都是基于 URL 的,开发者也可通过注解来灵活配置方法安全,使用相关注解,首先要通过 @EnableGlobalMethodSecurity 注解开启基于注解的安全配置
@Configuration
@EnableGlobalMethodSecurity(prePostEnabled = true,securedEnabled = true)
public class MultiHttpSecurityConfig{
}
代码解释:
- prePostEnabled = true 会解锁 @PreAuthorize 和 @PostAuthorize 两个注解, @PreAuthorize 注解会在方法执行前进行验证,而 @PostAuthorize 注解在方法执行后进行验证
- securedEnabled = true 会解锁 @Secured 注解
开启注解安全后,创建一个 MethodService 进行测试
@Service
public class MethodService {
@Secured("ROLE_ADMIN")
public String admin() {
return "hello admin";
}
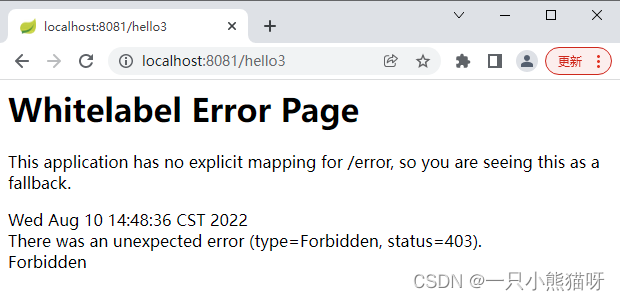
@PreAuthorize("hasRole('ADMIN') and hasRole('DBA')")
public String dba() {
return "hello dba";
}
@PreAuthorize("hasAnyRole('ADMIN','DBA','USER')")
public String user() {
return "user";
}
}
代码解释:
- @Secured(“ROLE_ADMIN”) 注解表示访问该方法需要 ADMIN 角色,注意这里需要在角色前加一个前缀 ROLE_
- @PreAuthorize(“hasRole(‘ADMIN’) and hasRole(‘DBA’)”) 注解表示访问该方法既需要 ADMIN 角色又需要 DBA 角色
- @PreAuthorize(“hasAnyRole(‘ADMIN’,‘DBA’,‘USER’)”) 表示访问该方法需要 ADMIN 、DBA 或 USER 角色中至少一个
- @PostAuthorize 和 @PreAuthorize 中都可以使用基于表达式的语法
最后在 Controller 中注入 Service 并调用 Service 中的方法进行测试
@RestController
public class HelloController {
    @Autowired
    MethodService methodService;
    @GetMapping("/hello")
    public String hello() {
        String user = methodService.user();
        return user;
    }
    @GetMapping("/hello2")
    public String hello2() {
        String admin = methodService.admin();
        return admin;
    }
    @GetMapping("/hello3")
    public String hello3() {
        String dba = methodService.dba();
        return dba;
    }
}
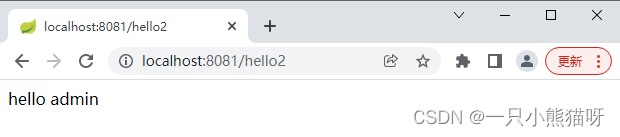
admin 访问 hello
admin 访问 hello2
admin 访问 hello3
到此这篇关于SpringBoot浅析安全管理之Spring Security配置的文章就介绍到这了,更多相关SpringBoot Spring Security内容请搜索猪先飞以前的文章或继续浏览下面的相关文章希望大家以后多多支持猪先飞!
原文出处:https://blog.csdn.net/GXL_1012/article/details/126267045
相关文章
IntelliJ IDEA2021.1 配置大全(超详细教程)
这篇文章主要介绍了IntelliJ IDEA2021.1 配置大全(超详细教程),需要的朋友可以参考下...2021-04-18- VPN可以虚拟出一个专用网络,让远处的计算机和你相当于处在同一个局域网中,而中间的数据也可以实现加密传输,用处很大,特别是在一些大公司,分公司处在不同的区域。...2016-01-27
- 这篇文章主要介绍了Tomcat配置及如何在Eclipse中启动,本文给大家介绍的非常详细,对大家的学习或工作具有一定的参考借鉴价值,需要的朋友可以参考下...2021-02-04
- 如果我们需要安培Laravel4的话最php最低要求要在php5.3.7版本并且我们需要把mcrypt与openss这两个扩展开启才可以,具体步骤我们参考下文。 前面我们介绍我了 com...2016-11-25
- 这篇文章主要介绍了Spring AOP 对象内部方法间的嵌套调用方式,具有很好的参考价值,希望对大家有所帮助。如有错误或未考虑完全的地方,望不吝赐教...2021-08-29
解决springboot使用logback日志出现LOG_PATH_IS_UNDEFINED文件夹的问题
这篇文章主要介绍了解决springboot使用logback日志出现LOG_PATH_IS_UNDEFINED文件夹的问题,文中通过示例代码介绍的非常详细,对大家的学习或者工作具有一定的参考学习价值,需要的朋友们下面随着小编来一起学习学习吧...2021-04-28Spring Cloud 中@FeignClient注解中的contextId属性详解
这篇文章主要介绍了Spring Cloud 中@FeignClient注解中的contextId属性详解,具有很好的参考价值,希望对大家有所帮助。如有错误或未考虑完全的地方,望不吝赐教...2021-09-25Springboot如何实现Web系统License授权认证
这篇文章主要介绍了Springboot如何实现Web系统License授权认证,文中通过示例代码介绍的非常详细,对大家的学习或者工作具有一定的参考学习价值,需要的朋友可以参考下...2020-05-28- 这篇文章主要为大家详细介绍了SpringBoot实现excel文件生成和下载,文中示例代码介绍的非常详细,具有一定的参考价值,感兴趣的小伙伴们可以参考一下...2021-02-09
详解Maven profile配置管理及激活profile的几种方式
这篇文章主要介绍了详解Maven profile配置管理及激活profile的几种方式,文中通过示例代码介绍的非常详细,对大家的学习或者工作具有一定的参考学习价值,需要的朋友们下面随着小编来一起学习学习吧...2021-01-26如何在Spring WebFlux的任何地方获取Request对象
这篇文章主要介绍了如何在Spring WebFlux的任何地方获取Request对象,帮助大家更好的理解和使用springboot框架,感兴趣的朋友可以了解下...2021-01-26- 这篇文章主要介绍了详解springBoot启动时找不到或无法加载主类解决办法,文中通过示例代码介绍的非常详细,对大家的学习或者工作具有一定的参考学习价值,需要的朋友们下面随着小编来一起学习学习吧...2020-09-16
- 这篇文章主要介绍了详解SpringCloudGateway内存泄漏问题,文中通过示例代码介绍的非常详细,对大家的学习或者工作具有一定的参考学习价值,需要的朋友们下面随着小编来一起学习学习吧...2020-07-16
- 这篇文章主要介绍了SpringBoot集成Redis实现消息队列的方法,文中通过示例代码介绍的非常详细,对大家的学习或者工作具有一定的参考学习价值,需要的朋友们下面随着小编来一起学习学习吧...2021-02-10
- 这篇文章主要介绍了IDEA如何添加配置文件到classpath中,文中通过示例代码介绍的非常详细,对大家的学习或者工作具有一定的参考学习价值,需要的朋友可以参考下...2020-09-19
- 通常php.ini的位置在:复制代码 代码如下:/etc目录下或/usr/local/lib目录下。如果你还是找不到php.ini或者找到了php.ini修改后不生效(其实是没找对),请使用如下办法:1.新建php文件,写入如下代码复制代码 代码如下:<?phpe...2014-05-31
- 以下就是部署PHP时的4个配置修改说明,大家一个一个进行学习研究。1、short_open_tag 是什么呢? 决定是否允许使用代码开始标志的缩写形式(<? ?> )。如果要和 XML 结合使用PHP,可以禁用此选项以便于嵌入使用<?x...2015-10-21
- 这篇文章主要介绍了解决Springboot get请求是参数过长的情况,具有很好的参考价值,希望对大家有所帮助。一起跟随小编过来看看吧...2020-09-17
Spring Boot项目@RestController使用重定向redirect方式
这篇文章主要介绍了Spring Boot项目@RestController使用重定向redirect方式,具有很好的参考价值,希望对大家有所帮助。如有错误或未考虑完全的地方,望不吝赐教...2021-09-02- 这篇文章主要介绍了Springboot+TCP监听服务器搭建过程,本文通过图文并茂的形式给大家介绍的非常详细,对大家的学习或工作具有一定的参考借鉴价值,需要的朋友可以参考下...2020-10-28