实现多文件上传php类
。
| 代码如下 | 复制代码 |
|
<?php class Upload{
function Upload($savePath, $fileFormat='',$maxSize = 0, $overwrite = 0) { // 上传 // 单个文件上传 if ($thumbWidth == 0) $thumbWidth = 1; // 文件格式检查,MIME检测 // 设置上传文件的最大字节限制 // 设置覆盖模式
// 设置缩略图 // 设置文件保存名 // 删除文件 // 返回上传文件的信息 // 得到错误信息 ?> <?php if($_FILES['uploadinput']['name'] <> ""){ ?> |
|
一,关闭notice错误提示
1、在php.ini文件中改动error_reporting
改为:
| 代码如下 | 复制代码 |
|
error_reporting=E_ALL & ~E_NOTICE |
|
2、如果你不能操作php.ini文件,你可以使用如下方法
在你想禁止notice错误提示的页面中加入如下代码:
| 代码如下 | 复制代码 |
|
error_reporting(E_ALL^E_NOTICE); |
|
这样出现错误就不会再有任何提示了
二、关闭全部错误提示
php.ini中
打开PHP安装目录下的php.ini文件
| 代码如下 | 复制代码 |
|
找到display_errors = On 修改为 display_errors = off |
|
注意:如果你已经把PHP.ini文件复制到windows目录下,那么必须同时把 c:windows/php.ini里的display_errors = On 修改为display_errors = off
php程序开启
| 代码如下 | 复制代码 |
|
<?php
|
|
在性能上关闭错误提示会给服务器性能负载加大不少哦
测试1:
在关闭错误显示的情况下,测试未初始化变量和已初始化变量在10000000次循环中的性能
变量已初始化的循环代码如下:
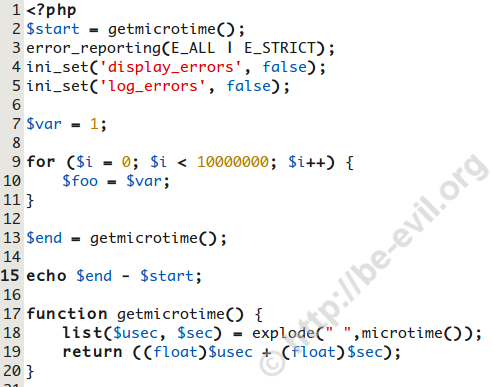
变量未初始化的循环代码如下:

测试成绩:
初始化:平均 5.28 秒
未初始化:平均 17.2 秒
性能差距:3.25倍
平均时间表:
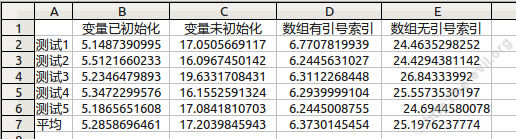
我们可以看到,关闭掉PHP错误输出并不会关闭php内核对错误的处理,代码中如果有大量的Notice级别的错误,还是会降低php程序的性能。
浏览器打开页面实现文件下载的程序代码(php/jsp/java) 有需要学习的同学可参考一下。tomcat中配置如下:
| 代码如下 | 复制代码 |
|
<mime-mapping> |
|
对于如上配置,当访问扩展名txt或jpg的资源时就出现下载提示框,如果只需要对某些提到的资源让其出现下载提示框,上述配置就不行了,解决的方法是在资源的response头中设置content-type即可,例如:
php 中
| 代码如下 | 复制代码 |
|
header("Content-type:application/octet-stream"); |
|
下载文件程序
| 代码如下 | 复制代码 |
| <? header("content-type:text/html; charset=utf-8"); $file_name=$_GET['name']; //服务器的真实文件名 $file_realName=urldecode($_GET['real']); //数据库的文件名urlencode编码过的 $file_dir="upload/"; $file = fopen($file_dir . $file_name,"r"); // 打开文件 // 输入文件标签 header( "Pragma: public" ); header( "Expires: 0" ); Header("Content-type: application/octet-stream"); Header("Accept-Ranges: bytes"); Header("Accept-Length: ".filesize($file_dir . $file_name)); Header("Content-Disposition: attachment; filename=" . iconv("UTF-8","GB2312//TRANSLIT",$file_realName)); // 输出文件内容 echo fread($file,filesize($file_dir . $file_name)); fclose($file); exit; ?> |
|
java 中
| 代码如下 | 复制代码 |
| response.setContentType("application/octet-stream"); resp.setHeader("Content-Disposition", "attachment;filename="downloaded.txt"); |
|
如果需要为下载设置一个保存的名字,可以用Content-Disposition属性来指定。
实例
| 代码如下 | 复制代码 |
|
<%@page language="java" contentType="application/x-msdownload" import="java.io.*,java.net.*" pageEncoding="gbk"%><% |
|
下面程序运行结果为()
| 代码如下 | 复制代码 |
|
?$numb=array( A.3 |
|
答案:B
count函数中如果mode被设置为 COUNT_RECURSIVE(或 1),则会递归底计算多维数组中的数组的元素个数(也就是你结果的12)。如果不设置mode默认为0 。不检测多维数组(数组中的数组)(结果3)。
首先遍历的是外面的数组array得出有两个元素(”color1″,”color2″,”color3″) 为3
再遍历(”color1″,”color2″,”color3″)数组得出的是9个元素 为9
结果就是3+9=12
参考
| 代码如下 | 复制代码 |
|
<?php echo(count($fruits[0])); |
|
你说的可能是用其他方式定义的数组,比如直接用:
| 代码如下 | 复制代码 |
|
<?php echo(count($fruits[0])); |
|
这样那就输出3,因为php中的数组不要求索引必须连续,参考手册上有如下一段:
数组
PHP 中的数组实际上是一个有序图。图是一种把 values 映射到 keys 的类型。此类型在很多方面做了优化,因此你可以把它当成真正的数组来使用,或列表(矢量),散列表(是图的一种实现),字典,集合,栈,队列以及更多可能性。因为可以用另一个 PHP 数组作为值,也可以很容易地模拟树。
实例
获得二维或多维数组的第一维的长度,这是个常用的程序判断,比如你读取的数组是一个二维数组:
| 代码如下 | 复制代码 |
| <?php $arr=array( 0=>array('title' => '新闻1', 'viewnum' => 123, 'content' => 'ZAQXSWedcrfv'), 1=>array('title' => '新闻2', 'viewnum' => 99, 'content' => 'QWERTYUIOPZXCVBNM') ); ?> |
|
如果你想统计数组$arr的长度,也就是说该二维数组只有两条新闻,你想要的数字也是2,但是如果使用count($arr)不同版本的php,统计的结果是不一样的;
后来在php手册中发现,count函数还有第二个参数,解释如下:
count函数有两个参数:
0(或COUNT_NORMAL)为默认,不检测多维数组(数组中的数组);
1(或COUNT_RECURSIVE)为检测多维数组,
所以如果要判断读取的数组$arr是不是有新闻信息,就要这样写了:
| 代码如下 | 复制代码 |
| <?php if(is_array($arr) && count($arr,COUNT_NORMAL)>0 ) { ..... } else { ..... } ?> |
|
你可以使用这样的代码来测试该函数:
| 代码如下 | 复制代码 |
| <?php $arr=array( 0=>array('title' => '新闻1', 'viewnum' => 123, 'content' => 'ZAQXSWedcrfv'), 1=>array('title' => '新闻2', 'viewnum' => 99, 'content' => 'QWERTYUIOPZXCVBNM') ); echo '不统计多维数组:'.count($arr,0);//count($arr,COUNT_NORMAL) echo "<br/>"; echo '统计多维数组:'.count($arr,1);//count($arr,COUNT_RECURSIVE) ?> |
|
好了,到此位置,已经解决php中获取二维或多维数组的第一维长度的问题
在php开发利用PHPMailer发送邮件是常用的做法了,这种比起php mail用好用多了,下面我们来看看PHPMailer如何发送带有附件的电子邮件吧。.首先到http://phpmailer.worxware.com/ 下载最新版本的程序包
2.下载完成后,找到class.phpmailer.php 、class.smtp.php两个类放到自己的目录下!
3.然后新建一个php文件这里命名为:phpmail_jiucool.php
4.phpmail_jiucool.php内容如下:
实例
| 代码如下 | 复制代码 |
|
function postmail_jiucool_com($to,$subject = "",$body = ""){ |
|
注意:
phpmailer如果添加附件的时候,在附件名称里一定要写明附件的后缀,如果不写明附件后缀,默认的附件后缀会是.txt。
比如
| 代码如下 | 复制代码 |
| $mail -> AddAttachment('include/id.csv','att');// | |
附件的路径和附件名称
如果向上面一样添加附件发送,则最终接到的附件可能是att.txt。
AddAttachment可以设置附件编码方式和附件类型,比如上面的附件添加也可以设置为
| 代码如下 | 复制代码 |
| $mail -> AddAttachment('include/id.csv','att.csv',"binary","text/comma-separated-values");// | |
附件的路径和附件名称、
附件的编码方式大概有这么几种:支持8bit, base64, binary, and quoted-printable 编码
而CSV可接受的MIME Type
· application/octet-stream
· text/comma-separated-values(推荐)
· text/csv
所以,csv格式文件的附件类型可以是上面三种中的任意一种
实例
| 代码如下 | 复制代码 |
|
require_once('include/PHPMailer/class.phpmailer.php'); //导入PHPMAILER类 |
|
只要加上这希就可以实例邮箱发送带附件了
$mail -> AddAttachment('include/id.csv','att.csv');//附件的路径和附件名称
相关文章
- 下面小编来给大家演示几个php操作zip文件的实例,我们可以读取zip包中指定文件与删除zip包中指定文件,下面来给大这介绍一下。 从zip压缩文件中提取文件 代...2016-11-25
Jupyter Notebook读取csv文件出现的问题及解决
这篇文章主要介绍了JupyterNotebook读取csv文件出现的问题及解决,具有很好的参考价值,希望对大家有所帮助。如有错误或未考虑完全的地方,望不吝赐教...2023-01-06- 有时我们接受或下载到的PSD文件打开是空白的,那么我们要如何来解决这个 问题了,下面一聚教程小伙伴就为各位介绍Photoshop打开PSD文件空白解决办法。 1、如我们打开...2016-09-14
- 这篇文章主要介绍了解决python 使用openpyxl读写大文件的坑,具有很好的参考价值,希望对大家有所帮助。一起跟随小编过来看看吧...2021-03-13
- 这篇文章主要介绍了C#实现HTTP下载文件的方法,包括了HTTP通信的创建、本地文件的写入等,非常具有实用价值,需要的朋友可以参考下...2020-06-25
- 这篇文章主要为大家详细介绍了SpringBoot实现excel文件生成和下载,文中示例代码介绍的非常详细,具有一定的参考价值,感兴趣的小伙伴们可以参考一下...2021-02-09
- C#使用System.IO中的文件操作方法在Windows系统中处理本地文件相当顺手,这里我们还总结了在Oracle中保存文件的方法,嗯,接下来就来看看整理的C#操作本地文件及保存文件到数据库的基本方法总结...2020-06-25
php无刷新利用iframe实现页面无刷新上传文件(1/2)
利用form表单的target属性和iframe 一、上传文件的一个php教程方法。 该方法接受一个$file参数,该参数为从客户端获取的$_files变量,返回重新命名后的文件名,如果上传失...2016-11-25- 本文章来人大家介绍一个php文件上传类的使用方法,期望此实例对各位php入门者会有不小帮助哦。 简介 Class.upload.php是用于管理上传文件的php文件上传类, 它可以帮...2016-11-25
- 要替换字符串中的内容我们只要利用php相关函数,如strstr,str_replace,正则表达式了,那么我们要替换目录所有文件的内容就需要先遍历目录再打开文件再利用上面讲的函数替...2016-11-25
- 又码了一个周末的代码,这次在做一些关于文件上传的东西。(PHP UPLOAD)小有收获项目是一个BT种子列表,用户有权限上传自己的种子,然后配合BT TRACK服务器把种子的信息写出来...2016-11-25
- 本文实例讲述了jQuery实现文件上传进度条效果的代码。分享给大家供大家参考。具体如下: 运行效果截图如下:具体代码如下:<!DOCTYPE html><html><head><meta charset="utf-8"><title>upload</title><link rel="stylesheet...2015-11-24
- 步骤:Window -> PHP -> Editor -> Templates,这里可以设置(增、删、改、导入等)管理你的模板。新建文件注释、函数注释、代码块等模板的实例新建模板,分别输入Name、Description、Patterna)文件注释Name: 3cfileDescriptio...2013-10-04
- 今天小编在这里就来给photoshop的这一款软件的使用者们来说下AI源文件转photoshop图像变模糊问题的解决教程,各位想知道具体解决方法的使用者们,那么下面就快来跟着小编...2016-09-14
- 这篇文章主要介绍了C++万能库头文件在vs中的安装步骤(图文),文中通过示例代码介绍的非常详细,对大家的学习或者工作具有一定的参考学习价值,需要的朋友们下面随着小编来一起学习学习吧...2021-02-23
- 本篇文章主要说明的是与php文件上传的相关配置的知识点。PHP文件上传功能配置主要涉及php.ini配置文件中的upload_tmp_dir、upload_max_filesize、post_max_size等选项,下面一一说明。打开php.ini配置文件找到File Upl...2015-10-21
ant design中upload组件上传大文件,显示进度条进度的实例
这篇文章主要介绍了ant design中upload组件上传大文件,显示进度条进度的实例,具有很好的参考价值,希望对大家有所帮助。一起跟随小编过来看看吧...2020-10-29- 这篇文章主要介绍了C#使用StreamWriter写入文件的方法,涉及C#中StreamWriter类操作文件的相关技巧,需要的朋友可以参考下...2020-06-25
- 举一个案例:复制代码 代码如下:<?phpclass Downfile { function downserver($file_name){$file_path = "./img/".$file_name;//转码,文件名转为gb2312解决中文乱码$file_name = iconv("utf-8","gb2312",$file_name...2014-06-07
- 这篇文章主要介绍了C#路径,文件,目录及IO常见操作,较为详细的分析并汇总了C#关于路径,文件,目录及IO常见操作,具有一定参考借鉴价值,需要的朋友可以参考下...2020-06-25