PHP一步步实现文件上传及上传文件类
一,比较简单的实现文件上传
文件上传原理
文件上传原理:将客户端的文件先上传到服务器端,然后再将服务器端的临时文件移动到指定的目录。
客户端配置
要上传文件,我们需要采用表单,并且表单发送的形式来POST请求,而且要求将enctype设置为multipart/form-data,总结上传的条件如下:
浏览器表单页面
表单发送方式为post
指定enctype=multipart/form-data
客户端的代码:
<form action="uploadFile.php" method="post" accept-charset="utf-8" enctype="multipart/form-data">
请选择要上传的文件:
<input type="file" name="myfile">
<input type="submit" value="上传文件">
</form>
$_FILES文件变量
下面是上传一个图片然后打印整理出来的数据:
// name => 'QC8054R7QPGQ_1000x500.jpg'
// type => 'image/jpeg'
// tmp_name => '/Applications/MAMP/tmp/php/php1X5KZU'
// error => 0
// size => 229936
$_FILES上传的参数含义说明:
name:上传的文件的名称
type: 上传的文件的MIME类型
tmp_name:文件上传到服务器的临时路径
site:上传的文件的大小
error:上传的文件的错误码,0表示上传成功UPLOAD_ERR_OK
移动文件
移动文件方式一
上传文件到服务器端是在一个临时路径下,我们需要将文件移动到指定的目录下,我们可以通过下面的函数来实现移动:
// 将指定的文件移到的目录路径下
// 要求待移动的文件是通过HTTP POST上传的
bool move_uploaded_file ( string $filename , string $destination )
我们需要判断一下是否是通过HTTP POST上传的,下面的方法可以判断:
// 判断文件是否是通过HTTP POST上传的,如果是返回TRUE,否则返回FALSE
bool is_uploaded_file ( string $filename )
移动文件方式二
我们还可以通过下面的函数来实现移动文件:
// 参数一:待移动的文件
// 参数二:移动到的目标路径
bool copy ( string $source , string $dest [, resource $context ] )
处理上传
<?php
define('UPLOAD_PATH', 'Uploads');
$name = $_FILES['myfile']['name'];
$type = $_FILES['myfile']['type'];
$tmp_name = $_FILES['myfile']['tmp_name'];
$error = $_FILES['myfile']['error'];
$size = $_FILES['myfile']['size'];
if ($error == UPLOAD_ERR_OK) {
if (is_uploaded_file($tmp_name)) {
move_uploaded_file($tmp_name, UPLOAD_PATH . '/' . $name);
} else {
if (is_file($tmp_name) && !copy($tmp_name, UPLOAD_PATH . '/' . $name)) {
var_dump('ok');
}
}
} else {
// 上传到服务器就已经出错了
var_dump($error);
}
php.ini上传配置
假设我们要支持上传20M的文件,那么我们可以设置以下选项:
// 一定要设置为On,才能上传文件,若设置为Off,则服务器是接收不到文件数据的
file_uploads = On
// 指定上传文件到服务器的临时目录,默认为不打开的,可以不写
upload_tmp_dir = "d:/uploads_tmp"
// 支持上传的文件的最大为20M
upload_max_filesize = 20M
// 设置POST请求允许一次请求的最大值为100M
post_max_size = 100M
// 上传操作允许的最长时间,超过600秒则会停止脚本运行,0表示无限制
max_execution_time = 600
// PHP脚本解析请求数据所用的最大时间,默认为60秒,0表示无限制
max_input_time = 600
// 单个PHP脚本所能申请的最大内存,-1表示无限制!
memory_limit = 128M
上传文件错误码
UPLOAD_ERR_OK:代表上传成功
UPLOAD_ERR_EXTENSION:上传的文件被PHP扩展程序中断
UPLOAD_ERR_PARTIAL:文件只有部分被上传
UPLOAD_ERR_CANT_WRITE:文件写入失败
UPLOAD_ERR_FORM_SIZE:表单文件超过了post_max_size
UPLOAD_ERR_INI_SIZE:文件大小超过了限制上传的大小
UPLOAD_ERR_NO_FILE:没有文件被上传
UPLOAD_ERR_NO_TMP_DIR:找不到临时目录
客户端限制上传
我们可以通过隐藏域来实现限制上传的文件大小,同时可以通过accept来限制上传的文件的类型,如下所示:
<form action="uploadFile.php" method="post" accept-charset="utf-8" enctype="multipart/form-data">
<input type="hidden" name="MAX_FILE_SIZE" value="1024">
请选择要上传的文件:
<input type="file" name="myfile" accept="image/png">
<input type="submit" value="上传文件">
</form>
服务端限制上传
我们可以通过在服务端来判断文件类型、文件大小,上传方式等来判断是否满足条件,然后才处理文件!
<?php
define('UPLOAD_PATH', 'Uploads');
define('MAX_FILE_SIZE', 2 * 1024 * 1024);
header('Content-type:text/html;Charset=utf-8');
$name = $_FILES['myfile']['name'];
$type = $_FILES['myfile']['type'];
$tmp_name = $_FILES['myfile']['tmp_name'];
$error = $_FILES['myfile']['error'];
$size = $_FILES['myfile']['size'];
$allowExt = array('png', 'jpg', 'jpeg');
if ($error == UPLOAD_ERR_OK) {
if ($size > MAX_FILE_SIZE) {
exit('上传的文件过大');
}
// 取上传的文件的扩展类型
$ext = pathinfo($name, PATHINFO_EXTENSION);
if (!in_array($ext, $allowExt)) {
exit('非法文件类型');
}
if (!is_uploaded_file($tmp_name)) {
exit('文件不是HTTP POST上传过来的');
}
if (move_uploaded_file($tmp_name, UPLOAD_PATH . '/' . $name)) {
echo '文件上传成功';
} else {
echo "文件上传失败";
}
} else {
// 上传到服务器就已经出错了
var_dump($error);
}
忽略文件重名之类的问题,那些需要额外添加一些小处理哦!
二,上传文件类
<?php
ini_set('display_errors', 'On');
error_reporting(E_ALL);
header('Content-type:text/html;Charset=utf-8');
/**
* Class for Uploading a single image
*/
class Upload {
protected $fileName; /* eg, $_FILES['file'], the name is file. */
protected $allowExt; /* Allow extension for uploading a file */
protected $allowMIMEType; /* Allow uploading file mine types */
protected $fileMaxSize; /* Limit a uploading file size */
protected $uploadPath; /* The destination path */
protected $isImageFlag; /* Note that file is an image or not. */
protected $errorMessage;
protected $fileExt;
protected $fileInfos;
protected $fileUniqueName;
protected $fileDestPath;
public function __construct($fileName = 'file', $uploadPath = './Uploads', $isImageFlag = true, $fileMaxSize = 1048576, $allowExt = array('png', 'jpg', 'jpeg', 'gif'), $allowMIMEType = array('image/png', 'image/jpeg', 'image/gif')) {
$this->fileName = $fileName;
$this->allowExt = $allowExt;
$this->allowMIMEType = $allowMIMEType;
$this->uploadPath = $uploadPath;
$this->isImageFlag = $isImageFlag;
$this->fileMaxSize = $fileMaxSize;
// print_r($_FILES);
$this->fileInfos = $_FILES[$fileName];
}
public function uploadFile() {
if ($this->isValidExt()
&& $this->isValidMIMEType()
&& $this->isValidFileSize()
&& $this->isRealImage()
&& $this->isHTTPPOST()
&& !$this->hasError()) {
$this->isUploadPathExist();
$this->fileUniqueName = $this->getUniqueName();
$this->fileDestPath = $this->uploadPath . '/' . $this->fileUniqueName . '.' . $this->fileExt;
// echo iconv('gb2312', 'UTF-8', $this->fileDestPath);
if (@move_uploaded_file($this->fileInfos['tmp_name'], $this->fileDestPath)) {
return $this->fileDestPath;
} else {
$this->errorMessage = '文件上传失败';
}
} else {
$this->errorMessage = '文件上传失败';
}
exit('<span style="color:red">'.$this->errorMessage.'</span>');
}
protected function hasError() {
$ret = true;
if (!is_null($this->fileInfos)) {
switch ($this->fileInfos['error']) {
case UPLOAD_ERR_INI_SIZE:
$this->errorMessage = '文件大小超过PHP.ini文件中upload_max_filesize';
break;
case UPLOAD_ERR_FORM_SIZE:
$this->errorMessage = '文件大小超过了表单中MAX_FILE_SIZE设置的值';
break;
case UPLOAD_ERR_NO_TMP_DIR:
$this->errorMessage = '找不到临时文件目录';
break;
case UPLOAD_ERR_NO_FILE:
$this->errorMessage = '没有选择任何文件上传';
break;
case UPLOAD_ERR_CANT_WRITE:
$this->errorMessage = '文件不可写';
break;
case UPLOAD_ERR_PARTIAL:
$this->errorMessage = '只有部分文件被上传';
break;
case UPLOAD_ERR_EXTENSION:
$this->errorMessage = '文件上传过程中被PHP扩展程序中断';
break;
default:
$this->errorMessage = '';
$ret = false;
}
} else {
$this->errorMessage = '文件上传出错';
}
return $ret;
}
protected function isValidFileSize() {
if ($this->fileInfos['size'] > $this->fileMaxSize) {
$this->errorMessage = '文件太大';
return false;
}
return true;
}
protected function isValidExt() {
$ext = pathinfo($this->fileInfos['name'], PATHINFO_EXTENSION);
if (!in_array($ext, $this->allowExt)) {
$this->errorMessage = '不支持的文件类型';
return false;
}
$this->fileExt = $ext;
return true;;
}
protected function isValidMIMEType() {
$type = $this->fileInfos['type'];
if (!in_array($type, $this->allowMIMEType)) {
$this->errorMessage = '不支持的文件MIME类型';
return false;
}
return true;
}
protected function isHTTPPOST() {
if (!is_uploaded_file($this->fileInfos['tmp_name'])) {
$this->errorMessage = '文件不是通过HTTP POST传上来的';
return false;
}
return true;
}
protected function isRealImage() {
if ($this->isImageFlag && !getimagesize($this->fileInfos['tmp_name'])) {
$this->errorMessage = '文件不是图片';
return false;
}
return true;
}
protected function isUploadPathExist() {
if (!file_exists($this->uploadPath)) {
mkdir($this->uploadPath, 0777, true);
}
}
protected function getUniqueName() {
return md5(microtime(true), true);
}
}
$upload = new Upload('myfile');
if ($upload->uploadFile()) {
echo "文件上传成功";
}
最近在看PHP内部实现的东西,想要了解PHP是如何从一个.php文件经过词法/语法/语义等分析生成OPCODE的。
鸟哥在博客里面安利了vld.so这个php opcode dump工具,网上没有在osx下mamp安装opcode的教程,自己鼓捣了一下,记录一下方便后人。
前提需要安装xcode command line tool这个网上教程比较多,自己去搜一下吧。
首先在/Applications/MAMP/bin/php中新建一个目录include。
下载一个对应版本的php源码解压到这个目录,并且
./configure
make && make install
之后导入shell环境变量到当前目录
echo "export PATH=/Applications/MAMP/bin/php/php{对应版本}/bin:$PATH" >> ~/.profile
运行
. ~/.profile
pear config-set php_ini /Applications/MAMP/bin/php/php{对应版本}/conf/php.ini
pecl config-set php_ini /Applications/MAMP/bin/php/php{对应版本}/conf/php.ini
更新pecl
pecl channel-update pecl.php.net
下载与安装VLD
wget http://pecl.php.net/get/vld-{对应版本}.tgz
tar zxvf vld-{对应版本}.tgz
cd ./vld-{对应版本}
/Applications/MAMP/bin/php/php{对应版本}/bin/phpize
./configure --with-php-config=/Applications/MAMP/bin/php/php{对应版本}/bin --enable-vld
make && make install
然后在
/Applications/MAMP/bin/php/php{对应版本}/conf/php.ini中添加
[vld]
extension=vld.so
并且在mamp的选项edit template里修改php.ini
然后source ~/.profile
之后php运行
php -dvld.active=1 /path/to/your/code.php
就可以看到opcode的输出了
冒泡排序我们排序算法中的许多中的其中一样了,这里我们一起来了解一下php实现冒泡排序实现方法与原理,具体如下。
一个程序应包括:
对数据的描述:在程序中要指定数据的类型和数据的组织形式,即数据结构(data structure)。
对操作的描述:即操作步骤,也就是算法(algorithm)。
Nikiklaus Wirth提出的公式:程序=数据结构+算法
作为一个?潘砍绦蛟北匦氲枚?闼惴ò?就从最简单的开始吧=> 冒泡排序
维基百科的说法
冒泡排序(英语:Bubble Sort,台湾另外一种译名为:泡沫排序)是一种简单的排序算法。它重复地走访过要排序的数列,一次比较两个元素,如果他们的顺序错误就把他们交换过来。走访数列的工作是重复地进行直到没有再需要交换,也就是说该数列已经排序完成。这个算法的名字由来是因为越小的元素会经由交换慢慢“浮”到数列的顶端。
我理解冒泡排序就是小学生排队,你比我个子矮(数字小),你就站我前面(浮上去),直到找到比我个子高那个,我站在他的前面,他继续往后面比个子!
直接上PHP代码
<?php
$arr = array(1, 43, 54, 72, 21, 66, 32,55,11, 78, 36, 76, 39,88);
function getpao($arr)
{
$len = count($arr);
//设置一个空数组 用来接收冒出来的泡
//该层循环控制 需要冒泡的轮数
for ($i = 1; $i < $len; $i++) { //该层循环用来控制每轮 冒出一个数 需要比较的次数
for ($k = 0; $k < $len - $i; $k++) {
if ($arr[$k] > $arr[$k + 1]) {
$tmp = $arr[$k + 1];
$arr[$k + 1] = $arr[$k];
$arr[$k] = $tmp;
}
}
}
return $arr;
}
var_dump(getpao($arr));
运行结果
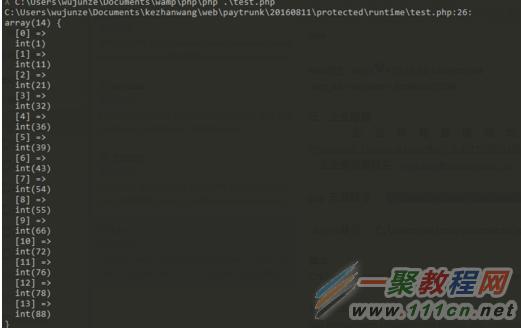
验证码制作
一、实验简介
本次实验将会带领大家使用面向对象的思想封装一个验证码类。并在注册和登陆界面展示使用。通过本次实验的学习,你将会领悟到 PHP 的 OOP 思想,以及 GD 库的使用,验证码生成。
1.1 涉及到的知识点
PHP
GD库
OOP编程
1.2 开发工具
sublime,一个方便快速的文本编辑器。点击桌面左下角: 应用程序菜单/开发/sublime
1.3 效果图
二、封装验证码类
2.1 建立目录以及准备字体
在 web 目录下建立一个 admin 目录作为我们的后台目录,存放后台代码文件。在 admin 下建立一个 fonts 目录,用于存放制作验证码所需字体。
在 admin 下新建一个 Captcha.php 文件,这就是我们需要编辑的验证码类文件。
当前目录层次结构:
编辑 Captcha.php 文件:
<?php
/**
* Captcha class
*/
class Captcha
{
function __construct()
{
# code...
}
}
添加该类的私有属性和构造方法:
<?php
/**
* Captcha class
*/
class Captcha
{
private $codeNum; //验证码位数
private $width; //验证码图片宽度
private $height; //验证码图片高度
private $img; //图像资源句柄
private $lineFlag; //是否生成干扰线条
private $piexFlag; //是否生成干扰点
private $fontSize; //字体大小
private $code; //验证码字符
private $string; //生成验证码的字符集
private $font; //字体
function __construct($codeNum = 4,$height = 50,$width = 150,$fontSize = 20,$lineFlag = true,$piexFlag = true)
{
$this->string = 'qwertyupmkjnhbgvfcdsxa123456789'; //去除一些相近的字符
$this->codeNum = $codeNum;
$this->height = $height;
$this->width = $width;
$this->lineFlag = $lineFlag;
$this->piexFlag = $piexFlag;
$this->font = dirname(__FILE__).'/fonts/consola.ttf';
$this->fontSize = $fontSize;
}
}
字体文件可通过以下命令下载到 fonts 目录:
$ wget http://labfile.oss.aliyuncs.com/courses/587/consola.ttf
接下来开始编写具体的方法:
创建图像资源句柄
//创建图像资源
public function createImage(){
$this->img = imagecreate($this->width, $this->height); //创建图像资源
imagecolorallocate($this->img,mt_rand(0,100),mt_rand(0,100),mt_rand(0,100)); //填充图像背景(使用浅色)
}
用到的相关函数
imagecreate:新建一个基于调色板的图像
imagecolorallocate:为一幅图像分配颜色
mt_rand:生成更好的随机数
创建验证码字符串并输出到图像
//创建验证码
public function createCode(){
$strlen = strlen($this->string)-1;
for ($i=0; $i < $this->codeNum; $i++) {
$this->code .= $this->string[mt_rand(0,$strlen)]; //从字符集中随机取出四个字符拼接
}
$_SESSION['code'] = $this->code; //加入 session 中
//计算每个字符间距
$diff = $this->width/$this->codeNum;
for ($i=0; $i < $this->codeNum; $i++) {
//为每个字符生成颜色(使用深色)
$txtColor = imagecolorallocate($this->img,mt_rand(100,255),mt_rand(100,255),mt_rand(100,255));
//写入图像
imagettftext($this->img, $this->fontSize, mt_rand(-30,30), $diff*$i+mt_rand(3,8), mt_rand(20,$this->height-10), $txtColor, $this->font, $this->code[$i]);
}
}
用到的相关函数:
imagettftext:用 TrueType 字体向图像写入文本
创建干扰线条
//创建干扰线条(默认四条)
public function createLines(){
for ($i=0; $i < 4; $i++) {
$color = imagecolorallocate($this->img,mt_rand(0,155),mt_rand(0,155),mt_rand(0,155)); //使用浅色
imageline($this->img,mt_rand(0,$this->width),mt_rand(0,$this->height),mt_rand(0,$this->width),mt_rand(0,$this->height),$color);
}
}
用到的相关函数:
imageline:画一条线段
创建干扰点
//创建干扰点 (默认一百个点)
public function createPiex(){
for ($i=0; $i < 100; $i++) {
$color = imagecolorallocate($this->img,mt_rand(0,255),mt_rand(0,255),mt_rand(0,255));
imagesetpixel($this->img,mt_rand(0,$this->width),mt_rand(0,$this->height),$color);
}
}
使用的相关函数:
imagesetpixel:画一个单一像素
对外输出图像:
public function show()
{
$this->createImage();
$this->createCode();
if ($this->lineFlag) { //是否创建干扰线条
$this->createLines();
}
if ($this->piexFlag) { //是否创建干扰点
$this->createPiex();
}
header('Content-type:image/png'); //请求页面的内容是png格式的图像
imagepng($this->img); //以png格式输出图像
imagedestroy($this->img); //清除图像资源,释放内存
}
用到的相关函数:
imagepng:以 PNG 格式将图像输出到浏览器或文件
imagedestroy:销毁一图像
对外提供验证码:
public function getCode(){
return $this->code;
}
完整代码如下:
<?php
/**
* Captcha class
*/
class Captcha
{
private $codeNum;
private $width;
private $height;
private $img;
private $lineFlag;
private $piexFlag;
private $fontSize;
private $code;
private $string;
private $font;
function __construct($codeNum = 4,$height = 50,$width = 150,$fontSize = 20,$lineFlag = true,$piexFlag = true)
{
$this->string = 'qwertyupmkjnhbgvfcdsxa123456789';
$this->codeNum = $codeNum;
$this->height = $height;
$this->width = $width;
$this->lineFlag = $lineFlag;
$this->piexFlag = $piexFlag;
$this->font = dirname(__FILE__).'/fonts/consola.ttf';
$this->fontSize = $fontSize;
}
public function createImage(){
$this->img = imagecreate($this->width, $this->height);
imagecolorallocate($this->img,mt_rand(0,100),mt_rand(0,100),mt_rand(0,100));
}
public function createCode(){
$strlen = strlen($this->string)-1;
for ($i=0; $i < $this->codeNum; $i++) {
$this->code .= $this->string[mt_rand(0,$strlen)];
}
$_SESSION['code'] = $this->code;
$diff = $this->width/$this->codeNum;
for ($i=0; $i < $this->codeNum; $i++) {
$txtColor = imagecolorallocate($this->img,mt_rand(100,255),mt_rand(100,255),mt_rand(100,255));
imagettftext($this->img, $this->fontSize, mt_rand(-30,30), $diff*$i+mt_rand(3,8), mt_rand(20,$this->height-10), $txtColor, $this->font, $this->code[$i]);
}
}
public function createLines(){
for ($i=0; $i < 4; $i++) {
$color = imagecolorallocate($this->img,mt_rand(0,155),mt_rand(0,155),mt_rand(0,155));
imageline($this->img,mt_rand(0,$this->width),mt_rand(0,$this->height),mt_rand(0,$this->width),mt_rand(0,$this->height),$color);
}
}
public function createPiexs(){
for ($i=0; $i < 100; $i++) {
$color = imagecolorallocate($this->img,mt_rand(0,255),mt_rand(0,255),mt_rand(0,255));
imagesetpixel($this->img,mt_rand(0,$this->width),mt_rand(0,$this->height),$color);
}
}
public function show()
{
$this->createImage();
$this->createCode();
if ($this->lineFlag) {
$this->createLines();
}
if ($this->piexFlag) {
$this->createPiexs();
}
header('Content-type:image/png');
imagepng($this->img);
imagedestroy($this->img);
}
public function getCode(){
return $this->code;
}
}
以上就是验证码类的全部代码。看起来确实挺简单的,不过用的图像处理函数比较多,上面相关的函数我也做了必要的链接和用途说明。这些函数也不用死记硬背,遇到不清楚的,随时查阅 PHP 官方文档,最重要的是还有中文文档。
2.2 使用验证码
既然已经封装完毕,那就可以开始使用了。这里为了方便,直接在 Captcha 类的下方调用该类:
session_start(); //开启session
$captcha = new Captcha(); //实例化验证码类(可自定义参数)
$captcha->show(); //调用输出
三、前端展示
后端已经准备好了验证码,前端界面就可以展示了,修改 index.php 中的注册与登陆表单的验证码部分:
<div class="form-group">
<div class="col-sm-12">
<img src="admin/Captcha.php" alt="" id="codeimg" onclick="javascript:this.src = 'admin/Captcha.php?'+Math.random();">
<span>Click to Switch</span>
</div>
</div>
img 标签添加了点击事件的 js 代码,这样就可以实现点击更换验证码的功能!
效果图:

四、完善
相关文章
- 下面小编来给大家演示几个php操作zip文件的实例,我们可以读取zip包中指定文件与删除zip包中指定文件,下面来给大这介绍一下。 从zip压缩文件中提取文件 代...2016-11-25
Jupyter Notebook读取csv文件出现的问题及解决
这篇文章主要介绍了JupyterNotebook读取csv文件出现的问题及解决,具有很好的参考价值,希望对大家有所帮助。如有错误或未考虑完全的地方,望不吝赐教...2023-01-06- 有时我们接受或下载到的PSD文件打开是空白的,那么我们要如何来解决这个 问题了,下面一聚教程小伙伴就为各位介绍Photoshop打开PSD文件空白解决办法。 1、如我们打开...2016-09-14
- C#使用System.IO中的文件操作方法在Windows系统中处理本地文件相当顺手,这里我们还总结了在Oracle中保存文件的方法,嗯,接下来就来看看整理的C#操作本地文件及保存文件到数据库的基本方法总结...2020-06-25
- 这篇文章主要介绍了解决python 使用openpyxl读写大文件的坑,具有很好的参考价值,希望对大家有所帮助。一起跟随小编过来看看吧...2021-03-13
- 这篇文章主要介绍了C#实现HTTP下载文件的方法,包括了HTTP通信的创建、本地文件的写入等,非常具有实用价值,需要的朋友可以参考下...2020-06-25
- 这篇文章主要为大家详细介绍了SpringBoot实现excel文件生成和下载,文中示例代码介绍的非常详细,具有一定的参考价值,感兴趣的小伙伴们可以参考一下...2021-02-09
php无刷新利用iframe实现页面无刷新上传文件(1/2)
利用form表单的target属性和iframe 一、上传文件的一个php教程方法。 该方法接受一个$file参数,该参数为从客户端获取的$_files变量,返回重新命名后的文件名,如果上传失...2016-11-25- 本文章来人大家介绍一个php文件上传类的使用方法,期望此实例对各位php入门者会有不小帮助哦。 简介 Class.upload.php是用于管理上传文件的php文件上传类, 它可以帮...2016-11-25
- 要替换字符串中的内容我们只要利用php相关函数,如strstr,str_replace,正则表达式了,那么我们要替换目录所有文件的内容就需要先遍历目录再打开文件再利用上面讲的函数替...2016-11-25
- 又码了一个周末的代码,这次在做一些关于文件上传的东西。(PHP UPLOAD)小有收获项目是一个BT种子列表,用户有权限上传自己的种子,然后配合BT TRACK服务器把种子的信息写出来...2016-11-25
- 本文实例讲述了jQuery实现文件上传进度条效果的代码。分享给大家供大家参考。具体如下: 运行效果截图如下:具体代码如下:<!DOCTYPE html><html><head><meta charset="utf-8"><title>upload</title><link rel="stylesheet...2015-11-24
- 今天小编在这里就来给photoshop的这一款软件的使用者们来说下AI源文件转photoshop图像变模糊问题的解决教程,各位想知道具体解决方法的使用者们,那么下面就快来跟着小编...2016-09-14
- 这篇文章主要介绍了C++万能库头文件在vs中的安装步骤(图文),文中通过示例代码介绍的非常详细,对大家的学习或者工作具有一定的参考学习价值,需要的朋友们下面随着小编来一起学习学习吧...2021-02-23
- 步骤:Window -> PHP -> Editor -> Templates,这里可以设置(增、删、改、导入等)管理你的模板。新建文件注释、函数注释、代码块等模板的实例新建模板,分别输入Name、Description、Patterna)文件注释Name: 3cfileDescriptio...2013-10-04
- 本篇文章主要说明的是与php文件上传的相关配置的知识点。PHP文件上传功能配置主要涉及php.ini配置文件中的upload_tmp_dir、upload_max_filesize、post_max_size等选项,下面一一说明。打开php.ini配置文件找到File Upl...2015-10-21
ant design中upload组件上传大文件,显示进度条进度的实例
这篇文章主要介绍了ant design中upload组件上传大文件,显示进度条进度的实例,具有很好的参考价值,希望对大家有所帮助。一起跟随小编过来看看吧...2020-10-29- 这篇文章主要介绍了C#使用StreamWriter写入文件的方法,涉及C#中StreamWriter类操作文件的相关技巧,需要的朋友可以参考下...2020-06-25
- 举一个案例:复制代码 代码如下:<?phpclass Downfile { function downserver($file_name){$file_path = "./img/".$file_name;//转码,文件名转为gb2312解决中文乱码$file_name = iconv("utf-8","gb2312",$file_name...2014-06-07
- 这篇文章主要介绍了C#路径,文件,目录及IO常见操作,较为详细的分析并汇总了C#关于路径,文件,目录及IO常见操作,具有一定参考借鉴价值,需要的朋友可以参考下...2020-06-25