SAE域名绑定设置服务器宕机时自动修改A记录并飞信通知

 更新时间:2016年11月25日 16:19  点击:1864
SAE域名绑定之后,一般是用CNAME方式将域名绑定到应用中。但是有时候我们需要用到A记录(比如说根域名,虽然在DNSPOD上可以设置CNAME记录,但很可能会影响到MX记录),而SAE的IP地址经常改变,ping应用二级域名得到的IP没多久就失效了(前些天网站因此几天打不开都没发现,我用的是教育网,自己能打开,但是电信线路变了)。还好DNSPOD有个功能叫D监控,可以帮你监控网站能否正常打开。如果发现宕机,DNSPOD会用邮件、短信、微信等方式提醒你。这里用到的是它的另一个通知方式,那就是URL回调

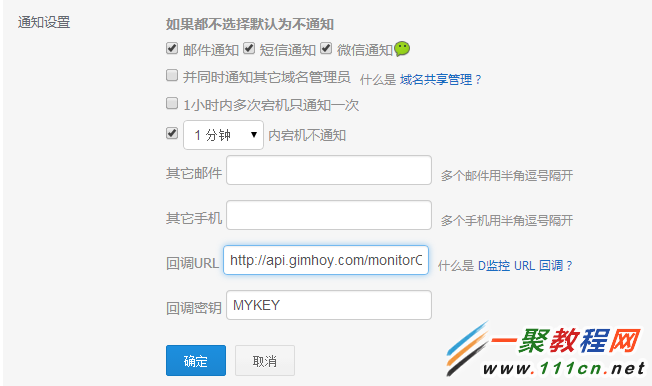
 “通过DNSPod 提供的D监控 URL 回调功能,您可以让宕机或恢复信息提交到您指定的 URL 上,从而更加灵活地处理各种通知信息。”

我们可以通过宕机之后的URL回调取得相关参数,并通过DNSPOD API实现自动修改记录的功能,再通过飞信发送宕机通知。

代码在后面,先说设置方法:

dnspod-monitor-callback

设置方法

1.点此下载代码,修改其中的参数为你自己的。

2.将代码上传到网站。

3.在DNSPOD开启D监控,在通知设置中回调URL一栏填入monitorCallback.php的地址,如http://blog.gimhoy.com/monitorCallback.php?rHost=hipic.sinaapp.com.其中rHost是SAE的二级域名。并设置回调密钥。

4.Enjoy~

dnspod-monitor-callback


代码
monitorCallback.php

 代码如下 复制代码

/*
* Copyright 2007-2014 Gimhoy Studio.
*
* @author Gimhoy
* @email contact@gimhoy.com
* @version 1.0.0
*/
$rHost = $_GET['rHost']; // SAE二级域名
if(empty($rHost)) $rHost = 'sinaapp.com';
$logName = 'monitorLog.txt'; //log 文件名
$logStorDomain = 'log'; // Storage Domain
$FetionNum = ''; //飞信登陆号码
$FetionPwd = ''; //飞信登陆密码
$MobileNum = ''; //接收通知短信的号码
$callback_key = 'MYKEY'; // 添加监控时设置的密钥

$monitor_id = $_POST['monitor_id']; // 监控编号
$domain_id = $_POST['domain_id']; // 域名编号
$domain = $_POST['domain']; // 域名名称
$record_id = $_POST['record_id']; // 记录编号
$sub_domain = $_POST['sub_domain']; // 主机名称
$record_line = $_POST['record_line']; // 记录线路
$ip = $_POST['ip']; // 记录IP
$status = $_POST['status']; // 当前状态
$status_code = $_POST['status_code']; // 状态代码
$reason = $_POST['reason']; // 宕机原因
$created_at = $_POST['created_at']; // 发生时间
$checksum = $_POST['checksum']; // 校检代码

if (md5($monitor_id. $domain_id. $record_id. $callback_key. $created_at) != $checksum) {
// 非法请求
echo 'BAD REQUEST';
} else {
// 开始处理
if ($status == 'Warn' || $status == 'Ok') {
// 宕机恢复
$msg = date("Y-m-d H:i:s").' '.$sub_domain.'.'.$domain."(".$record_line." ".$ip.")宕机恢复";
} elseif ($status == 'Down') {
// 宕机
$msg = date("Y-m-d H:i:s").' '.$sub_domain.'.'.$domain."(".$record_line." ".$ip.")在".$created_at."宕机。宕机原因:".$reason."可用IP:";
$ips = @gethostbyname($rHost);
include_once 'dnspod.class.php';
$newIP = $ips;
$data = array(
'domain_id' => $domain_id,
'record_id' => $record_id,
'sub_domain' => $sub_domain,
'record_type' => 'A',
'record_line' => $record_line,
'ttl' => '600',
'value' => $newIP
);
$dnspod = new dnspod();
$response = $dnspod->api_call('Record.Modify', $data);
if(isset($response['status']['code']) && $response['status']['code'] == 1) {
$msg = $msg.$newIP.'(已切换)';
}
else {
$msg = $msg.$newIP.'(切换失败,错误代码'.$response['status']['code'].')';
}
}
//飞信通知
require_once 'Fetion.class.php';
$fetion = new PHPFetion($FetionNum, $FetionPwd);
$result = $fetion->send($MobileNum, $msg);
if(strpos($result, '短信发送成功!') || strpos($result, '发送消息成功!')) { $r = "成功。";}else{$r = "失败。";}
$s = new SaeStorage();
$content = $s -> read($logStorDomain, $logName);
$content = $content.$msg.'。飞信通知'.$r.'
';
$s -> write($logStorDomain, $logName, $content);

// 处理完成
echo 'DONE';
}

dnspod.class.php

/*
* DNSPod API PHP Web 示例
* http://www.111cn.net/
*
* Copyright 2011, Kexian Li
* Released under the MIT, BSD, and GPL Licenses.
*
*/

class dnspod {
public function api_call($api, $data) {
if ($api == '' || !is_array($data)) {
exit('内部错误:参数错误');
}
$api = 'https://dnsapi.cn/' . $api;
$data = array_merge($data, array('login_email' => 'DNSPOD登陆账号', 'login_password' => 'DNSPOD登陆密码', 'format' => 'json', 'lang' => 'cn', 'error_on_empty' => 'yes'));

$result = $this->post_data($api, $data);

if (!$result) {
exit('内部错误:调用失败');
}
$results = @json_decode($result, 1);
if (!is_array($results)) {
exit('内部错误:返回错误');
}
if ($results['status']['code'] != 1) {
exit($results['status']['message']);
}
return $results;
}
private function post_data($url, $data) {
if ($url == '' || !is_array($data)) {
return false;
}
$ch = @curl_init();
if (!$ch) {
exit('内部错误:服务器不支持CURL');
}
curl_setopt($ch, CURLOPT_URL, $url);
curl_setopt($ch, CURLOPT_POST, 1);
curl_setopt($ch, CURLOPT_HEADER, 0);
curl_setopt($ch, CURLOPT_RETURNTRANSFER, 1);
curl_setopt($ch, CURLOPT_SSL_VERIFYPEER, 0);
curl_setopt($ch, CURLOPT_SSL_VERIFYHOST, 0);
curl_setopt($ch, CURLOPT_POSTFIELDS, http_build_query($data));
curl_setopt($ch, CURLOPT_USERAGENT, 'Gimhoy Monitor/1.0 (contact@gimhoy.com)');
$result = curl_exec($ch);
curl_close($ch);
return $result;
}
}


Fetion.class.php

 代码如下 复制代码

header('Content-Type: text/html; charset=utf-8');
/**
* PHP飞信发送类
* @author quanhengzhuang
* @version 1.5.0
*/
class PHPFetion {
/**
* 发送者手机号
* @var string
*/
protected $_mobile;
/**
* 飞信密码
* @param string
*/
protected $_password;
/**
* Cookie字符串
* @param string
*/
protected $_cookie = '';
/**
* Uid缓存
* @var array
*/
protected $_uids = array();
/**
* csrfToken
* @param string
*/
protected $_csrfToten = null;
/**
* 构造函数
* @param string $mobile 手机号(登录者)
* @param string $password 飞信密码
*/
public function __construct($mobile, $password)
{
if ($mobile === '' || $password === '')
{
return;
}
$this->_mobile = $mobile;
$this->_password = $password;
$this->_login();
}
/**
* 析构函数
*/
public function __destruct() {
$this->_logout();
}
/**
* 登录
* @return string
*/
protected function _login()
{
$uri = '/huc/user/space/login.do?m=submit&fr=space';
$data = 'mobilenum='.$this->_mobile.'&password='.urlencode($this->_password);
$result = $this->_postWithCookie($uri, $data);

//解析Cookie
preg_match_all('/.*?rnSet-Cookie: (.*?);.*?/si', $result, $matches);
if (isset($matches[1]))
{
$this->_cookie = implode('; ', $matches[1]);
}
$result = $this->_postWithCookie('/im/login/cklogin.action', '');

return $result;
}
/**
* 获取csrfToken,给好友发飞信时需要这个字段
* @param string $uid 飞信ID
* @return string
*/
protected function _getCsrfToken($uid)
{
if ($this->_csrfToten === null)
{
$uri = '/im/chat/toinputMsg.action?touserid='.$uid;
$result = $this->_postWithCookie($uri, '');
preg_match('/name="csrfToken".*?value="(.*?)"/', $result, $matches);

$this->_csrfToten = isset($matches[1]) ? $matches[1] : '';
}

return $this->_csrfToten;
}

/**
* 向指定的手机号发送飞信
* @param string $mobile 手机号(接收者)
* @param string $message 短信内容
* @return string
*/
public function send($mobile, $message) {
if($message === '') {
return '';
}
// 判断是给自己发还是给好友发
if($mobile === $this->_mobile) {
return $this->_toMyself($message);
}
else if(strlen($mobile)===11){
$uid = $this->_getUid($mobile);
}
else {
$uid=$mobile;
}
return $uid === '' ? $this->_addFriend($mobile) : $this->_toUid($uid, $message);
}
protected function _getname() {
$uri = '/im/index/index.action';
$result = $this->_postWithCookie($uri, '#');
// 匹配
preg_match('/(.*?)</a>/si', $result, $matches);
return $matches[2];
}
/*
* 通过手机号增加好友
* @param string $number 手机号(要加的好友手机)
* @param string $nickname 你的名字,出现在对方的验证短信里
* @param string $buddylist 分组,默认为空
* @param string $localName 好友屏显名
* @return string
*/
protected function _addFriend($number) {
$uri = '/im/user/insertfriendsubmit.action';
$data = 'nickname='. urlencode($this->_getname()).'&buddylist=1&localName=&number='. $number .'&type=0';
$result = $this->_postWithCookie($uri, $data);
return $result;
}
/**
* 获取飞信ID
* @param string $mobile 手机号
* @return string
*/
protected function _getUid($mobile)
{
if (empty($this->_uids[$mobile]))
{
$uri = '/im/index/searchOtherInfoList.action';
$data = 'searchText='.$mobile;
$result = $this->_postWithCookie($uri, $data);
//匹配
preg_match('/toinputMsg.action?touserid=(d+)/si', $result, $matches);

$this->_uids[$mobile] = isset($matches[1]) ? $matches[1] : '';
}
return $this->_uids[$mobile];
}
/**
* 向好友发送飞信
* @param string $uid 飞信ID
* @param string $message 短信内容
* @return string
*/
protected function _toUid($uid, $message) {
$uri = '/im/chat/sendMsg.action?touserid='.$uid;
$csrfToken = $this->_getCsrfToken($uid);
$data = 'msg='.urlencode($message).'&csrfToken='.$csrfToken;
$result = $this->_postWithCookie($uri, $data);
return $result;
}
/**
* 给自己发飞信
* @param string $message
* @return string
*/
protected function _toMyself($message) {
$uri = '/im/user/sendMsgToMyselfs.action';
$result = $this->_postWithCookie($uri, 'msg='.urlencode($message));
return $result;
}
/**
* 退出飞信
* @return string
*/
protected function _logout() {
$uri = '/im/index/logoutsubmit.action';
$result = $this->_postWithCookie($uri, '');
return $result;
}
protected function getgroup() {
$uri = '/im/index/index.action';
$data = 'type=group';
$result = $this->_postWithCookie($uri, $data);
// 匹配
preg_match_all('/contactlistView.action?idContactList=(d+)/si', $result, $matches);
foreach($matches[1] as $k=>$v){
if( $k== 0 ){
$min = $v;
$max = $v;
}else if($v!=9998&&$v!=9999){
$min = min($min,$v);
$max = max($max,$v);
}
}
return $max;
}
public function getyou1() {
$list=$this->getgroup();
for($i=0;$i<=$list;$i++){
$uri = '/im/index/contactlistView.action';
$data = 'idContactList='.$i.'&type=group';
$result = $this->_postWithCookie($uri, $data);
preg_match('/(.*?)|(.*?)((.*?)/(.*?))/si', $result, $listn);
if(!$listn[2]){continue;}
$shuchu.=str_replace(" ","",$listn[2])."(".$listn[4].")n";
preg_match('/共(d+)页/si', $result, $zpage);
preg_match('/共(d+)</a>页/si', $result, $dpage);
isset($zpage[1]) ? $page=$zpage[1] : $page=$dpage[4];
for($j=1;$j<=$page;$j++){
$uri = '/im/index/contactlistView.action';
$data = 'idContactList='.$i.'&page='.$j;
$result = $this->_postWithCookie($uri, $data);
preg_match_all('/(.*?)</a>/si', $result, $matches);
if(!$matches[1][0]){break;}
for($x=0;$x<=9;$x++){
if(!$matches[1][$x]){continue;}
$shuchu.=$matches[1][$x]." ".str_replace(" ","",$matches[3][$x])."n";
}
}
}
return $shuchu;
}
public function getyou() {
$list=$this->getgroup();
for($i=0;$i<=$list;$i++){
$uri = '/im/index/contactlistView.action';
$data = 'idContactList='.$i.'&type=group';
$result = $this->_postWithCookie($uri, $data);
preg_match('/(.*?)|(.*?)((.*?)/(.*?))/si', $result, $listn);
if(!$listn[2]){continue;}
$shuchu.=str_replace(" ","",$listn[2])."(".$listn[4].")n";
preg_match('/共(d+)页/si', $result, $zpage);
preg_match('/共(d+)</a>页/si', $result, $dpage);
isset($zpage[1]) ? $page=$zpage[1] : $page=$dpage[4];
for($j=1;$j<=$page;$j++){
$uri = '/im/index/contactlistView.action';
$data = 'idContactList='.$i.'&page='.$j;
$result = $this->_postWithCookie($uri, $data);
preg_match_all('/(.*?)</a>/si', $result, $matches);
if(!$matches[1][0]){break;}
for($x=0;$x<=9;$x++){
if(!$matches[1][$x]){continue;}
$shuchu.=$matches[1][$x]." ".str_replace(" ","",$matches[3][$x])."n";
}
}
}
return $shuchu;
}
/**
* 携带Cookie向f.10086.cn发送POST请求
* @param string $uri
* @param string $data
*/
protected function _postWithCookie($uri, $data)
{
$fp = fsockopen('f.10086.cn', 80);
fputs($fp, "POST $uri HTTP/1.1rn");
fputs($fp, "Host: f.10086.cnrn");
fputs($fp, "Cookie: {$this->_cookie}rn");
fputs($fp, "Content-Type: application/x-www-form-urlencodedrn");
fputs($fp, "User-Agent: Mozilla/5.0 (Windows NT 5.1; rv:14.0) Gecko/20100101 Firefox/14.0.1rn");
fputs($fp, "Content-Length: ".strlen($data)."rn");
fputs($fp, "Connection: closernrn");
fputs($fp, $data);

$result = '';
while (!feof($fp))
{
$result .= fgets($fp);
}

fclose($fp);

return $result;
}
}


今天在利用curl_multi函数来获取一些外网内容时发现只要一运行curl_multi函数我的cpu就占得非常的高,后来看一站长分享了此问题解决方法我也整理一下与各位分享一下,希望对大家有帮助。

简单的cURL处理如下:

 代码如下 复制代码

$ch = curl_init();
curl_setopt($ch, CURLOPT_URL, 'http://www.111cn.net');
curl_setopt($ch, CURLOPT_RETURNTRANSFER, TRUE);
$con = curl_exec($ch);
curl_close($ch);

cURL还提供了批量处理会话,下面是cURL批量处理相关函数:
curl_multi_init — 返回一个新cURL批处理句柄
curl_multi_add_handle — 向curl批处理会话中添加单独的curl句柄
curl_multi_exec — 解析一个cURL批处理句柄
curl_multi_getcontent — 如果设置了CURLOPT_RETURNTRANSFER,则返回获取的输出的文本流
curl_multi_select — 等待所有cURL批处理中的活动连接
curl_multi_info_read — 获取当前解析的cURL的相关传输信息
curl_multi_remove_handle — 移除curl批处理句柄资源中的某个句柄资源
curl_multi_close — 关闭一组cURL句柄

看下面使用curl multi批处理的例子:

 代码如下 复制代码
<?php
/**
 * cURL multi批量处理
 *
 * @author mckee
 * @link http://www.111cn.net
 *
 */
 
$url_array = array(
    'http://www.111cn.net/',
    'http://www.111cn.net/php/627.html',
    'http://www.111cn.net/php/258.html'
);
 
$handles = $contents = array();
 
//初始化curl multi对象
$mh = curl_multi_init();
 
//添加curl 批处理会话
foreach($url_array as $key => $url)
{
    $handles[$key] = curl_init($url);
    curl_setopt($handles[$key], CURLOPT_RETURNTRANSFER, 1);
    curl_setopt($handles[$key], CURLOPT_TIMEOUT, 10);
   
    curl_multi_add_handle($mh, $handles[$key]);
}
 
//======================执行批处理句柄=================================
$active = null;
do {
    $mrc = curl_multi_exec($mh, $active);
} while ($mrc == CURLM_CALL_MULTI_PERFORM);
 
 
while ($active and $mrc == CURLM_OK) {
   
    if(curl_multi_select($mh) === -1){
        usleep(100);
    }
    do {
        $mrc = curl_multi_exec($mh, $active);
    } while ($mrc == CURLM_CALL_MULTI_PERFORM);
 
}
//====================================================================
 
//获取批处理内容
foreach($handles as $i => $ch)
{
    $content = curl_multi_getcontent($ch);
    $contents[$i] = curl_errno($ch) == 0 ? $content : '';
}
 
//移除批处理句柄
foreach($handles as $ch)
{
    curl_multi_remove_handle($mh, $ch);
}
 
//关闭批处理句柄
curl_multi_close($mh);
 
print_r($contents);

上面这段程序重点是执行批处理的那段,普通的处理:

 代码如下 复制代码
do { $n=curl_multi_exec($mh,$active); } while ($active);

会造成CPU Loading过高,因为$active要等全部url数据接受完毕才变成false,所以这里用到了curl_multi_exec的返回值判断是否还有数据,当有数据的时候就不停调用curl_multi_exec,没有执行数据就会sleep,如此就会避免CPU Loading 100%了。

网站安装过程我们需要几处非常简单,一个是我们要让用户输入用户名密码然后连接数据库之后再把我们以前准备好.sql文件利用php读取并执行,最后简单配置一下站点,这样一个完整的php网站安装过程就完美的搞定了。

这次顺便做了一个install.php才发现难度其实并不大,还是文件写入操作而已,安装其实主要操作的还是数据库里的内容,先来看看文件里怎么写:(还是用的Codeigiter,对于使用其他框架或者手写而言,仅思路可参考,用了挺多CI自带的helper或者是library的)

 代码如下 复制代码
 $content = "<?php if ( ! defined('BASEPATH')) exit('No direct script access allowed');n";
 $content .= '$active_group'. "= 'default';n";
 $content .= '$active_record'." = TRUE;n";
 $content .= '$db'."['default']['hostname'] = '".$this->input->post('hostname')."';n";
 $content .= '$db'."['default']['username'] = '".$this->input->post('rootname')."';n";
 $content .= '$db'."['default']['password'] = '".$this->input->post('pass')."';n";
 $content .= '$db'."['default']['database'] = '".$this->input->post('book')."';n";
 $content .= '$db'."['default']['dbdriver'] = 'mysql';n";
 $content .= '$db'."['default']['dbprefix'] = '';n";
 $content .= '$db'."['default']['pconnect'] = TRUE;n";
 $content .= '$db'."['default']['db_debug'] = TRUE;n";
 $content .= '$db'."['default']['cache_on'] = FALSE;n";
 $content .= '$db'."['default']['cachedir'] = '';n";
 $content .= '$db'."['default']['char_set'] = 'utf8';n";
 $content .= '$db'."['default']['dbcollat'] = 'utf8_general_ci';n";
 $content .= '$db'."['default']['swap_pre'] = '';n";
 $content .= '$db'."['default']['autoinit'] = TRUE;n";
 $content .= '$db'."['default']['stricton'] = FALSE;";

在文件里用n来换行,因为里面包括了PHP的代码,这导致了我们只能用双引号避免冲突(否则的话就得用了,感觉工作量更大),针对$db,直接显示必须要用单引号,于是就出现了这个。

写入文件之后,接着我们需要做的是执行一系列安装操作,也就是CREATE TABLE,以及创建一个新用户用于登陆,在model里,我这么写:


 代码如下 复制代码
function install() {
 if (mysql_num_rows(mysql_query("SHOW TABLES LIKE 'pr_category'")) == 0)
 $this->db->query("CREATE TABLE pr_category(id INT NOT NULL PRIMARY KEY AUTO_INCREMENT, category VARCHAR(100) NOT NULL UNIQUE, deadline INT NOT NULL)");
 if (mysql_num_rows(mysql_query("SHOW TABLES LIKE 'pr_college'")) == 0)
 $this->db->query("CREATE TABLE pr_college(id INT NOT NULL PRIMARY KEY AUTO_INCREMENT, name VARCHAR(100) NOT NULL UNIQUE)");
 if (mysql_num_rows(mysql_query("SHOW TABLES LIKE 'pr_level'")) == 0)
 $this->db->query("CREATE TABLE pr_level(id INT NOT NULL PRIMARY KEY AUTO_INCREMENT, level INT NOT NULL, name VARCHAR(20) NOT NULL)");
 if (mysql_num_rows(mysql_query("SHOW TABLES LIKE 'pr_rates'")) == 0)
 $this->db->query("CREATE TABLE pr_rates(id INT NOT NULL PRIMARY KEY AUTO_INCREMENT, pid INT NOT NULL, ip VARCHAR(40) NOT NULL, category INT NOT NULL)");
 if (mysql_num_rows(mysql_query("SHOW TABLES LIKE 'pr_users'")) == 0)
 $this->db->query("CREATE TABLE pr_users(uid INT NOT NULL PRIMARY KEY AUTO_INCREMENT, username VARCHAR(45) NOT NULL UNIQUE, password VARCHAR(50) NOT NULL, level INT NOT NULL )");
 if (mysql_num_rows(mysql_query("SHOW TABLES LIKE 'pr_works'")) == 0)
 $this->db->query("CREATE TABLE pr_works(pid INT NOT NULL PRIMARY KEY AUTO_INCREMENT, title VARCHAR(100) NOT NULL, content TEXT, realname VARCHAR(20) NOT NULL, studentnum VARCHAR(20) NOT NULL, college INT NOT NULL, filename TEXT NOT NULL, category INT NOT NULL)");
 $query1 = $this->db->get_where('pr_level',array('level' => 1, 'name' => '普通用户'));
 $query2 = $this->db->get_where('pr_level',array('level' => 5, 'name' => '管理员'));
 $query3 = $this->db->get_where('pr_level',array('level' => 99, 'name' => '超级管理员'));
 if ($query1->num_rows() == 0)
 $this->db->query("INSERT INTO pr_level(level, name) VALUES (1, '普通用户')");
 if ($query2->num_rows() == 0)
 $this->db->query("INSERT INTO pr_level(level, name) VALUES (5, '管理员')");
 if ($query3->num_rows() == 0)
 $this->db->query("INSERT INTO pr_level(level, name) VALUES (99, '超级管理员')");
 $this->username = $this->input->post('username');
 $this->password = $this->input->post('password');
 $this->level = 99;
 $query4 = $this->db->get_where('pr_users',array('username' => $this->input->post('username')));
 if ($query4->num_rows() == 0) {
 $this->db->insert('pr_users', $this);
 return TRUE;
 } else {
 return FALSE;
 }
 }

其实这么写查询量很大效率又低,不过这有效的避免了上一次安装被打断之后重新安装遇到的麻烦,检测是否已经创建了某个表,是否已经有新用户了之类的。

 代码如下 复制代码
mysql_num_rows(mysql_query("SHOW TABLES LIKE 'pr_category'"))

这句可以查询数据库中是否存在这个表。

执行完如果顺利的话,将install.php改个名字:

 代码如下 复制代码
 rename('application/controllers/install.php', 'application/controllers/install.lock');

在其他文件里加入检测install.php是否存在,如果存在的话就跳转到install.php,这样就做好了简单的安装流程了(必须放在model前,否则会提示没有数据库而不会跳转)。

 代码如下 复制代码
 if (file_exists('application/controllers/install.php'))
 redirect('install');

至于什么是否存在表之类的,因为CI会check而且优先级也高于我们自己写的错误提示,所以这里就不加了。

完整源码(MVC):
Controller:

 代码如下 复制代码

 <?php
class Install extends CI_Controller {
 function __construct() {
 parent::__construct();
 $this->load->helper('url');
 $this->load->helper('file');
 }
 function index() {
 $data['title'] = '安装向导';
 $this->load->helper('form');
 $this->load->library('form_validation');
 $this->form_validation->set_rules('hostname', '主机名', 'trim|required|xss_clean');
 $this->form_validation->set_rules('rootname', '数据库用户名', 'trim|required|xss_clean');
 $this->form_validation->set_rules('username', '用户名', 'trim|required|xss_clean');
 $this->form_validation->set_rules('password', '密码', 'trim|required|xss_clean|md5');
 $data['error'] = '';
 if ($this->form_validation->run() == FALSE) {
 $this->load->view('install', $data);
 } else {
 $config['hostname'] = $this->input->post('hostname');
 $config['username'] = $this->input->post('rootname');
 $config['password'] = $this->input->post('pass');
 $config['database'] = $this->input->post('book');
 $config['dbdriver'] = 'mysql';
 $config['dbprefix'] = '';
 $config['pconnect'] = TRUE;
 $config['db_debug'] = TRUE;
 $config['cache_on'] = FALSE;
 $config['cachedir'] = '';
 $config['char_set'] = 'utf8';
 $config['dbcollat'] = 'utf8_general_ci';
 $config['swap_pre'] = '';
 $config['autoinit'] = TRUE;
 $config['stricton'] = FALSE;
 if ($this->load->database($config, TRUE)) {
 $content = "<?php if ( ! defined('BASEPATH')) exit('No direct script access allowed');n";
 $content .= '$active_group'. "= 'default';n";
 $content .= '$active_record'." = TRUE;n";
 $content .= '$db'."['default']['hostname'] = '".$this->input->post('hostname')."';n";
 $content .= '$db'."['default']['username'] = '".$this->input->post('rootname')."';n";
 $content .= '$db'."['default']['password'] = '".$this->input->post('pass')."';n";
 $content .= '$db'."['default']['database'] = '".$this->input->post('book')."';n";
 $content .= '$db'."['default']['dbdriver'] = 'mysql';n";
 $content .= '$db'."['default']['dbprefix'] = '';n";
 $content .= '$db'."['default']['pconnect'] = TRUE;n";
 $content .= '$db'."['default']['db_debug'] = TRUE;n";
 $content .= '$db'."['default']['cache_on'] = FALSE;n";
 $content .= '$db'."['default']['cachedir'] = '';n";
 $content .= '$db'."['default']['char_set'] = 'utf8';n";
 $content .= '$db'."['default']['dbcollat'] = 'utf8_general_ci';n";
 $content .= '$db'."['default']['swap_pre'] = '';n";
 $content .= '$db'."['default']['autoinit'] = TRUE;n";
 $content .= '$db'."['default']['stricton'] = FALSE;";
 if (write_file('application/config/database.php', $content)) {
 $this->load->model('install_model');
 if ($this->install_model->install()) {
 rename('application/controllers/install.php', 'application/controllers/install.lock');
 $this->load->library('session');
 if (!empty($this->session->userdata['login'])) {
 $this->session->sess_destroy(); // destroy the session
 }
 redirect('poster_admin/login', 'refresh');
 } else {
 $data['error'] = '超级管理员用户名已存在';
 $this->load->view('install', $data);
 }
 } else {
 $data['error'] = '安装失败,无法写入文件';
 $this->load->view('install', $data);
 }
 }
 }
 }
}
?>
Model:

class Install_model extends CI_Model {
 function __construct() {
 parent::__construct();
 $this->load->database();
 $this->load->dbforge();
 }
 function install() {
 if (mysql_num_rows(mysql_query("SHOW TABLES LIKE 'pr_category'")) == 0)
 $this->db->query("CREATE TABLE pr_category(id INT NOT NULL PRIMARY KEY AUTO_INCREMENT, category VARCHAR(100) NOT NULL UNIQUE, deadline INT NOT NULL)");
 if (mysql_num_rows(mysql_query("SHOW TABLES LIKE 'pr_college'")) == 0)
 $this->db->query("CREATE TABLE pr_college(id INT NOT NULL PRIMARY KEY AUTO_INCREMENT, name VARCHAR(100) NOT NULL UNIQUE)");
 if (mysql_num_rows(mysql_query("SHOW TABLES LIKE 'pr_level'")) == 0)
 $this->db->query("CREATE TABLE pr_level(id INT NOT NULL PRIMARY KEY AUTO_INCREMENT, level INT NOT NULL, name VARCHAR(20) NOT NULL)");
 if (mysql_num_rows(mysql_query("SHOW TABLES LIKE 'pr_rates'")) == 0)
 $this->db->query("CREATE TABLE pr_rates(id INT NOT NULL PRIMARY KEY AUTO_INCREMENT, pid INT NOT NULL, ip VARCHAR(40) NOT NULL, category INT NOT NULL)");
 if (mysql_num_rows(mysql_query("SHOW TABLES LIKE 'pr_users'")) == 0)
 $this->db->query("CREATE TABLE pr_users(uid INT NOT NULL PRIMARY KEY AUTO_INCREMENT, username VARCHAR(45) NOT NULL UNIQUE, password VARCHAR(50) NOT NULL, level INT NOT NULL )");
 if (mysql_num_rows(mysql_query("SHOW TABLES LIKE 'pr_works'")) == 0)
 $this->db->query("CREATE TABLE pr_works(pid INT NOT NULL PRIMARY KEY AUTO_INCREMENT, title VARCHAR(100) NOT NULL, content TEXT, realname VARCHAR(20) NOT NULL, studentnum VARCHAR(20) NOT NULL, college INT NOT NULL, filename TEXT NOT NULL, category INT NOT NULL)");
 $query1 = $this->db->get_where('pr_level',array('level' => 1, 'name' => '普通用户'));
 $query2 = $this->db->get_where('pr_level',array('level' => 5, 'name' => '管理员'));
 $query3 = $this->db->get_where('pr_level',array('level' => 99, 'name' => '超级管理员'));
 if ($query1->num_rows() == 0)
 $this->db->query("INSERT INTO pr_level(level, name) VALUES (1, '普通用户')");
 if ($query2->num_rows() == 0)
 $this->db->query("INSERT INTO pr_level(level, name) VALUES (5, '管理员')");
 if ($query3->num_rows() == 0)
 $this->db->query("INSERT INTO pr_level(level, name) VALUES (99, '超级管理员')");
 $this->username = $this->input->post('username');
 $this->password = $this->input->post('password');
 $this->level = 99;
 $query4 = $this->db->get_where('pr_users',array('username' => $this->input->post('username')));
 if ($query4->num_rows() == 0) {
 $this->db->insert('pr_users', $this);
 return TRUE;
 } else {
 return FALSE;
 }
 }
}
View:

<!DOCTYPE html>
<html lang="Zh-CN">
<html>
<head>
 <meta charset="utf-8"/>
 <meta name="viewport" content="width=device-width, initial-scale=1.0"/>
 <link rel="stylesheet" href="<?php echo base_url() . 'css/bootstrap.css' ?>">
 <link rel="stylesheet" href="<?php echo base_url() . 'css/login.css' ?>">
 <link rel="icon" type="image/x-icon" href="<?php echo base_url() . 'favicon.ico' ?>"/>
 <script src="<?php echo base_url() . 'js/jquery-1.9.0.js' ?>"></script>
 <script src="<?php echo base_url() . 'js/bootstrap.js' ?>"></script>
 <title><?php echo $title; ?> - SMU Poster</title>
</head>
<body>
<div class="container">
 <div class="row">
 <div class="col-sm-4 col-sm-offset-4">
 <div <?php $err = validation_errors(); echo !(empty($error) && empty($err)) ? 'class="alert alert-danger text-center"' : '' ?>><?php echo validation_errors(); ?>
 <?php echo $error ?></div>
 <?php echo form_open('install', array('class'=>'form-horizontal','role'=>'form')); ?>
 <div class="col-sm-sm-4 col-sm-offset-4"><h2>安装向导</h2></div>
 <div class="form-group">
 <div class="col-sm-9 col-sm-offset-2">
 <div class="input-group">
 <span class="input-group-addon"><span class="glyphicon glyphicon-cloud"></span></span>
 <input type="text" class="form-control" onMouseOver="$(this).tooltip('show')" data-toggle="tooltip" title="一般为localhost" id="hostname" name="hostname" placeholder="主机名" value="localhost"/>
 </div>
 </div>
 </div>
 <div class="form-group">
 <div class="col-sm-9 col-sm-offset-2">
 <div class="input-group">
 <span class="input-group-addon"><span class="glyphicon glyphicon-book"></span></span>
 <input type="text" class="form-control" onMouseOver="$(this).tooltip('show')" data-toggle="tooltip" title="数据库名如poster,请自行创建" id="book" name="book" placeholder="数据库名"/>
 </div>
 </div>
 </div>
 <div class="form-group">
 <div class="col-sm-9 col-sm-offset-2">
 <div class="input-group">
 <span class="input-group-addon"><span class="glyphicon glyphicon-user"></span></span>
 <input type="text" class="form-control" onMouseOver="$(this).tooltip('show')" data-toggle="tooltip" title="连接数据库的账号" id="rootname" name="rootname" placeholder="数据库账号"/>
 </div>
 </div>
 </div>
 <div class="form-group">
 <div class="col-sm-9 col-sm-offset-2">
 <div class="input-group">
 <span class="input-group-addon"><span class="glyphicon glyphicon-lock"></span></span>
 <input type="password" class="form-control" onMouseOver="$(this).tooltip('show')" data-toggle="tooltip" title="连接数据库的密码" id="pass" name="pass" placeholder="数据库密码"/>
 </div>
 </div>
 </div>
 <div class="form-group">
 <div class="col-sm-9 col-sm-offset-2">
 <div class="input-group">
 <span class="input-group-addon"><span class="glyphicon glyphicon-user"></span></span>
 <input type="text" onMouseOver="$(this).tooltip('show')" data-toggle="tooltip" title="注册一个后台超级管理员账号" class="form-control" id="username" name="username" placeholder="后台登录账号"/>
 </div>
 </div>
 </div>
 <div class="form-group">
 <div class="col-sm-9 col-sm-offset-2">
 <div class="input-group">
 <span class="input-group-addon"><span class="glyphicon glyphicon-lock"></span></span>
 <input type="password" onMouseOver="$(this).tooltip('show')" data-toggle="tooltip" title="后台超级管理员密码" class="form-control" id="password" name="password" placeholder="后台登陆密码"/>
 </div>
 </div>
 </div>
 <div class="form-group">
 <div class="col-sm-offset-3 col-sm-9">
 <button type="submit" class="btn btn-default">开始安装</button>
 </div>
 </div>
 </form>
 </div>
 </div>
</div>
<div id="footer">
 <div class="container">
 <p class="text-center copyright text-muted">Designed By <a href="http://www.111cn.net/">微软技术俱乐部</a></p>
 </div>
</div>
</body>
</html>

仔细的研究了一下,原来用php写的解压程序效率比想象的还是高很多的,既然这么好,干脆再优化一下后用到自己后台中,虽然现在大部分空间的控制面板中有压缩和解压这个功能,但是毕竟有时候有些麻烦。

做这个之前,没有接触过php压缩这一块,网上搜了一些,大多数都是php压缩类、压缩函数,少则几百行,多的就几千行代码。这对于我这种新手来说很摸不到头脑,再说我也不用这么复杂的功能。最后参考函数手册,理清楚了几个相关的函数后,就明白了怎么去整了。
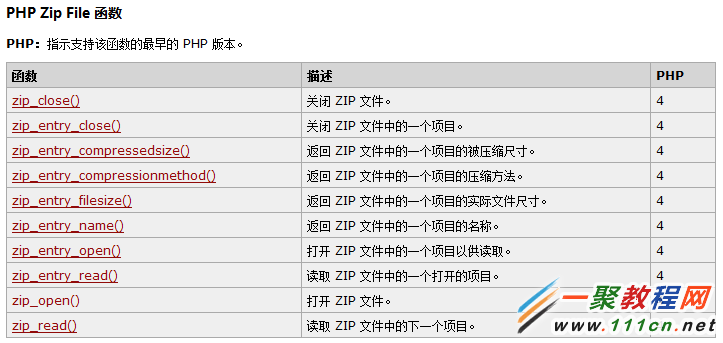
PHP Zip File 函数
PHP Zip File 函数


记得要开启 zip ,把 php.ini 中的 extension=php_zip.dll 前面的分号去掉。


源码范例:

 代码如下 复制代码


<?php


//需开启配置 php_zip.dll

//phpinfo();

header("Content-type:text/html;charset=utf-8");


function get_zip_originalsize($filename, $path) {

//先判断待解压的文件是否存在

if(!file_exists($filename)){

die("文件 $filename 不存在!");

$starttime = explode(' ',microtime()); //解压开始的时间

//将文件名和路径转成windows系统默认的gb2312编码,否则将会读取不到

$filename = iconv("utf-8","gb2312",$filename);

$path = iconv("utf-8","gb2312",$path);

//打开压缩包

$resource = zip_open($filename);

$i = 1;

//遍历读取压缩包里面的一个个文件

while ($dir_resource = zip_read($resource)) {

//如果能打开则继续

if (zip_entry_open($resource,$dir_resource)) {

//获取当前项目的名称,即压缩包里面当前对应的文件名

$file_name = $path.zip_entry_name($dir_resource);

//以最后一个“/”分割,再用字符串截取出路径部分

$file_path = substr($file_name,0,strrpos($file_name, "/"));

//如果路径不存在,则创建一个目录,true表示可以创建多级目录

if(!is_dir($file_path)){

mkdir($file_path,0777,true);

}

//如果不是目录,则写入文件

if(!is_dir($file_name)){

//读取这个文件

$file_size = zip_entry_filesize($dir_resource);

//最大读取6M,如果文件过大,跳过解压,继续下一个

if($file_size<(1024*1024*6)){

$file_content = zip_entry_read($dir_resource,$file_size);

file_put_contents($file_name,$file_content);

}else{ www.111cn.net

echo "<p> ".$i++." 此文件已被跳过,原因:文件过大, -> ".iconv("gb2312","utf-8",$file_name)." </p>";

}

}

//关闭当前

zip_entry_close($dir_resource);

}

}

//关闭压缩包

zip_close($resource); 

$endtime = explode(' ',microtime()); //解压结束的时间

$thistime = $endtime[0]+$endtime[1]-($starttime[0]+$starttime[1]);

$thistime = round($thistime,3); //保留3为小数

echo "<p>解压完毕!,本次解压花费:$thistime 秒。</p>";

}


$size = get_zip_originalsize('20131101.zip','1代潇瑞/');


?>


测试解压了一个300多KB的小文件,花了0.115秒,测试解压了一个30多MB的(网页文件,小文件比较多),花了20多秒。


php解压程序


跟系统比起来确实慢了一些,但是这也很不错了!刚刚入门,代码还不优良,但是实现了解压,而且代码也比网上的简介易懂,如果你看到这篇文章,相信对你是有帮助的!程序中用到了程序运行的时间,具体可以看看: 。

php解压程序


最后,我觉得:

 代码如下 复制代码

    //最大读取6M,如果文件过大,跳过解压,继续下一个

    if($file_size<(1024*1024*6)){

        $file_content = zip_entry_read($dir_resource,$file_size);

        file_put_contents($file_name,$file_content);

    }

这一块做的不太好,这样对大文件解压就没办法了,等会再优化一下。

需要安装imagick及其php扩展。一共有二个函数,都是从网上摘下来的,还没测试,这个方案应该可行,可以简单的仿照在线文档功能,有机会在项目中实践一下

第一种

 代码如下 复制代码
/**
* PDF2PNG  
* @param $pdf  待处理的PDF文件
* @param $path 待保存的图片路径
* @param $page 待导出的页面 -1为全部 0为第一页 1为第二页
* @return      保存好的图片路径和文件名
*/
 function pdf2png($pdf,$path,$page=0)

   if(!is_dir($path))
   {
       mkdir($path,true);
   }
   if(!extension_loaded('imagick'))
   { 
     echo '没有找到imagick!' ;
     return false;
   } 
   if(!file_exists($pdf))
   { 
      echo '没有找到pdf' ;
       return false; 
   }   www.111cn.net
   $im = new Imagick(); 
   $im->setResolution(120,120);   //设置图像分辨率
   $im->setCompressionQuality(80); //压缩比
   $im->readImage($pdf."[".$page."]"); //设置读取pdf的第一页
   //$im->thumbnailImage(200, 100, true); // 改变图像的大小
   $im->scaleImage(200,100,true); //缩放大小图像
   $filename = $path."/". time().'.png';
   if($im->writeImage($filename) == true)
   { 
      $Return  = $filename; 
   } 
   return $Return; 

$s = pdf2png('file/1371273225-ceshi_ppt.pdf','images');
echo '<div align="center"><img src="'.$s.'"></div>';

第二种

 代码如下 复制代码
function pdf2png($PDF,$Path){
   if(!extension_loaded('imagick')){
       return false;
   }
   if(!file_exists($PDF)){
       return false;
   }
   $IM = new imagick();
   $IM->setResolution(120,120);
   $IM->setCompressionQuality(100);
   $IM->readImage($PDF);
   foreach ($IM as $Key => $Var){
       $Var->setImageFormat('png');
       $Filename = $Path.'/'.md5($Key.time()).'.png';
       if($Var->writeImage($Filename) == true){
           $Return[] = $Filename;
       } www.111cn.net
   }
   return $Return;
}

创建一个jpg缩略图并显示出来
 

 代码如下 复制代码
<?php
header('Content-type: image/jpeg');
$image = new Imagick('image.jpg');
// If 0 is provided as a width or height parameter,// aspect ratio is maintained
$image->thumbnailImage(100, 0);
echo $image;
?>

缩略GIF动画图片
 

 代码如下 复制代码
<?php
/* Create a new imagick object and read in GIF */
$im = new Imagick("example.gif");
/* Resize all frames */
foreach ($im as $frame) {
/* 50x50 frames */
$frame->thumbnailImage(50, 50);
/* Set the virtual canvas to correct size */
$frame->setImagePage(50, 50, 0, 0);
}/* Notice writeImages instead of writeImage */
$im->writeImages("example_small.gif", true);
?>
[!--infotagslink--]

相关文章

  • 分享一段php获取linux服务器状态的代码

    简单的php获取linux服务器状态的代码,不多说-直接上函数:复制代码 代码如下:function get_used_status(){ $fp = popen('top -b -n 2 | grep -E "^(Cpu|Mem|Tasks)"',"r");//获取某一时刻系统cpu和内存使用情况 $rs =...2014-05-31
  • Springboot+TCP监听服务器搭建过程图解

    这篇文章主要介绍了Springboot+TCP监听服务器搭建过程,本文通过图文并茂的形式给大家介绍的非常详细,对大家的学习或工作具有一定的参考借鉴价值,需要的朋友可以参考下...2020-10-28
  • 服务器 UDP端口占用几千个的解决办法

    前一段时间使用NetStat命令查看服务器端口时,发现服务器udp端口开放了好多,最少在1000个以上,当时事情比较多,没有管它,今天终于有点时间,仔细检查了一下,排除了这个问题. ...2016-01-27
  • jQuery事件绑定用法详解(附bind和live的区别)

    这篇文章主要介绍了jQuery事件绑定用法,结合实例形式较为详细的分析了jQuery事件绑定的实现原理与相关注意事项,并附带了相关绑定方法的使用说明,重点介绍了bind和live的区别,需要的朋友可以参考下...2016-01-21
  • PHP连接公司内部服务器的MYSQL数据库的简单实例

    “主机,用户名,密码”得到连接、“数据库,sql,连接”得到结果,最后是结果的处理显示。当然,数据库连接是扩展库为我们完成的,我们能做的仅仅是处理结果而已。...2013-09-29
  • 详解nginx同一端口监听多个域名和同时监听http与https

    这篇文章主要介绍了详解nginx同一端口监听多个域名和同时监听http与https的相关资料,需要的朋友可以参考下...2017-07-06
  • 解决HttpPost+json请求---服务器中文乱码及其他问题

    这篇文章主要介绍了解决HttpPost+json请求---服务器中文乱码及其他问题,具有很好的参考价值,希望对大家有所帮助。一起跟随小编过来看看吧...2021-01-22
  • C# TextBox数据绑定的方法

    这篇文章主要为大家详细介绍了C# TextBox数据绑定的方法,具有一定的参考价值,感兴趣的小伙伴们可以参考一下...2020-06-25
  • 利用js实现Vue2.0中数据的双向绑定功能

    vue数据双向绑定是通过数据劫持结合发布者-订阅者模式的方式来实现的,下面这篇文章主要给大家介绍了关于如何利用js实现Vue2.0中数据的双向绑定功能的相关资料,需要的朋友可以参考下...2021-07-19
  • JavaScript为事件句柄绑定监听函数实例详解

    这篇文章主要介绍了JavaScript为事件句柄绑定监听函数的方法,结合实例详细分析了常见的事件句柄绑定监听函数的实现技巧,并实例讲解了跨浏览器的实现方法,需要的朋友可以参考下...2015-12-17
  • C#移除所有事件绑定的方法

    这篇文章主要介绍了C#移除所有事件绑定的方法,实例分析了C#事件绑定的移除方法,具有一定参考借鉴价值,需要的朋友可以参考下...2020-06-25
  • Vue2.x 的双向绑定原理及实现

    这篇文章主要介绍了Vue2.x 的双向绑定原理,Vue 是利用的 Object.defineProperty() 方法进行的数据劫持,利用 set、get 来检测数据的读写。需要的朋友可以参考下面文章的具体内容...2021-09-27
  • Hyper-V尝试连接到服务器出错无效类的解决方法

    这篇文章主要介绍了Hyper-V尝试连接到服务器出错无效类的解决方法,需要的朋友可以参考下...2016-09-28
  • mac使用Shell(终端)SSH连接远程服务器的方法

    这篇文章主要介绍了mac使用Shell(终端)SSH连接远程服务器的方法,文中通过示例代码介绍的非常详细,对大家的学习或者工作具有一定的参考学习价值,需要的朋友们下面随着小编来一起学习学习吧...2020-07-11
  • js实现上传图片到服务器

    这篇文章主要为大家详细介绍了js实现上传图片到服务器,文中示例代码介绍的非常详细,具有一定的参考价值,感兴趣的小伙伴们可以参考一下...2021-04-11
  • 详解JavaScript的AngularJS框架中的作用域与数据绑定

    这篇文章主要介绍了JavaScript的AngularJS框架中的作用域与数据绑定,包括作用域的继承以及数据的单向和双向绑定等重要知识点,需要的朋友可以参考下...2016-03-07
  • uploader秒传图片到服务器完整代码

    这篇文章主要为大家详细介绍了uploader秒传图片到服务器的完整代码,具有一定的参考价值,感兴趣的小伙伴们可以参考一下...2017-04-27
  • c# HttpWebRequest通过代理服务器抓取网页内容应用介绍

    在C#项目开发过程中可能会有些特殊的需求比如:用HttpWebRequest通过代理服务器验证后抓取网页内容,要想实现此方法并不容易,本文整理了一下,有需求的朋友可以参考下...2020-06-25
  • 图文详解本地Windows 7/8上IIS服务器搭建教程

    这篇文章主要以图文结合的方式详细介绍了本地Windows 78上IIS服务器搭建教程,具有一定的参考价值,感兴趣的小伙伴们可以参考一下 ...2017-07-06
  • PHP JS Ip地址及域名格式检测代码

    PHP IP地址格式检测函数复制代码 代码如下:function checkIp($ip){ $ip = str_replace(" ", "", $ip); $ip = strtolower($ip); $ip= str_replace("http://", "", $ip); $ip= str_replace("https://", ""...2013-10-04