微信公众平台实现微信网页登陆授权开发
文件1:index.php
//换成自己的接口信息
$appid = 'XXXXX';
header('location:https://open.weixin.qq.com/connect/oauth2/authorize?appid='.$appid.'&redirect_uri=127.0.0.1/oauth.php&response_type=code&scope=snsapi_userinfo&state=123&connect_redirect=1#wechat_redirect');
参数说明:
|
参数
|
是否必须
|
说明
|
| appid | 是 | 公众号的唯一标识 |
| redirect_uri | 是 | 授权后重定向的回调链接地址,请使用urlencode对链接进行处理 |
| response_type | 是 | 返回类型,请填写code |
| scope | 是 | 应用授权作用域,snsapi_base (不弹出授权页面,直接跳转,只能获取用户openid),snsapi_userinfo (弹出授权页面,可通过openid拿到昵称、性别、所在地。并且,即使在未关注的情况下,只要用户授权,也能获取其信息) |
| state | 否 | 重定向后会带上state参数,开发者可以填写a-zA-Z0-9的参数值 |
| #wechat_redirect | 是 | 无论直接打开还是做页面302重定向时候,必须带此参数 |
文件二:oauth.php
| 代码如下 | 复制代码 |
| <?php $code = $_GET['code']; $state = $_GET['state']; //换成自己的接口信息 $appid = 'XXXXX'; $appsecret = 'XXXXX'; if (empty($code)) $this->error('授权失败'); $token_url = 'https://api.weixin.qq.com/sns/oauth2/access_token?appid='.$appid.'&secret='.$appsecret.'&code='.$code.'&grant_type=authorization_code'; $token = json_decode(file_get_contents($token_url)); if (isset($token->errcode)) { echo '<h1>错误:</h1>'.$token->errcode; echo '<br/><h2>错误信息:</h2>'.$token->errmsg; exit; } $access_token_url = 'https://api.weixin.qq.com/sns/oauth2/refresh_token?appid='.$appid.'&grant_type=refresh_token&refresh_token='.$token->refresh_token; //转成对象 $access_token = json_decode(file_get_contents($access_token_url)); if (isset($access_token->errcode)) { echo '<h1>错误:</h1>'.$access_token->errcode; echo '<br/><h2>错误信息:</h2>'.$access_token->errmsg; exit; } $user_info_url = 'https://api.weixin.qq.com/sns/userinfo?access_token='.$access_token->access_token.'&openid='.$access_token->openid.'&lang=zh_CN'; //转成对象 $user_info = json_decode(file_get_contents($user_info_url)); if (isset($user_info->errcode)) { echo '<h1>错误:</h1>'.$user_info->errcode; echo '<br/><h2>错误信息:</h2>'.$user_info->errmsg; exit; } //打印用户信息 echo '<pre>'; print_r($user_info); echo '</pre>'; ?> |
|
|
参数
|
描述
|
| openid | 用户的唯一标识 |
| nickname | 用户昵称 |
| sex | 用户的性别,值为1时是男性,值为2时是女性,值为0时是未知 |
| province | 用户个人资料填写的省份 |
| city | 普通用户个人资料填写的城市 |
| country | 国家,如中国为CN |
| headimgurl | 用户头像,最后一个数值代表正方形头像大小(有0、46、64、96、132数值可选,0代表640*640正方形头像),用户没有头像时该项为空 |
| privilege | 用户特权信息,json 数组,如微信沃卡用户为(chinaunicom) |
| unionid | 只有在用户将公众号绑定到微信开放平台帐号后,才会出现该字段。详见:获取用户个人信息(UnionID机制) |
到此网页登陆授权开发功能就作完了,如果想要获取用户基本信息我们需要看另一个例子,在官方有说明大家可自行搜索哦。
cpu飙升占100%不但是与数据库或硬盘的io输入有关,但程序也是一个非常重要的地方了,今天小编找到一个代码可以测试你的php引起cpu占100%问题的解决办法,有兴趣的朋友可进入参考。用cpu接近100%时,你如何找到导致cpu飙升的原因?我的思路是,首先找到进程正在执行的代码行,从而确定可能有问题的代码段。然后,再仔细分析有问题的代码段,从而找出原因。
如果你的程序使用的是c、c++编写,那么你可以很容易的找到正在执行的代码行。但是,程序是php编写的,如何找到可能有问题的代码行呢?这个问题就是本文要解决的问题。
背景知识:
大家都知道php是一个解释性语言。用户编写的php代码会生成opcode,由解释器引擎去解释执行。在解释执行过程中,有一个全局变量包含了执行过 程中用到的各种数据。它就是executor_globals。在源码的Zend/zend_globals.h 文件中可以找到他的类型定义。
| 代码如下 | 复制代码 |
|
struct _zend_executor_globals { zval uninitialized_zval; zval error_zval; zend_ptr_stack arg_types_stack; /* symbol table cache */ zend_op **opline_ptr; HashTable *active_symbol_table; HashTable included_files; /* files already included */ JMP_BUF *bailout; int error_reporting; zend_op_array *active_op_array; HashTable *function_table; /* function symbol table */ zend_class_entry *scope; zval *This; long precision; int ticks_count; zend_bool in_execution; /* for extended information support */ #ifdef ZEND_WIN32 HashTable regular_list; zend_vm_stack argument_stack; int user_error_handler_error_reporting; zend_error_handling_t error_handling; /* timeout support */ int lambda_count; HashTable *ini_directives; zend_objects_store objects_store; struct _zend_execute_data *current_execute_data; struct _zend_module_entry *current_module; zend_property_info std_property_info; zend_bool active; void *saved_fpu_cw; void *reserved[ZEND_MAX_RESERVED_RESOURCES]; |
|
这里我们只说两个对我们比较重要的变量,active_op_array 和 current_execute_data。
active_op_array变量中保存了引擎正在执行的op_array(想了解什么是op_array请点击查看)。在Zend/zend_compile.h中有关于op_array的数据类型的定义。
| 代码如下 | 复制代码 |
|
struct _zend_op_array { zend_bool done_pass_two; zend_uint *refcount; zend_op *opcodes; zend_compiled_variable *vars; zend_uint T; zend_brk_cont_element *brk_cont_array; zend_try_catch_element *try_catch_array; /* static variables support */ zend_op *start_op; zend_uint this_var; char *filename; void *reserved[ZEND_MAX_RESERVED_RESOURCES]; |
|
看完定义,就不用我多说了把。定义中,filename和 function_name分别保存了正在执行的文件名和方法名。
current_execute_data保存了正在执行的op_array的execute_data。execute_data保存了每个op_array执行过程中的一些数据。其定义在,Zend/zend_compile.h:
| 代码如下 | 复制代码 |
| struct _zend_execute_data { struct _zend_op *opline; zend_function_state function_state; zend_function *fbc; /* Function Being Called */ zend_class_entry *called_scope; zend_op_array *op_array; zval *object; union _temp_variable *Ts; zval ***CVs; HashTable *symbol_table; struct _zend_execute_data *prev_execute_data; zval *old_error_reporting; zend_bool nested; zval **original_return_value; zend_class_entry *current_scope; zend_class_entry *current_called_scope; zval *current_this; zval *current_object; struct _zend_op *call_opline; }; |
|
定义中的opline就是正在执行的opcode。opcode的结构定义如下:
| 代码如下 | 复制代码 |
| struct _zend_op { opcode_handler_t handler; znode result; znode op1; znode op2; ulong extended_value; uint lineno; zend_uchar opcode; }; |
|
其中lineno就是opcode所对应的行号。
示例说明:
看完上面的数据结构定义,你是否已经知道如何找php正在执行的文件名,方法名和行号呢?如果还有疑问的话,那就接着看下面的例子。创建一个文件test.php,代码如下:
| 代码如下 | 复制代码 |
| <?php function test1(){ while(true){ sleep(1); } } test1(); ?> |
|
cli方式执行php脚本,加入执行的进程号为14973。我们使用gdb命令来调试进程。
| 代码如下 | 复制代码 |
| $sudo gdb -p 14973 (gdb) print (char *)executor_globals.active_op_array->filename $1 = 0x9853a34 "/home/xinhailong/test/php/test.php" (gdb) print (char *)executor_globals.active_op_array->function_name $2 = 0x9854db8 "test1" (gdb) print executor_globals->current_execute_data->opline->lineno $3 = 4 |
|
很显然,他正在执行第四行的sleep方法。
如果上面的方法你感觉麻烦,那你可以使用.gdbinit文件。这个文件在php源码的根目录下。使用方法如下:
| 代码如下 | 复制代码 |
| $sudo gdb -p 14973 (gdb) source /home/xinhailong/.gdbinit (gdb) zbacktrace [0xa453f34] sleep(1) /home/xinhailong/test/php/test.php:4 [0xa453ed0] test1() /home/xinhailong/test/php/test.php:7 (gdb) |
|
题外话:
从php5.6开始,php中集成了一个phpdbg的工具。可以像gdb调试c语言程序一样,调试php程序。感兴趣的话,可以打开下面的连接看看
最简单的方法,找到php安装目录的pecl
自动安装
# /usr/local/php/bin/pecl install apc
接下来按提示一步步完成即可
然后配置 /usr/local/php/etc/php.ini 末尾加入
extension=apc.so
手动安装
官网:http://cn2.php.net/manual/zh/book.apc.php
下载:http://pecl.php.net/package/APC 找最新的
下载apc
# wget http://pecl.php.net/get/APC-3.1.13.tgz
# tar -zxvf APC-3.1.13.tgz
# cd APC-3.1.13
生成configure文件
# /usr/local/php/bin/phpize
执行configure 并且make && make install
# ./configure --enable-apc --enable-apc-mmap --with-php-config=/usr/local/php/bin/php-config
# make
# make install
拷贝添加SO文件
# cp /usr/local/php/lib/php/extensions/no-debug-non-zts-20100525/apc.so /usr/local/php/lib/php/extensions/apc.so
# chmod 755 /usr/local/php/lib/php/extensions/apc.so
修改php.ini使之启动APC模块
# vi /usr/local/php/etc/php.ini
extension_dir = "/usr/local/php/lib/php/extensions"
extension=apc.so
apc.enabled = 1
; apc.cache_by_default = on
; apc.shm_segments = 1
; apc.shm_size = 128
; apc.ttl = 7200
; apc.user_ttl = 7200
; apc.num_files_hint = 1024
; apc.write_lock = On
; apc.gc_ttl=3600
; apc.ttl=0
; apc.mmap_file_mask=/tmp/apc.XXXXXX
重启apache
# service httpd restart
使用APC
test.php
<?php
print_r(apc_cache_info());
注意 在浏览器看会不是很友好,可以查看网页源代码就看到很清晰
Array
(
[num_slots] => 1031
[ttl] => 0
[num_hits] => 3
[num_misses] => 1
[num_inserts] => 1
[expunges] => 0
[start_time] => 1398341530
[mem_size] => 4240
[num_entries] => 1
[file_upload_progress] => 1
[memory_type] => mmap
[locking_type] => pthread mutex Locks
[cache_list] => Array
(
[0] => Array
(
[type] => file
[device] => 64768
[inode] => 1179758
[filename] => /data/www/www.111cn.net /test.php
[num_hits] => 3
[mtime] => 1398341609
[creation_time] => 1398341617
[deletion_time] => 0
[access_time] => 1398341630
[ref_count] => 1
[mem_size] => 4240
)
)
[deleted_list] => Array
(
)
[slot_distribution] => Array
(
[109] => 1
)
)
多次点击,可以发现 num_hits 在变化,说明缓存命中了!
压力测试看效果
关闭开启apc分别压力测试对比一下你会发现开启apc之后吞吐率会比没开启apc要提高许多。
# ab -n1000 -c10 http://www.111cn.net /test.php
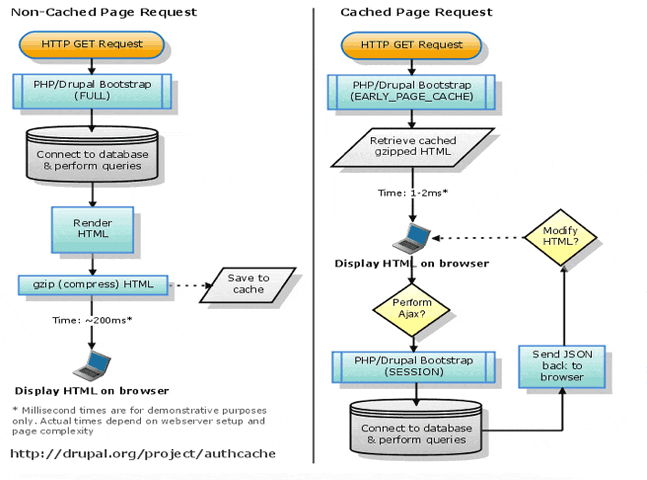
本教程来详解Drupal的Authcache缓存模块的缓存机制原理。Drupal带有内置的缓存模块:Boost、Authcache,但是这两个模块的原理不同,boost是生成静态页面,Authcache是生存页面缓存。相关文章:Drupal的模块高级应用之Authcache-动态加载内容教程
Authcache模块和Boost模块的原理不一样,Boost模块是生成静态页面,所以缓存的效果最好,速度最快。Authcache模块是利用Drupal自身的缓存机制,生成页面缓存,由于进入到了Drupal环节,因此速度没有Boost缓存快,但是优点就是可以灵活的使用PHP/Drupal相关方法,动态处理数据。

首先,我们从Drupal的bootstrap讲起。
function drupal_bootstrap($phase = NULL, $new_phase = TRUE) {
// Not drupal_static(), because does not depend on any run-time information.
static $phases = array(
DRUPAL_BOOTSTRAP_CONFIGURATION,
DRUPAL_BOOTSTRAP_PAGE_CACHE,
DRUPAL_BOOTSTRAP_DATABASE,
DRUPAL_BOOTSTRAP_VARIABLES,
DRUPAL_BOOTSTRAP_SESSION,
DRUPAL_BOOTSTRAP_PAGE_HEADER,
DRUPAL_BOOTSTRAP_LANGUAGE,
DRUPAL_BOOTSTRAP_FULL,
);
….
}
这是Drupal自带的bootstrap的几个环节(Drupal7),从CONFIGURATION、一直到 FULL,这样整个Drupal就启动了,所有的模块也加载了。
其中我们发现,有一个环节叫 PAGE_CACHE,我们来把这个阶段的处理函数完整的贴出来,以便大家能更好的理解这段代码。
function _drupal_bootstrap_page_cache() {
global $user;
// Allow specifying special cache handlers in settings.php, like
// using memcached or files for storing cache information.
require_once DRUPAL_ROOT . '/includes/cache.inc';
foreach (variable_get('cache_backends', array()) as $include) {
require_once DRUPAL_ROOT . '/' . $include;
}
// Check for a cache mode force from settings.php.
if (variable_get('page_cache_without_database')) {
$cache_enabled = TRUE;
}
else {
drupal_bootstrap(DRUPAL_BOOTSTRAP_VARIABLES, FALSE);
$cache_enabled = variable_get('cache');
}
drupal_block_denied(ip_address());
// If there is no session cookie and cache is enabled (or forced), try
// to serve a cached page.
if (!isset($_COOKIE[session_name()]) && $cache_enabled) {
// Make sure there is a user object because its timestamp will be
// checked, hook_boot might check for anonymous user etc.
$user = drupal_anonymous_user();
// Get the page from the cache.
$cache = drupal_page_get_cache();
// If there is a cached page, display it.
if (is_object($cache)) {
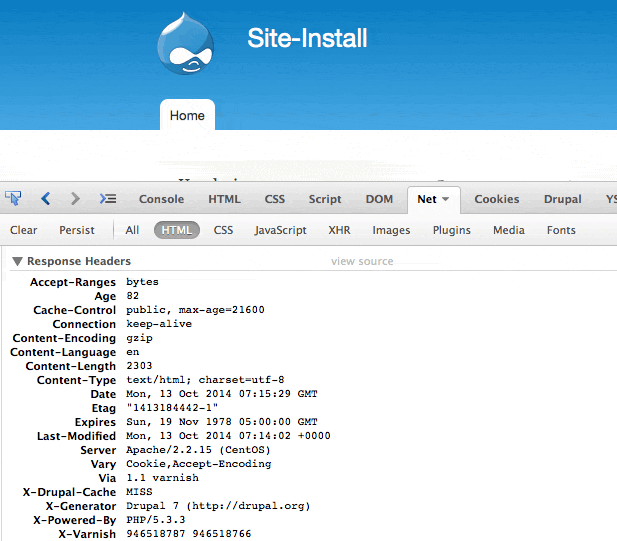
header('X-Drupal-Cache: HIT');
// Restore the metadata cached with the page.
$_GET['q'] = $cache->data['path'];
drupal_set_title($cache->data['title'], PASS_THROUGH);
date_default_timezone_set(drupal_get_user_timezone());
// If the skipping of the bootstrap hooks is not enforced, call
// hook_boot.
if (variable_get('page_cache_invoke_hooks', TRUE)) {
bootstrap_invoke_all('boot');
}
drupal_serve_page_from_cache($cache);
// If the skipping of the bootstrap hooks is not enforced, call
// hook_exit.
if (variable_get('page_cache_invoke_hooks', TRUE)) {
bootstrap_invoke_all('exit');
}
// We are done.
exit;
}
else {
header('X-Drupal-Cache: MISS');
}
}
}
当我们看到最下面,exit ;(We are done)之处,我们就知道,Drupal已经处理完了请求,后面的环境(Session、数据库、模块、FULL)等环节就不用启动了,因此大大节省了服务器的处理时间和提高了响应时间。
这就是Drupal自带的缓存处理机制!!
Drupal自带的缓存机制缺点也很明显,就是只对匿名用户有效。
因此,Authcache模块就出现了,Authcache就是利用Drupal自带的缓存机制,实现对登录用户的缓存。
继续看上面的代码,其中有3行,如下:
foreach (variable_get('cache_backends', array()) as $include) {
require_once DRUPAL_ROOT . '/' . $include;
}
其中,获取’cache_backends’的时候,加载了一个数组变量,所以在Drupal自身的缓存阶段要使用到authcache,那就必须修改这个 cache_backends。
果如其然,如下所示,我们在安装authcache的时候,就必须设置如下变量。
$conf['cache_backends'][] = 'sites/all/modules/authcache/authcache.cache.inc';
$conf['cache_backends'][] = 'sites/all/modules/authcache/modules/authcache_builtin/authcache_builtin.cache.inc';
这个时候,我们就加载进了authcache.cache.inc和文件了。
继续…
我们打开authcache.cache.inc 其中,就是定义一些函数。
继续查看authcache_builtin.cache.inc文件,看到如下代码:
$delivered = authcache_builtin_cacheinc_retrieve_cache_page();
if ($delivered) {
exit;
}
也就是说在这个时候,如果命中了缓存就直接输入页面内容,不再继续boot!这个地方也就代替了原本Drupal自己查找缓存和计算命中缓存的逻辑,使用authcache自己的算法,根据用户的角色不同,使用的缓存不同。
这就是authcache的核心!
当然authcache还可以做更多,比如,
1. 根据用户不同,生产不同的缓存(需要处理)。
2. 配合authcache_p13n模块,动态处理某些局部页面,比如某个block。
3. 修改缓存的某个些内容。(稍后会详细讲解)
等等,这就是authcache比boost灵活的地方,当然也是缺点,需要调用很多PHP、数据库等等,肯定比boost慢一些。
相关文章:Drupal模块讲解-Authcache缓存原理详解教程
本文讲一下如果通过修改authcache的核心代码,来实现缓存页面的个性化内容。
 高级应用之Authcache-动态加载内容教程" />
通用的缓存,或多或少都是要进行个性化处理的,比如用户名显示、动态加载用户资料、用户好友等等。
一般情况下,这种局部个性化,都是通过两种手段实现:一个是SSI,另一个是CSI。
Authcache本身可以实现局部personalization, 模块叫p13n。
Authcache的ajax模块属于CSI,ESI模块应该是属于SSI,但是由于ESI模块需要搭建varnish服务器,配置VCL,加上服务器的设置问题,会导致ESI容易出错,并且本身ESI传递cookie也会有些问题,因此ESI实际上实现起来相当复杂。
所以,如果我们要使用服务器端的personalization,通过PHP修改根据某些条件修改某些内容的话,需要hack一些authcache的代码。
1. autcache.module文件
找到下面一句,Line 188
// Invoke cache backends and serve page.
修改成如下:
| 代码如下 | 复制代码 |
| // Invoke cache backends and serve page. if (authcache_page_is_cacheable()) { $cache = authcache_backend_cache_save(); authcache_serve_page_from_cache($cache, authcache_key()); } else { ////process html result global $conf; $conf['page_compression'] = FALSE; $cache = new stdClass(); ////process html result $cache->data['body'] = ob_get_contents(); ob_clean(); foreach (variable_get('authcache_page_process', array()) as $include) { require_once DRUPAL_ROOT . '/' . $include; } foreach (variable_get('authcache_page_process_interface', array()) as $process) { require_once DRUPAL_ROOT . '/' . $include; if (is_callable($process)) { $process($cache); } } echo $cache->data['body']; } exit; } |
|
其中,主要是加了else后面的处理代码。
2. authcache.cache.inc文件
从85行开始,到函数结尾,修改成如下格式。
| 代码如下 | 复制代码 |
| $return_compressed = FALSE; ///NEW //Don't send compressed content if ($page_compression) { header('Vary: Accept-Encoding', FALSE); // If page_compression is enabled, the cache contains gzipped data. if ($return_compressed) { // $cache->data['body'] is already gzip'ed, so make sure // zlib.output_compression does not compress it once more. ini_set('zlib.output_compression', '0'); header('Content-Encoding: gzip'); } else { // The client does not support compression, so unzip the data in the // cache. Strip the gzip header and run uncompress. $cache->data['body'] = gzinflate(substr(substr($cache->data['body'], 10), 0, -8)); } } ///NEW foreach (variable_get('authcache_page_process', array()) as $include) { require_once DRUPAL_ROOT . '/' . $include; } foreach (variable_get('authcache_page_process_interface', array()) as $process) { if (is_callable($process)) { $process($cache); } } |
|
注意,有两个地方,///NEW 标注,表示新加的内容,中间有一段是原有的code。
改完之后,我们就完工了。
如何使用呢?
新建一个文件,比如在custom模块下面,叫custom_authcache.inc,黏贴如下代码:
| 代码如下 | 复制代码 |
| <?php /** Add the following lines to settings.php $conf['authcache_page_process'][] = 'sites/all/modules/custom/custom/custom_authcache.inc'; $conf['authcache_page_process_interface'][] = 'custom_authcache_common_process'; If you want to add more process interface, add your function name as an item in this array, $conf['authcache_page_process_interface']. If you want to include file, please add file name to this array, $conf['authcache_page_process'] Core Changes: modules/authcache/authcache.cache.inc modules/authcache/authcache.module **/ /* * Process authcache content to replace content */ function custom_authcache_common_process(&$cache) { $cache->data['body'] = str_ireplace('<span id="replace_placeholder_1"/>', _get_real_data(), $cache->data['body']); } |
|
看上面的注释,复制两行代码到settings.php文件。
具体的说明注释已经很详细了,相信应该没问题。
这样,这个custom_authcache_common_process函数就可以动态替换HTML里面的内容了,达到了个性化页面的目的。
相关文章
- 这篇文章主要为大家详细介绍了C#微信开发之发送模板消息的相关资料,具有一定的参考价值,感兴趣的小伙伴们可以参考一下...2020-06-25
- 这篇文章主要介绍了iOS新版微信底部返回横条问题的解决,文中通过示例代码介绍的非常详细,对大家的学习或者工作具有一定的参考学习价值,需要的朋友们下面随着小编来一起学习学习吧...2020-06-30
- 为公司系统业务需要,这几天了解了一下微信和支付宝扫码支付的接口,并用c#实现了微信和支付宝扫码支付的功能。需要的朋友跟随小编一起看看吧...2020-06-25
- 这篇文章主要介绍了Python爬取微信小程序通用方法代码实例详解,文中通过示例代码介绍的非常详细,对大家的学习或者工作具有一定的参考学习价值,需要的朋友可以参考下...2020-09-29
- 这篇文章主要介绍了C#实现的微信网页授权操作逻辑封装,分析了微信网页授权操作的原理、步骤并给出了C#实现的网页授权操作逻辑封装类,需要的朋友可以参考下...2020-06-25
- 这篇文章主要介绍了iOS新版微信底部工具栏遮挡问题完美解决,文中通过示例代码介绍的非常详细,对大家的学习或者工作具有一定的参考学习价值,需要的朋友们下面随着小编来一起学习学习吧...2020-06-30
- 这篇文章主要为大家详细介绍了C#图像识别,微信跳一跳机器人,具有一定的参考价值,感兴趣的小伙伴们可以参考一下...2020-06-25
- 这篇文章主要介绍了简单用VBS调用企业微信机器人发定时消息的方法,文中通过示例代码介绍的非常详细,对大家的学习或者工作具有一定的参考学习价值,需要的朋友们下面随着小编来一起学习学习吧...2020-12-08
- 这篇文章主要介绍了python实现企业微信定时发送文本消息的实例代码,本文给大家介绍的非常详细,对大家的学习或工作具有一定的参考借鉴价值,需要的朋友可以参考下...2020-11-25
- 六月才刚刚过半,就已经相继有中兴、华为被美国起诉,此次微信也未能幸免,被美国一家叫Uniloc的公司起诉,理由是微信的语音群聊、视频聊天等功能侵犯其两项与电话会议技术相关的专利,该公司要求微信立即中止这些功能。...2016-07-04
- 这篇文章主要为大家详细介绍了原生JS实现微信通讯录,文中示例代码介绍的非常详细,具有一定的参考价值,感兴趣的小伙伴们可以参考一下...2020-06-19
- 这篇文章主要介绍了HTML5实现微信拍摄上传照片功能,实现HTML5 Canvas手机拍摄,本地压缩上传图片时遇到问题的解决方法,具有一定的参考价值,感兴趣的小伙伴们可以参考一下...2017-04-27
- 这篇文章主要介绍了解决微信授权成功后点击按返回键出现空白页和报错的问题,文中通过示例代码介绍的非常详细,对大家的学习或者工作具有一定的参考学习价值,需要的朋友们下面随着小编来一起学习学习吧...2020-06-08
- 这篇文章主要介绍了使用JavaScript脚本判断网页是否在微信中被打开的方法,在各种使用微信参加活动的移动版页面上经常可以用到,需要的朋友可以参考下...2016-03-09
- 有很多人在做微信的扫一扫下载。但是在微信更新之后微信将该功能给禁止掉了,也不能说是全面禁止吧,因为腾讯、微信是一家嘛,通过应用宝审核的应用好像还是可以通过扫一扫直接下载的,下面通过本篇文章给大家介绍微信扫一扫下载app的代码片段,感兴趣的朋友一起看看吧...2016-01-02
JavaScript结合Bootstrap仿微信后台多图文界面管理
这篇文章主要为大家详细介绍了js结合Bootstrap仿微信后台多图文界面管理,具有一定的参考价值,感兴趣的小伙伴们可以参考一下...2016-07-29- 这篇文章主要介绍了利用aotu.js实现微信自动添加通讯录中的联系人,本文通过实例代码给大家介绍的非常详细,对大家的学习或工作具有一定的参考借鉴价值,需要的朋友可以参考下...2020-05-28
- 这篇文章主要为大家详细介绍了JavaScript仿微信打飞机游戏的相关代码,具有一定的参考价值,感兴趣的小伙伴们可以参考一下...2017-05-09
- 这篇文章主要介绍了JS实现微信 "炸屎"大作战,本文通过实例代码图文展示给大家介绍的非常详细,对大家的学习或工作具有一定的参考借鉴价值,需要的朋友可以参考下...2021-07-30
- 在微信回复信息,POST的XML数据如下图所示 ToUserName 为接收者名称 FromUserName 为发送者名称 被动回复,响应的信息如下: 这里要注意,ToUserName和FromU...2016-05-19
