php版微信开发主动发送实例
为了方便调试用CLI方式作测试,记得代码中替换你的appid和appsecret:
比如我们想取公众号的组数据:
if (isset($argc) && $argc >= 1 && $argv[0] == __FILE__) {
$client = new WechatJSON(array(
WechatJSON::APP_ID => 'wx78acfe8257asDb1',
WechatJSON::APP_SECRET => '9ba3476db1ff75654aBceae0b20fb9',
));
$res = $client->call('/groups/get');
if (!$res) {
var_dump($client->_error);
}
var_dump($res);
}
如下图所示:

又或者我们生成菜单:
if (isset($argc) && $argc >= 1 && $argv[0] == __FILE__) {
$client = new WechatJSON(array(
WechatJSON::APP_ID => 'wx78acfe8257asDb1',
WechatJSON::APP_SECRET => '9ba3476db1ff75654aBceae0b20fb9',
));
$res = $client->call('/menu/create', array(
'button' => array(
array(
'type' => 'click',
'name' => '测试铵钮',
'key' => 'test_btn'
),array(
'type' => 'view',
'name' => '测试跳转',
'url' => 'http://www.baidu.com'
))
),WechatJSON::JSON);
if (!$res) {
var_dump($client->_error);
}
var_dump($res);
}
成功后返回OK如下图:
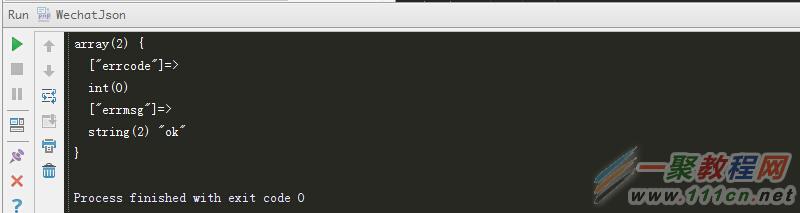
其他接口可以大家可以自己自由获取或者提交POST GET等这里不熬述了!有问题留言
微信高级接口API 类:
<?php
/**
* 微信 高级接口API Class WechatJSON
*/
class WechatJSON {
const
QR_SCENE = 'QR_SCENE',
QR_LIMIT_SCENE = 'QR_LIMIT_SCENE',
IMAGE = 'image',
VOICE = 'voice',
VIDEO = 'video',
NEWS = 'news',
MPNEWS = 'mpnews',
THUMB = 'thumb',
API_URL_PREFIX = 'https://api.weixin.qq.com/cgi-bin',
AUTH_API_URL = 'https://api.weixin.qq.com/sns/oauth2/access_token',
AUTH_URL = 'https://open.weixin.qq.com/connect/oauth2/authorize',
PAY_URL = 'https://api.weixin.qq.com/pay',
APP_ID = 'appid',
APP_SECRET = 'secret',
TIMEOUT = 'timeout',
JSON = 'json',
POST = 'post',
GET = 'get',
API_TYPE_CGI = 'cgi',
API_TYPE_PAY = 'pay';
public
$_error_number = 0,
$_error,
$_APPID,
$_APPSECRET;
protected
$_cache = array(),
$_options,
$_auth_access_token,
$_access_token,
$_timeout = 30;
static protected
$_no_need_token_apis = array(
'/showqrcode',
),
$_instance;
/**
* 单例模式
* @param array $options
* @return Wechat_API
*/
static public function getInstance(array $options = array()) {
if (empty(self::$_instance)) {
self::$_instance = new self ($options);
}
return self::$_instance;
}
/**
* @param array $options {Wechat_API::APP_ID:"", Wechat_API::APP_SECRET:"", Wechat_API::TIMEOUT:""}
*/
public function __construct(array $options = array()) {
$this->_options = array(
'timeout' => $this->_timeout,
);
$_options = array_merge($this->_options, $options);
$this->_APPID = $_options['appid'];
$this->_APPSECRET = $_options['secret'];
$this->_timeout = $_options['timeout'];
}
/**
* 提交请求
* @param $url
* @param array $params
* @param string $type Wechat_API::POST|Wechat_API::GET
* @return bool|mixed
*/
public function request($url, $params = array(), $type = self::POST, $format_result = true) {
$ch = curl_init();
if ($type == self::GET) {
$url = $url.'?'.http_build_query($params);
}
curl_setopt_array($ch, array(
CURLOPT_URL => $url,
CURLOPT_TIMEOUT => $this->_timeout,
CURLOPT_USERAGENT => 'wordpress_wechat_client/0.1.'.rand(1,6),
CURLOPT_HEADER => 0,
CURLOPT_FOLLOWLOCATION => 1,
CURLOPT_RETURNTRANSFER => 1,
CURLOPT_SSL_VERIFYPEER => 0,
CURLOPT_SSLVERSION => 3,
// CURLOPT_VERBOSE => 1,
));
if ($type == self::POST) {
curl_setopt($ch, CURLOPT_POST, 1);
curl_setopt($ch, CURLOPT_POSTFIELDS, $params);
}
if ($type == self::JSON) {
//微信的破接口竟然不支持unicode转义符,违反JSON协定,只能把JSON字符中的unicode转回来
$data = preg_replace('/\\\\u([a-f0-9]{4})/e', "json_decode('\"$0\"', 1)", json_encode($params));
curl_setopt($ch, CURLOPT_POSTFIELDS, $data);
curl_setopt($ch, CURLOPT_HTTPHEADER, array('Content-Type:application/json'));
}
$res = curl_exec($ch);
$this->_error_number = curl_errno($ch);
$this->_error = curl_error($ch);
curl_close($ch);
if ($this->_error_number) {
return false;
}
return ($format_result ? $this->parseResult($res) : $res);
}
/**
* 处理返回结果
* @param $res
* @return bool|mixed
*/
protected function parseResult($res) {
$res = json_decode($res, true);
if (!empty($res)) {
if (isset($res['errcode']) && $res['errcode']) {
$this->_error_number = $res['errcode'];
$this->_error = $res['errmsg'];
return false;
}
return $res;
}
return false;
}
public function getAccessToken() {
$cache = $this->cache($this->_APPID.':'.'access_token');
if ($cache) {
return $cache;
}
$res = $this->request(self::API_URL_PREFIX.'/token', array(
'grant_type' => 'client_credential',
self::APP_ID => $this->_APPID,
self::APP_SECRET => $this->_APPSECRET,
), self::GET);
if ($res) {
$this->cache($this->_APPID.':'.'access_token', $res['access_token']);
return $res['access_token'];
}
return false;
}
/**
* 预留缓存接口 (强烈建议实现此接口,用于缓存access_token,每次查询会节省很多时间)
* @param $key 缓存索引key
* @param null $value 缓存值
* @param int $timeout 缓存超时时间
* @return bool|mixed
*/
public function cache($key, $value = null, $timeout = 7200) {
if (!session_id()) {
session_start();
}
if (empty($value)) {
if (isset($_SESSION[$key])) {
return $_SESSION[$key];
}
return false;
}
$_SESSION[$key] = $value;
return false;
}
/**
* 调用具体的接口 注意:使用创建数据时使用Wechat_API::JSON
* @param $api_name REST规格接口名称
* @param array $params 接口参数
* @param string $type Wechat_API::GET|Wechat_API::POST|Wechat_API::JSON
* @return bool|mixed
*/
public function call($api_name, $params = array(), $type = self::GET, $api_type = self::API_TYPE_CGI) {
if($api_type == self::API_TYPE_PAY) {
$url = self::PAY_URL.$api_name;
} else {
$url = self::API_URL_PREFIX.$api_name;
}
if (in_array($api_name, self::$_no_need_token_apis)) {
$res = $this->request($url, $params, $type);
if ($res) {
return $res;
}
}
$this->_access_token = $this->getAccessToken();
if ($this->_access_token) {
if ($type == self::JSON) {
$url = $url.'?access_token='.$this->_access_token;
} else {
$params['access_token'] = $this->_access_token;
}
$res = $this->request($url, $params, $type);
if ($res) {
return $res;
}
}
return false;
}
/**
* 生成二维码
*
* @param int $scene_id 场景ID 临时二维码int32 | 永久二维码 < 1000
* @param string $type 二维码类型 Wechat_API::QR_LIMIT_SCENE | Wechat_API::QR_SCENE 临时二维码|永久二维码
* @return bool|mixed
*/
public function GetQrCode($scene_id = 0, $type = self::QR_LIMIT_SCENE) {
$res = $this->call('/qrcode/create', array(
'expire_seconds' => 1800,
'action_name' => $type,
'action_info' => array(
'scene' => array(
'scene_id' => $scene_id,
)
)
), self::JSON);
if ($res && isset($res['ticket'])) {
$res = $this->request('https://mp.weixin.qq.com/cgi-bin/showqrcode', array(
'ticket' => $res['ticket'],
), self::GET, false);
if ($res) {
return $res;
}
}
return false;
}
public function MediaUpload($file_full_path, $type = self::THUMB) {
$this->_access_token = $this->getAccessToken();
$res = false;
if ($this->_access_token) {
$url = 'http://file.api.weixin.qq.com/cgi-bin/media/upload?';
$url = $url.'access_token='.$this->_access_token.'&type='.$type;
$res = $this->request($url, array(
'media' => '@'.$file_full_path,
), self::POST);
}
return $res;
}
public function GetMedia($media_id) {
$this->_access_token = $this->getAccessToken();
if ($this->_access_token) {
$res = $this->request('http://file.api.weixin.qq.com/cgi-bin/media/get', array(
'access_token' => $this->_access_token,
'media_id' => $media_id,
), self::GET, false);
if ($res) {
$res_json = json_decode($res, 1);
if (!$res_json) {
return $res;
}
$this->_error_number = $res_json['errcode'];
$this->_error = $res_json['errmsg'];
}
}
return false;
}
}
用户授权也是高级接口那部分内容,只是把它独立出来,这样让整个微信框架条理清晰些,但我们用它首先要在微信后台设置OA2的URL,这里的URL和教程一的有所不同。它是不带http://开头的域名。
首先登陆你的微信后台找到《开发者中心》:
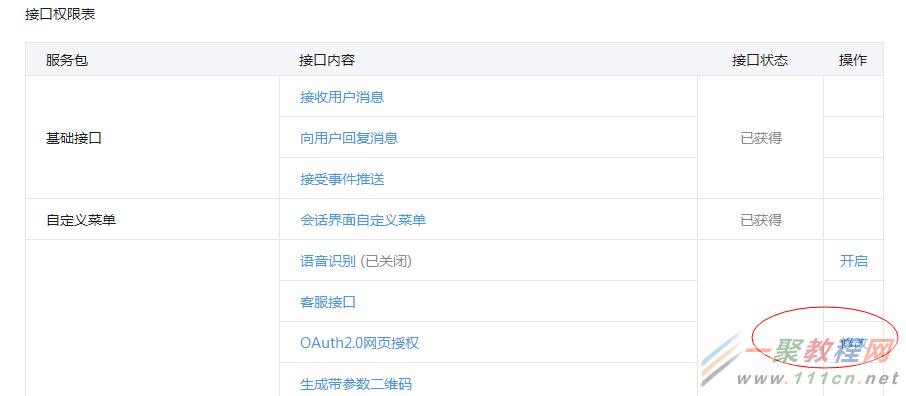
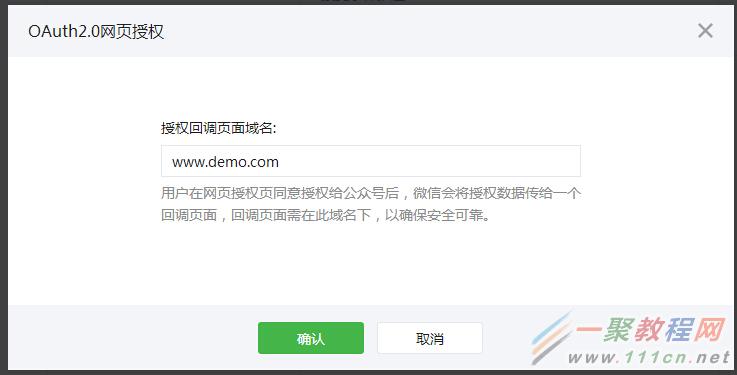
点击修改填入我们的域名如下格式:
好了,最基本要点的OA2要求搞好,下面我们用个WechatAuth类生成一个OA2的URL格式,然后再从服务号里,以链接或者菜单又或者图文,跳到微信内置的WEB里就实现了我们取openid或者授权取用户消息!
例子代码生成snsapi_base或者snsapi_userinfo:
$auth = new WechatAuth(array(
WechatAuth::APP_ID => 'wx32259fc5sd5aac12B',
WechatAuth::APP_SECRET => '7ef73d3c56fcd0d984862ff217d2c648',
));
$url = $auth->getLoginUrl(array(
'redirect_uri' => 'http://www.demo.com/wp/ken',
'scope' => 'snsapi_userinfo' //snsapi_base
));
echo $url;
执行后,我们会得到如下OA2的URL:
https://open.weixin.qq.com/connect/oauth2/authorize?appid=wx32259fc5d5aac13d&redirect_uri=http%3A%2F%2Fwww.demo.com%2Fwp%2Fken&response_type=code&scope=snsapi_userinfo&state=STATE#wechat_redirects
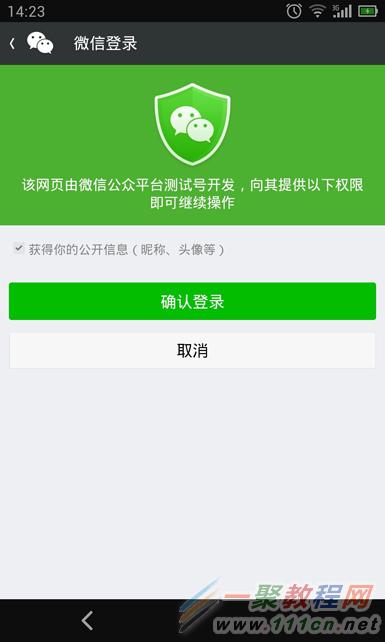
然后我们在服务号里以刚才说到的菜单好,链接好 点击转到微信内置的浏览器里,如果你的scope方式为snsapi_userinfo时会弹出授权界面,base时不会弹默认执行后会返回openid:
好了,OA2无非就是让我们生成特定格式的URL,让我们点过去取openid或者用户信息(无论是否关注了你的服务号,只要确认授权),可以运用本站微信的实例有相关OA2的运用或者留言给我!
WechatAuth类:
<?php
/**
* 微信 OAuth2.0授权接口
* Class WechatAuth
*/
class WechatAuth {
const
JSON = 'json',
POST = 'post',
GET = 'get',
APP_ID = 'appid',
APP_SECRET = 'secret',
API_URL_PREFIX = 'https://api.weixin.qq.com/sns';
public
$_error_number = 0,
$_error,
$_APPID,
$_APPSECRET;
protected
$_cache = array(),
$_options,
$_openid,
$_access_token,
$_refresh_token,
$_timeout = 30;
static protected
$_instance;
/**
* 单例模式
* @param array $options
* @return WechatAuth
*/
static public function getInstance(array $options = array()) {
if (empty(self::$_instance)) {
self::$_instance = new WechatAuth($options);
}
return self::$_instance;
}
/**
* @param array $options {WechatAuth::APP_ID:"", WechatAuth::APP_SECRET:""}
*/
public function __construct(array $options = array()) {
$this->_options = array(
'timeout' => $this->_timeout,
);
$_options = array_merge($this->_options, $options);
$this->_APPID = $_options['appid'];
$this->_APPSECRET = $_options['secret'];
$this->_timeout = $_options['timeout'];
}
/**
* 提交请求
* @param $url
* @param array $params
* @param string $type Webchat_API::POST|Webchat_API::GET
* @return bool|mixed
*/
public function request($url, $params = array(), $type = self::POST) {
$ch = curl_init();
if ($type == self::GET) {
$url = $url.'?'.http_build_query($params);
}
curl_setopt_array($ch, array(
CURLOPT_URL => $url,
CURLOPT_TIMEOUT => $this->_timeout,
CURLOPT_USERAGENT => 'wordpress_wechat_client/0.1.'.rand(1,6),
CURLOPT_HEADER => 0,
CURLOPT_FOLLOWLOCATION => 1,
CURLOPT_RETURNTRANSFER => 1,
CURLOPT_SSL_VERIFYPEER => 0,
CURLOPT_SSLVERSION => 3,
// CURLOPT_VERBOSE => 1,
));
if ($type == self::POST) {
curl_setopt($ch, CURLOPT_PORT, 1);
curl_setopt($ch, CURLOPT_POSTFIELDS, $params);
}
if ($type == self::JSON) {
//微信的破接口竟然不支持unicode转义符,违反JSON协定,只能把JSON字符中的unicode转回来
$data = preg_replace('/\\\\u([a-f0-9]{4})/e', "json_decode('\"$0\"', 1)", json_encode($params));
curl_setopt($ch, CURLOPT_POSTFIELDS, $data);
curl_setopt($ch, CURLOPT_HTTPHEADER, array('Content-Type:application/json'));
}
$res = curl_exec($ch);
$this->_error_number = curl_errno($ch);
$this->_error = curl_error($ch);
curl_close($ch);
if ($this->_error_number) {
return false;
}
return $this->parseResult($res);
}
/**
* 处理返回结果
* @param $res
* @return bool|mixed
*/
protected function parseResult($res) {
$res = json_decode($res, true);
if (!empty($res)) {
if (isset($res['errcode']) && $res['errcode']) {
$this->_error_number = $res['errcode'];
$this->_error = $res['errmsg'];
return false;
}
return $res;
}
return false;
}
/**
* 获取当前URL
* @return string
*/
static public function getCurrentUrl() {
$pageURL = 'http';
if (isset($_SERVER["HTTPS"]) && $_SERVER["HTTPS"] == "on") {
$pageURL .= "s";
}
$pageURL .= "://";
if (isset($_SERVER['SERVER_PORT']) && $_SERVER["SERVER_PORT"] != "80") {
$pageURL .= $_SERVER["SERVER_NAME"] . ":" . $_SERVER["SERVER_PORT"] . $_SERVER["REQUEST_URI"];
} else {
if(isset($_SERVER["SERVER_NAME"]) && isset($_SERVER["REQUEST_URI"]))
$pageURL .= $_SERVER["SERVER_NAME"] . $_SERVER["REQUEST_URI"];
}
return $pageURL;
}
/**
* 获取访问token
* @param bool $refresh 是否强制刷新
* @return bool|mixed
*/
public function getAuthAccessToken($refresh = false) {
$code = isset($_GET['code']) ? $_GET['code'] : '';
$state = isset($_GET['state']) ? $_GET['state'] : '';
$cache = $this->cache('auth_access_token');
if ($cache && ! $refresh) {
return array('access_token' => $cache, 'code' => $code, 'state' => $state);
}
$res = $this->request(self::API_URL_PREFIX.'/oauth2/access_token', array(
self::APP_ID => $this->_APPID,
self::APP_SECRET => $this->_APPSECRET,
'code' => $code,
'grant_type' => 'authorization_code',
), self::GET);
if ($res) {
$this->cache('auth_access_token', $res['access_token']);
$this->cache('auth_refresh_token', $res['refresh_token']);
$this->cache('auth_openid', $res['openid']);
} else {
if ($this->_error_number == 42001) {
return $this->refreshAccessToken();
}
}
return array('access_token' => $res['access_token'], 'code' => $code, 'state' => $state);
}
/**
* 刷新访问token
* @return mixed
*/
public function refreshAccessToken() {
$code = isset($_GET['code']) ? $_GET['code'] : '';
$state = isset($_GET['state']) ? $_GET['state'] : '';
$cache = $this->cache('auth_refresh_token');
if ($cache) {
$this->_refresh_token = $cache;
}
$res = $this->request(self::API_URL_PREFIX.'/oauth2/refresh_token', array(
self::APP_ID => $this->_APPID,
'refresh_token' => $this->_refresh_token,
'grant_type' => 'refresh_token',
), self::GET);
if ($res) {
$this->cache('auth_access_token', $res['access_token']);
$this->cache('auth_refresh_token', $res['refresh_token']);
$this->cache('auth_openid', $res['openid']);
}
return array('access_token' => $res['access_token'], 'code' => $code, 'state' => $state);
}
/**
* 获取用户信息
* @param bool $refresh 是否强制刷新
* @return bool|mixed
*/
public function getUserInfo($refresh = false) {
$this->_access_token = $this->getAuthAccessToken($refresh);
$cache = $this->cache('auth_openid');
if ($cache) {
$this->_openid = $cache;
}
$res = $this->request(self::API_URL_PREFIX.'/userinfo', array(
'access_token' => $this->_access_token,
'openid' => $this->_openid,
), self::GET);
if ($res) {
return $res;
}
return false;
}
/**
* 获取用户授权地址
* @param array $options
* @return string
*/
public function getLoginUrl($options = array()) {
$_options = array(
self::APP_ID => $this->_APPID,
'redirect_uri' => self::getCurrentUrl(),
'response_type' => 'code',
'scope' => 'snsapi_base', //snsapi_base | snsapi_userinfo
'state' => 'STATE',
);
$params = array_merge($_options, $options);
return 'https://open.weixin.qq.com/connect/oauth2/authorize?'.http_build_query($params).'#wechat_redirects';
}
/**
* 缓存接口Session实现
* @param $key 缓存索引key
* @param null $value 缓存值
* @return bool|mixed
*/
public function cache($key, $value = null) {
if (!session_id()) {
session_start();
}
if (empty($value)) {
if (isset($_SESSION[$key])) {
return $_SESSION[$key];
}
return false;
}
$_SESSION[$key] = $value;
return false;
}
}
短网址的实现原理就是有一个数据表会配置文件将短网址和实际网址进行对应,当请求某个短网址时,程序跳转到对应的实际网址上去,从而实现网址的访问。
方案1:PHP+MySQl实现短网址的生成和读取
常规的方案我们将生成好的短网址和原网址对应到一张数据表中,然后供读取使用。我们先来看如何生成唯一的短网址。
//生成短网址
function code62($x){
$show='';
while($x>0){
$s=$x % 62;
if ($s>35){
$s=chr($s+61);
}elseif($s>9&&$s<=35){
$s=chr($s+55);
}
$show.=$s;
$x=floor($x/62);
}
return $show;
}
function shorturl($url){
$url=crc32($url);
$result=sprintf("%u",$url);
return code62($result);
}
echo shorturl('http://www.111cn.net/');
//1EeIv2
使用以上PHP代码可以生成唯一的6位的短网址,然后我们将生成的短网址与原网址一起写入到MySQL表中,插入数据库的代码这里我就不写了,这是PHP基础。
接着,我们有一个link.php用来接收读取url并实现真实跳转。
include_once('connect.php'); //连接数据库
$url = $_GET['url'];
if(isset($url) && !empty($url)){
$sql = "select url from shorturl where codeid='$url'";
$query = mysql_query($sql);
if($row=mysql_fetch_array($query)){
$real_url = $row['url'];
header('Location: ' . $real_url);
}else{
header('HTTP/1.0 404 Not Found');
echo 'Unknown link.';
}
}else{
header('HTTP/1.0 404 Not Found');
echo 'Unknown link.';
}
代码中,如果得到短网址对应的真实url,会使用header跳转到真实的页面上去,否则返回404代码。这样我们可以使用如: http://yourdomain/link.php?url=xxx来实现短网址访问。
继续,我们使用URL rewrite即重写功能来实现诸如可以通过地址:http://yourdomain/xxx 来访问。
以下是rewrite规则:
#Apache规则:
RewriteRule ^/(.*)$ /link.php?url=$1 [L]
#如果使用nginx,规则这样写:
rewrite ^/(.*)$ /link.php?url=$1 last;
方案2:PHP+ini实现短网址技术
对于方案1使用数据库的做法好处就是操作方便,而大量短网址查询需要做优化。而方案2则放弃数据库,使用ini配置,我们将短网址和真实网址配置在ini文件中,PHP直接通过parse_ini_file()读取ini文件,几行代码就可以实现短网址的跳转。
links.ini文件像这样配置:
baidu = https://www.baidu.com/
qq = http://www.qq.com/
hw = http://www.111cn.net/
dm = http://m.111cn.net
而index.php的代码可以这样写:
$links = parse_ini_file('links.ini');
if(isset($_GET['l']) && array_key_exists($_GET['l'], $links)){
header('Location: ' . $links[$_GET['l']]);
}
else{
header('HTTP/1.0 404 Not Found');
echo 'Unknown link.';
}
当然,我们还需要配置下rewrite规则。
#Apache规则:
RewriteRule ^/(.*)$ /index.php?l=$1 [L]
#如果使用nginx,规则这样写:
rewrite ^/(.*)$ /index.php?l=$1 last;
php版微信数据统计接口其实是非常的好用了在前版本还没有此功能是后面的版本增加上去了,下面来看一个php版微信数据统计接口的例子具体如下微信在1月6日时放出了新的数据分析接口传送门:

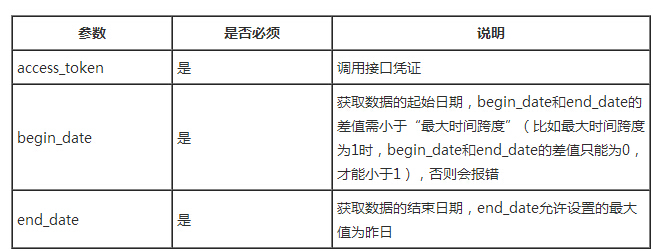
请注意:
1、接口侧的公众号数据的数据库中仅存储了2014年12月1日之后的数据,将查询不到在此之前的日期,即使有查到,也是不可信的脏数据;
2、请开发者在调用接口获取数据后,将数据保存在自身数据库中,即加快下次用户的访问速度,也降低了微信侧接口调用的不必要损耗。
用户分析数据接口指的是用于获得公众平台官网数据统计模块中用户分析数据的接口,具体接口列表如下(暂无用户属性数据接口):
最大时间跨度是指一次接口调用时最大可获取数据的时间范围,如最大时间跨度为7是指最多一次性获取7天的数据。access_token的实际值请通过“获取access_token”来获取。
接口调用请求说明
用户分析数据接口(包括接口列表中的所有接口)需要向相应接口调用地址POST以下示例数据包:
{
"begin_date": "2014-12-02",
"end_date": "2014-12-07"
}
调用参数说明
粗略看了下,暂时还是内测阶段,不过因为是新接口,所以要改进下本站所用的微信高级接口的类。修改如下:
在类里加上新接口常量:
API_DATA_CUBE_URL = 'https://api.weixin.qq.com/datacube',
API_TYPE_DATA = 'datacube',
修改call方法:因为它要求URL参数只是access token所以跟以前JSON时一样,不过要在判断里加入datacube的判断(注:注释已经说明):
public function call($api_name, $params = array(), $type = self::GET, $api_type = self::API_TYPE_CGI) {
//加入datacube后,用switch来组接口URL
switch(true) {
case $api_type == self::API_TYPE_PAY :
$url = self::PAY_URL.$api_name;
break;
case $api_type == self::API_TYPE_DATA:
$url = self::API_DATA_CUBE_URL.$api_name;
break;
default :
$url = self::API_URL_PREFIX.$api_name;
}
if (in_array($api_name, self::$_no_need_token_apis)) {
$res = $this->request($url, $params, $type);
if ($res) {
return $res;
}
}
$this->_access_token = $this->getAccessToken();
if ($this->_access_token) {
//加多个or判断带上access_token
if ($type == self::JSON || $api_type == self::API_TYPE_DATA) {
$url = $url.'?access_token='.$this->_access_token;
} else {
$params['access_token'] = $this->_access_token;
}
$res = $this->request($url, $params, $type);
if ($res) {
return $res;
}
}
return false;
}
最后CLI方式call文档中一个getinterfacesummary接口调试(注意:是POST方式给接口):
if (isset($argc) && $argc >= 1 && $argv[0] == __FILE__) {
$client = new WechatJSON(array(
WechatJSON::APP_ID => 'wx78sfsd023744d51',
WechatJSON::APP_SECRET => '9ba3476db1fsfsff512esf2f630fb9',
));
$res = $client->call('/getinterfacesummary', array(
'begin_date' => '2014-12-01',
'end_date' => '2014-12-31'
), WechatJSON::POST, WechatJSON::API_TYPE_DATA);
if (!$res) {
var_dump($client->_error);
}
var_dump($res);
}
运行结果,虽然是API 未授权(毕竟还是内测有条件的合作伙伴有资料,公众号的就等吧):
后记,以后再做个linux任务让后台自己每隔一段时间(一周或30天)因为数据统计接口有的是7天,有的是30天。这样执行取到数据再写进库表,生成图报表,省下自己log一些官方已经给你log的统计!
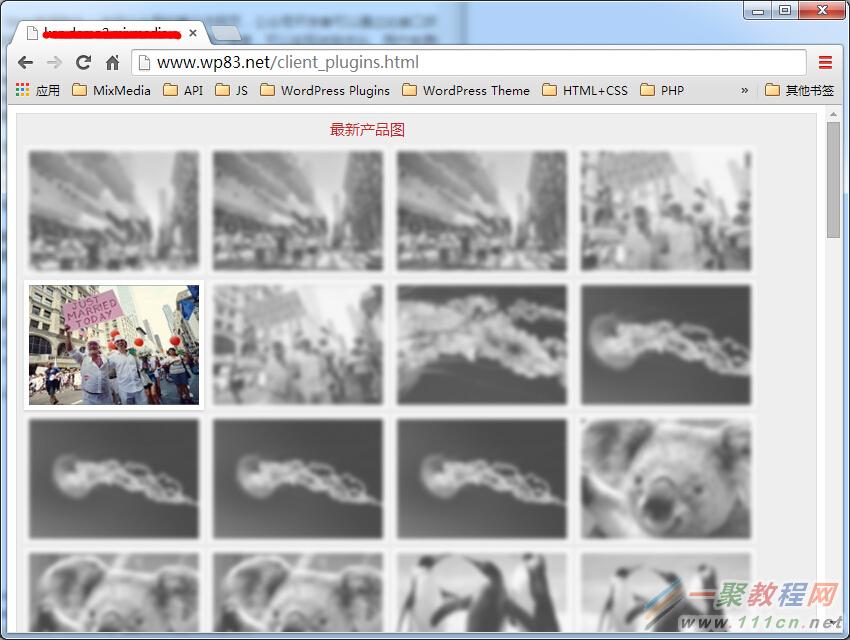
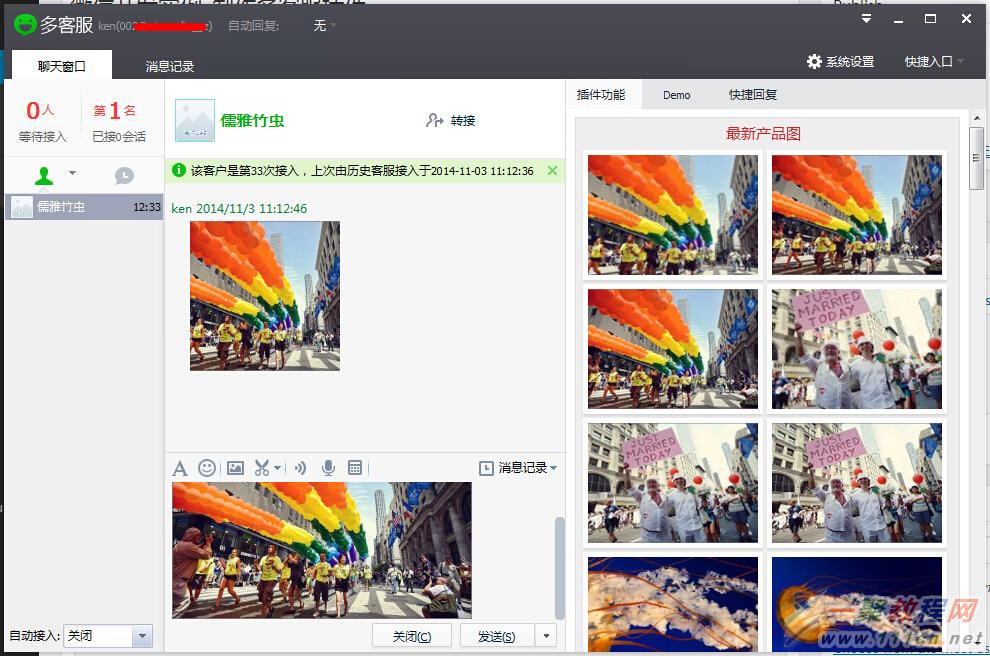
其实多客服插件很简单,就是简单的HTML结构。当然结合异步AJAX来获取数据。至于微信后台怎么设置插件的URL这里不多说了,看看API,别告诉我你不懂?做个插件代码中只需要调用微信官方给出的window.external.PutMsg(JSON)就可以选定的三种内容(文本、图片、图文)调到多客服软件的发送框!下面以发送图片为例。过程中是AJAX后台取图片,然后显示出来,再鼠标单击点选发送。(注意微信发图片有大小限制,请看官方API)
效果图:
client
一、我们要组织的JSON格式:
{
msg:{
head:{
random:(new Date()).valueOf().toString()
},
body:[{
type:1,
content:{
picUrl:imageUrl
}
}]
}
}
二、插件my_plugin.html排版布局的HTML(即插件窗口)最好是响应式,不过写固定宽度也行,官方给出的推荐宽度是420px
<html>
<head>
<meta http-equiv="Content-Type" content="text/html; charset=utf8" />
<meta http-equiv="Content-Language" content="zh-cn" />
<meta http-equiv="X-UA-Compatible" content="IE=EmulateIE7" />
<title></title>
</head>
<style>
body {
font-family: "Microsoft Yahei", Arial, sans-serif;
font-size: 14px;
background: #FFF;
overflow-x:hidden;
}
.title{font-size: 15px;margin-bottom:5px;}
.content{margin-bottom:10px;}
.textarea{background-color: #FFFCEC;}
.module{background: #eee;border: 1px solid #DDDDDD; padding:5px; margin-bottom:10px;}
.button {
margin-top: 8px;
padding: 0 20px;
text-align: center;
text-decoration: none;
font: 12px/25px Arial, sans-serif;
border-radius: 5px;
}
.green {color: #3e5706; background: #a5cd4e;}
.img {width:170px;height:120px;}
li.left{float:left;margin:8px 0 0 5px;padding:0;border:1px solid #0088d0;}
.gallery{
list-style: none;
margin: 0; padding: 0;
width: 100%;
font-size: 0; /* fix inline-block spacing */
}
.gallery li{
display: inline-block;
*display: inline;
zoom:1;
width: 170px; height: 120px;
margin: 2px;
border: 5px solid #fff;
-moz-box-shadow: 0 2px 2px rgba(0,0,0,.1);
-webkit-box-shadow: 0 2px 2px rgba(0,0,0,.1);
box-shadow: 0 2px 2px rgba(0,0,0,.1);
-webkit-transition: all .3s ease;
-moz-transition: all .3s ease;
-ms-transition: all .3s ease;
-o-transition: all .3s ease;
transition: all .3s ease;
}
.gallery:hover li:not(:hover){
-webkit-filter: blur(2px) grayscale(1);
-moz-filter: blur(2px) grayscale(1);
-o-filter: blur(2px) grayscale(1);
-ms-filter: blur(2px) grayscale(1);
filter: blur(2px) grayscale(1);
opacity: .7; /* fallback */
}
</style>
<body style="">
<div>
<div class="module">
<div class="title">
<span style="margin-left:39%;color:#C62A2A;">最新产品图</span>
</div>
<div class="content">
<ul class="gallery">
</ul>
</div>
<div style="text-align: center;clear:both;">
<input type="button" class="button" id="add" onclick="get()" value="重取"/>
</div>
<div>
<span id="putmsgret" style="color:red;font-size: 11px"></span>
</div>
</div>
</div>
<script type="text/javascript" src="http://static.paipaiimg.com/js/victor/lib/jquery.min.js"></script>
<script type="text/javascript" src="json2.min.js"></script>
<script>
var ul = $("ul");
get();
function get() {
$("li").remove();
$.getJSON('http://www.wp83.net/getImages.php',null,function(data){
$.each(data,function(index, url){
var li = '<li class="left">';
li += '<img class="img" src="thumb.php?src='+url+'&w=165&h=130" /></li>';
$("ul").append(li);
});
});
}
function MCS_ClientNotify(EventData) {
EventData = strToJson(EventData);
switch(EventData['event']){
case 'OnUserChange':{
OnUserChange(EventData);
break;
}
}
}
ul.on('click', ".img",function() {
var $img = $(this);
var thumbUrl = $img.attr('src');
var imageUrl = thumbUrl.substring(thumbUrl.indexOf('=')+1,thumbUrl.indexOf('&'));
var json = setmsg(imageUrl);
var strReturn = window.external.PutMsg(json);
document.getElementById('putmsgret').innerHTML= 'Status: ' + strReturn;
setTimeout(close_tips,3000);
});
/*ul.on('mouseenter mouseout', ".img",function(event) {
var $li = $(this).parents("li");
if (event.type == 'mouseenter') {
$li.css({background:'#EDED00'});
} else {
$li.css({background:'#FFF'});
}
});*/
function close_tips(){
document.getElementById('putmsgret').innerHTML = '';
}
function setmsg(imageUrl) {
var json = {
msg:{
head:{
random:(new Date()).valueOf().toString()
},
body:[{
type:1,
content:{
picUrl:imageUrl
}
}]
}
};
return JSON.stringify(json);
}
function OnUserChange(data) {
document.getElementById('toUser').innerHTML = data['userid'];
}
function strToJson(str){
var json = (new Function("return " + str))();
return json;
}
</script>
</body>
</html>
三、后台PHP要处理的获取图片目录的代码:(这个自由发挥了)
<?php
class GetImage {
const
HOST = 'http://www.wp83.net/',
JPG = 'jpg';
public
$files = array();
protected static
$allow_types = array(self::JPG);
public function __construct($dir){
$this->get_allfiles($dir, $this->files);
}
private function get_allfiles($path,&$files) {
if(is_dir($path)){
$dp = dir($path);
while ($file = $dp ->read()){
if($file !="." && $file !=".."){
$this->get_allfiles($path."/".$file, $files);
}
}
$dp ->close();
}
if(is_file($path)){
$type = substr($path,-3);
if(in_array($type, self::$allow_types))
$files[] = self::HOST.$path;
}
}
}
$dir = 'wp-content/uploads';
$images = new GetImage($dir);
echo json_encode($images->files);
然后我们可以直接用浏览器调试运行没问题,再去微信后台设置插件的url。因为它只是个html
在浏览器调试效果:
点选图片后发送效果:
相关文章
- 这篇文章主要为大家详细介绍了C#微信开发之发送模板消息的相关资料,具有一定的参考价值,感兴趣的小伙伴们可以参考一下...2020-06-25
- 这篇文章主要介绍了iOS新版微信底部返回横条问题的解决,文中通过示例代码介绍的非常详细,对大家的学习或者工作具有一定的参考学习价值,需要的朋友们下面随着小编来一起学习学习吧...2020-06-30
- 这篇文章主要介绍了vscode搭建STM32开发环境的详细过程,本文给大家介绍的非常详细,对大家的学习或工作具有一定的参考借鉴价值,需要的朋友可以参考下...2021-05-02
- 为公司系统业务需要,这几天了解了一下微信和支付宝扫码支付的接口,并用c#实现了微信和支付宝扫码支付的功能。需要的朋友跟随小编一起看看吧...2020-06-25
- 这篇文章主要介绍了Python爬取微信小程序通用方法代码实例详解,文中通过示例代码介绍的非常详细,对大家的学习或者工作具有一定的参考学习价值,需要的朋友可以参考下...2020-09-29
- 这篇文章主要介绍了C#实现的微信网页授权操作逻辑封装,分析了微信网页授权操作的原理、步骤并给出了C#实现的网页授权操作逻辑封装类,需要的朋友可以参考下...2020-06-25
- 下面我们一起来看一篇关于 安卓开发之Intent传递Object与List的例子,希望这个例子能够为各位同学带来帮助。 Intent 不仅可以传单个的值,也可以传对象与数据集合...2016-09-20
- 这篇文章主要介绍了iOS新版微信底部工具栏遮挡问题完美解决,文中通过示例代码介绍的非常详细,对大家的学习或者工作具有一定的参考学习价值,需要的朋友们下面随着小编来一起学习学习吧...2020-06-30
- 这篇文章主要为大家详细介绍了C#图像识别,微信跳一跳机器人,具有一定的参考价值,感兴趣的小伙伴们可以参考一下...2020-06-25
- 这篇文章主要为大家详细介绍了php微信公众账号开发之五个坑,具有一定的参考价值,感兴趣的小伙伴们可以参考一下...2016-10-02
- 在日常开发中,总会接触到各种接口,前后端数据传输接口,第三方业务平台接口,下面这篇文章主要给大家介绍了关于如何设计一个安全的API接口的相关资料,需要的朋友可以参考下...2021-08-12
- 在微信公众号平台开发者那里,在“账号管理”那里,有一项功能是“生成带参数的二维码”,通过这儿生成的二维码,只要通过微信扫一扫之后,会把事件自动推送到微...2016-05-19
- 有很多人在做微信的扫一扫下载。但是在微信更新之后微信将该功能给禁止掉了,也不能说是全面禁止吧,因为腾讯、微信是一家嘛,通过应用宝审核的应用好像还是可以通过扫一扫直接下载的,下面通过本篇文章给大家介绍微信扫一扫下载app的代码片段,感兴趣的朋友一起看看吧...2016-01-02
- 这篇文章主要介绍了简单用VBS调用企业微信机器人发定时消息的方法,文中通过示例代码介绍的非常详细,对大家的学习或者工作具有一定的参考学习价值,需要的朋友们下面随着小编来一起学习学习吧...2020-12-08
- 这篇文章主要介绍了python实现企业微信定时发送文本消息的实例代码,本文给大家介绍的非常详细,对大家的学习或工作具有一定的参考借鉴价值,需要的朋友可以参考下...2020-11-25
- 这篇文章主要介绍了HTML5实现微信拍摄上传照片功能,实现HTML5 Canvas手机拍摄,本地压缩上传图片时遇到问题的解决方法,具有一定的参考价值,感兴趣的小伙伴们可以参考一下...2017-04-27
- 这篇文章主要介绍了解决微信授权成功后点击按返回键出现空白页和报错的问题,文中通过示例代码介绍的非常详细,对大家的学习或者工作具有一定的参考学习价值,需要的朋友们下面随着小编来一起学习学习吧...2020-06-08
- 这篇文章主要给大家分享我对JS插件开发的一些感想和心得的相关资料,需要的朋友可以参考下...2016-02-09
- 六月才刚刚过半,就已经相继有中兴、华为被美国起诉,此次微信也未能幸免,被美国一家叫Uniloc的公司起诉,理由是微信的语音群聊、视频聊天等功能侵犯其两项与电话会议技术相关的专利,该公司要求微信立即中止这些功能。...2016-07-04
- 从这一节开始,我们将从零开始打造我们的chrome插件工具库,第一节我们将讲一下插件开发的基础知识并构建一个简单但却很实用的插件,在构建之前,我们先简单的了解一下插件以及插件开发的基础知识...2020-10-03