在php中获取数组键名最简单的办法就是直接利用foreach遍历就可以直接输入key,value值了,下面我来给大家演示几个实例吧。
我php foreach()函数可以遍历数组,取出数组的键值,怎么取键名$key?或只取第一个键名?比如下面的例子
| 代码如下 |
复制代码 |
|
$keyarray = array(
'12020011' => '2b70e63ffdf',
'12020017' => '20767a021'
);
|
第一种方法,我可以用foreach 取出第一个键名.如下
| 代码如下 |
复制代码 |
|
foreach($keyarray as $key => $value){
$a[]=$key;
}
print_r ($a[0]);exit;
|
也可以用 print_r ($a);取出所有键名第二种方法是用array_keys()函数.
| 代码如下 |
复制代码 |
|
$arrKeys = array_keys($keyarray);
print_r ($arrKeys[0]);exit;
|
上面有方法可以达到相同的效果.
以前我们都会去做ajax+php实现文件上传,这样可以在用户不刷新页面是动态上传图片,提高了用户体验,那时用得最多的就是使用iframe来操作了,下面我介绍一下真正的ajax php图片上传实例。
之前一直在研究ajax+php的表单无刷新验证,主要是用在注册提交表单上面的,ajax技术的使用使访客对于网页的友好度大大增加,作为提升页面友好的最主要技术,ajax是必不可少的。
当然,ajax不仅仅只有表单的无刷新验证,还可以更好地应用到页面的其它地方,凡是无刷新的地方基本上都有ajax技术的身影,今天讨论的是ajax+php无刷新上传图片。

无刷新上传图片的技术常常应用在上传附件或图片上传,比如常见的QQ邮箱上传附件,163邮箱上传附件,QQ空间上传图片等,这类都是应用了ajax无刷新的技术,可以让我们在当前页看到上传的附件,而在一般的小站点后台,上传产品时,往往看不到上传的产品图片的情况,这样往往起不到很好的效果。
下面是一款ajax+php的无刷新上传图片的源码,这仅仅是一个实例,而修改这个实例便可以很好地应用在网页当中,为你的页面增加一款无刷新的图片上传效果吧,这样的效果很多,可以到网上去查找。
file.php文件
| 代码如下 |
复制代码 |
|
<!DOCTYPE html PUBLIC "-//W3C//DTD XHTML 1.0 Transitional//EN" "http://www.w3.org/TR/xhtml1/DTD/xhtml1-transitional.dtd">
<html xmlns="http://www.w3.org/1999/xhtml">
<head>
<meta http-equiv="Content-Type" content="text/html; charset=gb2312" />
<title>无标题文档</title>
</head>
<body>
<?
$sort=12;
$f_type=strtolower("swf,jpg,rar,zip,7z,iso,gif");//设置可上传的文件类型
$file_size_max=200*1024*1024;//限制单个文件上传最大容量
$overwrite = 0;//是否允许覆盖相同文件,1:允许,0:不允许
$f_input="Files";//设置上传域名称
foreach($_FILES[$f_input]["error"] as $key => $error){
$up_error="no";
if ($error == UPLOAD_ERR_OK){
$f_name=$_FILES[$f_input]['name'][$key];//获取上传源文件名
$uploadfile=$uploaddir.strtolower(basename($f_name));
$tmp_type=substr(strrchr($f_name,"."),1);//获取文件扩展名
$tmp_type=strtolower($tmp_type);
if(!stristr($f_type,$tmp_type)){
echo "<script>alert('对不起,不能上传".$tmp_type."格式文件, ".$f_name." 文件上传失败!')</script>";
$up_error="yes";
}
if ($_FILES[$f_input]['size'][$key]>$file_size_max) {
echo "<script>alert('对不起,你上传的文件 ".$f_name." 容量为".round($_FILES[$f_input]
['size'][$key]/1024)."Kb,大于规定的".($file_size_max/1024)."Kb,上传失败!')</script>";
$up_error="yes";
}
if (file_exists($uploadfile)&&!$overwrite){
echo "<script>alert('对不起,文件 ".$f_name." 已经存在,上传失败!')</script>";
$up_error="yes";
}
$string = 'abcdefghijklmnopgrstuvwxyz0123456789';
$rand = '';
for ($x=0;$x<12;$x++)
$rand .= substr($string,mt_rand(0,strlen($string)-1),1);
$t=date("ymdHis").substr($gettime[0],2,6).$rand;
$attdir="./file/";
if(!is_dir($attdir))
{ mkdir($attdir);}
$uploadfile=$attdir.$t.".".$tmp_type;
if(($up_error!="yes") and (move_uploaded_file($_FILES[$f_input]['tmp_name']
[$key], $uploadfile))){
$_msg=$_msg.$f_name.'上传成功n';
}
else{
$_msg=$_msg.$f_name.'上传失败n';
}
}
}
echo "<script>window.parent.Finish('".$_msg."');</script>";
?>
</body>
</html>
|
fileupload.htm页面
| 代码如下 |
复制代码 |
|
<!DOCTYPE html PUBLIC "-//W3C//DTD XHTML 1.0 Transitional//EN" "http://www.w3.org/TR/xhtml1/DTD/xhtml1-transitional.dtd">
<html xmlns="http://www.w3.org/1999/xhtml">
<head>
<meta http-equiv="Content-Type" content="text/html; charset=gb2312" />
<title>无刷新文件上传系统</title>
</head>
<body>
<style>
.fu_list {
width:600px;
background:#ebebeb;
font-size:12px;
}
.fu_list td {
padding:5px;
line-height:20px;
background-color:#fff;
}
.fu_list table {
width:100%;
border:1px solid #ebebeb;
}
.fu_list thead td {
background-color:#f4f4f4;
}
.fu_list b {
font-size:14px;
}
/*file容器样式*/
a.files {
width:90px;
height:30px;
overflow:hidden;
display:block;
border:1px solid #BEBEBE;
background:url(img/fu_btn.gif) left top no-repeat;
text-decoration:none;
}
a.files:hover {
background-color:#FFFFEE;
background-position:0 -30px;
}
/*file设为透明,并覆盖整个触发面*/
a.files input {
margin-left:-350px;
font-size:30px;
cursor:pointer;
filter:alpha(opacity=0);
opacity:0;
}
/*取消点击时的虚线框*/
a.files, a.files input {
outline:none;/*ff*/
hide-focus:expression(this.hideFocus=true);/*ie*/
}
</style>
<form id="uploadForm" action="File.php">
<table border="0" cellspacing="1" class="fu_list">
<thead>
<tr>
<td colspan="2"><b>上传文件</b></td>
</tr>
</thead>
<tbody>
<tr>
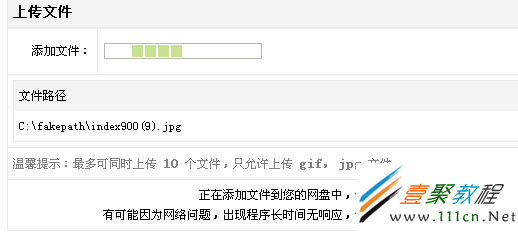
<td align="right" width="15%" style="line-height:35px;">添加文件:</td>
<td><a href="javascript:void(0);" class="files" id="idFile"></a> <img id="idProcess" style="display:none;" src="img/loading.gif" /></td>
</tr>
<tr>
<td colspan="2"><table border="0" cellspacing="0">
<thead>
<tr>
<td>文件路径</td>
<td width="100"></td>
</tr>
</thead>
<tbody id="idFileList">
</tbody>
</table></td>
</tr>
<tr>
<td colspan="2" style="color:gray">温馨提示:最多可同时上传 <b id="idLimit"></b> 个文件,只允许上传 <b id="idExt"></b> 文件。 </td>
</tr>
<tr>
<td colspan="2" align="center" id="idMsg"><input type="button" value="开始上传" id="idBtnupload" disabled="disabled" />
<input type="button" value="全部取消" id="idBtndel" disabled="disabled" />
</td>
</tr>
</tbody>
</table>
</form>
<script type="text/javascript">
var isIE = (document.all) ? true : false;
var $ = function (id) {
return "string" == typeof id ? document.getElementById(id) : id;
};
var Class = {
create: function() {
return function() {
this.initialize.apply(this, arguments);
}
}
}
var Extend = function(destination, source) {
for (var property in source) {
destination[property] = source[property];
}
}
var Bind = function(object, fun) {
return function() {
return fun.apply(object, arguments);
}
}
var Each = function(list, fun){
for (var i = 0, len = list.length; i < len; i++) { fun(list[i], i); }
};
//文件上传类
var FileUpload = Class.create();
FileUpload.prototype = {
//表单对象,文件控件存放空间
initialize: function(form, folder, options) {
this.Form = $(form);//表单
this.Folder = $(folder);//文件控件存放空间
this.Files = [];//文件集合
this.SetOptions(options);
this.FileName = this.options.FileName;
this._FrameName = this.options.FrameName;
this.Limit = this.options.Limit;
this.Distinct = !!this.options.Distinct;
this.ExtIn = this.options.ExtIn;
this.ExtOut = this.options.ExtOut;
this.onIniFile = this.options.onIniFile;
this.onEmpty = this.options.onEmpty;
this.onNotExtIn = this.options.onNotExtIn;
this.onExtOut = this.options.onExtOut;
this.onLimite = this.options.onLimite;
this.onSame = this.options.onSame;
this.onFail = this.options.onFail;
this.onIni = this.options.onIni;
if(!this._FrameName){
//为每个实例创建不同的iframe
this._FrameName = "uploadFrame_" + Math.floor(Math.random() * 1000);
//ie不能修改iframe的name
var oFrame = isIE ? document.createElement("<iframe name="" + this._FrameName + "">") : document.createElement("iframe");
//为ff设置name
oFrame.name = this._FrameName;
oFrame.style.display = "none";
//在ie文档未加载完用appendChild会报错
document.body.insertBefore(oFrame, document.body.childNodes[0]);
}
//设置form属性,关键是target要指向iframe
this.Form.target = this._FrameName;
this.Form.method = "post";
//注意ie的form没有enctype属性,要用encoding
this.Form.encoding = "multipart/form-data";
//整理一次
this.Ini();
},
//设置默认属性
SetOptions: function(options) {
this.options = {//默认值
FileName: "Files[]",//文件上传控件的name,配合后台使用
FrameName: "",//iframe的name,要自定义iframe的话这里设置name
onIniFile: function(){},//整理文件时执行(其中参数是file对象)
onEmpty: function(){},//文件空值时执行
Limit: 10,//文件数限制,0为不限制
onLimite: function(){},//超过文件数限制时执行
Distinct: true,//是否不允许相同文件
onSame: function(){},//有相同文件时执行
ExtIn: ["gif","jpg","rar","zip","iso","swf","exe"],//允许后缀名
onNotExtIn: function(){},//不是允许后缀名时执行
ExtOut: [],//禁止后缀名,当设置了ExtIn则ExtOut无效
onExtOut: function(){},//是禁止后缀名时执行
onFail: function(){},//文件不通过检测时执行(其中参数是file对象)
onIni: function(){}//重置时执行
};
Extend(this.options, options || {});
},
//整理空间
Ini: function() {
//整理文件集合
this.Files = [];
//整理文件空间,把有值的file放入文件集合
Each(this.Folder.getElementsByTagName("input"), Bind(this, function(o){
if(o.type == "file"){ o.value && this.Files.push(o); this.onIniFile(o); }
}))
//插入一个新的file
var file = document.createElement("input");
file.name = this.FileName; file.type = "file"; file.onchange = Bind(this, function(){ this.Check(file); this.Ini(); });
this.Folder.appendChild(file);
//执行附加程序
this.onIni();
},
//检测file对象
Check: function(file) {
//检测变量
var bCheck = true;
//空值、文件数限制、后缀名、相同文件检测
if(!file.value){
bCheck = false; this.onEmpty();
} else if(this.Limit && this.Files.length >= this.Limit){
bCheck = false; this.onLimite();
} else if(!!this.ExtIn.length && !RegExp(".(" + this.ExtIn.join("|") + ")$", "i").test(file.value)){
//检测是否允许后缀名
bCheck = false; this.onNotExtIn();
} else if(!!this.ExtOut.length && RegExp(".(" + this.ExtOut.join("|") + ")$", "i").test(file.value)) {
//检测是否禁止后缀名
bCheck = false; this.onExtOut();
} else if(!!this.Distinct) {
Each(this.Files, function(o){ if(o.value == file.value){ bCheck = false; } })
if(!bCheck){ this.onSame(); }
}
//没有通过检测
!bCheck && this.onFail(file);
},
//删除指定file
Delete: function(file) {
//移除指定file
this.Folder.removeChild(file); this.Ini();
},
//删除全部file
Clear: function() {
//清空文件空间
Each(this.Files, Bind(this, function(o){ this.Folder.removeChild(o); })); this.Ini();
}
}
var fu = new FileUpload("uploadForm", "idFile", { ExtIn: ["gif","jpg"],
onIniFile: function(file){ file.value ? file.style.display = "none" : this.Folder.removeChild(file); },
onEmpty: function(){ alert("请选择一个文件"); },
onLimite: function(){ alert("超过上传限制"); },
onSame: function(){ alert("已经有相同文件"); },
onNotExtIn: function(){ alert("只允许上传" + this.ExtIn.join(",") + "文件"); },
onFail: function(file){ this.Folder.removeChild(file); },
onIni: function(){
//显示文件列表
var arrRows = [];
if(this.Files.length){
var oThis = this;
Each(this.Files, function(o){
var a = document.createElement("a"); a.innerHTML = "取消"; a.href = "javascript:void(0);";
a.onclick = function(){ oThis.Delete(o); return false; };
arrRows.push([o.value, a]);
});
} else { arrRows.push(["<font color='gray'>没有添加文件</font>", " "]); }
AddList(arrRows);
//设置按钮
$("idBtnupload").disabled = $("idBtndel").disabled = this.Files.length <= 0;
}
});
$("idBtnupload").onclick = function(){
//显示文件列表
var arrRows = [];
Each(fu.Files, function(o){ arrRows.push([o.value, " "]); });
AddList(arrRows);
fu.Folder.style.display = "none";
$("idProcess").style.display = "";
$("idMsg").innerHTML = "正在添加文件到您的网盘中,请稍候……<br />有可能因为网络问题,出现程序长时间无响应,请点击“<a href='?'><font color='red'>取消</font></a>”重新上传文件";
fu.Form.submit();
}
//用来添加文件列表的函数
function AddList(rows){
//根据数组来添加列表
var FileList = $("idFileList"), oFragment = document.createDocumentFragment();
//用文档碎片保存列表
Each(rows, function(cells){
var row = document.createElement("tr");
Each(cells, function(o){
var cell = document.createElement("td");
if(typeof o == "string"){ cell.innerHTML = o; }else{ cell.appendChild(o); }
row.appendChild(cell);
});
oFragment.appendChild(row);
})
//ie的table不支持innerHTML所以这样清空table
while(FileList.hasChildNodes()){ FileList.removeChild(FileList.firstChild); }
FileList.appendChild(oFragment);
}
$("idLimit").innerHTML = fu.Limit;
$("idExt").innerHTML = fu.ExtIn.join(",");
$("idBtndel").onclick = function(){ fu.Clear(); }
//在后台通过window.parent来访问主页面的函数
function Finish(msg){ alert(msg); location.href = location.href; }
</script>
</body>
</html>
|
我们经常会在提交表单时发现数据库中有一些看不到的回车换行了,这样如果js调用就会出问题,下面我来介绍在php过滤回车换行方法。
在unix世界换行就用/n来代替,但是windows为了体现他的不同,就用/r/n,更有意思的是在mac中用/r。因此unix系列用 /n,windows系列用 /r/n,mac用 /r,这样就用你写的程序在不同的平台上运行有着不少的麻烦。下面是PHP去除换行符的一些常见方法。
第一种写法:
| 代码如下 |
复制代码 |
|
$content=str_replace("n","",$content);
echo $content;
|
第二种写法:
| 代码如下 |
复制代码 |
|
str_replace("rn","",$str);
|
第三种写法:
| 代码如下 |
复制代码 |
|
$content=preg_replace("/s/","",$content);
echo $content;
|
关于n,r,t
n 软回车: 在Windows 中表示换行且回到下一行的最开始位置 ,在Linux、unix 中只表示换行,但不会回到下一行的开始位置。
r 软空格: 在Linux、unix 中表示返回到当行的最开始位置。 在Mac OS 中表示换行且返回到下一行的最开始位置,相当于Windows 里的 n 的效果。
t 跳格(移至下一列)
在网站看到很多方法.结果都不不能用.一般是n这个符号换不掉,如果n符号清空了,还是会换行,一般是源码代码中有br标签,可以直接替换掉.
| 代码如下 |
复制代码 |
|
function DeleteHtml($str)
{
$str = str_replace("<br/>","",$str);
$str = str_replace("\t","",$str);
$str = str_replace("\r\n","",$str);
$str = str_replace("\r","",$str);
$str = str_replace("\n","",$str);
return trim($str);
}
|
注意,n前面的转义符号.
过滤html与换行实例
| 代码如下 |
复制代码 |
|
<?php
// $document 应包含一个 HTML 文档。
$search = array ("'<script[^>]*?>.*?</script>'si", // 去掉 javascript
"'<[/!]*?[^<>]*?>'si", // 去掉 HTML 标记
"'([rn])[s]+'", // 去掉空白字符
"'&(quot|#34);'i", // 替换 HTML 实体
"'&(amp|#38);'i",
"'&(lt|#60);'i",
"'&(gt|#62);'i",
"'&(nbsp|#160);'i",
"'&(iexcl|#161);'i",
"'&(cent|#162);'i",
"'&(pound|#163);'i",
"'&(copy|#169);'i",
"'&#(d+);'e"); // 作为 PHP 代码运行
$replace = array ("","","\1",""","&","<",">"," ",chr(161),chr(162),chr(163),chr(169),"chr(\1)");
$text = preg_replace($search,$replace,$document);
?>
|
本文章来给各位同学介绍关于一个PHP SoapServer实例代码,希望此实例能给各位同学带来一点帮助哦。
PHP SoapServer实例代码
server端代码:
| 代码如下 |
复制代码 |
|
<?php
if (!isset($_SERVER['PHP_AUTH_USER']) || !isset($_SERVER['PHP_AUTH_PW']) ||
!($_SERVER['PHP_AUTH_USER'] == 'outsider' && $_SERVER['PHP_AUTH_PW'] == '123456')) {
header('WWW-Authenticate: Basic realm="WEBSERVICE"');
header("HTTP/1.0 401 Unauthorized");
echo "You must enter a valid login ID and password to access this resource/n";
die;
}
class test {
function show($one, $two) {
return $one + $two;
}
function user_info() {
$user_info = array(
'name' => 'Outsider',
'sex' => '男',
'email' => 'outsider@outsiderla.me',
'tel' => '1369*******',
);
return json_encode($user_info);
}
}
$server = new SoapServer(null, array('uri' => 'server.php', 'location' => 'http://demo.test.com/server.php'));
$server->setClass('test');
//$server->addFunction('getUserInfo');
$server->handle();
?>
|
第三方调用代码:
| 代码如下 |
复制代码 |
|
<?php
$soap = new SoapClient(null, array('location' => 'http://demo.test.com/server.php', 'uri' => 'server.php', "login" => "outsider", "password" => "123456"));
$user_info = json_decode($soap->user_info());
echo $user_info->email;
?>
|
本文章来人大家介绍一个php文件上传类的使用方法,期望此实例对各位php入门者会有不小帮助哦。
简介
Class.upload.php是用于管理上传文件的php文件上传类, 它可以帮助你快速的给自己的网站集成上传文件功能。不仅如此,此分类还有一些列的处理功能,可以对上传的文件或者本地的文件进行处理,其图片处理功能比较 强大,包括图片的缩放、旋转、剪裁、类型转换、应用滤镜、添加边框文字和水印等。支持的图片类型是png、jpg、gif和bmp。
使用方法
首先我们要有一个用于提交上传文件的表单,如下,注意表单要写上enctype="multipart/form-data"。
| 代码如下 |
复制代码 |
|
<form enctype="multipart/form-data" method="post" action="upload.php">
<input type="file" size="32" name="image_field" value="">
<input type="submit" name="Submit" value="upload">
</form>
|
然后创建表单处理脚本文件upload.php,在脚本中添加如下程序。含义请看注释
| 代码如下 |
复制代码 |
|
$handle = new upload($_FILES['image_field']);
|
//image_field是表单中上传控件的name属性,创建一个类的实例并用$_FILES[' image_field ']初始化,现在这个类已经知道你要处理哪个文件,并对文件的位置大小等信息了如指掌。
| 代码如下 |
复制代码 |
|
if ($handle->uploaded) {
//这个判断是个安全选项,看一下这个文件真的是正规途径过来的上传文件吗。
$handle->file_new_name_body = 'image_resized';//给这个文件起个名字吧, 注意这个是不带扩展名的部分,如果有与之同名的文件,默认的行为是重命名。
$handle->image_resize = true;//我们传了一张图片,需要对它进行缩放,设置缩放属性为true
$handle->image_x = 100;//缩放要有标准,这里我们以宽度为基准,宽度必须是100像素
$handle->image_ratio_y = true;//你也可以指定一个具体的长度数值,写法是$handle->image_y = [数值],这里是告诉程序以宽度为基准,高度按比例缩放。
$handle->process('/home/user/files/');//在执行这句话之前,你还可以设定更多的处理选项,比如是否对图 片进行旋转剪裁,设定好了,就用这句话来执行图片处理和上传。图片处理时会创建一个原图片的副本,不会修改原始文件,原始文件存在于php的临时文件夹 中,在linux服务器上可能是/tmp目录。这样你可以对同一张上传的图片进行多次处理,并指定上传到不同的位置。这里'/home/user /files/'指定了文件要被复制到的位置。
if ($handle->processed) {
echo 'image resized';
$handle->clean();//如果文件成功上传,就清除掉这个对源文件的引用,此后将不能再对刚才上传到临时文件夹的图片进行处理和复制了。
} else {
echo 'error : ' . $handle->error;
}
}
|
如何直接下载图片,如果你是做在线图片处理程序,这个很有用。
| 代码如下 |
复制代码 |
|
$handle = new upload($_FILES['image_field']);
header('Content-type: ' . $handle->file_src_mime);
header("Content-Disposition:attachment; filename=".rawurlencode($handle->file_src_name).";");
echo $handle->Process();
|
如何将图片直接输出到浏览器
| 代码如下 |
复制代码 |
|
$handle = new upload($_FILES['image_field']);
header('Content-type: ' . $handle->file_src_mime);
echo $handle->Process();
|
比较常用的处理参数,这些参数可以在调用$handle->process()之前设定处理方式
| 代码如下 |
复制代码 |
|
$handle->file_new_name_body = 'new name'
|
指定文件被上传到指定位置后的名字,不包含扩展名的部分
| 代码如下 |
复制代码 |
|
$handle->file_new_name_ext = 'txt'
|
指定文件扩展名
| 代码如下 |
复制代码 |
|
$handle->mime_check = true;
|
指定是否对文件扩展名进行安全性检查,默认是true,即进行检查,注意这可能导致某些类型的文件无法上传,比如.zip文件
| 代码如下 |
复制代码 |
|
$handle->allowed = array('application/pdf','application/msword', 'image/*');
|
指定允许上传的文件mime类型
| 代码如下 |
复制代码 |
|
$handle->image_max_width = 200;
|
指定最大允许的图片宽度,如果图片超过此宽度将被视为不符合要求无法上传,类似参数有$handle->image_max_height,,$handle->image_max_pixels,$handle->image_max_ratio等
在处理文件之前你可以读取的文件信息
file_src_name:上传文件的原始名称,包括扩展名
file_src_name_body:原始名称,不包括扩展名
file_src_name_ext:扩展名
file_src_pathname:文件完整的路径和名称
file_src_mime:mime类型
file_src_size: 文件大小
file_src_error: 上传错误
file_is_image: 布尔类型,是否是图片
如果文件是图片,你还可以读到
image_src_x,image_src_y,image_src_pixels,image_src_type,image_src_bits
文件处理了,也上传了,能返回什么,这个也是很有用的,如果你要记录文件信息到数据库或者显示给用户的话。
file_dst_path:上传后的文件路径
file_dst_name_body: 上传后的文件名,不包括扩展名
file_dst_name_ext:上传后的文件扩展名
file_dst_name:上传后的文件全名
file_dst_pathname:上传后的文件完整的路径和名称
如果文件是图片,你还可以读到
image_dst_x,image_dst_y,image_convert