PHP开启mcrypt扩展和SSL(OpenSSL)的方法详解
打开php.ini,
将“;extension=php_openssl.dll”前面分号去掉。
将“;extension=php_mcrypt.dll“前面分号去掉
重启apache之后还在apache日志中看到 看了看Apache的错误日志:提示“不能加载XXX动态库"问题了,我们后来搜索才发现需要复制目录或设置环境变量了。
1,要想开启mcrypt支持,系统需要安装了libmcrypt.dll库。
这个一般用户是没有安装过的,但不用担心,PHP的windows发行包里已经给我们附带了此文件,在PHP压缩包的根目录下即可找到,然后将其复制到%system%/system32目录下即可。
2,要想开启OpenSSL支持,系统需要安装libeay32.dll和ssleay32.dll两个库。
如果你以前安装过OpenSSL,那么你的系统目录中应该已经存在这两个文件;如果没有安装,PHP的windows发行包里同样附带了这两个文件,将其复制到%system%/system32目录下即可。
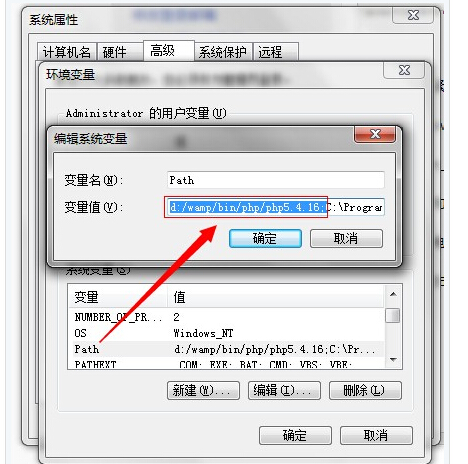
环境变量设置
winxp下,右击我的电脑-属性-高级-环境变量-系统变量-变量path-双击
win7下,右击计算机-属性-高级系统设置-环境变量-系统变量-双击)
# 安装mcrypt
yum install -y php-mcrypt libmcrypt libmcrypt-devel
# 升级bison
cd /var/soft/
wget http://ftp.gnu.org/gnu/bison/bison-2.6.4.tar.gz
tar -xvzf bison-2.6.4.tar.gz
cd bison-2.6.4
./configure
make && make install
# 升级re2c,解决You will need re2c 0.13.4 or later if you want to regenerate PHP parsers.错误
cd /var/soft/
wget http://sourceforge.net/projects/re2c/files/re2c/0.13.5/re2c-0.13.5.tar.gz/download
tar zxf re2c-0.13.5.tar.gz && cd re2c-0.13.5
./configure
make && make install
编译PHP7
# 创建目录
mkdir -p /var/soft/php7
cd /var/soft/php7
# 下载源代码
git clone http://git.php.net/repository/php-src.git
cd php-src
./buildconf
# 配置参数
./configure --prefix=/usr/local/php7 \
--with-config-file-path=/usr/local/php7/etc \
--with-mcrypt=/usr/include \
--with-mysql=mysqlnd \
--with-mysqli=mysqlnd \
--with-pdo-mysql=mysqlnd \
--with-gd \
--with-iconv \
--with-zlib \
--enable-xml \
--enable-bcmath \
--enable-shmop \
--enable-sysvsem \
--enable-inline-optimization \
--enable-mbregex \
--enable-fpm \
--enable-mbstring \
--enable-ftp \
--enable-gd-native-ttf \
--with-openssl \
--enable-pcntl \
--enable-sockets \
--with-xmlrpc \
--enable-zip \
--enable-soap \
--without-pear \
--with-gettext \
--enable-session \
--with-curl \
--with-jpeg-dir \
--with-freetype-dir \
--enable-opcache
#################################################################################
# 编译安装php时出现 /encodings.c:101: undefined reference to `libiconv_close’ 错误的解决方法
# 在装php时出现以下的错误:
# /root/Downloads/php-5.6.5/ext/xmlrpc/libxmlrpc/encodings.c:73: undefined reference to `libiconv_open'
# /root/Downloads/php-5.6.5/ext/xmlrpc/libxmlrpc/encodings.c:81: undefined reference to `libiconv'
# /root/Downloads/php-5.6.5/ext/xmlrpc/libxmlrpc/encodings.c:101: undefined reference to `libiconv_close'
# /root/Downloads/php-5.6.5/ext/xmlrpc/libxmlrpc/encodings.c:101: undefined reference to `libiconv_close'
# collect2: error: ld returned 1 exit status
# make: *** [sapi/cli/php] Error 1
# 根据php官网描述这是一个bug(https://bugs.php.net/bug.php?id=52611)。在configure以后要手动修改下Makefile文件,找到EXTRA_LIBS 在最后添加 -liconv 即可顺利通过
# (大约在Makefile文件的104)
# EXTRA_LIBS = -lcrypt -lz -lresolv -lcrypt -lrt -lmysqlclient -lmcrypt -lltdl -lpng -lz -ljpeg -lcurl -lz -lrt -lm -ldl -lnsl -lxml2 -lz -lm -ldl -lssl -lcrypto -lcurl -lxml2 -lz -lm -ldl -lfreetype -lmysqlclient -lz -lm -lssl -lcrypto -ldl -lxml2 -lz -lm -ldl -lxml2 -lz -lm -ldl -lcrypt -lxml2 -lz -lm -ldl -lxml2 -lz -lm -ldl -lxml2 -lz -lm -ldl -lxml2 -lz -lm -ldl -lssl -lcrypto -lcrypt -liconv
#################################################################################
# 编译安装
make && sudo make install
# 配置
cp php.ini-production /usr/local/php7/etc/php.ini
cp sapi/fpm/init.d.php-fpm /etc/init.d/php7-fpm
chmod +x /etc/init.d/php7-fpm
cp /usr/local/php7/etc/php-fpm.conf.default /usr/local/php7/etc/php-fpm.conf
cp /usr/local/php7/etc/php-fpm.d/www.conf.default /usr/local/php7/etc/php-fpm.d/www.conf
# 配置opcache
vim /usr/local/php7/etc/php.ini
# 加入
zend_extension=/usr/local/php7/lib/php/extensions/no-debug-non-zts-20141001/opcache.so
# 启动
/etc/init.d/php7-fpm start
# 查看PHP版本
/usr/local/php7/bin/php -v
结果:
PHP 7.0.0-dev (cli) (built:www.111cn.net Mar 3 2015 10:02:26)
Copyright (c) 1997-2015 The PHP Group
Zend Engine v3.0.0-dev, Copyright (c) 1998-2015 Zend Technologies
with Zend OPcache v7.0.4-dev, Copyright (c) 1999-2015, by Zend Technologies
1. 准备cpanel专供php
# cd /var/cpanel/easy/apache/custom_opt_mods
# wget http://docs.cpanel.net/twiki/pub/EasyApache/EasyApacheCustomModules/custom_opt_mod-PHP5217.tar.gz
# tar -xzvf custom_opt_mod-PHP5217.tar.gz
2. 通过easyApache重装
搜索easyApache,然后一步步看图。
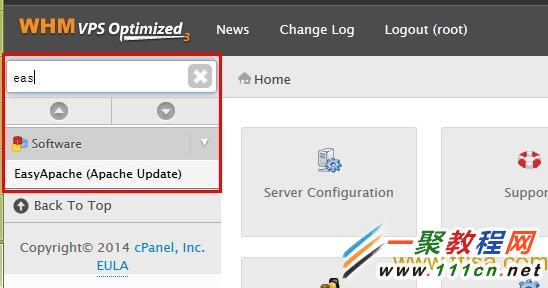
easyApache
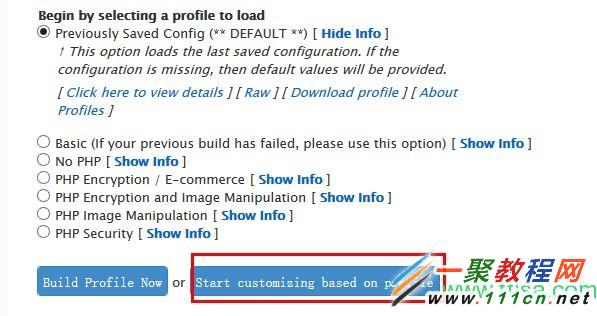
cPanel安装php5.2.17
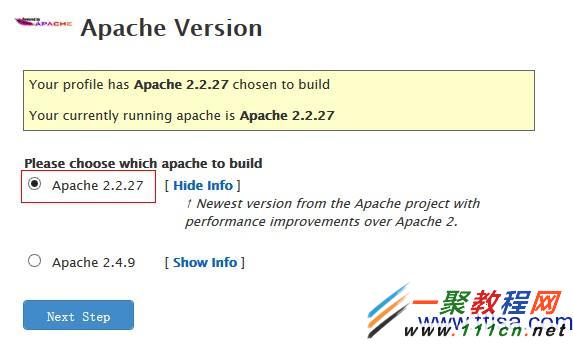
cPanel安装php5.2.17
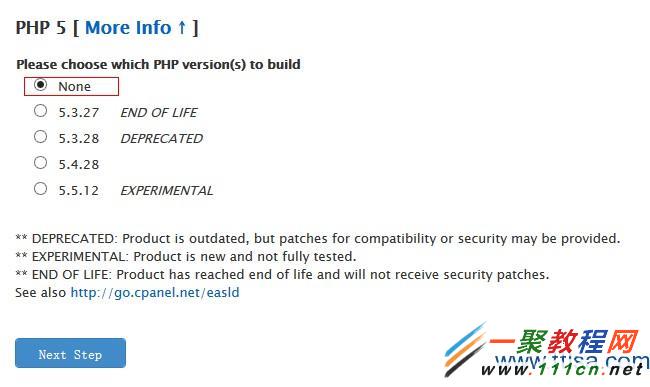
cPanel安装php5.2.17
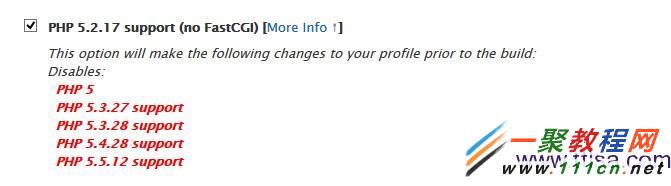
cPanel安装php5.2.17
然后和往常一样一步步往下走即可完成。
3. php扩展配置
因为这不是cPanel原生的安装,所以没有php的扩展选项,它会根据php压缩包内的默认配置参数安装。如果你需要支持额外选项,例如gd和ftp,如下操作:
# cat /var/cpanel/easy/apache/rawopts/PHP-5.2.17
--with-gd
--enable-ftp
一行一个,它会解析成–with-gd –enable-ftp,然后整合到configure后面。
libmemcached是一个php 加速的插件了,但有很多要在安装配置libmemcached扩展时会碰到一些问题了,今天我们来看看php5.3安装libmemcached扩展的教程libmemcached 是一个 memcached 的库,客户端库,C 和 C++ 语言实现的客户端库,具有低内存占用率、线程安全、并提供对memcached功能的全面支持。它还采用 多种命令行工具: memcat , memflush , memrm , memstat ,并memslap (负载代)。程序库一直在设计,让不同的散列方法对密钥,分割的钥匙,并使用统一的散列分配
hash一致性存储
multi get/set
自动把key hash 为int,避开了memcache key字符串默认小于255Byte的限制
好久没有配置服务器,一直以为libmemcached的php memcached 已经纳入基本安装包了,到头来还需要自己编译.整个安装过程很多暗坑,尝试了几次才成功
安装分两步
安装libmemcached,目标是so和header文件
安装memcachedphp extensions
libmemcaced 分为两大版本0.x和1.x, 1.x的版本从2011-09-28开始,编译很麻烦,需要gcc4.0以上的专门配置,compile无比慢. 0.x版本就简单很多,最高版本是0.53,所以选择安装0.53
极品总是成对出现,php的memcahed也从2.1.0开始,要求libmemcached 必须是1.0.x版本
libmemcaced我用的0.53,那php-memcahed 就选择2.0.0. 开源软件的版本维护是一团烂帐
安装libmemcached
wget https://launchpad.net/libmemcached/1.0/0.53/+download/libmemcached-0.53.tar.gz
tar xvfz libmemcached-0.53.tar.gz
cd libmemcached-0.53
./configure --prefix=/opt/libmemcached
make && make install
安装php扩展
wget http://pecl.php.net/get/memcached-2.0.0.tgz
tar zvxf memcached-2.0.0.tgz
cd memcached-2.0.0/
./configure --enable-memcached --with-php-config=/usr/local/php/bin/php-config --with-libmemcached-dir=/opt/libmemcached/
make && make install
make install 是 把memcached.so 安装到 ${php install dir}/extensions/no-debug-non-zts-20090626/,这个目录随着php的版本不同而不同
最后一步,修改php.ini,加上 extension=memcached.so
需要注意的是, libmemcached 不是 libmemcache ,它们是两个不同的客户端库,前者现在的开发比较活跃,后者已经有很长时间没有更新了。
Brew 是 Mac 下面的包管理工具,能在Mac中方便的安装软件或者卸载软件, 只需要一个命令, 非常方便。本文我们来看看用brew安装不同版本的php。MAC OS X 10.9.5系统里已经自带了 apache 和 php ,只是默认没有启用,我们将他们启用即可。
APACHE的默认版本是 Apache/2.2.26 (Unix),php版本是PHP 5.4.30。
由于调试程序需要,我需要同时安装低版本的php5.3,但是又不希望删除系统预装的php 5.4,或升级/降级系统的php5.4,那么怎么办呢?这个时候,就可以通过brew的方式安装新的php版本。
第一步,先安装 brew
Brew 是 Mac 下面的包管理工具,通过 Github 托管适合 Mac 的编译配置以及 Patch,可以方便的安装开发工具。 Mac 自带ruby 所以安装起来很方便,同时它也会自动把git也给你装上。官方网站: http://brew.sh
在mac下终端里直接输入命令行:
ruby -e "$(curl -fsSL https://raw.githubusercontent.com/Homebrew/install/master/install)"
安装完成之后,建议执行一下自检:brew doctor 如果看到Your system is ready to brew. 那么你的brew已经可以开始使用了。
常用命令: (所有软件以PHP5.5为例子)
brew update #更新brew可安装包,建议每次执行一下
brew search php55 #搜索php5.5
brew tap josegonzalez/php #安装扩展<gihhub_user/repo>
brew tap #查看安装的扩展列表
brew install php55 #安装php5.5
brew remove php55 #卸载php5.5
brew upgrade php55 #升级php5.5
brew options php55 #查看php5.5安装选项
brew info php55 #查看php5.5相关信息
brew home php55 #访问php5.5官方网站
brew services list #查看系统通过 brew 安装的服务
brew services cleanup #清除已卸载无用的启动配置文件
brew services restart php55 #重启php-fpm
第二步,安装PHP
先添加brew的PHP扩展库:
brew update
brew tap homebrew/dupes
brew tap homebrew/php
brew tap josegonzalez/homebrew-php
可以使用 brew options php53 命令来查看安装php5.3的选项,这里我用下面的选项安装:
brew install php53 --with-apache --with-gmp --with-imap --with-tidy --with-debug
请注意:如果你希望以mac下的apache作为web server,编译时要加 --with-apache;如果你的web server 是 nginx这类,就需要加上 --with-fpm。
Options
--disable-opcache
Build without Opcache extension
--disable-zend-multibyte
Disable auto-detection of Unicode encoded scripts
--homebrew-apxs
Build against apxs in Homebrew prefix
--with-apache
Enable building of shared Apache 2.0 Handler module, overriding any options which disable apache
--with-cgi
Enable building of the CGI executable (implies --without-apache)
--with-debug
Compile with debugging symbols
--with-fpm
Enable building of the fpm SAPI executable (implies --without-apache)
--with-gmp
Build with gmp support
--with-homebrew-curl
Include Curl support via Homebrew
--with-homebrew-libxslt
Include LibXSLT support via Homebrew
--with-homebrew-openssl
Include OpenSSL support via Homebrew
--with-imap
Include IMAP extension
--with-libmysql
Include (old-style) libmysql support instead of mysqlnd
--with-mssql
Include MSSQL-DB support
--with-pdo-oci
Include Oracle databases (requries ORACLE_HOME be set)
--with-phpdbg
Enable building of the phpdbg SAPI executable (PHP 5.4 and above)
--with-postgresql
Build with postgresql support
--with-thread-safety
Build with thread safety
--with-tidy
Include Tidy support
--without-bz2
Build without bz2 support
--without-mysql
Remove MySQL/MariaDB support
--without-pcntl
Build without Process Control support
--without-pear
Build without PEAR
--without-snmp
Build without SNmp support
--HEAD
Install HEAD version
HP编译过程中如果遇到 configure: error: Cannot find OpenSSL's <evp.h> 错误,执行 xcode-select --install 重新安装一下 Xcode Command Line Tools 即可解决该错误(来源:https://github.com/Homebrew/homebrew-php/issues/1181)。
安装完php后,会有一段提示,请仔细阅读:
Caveats
To enable PHP in Apache add the following to httpd.conf and restart Apache:
LoadModule php5_module /usr/local/opt/php53/libexec/apache2/libphp5.so
The php.ini file can be found in:
/usr/local/etc/php/5.3/php.ini
✩✩✩✩ PEAR ✩✩✩✩
If PEAR complains about permissions, 'fix' the default PEAR permissions and config:
chmod -R ug+w /usr/local/Cellar/php53/5.3.29/lib/php
pear config-set php_ini /usr/local/etc/php/5.3/php.ini
✩✩✩✩ Extensions ✩✩✩✩
If you are having issues with custom extension compiling, ensure that
you are using the brew version, by placing /usr/local/bin before /usr/sbin in your PATH:
PATH="/usr/local/bin:$PATH"
PHP53 Extensions will always be compiled against this PHP. Please install them
using --without-homebrew-php to enable compiling against system PHP.
✩✩✩✩ PHP CLI ✩✩✩✩
If you wish to swap the PHP you use on the command line, you should add the following to ~/.bashrc,
~/.zshrc, ~/.profile or your shell's equivalent configuration file:
export PATH="$(brew --prefix homebrew/php/php53)/bin:$PATH"
To have launchd start php53 at login:
ln -sfv /usr/local/opt/php53/*.plist ~/Library/LaunchAgents
Then to load php53 now:
launchctl load ~/Library/LaunchAgents/homebrew.mxcl.php53.plist
==> Summary
/usr/local/Cellar/php53/5.3.29: 480 files, 31M, built in 12.9 minutes
等待PHP编译完成,开始安装PHP常用扩展,扩展安装过程中 brew会自动安装依赖包,使用 brew search php53- 命令,可以查看还有哪些扩展可以安装,然后执行 brew install php53-XXX 就可以了。
由于Mac自带了php和php-fpm,因此需要添加系统环境变量PATH来替代自带PHP版本:
echo 'export PATH="$(brew --prefix homebrew/php/php53)/bin:$PATH"' >> ~/.bash_profile #for php
echo 'export PATH="$(brew --prefix homebrew/php/php53)/sbin:$PATH"' >> ~/.bash_profile #for php-fpm
echo 'export PATH="/usr/local/bin:/usr/local/sbin:$PATH"' >> ~/.bash_profile #for other brew install soft
source ~/.bash_profile #更新配置
如何卸载安装的 php5.3呢?
# 卸载
brew uninstall php53
# 清除缓存以及老旧版本文件
brew cleanup -s
测试一下效果:
$ php -v
PHP 5.3.29 (cli) (built: Jan 24 2015 12:40:58) (DEBUG)
Copyright (c) 1997-2014 The PHP Group
Zend Engine v2.3.0, Copyright (c) 1998-2014 Zend Technologies
# mac系统自带的php
$ /usr/bin/php -v
PHP 5.4.30 (cli) (built: Jul 29 2014 23:43:29)
Copyright (c) 1997-2014 The PHP Group
Zend Engine v2.4.0, Copyright (c) 1998-2014 Zend Technologies
with Zend Guard Loader v3.3, Copyright (c) 1998-2013, by Zend Technologies
由于我们没有安装php的fpm模式,所以 php-fpm -v 命令显示的是mac自带的:
$ php-fpm -v
PHP 5.4.30 (fpm-fcgi) (built: Jul 29 2014 23:44:15)
Copyright (c) 1997-2014 The PHP Group
Zend Engine v2.4.0, Copyright (c) 1998-2014 Zend Technologies
with Zend Guard Loader v3.3, Copyright (c) 1998-2013, by Zend Technologies
这个时候,我们使用 phpinfo 函数显示出来的php版本还是max自带的PHP5.4,需要我们修改 apache的配置文件 httpd.conf,加载的php5模块路径指向刚刚安装的 php5.3目录里的 libphp5.so:
LoadModule php5_module /usr/local/opt/php53/libexec/apache2/libphp5.so
重启apache,phpinfo() 脚本里显示的 php 版本就变成了 PHP Version 5.3.29。
相关文章
- 由于要使用mikoomi mongodb plugin插件,所以需要php对mongodb的扩展支持,默认通过源安装的php并没有mongodb的扩展支持,具体可以通过php -m|grep mongo 验证 。这里就结...2016-11-25
php 中file_get_contents超时问题的解决方法
file_get_contents超时我知道最多的原因就是你机器访问远程机器过慢,导致php脚本超时了,但也有其它很多原因,下面我来总结file_get_contents超时问题的解决方法总结。...2016-11-25- 相信很多站长都遇到过这样一个问题,访问页面时出现408错误,下面一聚教程网将为大家介绍408错误出现的原因以及408错误的解决办法。 HTTP 408错误出现原因: HTT...2017-01-22
- php如何实现抓取网页图片,相较于手动的粘贴复制,使用小程序要方便快捷多了,喜欢编程的人总会喜欢制作一些简单有用的小软件,最近就参考了网上一个php抓取图片代码,封装了一个php远程抓取图片的类,测试了一下,效果还不错分享...2015-10-30
- 下面我们来看一篇关于Android子控件超出父控件的范围显示出来方法,希望这篇文章能够帮助到各位朋友,有碰到此问题的朋友可以进来看看哦。 <RelativeLayout xmlns:an...2016-10-02
- ps软件是现在非常受大家喜欢的一款软件,有着非常不错的使用功能。这次文章就给大家介绍下ps把文字背景变透明的操作方法,喜欢的一起来看看。 1、使用Photoshop软件...2017-07-06
- 安装curl扩展支持https是非常的重要现在许多的网站都使用了https了,下面我们来看一篇关于PHP安装curl扩展支持https例子吧。 问题: 线上运行的lamp服务器,默认yu...2016-11-25
intellij idea快速查看当前类中的所有方法(推荐)
这篇文章主要介绍了intellij idea快速查看当前类中的所有方法,本文通过实例代码给大家介绍的非常详细,对大家的学习或工作具有一定的参考借鉴价值,需要的朋友可以参考下...2020-09-02- 1.在没有设置默认值的情况下: 复制代码 代码如下:SELECT userinfo.id, user_name, role, adm_regionid, region_name , create_timeFROM userinfoLEFT JOIN region ON userinfo.adm_regionid = region.id 结果:...2014-05-31
js导出table数据到excel即导出为EXCEL文档的方法
复制代码 代码如下: <!DOCTYPE html PUBLIC "-//W3C//DTD XHTML 1.0 Transitional//EN" "http://www.w3.org/TR/xhtml1/DTD/xhtml1-transitional.dtd"> <html xmlns="http://www.w3.org/1999/xhtml"> <head> <meta ht...2013-10-13- 批量更新mysql更新语句很简单,更新一条数据的某个字段,一般这样写:复制代码 代码如下:UPDATE mytable SET myfield = 'value' WHERE other_field = 'other_value';如果更新同一字段为同一个值,mysql也很简单,修改下where即...2013-10-04
- 本文涉及的主题虽然很基础,在许多人看来属于小伎俩,但在JavaScript基础知识中属于一个综合性的话题。这里会涉及到对象属性的封装、原型、构造函数、闭包以及立即执行表达式等知识。公有方法 公有方法就是能被外部访问...2015-11-08
- ps软件是一款非常不错的图片处理软件,有着非常不错的使用效果。这次文章要给大家介绍的是ps怎么制作倒影,一起来看看设计倒影的方法。 用ps怎么做倒影最终效果̳...2017-07-06
- 最近想自学PHP ,做了个验证码,但不知道怎么搞的,总出现一个如下图的小红叉,但验证码就是显示不出来,原因如下 未修改之前,出现如下错误; (1)修改步骤如下,原因如下,原因是apache权限没开, (2)点击打开php.int., 搜索extension=ph...2013-10-04
- 单个字符分割 string s="abcdeabcdeabcde"; string[] sArray=s.Split('c'); foreach(string i in sArray) Console.WriteLine(i.ToString()); 输出下面的结果: ab de...2020-06-25
安卓手机wifi打不开修复教程,安卓手机wifi打不开解决方法
手机wifi打不开?让小编来告诉你如何解决。还不知道的朋友快来看看。 手机wifi是现在生活中最常用的手机功能,但是遇到手机wifi打不开的情况该怎么办呢?如果手机wifi...2016-12-21- javascript控制页面控件隐藏显示的两种方法,方法的不同之处在于控件隐藏后是否还在页面上占位 方法一: 复制代码 代码如下: document.all["panelsms"].style.visibility="hidden"; document.all["panelsms"].style.visi...2013-10-13
连接MySql速度慢的解决方法(skip-name-resolve)
最近在Linux服务器上安装MySql5后,本地使用客户端连MySql速度超慢,本地程序连接也超慢。 解决方法:在配置文件my.cnf的[mysqld]下加入skip-name-resolve。原因是默认安装的MySql开启了DNS的反向解析。如果禁用的话就不能...2015-10-21- 本篇文章是对C#方法进行了详细的总结与介绍,需要的朋友参考下...2020-06-25
- 步骤:Window -> PHP -> Editor -> Templates,这里可以设置(增、删、改、导入等)管理你的模板。新建文件注释、函数注释、代码块等模板的实例新建模板,分别输入Name、Description、Patterna)文件注释Name: 3cfileDescriptio...2013-10-04