利用idea快速搭建一个spring-cloud(图文)
package com.example.consumer;

import org.springframework.boot.SpringApplication;
import org.springframework.boot.autoconfigure.SpringBootApplication;
import org.springframework.cloud.netflix.eureka.EnableEurekaClient;
import org.springframework.cloud.openfeign.EnableFeignClients;
import org.springframework.context.annotation.ComponentScan;
import org.springframework.stereotype.Component;
@SpringBootApplication

//扫描所有包
@ComponentScan("com.test")
//声明为注册服务
@EnableEurekaClient
//把调用注册子模块接口引入到Spring容器中(不加此注解会出现找不到@FeignClient修饰的接口)
@EnableFeignClients("com.test")//包路径解决启动类在别的包下问题

public class ConsumerApplication {

    public static void main(String[] args) {
        SpringApplication.run(ConsumerApplication.class, args);
    }

}
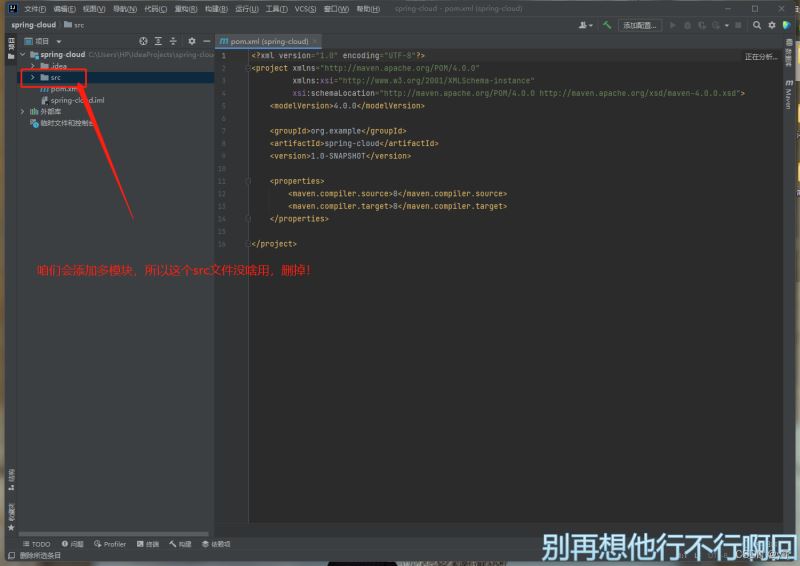
1、创建一个空的maven项目!


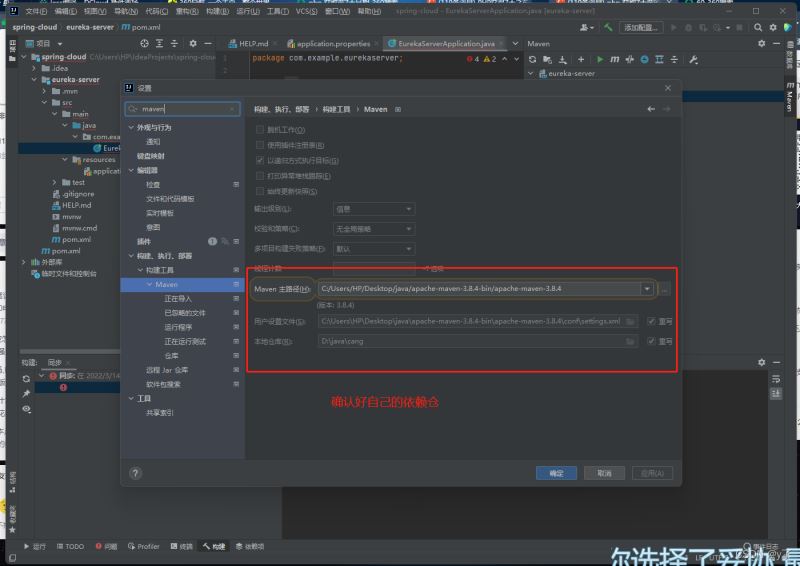
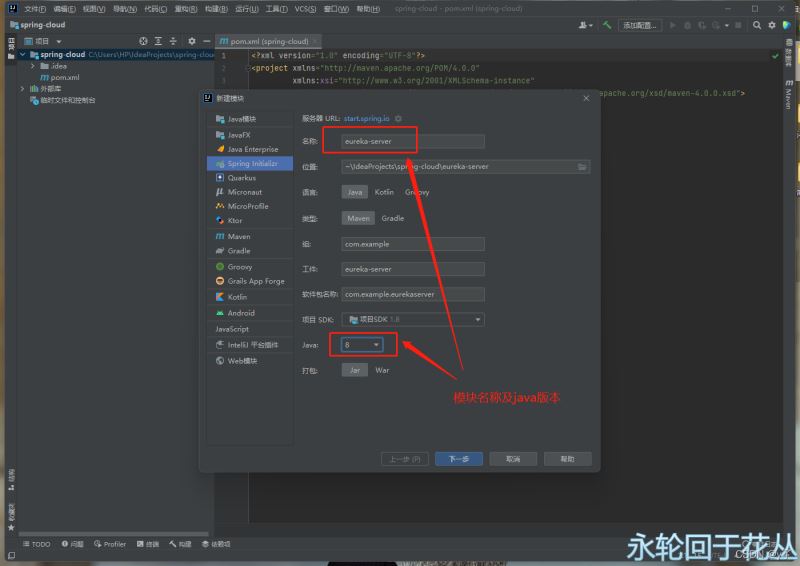
2、创建一个注册中心模块


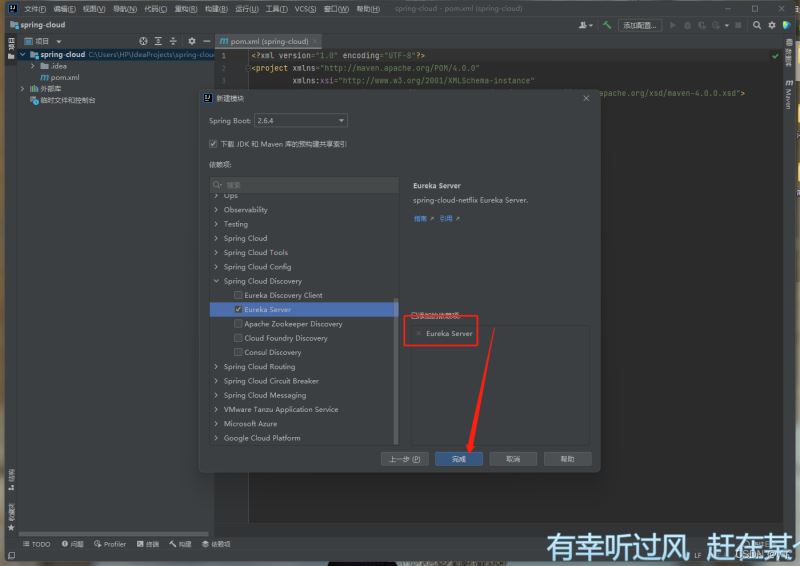
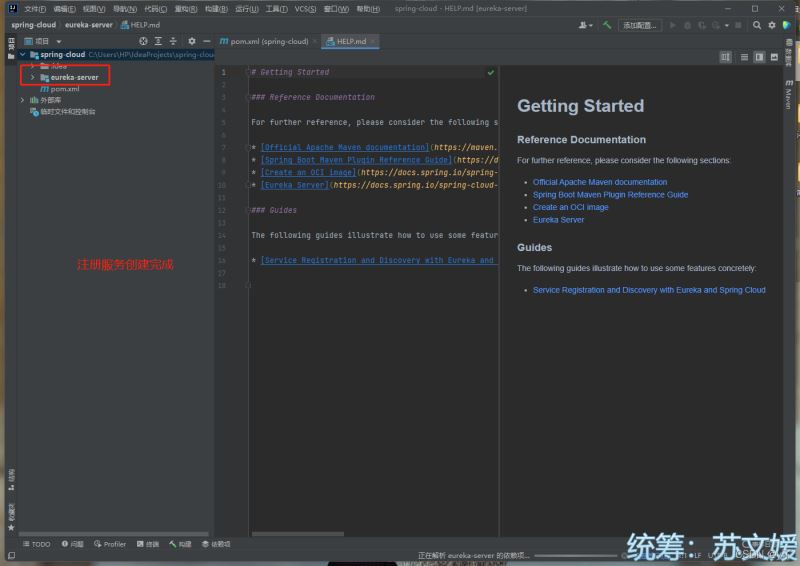
3、配置注册中心
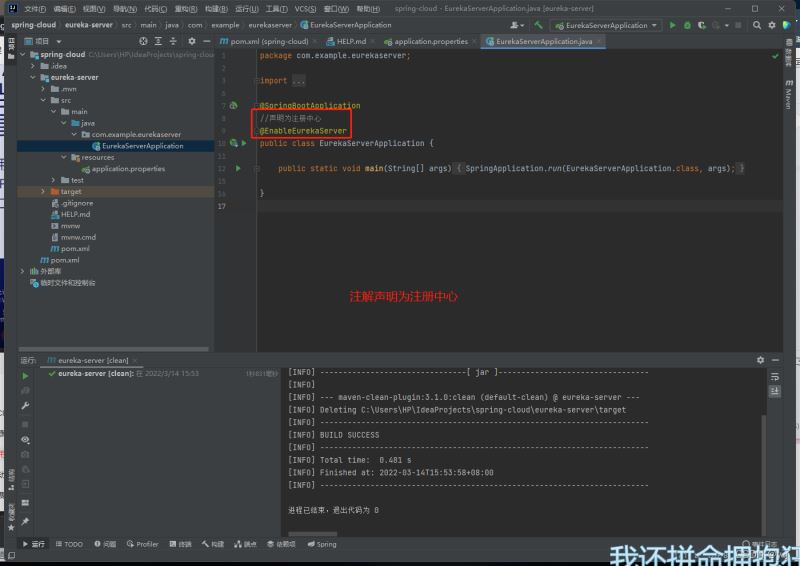
package com.example.eurekaserver;

import org.springframework.boot.SpringApplication;
import org.springframework.boot.autoconfigure.SpringBootApplication;
import org.springframework.cloud.netflix.eureka.server.EnableEurekaServer;

@SpringBootApplication
//声明为注册中心
@EnableEurekaServer
public class EurekaServerApplication {

    public static void main(String[] args) {
        SpringApplication.run(EurekaServerApplication.class, args);
    }

}
配置文件改用yml,配置如下:
server:
  #运行端口
  port: 8888
eureka:
  instance:
    #注册ip
    hostname: localhost
  client:
    #禁止自己当做服务注册
    register-with-eureka: false
    #屏蔽注册信息
    fetch-registry: false
    #注册url
    serviceUrl:
      defaultZone: http://${eureka.instance.hostname}:${server.port}/eureka/

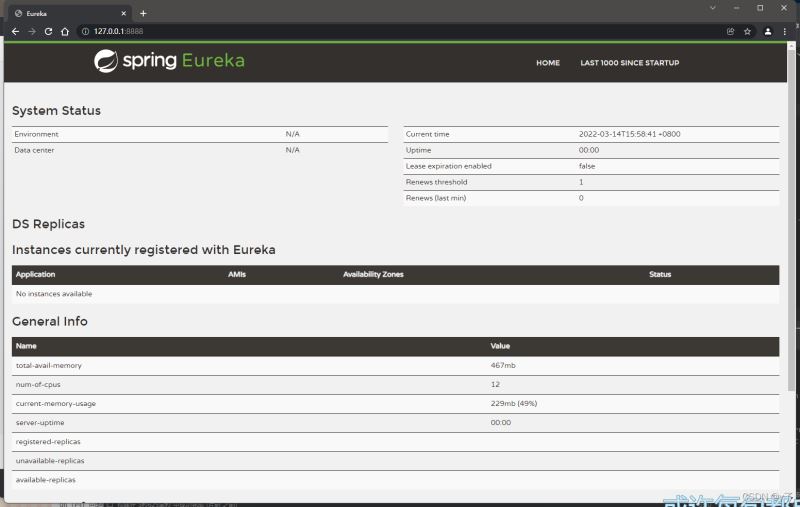
启动成功后,访问本地+端口即可看到注册中心页面,说明成功啦!
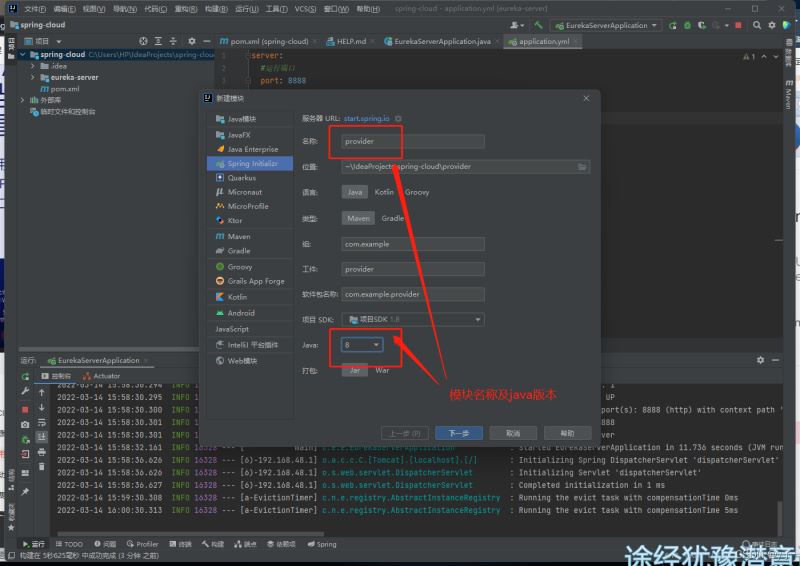
3、创建一个服务提供者(就是常写的spring-boot)

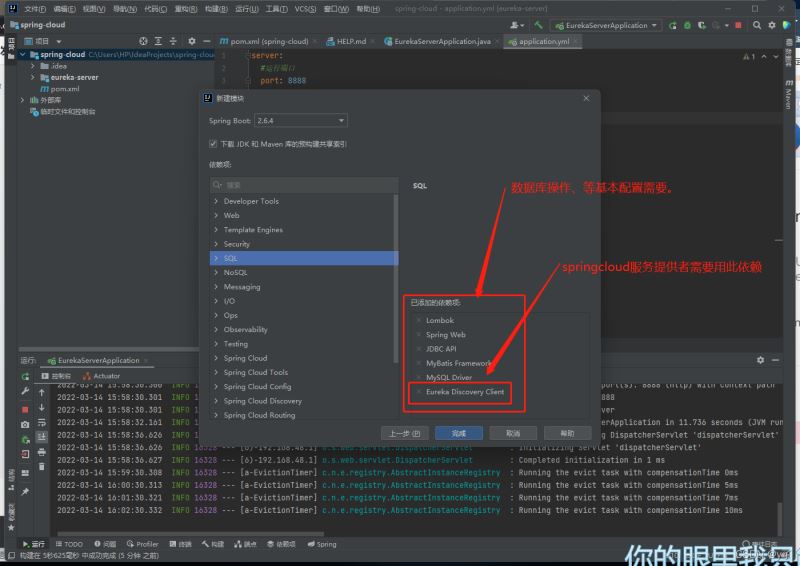
服务提供者配置,如下:

package com.example.provider;

import org.springframework.boot.SpringApplication;
import org.springframework.boot.autoconfigure.SpringBootApplication;
import org.springframework.cloud.netflix.eureka.EnableEurekaClient;

@SpringBootApplication
//声明为注册服务
@EnableEurekaClient
public class ProviderApplication {

    public static void main(String[] args) {
        SpringApplication.run(ProviderApplication.class, args);
    }

}
配置文件改用yml,配置如下:
eureka:
  client:
    serviceUrl:
      #服务注册地址
      defaultZone: http://localhost:8888/eureka/
server:
  #运行端口
  port: 8001
spring:
  application:
    #服务注册名称
    name: service-provider
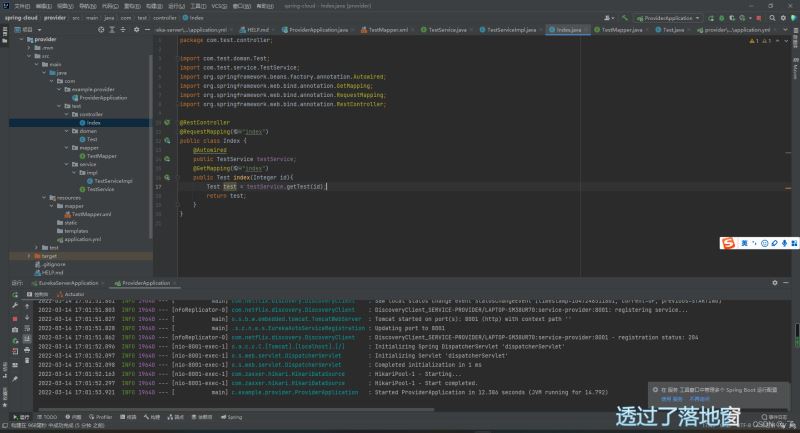
按照写springboot那样写一个查库接口
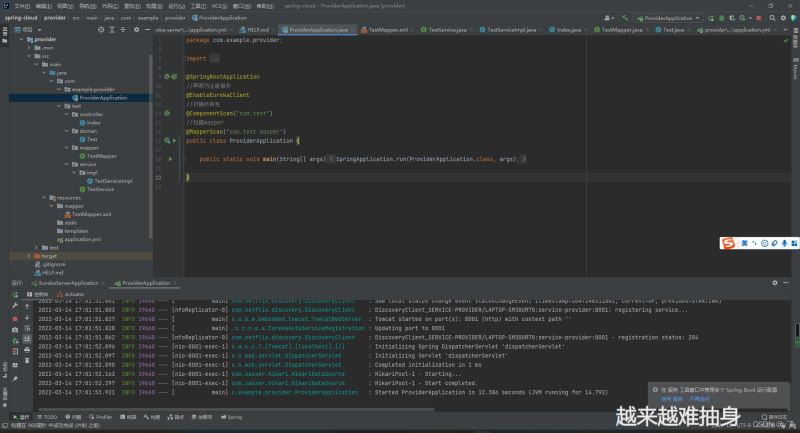
package com.example.provider;

import org.mybatis.spring.annotation.MapperScan;
import org.springframework.boot.SpringApplication;
import org.springframework.boot.autoconfigure.SpringBootApplication;
import org.springframework.cloud.netflix.eureka.EnableEurekaClient;
import org.springframework.context.annotation.ComponentScan;

@SpringBootApplication
//声明为注册服务
@EnableEurekaClient
//扫描所有包
@ComponentScan("com.test")
//扫描mapper
@MapperScan("com.test.mapper")
public class ProviderApplication {

    public static void main(String[] args) {
        SpringApplication.run(ProviderApplication.class, args);
    }

}
yml配置
eureka:
  client:
    serviceUrl:
      #服务注册地址
      defaultZone: http://localhost:8888/eureka/
server:
  #运行端口
  port: 8001
spring:
  application:
    #服务注册名称
    name: service-provider
  #数据库链接
  datasource:
    username: root
    password: yh996112
    url: jdbc:mysql://localhost:3306/yanghao?useUnicode=true&characterEncoding=utf-8&useSSL=true&serverTimezone=UTC
    driver-class-name: com.mysql.cj.jdbc.Driver
#mybatis配置
mybatis:
  mapper-locations: classpath:mapper/*Mapper.xml
  type-aliases-package: com.test.doman

OK,查库然后接口返回数据成功!
咱们的服务也在注册中心中注册成功啦!

4、创建一个消费者服务
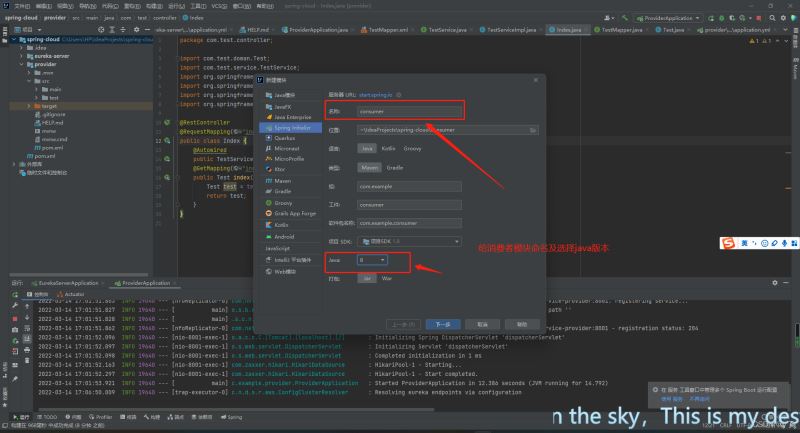
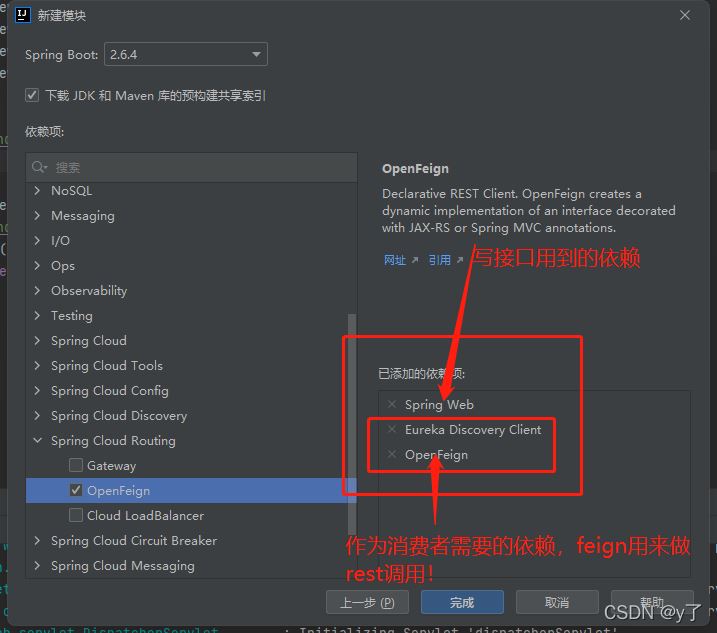
点击完成创建该模块
启动器配置

package com.example.consumer;

import org.springframework.boot.SpringApplication;
import org.springframework.boot.autoconfigure.SpringBootApplication;
import org.springframework.cloud.netflix.eureka.EnableEurekaClient;
import org.springframework.cloud.openfeign.EnableFeignClients;
import org.springframework.context.annotation.ComponentScan;
import org.springframework.stereotype.Component;

@SpringBootApplication
//声明为注册服务
@EnableEurekaClient
//把调用注册子模块接口引入到Spring容器中(不加此注解会出现找不到@FeignClient修饰的接口)
@EnableFeignClients
public class ConsumerApplication {

    public static void main(String[] args) {
        SpringApplication.run(ConsumerApplication.class, args);
    }

}
配置文件改用yml,配置如下:
eureka:
  client:
    serviceUrl:
      #服务注册地址
      defaultZone: http://localhost:8888/eureka/
server:
  #运行端口
  port: 8002
spring:
  application:
    #服务注册名称
    name: service-consumer
将服务提供者模块中的controller复制到消费者模块,如果涉及doman中文件就一并复制过去。

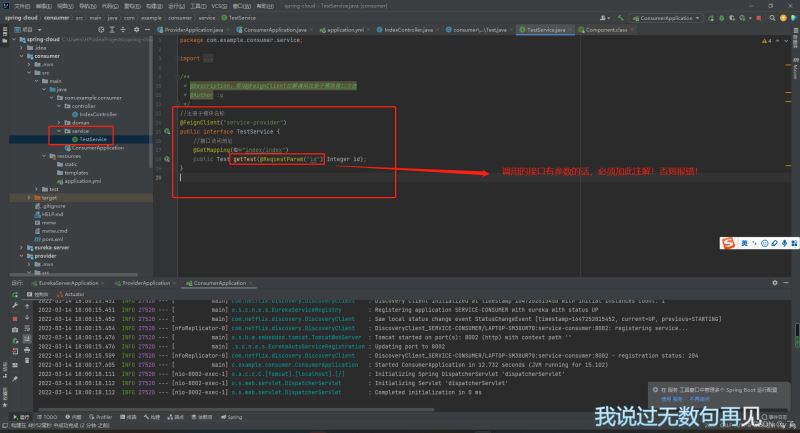
package com.example.consumer.service;

import com.example.consumer.doman.Test;
import org.springframework.cloud.openfeign.FeignClient;
import org.springframework.stereotype.Service;
import org.springframework.web.bind.annotation.GetMapping;
import org.springframework.web.bind.annotation.RequestParam;

/**
 * @Description:使用@FeignClient注解调用注册子模块接口方法
 * @Author :y
 */
//注册子模块名称
@FeignClient("service-provider")
public interface TestService {
    //接口访问地址
    @GetMapping("index/index")
    public Test getTest(@RequestParam("id") Integer id);
}
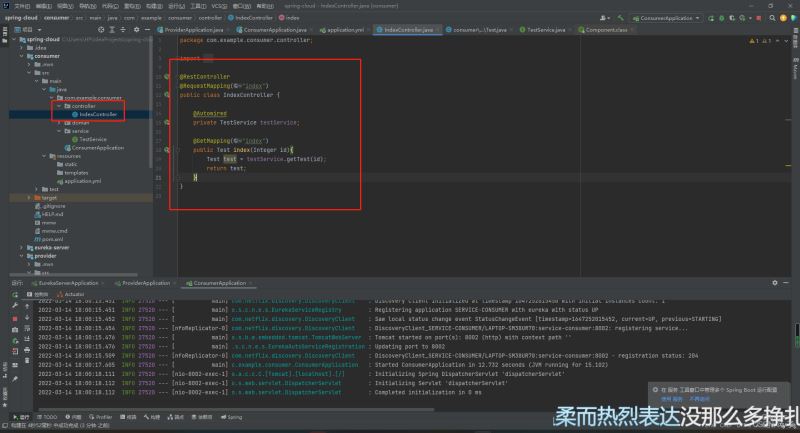
接口调用该service
启动消费者,进行接口测试!

访问消费者接口没有问题,成功的调用了服务提供者的接口返回了数据!!!
以上就是idea快速部署springCloud的全部过程,其中发现了一个问题,在消费者模块中启动器貌似无法使用@ComponentScan注解扫描包,使用后启动会报错???具有原因没有了解,建议不要把启动类放在别的包。
2022-03-14:该问题解决!
问题描述:
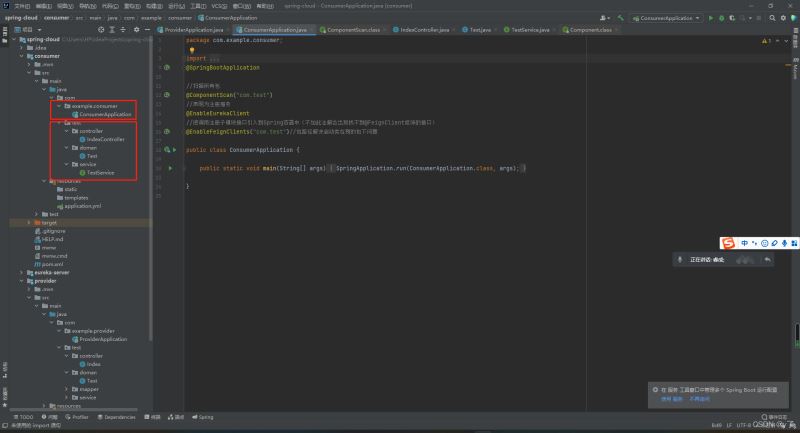
在消费者模块中,当启动类在别的包下时,使用@ComponentScan扫描包来自动javaBean
但是因为service接口中的@FeignClient注解同样不在启动类的包下,所以仅用@ComponentScan扫描包而找不到@FeignClient同样会报错的。
所以在启动类的@EnableFeignClients注解应该指定包去扫描一下!!!
消费者模块配置如下:

到此这篇关于利用idea快速搭建一个spring-cloud(图文)的文章就介绍到这了,更多相关idea搭建spring-cloud内容请搜索猪先飞以前的文章或继续浏览下面的相关文章希望大家以后多多支持猪先飞!
原文出处:https://blog.csdn.net/weixin_47723549/article/details/123480
相关文章
IntelliJ IDEA2021.1 配置大全(超详细教程)
这篇文章主要介绍了IntelliJ IDEA2021.1 配置大全(超详细教程),需要的朋友可以参考下...2021-04-18- 这篇文章主要介绍了解决IDEA 左侧Project中没有out文件夹的问题,具有很好的参考价值,希望对大家有所帮助。一起跟随小编过来看看吧...2021-02-08
- 这篇文章主要介绍了idea 修改项目名和module名称的操作,具有很好的参考价值,希望对大家有所帮助。一起跟随小编过来看看吧...2021-02-13
- 这篇文章主要介绍了idea一直卡在build不动的解决方案,本文给大家介绍的非常详细,对大家的学习或工作具有一定的参考借鉴价值,需要的朋友可以参考下...2020-10-21
- 这篇文章主要介绍了Intellij IDEA连接Navicat数据库的方法,本文通过图文并茂的形式给大家介绍的非常详细,对大家的学习或工作具有一定的参考借价值,需要的朋友可以参考下...2021-03-25
idea 访问html页面端口号显示的是63342而不是8080
这篇文章主要介绍了idea 访问html页面端口号显示的是63342而不是8080,文中通过示例代码介绍的非常详细,对大家的学习或者工作具有一定的参考学习价值,需要的朋友们下面随着小编来一起学习学习吧...2020-08-11- 这篇文章主要介绍了解决IDEA占用C盘空间过大的问题,具有很好的参考价值,希望对大家有所帮助。一起跟随小编过来看看吧...2021-02-22
- 这篇文章主要介绍了intelliJ IDEA 多行选中相同内容的快捷键分享,具有很好的参考价值,希望对大家有所帮助。一起跟随小编过来看看吧...2021-02-06
- 这篇文章主要介绍了解决idea2020 maven无法自动导包的问题,具有很好的参考价值,希望对大家有所帮助。一起跟随小编过来看看吧...2021-02-13
intellij idea快速查看当前类中的所有方法(推荐)
这篇文章主要介绍了intellij idea快速查看当前类中的所有方法,本文通过实例代码给大家介绍的非常详细,对大家的学习或工作具有一定的参考借鉴价值,需要的朋友可以参考下...2020-09-02解决IDEA maven 项目修改代码不生效,mvn clean、install后才生效
这篇文章主要介绍了解决IDEA maven 项目修改代码不生效,mvn clean、install后才生效的问题,具有很好的参考价值,希望对大家有所帮助。一起跟随小编过来看看吧...2020-09-25- 这篇文章主要介绍了IDEA中的clean,清除项目缓存图文教程,具有很好的参考价值,希望对大家有所帮助。一起跟随小编过来看看吧...2020-09-25
- 这篇文章主要介绍了idea 打包maven项目忽略test文件的操作,具有很好的参考价值,希望对大家有所帮助。一起跟随小编过来看看吧...2021-02-05
- 这篇文章主要介绍了解决IDEA插件市场Plugins无法加载的问题,本文通过图文并茂的形式给大家介绍的非常详细,对大家的学习或工作具有一定的参考借鉴价值,需要的朋友可以参考下...2020-10-21
- 这篇文章主要介绍了IDEA 2021.2 启动报错及激活教程,文章开头给大家介绍了idea2021最新激活方法,关于idea2021启动报错的问题小编也给大家介绍的非常详细,需要的朋友可以参考下...2021-10-15
- 这篇文章主要介绍了IDEA如何添加配置文件到classpath中,文中通过示例代码介绍的非常详细,对大家的学习或者工作具有一定的参考学习价值,需要的朋友可以参考下...2020-09-19
解决idea check out 切换分支时找不到需要的分支问题
这篇文章主要介绍了解决idea check out 切换分支时找不到需要的分支问题,具有很好的参考价值,希望对大家有所帮助。一起跟随小编过来看看吧...2021-02-09详解在IDEA中将Echarts引入web两种方式(使用js文件和maven的依赖导入)
这篇文章主要介绍了在IDEA中将Echarts引入web两种方式(使用js文件和maven的依赖导入),本文通过图文并茂的形式给大家介绍的非常详细,对大家的学习或工作具有一定的参考借鉴价值,需要的朋友可以参考下...2020-07-11- 这篇文章主要介绍了idea out目录与target目录的区别详解,具有很好的参考价值,希望对大家有所帮助。一起跟随小编过来看看吧...2021-02-08
- 这篇文章主要介绍了解决IDEA右键没有创建新的package选项的情况,具有很好的参考价值,希望对大家有所帮助。一起跟随小编过来看看吧...2021-02-13