springboot与vue详解实现短信发送流程
一、前期工作
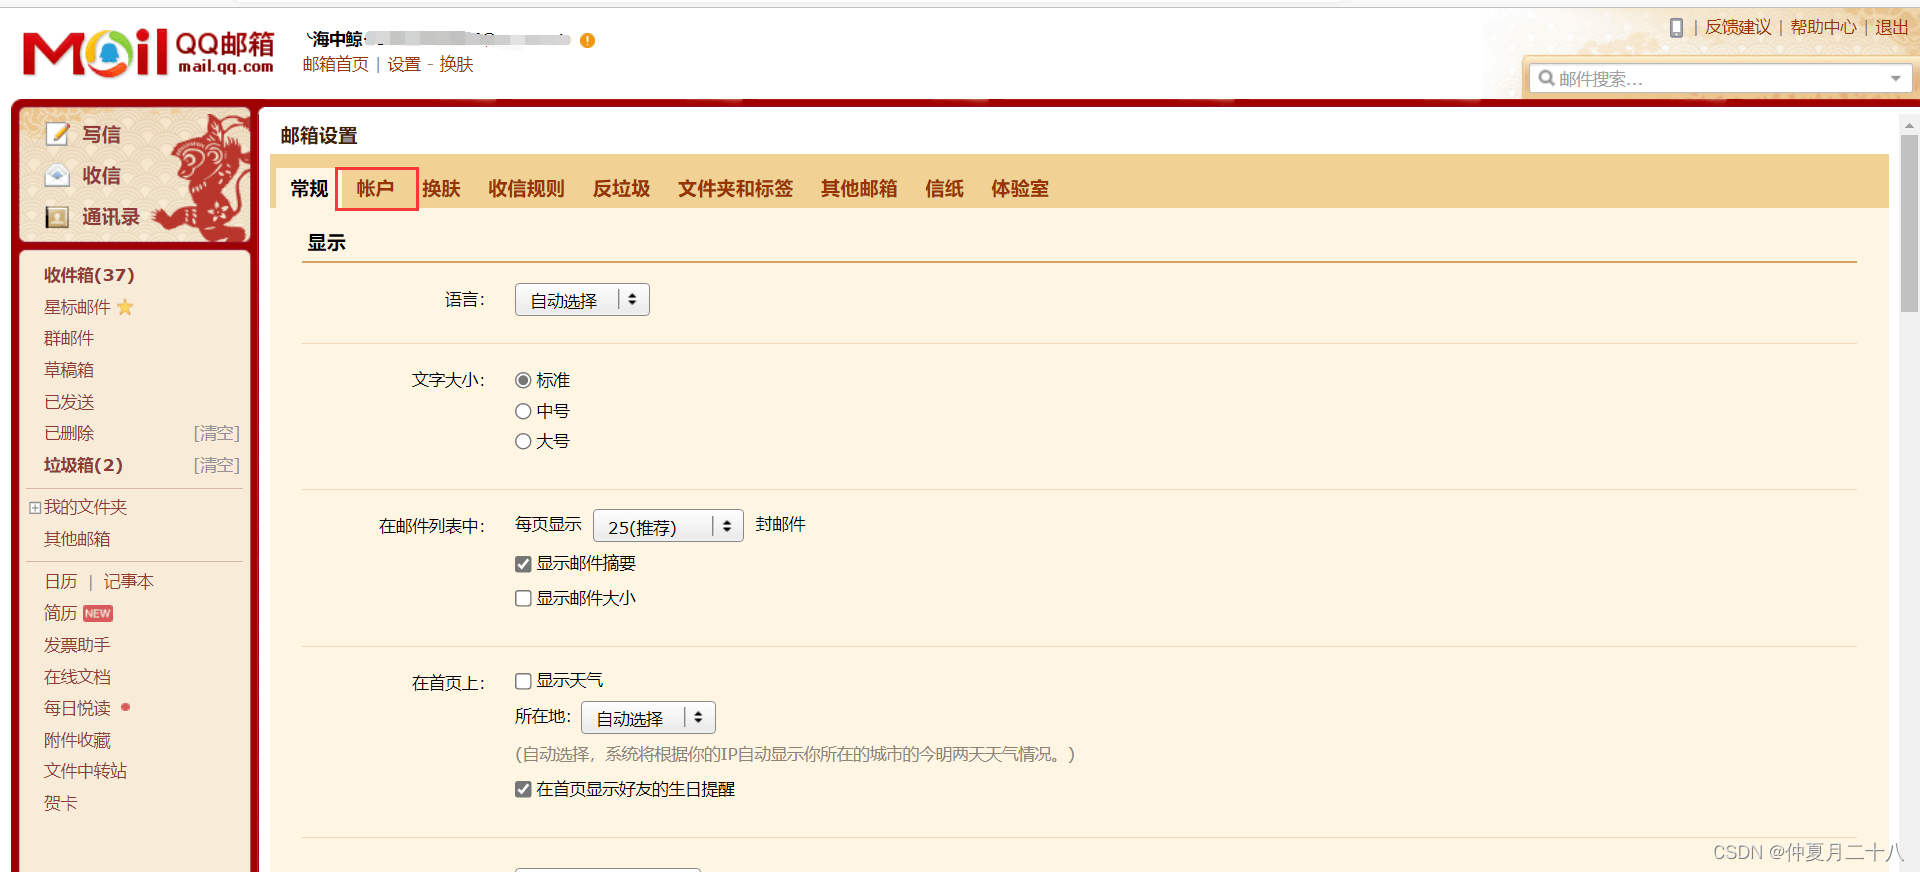
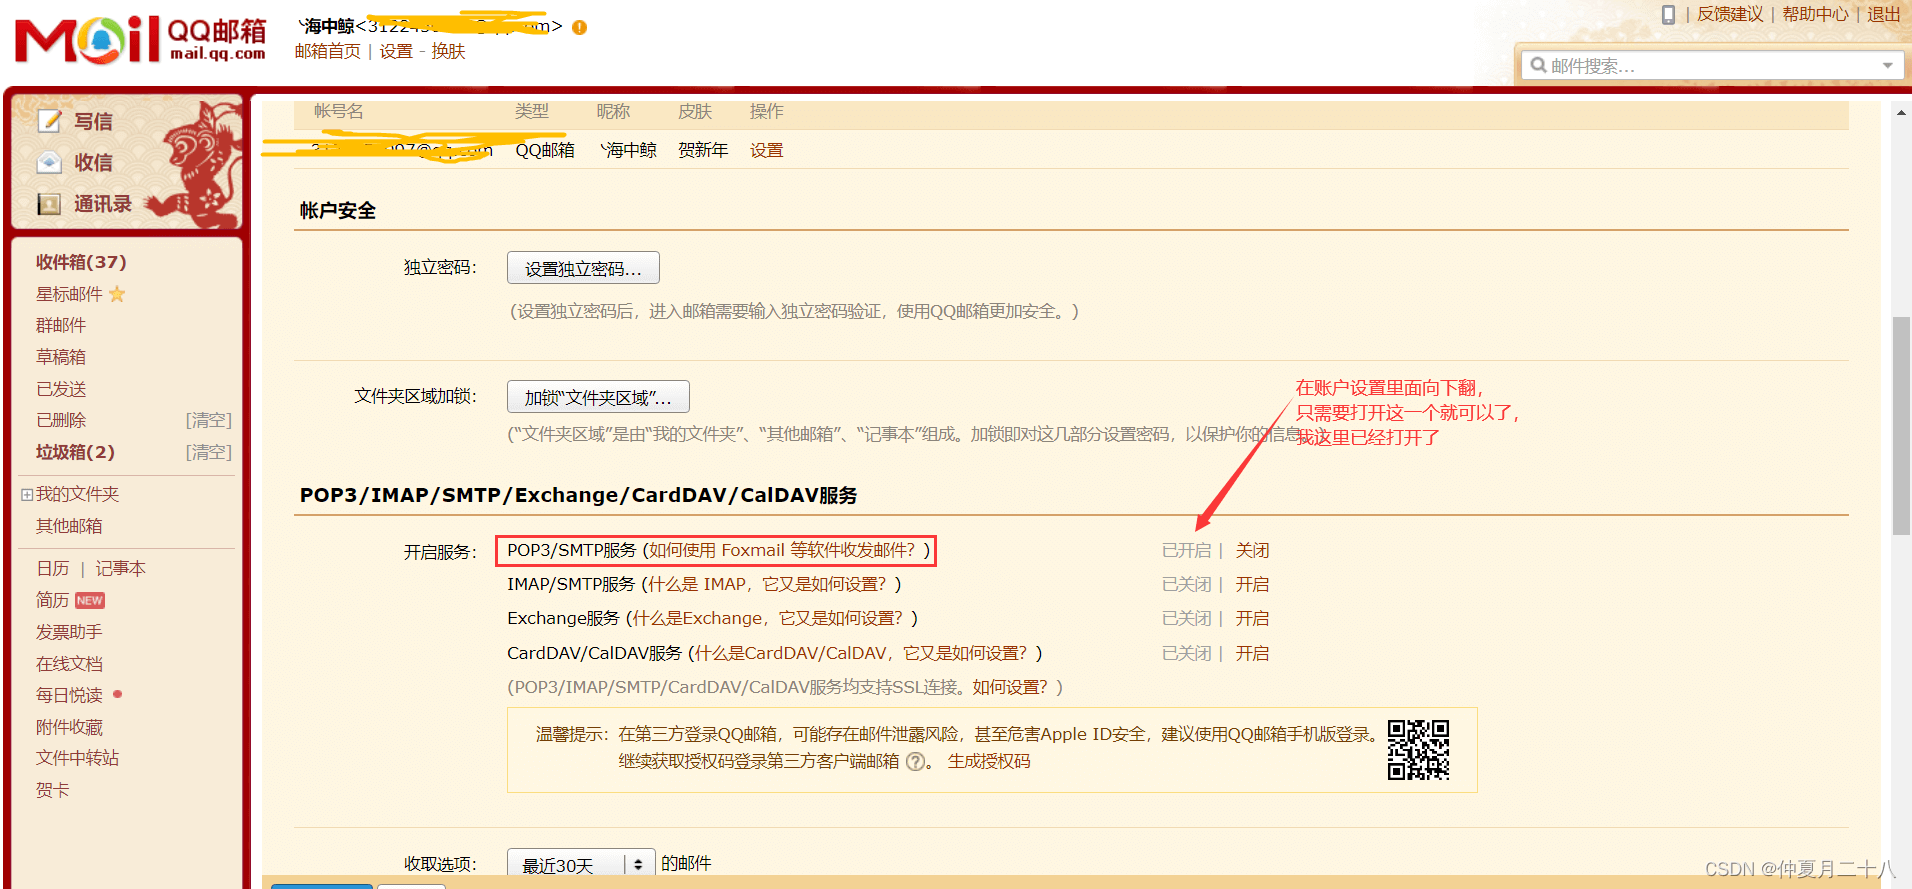
1.开启邮箱服务
开启邮箱的POP3/SMTP服务(这里以qq邮箱为例,网易等都是一样的)
2.导入依赖
在springboot项目中导入以下依赖:
<dependency>
            <groupId>org.springframework</groupId>
            <artifactId>spring-context-support</artifactId>
            <version>5.3.18</version>
        </dependency>
        <dependency>
            <groupId>org.springframework.boot</groupId>
            <artifactId>spring-boot-starter-mail</artifactId>
        </dependency>
        <dependency>
            <groupId>org.projectlombok</groupId>
            <artifactId>lombok</artifactId>
        </dependency>
        <dependency>
            <groupId>junit</groupId>
            <artifactId>junit</artifactId>
        </dependency>
        <dependency>
            <groupId>org.springframework.boot</groupId>
            <artifactId>spring-boot-starter-jdbc</artifactId>
        </dependency>
        <dependency>
            <groupId>mysql</groupId>
            <artifactId>mysql-connector-java</artifactId>
            <version>5.1.47</version>
            <scope>runtime</scope>
        </dependency>
        <dependency>
            <groupId>com.alibaba</groupId>
            <artifactId>druid</artifactId>
            <version>1.1.21</version>
        </dependency>
        <dependency>
            <groupId>com.alibaba</groupId>
            <artifactId>druid-spring-boot-starter</artifactId>
            <version>1.1.17</version>
        </dependency>
        <dependency>
            <groupId>org.mybatis.spring.boot</groupId>
            <artifactId>mybatis-spring-boot-starter</artifactId>
            <version>2.2.2</version>
        </dependency>
3.配置application.yaml文件
# 邮箱设置
spring:
mail:
host: smtp.163.com //如果是qq的邮箱就是smtp.qq.com
password: 开启pop3生成的一个字符串密码
username: 自己的邮箱地址,是什么邮箱后缀就是什么。
port:
default-encoding: UTF-8
protocol: smtp
properties:
mail.smtp.auth: true
mail.smtp.starttls.enable: true
mail.smtp.starttls.required: true
mail.smtp.socketFactory.class: javax.net.ssl.SSLSocketFactory
mail.smtp.socketFactory.fallback: false
mail:
smtp:
ssl:
enable: true
mvc:
pathmatch:
matching-strategy: ant_path_matcher
datasource: # jdbc数据库设置
druid:
password: sql密码
username: sql用户
url: jdbc:mysql://localhost:3306/sys?charsetEncoding=utf-8&useSSL=false
driver-class-name: com.mysql.jdbc.Driver
db-type: com.alibaba.druid.pool.DruidDataSource
mybatis: #mybatis的配置
type-aliases-package: com.cheng.springcolud.pojo
config-location: classpath:mybatis/mybatis-config.xml
mapper-locations: classpath:mybatis/mapper/*.xml
二、实现流程
1.导入数据库
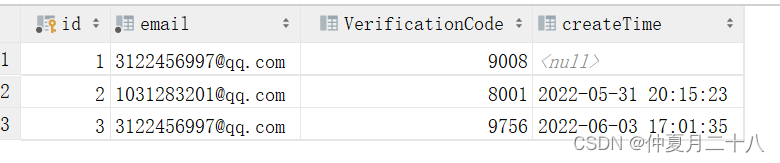
/*
 Navicat Premium Data Transfer
 Source Server         : likai
 Source Server Type    : MySQL
 Source Server Version : 50719
 Source Host           : localhost:3306
 Source Schema         : sys
 Target Server Type    : MySQL
 Target Server Version : 50719
 File Encoding         : 65001
 Date: 04/06/2022 14:08:29
*/
SET NAMES utf8mb4;
SET FOREIGN_KEY_CHECKS = 0;
-- ----------------------------
-- Table structure for useremaillogintable
-- ----------------------------
DROP TABLE IF EXISTS `useremaillogintable`;
CREATE TABLE `useremaillogintable`  (
  `id` int(255) NOT NULL AUTO_INCREMENT,
  `email` varchar(255) CHARACTER SET utf8 COLLATE utf8_general_ci NOT NULL,
  `VerificationCode` int(20) NULL DEFAULT NULL,
  `createTime` datetime(0) NULL DEFAULT NULL ON UPDATE CURRENT_TIMESTAMP(0),
  PRIMARY KEY (`id`) USING BTREE
) ENGINE = InnoDB AUTO_INCREMENT = 4 CHARACTER SET = utf8 COLLATE = utf8_general_ci ROW_FORMAT = Dynamic;
SET FOREIGN_KEY_CHECKS = 1;
2.后端实现
编写实体类
代码如下(示例):
@Data
@NoArgsConstructor
@ToString
public class EmailVerification {
    private int id;
    private String email; //需要发送的邮箱
    private Integer verificationCode;//验证码
    private Date createTime;
    public EmailVerification(String email, Integer verificationCode) {
        this.email = email;
        this.verificationCode = verificationCode;
    }
}
编写工具类ResultVo
@Data
@AllArgsConstructor
@NoArgsConstructor
public class ResultVO {
    private int code;//相应给前端的状态码
    private String msg;//相应给前端的提示信息
    private Object data;//响应给前端的数据
}
编写dao层接口
Mapper
@Repository
public interface EmailVerificationDao {
    /*将短信验证码和个人邮箱保存到数据库中*/
    public Boolean getEmailVerificationCode(String email,Integer verificationCode);
    /*校验短信信息*/
    public List<EmailVerification> checkEmailVerificationCode(String email,Integer verificationCode);
    /*查询所有的用户*/
    public List<EmailVerification> queryEmailVerificationInfo();
}
配置dao层接口的数据库操作
<?xml version="1.0" encoding="utf-8" ?>
<!DOCTYPE mapper PUBLIC "-//mybatis.org//DTD Mapper 3.0//EN" "http://mybatis.org/dtd/mybatis-3-mapper.dtd" >
<mapper namespace="com.cheng.dao.EmailVerificationDao">
    <insert id="getEmailVerificationCode">
        insert into sys.useremaillogintable(email, VerificationCode,createTime) VALUES (#{email},#{verificationCode},NOW())
    </insert>
    <select id="checkEmailVerificationCode" resultType="com.cheng.bean.EmailVerification">
        select * from sys.useremaillogintable where email=#{email} and VerificationCode=#{verificationCode}
    </select>
    <select id="queryEmailVerificationInfo" resultType="com.cheng.bean.EmailVerification" >
        select * from sys.useremaillogintable;
    </select>
</mapper>
编写service层接口
public interface EmailVerificationCodeService {
    public boolean getEmailVerificationCode(String email,Integer verificationCode);
    public ResultVO checkEmailVerificationCode(String email, Integer verificationCode);
    public ResultVO queryEmailVerificationInfo();
    public ResultVO sendEmailVerificationCode(String email);
}
代码讲解: getEmailVerificationCod方法是将数据(验证码和邮箱地址)放入数据库当中,checkEmailVerificationCode是用来校验其验证码和邮箱是否是正确,·queryEmailVerificationInfo·是用来查询所有的数据,在这里我新加了个接口叫做senEmailVerificationCode就是单纯用来发送短信信息的,只有一个参数,他是没有相对应的数据库操作的。
编写service层的实现方法
@Service
public class EmailVerificationCodeServiceImpl implements EmailVerificationCodeService{
@Autowired
EmailVerificationDao emailVerificationDao;
private final static String EmailFrom = "li3122456997@163.com";
private final JavaMailSenderImpl javaMailSender;
public int code = (int)(Math.random() * 9000 + 1000);
public EmailVerificationCodeServiceImpl(JavaMailSenderImpl javaMailSender) {
this.javaMailSender = javaMailSender;
}
@Override
public boolean getEmailVerificationCode(String email,Integer verificationCode) {
verificationCode =code;
return emailVerificationDao.getEmailVerificationCode(email,verificationCode);
}
@Override
public ResultVO checkEmailVerificationCode(String email, Integer verificationCode) {
List<EmailVerification> emailVerifications = emailVerificationDao.checkEmailVerificationCode(email, verificationCode);
if (emailVerifications.size()>0){
return new ResultVO(1001,"校验成功",emailVerifications);
}else {
return new ResultVO(1002,"校验失败",null);
}
}
@Override
public ResultVO queryEmailVerificationInfo() {
List<EmailVerification> emailVerifications = emailVerificationDao.queryEmailVerificationInfo();
return new ResultVO(1001,"success",emailVerifications);
}
@Override
public ResultVO sendEmailVerificationCode(String email) {
SimpleMailMessage simpleMailMessage = new SimpleMailMessage();
simpleMailMessage.setSubject("验证码");
simpleMailMessage.setTo(email);//收件人
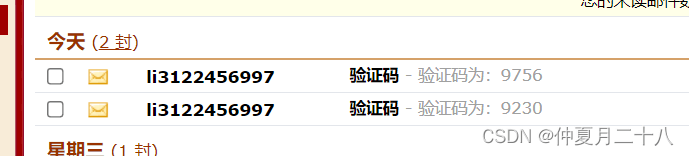
simpleMailMessage.setText("验证码为:"+code);
simpleMailMessage.setFrom("******@163.com"); //发送的人(写自己的)
javaMailSender.send(simpleMailMessage);
boolean emailVerificationCode = getEmailVerificationCode(email, code);
if (emailVerificationCode){
return new ResultVO(1001,"发送成功!","验证码为:"+code);
}else {
return new ResultVO(1002,"发送失败",null);
}
}
}
代码讲解: 这里就一个注重点,就是sendEmailVerificationCode的实现,我将随机数给提出出来,因为getEmailVerificationCode也是需要将随机数给保存到数据库当中的,为了避免两者的验证码不同,我就给其提取出来,以确保其一致性,在sendEmailVerificationCode的实现,我在里面调用了getEmailVerificationCode方法,这样可以保证其邮箱地址的一致性。在通过判断,验证短信是否发送成功。
实现controller层
@RestController
@CrossOrigin//允许回复前端数据,跨域请求允许
public class EmailController {
    @Autowired
    EmailVerificationCodeService emailVerificationCodeService;
    @Autowired
    InfoTimingSendServiceImpl infoTimingSendService;
    @GetMapping("send")
    public ResultVO sendMail(@RequestParam(value = "email") String email){
        return emailVerificationCodeService.sendEmailVerificationCode(email);
    }
    @GetMapping("checkEmailVerification")
    public ResultVO checkEmail(@RequestParam(value = "email") String email, @RequestParam(value = "verificationCode") Integer verificationCode){
        ResultVO resultVO = emailVerificationCodeService.checkEmailVerificationCode(email, verificationCode);
        return resultVO;
    }
    @GetMapping("queryAll")
    public ResultVO queryAll(){
        ResultVO resultVO = emailVerificationCodeService.queryEmailVerificationInfo();
        return resultVO;
    }
}
注意: 需要加入@CrossOrigin注解,这个注解是可以解决跨域问题,这个项目我写的是前后端分离的,所以这里需要加入这个在注解,为后面通过axios来获取数据做准备
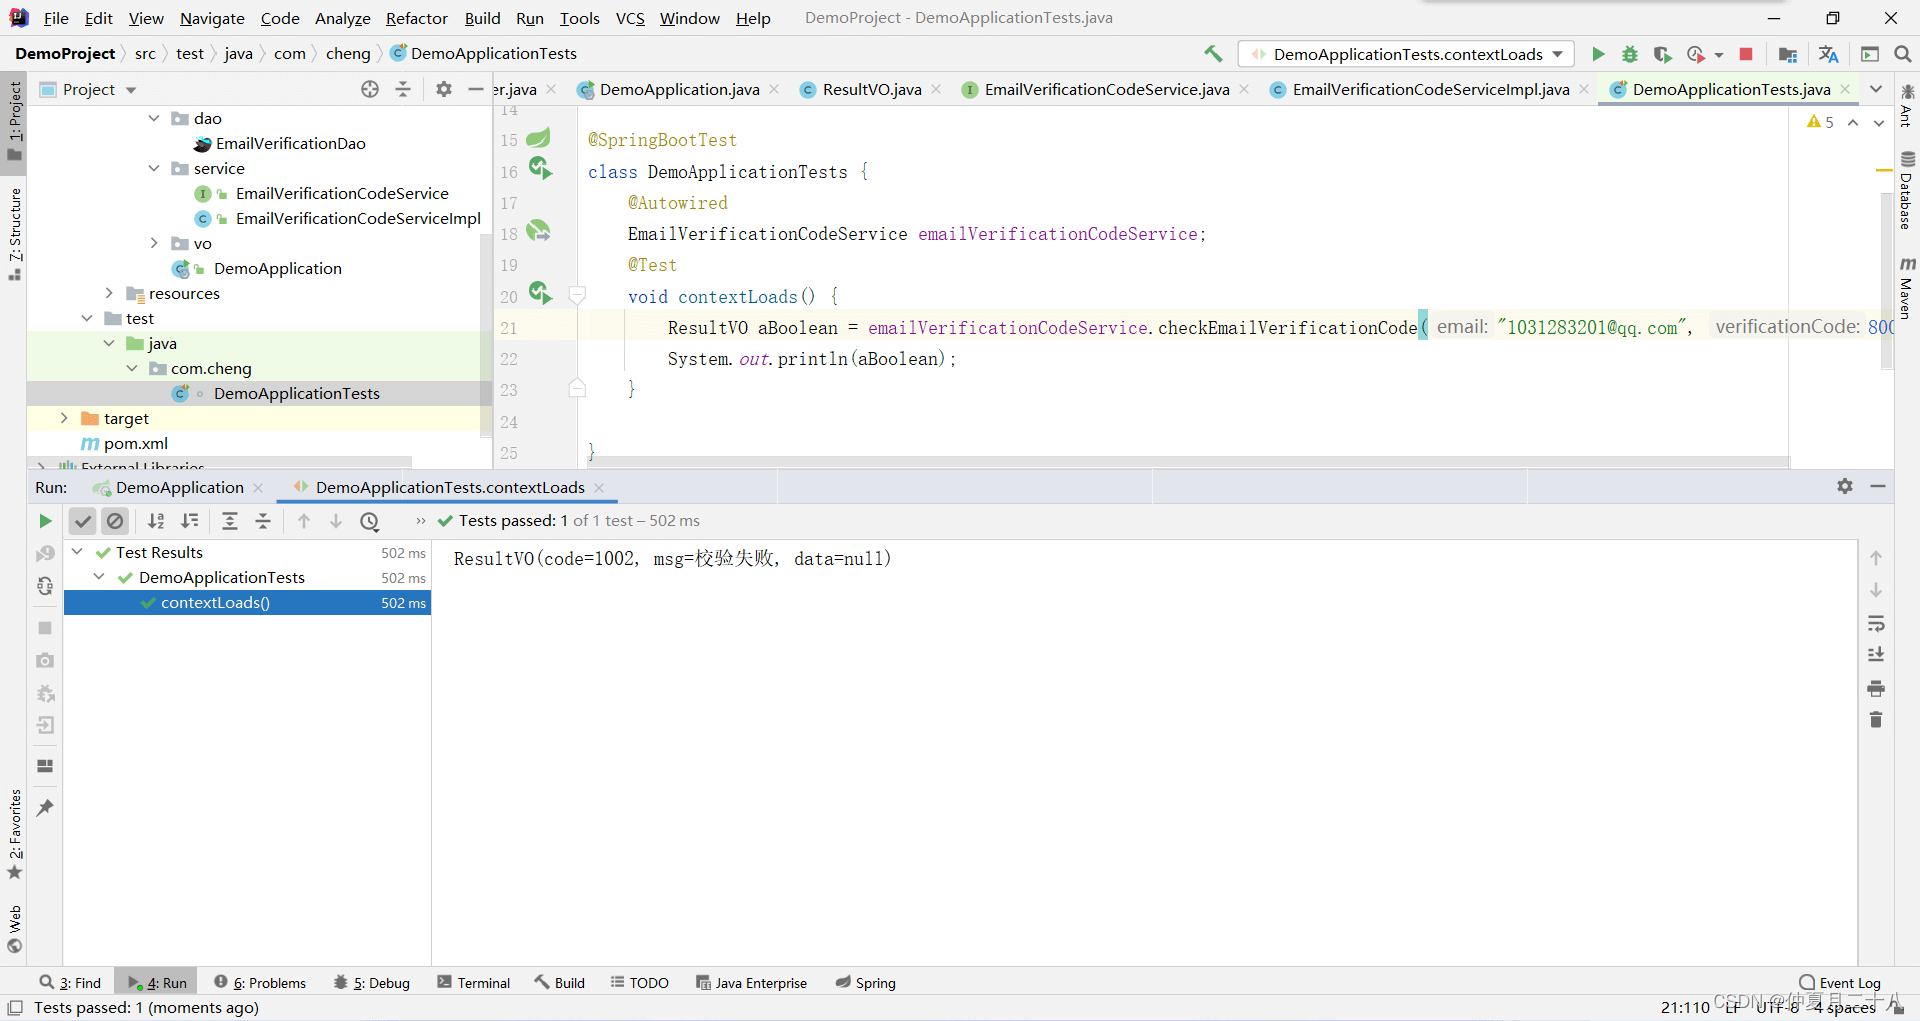
Test代码
@SpringBootTest
class DemoApplicationTests {
    @Autowired
    EmailVerificationCodeService emailVerificationCodeService;
    @Autowired
    InfoTimingSendServiceImpl infoTimingSendService;
    @Test
    void contextLoads() {
        ResultVO aBoolean = emailVerificationCodeService.checkEmailVerificationCode("***@qq.com", 8001);
        System.out.println(aBoolean);
    }
    @Test
    void infoSendTest(){
        infoTimingSendService.infoSend();
    }
    @Test
    void send(){
        final ResultVO resultVO = emailVerificationCodeService.sendEmailVerificationCode("***7@qq.com");
        System.out.println(resultVO);
    }
}
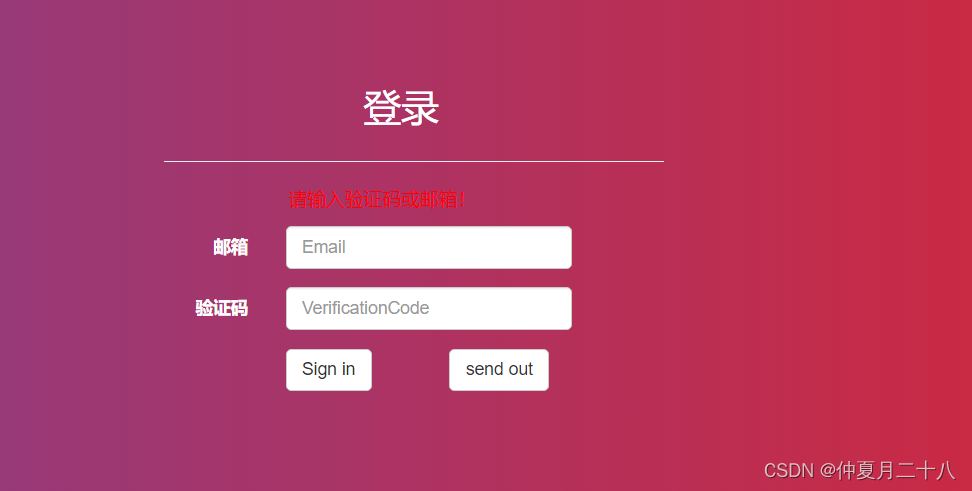
前端页面的实现
注意: 在前端页面我使用了bootstrap框架,vue,axios,所以需要当如相对应的包
注册页面
<!DOCTYPE html>
<html>
<head>
<meta charset="utf-8">
<title></title>
<link rel="stylesheet" href="css/bootstrap.min.css" rel="external nofollow" />
<script src="js/jquery.min.js"></script>
<script src="js/bootstrap.min.js"></script>
<script src="js/vue.js"></script>
<style>
</style>
</head>
<body style="background: linear-gradient(to right,#7b4397,#dc2430);">
<div id="container">
<div class="container-fluid" style="color: white;">
<form class="form-horizontal" role="form" style="padding-left: 500px; margin-top: 200px;">
<fieldset>
<div class="form-group">
<p style="font-size: 30px;margin-left: 250px; margin-right: 240px;color:white">登录</p>
<hr style="width: 400px;margin-left: 90px; background-color: red;" />
<p style="font-size: 15px;margin-left: 190px; margin-right: 240px;color:red" id="tips">{{tips}} </p>
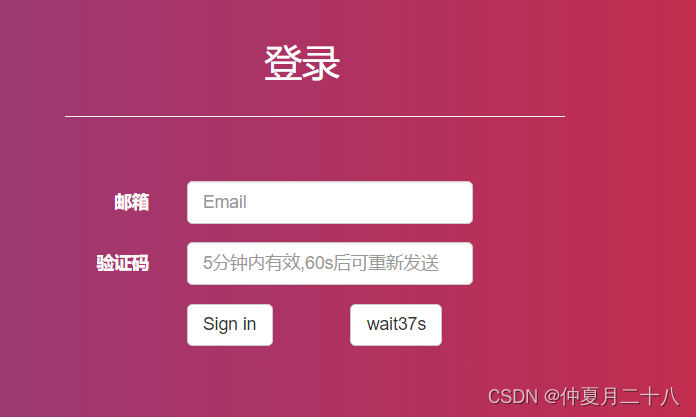
<label for="inputEmail3" class="col-sm-2 control-label">邮箱</label>
<div class="col-sm-3">
<input type="email" v-model="email" class="form-control" id="inputEmail3" placeholder="Email">
</div>
</div>
<div class="form-group">
<label for="inputPassword3" class="col-sm-2 control-label">验证码</label>
<div class="col-sm-3">
<input v-if="verification_send" type="text" v-model="verification" class="form-control" id="inputPassword3" placeholder="VerificationCode">
<input v-else type="text" class="form-control" v-model="verification" id="inputPassword3" placeholder="5分钟内有效,60s后可重新发送" />
</div>
</div>
<div class="form-group">
<div class="col-sm-offset-2 col-sm-3">
<a type="submit" class="btn btn-default" @click="sign">Sign in</a>
<a v-if="time==60" class="btn btn-default" @click="send" class="btn btn-default">{{info}}</a>
<a v-if="time<60&&time>=0" class="btn btn-default" @click="send" class="btn btn-default" style="pointer-events: none;">{{"wait"+time+"s"}}</a>
<a v-if="time<0" class="btn btn-default" @click="send" class="btn btn-default">{{info}}</a>
</div>
</div>
</form>
</div>
</div>
<script src="js/axios.min.js"></script>
<script type="text/javascript">
var baseUrl="http://localhost:8080/";
var vm = new Vue({
el:'#container',
data:{
info: 'send out',
time: 60,
verification_send: true,
verification:"",
email:"",
tips:""
},
methods:{
send:function (){
var url1 = baseUrl+"/send";
axios.get(url1,{params:{email:vm.email}}).then((res)=>{
console.log(res);
if(res.data.code==1001){
vm.tips="发送成功!";
}else{
vm.tips="发送失败!请稍后再试"
}
});
setInterval(function(){
if(vm.time==60){
vm.time--;
this.time=vm.time;
vm.verification_send = false;
console.log(vm.time);
}else if(vm.time==0){
clearInterval(vm.time)
vm.verification_send = true;
}else{
vm.time--;
console.log(vm.time);
}
},1000);
},
sign:function(){
var url = baseUrl+"/checkEmailVerification";
if(vm.email==""&&vm.verification==""){
vm.tips="请输入验证码或邮箱!";
}else{
axios.get(url,{params:{email:vm.email,verificationCode:vm.verification}})
.then((res)=>{
var vo = res.data;
if(vo.code==1001){
vm.tips="登录成功";
setInterval(function(){
window.location.href="index.html" rel="external nofollow" ;
},3000);
}else{
vm.tips="请输入正确的验证码!";
}
})
}
}
}
})
</script>
</body>
</html>
讲解:在这里,在发送按钮上面加入了时间倒计时,当我点击的时候,会倒计时1minute,在这期间,发送按钮是无法被点击的!这就避免了多次放松
index.htm
<!DOCTYPE html>
<html>
	<head>
		<meta charset="utf-8">
		<title></title>
	</head>
	<body>
		<center style="margin-top: 50px;">
			<p>欢迎你:</p>
			<p>登录成功!</p>
		</center>
	</body>
</html>
页面效果:

效果图:
运行截图+sql图


总结
以上就是springboot+vue实现后端和前端短信发送的所有代码,其实像短信发送了两次,以第二次为准的话,我们可以实现一个数据库内容的修改,当其发送了两次,我们就以第二次为准!希望对大家有所帮助,这里前端的验证其实是不够完善的,我没有去加入邮箱的验证。是因为我的QQ邮箱被腾讯被封了,我害怕试多了之后,网易邮箱也被封了!!!!
原文出处:https://blog.csdn.net/m0_49652369/article/details/125114199
相关文章
解决springboot使用logback日志出现LOG_PATH_IS_UNDEFINED文件夹的问题
这篇文章主要介绍了解决springboot使用logback日志出现LOG_PATH_IS_UNDEFINED文件夹的问题,文中通过示例代码介绍的非常详细,对大家的学习或者工作具有一定的参考学习价值,需要的朋友们下面随着小编来一起学习学习吧...2021-04-28- 这篇文章主要介绍了vue中activated的用法,帮助大家更好的理解和使用vue框架,感兴趣的朋友可以了解下...2021-01-03
基于vue-simple-uploader封装文件分片上传、秒传及断点续传的全局上传插件功能
这篇文章主要介绍了基于vue-simple-uploader封装文件分片上传、秒传及断点续传的全局上传插件,本文给大家介绍的非常详细,对大家的学习或工作具有一定的参考借鉴价值,需要的朋友可以参考下...2021-02-23Antd-vue Table组件添加Click事件,实现点击某行数据教程
这篇文章主要介绍了Antd-vue Table组件添加Click事件,实现点击某行数据教程,具有很好的参考价值,希望对大家有所帮助。一起跟随小编过来看看吧...2020-11-17- 这篇文章主要介绍了vue 实现动态路由的方法,文中示例代码非常详细,帮助大家更好的理解和学习,感兴趣的朋友可以了解下...2020-07-06
- 这篇文章主要介绍了vue 监听 Treeselect 选择项的改变操作,具有很好的参考价值,希望对大家有所帮助。一起跟随小编过来看看吧...2020-09-01
- 这篇文章主要介绍了Vue组件跨层级获取组件操作,具有很好的参考价值,希望对大家有所帮助。一起跟随小编过来看看吧...2020-07-28
- 这篇文章主要介绍了Vue基于localStorage存储信息代码实例,文中通过示例代码介绍的非常详细,对大家的学习或者工作具有一定的参考学习价值,需要的朋友可以参考下...2020-11-16
- 这篇文章主要介绍了vue 获取到数据但却渲染不到页面上的解决方法,文中通过示例代码介绍的非常详细,对大家的学习或者工作具有一定的参考学习价值,需要的朋友们下面随着小编来一起学习学习吧...2020-11-19
antdesign-vue结合sortablejs实现两个table相互拖拽排序功能
这篇文章主要介绍了antdesign-vue结合sortablejs实现两个table相互拖拽排序功能,本文通过实例图文相结合给大家介绍的非常详细,对大家的学习或工作具有一定的参考借鉴价值,需要的朋友可以参考下...2021-01-09- 这篇文章主要为大家详细介绍了SpringBoot实现excel文件生成和下载,文中示例代码介绍的非常详细,具有一定的参考价值,感兴趣的小伙伴们可以参考一下...2021-02-09
vuejs element table 表格添加行,修改,单独删除行,批量删除行操作
这篇文章主要介绍了vuejs element table 表格添加行,修改,单独删除行,批量删除行操作,具有很好的参考价值,希望对大家有所帮助。一起跟随小编过来看看吧...2020-07-18- 最常见的多环境配置,就是开发环境配置,和生产环境配置,本文主要介绍了vue项目多环境配置的实现,感兴趣的可以了解一下...2021-07-20
- 这篇文章主要介绍了vue treeselect获取当前选中项的label实例,具有很好的参考价值,希望对大家有所帮助。一起跟随小编过来看看吧...2020-09-01
vue项目页面嵌入代码块vue-prism-editor的实现
这篇文章主要介绍了vue项目页面嵌入代码块vue-prism-editor的实现,本文给大家介绍的非常详细,对大家的学习或工作具有一定的参考借鉴价值,需要的朋友可以参考下...2020-10-30- 这篇文章主要给大家介绍了关于Vue中slot-scope的深入理解,这个教程非常适合初学者,文中通过示例代码介绍的非常详细,对大家的学习或者工作具有一定的参考学习价值,需要的朋友们下面随着小编来一起学习学习吧...2021-04-17
- 这篇文章主要介绍了Vue 3.0 中 jsx 语法使用,帮助大家更好的理解和使用vue框架,感兴趣的朋友可以了解下...2020-11-13
解决vue的router组件component在import时不能使用变量问题
这篇文章主要介绍了解决vue的router组件component在import时不能使用变量问题,具有很好的参考价值,希望对大家有所帮助。一起跟随小编过来看看吧...2020-07-27- 这篇文章主要为大家详细介绍了vue实现同时设置多个倒计时,文中示例代码介绍的非常详细,具有一定的参考价值,感兴趣的小伙伴们可以参考一下...2021-05-20
vue Treeselect下拉树只能选择第N级元素实现代码
这篇文章主要介绍了vue Treeselect下拉树只能选择第N级元素实现代码,具有很好的参考价值,希望对大家有所帮助。一起跟随小编过来看看吧...2020-09-01