SpringCloud之@FeignClient()注解的使用方式
@FeignClient()注解的使用
由于SpringCloud采用分布式微服务架构,难免在各个子模块下存在模块方法互相调用的情况。比如service-admin服务要调用service-card 服务的方法。
- @FeignClient()注解就是为了解决这个问题的。
- @FeignClient()注解的源码要求它必须在Interface接口上使用。( FeignClient注解被@Target(ElementType.TYPE)修饰,表示FeignClient注解的作用目标在接口上)
@RequestLine与其它请求不同,只需要简单写请求方式和路径就能达到请求其它服务的目的。
@FeignClient(value = "feign-server",configuration = FeignConfig.class)  //需要一个配置文件
public interface TestService {
    @RequestLine("POST /feign/test")    //对应请求方式和路径
    String feign(@RequestBody UserDO userDO);
}
@EnableFeignClients
@SpringBootConfiguration
public class FeignConfig {
    @Bean
    public Contract contract(){
        return new feign.Contract.Default();
    }
}
@FeignClient标签的常用属性如下
value: 服务名name: 指定FeignClient的名称,如果项目使用了Ribbon,name属性会作为微服务的名称,用于服务发现url: url一般用于调试,可以手动指定@FeignClient调用的地址decode404:当发生http 404错误时,如果该字段位true,会调用decoder进行解码,否则抛出FeignExceptionconfiguration: Feign配置类,可以自定义Feign的Encoder、Decoder、LogLevel、Contractfallback: 定义容错的处理类,当调用远程接口失败或超时时,会调用对应接口的容错逻辑,fallback指定的类必须实现@FeignClient标记的接口fallbackFactory: 工厂类,用于生成fallback类示例,通过这个属性我们可以实现每个接口通用的容错逻辑,减少重复的代码path: 定义当前FeignClient的统一前缀
此外还要求服务的启动类要有@EnableFeignClients 注解才能使Fegin生效。
SpringCloud 服务间互相调用 @FeignClient注解
SpringCloud搭建各种微服务之后,服务间通常存在相互调用的需求,SpringCloud提供了@FeignClient 注解非常优雅的解决了这个问题
首先,保证几个服务都在一个Eureka中注册成功形成服务场。
如下,我一共有三个服务注册在服务场中。COMPUTE-SERVICE ; FEIGN-CONSUMER ; TEST-DEMO;
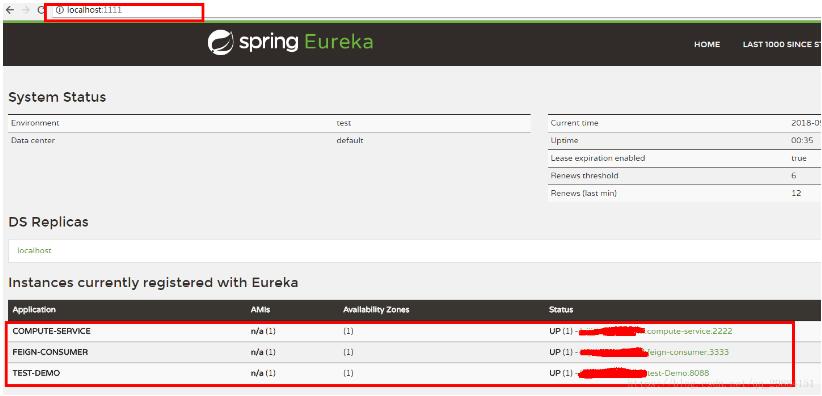
我在FEIGN-CONSUMER
服务中调用其他两个服务的两个接口
分别为get带参和post不带参两个接口如下这个是COMPUTE-SERVICE中的get带参方法
@RequestMapping(value = "/add" ,method = RequestMethod.GET)
public Integer add(@RequestParam Integer a, @RequestParam Integer b) {
    ServiceInstance instance = client.getLocalServiceInstance();
    Integer r = a + b;
    logger.info("/add, host:" + instance.getHost() + ", service_id:" + instance.getServiceId() + ", result:" + r);
    return r;
}
如果要在FEIGN-CONSUMER 服务中调用这个方法的话,需要在 FEIGN-CONSUMER 中新建一个接口类专门调用某一工程中的系列接口
 @FeignClient("compute-service")
 public interface ComputeClient {
     @RequestMapping(method = RequestMethod.GET, value = "/add")
     Integer add(@RequestParam(value = "a") Integer a, @RequestParam(value = "b") Integer b);
 }
其中,@FeignClient注解中标识出准备调用的是当前服务场中的哪个服务,这个服务名在目标服务中的配置中取
spring.application.name
接下来,在@RequestMapping中设置目标接口的接口类型、接口地址等属性。然后在下面定义接口参数以及返回参数
在FEIGN-CONSUMER
Controller层调用方法的时候
将上面接口注入进来,就可以直接用了
 @Autowired
 ComputeClient computeClient;

 @RequestMapping(value = "/add", method = RequestMethod.GET)
 public Integer add() {
     return computeClient.add(10, 20);
 }
当然,post方法同理:
这是目标接口:
 @RestController
 @RequestMapping("/demo")
 @EnableAutoConfiguration
 public class HelloController {
    @RequestMapping(value = "/test",method = RequestMethod.POST)
    String test1(){
       return "hello,test1()";
    }
 }
这是在本项目定义的接口文件:
 @FeignClient("test-Demo")
 public interface TestDemo {
     @RequestMapping(method = RequestMethod.POST, value = "/demo/test")
     String test();
 }
这是项目中的Controller层
 @RestController
 public class ConsumerController {
     @Autowired
     TestDemo testDemo;

     @Autowired
     ComputeClient computeClient;

     @RequestMapping(value = "/add", method = RequestMethod.GET)
     public Integer add() {
         return computeClient.add(10, 20);
     }

     @RequestMapping(value = "/test", method = RequestMethod.GET)
     public String test() {
         return testDemo.test();
     }
 }
最终调用结果如下:
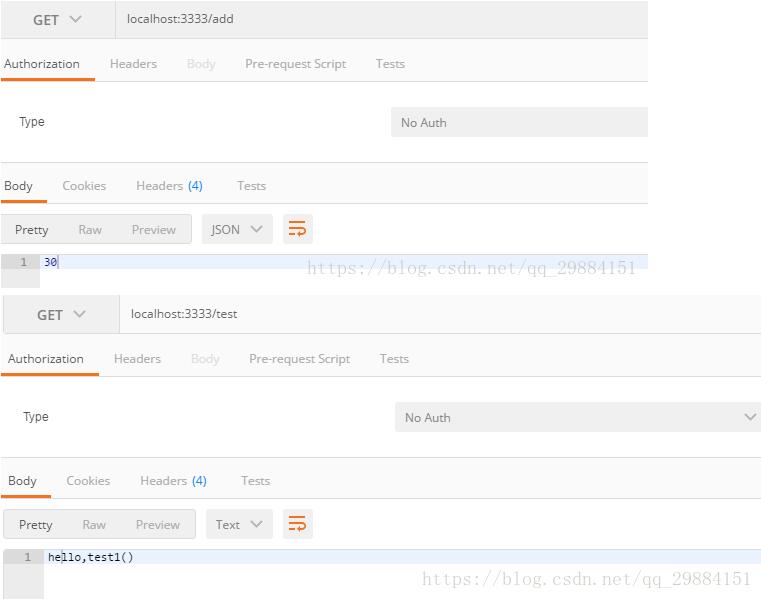
OK 服务间接口调用就是这样了!
以上为个人经验,希望能给大家一个参考,也希望大家多多支持猪先飞。
相关文章
基于springcloud异步线程池、高并发请求feign的解决方案
这篇文章主要介绍了基于springcloud异步线程池、高并发请求feign的解决方案,具有很好的参考价值,希望对大家有所帮助。一起跟随小编过来看看吧...2021-02-25Spring Cloud 中@FeignClient注解中的contextId属性详解
这篇文章主要介绍了Spring Cloud 中@FeignClient注解中的contextId属性详解,具有很好的参考价值,希望对大家有所帮助。如有错误或未考虑完全的地方,望不吝赐教...2021-09-25- 这篇文章主要介绍了Swagger中@ApiIgnore注解的使用,具有很好的参考价值,希望对大家有所帮助。如有错误或未考虑完全的地方,望不吝赐教...2021-10-21
完美解决SpringCloud-OpenFeign使用okhttp替换不生效问题
这篇文章主要介绍了完美解决SpringCloud-OpenFeign使用okhttp替换不生效问题,具有很好的参考价值,希望对大家有所帮助。一起跟随小编过来看看吧...2021-02-25校验非空的注解@NotNull如何取得自定义的message
这篇文章主要介绍了校验非空的注解@NotNull如何取得自定义的message,具有很好的参考价值,希望对大家有所帮助。如有错误或未考虑完全的地方,望不吝赐教...2021-09-29- @Autowired 注解的主要功能就是完成自动注入,使用也非常简单,但这篇文章主要给大家介绍了关于Spring为什么不推荐使用@Autowired注解的相关资料,需要的朋友可以参考下...2021-11-03
Java中lombok的@Builder注解的解析与简单使用详解
这篇文章主要介绍了Java中lombok的@Builder注解的解析与简单使用,本文给大家介绍的非常详细,对大家的学习或工作具有一定的参考借鉴价值,需要的朋友可以参考下...2021-01-06如何解决springcloud feign 首次调用100%失败的问题
这篇文章主要介绍了如何解决springcloud feign 首次调用100%失败的问题,具有很好的参考价值,希望对大家有所帮助。如有错误或未考虑完全的地方,望不吝赐教...2021-06-23处理@PathVariable注解允许参数为空、允许不传参数的问题
这篇文章主要介绍了处理@PathVariable注解允许参数为空、允许不传参数的问题,具有很好的参考价值,希望对大家有所帮助。一起跟随小编过来看看吧...2021-02-23- 这篇文章主要介绍了Mybatis用注解写in查询的实现方式,具有很好的参考价值,希望对大家有所帮助。如有错误或未考虑完全的地方,望不吝赐教...2021-07-13
解决@Transactional注解事务不回滚不起作用的问题
这篇文章主要介绍了解决@Transactional注解事务不回滚不起作用的问题,具有很好的参考价值,希望对大家有所帮助。一起跟随小编过来看看吧...2021-02-23- 这篇文章主要介绍了spring cloud gateway中如何读取请求参数的操作,具有很好的参考价值,希望对大家有所帮助。如有错误或未考虑完全的地方,望不吝赐教...2021-07-15
解决SpringCloud Feign传对象参数调用失败的问题
这篇文章主要介绍了解决SpringCloud Feign传对象参数调用失败的问题,具有很好的参考价值,希望对大家有所帮助。如有错误或未考虑完全的地方,望不吝赐教...2021-06-24- 这篇文章主要介绍了@Query注解的原生用法和native用法解析,具有很好的参考价值,希望对大家有所帮助。如有错误或未考虑完全的地方,望不吝赐教...2021-08-27
SpringCloud2020整合Nacos-Bootstrap配置不生效的解决
这篇文章主要介绍了SpringCloud2020整合Nacos-Bootstrap配置不生效的解决,文中通过示例代码介绍的非常详细,对大家的学习或者工作具有一定的参考学习价值,需要的朋友们下面随着小编来一起学习学习吧...2021-01-25- 这篇文章主要介绍了springboot RESTful以及参数注解的使用方式,具有很好的参考价值,希望对大家有所帮助。如有错误或未考虑完全的地方,望不吝赐教...2021-10-19
- 这篇文章主要介绍了spring cloud gateway转发服务报错的解决,具有很好的参考价值,希望对大家有所帮助。如有错误或未考虑完全的地方,望不吝赐教...2021-09-02
- 这篇文章主要介绍了解决springcloud-gateway限流遇到的问题,具有很好的参考价值,希望对大家有所帮助。如有错误或未考虑完全的地方,望不吝赐教...2021-07-16
聊聊@RequestParam,@PathParam,@PathVariable等注解的区别
这篇文章主要介绍了聊聊@RequestParam,@PathParam,@PathVariable等注解的区别,具有很好的参考价值,希望对大家有所帮助。一起跟随小编过来看看吧...2021-02-23SpringCloud @FeignClient参数的用法解析
这篇文章主要介绍了SpringCloud @FeignClient参数的用法,具有很好的参考价值,希望对大家有所帮助。如有错误或未考虑完全的地方,望不吝赐教...2021-10-21