Android自定义软键盘的步骤记录
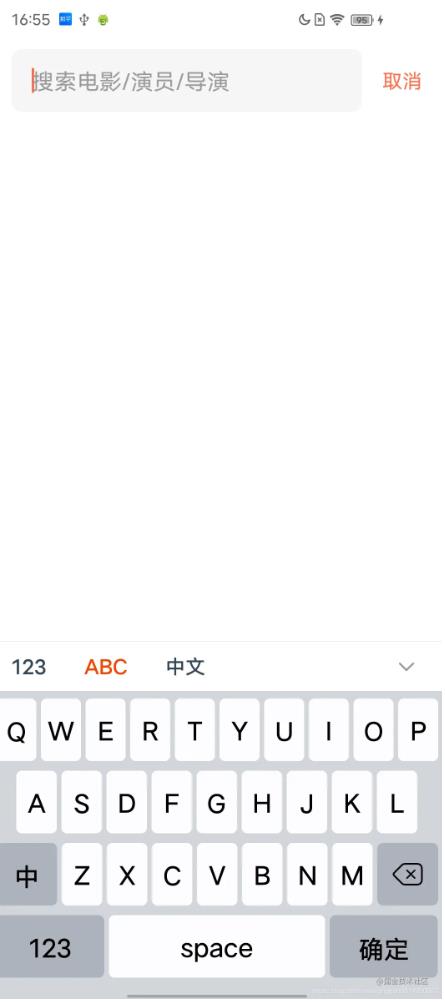
效果图
还是咱们的老规矩,先放最终效果图 😄😄😄
实现自定义软键盘
需要实现一个软键盘很简单,只需要很简单的3步
1、通过xml文件,定义出来键盘结构
2、将定义好的键盘结构与KeyboardView绑定起来
3、实现onKey方法,处理输入和操作事件
1、通过xml定义键盘
在res下面定义一个xml文件夹,并创建你的软键盘布局xml文件
这边需要根据自己的每一个key对应的比例计算出来大小,%p就是占整个的百分比,要注意间隔距离。
<?xml version="1.0" encoding="utf-8"?>
<Keyboard xmlns:android="http://schemas.android.com/apk/res/android"
    android:horizontalGap="1%p"
    android:keyWidth="10%p"
    android:keyHeight="50dp"
    android:verticalGap="1%p">

    <Row>
        <Key
            android:codes="81"<!--最终展示内容的unicode-->
            android:horizontalGap="1%p"<!--横向间隔比率-->
            android:keyWidth="8.9%p"<!--键位宽度比率-->
            android:keyEdgeFlags="left"<!--键盘间隔对其方式-->
            android:keyLabel="Q" <!--键盘上展示的文案--> />
        <Key
            android:codes="87"
            android:keyWidth="8.9%p"
            android:keyLabel="W" />
        <Key
            android:codes="69"
            android:keyWidth="8.9%p"
            android:keyLabel="E" />
        <Key
            android:codes="82"
            android:keyWidth="8.9%p"
            android:keyLabel="R" />
        <Key
            android:codes="84"
            android:keyWidth="8.9%p"
            android:keyLabel="T" />
        <Key
            android:codes="89"
            android:keyWidth="8.9%p"
            android:keyLabel="Y" />
        <Key
            android:codes="85"
            android:keyWidth="8.9%p"
            android:keyLabel="U" />
        <Key
            android:codes="73"
            android:keyWidth="8.9%p"
            android:keyLabel="I" />
        <Key
            android:codes="79"
            android:keyWidth="8.9%p"
            android:keyLabel="O" />
        <Key
            android:codes="80"
            android:keyWidth="8.9%p"
            android:keyEdgeFlags="right"
            android:keyLabel="P" />
    </Row>

    <Row>
        <Key
            android:codes="65"
            android:horizontalGap="5.5%p"
            android:keyWidth="9%p"
            android:keyEdgeFlags="left"
            android:keyLabel="A" />
        <Key
            android:codes="83"
            android:keyWidth="9%p"
            android:keyLabel="S" />
        <Key
            android:codes="68"
            android:keyWidth="9%p"
            android:keyLabel="D" />
        <Key
            android:codes="70"
            android:keyWidth="9%p"
            android:keyLabel="F" />
        <Key
            android:codes="71"
            android:keyWidth="9%p"
            android:keyLabel="G" />
        <Key
            android:codes="72"
            android:keyWidth="9%p"
            android:keyLabel="H" />
        <Key
            android:codes="74"
            android:keyWidth="9%p"
            android:keyLabel="J" />
        <Key
            android:codes="75"
            android:keyWidth="9%p"
            android:keyLabel="K" />
        <Key
            android:codes="76"
            android:keyWidth="9%p"
            android:keyEdgeFlags="left"
            android:keyLabel="L" />
    </Row>

    <Row>
        <Key
            android:codes="-1005"
            android:keyWidth="13.5%p"
            android:keyEdgeFlags="left"
            android:keyLabel="中" />
        <Key
            android:codes="90"
            android:keyWidth="9%p"
            android:keyLabel="Z" />
        <Key
            android:codes="88"
            android:keyWidth="9%p"
            android:keyLabel="X" />
        <Key
            android:codes="67"
            android:keyWidth="9%p"
            android:keyLabel="C" />
        <Key
            android:codes="86"
            android:keyWidth="9%p"
            android:keyLabel="V" />
        <Key
            android:codes="66"
            android:keyWidth="9%p"
            android:keyLabel="B" />
        <Key
            android:codes="78"
            android:keyWidth="9%p"
            android:keyLabel="N" />
        <Key
            android:codes="77"
            android:keyWidth="9%p"
            android:keyLabel="M" />
        <Key
            android:codes="-5"
            android:isRepeatable="true"
            android:keyWidth="13.5%p" />
    </Row>
    <Row>
        <Key
            android:codes="-1004"
            android:keyWidth="24%p"
            android:keyEdgeFlags="left"
            android:keyLabel="123" />
        <Key
            android:codes="32"
            android:keyWidth="48%p"
            android:keyLabel="space" />
        <Key
            android:codes="-1003"
            android:keyWidth="24%p"
            android:keyEdgeFlags="right"
            android:keyLabel="确定" />
    </Row>
</Keyboard>
2、将xml文件与keyboardview绑定起来
创建出来的keyboard文件是要与keyboard类结合起来使用的。
WordKeyboard = new Keyboard(context, R.xml.stock_word_keyboard);
实现自己的keyboardview,继承自KeyboardView。
public class MyKeyboardView extends KeyboardView {
...
init{
  WordKeyboard = new Keyboard(context, R.xml.stock_word_keyboard);
  //将你的keyboard与keyboardview绑定起来
  this.setKeyboard(WordKeyboard);
}
我们真实需要添加到布局中的view实际上就是自定义的MyKeyboardView ,它的使用和其他自定义view没有任何区别。
3、处理点击事件onKey
如果你完成了上面两步,并将view添加到布局中,你会发现已经可以展示出来了。但是点击并没有任何效果。
如果想要出效果,就需要实现onkey进行处理。
KeyboardView.this.setOnKeyboardActionListener(new OnKeyboardActionListener() {

    @Override
    public void onKey(int primaryCode, int[] keyCodes) {
        try {
            Editable editable = editText.getText();
            int start = editText.getSelectionStart();
            int end = editText.getSelectionEnd();
            String code = String.valueOf(primaryCode);
            switch (code) {
            		//切换到数字键盘
                case KeyboardKeyMap.TOOL_SWITCH_TO_NUM:
                    onKeyboardCallback.switchToNumberKeyboard();
                    break;
                    //切换到系统键盘
                case KeyboardKeyMap.TOOL_SWITCH_TO_WORD:
                    onKeyboardCallback.switchToSystemKeyboard();
                    break;
                    //隐藏键盘
                case KeyboardKeyMap.TOOL_HIDE:
                    onKeyboardCallback.onHideStockKeyboard();
                    break;
                    //删除
                case KeyboardKeyMap.TOOL_DEL:
                    if (editable != null && editable.length() > 0) {
                        if (start == end) {
                            editable.delete(start - 1, start);
                        } else {
                            editable.delete(start, end);
                        }
                    }
                    break;
                    //清空输入
                case KeyboardKeyMap.TOOL_CLEAR:
                    if (editable != null) {
                        editable.clear();
                    }
                    break;
                    //确认按钮
                case KeyboardKeyMap.TOOL_CONFIRM:
                    onKeyboardCallback.onConfirmStockKeyboard();
                    break;
                default:
                   //正常输入
                    if (editable != null) {
                        if (KeyboardKeyMap.isStockPrefix(code)) {
	                        //这里处理更加特殊的输入定义,
	                        //比如你需要输入城市简称等(车牌自定义键盘需要)
                            String resultCode = KeyboardKeyMap.findInputByKey(code);
                            editable.replace(start, end, resultCode);
                        } else {
                            //这里如果是正常的键位(排除确认、清空、切换等功能键位),
                            //则将键位上的unicode转换为正常的数字,比如定义键盘P对应的
                            //unicode是80,因为xml定义键位的时候为了方便匹配,所以值
                            //是使用的unicode,这边则会将80转换为真正要输入的P字母。
                            String resultCode = Character.toString((char) primaryCode);
                            editable.replace(start, end, resultCode);
                        }
                    }
                    break;
            }
        } catch (Exception e) {
            e.printStackTrace();
        }
    }
}
到这里,基本的自定义键盘定义操作就完成了。当然如果你是工作使用,并没有结束,因为一般情况下自定义键盘需要和系统键盘并存,因此你还需要处理键盘切换的闪动问题。对于键盘切换控制,我这里就不过多介绍了,可以自行查阅软键盘+表情切换,处理方案目前已经很成熟了。原理是一样的。
附赠一些实用的效果处理
1、点击空白处,关闭软键盘,如果有内容,出发内容点击,并关系软键盘,如果是滑动,则只关闭软键盘
效果实现太简单了,这里不做过多说明,理解事件分发自然懂。
class AutoHideKeyboardCstLayout @JvmOverloads constructor(
    context: Context, attrs: AttributeSet? = null
) : ConstraintLayout(context, attrs) {

    var keyboardHideListener: (() -> Unit)? = null

    override fun onInterceptTouchEvent(ev: MotionEvent?): Boolean {
        if (ev?.action == MotionEvent.ACTION_DOWN) {
            keyboardHideListener?.invoke()
        }
        return super.onInterceptTouchEvent(ev)
    }
}
关闭操作只需要在回调方法执行即可。
contentHideKeyboardCstLayout.keyboardHideListener = {
    hidePanelAndKeyboard()
}
2、切换软键盘panel,很简单的实现
<RelativeLayout xmlns:android="http://schemas.android.com/apk/res/android"
    xmlns:app="http://schemas.android.com/apk/res-auto"
    android:layout_width="match_parent"
    android:layout_height="40dp"
    android:background="@android:color/white"
    android:elevation="0.5dp">

    <androidx.appcompat.widget.AppCompatTextView
        android:id="@+id/tvStockNumKeyboard"
        android:layout_width="wrap_content"
        android:layout_height="wrap_content"
        android:layout_centerVertical="true"
        android:layout_marginStart="10dp"
        android:button="@null"
        android:padding="6dp"
        android:text="123"
        android:textColor="@drawable/stock_switch_label_color"
        android:textSize="16dp"
        android:textStyle="bold" />

    <androidx.appcompat.widget.AppCompatTextView
        android:id="@+id/tvStockWordKeyboard"
        android:layout_width="wrap_content"
        android:layout_height="wrap_content"
        android:layout_centerVertical="true"
        android:layout_marginStart="18dp"
        android:layout_toEndOf="@+id/tvStockNumKeyboard"
        android:button="@null"
        android:padding="6dp"
        android:text="ABC"
        android:textColor="@drawable/stock_switch_label_color"
        android:textSize="16dp"
        android:textStyle="bold" />

    <androidx.appcompat.widget.AppCompatTextView
        android:id="@+id/tvSystemKeyboard"
        android:layout_width="wrap_content"
        android:layout_height="wrap_content"
        android:layout_centerVertical="true"
        android:layout_marginStart="18dp"
        android:layout_toEndOf="@+id/tvStockWordKeyboard"
        android:button="@null"
        android:padding="6dp"
        android:text="中文"
        android:textColor="@drawable/stock_switch_label_color"
        android:textSize="16dp"
        android:textStyle="bold" />

    <FrameLayout
        android:id="@+id/keyboardDone"
        android:layout_width="60sp"
        android:layout_height="match_parent"
        android:layout_alignParentEnd="true"
        android:layout_centerVertical="true">

        <ImageView
            android:layout_width="16dp"
            android:layout_height="16dp"
            android:layout_gravity="center"
            android:contentDescription="@null"
            android:scaleType="centerInside"
            android:src="@drawable/keyboard_done_"
            android:textColor="@color/white"
            android:textSize="16sp" />
    </FrameLayout>

    <View
        android:layout_width="match_parent"
        android:layout_height="0.5dp"
        android:background="#EEEEEE" />
</RelativeLayout>
颜色切换selector
<?xml version="1.0" encoding="utf-8"?>
<selector xmlns:android="http://schemas.android.com/apk/res/android">
    <item android:color="#F14400" android:state_selected="true" />
    <item android:color="#334455" android:state_selected="false" />
</selector>
class KeyboardSwitcher @JvmOverloads constructor(
    context: Context, attrs: AttributeSet? = null
) : RelativeLayout(context, attrs) {

    private var mViewBinding: RtcKeyboardSwitcherBinding? = null
    private var mStockKeyboardView: StockKeyboardView? = null

    init {
        mViewBinding = RtcKeyboardSwitcherBinding.inflate(LayoutInflater.from(context), this, true)
    }

    fun pressNumberKeyboard() {
        mViewBinding?.tvStockNumKeyboard?.performClick()
    }

    fun pressWordKeyboard() {
        mViewBinding?.tvStockWordKeyboard?.performClick()
    }

    fun pressSystemKeyboard() {
        mViewBinding?.tvSystemKeyboard?.performClick()
    }

    fun switchKeyboard(
        _switchKeyboard: (isSystemKeyboard: Boolean) -> Unit,
        _keyboardDone: () -> Unit
    ) {
        mViewBinding?.apply {
            tvStockNumKeyboard.setOnClickListener {
                resetSelectedState()
                _switchKeyboard.invoke(false)
                mStockKeyboardView?.showNumberKeyboard()
                it.isSelected = true
            }
            tvStockWordKeyboard.setOnClickListener {
                resetSelectedState()
                _switchKeyboard.invoke(false)
                mStockKeyboardView?.showWordKeyboard()
                it.isSelected = true
            }
            tvSystemKeyboard.setOnClickListener {
                resetSelectedState()
                _switchKeyboard.invoke(true)
                it.isSelected = true
            }
            keyboardDone.setOnClickListener {
                _keyboardDone.invoke()
            }
        }
    }

    fun setDefaultKeyboard(index: Int) {
        resetSelectedState()
        mViewBinding?.apply {
            when (index) {
                0 -> {
                    tvStockNumKeyboard.isSelected = true
                }
                1 -> {
                    tvStockWordKeyboard.isSelected = true
                }
                2 -> {
                    tvSystemKeyboard.isSelected = true
                }
            }
        }
    }

    private fun resetSelectedState() {
        mViewBinding?.apply {
            tvStockNumKeyboard.isSelected = false
            tvStockWordKeyboard.isSelected = false
            tvSystemKeyboard.isSelected = false
        }
    }

    override fun onTouchEvent(event: MotionEvent?): Boolean {
        if (event?.action == MotionEvent.ACTION_DOWN) {
            performClick()
        }
        return true
    }

    override fun performClick(): Boolean {
        return super.performClick()
    }

    fun attach(stockKeyboardView: StockKeyboardView) {
        this.mStockKeyboardView = stockKeyboardView
    }

    fun showNumberKeyboard() {
        this.mStockKeyboardView?.showNumberKeyboard()
    }
}
总结
到此这篇关于Android自定义软键盘的文章就介绍到这了,更多相关Android自定义软键盘内容请搜索猪先飞以前的文章或继续浏览下面的相关文章希望大家以后多多支持猪先飞!
相关文章
- 下面我们来看一篇关于Android子控件超出父控件的范围显示出来方法,希望这篇文章能够帮助到各位朋友,有碰到此问题的朋友可以进来看看哦。 <RelativeLayout xmlns:an...2016-10-02
- 这篇文章主要给大家介绍了关于C#创建自定义控件及添加自定义属性和事件使用的相关资料,文中通过示例代码介绍的非常详细,对大家学习或者使用C#具有一定的参考学习价值,需要的朋友们下面来一起学习学习吧...2020-06-25
- 本文实例讲述了JS实现自定义简单网页软键盘效果。分享给大家供大家参考,具体如下:这是一款自定义的简单点的网页软键盘,没有使用任何控件,仅是为了练习JavaScript编写水平,安全性方面没有过多考虑,有顾虑的可以不用,目的是学...2015-11-08
Android开发中findViewById()函数用法与简化
findViewById方法在android开发中是获取页面控件的值了,有没有发现我们一个页面控件多了会反复研究写findViewById呢,下面我们一起来看它的简化方法。 Android中Fin...2016-09-20- 如果我们的项目需要做来电及短信的功能,那么我们就得在Android模拟器开发这些功能,本来就来告诉我们如何在Android模拟器上模拟来电及来短信的功能。 在Android模拟...2016-09-20
- 夜神android模拟器如何设置代理呢?对于这个问题其实操作起来是非常的简单,下面小编来为各位详细介绍夜神android模拟器设置代理的方法,希望例子能够帮助到各位。 app...2016-09-20
- 为了增强android应用的用户体验,我们可以在一些Button按钮上自定义动态的设置一些样式,比如交互时改变字体、颜色、背景图等。 今天来看一个通过重写Button来动态实...2016-09-20
- 如果我们要在Android应用APP中加载html5页面,我们可以使用WebView,本文我们分享两个WebView加载html5页面实例应用。 实例一:WebView加载html5实现炫酷引导页面大多...2016-09-20
- 深入理解Android中View和ViewGroup从组成架构上看,似乎ViewGroup在View之上,View需要继承ViewGroup,但实际上不是这样的。View是基类,ViewGroup是它的子类。本教程我们深...2016-09-20
- 下面我们来看一篇关于Android自定义WebView网络视频播放控件开发例子,这个文章写得非常的不错下面给各位共享一下吧。 因为业务需要,以下代码均以Youtube网站在线视...2016-10-02
- 自定义一个jquery模态窗口插件,将它集成到现有平台框架中时,它只能在mainFrame窗口中显示,无法在顶层窗口显示. 解决这个问题的办法: 通过以下代码就可能实现在顶层窗口弹窗 复制代码 代码如下: $(window.top.documen...2014-05-31
- java开发的Android应用,性能一直是一个大问题,,或许是Java语言本身比较消耗内存。本文我们来谈谈Android 性能优化之MemoryFile文件读写。 Android匿名共享内存对外A...2016-09-20
- 这篇文章主要介绍了自定义feignClient的常见坑及解决方案,具有很好的参考价值,希望对大家有所帮助。如有错误或未考虑完全的地方,望不吝赐教...2021-10-20
- TextView默认是横着显示了,今天我们一起来看看Android设置TextView竖着显示如何来实现吧,今天我们就一起来看看操作细节,具体的如下所示。 在开发Android程序的时候,...2016-10-02
- 今天小编就为大家分享一篇pytorch 自定义卷积核进行卷积操作方式,具有很好的参考价值,希望对大家有所帮助。一起跟随小编过来看看吧...2020-05-06
android.os.BinderProxy cannot be cast to com解决办法
本文章来给大家介绍关于android.os.BinderProxy cannot be cast to com解决办法,希望此文章对各位有帮助呀。 Android在绑定服务的时候出现java.lang.ClassCastExc...2016-09-20- 这篇文章主要介绍了Android 实现钉钉自动打卡功能的步骤,帮助大家更好的理解和学习使用Android,感兴趣的朋友可以了解下...2021-03-15
PHP YII框架开发小技巧之模型(models)中rules自定义验证规则
YII的models中的rules部分是一些表单的验证规则,对于表单验证十分有用,在相应的视图(views)里面添加了表单,在表单被提交之前程序都会自动先来这里面的规则里验证,只有通过对其有效的限制规则后才能被提交,可以很有效地保证...2015-11-24- 这篇文章主要介绍了jquery自定义插件开发之window的实现过程的相关资料,需要的朋友可以参考下...2016-05-09
- 下面我们来看一篇关于Android 开发之布局细节对比:RTL模式 ,希望这篇文章对各位同学会带来帮助,具体的细节如下介绍。 前言 讲真,好久没写博客了,2016都过了一半了,赶紧...2016-10-02