Android Studio连接MySql实现登录注册(附源代码)
更新时间:2021年5月16日 20:01 点击:2020
本文主要介绍了Android Studio连接MySql实现登录注册,分享给大家,具体如下:
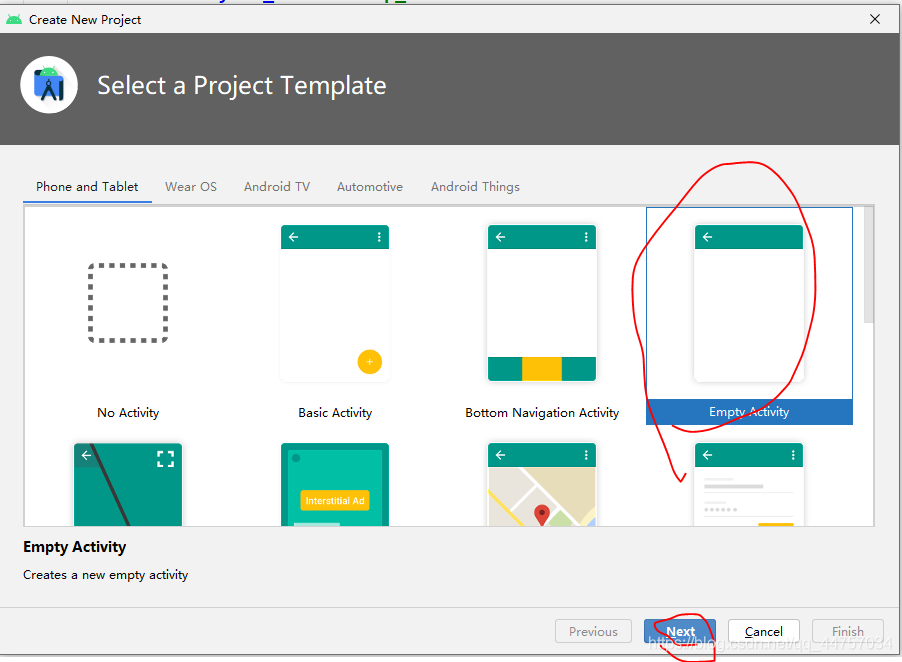
一、创建工程
1、创建一个空白工程
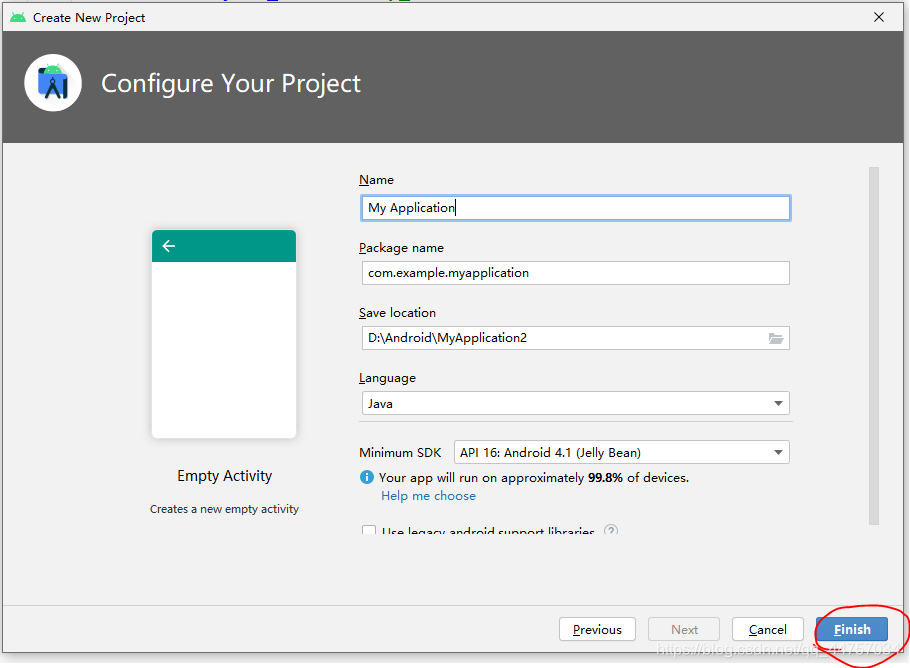
2、随便起一个名称
3、设置网络连接权限

<uses-permission android:name="android.permission.INTERNET"/>
二、引入Mysql驱动包
1、切换到普通Java工程
2、在libs当中引入MySQL的jar包
将mysql的驱动包复制到libs当中

三、编写数据库和dao以及JDBC相关代码
1、在数据库当中创建表
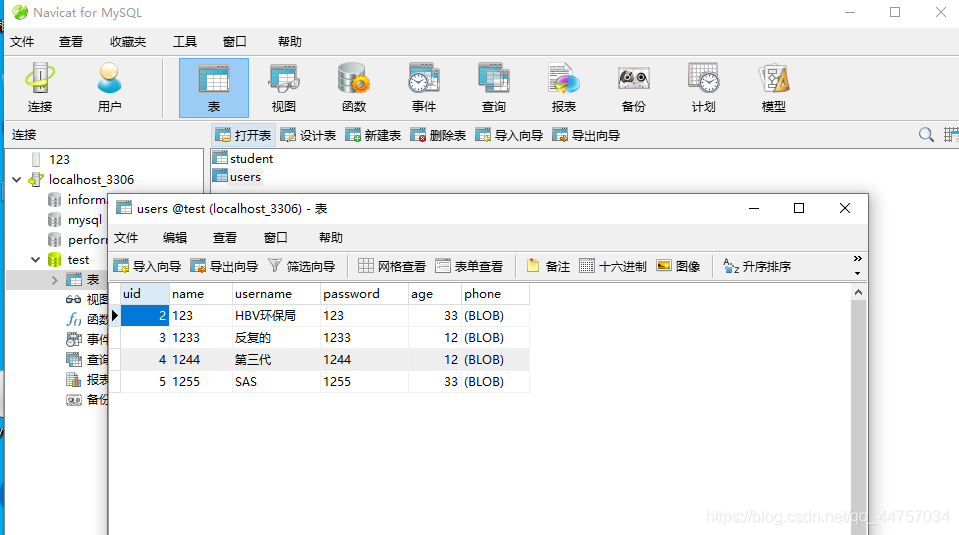
SQL语句
/*
Navicat MySQL Data Transfer

Source Server         : localhost_3306
Source Server Version : 50562
Source Host           : localhost:3306
Source Database       : test

Target Server Type    : MYSQL
Target Server Version : 50562
File Encoding         : 65001

Date: 2021-05-10 17:28:36
*/

SET FOREIGN_KEY_CHECKS=0;

-- ----------------------------
-- Table structure for `student`
-- ----------------------------
DROP TABLE IF EXISTS `student`;
CREATE TABLE `student` (
  `sid` int(11) NOT NULL AUTO_INCREMENT,
  `sname` varchar(255) NOT NULL,
  `sage` int(11) NOT NULL,
  `address` varchar(255) NOT NULL,
  PRIMARY KEY (`sid`)
) ENGINE=InnoDB AUTO_INCREMENT=3 DEFAULT CHARSET=utf8;

-- ----------------------------
-- Records of student
-- ----------------------------
INSERT INTO `student` VALUES ('1', 'andi', '21', '21212');
INSERT INTO `student` VALUES ('2', 'a', '2121', '2121');

-- ----------------------------
-- Table structure for `users`
-- ----------------------------
DROP TABLE IF EXISTS `users`;
CREATE TABLE `users` (
  `uid` int(11) NOT NULL AUTO_INCREMENT,
  `name` varchar(255) NOT NULL,
  `username` varchar(255) NOT NULL,
  `password` varchar(255) NOT NULL,
  `age` int(255) NOT NULL,
  `phone` longblob NOT NULL,
  PRIMARY KEY (`uid`)
) ENGINE=InnoDB AUTO_INCREMENT=6 DEFAULT CHARSET=utf8;

-- ----------------------------
-- Records of users
-- ----------------------------
INSERT INTO `users` VALUES ('2', '123', 'HBV环保局', '123', '33', 0x3133333333333333333333);
INSERT INTO `users` VALUES ('3', '1233', '反复的', '1233', '12', 0x3132333333333333333333);
INSERT INTO `users` VALUES ('4', '1244', '第三代', '1244', '12', 0x3133333333333333333333);
INSERT INTO `users` VALUES ('5', '1255', 'SAS', '1255', '33', 0x3133333333333333333333);
2、在Android Studio当中创建JDBCUtils类
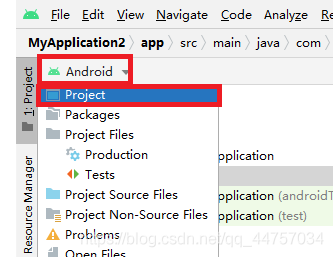
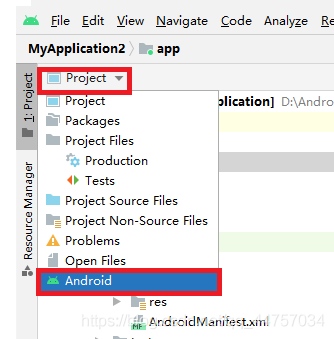
切换会Android视图
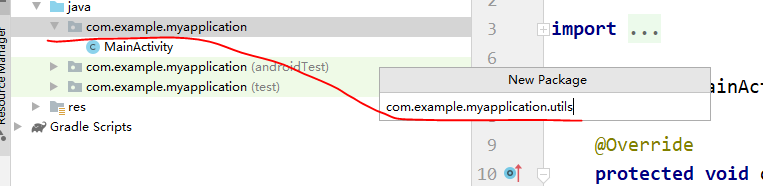
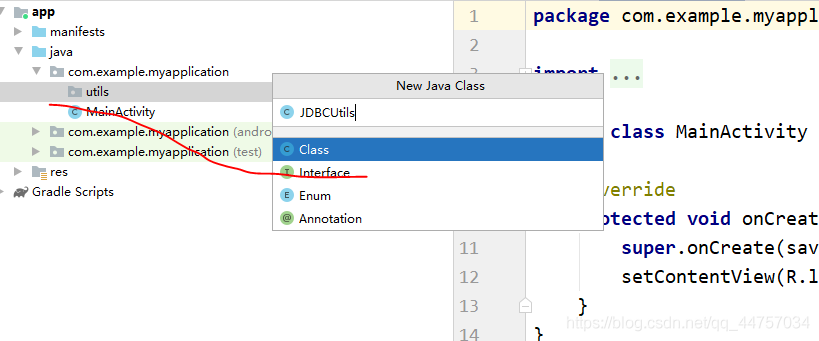
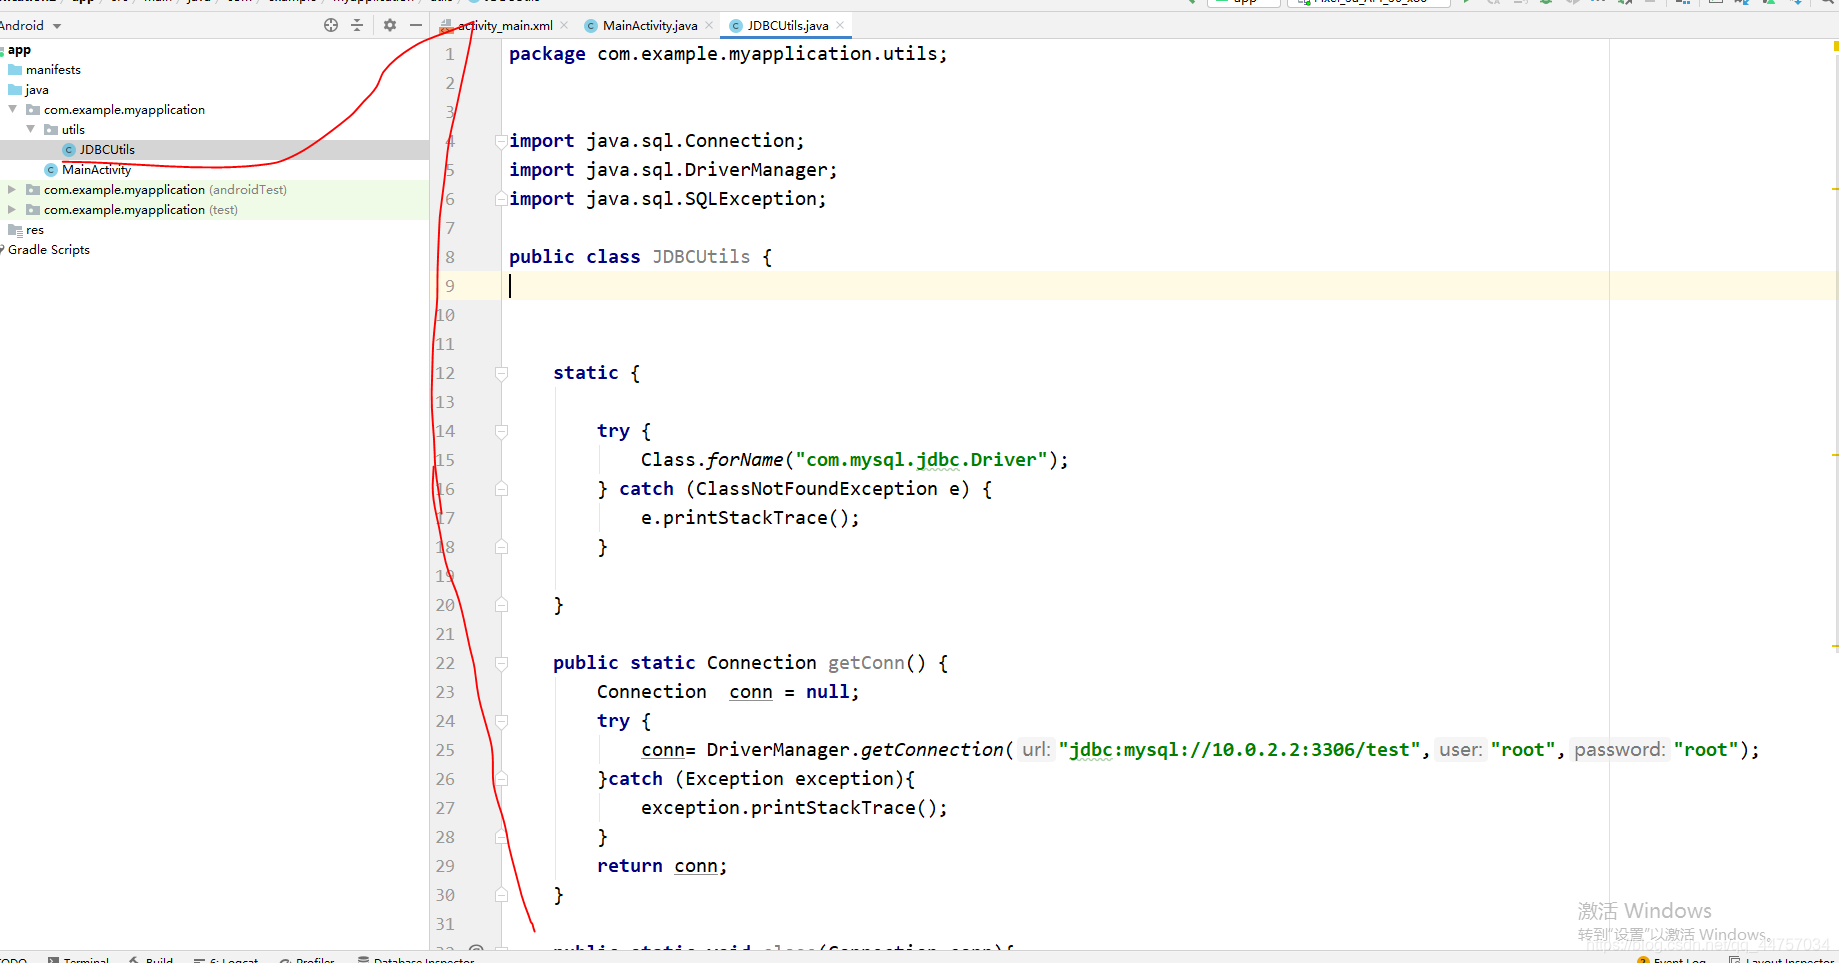
注意链接数据库的地址是:jdbc:mysql://10.0.2.2:3306/test
package com.example.myapplication.utils;


import java.sql.Connection;
import java.sql.DriverManager;
import java.sql.SQLException;

public class JDBCUtils {


    static {

        try {
            Class.forName("com.mysql.jdbc.Driver");
        } catch (ClassNotFoundException e) {
            e.printStackTrace();
        }

    }

    public static Connection getConn() {
        Connection  conn = null;
        try {
            conn= DriverManager.getConnection("jdbc:mysql://10.0.2.2:3306/test","root","root");
        }catch (Exception exception){
            exception.printStackTrace();
        }
        return conn;
    }

    public static void close(Connection conn){
        try {
            conn.close();
        } catch (SQLException throwables) {
            throwables.printStackTrace();
        }
    }
}
3、创建User实体类
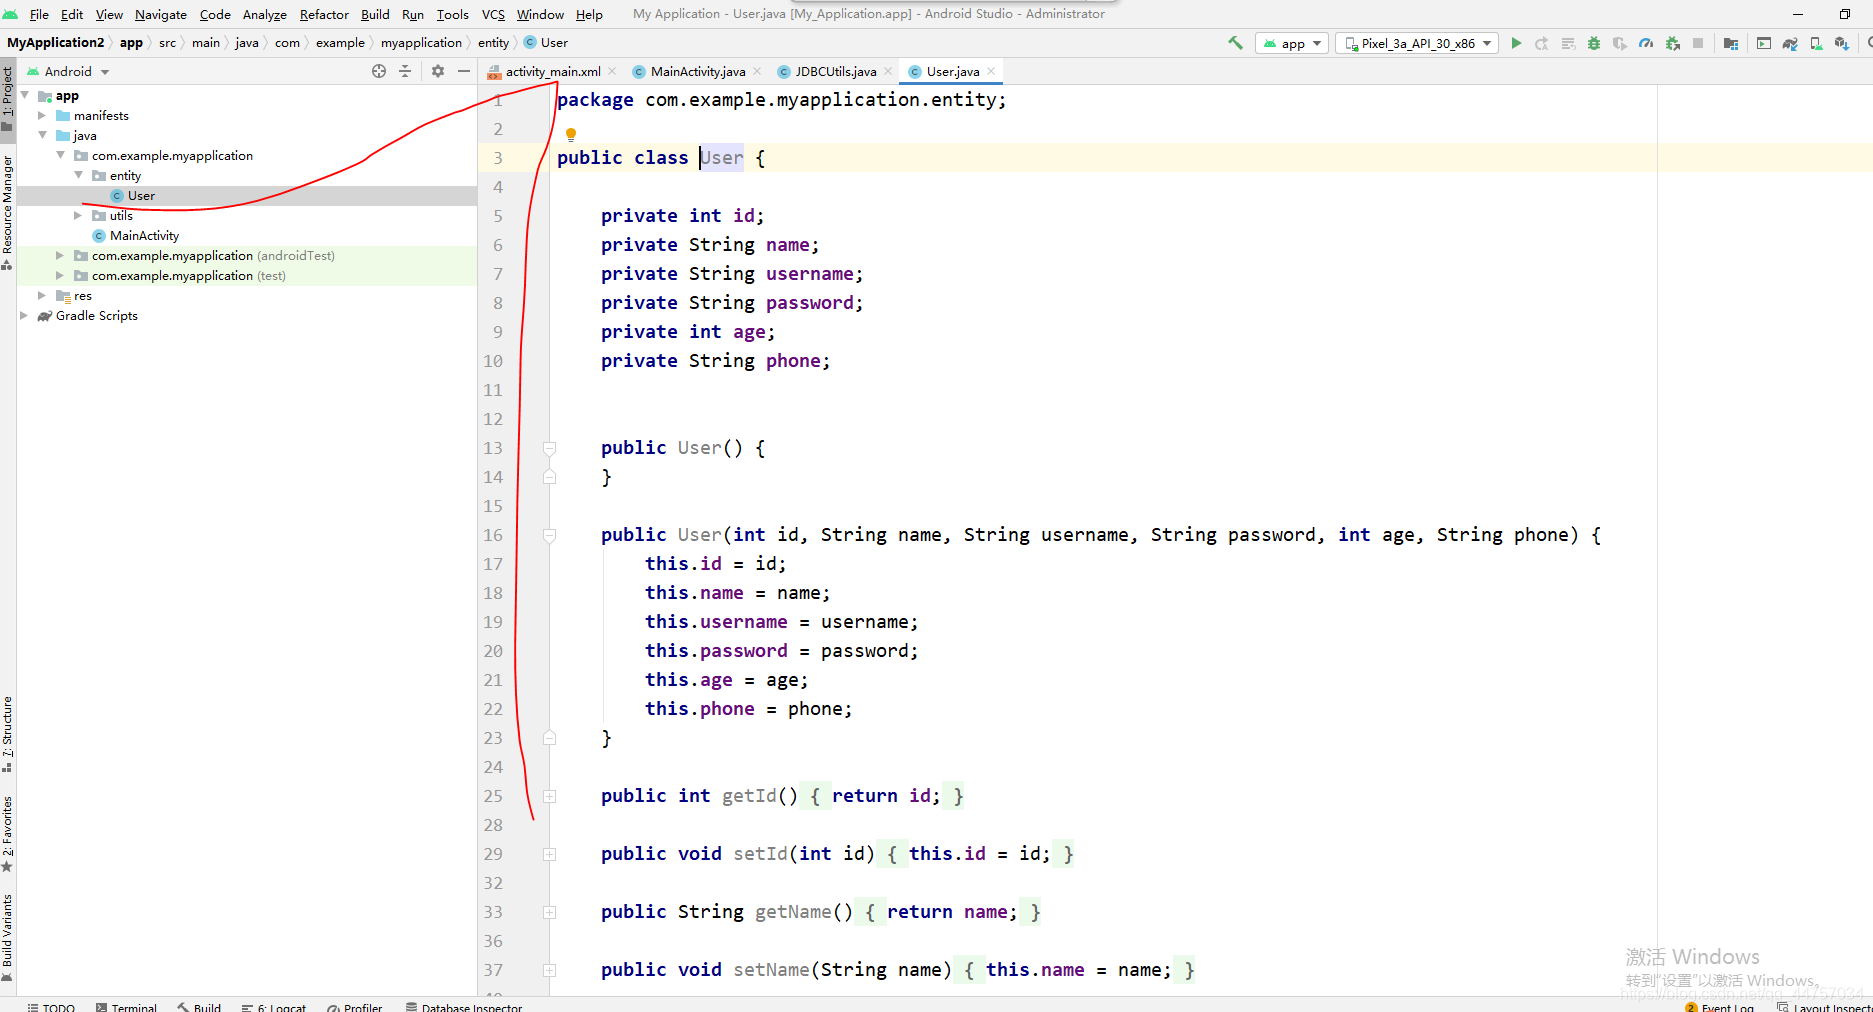
package com.example.myapplication.entity;

public class User {

    private int id;
    private String name;
    private String username;
    private String password;
    private int age;
    private String phone;


    public User() {
    }

    public User(int id, String name, String username, String password, int age, String phone) {
        this.id = id;
        this.name = name;
        this.username = username;
        this.password = password;
        this.age = age;
        this.phone = phone;
    }

    public int getId() {
        return id;
    }

    public void setId(int id) {
        this.id = id;
    }

    public String getName() {
        return name;
    }

    public void setName(String name) {
        this.name = name;
    }

    public String getUsername() {
        return username;
    }

    public void setUsername(String username) {
        this.username = username;
    }

    public String getPassword() {
        return password;
    }

    public void setPassword(String password) {
        this.password = password;
    }

    public int getAge() {
        return age;
    }

    public void setAge(int age) {
        this.age = age;
    }

    public String getPhone() {
        return phone;
    }

    public void setPhone(String phone) {
        this.phone = phone;
    }
}
4、创建dao层和UserDao

package com.example.myapplication.dao;

import com.example.myapplication.entity.User;
import com.example.myapplication.utils.JDBCUtils;

import java.sql.Connection;
import java.sql.PreparedStatement;
import java.sql.ResultSet;
import java.sql.SQLException;

public class UserDao {


    public boolean login(String name,String password){

        String sql = "select * from users where name = ? and password = ?";

        Connection  con = JDBCUtils.getConn();

        try {
            PreparedStatement pst=con.prepareStatement(sql);

            pst.setString(1,name);
            pst.setString(2,password);

            if(pst.executeQuery().next()){

                return true;

            }

        } catch (SQLException throwables) {
            throwables.printStackTrace();
        }finally {
            JDBCUtils.close(con);
        }

        return false;
    }

    public boolean register(User user){

        String sql = "insert into users(name,username,password,age,phone) values (?,?,?,?,?)";

        Connection  con = JDBCUtils.getConn();

        try {
            PreparedStatement pst=con.prepareStatement(sql);

            pst.setString(1,user.getName());
            pst.setString(2,user.getUsername());
            pst.setString(3,user.getPassword());
            pst.setInt(4,user.getAge());
            pst.setString(5,user.getPhone());

            int value = pst.executeUpdate();

            if(value>0){
                return true;
            }


        } catch (SQLException throwables) {
            throwables.printStackTrace();
        }finally {
            JDBCUtils.close(con);
        }
        return false;
    }

    public User findUser(String name){

        String sql = "select * from users where name = ?";

        Connection  con = JDBCUtils.getConn();
        User user = null;
        try {
            PreparedStatement pst=con.prepareStatement(sql);

            pst.setString(1,name);

            ResultSet rs = pst.executeQuery();

            while (rs.next()){

               int id = rs.getInt(0);
               String namedb = rs.getString(1);
               String username = rs.getString(2);
               String passworddb  = rs.getString(3);
               int age = rs.getInt(4);
                String phone = rs.getString(5);
               user = new User(id,namedb,username,passworddb,age,phone);
            }

        } catch (SQLException throwables) {
            throwables.printStackTrace();
        }finally {
            JDBCUtils.close(con);
        }

        return user;
    }


}
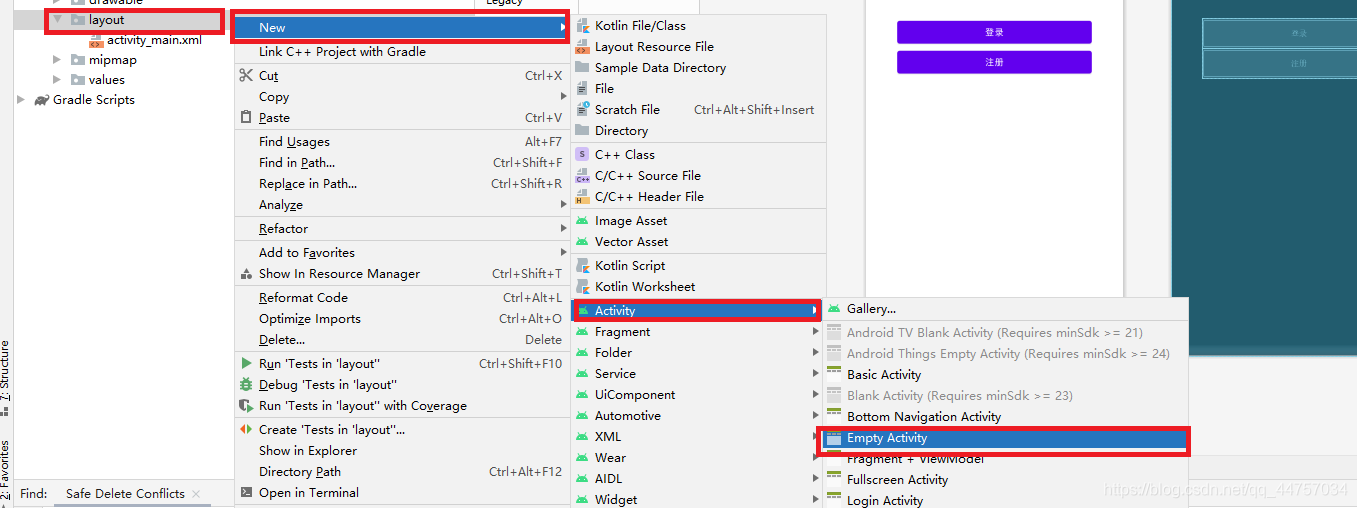
四、编写页面和Activity相关代码
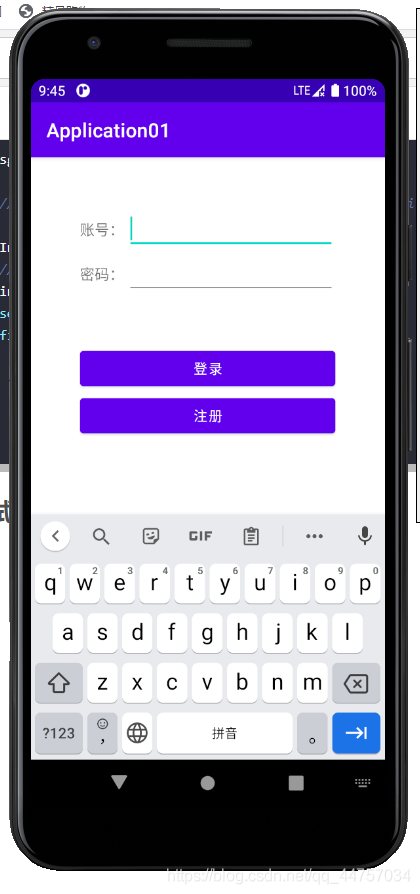
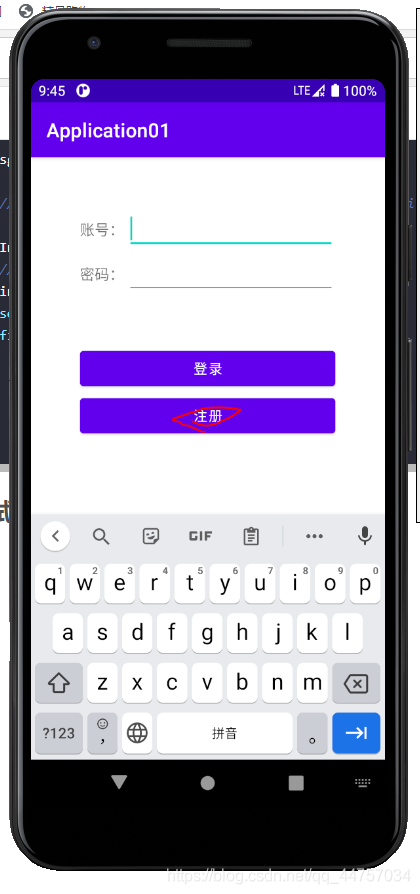
1、编写登录页面

<?xml version="1.0" encoding="utf-8"?>
<androidx.constraintlayout.widget.ConstraintLayout xmlns:android="http://schemas.android.com/apk/res/android"
    xmlns:app="http://schemas.android.com/apk/res-auto"
    xmlns:tools="http://schemas.android.com/tools"
    android:layout_width="match_parent"
    android:layout_height="match_parent"
    tools:context=".MainActivity">


    <LinearLayout
        android:layout_width="match_parent"
        android:layout_height="match_parent"
        android:orientation="vertical"
        tools:layout_editor_absoluteX="219dp"
        tools:layout_editor_absoluteY="207dp"
        android:padding="50dp"

        >

        <LinearLayout
            android:layout_width="match_parent"
            android:layout_height="wrap_content"
            android:orientation="horizontal">


            <TextView
                android:id="@+id/textView"
                android:layout_width="wrap_content"
                android:layout_height="wrap_content"
                android:layout_weight="1"
                android:textSize="15sp"
                android:text="账号:" />

            <EditText
                android:id="@+id/name"
                android:layout_width="wrap_content"
                android:layout_height="wrap_content"
                android:layout_weight="1"
                android:ems="10"
                android:inputType="textPersonName"
                android:text="" />
        </LinearLayout>
        <LinearLayout
            android:layout_width="match_parent"
            android:layout_height="wrap_content"
            android:orientation="horizontal">


            <TextView
                android:id="@+id/textView2"
                android:layout_width="wrap_content"
                android:layout_height="wrap_content"
                android:layout_weight="1"
                android:textSize="15sp"
                android:text="密码:"

                />

            <EditText
                android:id="@+id/password"
                android:layout_width="wrap_content"
                android:layout_height="wrap_content"
                android:layout_weight="1"
                android:ems="10"
                android:inputType="textPersonName"
               />
        </LinearLayout>
        <LinearLayout
            android:layout_width="match_parent"
            android:layout_height="wrap_content"
            android:orientation="horizontal">


        </LinearLayout>

        <Button
            android:layout_marginTop="50dp"
            android:id="@+id/button2"
            android:layout_width="match_parent"
            android:layout_height="wrap_content"
            android:text="登录"
            android:onClick="login"
            />

        <Button
            android:id="@+id/button3"
            android:layout_width="match_parent"
            android:layout_height="wrap_content"
            android:onClick="reg"
            android:text="注册" />
    </LinearLayout>
</androidx.constraintlayout.widget.ConstraintLayout>
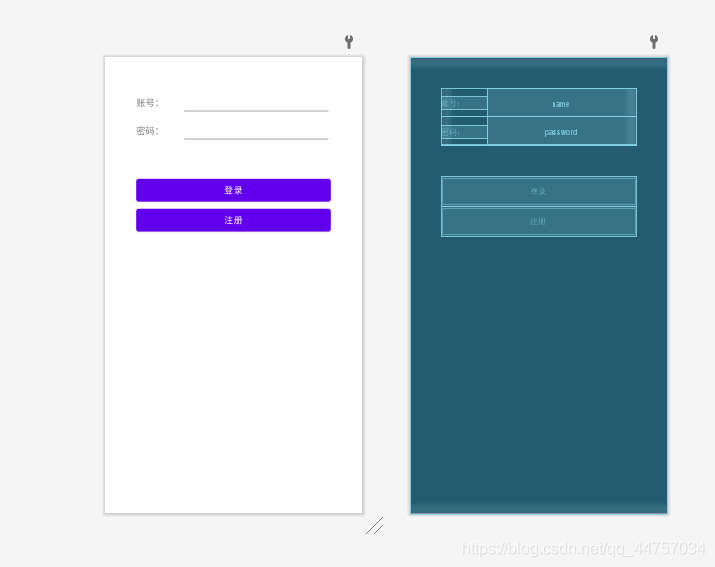
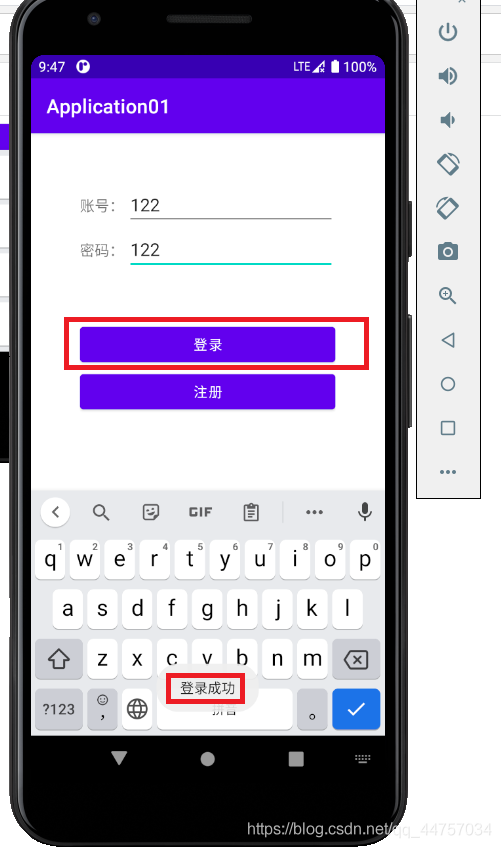
效果
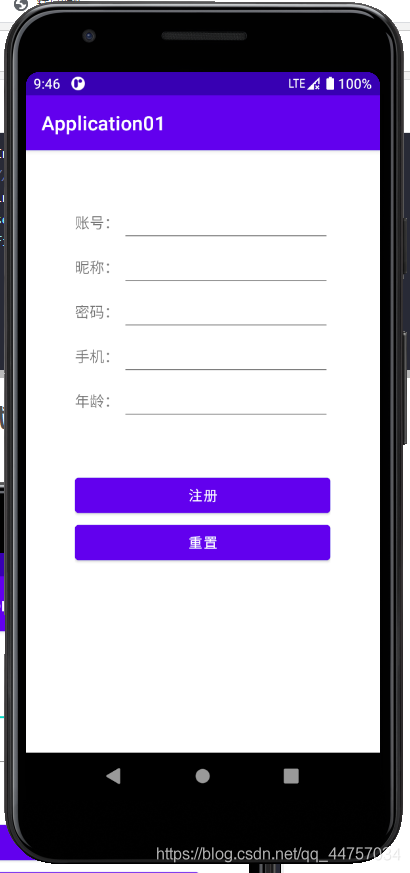
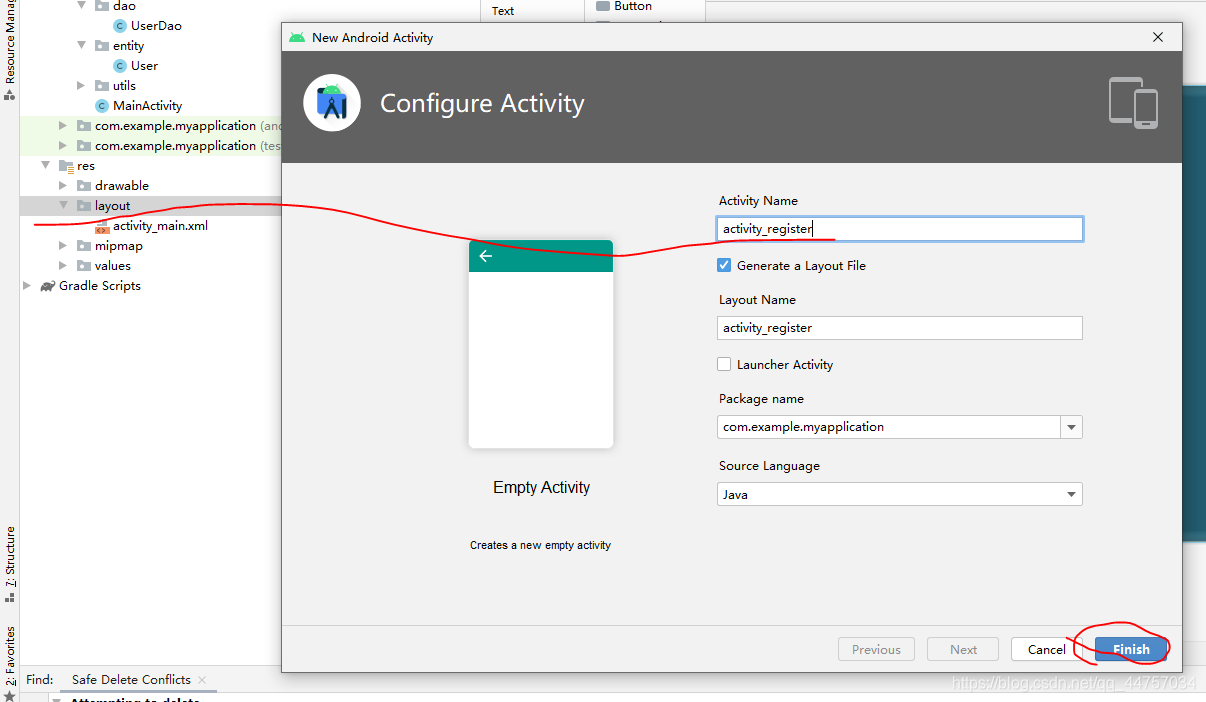
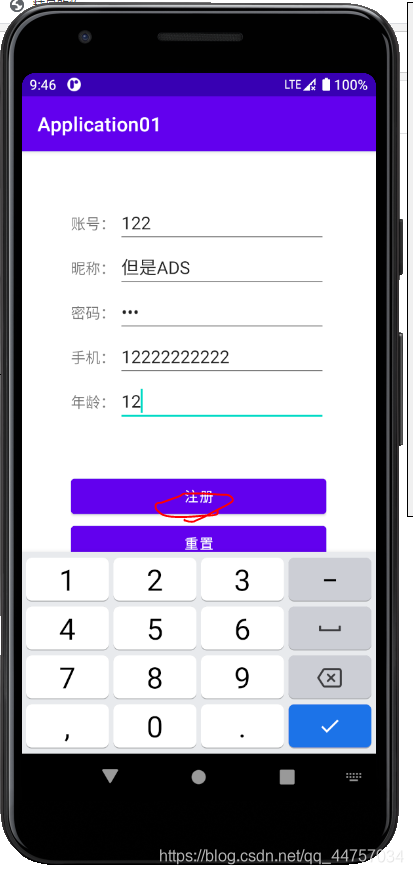
2、编写注册页面代码
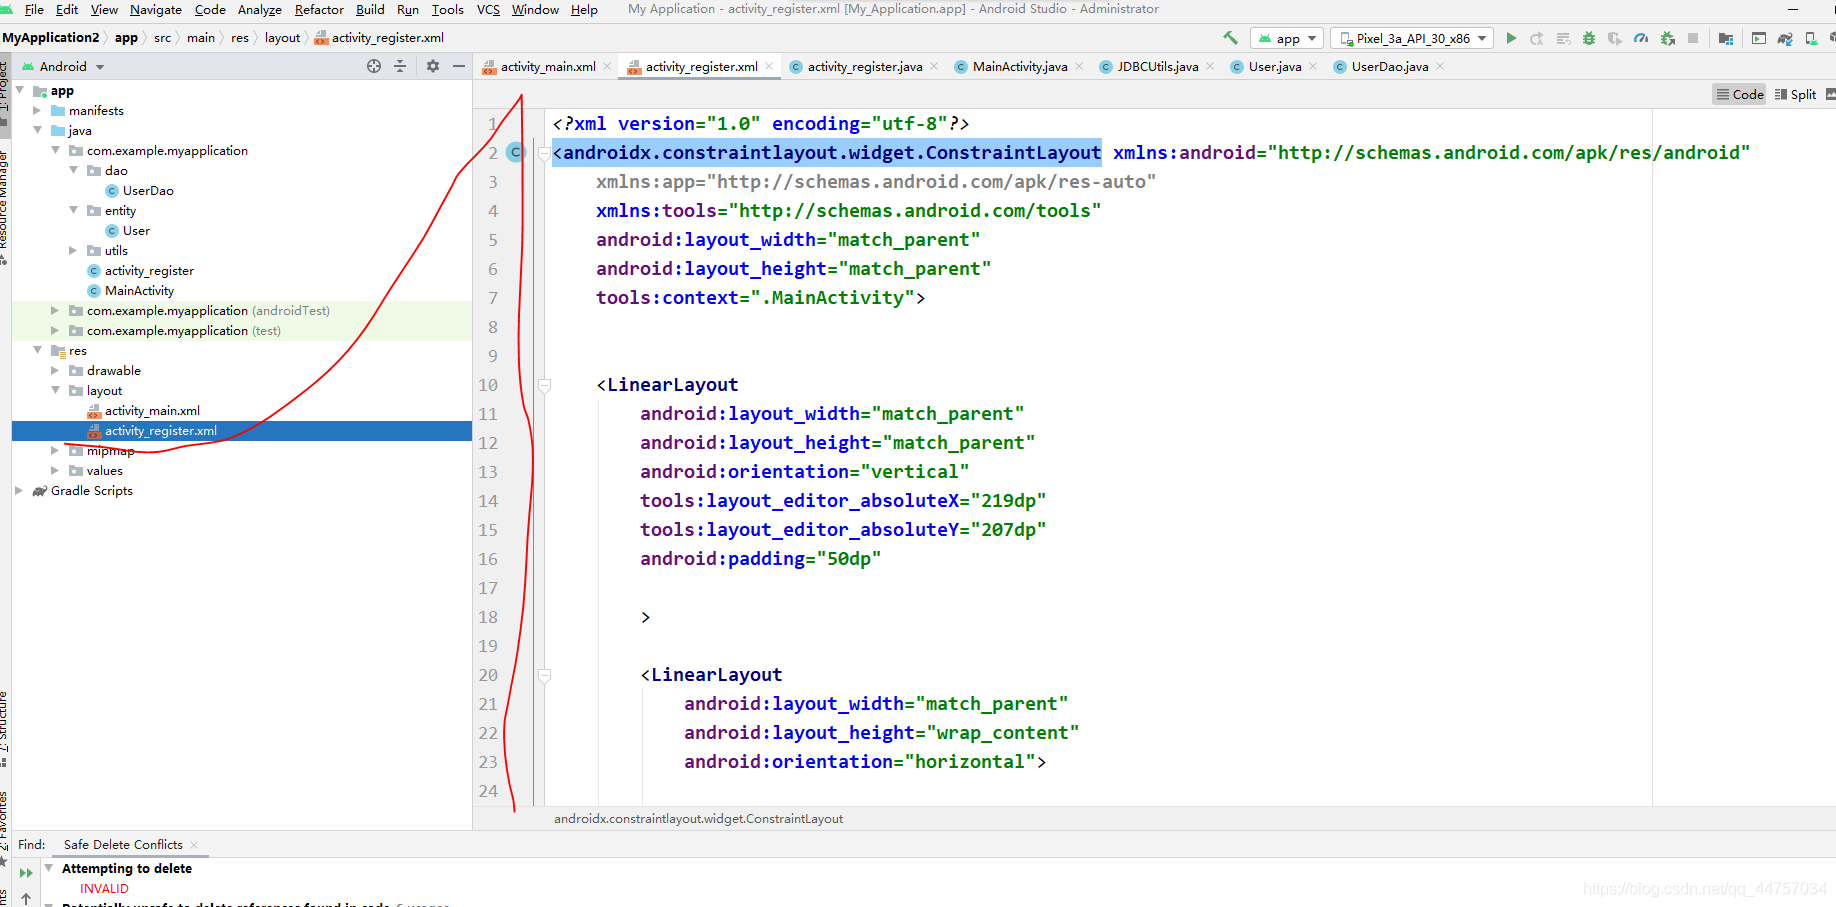
<?xml version="1.0" encoding="utf-8"?>
<androidx.constraintlayout.widget.ConstraintLayout xmlns:android="http://schemas.android.com/apk/res/android"
    xmlns:app="http://schemas.android.com/apk/res-auto"
    xmlns:tools="http://schemas.android.com/tools"
    android:layout_width="match_parent"
    android:layout_height="match_parent"
    tools:context=".MainActivity">


    <LinearLayout
        android:layout_width="match_parent"
        android:layout_height="match_parent"
        android:orientation="vertical"
        tools:layout_editor_absoluteX="219dp"
        tools:layout_editor_absoluteY="207dp"
        android:padding="50dp"

        >

        <LinearLayout
            android:layout_width="match_parent"
            android:layout_height="wrap_content"
            android:orientation="horizontal">


            <TextView
                android:id="@+id/textView"
                android:layout_width="wrap_content"
                android:layout_height="wrap_content"
                android:layout_weight="1"
                android:textSize="15sp"
                android:text="账号:" />

            <EditText
                android:id="@+id/name"
                android:layout_width="wrap_content"
                android:layout_height="wrap_content"
                android:layout_weight="1"
                android:ems="10"
                android:inputType="textPersonName"
                android:text="" />
        </LinearLayout>
        <LinearLayout
            android:layout_width="match_parent"
            android:layout_height="wrap_content"
            android:orientation="horizontal">


            <TextView
                android:id="@+id/textView2"
                android:layout_width="wrap_content"
                android:layout_height="wrap_content"
                android:layout_weight="1"
                android:textSize="15sp"
                android:text="密码:"

                />

            <EditText
                android:id="@+id/password"
                android:layout_width="wrap_content"
                android:layout_height="wrap_content"
                android:layout_weight="1"
                android:ems="10"
                android:inputType="textPersonName"
                />
        </LinearLayout>
        <LinearLayout
            android:layout_width="match_parent"
            android:layout_height="wrap_content"
            android:orientation="horizontal">


        </LinearLayout>

        <Button
            android:layout_marginTop="50dp"
            android:id="@+id/button2"
            android:layout_width="match_parent"
            android:layout_height="wrap_content"
            android:text="登录"
            android:onClick="login"
            />

        <Button
            android:id="@+id/button3"
            android:layout_width="match_parent"
            android:layout_height="wrap_content"
            android:onClick="reg"
            android:text="注册" />
    </LinearLayout>
</androidx.constraintlayout.widget.ConstraintLayout>
3、完善MainActivity
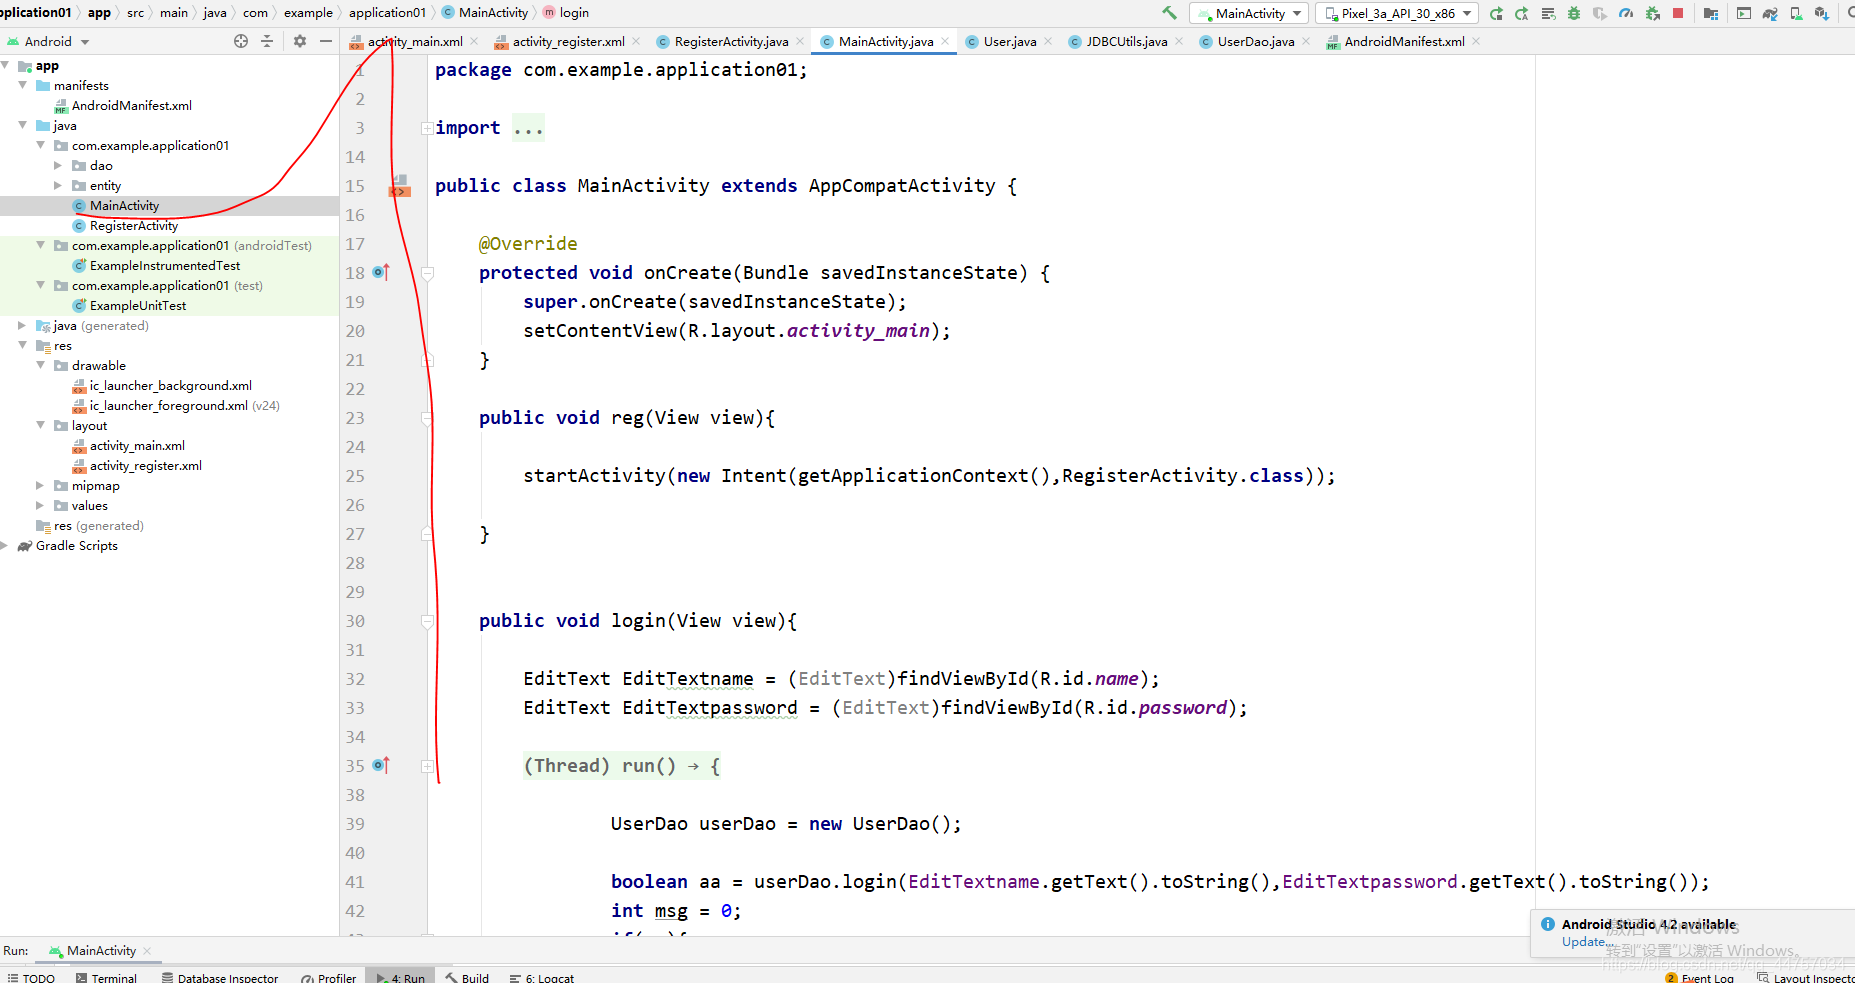
package com.example.application01;

import androidx.appcompat.app.AppCompatActivity;

import android.content.Intent;
import android.os.Bundle;
import android.os.Handler;
import android.os.Message;
import android.view.View;
import android.widget.EditText;
import android.widget.Toast;

import com.example.application01.dao.UserDao;

public class MainActivity extends AppCompatActivity {

    @Override
    protected void onCreate(Bundle savedInstanceState) {
        super.onCreate(savedInstanceState);
        setContentView(R.layout.activity_main);
    }

    public void reg(View view){

        startActivity(new Intent(getApplicationContext(),RegisterActivity.class));

    }


    public void login(View view){

        EditText EditTextname = (EditText)findViewById(R.id.name);
        EditText EditTextpassword = (EditText)findViewById(R.id.password);

        new Thread(){
            @Override
            public void run() {

                UserDao userDao = new UserDao();

                boolean aa = userDao.login(EditTextname.getText().toString(),EditTextpassword.getText().toString());
                int msg = 0;
                if(aa){
                    msg = 1;
                }

                hand1.sendEmptyMessage(msg);


            }
        }.start();


    }
    final Handler hand1 = new Handler()
    {
        @Override
        public void handleMessage(Message msg) {

            if(msg.what == 1)
            {
                Toast.makeText(getApplicationContext(),"登录成功",Toast.LENGTH_LONG).show();

            }
            else
            {
                Toast.makeText(getApplicationContext(),"登录失败",Toast.LENGTH_LONG).show();
            }
        }
    };
}
4、完善RegisterActivity
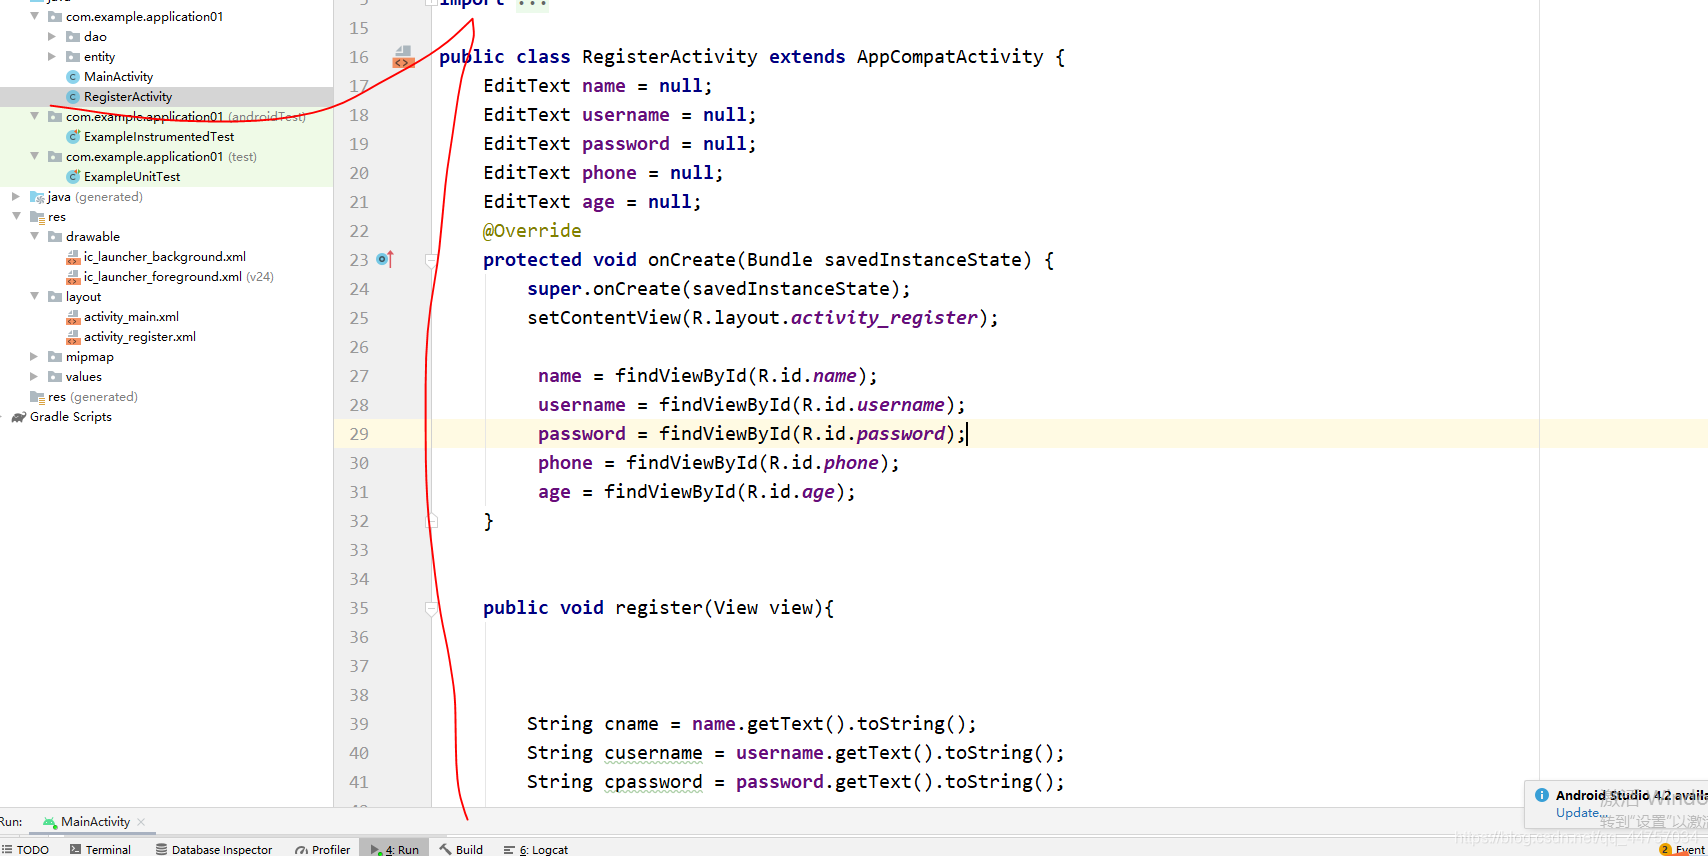
package com.example.application01;

import androidx.appcompat.app.AppCompatActivity;

import android.content.Intent;
import android.os.Bundle;
import android.os.Handler;
import android.os.Message;
import android.view.View;
import android.widget.EditText;
import android.widget.Toast;

import com.example.application01.dao.UserDao;
import com.example.application01.entity.User;

public class RegisterActivity extends AppCompatActivity {
    EditText name = null;
    EditText username = null;
    EditText password = null;
    EditText phone = null;
    EditText age = null;
    @Override
    protected void onCreate(Bundle savedInstanceState) {
        super.onCreate(savedInstanceState);
        setContentView(R.layout.activity_register);

         name = findViewById(R.id.name);
         username = findViewById(R.id.username);
         password = findViewById(R.id.password);
         phone = findViewById(R.id.phone);
         age = findViewById(R.id.age);
    }


    public void register(View view){


        String cname = name.getText().toString();
        String cusername = username.getText().toString();
        String cpassword = password.getText().toString();

        System.out.println(phone.getText().toString());

        String cphone = phone.getText().toString();
        int cgae = Integer.parseInt(age.getText().toString());

        if(cname.length() < 2 || cusername.length() < 2 || cpassword.length() < 2 ){
            Toast.makeText(getApplicationContext(),"输入信息不符合要求请重新输入",Toast.LENGTH_LONG).show();
            return;

        }


        User user = new User();

        user.setName(cname);
        user.setUsername(cusername);
        user.setPassword(cpassword);
        user.setAge(cgae);
        user.setPhone(cphone);

        new Thread(){
            @Override
            public void run() {

                int msg = 0;

                UserDao userDao = new UserDao();

                User uu = userDao.findUser(user.getName());

                if(uu != null){
                    msg = 1;
                }

                boolean flag = userDao.register(user);
                if(flag){
                    msg = 2;
                }
                hand.sendEmptyMessage(msg);

            }
        }.start();


    }
    final Handler hand = new Handler()
    {
        @Override
        public void handleMessage(Message msg) {
            if(msg.what == 0)
            {
                Toast.makeText(getApplicationContext(),"注册失败",Toast.LENGTH_LONG).show();

            }
            if(msg.what == 1)
            {
                Toast.makeText(getApplicationContext(),"该账号已经存在,请换一个账号",Toast.LENGTH_LONG).show();

            }
            if(msg.what == 2)
            {
                //startActivity(new Intent(getApplication(),MainActivity.class));

                Intent intent = new Intent();
                //将想要传递的数据用putExtra封装在intent中
                intent.putExtra("a","註冊");
                setResult(RESULT_CANCELED,intent);
                finish();
            }

        }
    };
}
五、运行测试效果
到此这篇关于Android Studio连接MySql实现登录注册(附源代码) 的文章就介绍到这了,更多相关Android Studio 登录注册内容请搜索猪先飞以前的文章或继续浏览下面的相关文章希望大家以后多多支持猪先飞!
相关文章
- 下面我们来看一篇关于Android子控件超出父控件的范围显示出来方法,希望这篇文章能够帮助到各位朋友,有碰到此问题的朋友可以进来看看哦。 <RelativeLayout xmlns:an...2016-10-02
- 这篇文章主要介绍了Rstudio中安装package出现的问题及解决方案,具有很好的参考价值,希望对大家有所帮助。一起跟随小编过来看看吧...2021-05-06
Android开发中findViewById()函数用法与简化
findViewById方法在android开发中是获取页面控件的值了,有没有发现我们一个页面控件多了会反复研究写findViewById呢,下面我们一起来看它的简化方法。 Android中Fin...2016-09-20- 如果我们的项目需要做来电及短信的功能,那么我们就得在Android模拟器开发这些功能,本来就来告诉我们如何在Android模拟器上模拟来电及来短信的功能。 在Android模拟...2016-09-20
- 夜神android模拟器如何设置代理呢?对于这个问题其实操作起来是非常的简单,下面小编来为各位详细介绍夜神android模拟器设置代理的方法,希望例子能够帮助到各位。 app...2016-09-20
- 为了增强android应用的用户体验,我们可以在一些Button按钮上自定义动态的设置一些样式,比如交互时改变字体、颜色、背景图等。 今天来看一个通过重写Button来动态实...2016-09-20
- 如果我们要在Android应用APP中加载html5页面,我们可以使用WebView,本文我们分享两个WebView加载html5页面实例应用。 实例一:WebView加载html5实现炫酷引导页面大多...2016-09-20
- 深入理解Android中View和ViewGroup从组成架构上看,似乎ViewGroup在View之上,View需要继承ViewGroup,但实际上不是这样的。View是基类,ViewGroup是它的子类。本教程我们深...2016-09-20
- 下面我们来看一篇关于Android自定义WebView网络视频播放控件开发例子,这个文章写得非常的不错下面给各位共享一下吧。 因为业务需要,以下代码均以Youtube网站在线视...2016-10-02
- java开发的Android应用,性能一直是一个大问题,,或许是Java语言本身比较消耗内存。本文我们来谈谈Android 性能优化之MemoryFile文件读写。 Android匿名共享内存对外A...2016-09-20
- TextView默认是横着显示了,今天我们一起来看看Android设置TextView竖着显示如何来实现吧,今天我们就一起来看看操作细节,具体的如下所示。 在开发Android程序的时候,...2016-10-02
- 这篇文章主要为大家详细介绍了Visual Studio 2015下载和安装图文教程,具有一定的参考价值,感兴趣的小伙伴们可以参考一下...2021-09-22
android.os.BinderProxy cannot be cast to com解决办法
本文章来给大家介绍关于android.os.BinderProxy cannot be cast to com解决办法,希望此文章对各位有帮助呀。 Android在绑定服务的时候出现java.lang.ClassCastExc...2016-09-20关于Visual Studio无法打开源文件"stdio.h"问题
这篇文章主要介绍了关于Visual Studio无法打开源文件"stdio.h"问题,本文给大家介绍的非常详细,对大家的学习或工作具有一定的参考借鉴价值,需要的朋友可以参考下...2021-04-03- 这篇文章主要介绍了Android 实现钉钉自动打卡功能的步骤,帮助大家更好的理解和学习使用Android,感兴趣的朋友可以了解下...2021-03-15
- 下面我们来看一篇关于Android 开发之布局细节对比:RTL模式 ,希望这篇文章对各位同学会带来帮助,具体的细节如下介绍。 前言 讲真,好久没写博客了,2016都过了一半了,赶紧...2016-10-02
- 首先如果要在程序中使用sdcard进行存储,我们必须要在AndroidManifset.xml文件进行下面的权限设置: 在AndroidManifest.xml中加入访问SDCard的权限如下: <!--...2016-09-20
- 下面来给各位简单的介绍一下关于Android开发之PhoneGap打包及错误解决办法,希望碰到此类问题的同学可进入参考一下哦。 在我安装、配置好PhoneGap项目的所有依赖...2016-09-20
- 这篇文章主要给大家介绍了关于C#客户端程序Visual Studio远程调试的相关资料,文中通过示例代码介绍的非常详细,对大家的学习或者工作具有一定的参考学习价值,需要的朋友们下面来一起学习学习吧...2020-06-25
用Intel HAXM给Android模拟器Emulator加速
Android 模拟器 Emulator 速度真心不给力,, 现在我们来介绍使用 Intel HAXM 技术为 Android 模拟器加速,使模拟器运行度与真机比肩。 周末试玩了一下在Eclipse中使...2016-09-20