Android高德地图marker自定义弹框窗口
更新时间:2021年4月23日 00:00 点击:1606
本文实例为大家分享了Android高德地图marker自定义弹框窗口的具体代码,供大家参考,具体内容如下
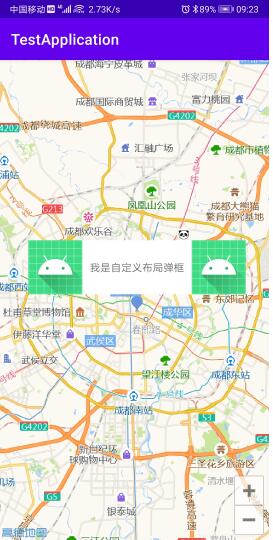
最终效果:
1.gradle里添加高德地图依赖
implementation 'com.amap.api:map2d:latest.integration'//2d地图功能
implementation 'com.amap.api:location:latest.integration'//定位功能
2.如果要用到定位的话,就首先到高德控制台里面加入本应用的信息获取到key,再在Application里设置key,并在AndroidManifest.xml中应用MainApp
public class MainApp extends android.app.Application {

    @Override
    public void onCreate() {
        super.onCreate();
        //高德地图注册
        AMapLocationClient.setApiKey("0f1d26a891783cc4d632965a7cc08443");
    }

}
<manifest xmlns:android="http://schemas.android.com/apk/res/android"
    package="com.hk.testapplication">
    <uses-permission android:name="android.permission.INTERNET" /> <!-- 访问网络权限 -->
    <uses-permission android:name="android.permission.ACCESS_COARSE_LOCATION" /> <!-- 用于访问GPS定位 -->
    <uses-permission android:name="android.permission.ACCESS_FINE_LOCATION" />
    <uses-permission android:name="android.permission.ACCESS_LOCATION_EXTRA_COMMANDS" />
    <application
        android:name=".MainApp"
        android:allowBackup="true"
        android:icon="@mipmap/ic_launcher"
        android:label="@string/app_name"
        android:roundIcon="@mipmap/ic_launcher_round"
        android:supportsRtl="true"
        android:theme="@style/Theme.TestApplication">
        <activity android:name=".MainActivity">
            <intent-filter>
                <action android:name="android.intent.action.MAIN" />

                <category android:name="android.intent.category.LAUNCHER" />
            </intent-filter>
        </activity>
    </application>

</manifest>
3. 创建activity_main.xml地图布局文件
<?xml version="1.0" encoding="utf-8"?>
<androidx.constraintlayout.widget.ConstraintLayout xmlns:android="http://schemas.android.com/apk/res/android"
    xmlns:app="http://schemas.android.com/apk/res-auto"
    xmlns:tools="http://schemas.android.com/tools"
    android:layout_width="match_parent"
    android:layout_height="match_parent"
    tools:context=".MainActivity">

    <com.amap.api.maps2d.MapView
        android:id="@+id/mapview"
        android:layout_width="match_parent"
        android:layout_height="match_parent">
    </com.amap.api.maps2d.MapView>

</androidx.constraintlayout.widget.ConstraintLayout>
4. MainActivity里加载地图,添加marker
@Override
protected void onCreate(Bundle savedInstanceState) {
        super.onCreate(savedInstanceState);
        setContentView(R.layout.activity_main);
        mMapView = findViewById(R.id.mapview);
        mMapView.onCreate(savedInstanceState);// 此方法必须重写
        mMap = mMapView.getMap();
        initPoint(30.665534,104.070929);   //地图中心点位
        initMarker();//测试点位
    }
    /**
     * 绘制marker
     */
    private void initMarker() {
        mMarkers = new ArrayList<>();

        //绘制marker  实际使用时会循环创建marker并填入数据
        Marker marker = mMap.addMarker(new MarkerOptions()
                .anchor(0.5f, 0.5f)
                .position(new LatLng(30.665534,104.070929))
                .title("标题数据")
                .snippet("消息数据")
                .icon(BitmapDescriptorFactory.fromBitmap(BitmapFactory
                        .decodeResource(getResources(), R.mipmap.ic_launcher_round))));//点位图标
        mMarkers.add(marker);
    }
    /**
     * 加载地图中心点
     */
    private void initPoint(double latitude, double Longitude) {
        LatLng marker1 = new LatLng(latitude, Longitude);
        mMap.moveCamera(CameraUpdateFactory.changeLatLng(marker1));
        mMap.moveCamera(CameraUpdateFactory.zoomTo(12));
    }


    @Override
    public void onResume() {
        super.onResume();
        if (mMapView != null)
            mMapView.onResume(); //管理地图的生命周期
    }

    @Override
    public void onPause() {
        super.onPause();
        if (mMapView != null)
            mMapView.onPause(); //管理地图的生命周期
    }

    @Override
    public void onDestroy() {
        super.onDestroy();
        if (mMapView != null)
            mMapView.onDestroy(); //管理地图的生命周期
    }


}
5.添加弹框自定义布局view_map_infowindow.xml
<?xml version="1.0" encoding="utf-8"?>
<LinearLayout xmlns:android="http://schemas.android.com/apk/res/android"
    android:orientation="horizontal"
    android:layout_width="match_parent"
    android:layout_height="50dp"
    android:minHeight="50dp"
    android:minWidth="100dp"
    android:background="#ffff"
    android:gravity="center"
    >
<ImageView
    android:id="@+id/iv_left"
    android:layout_width="wrap_content"
    android:layout_height="wrap_content"
    android:src="@mipmap/ic_launcher"/>
    <TextView
        android:layout_marginLeft="10dp"
        android:layout_marginRight="10dp"
        android:id="@+id/tv_msg"
        android:text="自定义布局"
        android:layout_width="wrap_content"
        android:layout_height="wrap_content" />
    <ImageView
        android:id="@+id/iv_right"
        android:layout_width="wrap_content"
        android:layout_height="wrap_content"
        android:src="@mipmap/ic_launcher"/>
记得设置布局最小高度和宽度,不然窗口会默认宽度高度,会使布局显示不完整
6.添加自定义弹框窗口adapter
/**
 *自定义地图弹框adapter
 * @author hk
 */
public class MapInfoWinAdapter implements AMap.InfoWindowAdapter, View.OnClickListener {
    private Context mContext;
    private LatLng latLng;
    private TextView mTvMsg;
    private ImageView mIvLeft,mIvRight;
    private String mSnippet,mTitle;
    @Override
    public View getInfoWindow(Marker marker) {
        initData(marker);
        View view = initView();
        return view;
    }
    @Override
    public View getInfoContents(Marker marker) {
        return null; //因为是自定义的布局,返回null
    }
    public MapInfoWinAdapter(Context context) {
        mContext = context;
    }
    private void initData(Marker marker) {
        //当前点位经纬度
        latLng = marker.getPosition();
        //当前点位带的消息信息  也可通过这个传输数据把数据转成json
        mSnippet = marker.getSnippet();
        //当前点位带的标题信息
        mTitle = marker.getTitle();
    }
    @NonNull
    private View initView() {
        //获取自定义的布局
        View view = LayoutInflater.from(mContext).inflate(R.layout.view_map_infowindow, null);
        mTvMsg = (TextView) view.findViewById(R.id.tv_msg);
        mIvLeft= (ImageView) view.findViewById(R.id.iv_left);
        mIvRight= (ImageView) view.findViewById(R.id.iv_right);
        mTvMsg.setText("我是自定义布局弹框");
        mIvLeft.setOnClickListener(this);
        mIvRight.setOnClickListener(this);
        return view;
    }
    @Override
    public void onClick(View v) {
        switch (v.getId()){
            case R.id.iv_left:
                Toast.makeText(mContext,"我是左边按钮点击事件",Toast.LENGTH_SHORT).show();
                break;
            case R.id.iv_right:
                Toast.makeText(mContext,"我是右边按钮点击事件",Toast.LENGTH_SHORT).show();
                break;
        }

    }
}
7.地图绑定adapter
//重要 创建自定义适配器
MapInfoWinAdapter adapter = new MapInfoWinAdapter(this);
mMap.setInfoWindowAdapter(adapter);//设置自定义窗口adapter
现在点击marker就会弹出我们自定义的布局了
8.点击地图或弹框关闭弹框窗口
mMap.setOnInfoWindowClickListener(this);//弹框窗口点击事件
   mMap.setOnMapClickListener(this);//地图点击事件

    @Override
    public void onMapClick(LatLng latLng) {
        //点击地图区域关闭所有窗口
        for (Marker marker : mMarkers) {
            marker.hideInfoWindow();
        }
    }
    @Override
    public void onInfoWindowClick(Marker marker) {
        if (marker.isInfoWindowShown()) {
            marker.hideInfoWindow();//再次点击窗口就隐藏窗口
        }
    }
到此自定义弹框窗口就完成了,以下为完整MainActivity代码
public class MainActivity extends AppCompatActivity implements AMap.OnInfoWindowClickListener, AMap.OnMapClickListener {
    private AMap mMap;
    private List<Marker> mMarkers;
    private MapView mMapView;
    @Override
    protected void onCreate(Bundle savedInstanceState) {
        super.onCreate(savedInstanceState);
        setContentView(R.layout.activity_main);
        mMapView = findViewById(R.id.mapview);
        mMapView.onCreate(savedInstanceState);// 此方法必须重写
        mMap = mMapView.getMap();
        mMap.setOnMapClickListener(this);//地图点击事件
        initPoint(30.665534,104.070929);   //地图中心点位
        initMarker();//测试点位
    }
    /**
     * 绘制marker
     */
    private void initMarker() {
        mMarkers = new ArrayList<>();
        //重要 创建自定义适配器
        MapInfoWinAdapter adapter = new MapInfoWinAdapter(this);
        mMap.setInfoWindowAdapter(adapter);//设置自定义窗口adapter
        mMap.setOnInfoWindowClickListener(this);

        //绘制marker  实际使用时会循环创建marker并填入数据
        Marker marker = mMap.addMarker(new MarkerOptions()
                .anchor(0.5f, 0.5f)
                .position(new LatLng(30.665534,104.070929))
                .title("标题数据")
                .snippet("消息数据")
                .icon(BitmapDescriptorFactory.fromBitmap(BitmapFactory
                        .decodeResource(getResources(), R.mipmap.ic_launcher_round))));//点位图标
        mMarkers.add(marker);
    }
    /**
     * 加载地图中心点
     */
    private void initPoint(double latitude, double Longitude) {
        LatLng marker1 = new LatLng(latitude, Longitude);
        mMap.moveCamera(CameraUpdateFactory.changeLatLng(marker1));
        mMap.moveCamera(CameraUpdateFactory.zoomTo(12));
    }
    @Override
    public void onMapClick(LatLng latLng) {
        //点击地图区域关闭所有窗口
        for (Marker marker : mMarkers) {
            marker.hideInfoWindow();
        }
    }
    @Override
    public void onInfoWindowClick(Marker marker) {
        if (marker.isInfoWindowShown()) {
            marker.hideInfoWindow();//再次点击窗口就隐藏窗口
        }
    }

    @Override
    public void onResume() {
        super.onResume();
        if (mMapView != null)
            mMapView.onResume(); //管理地图的生命周期
    }

    @Override
    public void onPause() {
        super.onPause();
        if (mMapView != null)
            mMapView.onPause(); //管理地图的生命周期
    }

    @Override
    public void onDestroy() {
        super.onDestroy();
        if (mMapView != null)
            mMapView.onDestroy(); //管理地图的生命周期
    }


}
以上就是本文的全部内容,希望对大家的学习有所帮助,也希望大家多多支持猪先飞。
上一篇: Android自定义圆环式进度条
下一篇: Android简单自定义音乐波动特效图
相关文章
- 下面我们来看一篇关于Android子控件超出父控件的范围显示出来方法,希望这篇文章能够帮助到各位朋友,有碰到此问题的朋友可以进来看看哦。 <RelativeLayout xmlns:an...2016-10-02
- 采用CSS覆盖的方法就可以了,但是官方是不允许这么做的...2013-10-13
Android开发中findViewById()函数用法与简化
findViewById方法在android开发中是获取页面控件的值了,有没有发现我们一个页面控件多了会反复研究写findViewById呢,下面我们一起来看它的简化方法。 Android中Fin...2016-09-20- overlay就是在地图上以另外一种形式浮现在地图上,常见的地图覆盖物为这三种类型,如:popup 弹窗、label标注信息、text文本信息等,接下来跟随小编看下openlayers6之地图覆盖物overlay详解,一起看看吧...2021-09-15
- 如果我们的项目需要做来电及短信的功能,那么我们就得在Android模拟器开发这些功能,本来就来告诉我们如何在Android模拟器上模拟来电及来短信的功能。 在Android模拟...2016-09-20
- 夜神android模拟器如何设置代理呢?对于这个问题其实操作起来是非常的简单,下面小编来为各位详细介绍夜神android模拟器设置代理的方法,希望例子能够帮助到各位。 app...2016-09-20
- 为了增强android应用的用户体验,我们可以在一些Button按钮上自定义动态的设置一些样式,比如交互时改变字体、颜色、背景图等。 今天来看一个通过重写Button来动态实...2016-09-20
- 如果我们要在Android应用APP中加载html5页面,我们可以使用WebView,本文我们分享两个WebView加载html5页面实例应用。 实例一:WebView加载html5实现炫酷引导页面大多...2016-09-20
- 深入理解Android中View和ViewGroup从组成架构上看,似乎ViewGroup在View之上,View需要继承ViewGroup,但实际上不是这样的。View是基类,ViewGroup是它的子类。本教程我们深...2016-09-20
- 下面我们来看一篇关于Android自定义WebView网络视频播放控件开发例子,这个文章写得非常的不错下面给各位共享一下吧。 因为业务需要,以下代码均以Youtube网站在线视...2016-10-02
- java开发的Android应用,性能一直是一个大问题,,或许是Java语言本身比较消耗内存。本文我们来谈谈Android 性能优化之MemoryFile文件读写。 Android匿名共享内存对外A...2016-09-20
- 这篇文章主要介绍了vue+高德地图实现地图搜索及点击定位操作,具有很好的参考价值,希望对大家有所帮助。一起跟随小编过来看看吧...2020-09-09
- TextView默认是横着显示了,今天我们一起来看看Android设置TextView竖着显示如何来实现吧,今天我们就一起来看看操作细节,具体的如下所示。 在开发Android程序的时候,...2016-10-02
- 这篇文章主要介绍了C# Winform中实现主窗口打开登录窗口关闭的方法,这在需要用户名密码的软件项目中是必用的一个技巧,要的朋友可以参考下...2020-06-25
android.os.BinderProxy cannot be cast to com解决办法
本文章来给大家介绍关于android.os.BinderProxy cannot be cast to com解决办法,希望此文章对各位有帮助呀。 Android在绑定服务的时候出现java.lang.ClassCastExc...2016-09-20- 最近项目不多忙,于是抽点时间巩固下切换窗口问题,感兴趣的朋友跟着小编一起学习吧...2020-06-25
- 这篇文章主要介绍了Element图表初始大小及窗口自适应实现,文中通过示例代码介绍的非常详细,对大家的学习或者工作具有一定的参考学习价值,需要的朋友可以参考下...2020-07-10
- 这篇文章主要介绍了Android 实现钉钉自动打卡功能的步骤,帮助大家更好的理解和学习使用Android,感兴趣的朋友可以了解下...2021-03-15
如何根据百度地图计算出两地之间的驾驶距离(两种语言js和C#)
以下是使用js代码实现百度地图计算两地距离,代码如下所示:<script src="js/jquery-1.9.0.js" type="text/javascript" language="javascript"></script><script language="javascript" type="text/javascript" src="js/...2015-10-30- 这篇文章主要介绍了React使用高德地图的实现示例(react-amap),文中通过示例代码介绍的非常详细,对大家的学习或者工作具有一定的参考学习价值,需要的朋友们下面随着小编来一起学习学习吧...2021-04-18