安卓(android)手机开发之环境搭建 HelloWord
因为之前做了个安卓壁纸站所以我们突然想起了安卓手机开发了,下面来看我的安卓环境配置文章吧。
这次接触安卓环境,一切都很陌生;花了一个下午的时间,走了很多弯路,不过最终还是把环境搭成了。下面总结一下搭建步骤:


 将其解压到D:Program Filesandroid-sdk-windows目录。
 ,打开之后下图所示:
 。选择一个特定版本的SDK下载回来。根据您的网速可能需要等上3分到几个小时不等,比如我的网速比较慢,下载了2个多小时。我选择的安卓版本是
 ,单击install packages开始联机
 ,打开之后选择“NEW”
 创建一个安卓仿真设备,什么是仿真设备呢?其实就是一个安卓手机模拟器。输入仿真设备名称和平台以及CPU类型,然后就可以创建了。如图:
1.启动 ,创建一个Android项目:helloandroid。添加一个类“HelloAndroid”,源码如下
| 代码如下 | 复制代码 |
|
package com.example.helloandroid; |
|
2.点击![]() 按钮,在Run Configuration对话框中双击android application,进行如下设置:
按钮,在Run Configuration对话框中双击android application,进行如下设置:

 (注:真机调试模式请选择红色圈框的选项,AVD调试器请选择下边的仿真设备。)
我用的是真机,所以会自动出现如下对话框,选择我的设备
单击OK,我的手机屏幕已经可以看到“Hello,word”了,你的呢?
第一步:使用adb下载手机端的hosts文件,在Windows下打开命令提示行,切换到C:目录下。
C:>adb pull /system/etc/hosts
这样,便将手机端的hosts文件下载到Windows的C盘根目录下,先不要关闭命令提示行窗口。
第二步:复制https://smarthosts.googlecode.com/svn/trunk/hosts页面的所有内容,推荐使用notepad++打开下载回来的hosts文件,然后将内容粘贴到hosts文件中,保存。
第三步:在手机端打开rootexplorer,我想使用Android并且root过的手机都会有rootexplorer吧,打开后进入system目录,将权限更改为可读写。
第四步:切回到命令提示行窗口输入如下内容将hosts文件回传到手机中。
C:>adb push hosts /system/etc/
这里再介绍一下 如何获取hosts列表呢?
https://smarthosts.googlecode.com/svn/trunk/hosts
通过上面这个地址,本来这是一个开源项目,叫做smarthosts,但是已经出于某种原因停止更新了。
该程序也可以修改电脑上的hosts地址。
| 代码如下 | 复制代码 |
|
/创建电话管理 //获取手机号码
<!-- 添加权限 --> |
|
为了使用本文中给出的示例,您需要安装和配置以下软件。请参见 参考资料 中的相关链接。
常用缩写词ADT: Android Development Tools,Android 开发工具
API: Application programming interface,应用程序编程接口
AVD: Android Virtual Device,Android 虚拟设备
DOM: Document object model,文档对象模型
IDE: Integrated Development Environment,集成开发环境
JSON: JavaScript Object Notation,JavaScript 对象表示法
SAX: Simple API for XML,XML 简易 API
SDK: Software Development Kit,软件开发包
UI: User Interface,用户界面
XML: Extensible Markup Language,可扩展标记语言
安装 Eclipse IDE。
安装针对 Eclipse 的 Android Development Tools (ADT)插件,它提供一组在 Eclipse 中开发 Android 应用程序的扩展。
下载并安装 Android SDK Platform,它提供用于开发 Android 应用程序的工具。
选择 Window > Android SDK 和 AVD Manager,在 Eclipse 中启动 Android SDK 和 AVD Manager。
在 Android SDK 和 AVD Manager 中创建一个 Android Virtual Device (AVD),它是 Android 的模拟器。
请为 AVD 选择 Platform 3.0 和 API 11。
创建一份 XML 文档
在这一节中,您将在 Android 上创建一份 XML 文档。第一步是创建一个 Android 项目。
在 Eclipse IDE 中选择 File > New。在 New 对话框中,选择 Android > Android Project。然后单击 Next。
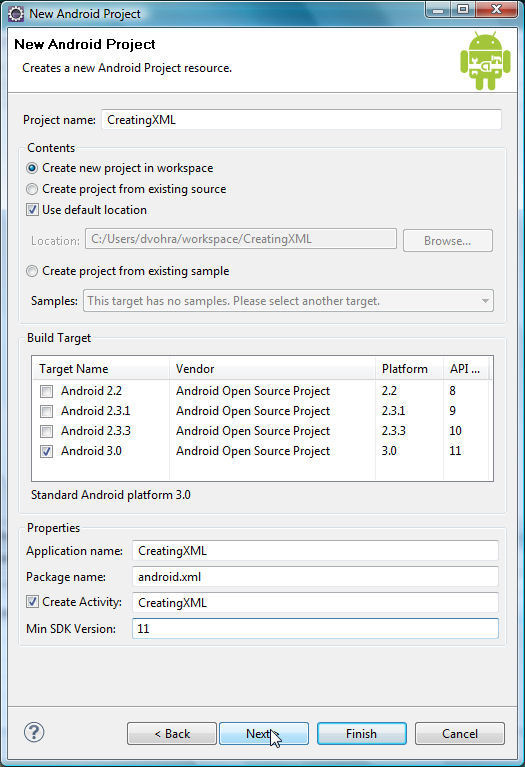
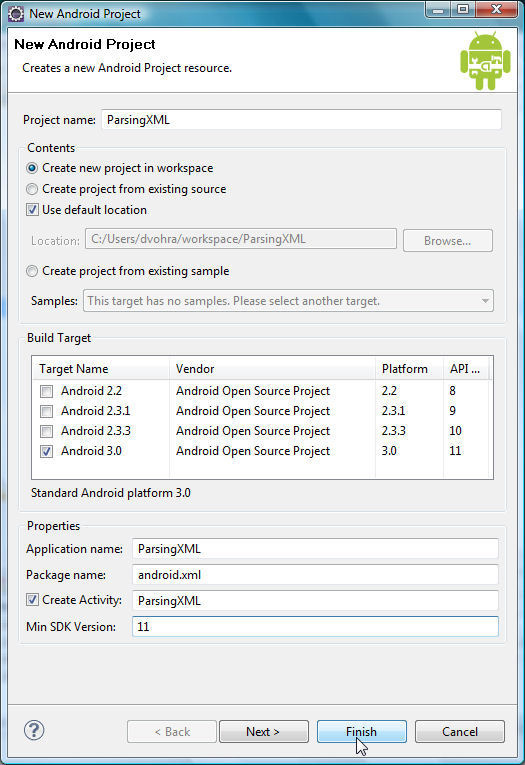
在 New Android Project 窗口中,如 图 1 中所示,指定:
项目名称:CreatingXML
“构建目标” 复选框:Android Platform 3.0 和 API 11
属性:
应用程序名称:CreatingXML
包名称 :android.xml
选择创建活动:活动类 (CreatingXML)。一个活动代表一次用户交互。该类扩展了 Activity 类,为 UI 创建了一个窗口。
最低 SDK 版本:11
图 1. 为平台 3.0 创建一个 Android 项目
- 单击 Next。
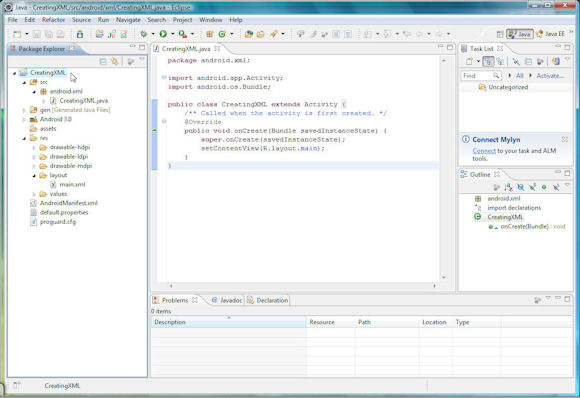
- 单击 Finish。这样就创建好了一个用于创建 XML 文档的 Android 项目。Android 项目包含以下这些文件:
- 一个活动类
CreatingXML,它扩展了 Activity 类。
- res/layout/main.xml 文件,它指定了 Android UI 组件的布局。
- AndroidManifest.xml 文件,它包含应用程序配置,比如包名称,启动 Android 应用程序时启动的主要活动、应用程序组件、进程以及最低的 API 级别。
图 2. 用于创建 XML 文档的 Android 项目
LinearLayout,并将 android:orientation 设置为 vertical。在这个例子中,您将以文本消息的形式显示 XML 文档。添加一个 id 为 xmlresult 的 TextView 元素,以显示 XML 文档,如 清单 1 中所示。
清单 1. 布局文件 main.xml
<?xml version="1.0" encoding="utf-8"?>
<LinearLayout xmlns:android="http://schemas.android.com/apk/res/android"
     android:orientation="vertical" android:layout_width="fill_parent"
     android:layout_height="fill_parent">
     <TextView android:id="@+id/xmlresult" android:layout_width="fill_parent"
          android:layout_height="wrap_content" />
</LinearLayout>
|
Activity 运行 CreatingXML。使用 uses-sdk 元素 11 指定最低的 Android 版本。使用活动元素与子元素指定活动 intent-filter 和 action。清单 2 显示了该文件。
清单 2. 配置文件 AndroidManifest.xml
<?xml version="1.0" encoding="utf-8"?>
<manifest xmlns:android="http://schemas.android.com/apk/res/android"
      package="android.xml"
      android:versionCode="1"
      android:versionName="1.0">
    <uses-sdk android:minSdkVersion="11" />

    <application android:icon="@drawable/icon" android:label="@string/app_name">
        <activity android:name=".CreatingXML"
                  android:label="@string/app_name">
            <intent-filter>
                <action android:name="android.intent.action.MAIN" />
                <category android:name="android.intent.category.LAUNCHER" />
            </intent-filter>
        </activity>

    </application>
</manifest>
|
CreatingXML 中创建一份 XML 文档,该类扩展了 Activity 类。因为示例使用 javax.xml.parsers.DocumentBuilder 来创建 XML 文档,需要导入以下内容。javax.xml.parsers.DocumentBuilder类javax.xml.parsers.DocumentBuilderFactory类org.w3c.dom包javax.xml.transform.TransformerFactory类javax.xml.transform.Transformer类javax.xml.transform.dom.DOMSource类javax.xml.transform.stream.StreamResult类
onCreate(Bundle savedInstanceState) 方法。在 onCreate 方法中,可以使用 setContentView 方法设置 UI,并使用 setContentView(R.layout.main); 设置布局资源。findViewById 方法定义 Android 小部件 TextView 对象(其 id 为 xmlresult),如下所示: TextView xmlResult = (TextView) findViewById(R.id.xmlresult); 。newInstance() 创建 DocumentBuilderFactory 对象的一个实例。使用 DocumentBuilderFactory 类的 newDocumentBuilder() 方法创建一个 DocumentBuilder 对象,如 清单 3 中所示。
清单 3. 创建一个 DocumentBuilder
DocumentBuilderFactory documentBuilderFactory = DocumentBuilderFactory.newInstance(); DocumentBuilder documentBuilder = documentBuilderFactory.newDocumentBuilder(); |
DocumentBuilder 类的 newDocument() 方法创建一个新的 Document 对象:Document document = documentBuilder.newDocument();。 createElement() 方法可创建 Document 对象的根元素 "catalog": Element rootElement = document.createElement("catalog");。 setAttribute 方法设置根元素上的 publisher 和 journal 属性。
清单 4. 设置根元素属性
rootElement.setAttribute("journal", "Oracle Magazine");
rootElement.setAttribute("publisher", "Oracle Publishing");
|
appendChild() 方法将根元素附加到 Document 对象: document.appendChild(rootElement);。 createElement() 方法创建一个 "article" 元素。使用 appendChild() 方法将该元素附加到根元素,如 清单 5 中所示。
清单 5. 创建一个 "article" 元素
Element articleElement = document.createElement("article");
rootElement.appendChild(articleElement);
|
"article" 元素添加一个 "edition" 元素。
清单 6. 添加 "edition" 元素
Element editionElement = document.createElement("edition");
articleElement.appendChild(editionElement);
|
createTextNode() 方法向 "edition" 元素添加一个文本节点。将文本节点的值设置为 "Sept-Oct 2005",如下所示: editionElement.appendChild(document.createTextNode("Sept-Oct 2005"));. "title" 元素并将它添加给 "article" 元素。如 清单 7 中所示,向 "title" 元素添加一个文本节点,并将其值设为 "Creating Search Pages"。
清单 7. 创建一个文本节点
Element titleElement = document.createElement("title");
articleElement.appendChild(titleElement);
titleElement.appendChild(document.createTextNode("Creating Search Pages"));
|
"article" 元素添加一个 "author" 元素。向 "author" 元素添加一个文本节点,并将其值设为 "Steve Muench",如 清单 8 中所示。
清单 8. 添加 "author" 元素
authorElement = document.createElement("author");
articleElement.appendChild(authorElement);
authorElement.appendChild(document.createTextNode("Steve Muench"));
|
"article" 元素。您可以使用与非 Android 应用程序相同的方式来创建 XML 文档 DOM 结构。这个示例将执行以下操作:- 将 DOM
Document对象输出到一个ByteArrayOutputStream中 - 以字符串的形式从
OutputStream获取 XML 文档 - 设置 Android 上的
TextView小部件上的字符串
newInstance() 创建一个 TransformerFactory 对象。如 清单 9中所示,使用 factory 对象的 newTransformer() 方法创建一个 Transformer 对象。
清单 9. 创建一个转换器对象
TransformerFactory factory = TransformerFactory.newInstance(); Transformer transformer = factory.newTransformer(); |
java.util.Properties 对象,并设置以下输出属性:- 缩进 (
INDENT) - 输出格式 (
METHOD) - XML 声明 (
OMIT_XML_DECLARATION) - XML 版本 (
VERSION) - XML 文档的编码方式 (
ENCODING)
Source 对象与 Result 对象。从 Document 对象创建一个 DOMSource 对象。为了获得输出,我们将从 ByteArrayOutputStream 创建一个 ByteArrayOutputStream 对象和一个 StreamResult 对象,如 清单 10 中所示。
清单 10. 转换 DOM 结构
DOMSource domSource = new DOMSource(document.getDocumentElement()); OutputStream output = new ByteArrayOutputStream(); StreamResult result = new StreamResult(output); |
Transformer对象的 transform() 方法转换 Document 对象,如下所示: transformer.transform(domSource, result);。 ByteArrayOutputStream 对象获取 String 对象,并设置 TextView 小部件 xmlResult 上的 String。
清单 11. 获取与设置字符串
String xmlString = output.toString(); xmlResult.setText(xmlString); |
Activity 类 CreatingXML。
清单 12. Activity 类 CreatingXML
package android.xml;

import android.app.Activity;
import android.os.Bundle;
import android.widget.TextView;
import javax.xml.parsers.DocumentBuilderFactory;
import javax.xml.parsers.DocumentBuilder;
import javax.xml.parsers.ParserConfigurationException;
import org.w3c.dom.Document;
import org.w3c.dom.Element;
import javax.xml.transform.TransformerFactory;
import javax.xml.transform.Transformer;
import java.util.Properties;
import javax.xml.transform.OutputKeys;

import javax.xml.transform.TransformerConfigurationException;
import javax.xml.transform.TransformerException;

import javax.xml.transform.dom.DOMSource;
import javax.xml.transform.stream.StreamResult;
import java.io.OutputStream;
import java.io.ByteArrayOutputStream;
import javax.xml.transform.dom.DOMSource;

public class CreatingXML extends Activity {
    /** Called when the activity is first created. */
    @Override
    public void onCreate(Bundle savedInstanceState) {
        super.onCreate(savedInstanceState);
        setContentView(R.layout.main);
        TextView     xmlResult = (TextView) findViewById(R.id.xmlresult);

        try {
        DocumentBuilderFactory documentBuilderFactory = DocumentBuilderFactory
                      .newInstance();
            DocumentBuilder documentBuilder = documentBuilderFactory
                      .newDocumentBuilder();
            Document document = documentBuilder.newDocument();

            Element rootElement = document.createElement("catalog");
            rootElement.setAttribute("journal", "Oracle Magazine");
            rootElement.setAttribute("publisher", "Oracle Publishing");
            document.appendChild(rootElement);

            Element articleElement = document.createElement("article");
            rootElement.appendChild(articleElement);

            Element editionElement = document.createElement("edition");
            articleElement.appendChild(editionElement);
            editionElement.
            appendChild(document.createTextNode("Sept-Oct 2005"));

            Element titleElement = document.createElement("title");
            articleElement.appendChild(titleElement);
            titleElement.appendChild(document
                      .createTextNode("Creating Search Pages"));

            Element authorElement = document.createElement("author");
            articleElement.appendChild(authorElement);
            authorElement.
            appendChild(document.createTextNode("Steve Muench"));

            articleElement = document.createElement("article");
            rootElement.appendChild(articleElement);

            editionElement = document.createElement("edition");
            articleElement.appendChild(editionElement);
            editionElement.appendChild(document
                      .createTextNode("November - December 2010"));

            titleElement = document.createElement("title");
            articleElement.appendChild(titleElement);
            titleElement.appendChild(document
                      .createTextNode("Agile Enterprise Architecture"));

            authorElement = document.createElement("author");
            articleElement.appendChild(authorElement);
            authorElement.appendChild(document.createTextNode("Bob Rhubart"));

            TransformerFactory factory = TransformerFactory.newInstance();
            Transformer transformer = factory.newTransformer();
            Properties outFormat = new Properties();
            outFormat.setProperty(OutputKeys.INDENT, "yes");
            outFormat.setProperty(OutputKeys.METHOD, "xml");
            outFormat.setProperty(OutputKeys.OMIT_XML_DECLARATION, "no");
            outFormat.setProperty(OutputKeys.VERSION, "1.0");
            outFormat.setProperty(OutputKeys.ENCODING, "UTF-8");
            transformer.setOutputProperties(outFormat);
            DOMSource domSource =
            new DOMSource(document.getDocumentElement());
            OutputStream output = new ByteArrayOutputStream();
            StreamResult result = new StreamResult(output);
            String xmlString = output.toString();
            xmlResult.setText(xmlString);

        } catch (ParserConfigurationException e) {
        } catch (TransformerConfigurationException e) {
        } catch (TransformerException e) {
        }

    }
}
|
图 3. 运行 Android 应用程序
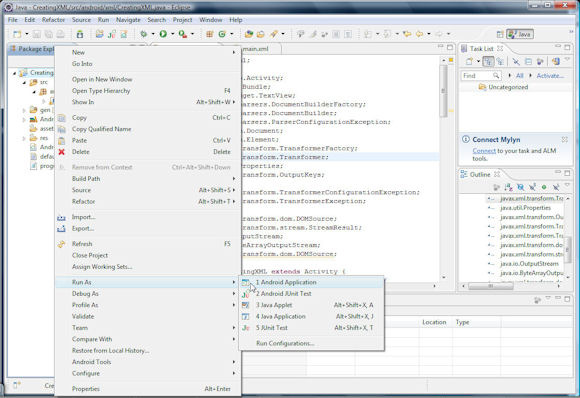
图 4. 安装在 Android 设备上的应用程序
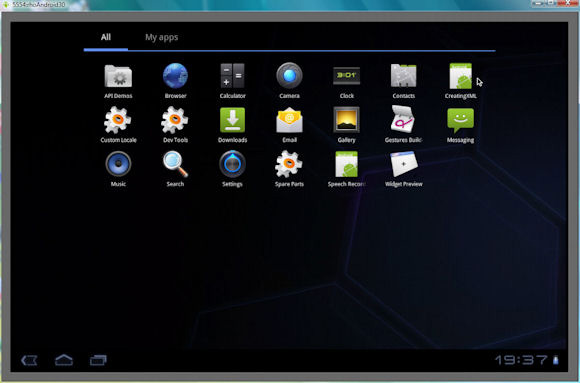
图 5. 在 Android 设备上创建并显示一份 XML 文档
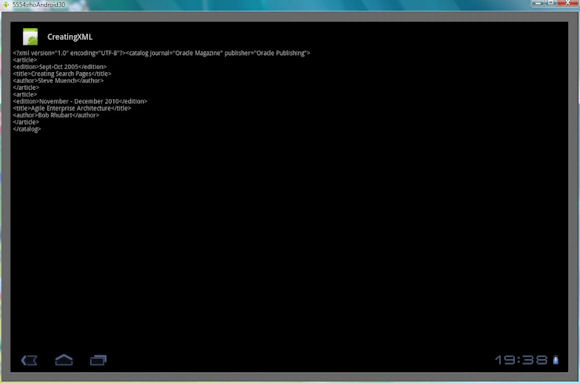
清单 13. catalog.xml
<?xml version = '1.0' encoding = 'UTF-8'?>
<catalog journal="Oracle Magazine" publisher="Oracle Publishing">
     <article>
          <edition>Sept-Oct 2005</edition>
          <title>Creating Search Pages</title>
          <author>Steve Muench</author>
     </article>
     <article>
          <edition>November - December 2010</edition>
          <title>Agile Enterprise Architecture</title>
          <author>Bob Rhubart</author>
     </article>
</catalog>
|
- 在 Eclipse IDE 中选择 File > New。在 New 对话框中,选择 Android > Android Project。然后单击 Next。
- 在 New Android Project 窗口中,如 图 6 中一样指定:
- 项目名称:
ParsingXML - “构建目标” 复选框:Android Platform 3.0 与 API 11。
- 属性:
- 应用程序名称:
ParsingXML - 包名称:
android.xml - 选择 “创建活动”:Activity 类 (
ParsingXML) - 最低 SDK 版本:11
- 应用程序名称:
图 6. 创建一个 Android 项目来解析 XML 文档
- 项目名称:
- 单击 Finish。
这样就创建好了一个 Android 项目,它包含以下内容:
- 一个
Activity类ParsingXML - 一个 res/layout/main.xml 布局文件
- 一个 AndroidManifest.xml 应用程序配置文件
- 一个
TextView 小部件上。 - 在 main.xml 文件中,为每个标签和元素文本节点值添加一个
TextView小部件。 - 创建一个
LinearLayout并将android:orientation设置为"vertical"。 - 添加具有以下 id 的
TextView元素:"journal_label""journal""publisher_label""publisher""edition1_label""edition1""title1_label""title1""author1_label""author1""edition2_label""title2_label""title2""author2_label""author2"
清单 14. 布局文件 main.xml
<?xml version="1.0" encoding="utf-8"?>
<LinearLayout xmlns:android="http://schemas.android.com/apk/res/android"
     android:orientation="vertical" android:layout_width="fill_parent"
     android:layout_height="fill_parent">
          <TextView android:id="@+id/journal_label"
               android:layout_width="fill_parent"
               android:layout_height="wrap_content"
               android:text="Journal:" />
          <TextView android:id="@+id/journal" android:singleLine="true"
               android:layout_width="fill_parent"
               android:layout_height="wrap_content" />
          <TextView android:id="@+id/publisher_label"
               android:layout_width="fill_parent"
               android:layout_height="wrap_content"
               android:text="Publisher:" />
          <TextView android:id="@+id/publisher"
               android:singleLine="true"
               android:layout_width="fill_parent"
               android:layout_height="wrap_content" />
          <TextView android:id="@+id/edition1_label"
               android:layout_width="fill_parent"
               android:layout_height="wrap_content"
               android:text="Edition:" />
          <TextView android:id="@+id/edition1" android:singleLine="true"
               android:layout_width="fill_parent"
               android:layout_height="wrap_content" />
          <TextView android:layout_width="fill_parent"
               android:id="@+id/title1_label"
               android:layout_height="wrap_content" android:text="Title:" />
          <TextView android:id="@+id/title1"
               android:singleLine="true" android:layout_width="fill_parent"
               android:layout_height="wrap_content" />
          <TextView android:layout_width="fill_parent"
               android:id="@+id/author1_label"
               android:layout_height="wrap_content" android:text="Author:" />

          <TextView android:id="@+id/author1" android:singleLine="true"
               android:layout_width="fill_parent"
               android:layout_height="wrap_content" />
          <TextView android:id="@+id/edition2_label"
               android:layout_width="fill_parent"
               android:layout_height="wrap_content"
               android:text="Edition:" />


          <TextView android:id="@+id/edition2" android:singleLine="true"
               android:layout_width="fill_parent"
               android:layout_height="wrap_content" />
          <TextView android:layout_width="fill_parent"
               android:id="@+id/title2_label"
               android:layout_height="wrap_content" android:text="Title:" />
          <TextView android:id="@+id/title2"
               android:singleLine="true" android:layout_width="fill_parent"
               android:layout_height="wrap_content" />
          <TextView android:layout_width="fill_parent"
               android:id="@+id/author2_label"
               android:layout_height="wrap_content" android:text="Author:" />
          <TextView android:id="@+id/author2" android:singleLine="true"
               android:layout_width="fill_parent"
               android:layout_height="wrap_content" />
</LinearLayout>
|
- 要运行的
activity,指定为ParsingXML - 使用
uses-sdk元素将最低的 Android 版本指定为 11 - 使用活动元素与子元素指定
activity、intent-filter与action
清单 15. 配置文件 AndroidManifest.xml
<?xml version="1.0" encoding="utf-8"?>
<manifest xmlns:android="http://schemas.android.com/apk/res/android"
      package="android.xml"
      android:versionCode="1"
      android:versionName="1.0">
    <uses-sdk android:minSdkVersion="11" />

    <application android:icon="@drawable/icon" android:label="@string/app_name">
        <activity android:name=".ParsingXML"
                  android:label="@string/app_name">
            <intent-filter>
                <action android:name="android.intent.action.MAIN" />
                <category android:name="android.intent.category.LAUNCHER" />
            </intent-filter>
        </activity>

    </application>
</manifest>
|
- 在 res 目录中创建一个名为 xml 的目录,然后将 XML 文档复制到 res/xml 目录中。
- 在
ParsingXML活动类中,导入 android.content.res.XmlResourceParser 和 org.xmlpull.v1.XmlPullParser 接口。启动活动时调用了onCreate(Bundle savedInstanceState)方法。 - 在
onCreate方法中,使用setContentView方法和布局资源设置 UI,比如:setContentView(R.layout.main); - 使用
findViewById方法与小部件 id 获取 main.xml 文件中定义的 AndroidTextView小部件,如 清单 16中所示。
清单 16. 获取 TextView 小部件
TextView journal = (TextView) findViewById(R.id.journal); TextView publisher = (TextView) findViewById(R.id.publisher); TextView edition1 = (TextView) findViewById(R.id.edition1); TextView title1 = (TextView) findViewById(R.id.title1); TextView author1 = (TextView) findViewById(R.id.author1); TextView edition2 = (TextView) findViewById(R.id.edition2); TextView title2 = (TextView) findViewById(R.id.title2); TextView author2 = (TextView) findViewById(R.id.author2); |
XmlResourceParser 对象,代码如下: XmlResourceParser xpp = getResources().getXml(R.xml.catalog);。 XmlResourceParser 来解析 XML 文档,它也是一个 pull 解析器(扩展了 XmlPullParser 接口)。该 pull 解析器将 XML 文档处理为一系列解析事件。可以使用 next() 方法获得下一个解析事件,代码如下: xpp.next();。getEventType 方法 int 获取事件类型,它返回一个 int 值:eventType = xpp.getEventType();。 int 值。
表 1. 事件类型 int 值
| int 值 | 描述 |
|---|---|
| COMMENT | 一段 XML 注释 |
| DOCDECL | XML 文档类型描述 |
| END_DOCUMENT | 文档结尾 |
| END_TAG | 一个元素标签的结尾 |
| IGNORABLE_WHITESPACE | 可忽略的空格 |
| PROCESSING_INSTRUCTION | 处理指令 |
| START_DOCUMENT | 文档开始 |
| START_TAG | 一个元素标签的开始 |
| TEXT | 字符数据 |
START_TAG 与 TEXT 事件类型,它们分别对应于元素开始标签与元素文本节点。您首先要确定元素标签,然后获得元素标签的文本节点值。使用 int 变量 iter 来表示 XML 文档中不同的 "article"元素,同时使用 String 变量 elemtext 来制定元素标签名称。要为迭代器指定一个 int 变量并为元素名称指定一个 String 变量,请使用 清单 17 中的代码。
清单 17. 指定变量
int iter = 0; String elemtext = null; |
- 确定事件类型
- 获得元素标签名称与元素标签文本值
- 设置对应
TextView小部件上的文本节点值
清单 18. 获得开始标签的元素名称
while (eventType != XmlPullParser.END_DOCUMENT) {
              if (eventType == XmlPullParser.START_TAG) {
         String elemName = xpp.getName();
...
...
                                                         }
                                                 }
|
"catalog",请获得 "journal" 与 "publisher" 的属性值,并设置 "journal" 与 "publisher" TextView 小部件上的属性值。可以使用 XmlResourceParser 的 getAttributeValue() 方法来获得属性值,如 清单 19 中所示。
清单 19. 获得与设置属性值
if (elemName.equals("catalog")) {
String journalAttr = xpp.getAttributeValue(null,"journal");
String publisherAttr = xpp.getAttributeValue(null,"publisher");
journal.setText(journalAttr);
publisher.setText(publisherAttr);
...
}
|
"article" 元素的迭代器变量 iter 的值,如 清单 20 中所示。
清单 20. 增加变量的值
if (elemName.equals("article")) {
     iter = iter + 1;
                                 }
|
TEXT 则获得文本节点值,并在相应的 TextView 小部件上设置文本节点值。可以使用 elemtext String 变量来获得元素标签名称,该变量是为事件类型 START_TAG 设置的。使用 XmlResourceParser 的 getText() 方法获得文本节点值。使用 setText 方法设置 TextView 小部件上的文本节点值,如 清单 21 中所示。
清单 21. 获得文本节点值
else if (eventType == XmlPullParser.TEXT) {
//Obtain the element name and element text node values and
//set the text node values on the corresponding TextView
//widgets
}
|
Activity 类 ParsingXML。
清单 22. Activity 类 ParsingXML
package android.xml;

import android.app.Activity;
import android.os.Bundle;
import android.widget.TextView;
import org.xmlpull.v1.XmlPullParser;
import org.xmlpull.v1.XmlPullParserException;
import java.io.IOException;
import android.content.res.XmlResourceParser;

public class ParsingXML extends Activity {
    /** Called when the activity is first created. */
    @Override
    public void onCreate(Bundle savedInstanceState) {
         super.onCreate(savedInstanceState);
         //setContentView(R.layout.main);
         setContentView(R.layout.relativelayout);
         TextView journal = (TextView) findViewById(R.id.journal);
         TextView publisher = (TextView) findViewById(R.id.publisher);
         TextView edition1 = (TextView) findViewById(R.id.edition1);
         TextView title1 = (TextView) findViewById(R.id.title1);
         TextView author1 = (TextView) findViewById(R.id.author1);

         TextView edition2 = (TextView) findViewById(R.id.edition2);
         TextView title2 = (TextView) findViewById(R.id.title2);
         TextView author2 = (TextView) findViewById(R.id.author2);
         try {
              XmlResourceParser xpp = getResources().getXml(R.xml.catalog);

              xpp.next();
              int eventType = xpp.getEventType();
              int iter = 0;
              String elemtext = null;

              while (eventType != XmlPullParser.END_DOCUMENT) {

                 if (eventType == XmlPullParser.START_TAG) {

                     String elemName = xpp.getName();
                     if (elemName.equals("catalog")) {
                 String journalAttr = xpp.getAttributeValue(null,
                                  "journal");
                 String publisherAttr = xpp.getAttributeValue(null,
                                  "publisher");
                        journal.setText(journalAttr);
                        publisher.setText(publisherAttr);
                     }
                     if (elemName.equals("article")) {
                        iter = iter + 1;
                     }

                     if (elemName.equals("edition")) {
                        elemtext = "edition";
                     }
                     if (elemName.equals("title")) {
                        elemtext = "title";
                     }
                     if (elemName.equals("author")) {
                        elemtext = "author";
                     }
                 }

                 else if (eventType == XmlPullParser.TEXT) {
                     if (iter == 1) {
                        if (elemtext.equals("edition")) {
                             edition1.setText(xpp.getText());
                        } else if (elemtext.equals("title")) {
                             title1.setText(xpp.getText());
                        } else if (elemtext.equals("author")) {
                             author1.setText(xpp.getText());
                        }
                     }

                     else if (iter == 2) {
                        if (elemtext.equals("edition")) {
                             edition2.setText(xpp.getText());
                        } else if (elemtext.equals("title")) {
                             title2.setText(xpp.getText());
                        } else if (elemtext.equals("author")) {
                             author2.setText(xpp.getText());
                        }

                     }
                 }
                 eventType = xpp.next();
              }

         } catch (XmlPullParserException e) {
         } catch (IOException e) {
         }

    }
}
|
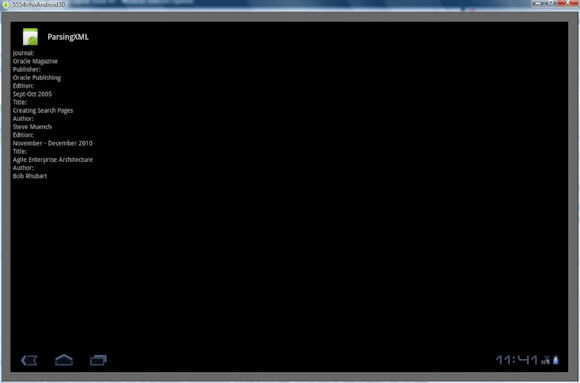
图 7. 运行一个 Android 应用程序来解析 XML 文档

图 8. 安装在 Android 设备上的ParsingXML 应用程序
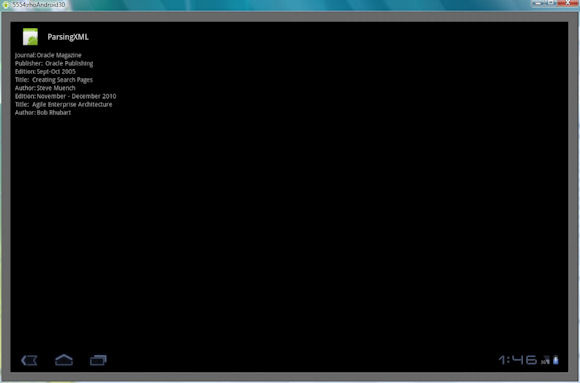
图 9. 通过解析获得的 XML 文档节点值
RelativeLayout 代替 LinearLayout。使用 TextView 小部件的 android:layout_marginLeft 属性可以让文本节点值出现在标签的右侧。使用 android:layout_below 属性可以让文本节点值出现在前一行中文本节点值的下方。 RelativeLayout 提供了其他属性,比如 android:layout_toRightOf,用于输出一个小部件在另一个小部件的右侧;还提供了 android:layout_toLeftOf,用于输出一个组件在另一个组件的左侧。清单 23 显示了相对布局的 main.xml。
清单 23. 相对布局
<?xml version="1.0" encoding="utf-8"?>

<RelativeLayout
     xmlns:android="http://schemas.android.com/apk/res/android"
     android:layout_width="fill_parent"
     android:layout_height="wrap_content"
     android:padding="5px">

          <TextView android:id="@+id/journal_label"
               android:layout_width="fill_parent"
               android:layout_height="wrap_content"
               android:text="Journal:" />

          <TextView android:id="@+id/journal"
               android:layout_marginLeft="50px"
               android:layout_width="fill_parent"
               android:layout_height="wrap_content" />

          <TextView android:id="@+id/publisher_label"
               android:layout_below="@id/journal_label"
               android:layout_width="fill_parent"
               android:layout_height="wrap_content"
               android:text="Publisher:" />

          <TextView android:id="@+id/publisher"
               android:layout_below="@id/journal"
               android:layout_marginLeft="70px"
               android:layout_width="fill_parent"
               android:layout_height="wrap_content" />

          <TextView android:id="@+id/edition1_label"
               android:layout_below="@id/publisher_label"
               android:layout_width="fill_parent"
               android:layout_height="wrap_content"
               android:text="Edition:" />

          <TextView android:id="@+id/edition1"
               android:layout_below="@id/publisher"
               android:layout_width="fill_parent"
               android:layout_marginLeft="50px"
               android:layout_height="wrap_content" />

          <TextView android:layout_width="fill_parent"
               android:id="@+id/title1_label"
               android:layout_below="@id/edition1_label"
               android:layout_height="wrap_content"
               android:text="Title:" />

          <TextView android:id="@+id/title1"
               android:layout_marginLeft="40px"
               android:layout_below="@id/edition1"
               android:layout_width="fill_parent"
               android:layout_height="wrap_content" />

          <TextView android:layout_width="fill_parent"
               android:id="@+id/author1_label"
               android:layout_below="@id/title1_label"
               android:layout_height="wrap_content"
               android:text="Author:" />

          <TextView android:id="@+id/author1"
               android:layout_below="@id/title1"
               android:layout_width="fill_parent"
               android:layout_marginLeft="50px"
               android:layout_height="wrap_content" />

          <TextView android:id="@+id/edition2_label"
               android:layout_below="@id/author1_label"
               android:layout_width="fill_parent"
               android:layout_height="wrap_content"
               android:text="Edition:" />

          <TextView android:id="@+id/edition2"
               android:layout_below="@id/author1"
               android:layout_width="fill_parent"
               android:layout_marginLeft="50px"
               android:layout_height="wrap_content" />

          <TextView android:layout_width="fill_parent"
               android:id="@id/title2_label"
               android:layout_below="@id/edition2_label"
               android:layout_height="wrap_content"
               android:text="Title:" />

          <TextView android:id="@+id/title2"
               android:layout_marginLeft="40px"
               android:layout_below="@id/edition2"
               android:layout_width="fill_parent"
               android:layout_height="wrap_content" />

          <TextView android:layout_width="fill_parent"
               android:id="@+id/author2_label"
               android:layout_below="@id/title2_label"
               android:layout_height="wrap_content"
               android:text="Author:" />

          <TextView android:id="@+id/author2"
               android:layout_below="@id/title2"
               android:layout_width="fill_parent"
               android:layout_marginLeft="50px"
               android:layout_height="wrap_content" />

</RelativeLayout>
|
图 10. 格式化的 XML 文档节点值
代码其实没有几行,这里简单记录下学习的过程.
Android系统启动时会扫描系统与SD卡中的对媒体文件,分别存入数据库sqlite中,以contentProvider的形式对外提供服务
路径:/data/data/com.android.providers.media/databases/XXX...

可以看到有2个db文件, 一个是系统的,一个是sd卡里的
用SQLite Expert打开internal.db,部分截图如下:
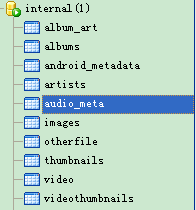
这里面记录了音频audio、视频video、图片images的相关数据信息,我们以音频audio为例,蓝色部分audio_meta就是audio数据表,打开之后就可以看到详细信息了,里面列出了系统内部的所有音频文件,各个字段在android.provider.MediaStore中都定义有相应的常量,如id --- MediaStore.Audio.Media._ID.
而这里面有想说下这四个字段
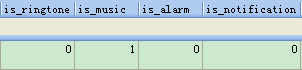
含义在源码里都有说明,看了一遍数据,发现这四个字段同时有且仅有一个字段为1,也就是对于一个多媒体文件只能是这四种中的一种,默认为0,如果是某种类型,则android系统默认置为1,所以也就明白了为什么很多扫描系统通知或者来电铃声的示例代码中,都会有一个类似的条件语句:is_notification = 1.
如:
/**
* 扫描系统内部通知铃声
*/
| 代码如下 | 复制代码 |
|
private void scannerMediaFile() { if (cursor == null) { while (cursor.moveToNext()) { |
|
这里 is_notification != 0,效果是一样的,除非哪天google再定义个2, 3 ......
上面扯了些其他的,关于设置铃声的方法,系统提供了一个铃声管理器android.provider.RingtoneManager,其中提供了获取与设置铃声的API
如:
| 代码如下 | 复制代码 |
| Uri uri = RingtoneManager.getActualDefaultRingtoneUri(MediaActivity.this, RingtoneManager.TYPE_NOTIFICATION);可以获取到当前系统的通知铃声uri | |
第二个参数可以指定获取的铃声类型,还有其他的TYPE_RINGTONE,TYPE_ALARM, TYPE_ALL
设置铃声的API:
| 代码如下 | 复制代码 |
| RingtoneManager.setActualDefaultRingtoneUri(MediaActivity.this, RingtoneManager.TYPE_NOTIFICATION, Uri.parse(data.get(position))); |
|
第二个参数同上,最后一个是指定一个新的Uri, 这里的data.get(position)就是在上面的扫描代码扫描出的所有通知铃声path路径中选泽一个,然后在解析成一个URI对象传入即可
那么android是如何获取指定类型的系统铃声呢?
这涉及到另一个类android.provider.Settings
相关源码如下:
| 代码如下 | 复制代码 |
|
public static Uri getActualDefaultRingtoneUri(Context context, int type) { |
|
| 代码如下 | 复制代码 |
|
public synchronized static String getString(ContentResolver resolver, String name) { //NameValueCache中getString()方法部分代码 String value = c.moveToNext() ? c.getString(0) : null; |
|
settings.db结构如下:

上面示例中指定的TYPE_NOTIFICATION的数据如下(蓝色部分):

最后返回的就是file:///..........这个String数据,再转化成URI返回给调用者
OK,那么设置铃声的API, setAc.......执行的过程也类似:
| 代码如下 | 复制代码 |
|
public static boolean putString(ContentResolver resolver, String name, String value) { protected static boolean putString(ContentResolver resolver, Uri uri, |
|
1,设置铃声之前,要先知道有哪些系统铃声,所以需要扫描,android提供了xxx.media这个contentProvider为此服务,对应的数据库为internal.db/external-xx.db
2,拿到铃声,真正需要设置的时候,提供了Setting类管理这个过程,其对应的数据库为settings.db
2.1 首先检查是否涉及到系统的一些安全设置参数,这里定义了Secure类来管理,如果涉及到系统安全,那么又分为两种情况:
2.1.1 如果是查询,则操作secure 表查询
2.1.2 如果是写操作,则直接return
2.2 不涉及到系统安全,就属于正常设置,接着定义了System类管理
3,查询操作的实际操作类NameValueCache, 其中定义了
缓存name/value键值对的集合,避免每次操作都去操作数据库
可以由调用者指定的uri,便于根据uri决定去操作哪张表
以及写操作的NameValueTable类,因为写操作涉及到id, 所以继承了BaseColumns类
相关文章
- “一起,让我们将这个世界变得更好。”苹果首席执行官蒂姆 库克对着台下5000多名开发者说道,声音略有些沙哑和颤抖。...2016-07-04
- 支付宝支付在国内算是大家了,我们到处都可以使用支付宝了,下文整理介绍的是在安卓app应用中使用支付宝进行支付的开发例子。 之前讲了一篇博客关与支付宝集成获取...2016-09-20
- PHP+Ajax有许多的功能都会用到它小编今天就有使用PHP+Ajax实现的一个微信登录功能了,下面我们来看一个PHP+Ajax手机发红包的程序例子,具体如下所示。 PHP发红包基本...2016-11-25
- 下面我们来看一篇关于Android子控件超出父控件的范围显示出来方法,希望这篇文章能够帮助到各位朋友,有碰到此问题的朋友可以进来看看哦。 <RelativeLayout xmlns:an...2016-10-02
- 华为手机怎么恢复已卸载的应用?有时候我们在使用华为手机的时候,想知道卸载的应用怎么恢复,这篇文章主要介绍了华为手机恢复应用教程,需要的朋友可以参考下...2020-06-29
- 很多用安卓智能手机的朋友是用九宫格锁屏,网上也有暴力删除手机图形锁的方法,不过我们可以用程序来破解。本文只提供技术学习,不能干坏事 安卓手机的图形锁(九宫格)...2016-09-20
- 华为手机怎么开启双时钟?华为手机是可以设置双时钟的,如果来回在两个有时差的地方工作,是可以设置双时钟显示,下面我们就来看看华为添加双时钟的技巧,需要的朋友可以参考下...2020-12-08
安卓手机wifi打不开修复教程,安卓手机wifi打不开解决方法
手机wifi打不开?让小编来告诉你如何解决。还不知道的朋友快来看看。 手机wifi是现在生活中最常用的手机功能,但是遇到手机wifi打不开的情况该怎么办呢?如果手机wifi...2016-12-21Android开发中findViewById()函数用法与简化
findViewById方法在android开发中是获取页面控件的值了,有没有发现我们一个页面控件多了会反复研究写findViewById呢,下面我们一起来看它的简化方法。 Android中Fin...2016-09-20- 如果我们的项目需要做来电及短信的功能,那么我们就得在Android模拟器开发这些功能,本来就来告诉我们如何在Android模拟器上模拟来电及来短信的功能。 在Android模拟...2016-09-20
- 夜神android模拟器如何设置代理呢?对于这个问题其实操作起来是非常的简单,下面小编来为各位详细介绍夜神android模拟器设置代理的方法,希望例子能够帮助到各位。 app...2016-09-20
- 为了增强android应用的用户体验,我们可以在一些Button按钮上自定义动态的设置一些样式,比如交互时改变字体、颜色、背景图等。 今天来看一个通过重写Button来动态实...2016-09-20
- 如果我们要在Android应用APP中加载html5页面,我们可以使用WebView,本文我们分享两个WebView加载html5页面实例应用。 实例一:WebView加载html5实现炫酷引导页面大多...2016-09-20
- 深入理解Android中View和ViewGroup从组成架构上看,似乎ViewGroup在View之上,View需要继承ViewGroup,但实际上不是这样的。View是基类,ViewGroup是它的子类。本教程我们深...2016-09-20
- 下面我们来看一篇关于Android自定义WebView网络视频播放控件开发例子,这个文章写得非常的不错下面给各位共享一下吧。 因为业务需要,以下代码均以Youtube网站在线视...2016-10-02
- java开发的Android应用,性能一直是一个大问题,,或许是Java语言本身比较消耗内存。本文我们来谈谈Android 性能优化之MemoryFile文件读写。 Android匿名共享内存对外A...2016-09-20
- 设置登录密码我们一般会有限制的如由什么组合了,下面我们来看一篇关于安卓开发之设置密码只能输入字母和数字的组合方法,具体的细节如下所示。 无论是电脑还是手机...2016-09-20
- TextView默认是横着显示了,今天我们一起来看看Android设置TextView竖着显示如何来实现吧,今天我们就一起来看看操作细节,具体的如下所示。 在开发Android程序的时候,...2016-10-02
android.os.BinderProxy cannot be cast to com解决办法
本文章来给大家介绍关于android.os.BinderProxy cannot be cast to com解决办法,希望此文章对各位有帮助呀。 Android在绑定服务的时候出现java.lang.ClassCastExc...2016-09-20- 这篇文章主要介绍了Android 实现钉钉自动打卡功能的步骤,帮助大家更好的理解和学习使用Android,感兴趣的朋友可以了解下...2021-03-15