Android获取本机号码问题和获取系统版本信息

 更新时间:2016年9月20日 19:59  点击:1956
本文章来给各位同学介绍Android获取本机号码问题和获取系统版本信息,有需要了解的朋友不防进入参考。

1、使用TelephonyManager提供的方法,核心代码:


 代码如下 复制代码
TelephonyManager tm = (TelephonyManager) this.getSystemService(TELEPHONY_SERVICE);
String imei = tm.getDeviceId();       //取出IMEI
Log.d(TAG, "IMEI:"+imei);
String tel = tm.getLine1Number();     //取出MSISDN,很可能为空
Log.d(TAG, "MSISDN:"+tel);
String iccid =tm.getSimSerialNumber();  //取出ICCID
Log.d(TAG, "ICCID:"+iccid);
String imsi =tm.getSubscriberId();     //取出IMSI
Log.d(TAG, "IMSI:"+imsi);

2、加入权限

在manifest.xml文件中要添加 <uses-permission android:name="android.permission.READ_PHONE_STATE" />

手机型号 Build.MODEL

 代码如下 复制代码

String MODEL The end-user-visible name for the end product.

sdk版本 Build.VERSION.SDK

 代码如下 复制代码

String SDK This constant is deprecated. Use SDK_INT to easily get this as an integer.

frimware版本号(系统版本号) Build.VERSION.RELEASE

 代码如下 复制代码

String RELEASE The user-visible version string.

获取手机的其他信息:

 代码如下 复制代码

private void getPhoneStatus(){

TelephonyManager phoneMgr=(TelephonyManager)this.getSystemService(Context.TELEPHONY_SERVICE);     
String model = Build.MODEL; //手机型号
String phoneNum = phoneMgr.getLine1Number();//本机电话号码
String sdkVersion = Build.VERSION.SDK;//SDK版本号
String osVersion = Build.VERSION.RELEASE;//Firmware/OS 版本号
}

Build中包括 硬件厂商,硬件编号,序列号等很多信息。调用方法也很简单,和上面类似的。

本文章来给大家介绍Android常见布局之线性布局一些实现程序,各位朋友可参考。
Android中比较常见的布局有线性布局(LinearLayout),表格布局(TableLayout),相对布局(RelativeLayout)及帧布局(FrameLayout)。
线性布局是将其中的组件按照线性的,以垂直或者水平方向来布局,组件的布局方向可由orientation属性来控制,其具体值有水平(horizontal)及垂直(vertical)。搞清楚布局以后,这玩意就的思考加练习,以各种方式在纸上进行画,或者在心里画,然后编写布局文件来练习,时间长了就自然而然的熟练了。
练习要求:
1、把屏幕分成2部分,上面一部分,下面一部分
2、上面部分分为4列
3、下面部分分为4行
OK,开始练习!(在Eclipse中建立项目测试Layout,修改其res目录下的layout目录中的main.xml文件)
第一步:考虑LinearLayout使用数目,并确定其方向,由于是分为上下两部分,所以最外层layout采用垂直方向布局,里面两个layout分别表示上下;
<?xml version="1.0" encoding="utf-8" ?>
<LinearLayout xmlns:android="http://schemas.android.com/apk/res/android"
    android:orientation="vertical"
    android:layout_width="fill_parent"
    android:layout_height="fill_parent">
    <LinearLayout>   <!-- 上面部分 -->
    </LinearLayout>
    <LinearLayout>   <!-- 下面部分 -->
    </LinearLayout>
 </LinearLayout>
第二步:补充内部layout属性及增加组件,这里用TextView组件来填充LinearLayout,不断补充调整,最终布局文件如下:
 <?xml version="1.0" encoding="utf-8"?>
 <LinearLayout xmlns:android="http://schemas.android.com/apk/res/android"
     android:orientation="vertical"
     android:layout_width="fill_parent"
     android:layout_height="fill_parent">
     <LinearLayout android:orientation="horizontal"
         android:layout_width="fill_parent"
         android:layout_height="fill_parent"
         android:layout_weight="1">
            <TextView
                 android:text="col1"
                 android:gravity="center_horizontal"
                 android:background="#999999"
                 android:layout_width="wrap_content"
                 android:layout_height="fill_parent" 
                 android:layout_weight="1" />
            <TextView
                 android:text="col2"
                 android:gravity="center_horizontal"
                 android:background="#290fc0"
                 android:layout_width="wrap_content"
                 android:layout_height="fill_parent"
                 android:layout_weight="1" />
            <TextView
                 android:text="col3"
                 android:gravity="center_horizontal"
                 android:background="#999999"
                 android:layout_width="wrap_content"
                 android:layout_height="fill_parent"
                 android:layout_weight="1" />
            <TextView
                 android:text="col4"
                 android:gravity="center_horizontal"
                 android:background="#290fc0"
                 android:layout_width="wrap_content"
                 android:layout_height="fill_parent"
                 android:layout_weight="1" /> 
     </LinearLayout>
     <LinearLayout
         android:orientation="vertical"
         android:layout_width="fill_parent"
         android:layout_height="fill_parent"
         android:layout_weight="1">
         <TextView
              android:text="row_one"
              android:textSize="15sp"
              android:background="#290fc0"
              android:layout_width="fill_parent"
              android:layout_height="wrap_content"
              android:layout_weight="1" />
         <TextView
              android:text="row_two"
              android:textSize="15sp"
              android:background="#999999"
              android:layout_width="fill_parent"
              android:layout_height="wrap_content"
              android:layout_weight="1" />
         <TextView
              android:text="row_three"
              android:textSize="15sp"
              android:background="#290fc0"
              android:layout_width="fill_parent"
              android:layout_height="wrap_content"
              android:layout_weight="1" />
          <TextView
              android:text="row_four"
              android:textSize="15sp"
              android:background="#999999"
              android:layout_width="fill_parent"
              android:layout_height="wrap_content"
              android:layout_weight="1" />
     </LinearLayout>
</LinearLayout>
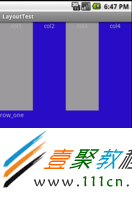
运行效果如下图所示:
LinearLayout
本文章来给各位朋友介绍Android打包apk报错:Errors occurred during the build 解决办法,碰到此问题的同学不防进入参考。

   Android应用打包apk时报错:Errors occurred during the build,如图:

点击查看原图

       解决方法:选中Android应用项目,右键选则“Properties”  ,“Builders”中只勾选“Android Package Builder”,如图:

点击查看原图

本文章来给各位同学介绍自定义Android日期时间选择控件DateTimePickerDialog方法,有需要了解的同学不防进入参考。

Android系统提供了DatePicker、TimePicker、DatePickerDialog、TimePickerDialog控件用于日期和时间的选择和设置,但是它们都是相对独立的,不能方便的设置“yyyy-MM-dd HH:mm:ss”型日期时间,下面是使用这几种组件自定义的一个日期时间选择控件DateTimePickerDialog,可以方便的设置“yyyy-MM-dd HH:mm:ss”型日期时间,“yyyy-MM-dd”型日期和“HH:mm:ss”型时间,

代码实现:

 代码如下 复制代码

DateTimePickerDialog.java

package me.gogogogo.util;

import java.text.SimpleDateFormat;
import java.util.Calendar;

import me.gogogogo.activity.R;
import android.app.Activity;
import android.app.AlertDialog;
import android.app.DatePickerDialog;
import android.app.TimePickerDialog;
import android.content.DialogInterface;
import android.widget.DatePicker;
import android.widget.EditText;
import android.widget.LinearLayout;
import android.widget.DatePicker.OnDateChangedListener;
import android.widget.TimePicker;
import android.widget.TimePicker.OnTimeChangedListener;
/**
 * 日期时间选择控件
 * @author 大漠
 */
public class DateTimePickerDialog implements  OnDateChangedListener,OnTimeChangedListener{
 private DatePicker datePicker;
 private TimePicker timePicker;
 private AlertDialog ad;
 private String dateTime;
 private String initDateTime;
 private Activity activity;
 
 /**
  * 日期时间弹出选择框构
  * @param activity:调用的父activity
  */
 public DateTimePickerDialog(Activity activity)
 {
  this.activity = activity;
 }
 
 public void init(DatePicker datePicker,TimePicker timePicker)
 {
  Calendar calendar= Calendar.getInstance();
  initDateTime=calendar.get(Calendar.YEAR)+"-"+calendar.get(Calendar.MONTH)+"-"+
    calendar.get(Calendar.DAY_OF_MONTH)+" "+
    calendar.get(Calendar.HOUR_OF_DAY)+":"+
    calendar.get(Calendar.MINUTE)+
    calendar.get(Calendar.SECOND);
  datePicker.init(calendar.get(Calendar.YEAR), calendar.get(Calendar.MONTH),calendar.get(Calendar.DAY_OF_MONTH), this);
  timePicker.setCurrentHour(calendar.get(Calendar.HOUR_OF_DAY));
  timePicker.setCurrentMinute(calendar.get(Calendar.MINUTE));
 }
 
 /**
  * 弹出日期时间选择框
  * @param dateTimeTextEdite 需要设置的日期时间文本编辑框
  * @param type: 0为日期时间类型:yyyy-MM-dd HH:mm:ss
  *         1为日期类型:yyyy-MM-dd
  *         2为时间类型:HH:mm:ss
  * @return
  */
 public AlertDialog dateTimePicKDialog(final EditText dateTimeTextEdite, int type)
 {
  Calendar c = Calendar.getInstance();
  switch (type) {
  case 1:
   new DatePickerDialog(activity,
     new DatePickerDialog.OnDateSetListener() {
      public void onDateSet(DatePicker datePicker, int year, int monthOfYear,
        int dayOfMonth) {
       Calendar calendar = Calendar.getInstance();
       calendar.set(datePicker.getYear(), datePicker.getMonth(),
         datePicker.getDayOfMonth());
       SimpleDateFormat sdf = new SimpleDateFormat("yyyy-MM-dd");
       dateTime=sdf.format(calendar.getTime());
       dateTimeTextEdite.setText(dateTime);
      }
     },
     c.get(Calendar.YEAR),
     c.get(Calendar.MONTH),
     c.get(Calendar.DATE)).show();
   return null;
  case 2:
   new TimePickerDialog(activity,
     new TimePickerDialog.OnTimeSetListener() {
      public void onTimeSet(TimePicker timePicker, int hourOfDay, int minute) {
       Calendar calendar = Calendar.getInstance();
       calendar.set(Calendar.YEAR, Calendar.MONTH,
         Calendar.DAY_OF_MONTH, timePicker.getCurrentHour(),
         timePicker.getCurrentMinute());
       SimpleDateFormat sdf = new SimpleDateFormat("HH:mm:ss");
       dateTime=sdf.format(calendar.getTime());
       dateTimeTextEdite.setText(dateTime);
      }
     },
     c.get(Calendar.HOUR_OF_DAY),
     c.get(Calendar.MINUTE),
     true).show();
   return null;
  default:
   LinearLayout dateTimeLayout  = (LinearLayout) activity.getLayoutInflater().inflate(R.layout.datetime, null);
   datePicker = (DatePicker) dateTimeLayout.findViewById(R.id.datepicker);
   timePicker = (TimePicker) dateTimeLayout.findViewById(R.id.timepicker);
   init(datePicker,timePicker);
   timePicker.setIs24HourView(true);
   timePicker.setOnTimeChangedListener(this);
     
   ad = new AlertDialog.Builder(activity).setIcon(R.drawable.datetimeicon).setTitle(initDateTime).setView(dateTimeLayout).setPositiveButton("设置",
       new DialogInterface.OnClickListener()
       {
        public void onClick(DialogInterface dialog,
          int whichButton)
        {
         dateTimeTextEdite.setText(dateTime);
        }
       }).setNegativeButton("取消",
       new DialogInterface.OnClickListener()
       {
        public void onClick(DialogInterface dialog,
          int whichButton)
        {
         dateTimeTextEdite.setText("");
        }
       }).show();
   
   onDateChanged(null, 0, 0, 0);
   return ad;
  }
 }
 
 public void onTimeChanged(TimePicker view, int hourOfDay, int minute)
 {
  onDateChanged(null, 0, 0, 0);
 }

 public void onDateChanged(DatePicker view, int year, int monthOfYear,
   int dayOfMonth)
 {
  Calendar calendar = Calendar.getInstance();

  calendar.set(datePicker.getYear(), datePicker.getMonth(),
    datePicker.getDayOfMonth(), timePicker.getCurrentHour(),
    timePicker.getCurrentMinute());
  SimpleDateFormat sdf = new SimpleDateFormat("yyyy-MM-dd HH:mm:ss");
  dateTime=sdf.format(calendar.getTime());
  ad.setTitle(dateTime);
 }
 
}

布局文件:

datetime.xml

 代码如下 复制代码

<?xml version="1.0" encoding="utf-8"?>
<LinearLayout xmlns:android="http://schemas.android.com/apk/res/android"
 android:orientation="vertical"
 android:layout_width="fill_parent"
 android:layout_height="fill_parent">
 <DatePicker
     android:id="@+id/datepicker"
  android:layout_width="fill_parent"
  android:layout_height="wrap_content" />
 <TimePicker
     android:id="@+id/timepicker"
  android:layout_width="fill_parent"
  android:layout_height="wrap_content" />
</LinearLayout>

使用实例:

MainActivity.java

 代码如下 复制代码

package me.gogogogo.activity;

import me.gogogogo.util.DateTimePickerDialog;
import android.os.Bundle;
import android.view.View;
import android.view.View.OnClickListener;
import android.widget.EditText;
import android.app.Activity;

public class MainActivity extends Activity {
 private EditText date;
 private EditText time;
 private EditText datetime;
    public void onCreate(Bundle savedInstanceState) {
        super.onCreate(savedInstanceState);
        setContentView(R.layout.main);
       
        datetime = (EditText) this.findViewById(R.id.datetime);
        date = (EditText) this.findViewById(R.id.date);
        time = (EditText) this.findViewById(R.id.time);
       
        datetime.setOnClickListener(new DateTimeOnClick());
        date.setOnClickListener(new DateOnClick());
        time.setOnClickListener(new TimeOnClick());
    }
   
    private final class DateTimeOnClick implements OnClickListener{
  public void onClick(View v) {
   DateTimePickerDialog dateTimePicKDialog = new DateTimePickerDialog(
     MainActivity.this);
   dateTimePicKDialog.dateTimePicKDialog(datetime, 0);
  }
    }
   
    private final class DateOnClick implements OnClickListener{
     public void onClick(View v) {
      DateTimePickerDialog dateTimePicKDialog = new DateTimePickerDialog(
     MainActivity.this);
   dateTimePicKDialog.dateTimePicKDialog(date, 1);
  }
    }
   
    private final class TimeOnClick implements OnClickListener{
     public void onClick(View v) {
      DateTimePickerDialog dateTimePicKDialog = new DateTimePickerDialog(
     MainActivity.this);
   dateTimePicKDialog.dateTimePicKDialog(time, 2);
  }
    }
}

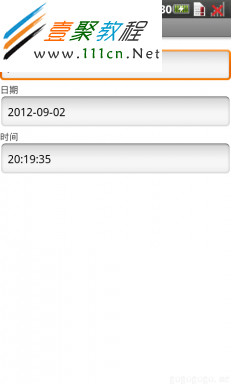
设置之后日期时间控件效果如下

点击查看原图

昨天有一朋友问我有没有办法设置Android ImageView点击时的样式呢,后来我们到论坛问了朋友如下说


imageview.setXXX可以设置
setBackgroundResource背景,
布局setLayoutParams
还有setScaleType ,
源图片是无法改变的.不用担心.如果图片旋转,也只有生成另一个Bitmap

解决办法

首先,再res/drawable文件夹下创建一个xml文件,命名为logoutimage.xml,在该文件中实该图片在点击前和点击时的图片,代码如下:

 代码如下 复制代码

<?xml version="1.0" encoding="utf-8"?>
<selector xmlns:android="http://schemas.android.com/apk/res/android">
    <!-- 默认图片 --> 
    <item android:state_pressed="false" 
        android:drawable="@drawable/logout2" />
    <!-- 点击时图片 --> 
    <item android:state_pressed="true" 
        android:drawable="@drawable/logout1" /> 
</selector>

然后在ImageView的src属性中引用该文件,代码如下:

 代码如下 复制代码

<ImageButton
   android:src="@drawable/logoutimage"
   android:layout_width="wrap_content"
   android:layout_height="wrap_content"
   />

更多情况

 代码如下 复制代码

<!-- 默认图片 -->   
<item android:drawable="@drawable/img1" />
 
<!-- 没有焦点时的图片 -->   
<item android:state_window_focused="false"  
      android:drawable="@drawable/img2" />    

 <!--获得焦点时的图片  -->   
<item android:state_focused="true"    
      android:drawable="@drawable/img3" />
 
 <!--选中时的图片  -->   
 <item android:state_selected="true"    
      android:drawable="@drawable/img4" />
 
 <!-- 触摸模式下单击时的图片 -->   
 <item android:state_focused="false"
    android:state_pressed="true"    
    android:drawable="@drawable/img5" />  
 
 <!-- 非触摸模式下获得焦点并单击时的图片 -->   
 <item android:state_focused="true"
    android:state_pressed="true"    
    android:drawable= "@drawable/img6" />

方法这些了,大家可看看如下效果图

Android ImageView点击样式

[!--infotagslink--]

相关文章

  • PHP成员变量获取对比(类成员变量)

    下面本文章来给大家介绍在php中成员变量的一些对比了,文章举了四个例子在这例子中分别对不同成员变量进行测试与获取操作,下面一起来看看。 有如下4个代码示例,你认...2016-11-25
  • php 获取用户IP与IE信息程序

    php 获取用户IP与IE信息程序 function onlineip() { global $_SERVER; if(getenv('HTTP_CLIENT_IP')) { $onlineip = getenv('HTTP_CLIENT_IP');...2016-11-25
  • php获取一个文件夹的mtime的程序

    php获取一个文件夹的mtime的程序了,这个就是时间问题了,对于这个问题我们来看小编整理的几个例子,具体的操作例子如下所示。 php很容易获取到一个文件夹的mtime,可以...2016-11-25
  • Android子控件超出父控件的范围显示出来方法

    下面我们来看一篇关于Android子控件超出父控件的范围显示出来方法,希望这篇文章能够帮助到各位朋友,有碰到此问题的朋友可以进来看看哦。 <RelativeLayout xmlns:an...2016-10-02
  • 如何获取网站icon有哪些可行的方法

    获取网站icon,常用最简单的方法就是通过website/favicon.ico来获取,不过由于很多网站都是在页面里面设置favicon,所以此方法很多情况都不可用。 更好的办法是通过google提供的服务来实现:http://www.google.com/s2/favi...2014-06-07
  • jquery如何获取元素的滚动条高度等实现代码

    主要功能:获取浏览器显示区域(可视区域)的高度 : $(window).height(); 获取浏览器显示区域(可视区域)的宽度 :$(window).width(); 获取页面的文档高度 $(document).height(); 获取页面的文档宽度 :$(document).width();...2015-10-21
  • Android开发中findViewById()函数用法与简化

    findViewById方法在android开发中是获取页面控件的值了,有没有发现我们一个页面控件多了会反复研究写findViewById呢,下面我们一起来看它的简化方法。 Android中Fin...2016-09-20
  • Android模拟器上模拟来电和短信配置

    如果我们的项目需要做来电及短信的功能,那么我们就得在Android模拟器开发这些功能,本来就来告诉我们如何在Android模拟器上模拟来电及来短信的功能。 在Android模拟...2016-09-20
  • jquery获取div距离窗口和父级dv的距离示例

    jquery中jquery.offset().top / left用于获取div距离窗口的距离,jquery.position().top / left 用于获取距离父级div的距离(必须是绝对定位的div)。 (1)先介绍jquery.offset().top / left css: 复制代码 代码如下: *{ mar...2013-10-13
  • 夜神android模拟器设置代理的方法

    夜神android模拟器如何设置代理呢?对于这个问题其实操作起来是非常的简单,下面小编来为各位详细介绍夜神android模拟器设置代理的方法,希望例子能够帮助到各位。 app...2016-09-20
  • Jquery 获取指定标签的对象及属性的设置与移除

    1、先讲讲JQuery的概念,JQuery首先是由一个 America 的叫什么 John Resig的人创建的,后来又很多的JS高手也加入了这个团队。其实 JQuery是一个JavaScript的类库,这个类库集合了很多功能方法,利用类库你可以用简单的一些代...2014-05-31
  • android自定义动态设置Button样式【很常用】

    为了增强android应用的用户体验,我们可以在一些Button按钮上自定义动态的设置一些样式,比如交互时改变字体、颜色、背景图等。 今天来看一个通过重写Button来动态实...2016-09-20
  • Android WebView加载html5页面实例教程

    如果我们要在Android应用APP中加载html5页面,我们可以使用WebView,本文我们分享两个WebView加载html5页面实例应用。 实例一:WebView加载html5实现炫酷引导页面大多...2016-09-20
  • 深入理解Android中View和ViewGroup

    深入理解Android中View和ViewGroup从组成架构上看,似乎ViewGroup在View之上,View需要继承ViewGroup,但实际上不是这样的。View是基类,ViewGroup是它的子类。本教程我们深...2016-09-20
  • Android自定义WebView网络视频播放控件例子

    下面我们来看一篇关于Android自定义WebView网络视频播放控件开发例子,这个文章写得非常的不错下面给各位共享一下吧。 因为业务需要,以下代码均以Youtube网站在线视...2016-10-02
  • Android用MemoryFile文件类读写进行性能优化

    java开发的Android应用,性能一直是一个大问题,,或许是Java语言本身比较消耗内存。本文我们来谈谈Android 性能优化之MemoryFile文件读写。 Android匿名共享内存对外A...2016-09-20
  • Android设置TextView竖着显示实例

    TextView默认是横着显示了,今天我们一起来看看Android设置TextView竖着显示如何来实现吧,今天我们就一起来看看操作细节,具体的如下所示。 在开发Android程序的时候,...2016-10-02
  • C#获取字符串后几位数的方法

    这篇文章主要介绍了C#获取字符串后几位数的方法,实例分析了C#操作字符串的技巧,具有一定参考借鉴价值,需要的朋友可以参考下...2020-06-25
  • jquery获取tagName再进行判断

    如果是为了取到tagName后再进行判断,那直接用下面的代码会更方便: $(element).is('input') 如果是要取到标签用作到别的地方,可以使用一下代码: $(element)[0].tagName 或: $(element).get(0).tagName...2014-05-31
  • android.os.BinderProxy cannot be cast to com解决办法

    本文章来给大家介绍关于android.os.BinderProxy cannot be cast to com解决办法,希望此文章对各位有帮助呀。 Android在绑定服务的时候出现java.lang.ClassCastExc...2016-09-20