Android 开发Missing contentDescription attribute on image in XML
最近在做 Android 开发,刚刚入门,遇到不少问题,累积了做重构时的习惯,遇到问题,好好解决,好好总结,于是整理如下:
一. Eclipse Error
1.'Missing contentDescription attribute on image' in XML
原因:缺少图片描述,在 ADT 16 开始会抛出这个警告,确保开发者为图片添加内容描述。
解决方法:为图片添加 android:contentDescription="@string/desc" 属性。
2. Buttons in button bars should be borderless
原因:两个 Buttons 放在一个布局里会被判断为按钮栏,需要添加样式取消它的边框。
解决方法: 在 Buttons 上添加属性 style="?android:attr/buttonBarButtonStyle" 。系统提示也可以在按钮的父布局上添加 style="? android:attr/buttonBarStyle" 属性,但是我在线性布局上测试了一下无效,求高手指导!
二. 开发技巧
1. 在新打开的 Activity 中触发前一个 Activity 作出调整
例如:原页面相应的 class 为 Main.class (主要代码)
| 代码如下 | 复制代码 |
|
public class Main extends Activity { public class NewPage extends Activity { |
|
如果需要在 Activity 之间传输数据,还可以使用 Bunble 在 intent 中保存和获取数据。
2. 获取列表中被点击事项的位置
扩展 BaseAdapter 类,重写 getView 方法,第一个方法即为事项的位置,若要配合 cursor 使用,则可以使用 cursor.moveToPosition(position) 把 cursor 移动到事项在数据库中相应的数据行。
继续整理一下做 Android 开发过程中遇到的一些问题和技巧。
1. 4.0 或以上版本的 Android 不能在主线程中联网
Android 应用程序运行在一个 dalvik 虚拟机进程中,当这个进程开始的时候会启动一个主线程( MainThread ),在 Android 4.0 或以上的版本中,强制禁止在主线程执行耗时的网络操作,若需要进行网络操作,则需要另外开辟线程或使用 AsyncTask ,下面介绍的是另外开辟线程的方法。
| 代码如下 | 复制代码 |
|
@Override |
|
但是,联网操作后一般都需要根据联网所得数据更新 UI ,这时又会产生一个新问题,主线程负责处理和 UI 相关的操作,因此主线程又被称为 UI 线程。而 Android 采用 UI 单线程模型,只能在主线程中对 UI 元素进行操作,在非 UI 线程直接对 UI 进行了操作,则会报错。
为了解决这个问题,则需要利用 Android 的消息循环的机制实现线程间的通信。即在非 UI 线程发送消息到 UI 线程,让 UI 线程来进行 UI 的操作。例如,可以利用 View 的 post 方法告知 UI 线程执行操作更新 UI 。
| 代码如下 | 复制代码 |
|
Runnable postLoad = new Runnable(){ |
|
2. 检测是否有网络
| 代码如下 | 复制代码 |
|
final ConnectivityManager mConnectivity = (ConnectivityManager) getSystemService(Context.CONNECTIVITY_SERVICE); |
|
3. 自定义 touch 创建左右划动检测
| 代码如下 | 复制代码 |
| // 定义手势速度记录器 private VelocityTracker velocityTracker; // 定义手势动作两点之间的距离要求 private static final int VELOCITYX = 900; private static final int VELOCITYY = 800; WebView postContent = (WebView) findViewById(R.id.postContent); postContent.setOnTouchListener(new OnTouchListener() { @Override public boolean onTouch(View arg0, MotionEvent arg1) { // TODO Auto-generated method stub switch(arg1.getAction()){ case MotionEvent.ACTION_DOWN: if(velocityTracker == null){ // 取得手势在屏幕上的滑动速度 velocityTracker = VelocityTracker.obtain(); velocityTracker.addMovement(arg1); } break; case MotionEvent.ACTION_MOVE: if(velocityTracker != null){ velocityTracker.addMovement(arg1); } break; case MotionEvent.ACTION_CANCEL: case MotionEvent.ACTION_OUTSIDE: break; case MotionEvent.ACTION_UP: int velocityX = 0, velocityY = 0; if(velocityTracker != null){ velocityTracker.addMovement(arg1); velocityTracker.computeCurrentVelocity(1000); // 计算每秒滑动多少个像素 velocityX = (int) velocityTracker.getXVelocity(); // 最后计算检索 X 速度 velocityY = (int) velocityTracker.getYVelocity(); // 最后计算检索 Y 速度 } // 从右向左划 if( velocityX < -VELOCITYX && velocityY < VELOCITYY && velocityY > -VELOCITYY ){ // 执行相应操作 return true; } else if( velocityX > VELOCITYX && velocityY < VELOCITYY && velocityY > -VELOCITYY ) { // 从左向右划 // 执行相应操作 return true; } else { // 判断若不是划动操作,则返回 false 使用 WebView 自身的 touch 处理 return false; } } return false; } }); |
|
在检测过程中发现触摸操作不完整(例如划动距离太少,或者误触屏幕),或是直接判断出不是划动操作,必须返回 false ,使到组件自身的 touch 处理得以保留。
这里我们给大家总结了下关于Android TextView文本文字的常用两种应用,一种是像我们使用微信会看到长文件是可以折叠显示了,还有一种就是TextView文字颜色TextColor焦点效果,下面我一起来看这两种方法。textview文字状态一,TextView文字颜色TextColor焦点效果
| 代码如下 | 复制代码 |
|
<TextView android:id="@+id/tv_quit" android:layout_width="wrap_content" android:layout_height="wrap_content" android:textColor="@drawable/list_item_color" />
list_item_color 文件 <?xml version="1.0" encoding="utf-8"?> <!-- 单击选中时字体颜色--> <item android:state_pressed="true" android:color="#FFFFFF" /> <!-- 有焦点时的字体颜色--> <item android:state_focused="true" android:color="#FFFFFF" /> <!-- 滚动选中时字体颜色--> <!-- 默认字体颜色--> <item android:color="#000000" /> </selector> |
|
textview文字状态二,Android TextView文本折叠效果
本例要实现文本展开收起的效果,即默认只显示4行文字,如果textview文字超过4行的话,点击右下角的 更多 按钮即可查看全部的内容。之前的做法是根据 TextView 中的字数来判断,效果不太好。这里在一个FrameLayout 包裹两个 TextView
布局文件 activity_main.xml
| 代码如下 | 复制代码 |
|
<RelativeLayout xmlns:android="http://schemas.android.com/apk/res/android" <TextView <FrameLayout <TextView <TextView <Button <ImageView </RelativeLayout> |
|
MainActivity.java
| 代码如下 | 复制代码 |
|
package com.example.textviewfold; import android.app.Activity; public class MainActivity extends Activity implements OnClickListener { private Button bt_more; @Override findView(); private void setListener() { private void initView() { ViewTreeObserver vto = fl_desc.getViewTreeObserver(); /** private void findView() { bt_more = (Button) findViewById(R.id.bt_more); @Override tv_desc_short.setVisibility(View.GONE); default: /** String text = (String) btn.getText();
|
|
运行效果
为展开的状态
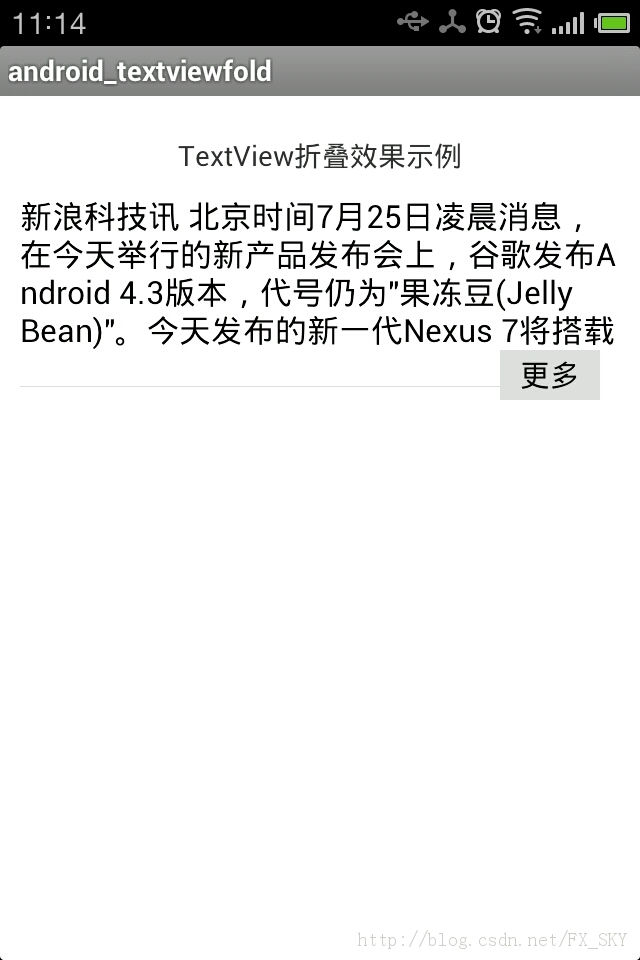
展开后的状态

下面我们一起来看篇Android开发AnimationDrawable控制逐帧播放动画实现过程,希望文章对各位朋友带不一些帮助。
当我们点击按钮时,该图片会不停的旋转,当再次点击按钮时,会停止在当前的状态。
activity代码:
| 代码如下 | 复制代码 |
|
package cn.com.chenzheng_java.animation; import android.app.Activity; imageView = (ImageView) findViewById(R.id.imageView_animation1); } public void myClickHandler(View targetButton){ // 动画是否正在运行 }
|
|
animation1.xml文件:
| 代码如下 | 复制代码 |
|
|
|
存放动画文件的xml文件:
| 代码如下 | 复制代码 |
| <?xml version="1.0" encoding="utf-8"?> <!-- 根标签为animation-list,其中oneshot代表着是否只展示一遍,设置为false会不停的循环播放动画 根标签下,通过item标签对动画中的每一个图片进行声明 android:duration 表示展示所用的该图片的时间长度 --> <animation-list xmlns:android="http://schemas.android.com/apk/res/android" android:oneshot="false" > <item android:drawable="@drawable/a1" android:duration="50"></item> <item android:drawable="@drawable/a2" android:duration="50"></item> <item android:drawable="@drawable/a3" android:duration="50"></item> <item android:drawable="@drawable/a4" android:duration="50"></item> <item android:drawable="@drawable/a5" android:duration="50"></item> <item android:drawable="@drawable/a6" android:duration="50"></item> </animation-list> |
|
除此之外:在AnimationDrawable中,我们还可以看到如下的几个重要方法:
setOneShot(boolean flag) 和在配置文件中进行配置一样,可以设置动画是否播放一次,false为连续播放;
addFrame (Drawable frame, int duration) 动态的添加一个图片进入该动画中
在这里我们来看两个关于在android开发中checkbox自定义图片的问题,一个是CheckBox自定义图片没有效果,而另一个是CheckBox自定义图片大小设置。一,CheckBox自定义图片问题
结果点击的时候 会有checked效果,但是,手指离开后没有check住~
| 代码如下 | 复制代码 |
|
<?xml version="1.0" encoding="utf-8"?> <selector xmlns:android="http://schemas.android.com/apk/res/android"> <item android:state_checked="false" </selector> |
|
上面的写法,最后当然没好使,于是就搜索了一下,搜来的多了一对标签状态,但还是不能用。但是原生的是可以的,想了想还是看看源码好了。发现源码中的配置多了不少,当然首先就是全部复制过来。然后,适当精简一下。再次发布程序,顿时好使了。结果如下:
| 代码如下 | 复制代码 |
|
<?xml version="1.0" encoding="utf-8"?> <selector xmlns:android="http://schemas.android.com/apk/res/android"> <item android:state_checked="true" android:state_window_focused="false" <item android:state_checked="true" android:state_pressed="true" <item android:state_checked="true" android:state_focused="true" <item android:state_checked="false" </selector> |
|
二,CheckBox自定义图片大小问题
1.在drawable中创建文件checkbox_selector.xml:
| 代码如下 | 复制代码 |
|
<?xml version="1.0" encoding="utf-8"?> <?xml version="1.0" encoding="utf-8"?> <resources> <style name="MyCheckBox" parent="@android:style/Widget.CompoundButton.CheckBox"> <item name="android:button">@drawable/checkbox_selector</item> <item name="android:paddingLeft">25.0dip</item> <item name="android:maxHeight">10.0dip</item> </style> </resources> |
|
3.在你的CheckBox中添加属性:
| 代码如下 | 复制代码 |
|
<CheckBox |
|
相关文章
- 下面我们来看一篇关于Android子控件超出父控件的范围显示出来方法,希望这篇文章能够帮助到各位朋友,有碰到此问题的朋友可以进来看看哦。 <RelativeLayout xmlns:an...2016-10-02
Android开发中findViewById()函数用法与简化
findViewById方法在android开发中是获取页面控件的值了,有没有发现我们一个页面控件多了会反复研究写findViewById呢,下面我们一起来看它的简化方法。 Android中Fin...2016-09-20- 如果我们的项目需要做来电及短信的功能,那么我们就得在Android模拟器开发这些功能,本来就来告诉我们如何在Android模拟器上模拟来电及来短信的功能。 在Android模拟...2016-09-20
- 夜神android模拟器如何设置代理呢?对于这个问题其实操作起来是非常的简单,下面小编来为各位详细介绍夜神android模拟器设置代理的方法,希望例子能够帮助到各位。 app...2016-09-20
- 为了增强android应用的用户体验,我们可以在一些Button按钮上自定义动态的设置一些样式,比如交互时改变字体、颜色、背景图等。 今天来看一个通过重写Button来动态实...2016-09-20
- 如果我们要在Android应用APP中加载html5页面,我们可以使用WebView,本文我们分享两个WebView加载html5页面实例应用。 实例一:WebView加载html5实现炫酷引导页面大多...2016-09-20
- 深入理解Android中View和ViewGroup从组成架构上看,似乎ViewGroup在View之上,View需要继承ViewGroup,但实际上不是这样的。View是基类,ViewGroup是它的子类。本教程我们深...2016-09-20
- 下面我们来看一篇关于Android自定义WebView网络视频播放控件开发例子,这个文章写得非常的不错下面给各位共享一下吧。 因为业务需要,以下代码均以Youtube网站在线视...2016-10-02
- java开发的Android应用,性能一直是一个大问题,,或许是Java语言本身比较消耗内存。本文我们来谈谈Android 性能优化之MemoryFile文件读写。 Android匿名共享内存对外A...2016-09-20
- TextView默认是横着显示了,今天我们一起来看看Android设置TextView竖着显示如何来实现吧,今天我们就一起来看看操作细节,具体的如下所示。 在开发Android程序的时候,...2016-10-02
- 这篇文章主要介绍了vscode搭建STM32开发环境的详细过程,本文给大家介绍的非常详细,对大家的学习或工作具有一定的参考借鉴价值,需要的朋友可以参考下...2021-05-02
android.os.BinderProxy cannot be cast to com解决办法
本文章来给大家介绍关于android.os.BinderProxy cannot be cast to com解决办法,希望此文章对各位有帮助呀。 Android在绑定服务的时候出现java.lang.ClassCastExc...2016-09-20- 这篇文章主要介绍了Android 实现钉钉自动打卡功能的步骤,帮助大家更好的理解和学习使用Android,感兴趣的朋友可以了解下...2021-03-15
- 下面我们来看一篇关于Android 开发之布局细节对比:RTL模式 ,希望这篇文章对各位同学会带来帮助,具体的细节如下介绍。 前言 讲真,好久没写博客了,2016都过了一半了,赶紧...2016-10-02
- 首先如果要在程序中使用sdcard进行存储,我们必须要在AndroidManifset.xml文件进行下面的权限设置: 在AndroidManifest.xml中加入访问SDCard的权限如下: <!--...2016-09-20
- 下面来给各位简单的介绍一下关于Android开发之PhoneGap打包及错误解决办法,希望碰到此类问题的同学可进入参考一下哦。 在我安装、配置好PhoneGap项目的所有依赖...2016-09-20
- 下面我们一起来看一篇关于 安卓开发之Intent传递Object与List的例子,希望这个例子能够为各位同学带来帮助。 Intent 不仅可以传单个的值,也可以传对象与数据集合...2016-09-20
用Intel HAXM给Android模拟器Emulator加速
Android 模拟器 Emulator 速度真心不给力,, 现在我们来介绍使用 Intel HAXM 技术为 Android 模拟器加速,使模拟器运行度与真机比肩。 周末试玩了一下在Eclipse中使...2016-09-20- 这篇文章主要为大家详细介绍了php微信公众账号开发之五个坑,具有一定的参考价值,感兴趣的小伙伴们可以参考一下...2016-10-02
- 在安卓开发时我碰到一个问题就是需要实现全屏,但又需要我们来判断出用户是使用了全屏或非全屏了,下面我分别找了两段代码,大家可参考。 先来看一个android屏幕全屏实...2016-09-20