Android开发界面View的Dialog对话框实例教程
用户界面View之Dialog 对话框
一、AlertDialog常用方法
使用AlertDialog.Builder中的create()方法创建一个AlertDialog
setTitle();给对话框设置标题
setIcon();给对话框设置图标
setMessage();设置对话框的提示信息
setView() 给对话框设置自定义样式
setItems();设置对话框要显示的一个list,一般用于显示几个命令时
setSingleChoiceItems();设置对话框显示一个单选的List
setMultiChoiceItems();设置对话框显示一系列的复选框
setNeutralButton();普通按钮
setPositiveButton();给对话框添加"确定"按钮
setNegativeButton();给对话框添加"取消"按钮
示例一:


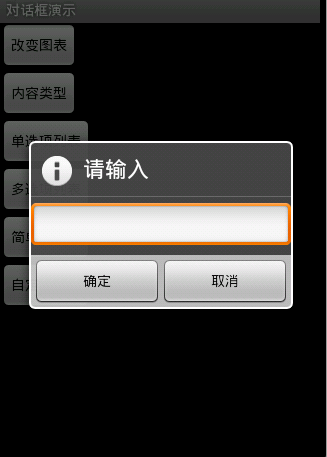

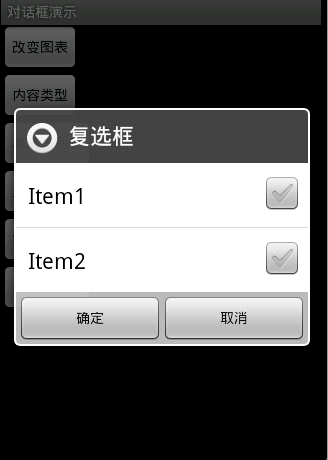
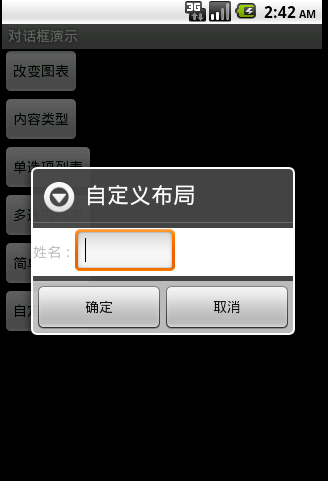
图1效果:该效果是当按返回按钮时弹出一个提示,来确保无误操作,采用常见的对话框样式。
代码:
创建对话框方法dialog()
protected void dialog() {
AlertDialog.Builder builder = new Builder(Main.this);
builder.setMessage("确认退出吗?");
builder.setTitle("提示");
builder.setPositiveButton("确认", new OnClickListener() {
@Override
public void onClick(DialogInterface dialog, int which) {
dialog.dismiss();
Main.this.finish();
}
});
builder.setNegativeButton("取消", new OnClickListener() {
@Override
public void onClick(DialogInterface dialog, int which) {
dialog.dismiss();
}
});
builder.create().show();
}
在onKeyDown(int keyCode, KeyEvent event)方法中调用此方法
public boolean onKeyDown(int keyCode, KeyEvent event) {
if (keyCode == KeyEvent.KEYCODE_BACK && event.getRepeatCount() == 0) {
dialog();
}
return false;
}
图2效果:改变了对话框的图表,添加了三个按钮
Dialog dialog = new AlertDialog.Builder(this).setIcon(
android.R.drawable.btn_star).setTitle("喜好调查").setMessage(
"你喜欢李连杰的电影吗?").setPositiveButton("很喜欢",
new OnClickListener() {
@Override
public void onClick(DialogInterface dialog, int which) {
// TODO Auto-generated method stub
Toast.makeText(Main.this, "我很喜欢他的电影。",
Toast.LENGTH_LONG).show();
}
}).setNegativeButton("不喜欢", new OnClickListener() {
@Override
public void onClick(DialogInterface dialog, int which) {
// TODO Auto-generated method stub
Toast.makeText(Main.this, "我不喜欢他的电影。", Toast.LENGTH_LONG)
.show();
}
}).setNeutralButton("一般", new OnClickListener() {
@Override
public void onClick(DialogInterface dialog, int which) {
// TODO Auto-generated method stub
Toast.makeText(Main.this, "谈不上喜欢不喜欢。", Toast.LENGTH_LONG)
.show();
}
}).create();
dialog.show();
图3效果:信息内容是一个简单的View类型
new AlertDialog.Builder(this).setTitle("请输入").setIcon(
android.R.drawable.ic_dialog_info).setView(
new EditText(this)).setPositiveButton("确定", null)
.setNegativeButton("取消", null).show();
图4效果:信息内容是一组单选框
new AlertDialog.Builder(this).setTitle("复选框").setMultiChoiceItems(
new String[] { "Item1", "Item2" }, null, null)
.setPositiveButton("确定", null)
.setNegativeButton("取消", null).show();
图5效果:信息内容是一组多选框
new AlertDialog.Builder(this).setTitle("单选框").setIcon(
android.R.drawable.ic_dialog_info).setSingleChoiceItems(
new String[] { "Item1", "Item2" }, 0,
new DialogInterface.OnClickListener() {
public void onClick(DialogInterface dialog, int which) {
dialog.dismiss();
}
}).setNegativeButton("取消", null).show();
图6效果:信息内容是一组简单列表项
new AlertDialog.Builder(this).setTitle("列表框").setItems(
new String[] { "Item1", "Item2" }, null).setNegativeButton(
"确定", null).show();
图7效果:信息内容是一个自定义的布局
1.布局文件
<?xml version="1.0" encoding="utf-8"?>
<LinearLayout xmlns:android="http://schemas.android.com/apk/res/android"
android:layout_height="wrap_content" android:layout_width="wrap_content"
android:background="#ffffffff" android:orientation="horizontal"
android:id="@+id/dialog">
<TextView android:layout_height="wrap_content"
android:layout_width="wrap_content"
android:id="@+id/tvname" android:text="姓名:" />
<EditText android:layout_height="wrap_content"
android:layout_width="wrap_content" android:id="@+id/etname" android:minWidth="100dip"/>
</LinearLayout>
2.调用代码
LayoutInflater inflater = getLayoutInflater();
View layout = inflater.inflate(R.layout.dialog,
(ViewGroup) findViewById(R.id.dialog));
new AlertDialog.Builder(this).setTitle("自定义布局").setView(layout)
.setPositiveButton("确定", null)
.setNegativeButton("取消", null).show();
动画效果图如下: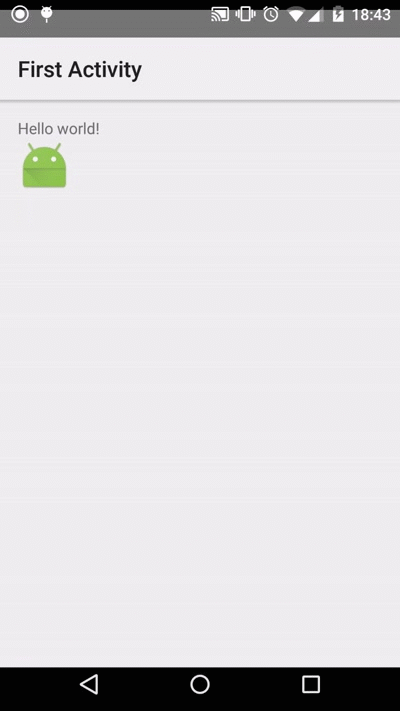
下面要介绍的其中一种Activity的切换效果(如上图).当前后两个Activity有共同的UI元素时候,适合用这种动画效果,给用户连贯性的体验.
实现步骤
1. 新建一个Android应用Project,里面有两个Activity;
2. 下面是MainActivity的代码和XML布局;
代码和布局都非常简单.解释一下onClick()方法的代码.
makeSceneTransactionAnimation()方法第二个参数是用来告诉指定共同的UI元素是哪一个,这里是shareView.
makeSceneTransactionAnimation()方法第三个参数是"robot",和XML布局里面的android:transactionName="robot"的值是一一对应的.
package com.example.garena.myapplication;
import android.app.ActionBar;
import android.app.Activity;
import android.app.ActivityOptions;
import android.content.Intent;
import android.os.Bundle;
import android.view.View;
public class MainActivity extends Activity {
@Override
protected void onCreate(Bundle savedInstanceState) {
super.onCreate(savedInstanceState);
setContentView(R.layout.activity_main);
final View shareView = findViewById(R.id.share_element_image_view);
shareView.setOnClickListener(new View.OnClickListener() {
@Override
public void onClick(View v) {
Intent intent = new Intent(MainActivity.this, SecondActivity.class);
ActivityOptions options = ActivityOptions
.makeSceneTransitionAnimation(MainActivity.this, shareView, "robot");
startActivity(intent, options.toBundle());
}
});
ActionBar actionBar = getActionBar();
if (actionBar != null) {
actionBar.setTitle(R.string.first_activity);
}
}
}
<LinearLayout xmlns:android="http://schemas.android.com/apk/res/android"
xmlns:tools="http://schemas.android.com/tools"
android:layout_width="match_parent"
android:layout_height="match_parent"
android:orientation="vertical"
android:paddingBottom="@dimen/activity_vertical_margin"
android:paddingLeft="@dimen/activity_horizontal_margin"
android:paddingRight="@dimen/activity_horizontal_margin"
android:paddingTop="@dimen/activity_vertical_margin"
tools:context=".MainActivity">
<TextView
android:layout_width="wrap_content"
android:layout_height="wrap_content"
android:text="@string/hello_world" />
<ImageView
android:id="@+id/share_element_image_view"
android:layout_width="wrap_content"
android:layout_height="wrap_content"
android:src="@drawable/ic_launcher"
android:transitionName="robot" />
</LinearLayout>
3. 下面是SecondActivity的代码和布局;
在onClick()方法里面,调用finishAfterTransaction()来finish activity.
在XML布局里面,同样是需要用android:transactionName="roboto"来标识共同的UI元素.
package com.example.garena.myapplication;
import android.app.ActionBar;
import android.app.Activity;
import android.os.Bundle;
import android.view.View;
public class SecondActivity extends Activity {
@Override
protected void onCreate(Bundle savedInstanceState) {
super.onCreate(savedInstanceState);
setContentView(R.layout.second_activity);
ActionBar actionBar = getActionBar();
if (actionBar != null) {
actionBar.setTitle(R.string.second_activity);
}
View btnBack = findViewById(R.id.btn_back);
btnBack.setOnClickListener(new View.OnClickListener() {
@Override
public void onClick(View v) {
finishAfterTransition();
}
});
}
}
<?xml version="1.0" encoding="utf-8"?>
<LinearLayout xmlns:android="http://schemas.android.com/apk/res/android"
android:layout_width="match_parent"
android:layout_height="match_parent"
android:gravity="center"
android:orientation="vertical">
<ImageView
android:id="@+id/title_icon_image_view"
android:layout_width="wrap_content"
android:layout_height="wrap_content"
android:src="@drawable/ic_launcher"
android:transitionName="robot" />
<Button
android:id="@+id/btn_back"
android:layout_width="wrap_content"
android:layout_height="wrap_content"
android:text="@string/back" />
</LinearLayout>
4. 运行效果(如上图);
从最终运行的效果图可以看到,点击小机器人的图标进入SecondActivity时,能看到小机器人图标移动到SecondActivity这个小机器人图标的位置.
点击SecondActivity的Back按钮,小机器人图标会移动到MainActivity中小机器人图标的位置.
一、使用include标签将可复用的组件抽取出来(引用布局)
二、使用merge标签减少布局的嵌套层次(merge相当于framelayout)
场景1:布局根结点是FrameLayout且不需要设置background或padding等属性,可以用merge代替。
场景2:某布局作为子布局被其他布局include时,使用merge当作该布局的顶节点,这样在被引入时,顶结点会自动被忽略。
三、使用ViewStub标签来加载一些不常用的布局
作用:ViewStub标签同include标签一样可以用来引入一个外部布局,不同的是,ViewStub引入的布局默认不会扩张,既不会占用显示也不会占用位置,从而在解析Layout时节省cpu和内存
示例一:include
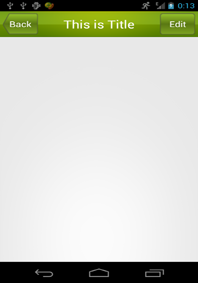
下面是res/layout/title.xml 布局文件:
<LinearLayout xmlns:android="http://schemas.android.com/apk/res/android"
xmlns:tools="http://schemas.android.com/tools"
android:layout_width="match_parent"
android:layout_height="wrap_content"
android:background="@drawable/title_bg" >
<Button
android:id="@+id/title_back"
android:layout_width="wrap_content"
android:layout_height="wrap_content"
android:layout_gravity="center"
android:layout_margin="5dp"
android:background="@drawable/back_bg"
android:text="Back"
android:textColor="#fff" />
<TextView
android:id="@+id/title_text"
android:layout_width="0dp"
android:layout_height="wrap_content"
android:layout_gravity="center"
android:layout_weight="1"
android:gravity="center"
android:text="This is Title"
android:textColor="#fff"
android:textSize="25sp" />
<Button
android:id="@+id/title_edit"
android:layout_width="wrap_content"
android:layout_height="wrap_content"
android:layout_gravity="center"
android:layout_margin="5dp"
android:background="@drawable/edit_bg"
android:text="Edit"
android:textColor="#fff" />
下面是res/layout/activity_main.xml 布局文件:
<LinearLayout xmlns:android="http://schemas.android.com/apk/res/android"
xmlns:tools="http://schemas.android.com/tools"
android:layout_width="match_parent"
android:layout_height="wrap_content" >
示例二:merge
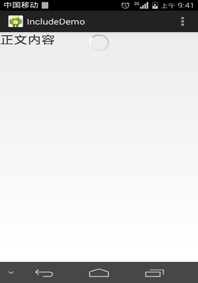
下面是res/layout/progress.xml 布局文件:
<merge xmlns:android="http://schemas.android.com/apk/res/android"
android:layout_width="match_parent"
android:layout_height="match_parent"
android:orientation="vertical" >
<ProgressBar
android:layout_width="wrap_content"
android:layout_height="wrap_content"
android:layout_gravity="center" />
下面是res/layout/activity_main.xml 布局文件:
<LinearLayout xmlns:android="http://schemas.android.com/apk/res/android"
xmlns:tools="http://schemas.android.com/tools"
android:layout_width="match_parent"
android:layout_height="wrap_content"
android:orientation="vertical" >
<FrameLayout
android:layout_width="match_parent"
android:layout_height="wrap_content" >
<TextView
android:layout_width="wrap_content"
android:layout_height="wrap_content"
android:text="正文内容"
android:textSize="25sp" />
示例三:ViewStub

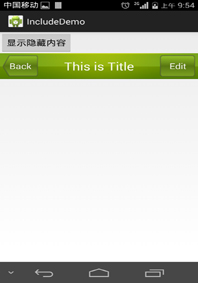
<LinearLayout xmlns:android="http://schemas.android.com/apk/res/android"
xmlns:tools="http://schemas.android.com/tools"
android:layout_width="match_parent"
android:layout_height="wrap_content"
android:orientation="vertical" >
<Button
android:id="@+id/button"
android:layout_width="wrap_content"
android:layout_height="wrap_content"
android:text="显示隐藏内容"/>
<ViewStub
android:id="@+id/id_viewStub"
android:layout_width="match_parent"
android:layout_height="wrap_content"
android:layout="@layout/title"/>
下面是MainActivity.java主界面文件:
public class MainActivity extends Activity {
private Button b;
private ViewStub stub;
protected void onCreate(Bundle savedInstanceState) {
super.onCreate(savedInstanceState);
setContentView(R.layout.activity_main);
b=(Button) findViewById(R.id.button);
stub=(ViewStub) findViewById(R.id.id_viewStub);
b.setOnClickListener(new OnClickListener() {
public void onClick(View v) {
stub.inflate();
}
});
}
}
1、生成正式版本,并找到unsigned文件的路径,记下来
demo-unsigned.apk
2、用keytool生成签名keystore文件
keytool -genkey -v -keystore <keystoreName>.keystore -alias <Keystore AliasName> -keyalg <Key algorithm> -keysize <Key size> -validity <Key Validity in Days>
<keystoreName>:要生成的签名文件名,扩展名为 keystore
<Keystore AliasName>:签名的别名,作为唯一性依据
<Key algorithm>:加密方式,譬如RSA
<Key size>:签名长度,可忽略
<Key Validity in Days>:有效期,单位是 天
输入以上命令后,接下来按提示操作,分别是:
输入密码,
确认密码,
组织单位名称,
组织名称,
市,
省,
国家两字母代码(中国是CN)
最后,核对以上信息,按Y完成
输入主密码,这里我不是太了解为什么要分两个,直接回车表示使用相同密码。
3、用jarsigner给未签名的应用签名并生成已签名的应用
jarsigner -verbose -keystore <keystorename> -signedjar <Output Signed APK file> -digestalg SHA1 -sigalg MD5withRSA <Unsigned APK file> <Keystore Alias name>
<keystorename>:上一步通过keytool生成的签名文件(带扩展名keystore)
<Output Signed APK file>:签名后输出的文件
<Unsigned APK file>:未签名且此刻用于签名的文件
<Keystore Alias name>:签名的别名(不带扩展名keystore)
然后,按提示输入上一步设置的密码,即可大功告成。
关于keytool和jarsigner显示乱码的问题,解决方法
部分脚本在 MAC OS X 的终端输出不了正常中文,取而代之的是?,即乱码,原因是其编码不正确。本以为UTF-8可以打天下,谁知有人不按常理出牌,比如keytool和jarsigner。。。
解决方法:
打开终端后在菜单-偏好设置-描述文件-高级,下面有文本编码的设置,默认是UTF-8,这里我改为中文(GB 18030),至少keytool和jarsigner返回的中文可以正常显示。
注意:
不同的颜色风格自有一套高级选项,所以修改了文本编码后切换其他的颜色风格不会把该设置带过去
在网上找了很多关于dialog的自定义样式的问题,还有很多人写得比较复杂,需要改动style什么的,或者是自定义dialog搞得很复杂,我最后还是找到了方法来实现。
下面是我的dialog布局xml文件:
[mw_shl_code=java,true]<?xml version="1.0" encoding="utf-8"?>
<RelativeLayout xmlns:android="http://schemas.android.com/apk/res/android"
android:layout_width="fill_parent"
android:layout_height="wrap_content"
android:background="@android:color/transparent"
android:layout_margin="50dp">
<RelativeLayout
android:id="@+id/rl_dialog_content"
android:layout_width="fill_parent"
android:layout_height="200dp"
android:background="@drawable/alertdialog_bg">
<TextView
android:id="@+id/dialog_text"
android:layout_width="fill_parent"
android:layout_height="wrap_content"
android:text="现在就打电话给客服:arjinmc"
android:layout_marginTop="50dp"
android:layout_marginLeft="30dp"
android:layout_marginRight="30dp"
android:maxLines="5"
android:gravity="center"
/>
<LinearLayout
android:id="@+id/ll_buttons"
android:layout_width="fill_parent"
android:layout_height="wrap_content"
android:orientation="horizontal"
android:layout_alignParentBottom="true"
android:layout_margin="30dp">
<Button
android:id="@+id/dialog_cancel"
android:text="@string/alert_cancel"
android:background="@drawable/btn_long_white"
style="@style/dialog_button"
android:layout_weight="1"
android:textColor="@color/tabs_font"
/>
<Button
android:id="@+id/dialog_ok"
android:text="@string/alert_ok"
android:background="@drawable/btn_long_red"
style="@style/dialog_button"
android:layout_weight="1"
android:layout_marginLeft="5dp"/>
</LinearLayout>
</RelativeLayout>
<ImageButton
android:id="@+id/dialog_close"
android:layout_width="wrap_content"
android:layout_height="wrap_content"
android:background="@drawable/alertdialog_close"
android:layout_alignParentRight="true"
android:layout_alignParentTop="true"
android:layout_marginLeft="20dp"
/>
</RelativeLayout>
[/mw_shl_code]
在代码中需要这样写就可以了:
[mw_shl_code=java,true]//布局文件转换为view对象
LayoutInflater inflaterDl = LayoutInflater.from(this);
RelativeLayout layout = (RelativeLayout)inflaterDl.inflate(R.layout.layout_dialog, null );
//对话框
final Dialog dialog = new AlertDialog.Builder(SettingActivity.this).create();
dialog.show();
dialog.getWindow().setContentView(layout);
//取消按钮
Button btnCancel = (Button) layout.findViewById(R.id.dialog_cancel);
btnCancel.setOnClickListener(new OnClickListener() {
@Override
public void onClick(View v) {
Toast.makeText(getApplicationContext(), "cancel", Toast.LENGTH_SHORT).show();
}
});
//确定按钮
Button btnOK = (Button) layout.findViewById(R.id.dialog_ok);
btnOK.setOnClickListener(new OnClickListener() {
@Override
public void onClick(View v) {
Toast.makeText(getApplicationContext(), "ok", Toast.LENGTH_SHORT).show();
}
});
//关闭按钮
ImageButton btnClose = (ImageButton) layout.findViewById(R.id.dialog_close);
btnClose.setOnClickListener(new OnClickListener() {
@Override
public void onClick(View v) {
dialog.dismiss();
}
});[/mw_shl_code]
非常easy!自己动手吧。
自定义dialog的样式并比较日期
<style name="myDialogTheme" parent="android:style/Theme.Dialog">
<item name="android:windowNoTitle">true</item>
</style>
1、布局main.xml
<?xml version="1.0" encoding="utf-8"?>
<LinearLayout xmlns:android="http://schemas.android.com/apk/res/android"
android:layout_width="fill_parent"
android:layout_height="fill_parent"
android:orientation="vertical" >
<TextView
android:layout_width="fill_parent"
android:layout_height="wrap_content"
android:text="@string/hello" />
<Button
android:id="@+id/btn"
android:layout_height="wrap_content"
android:layout_width="fill_parent"
android:text="按下按钮试试"/>
</LinearLayout>
2、ly_dialogcontent
<?xml version="1.0" encoding="utf-8"?>
<RelativeLayout xmlns:android="http://schemas.android.com/apk/res/android"
android:layout_width="220dp"
android:layout_height="wrap_content"
android:orientation="vertical"
android:gravity="center"
android:layout_gravity="center"
android:background="#88E0EEEE">
<LinearLayout
android:layout_height="wrap_content"
android:layout_width="fill_parent"
android:orientation="vertical">
<TextView
android:layout_width="fill_parent"
android:layout_height="wrap_content"
android:textColor="@android:color/white"
android:textSize="20sp"
android:text="查询"
android:gravity="center"
android:layout_gravity="center"
android:padding="10dp"/>
<LinearLayout
android:layout_width="fill_parent"
android:layout_height="wrap_content"
android:padding="10dp"
android:gravity="center">
<TextView
android:layout_height="wrap_content"
android:layout_width="wrap_content"
android:text="开始时间:"/>
<EditText
android:id="@+id/beginTime"
android:layout_height="wrap_content"
android:layout_width="wrap_content"
android:singleLine="true"/>
</LinearLayout>
<LinearLayout
android:layout_width="fill_parent"
android:layout_height="wrap_content"
android:padding="10dp"
android:gravity="center">
<TextView
android:layout_height="wrap_content"
android:layout_width="wrap_content"
android:text="开始时间:"/>
<EditText
android:id="@+id/endTime"
android:layout_height="wrap_content"
android:layout_width="wrap_content"
android:singleLine="true"/>
</LinearLayout>
<LinearLayout
android:layout_width="fill_parent"
android:layout_height="wrap_content"
android:gravity="center">
<Button
android:id="@+id/search"
android:layout_height="wrap_content"
android:layout_width="wrap_content"
android:layout_weight="1.0"
android:text="查询"/>
<Button
android:id="@+id/cancel"
android:layout_height="wrap_content"
android:layout_width="wrap_content"
android:layout_weight="1.0"
android:text="取消"/>
</LinearLayout>
</LinearLayout>
</RelativeLayout>
3、Mainactivity
package com.ct.dialog;
import java.text.ParseException;
import java.text.SimpleDateFormat;
import java.util.Calendar;
import java.util.Date;
import android.app.Activity;
import android.app.DatePickerDialog;
import android.app.DatePickerDialog.OnDateSetListener;
import android.app.Dialog;
import android.app.TimePickerDialog;
import android.app.TimePickerDialog.OnTimeSetListener;
import android.os.Bundle;
import android.text.InputType;
import android.view.LayoutInflater;
import android.view.View;
import android.view.View.OnClickListener;
import android.widget.Button;
import android.widget.DatePicker;
import android.widget.EditText;
import android.widget.TimePicker;
import android.widget.Toast;
public class MainActivity extends Activity {
/** Called when the activity is first created. */
private Button btnBn;
private Dialog dlg;
private LayoutInflater mInflater;
private Calendar calendar;
@Override
public void onCreate(Bundle savedInstanceState) {
super.onCreate(savedInstanceState);
setContentView(R.layout.main);
btnBn = (Button)findViewById(R.id.btn);
init();
btnBn.setOnClickListener(new OnClickListener() {
@Override
public void onClick(View v) {
// TODO Auto-generated method stub
dlg.show();
}
});
}
private void init(){
calendar = Calendar.getInstance();
dlg = new Dialog(MainActivity.this, R.style.myDialogTheme);
mInflater = LayoutInflater.from(MainActivity.this);
dlg.setCancelable(true);
dlg.setCanceledOnTouchOutside(true);
View view = mInflater.inflate(R.layout.ly_dialogcontent, null);
final EditText begin = (EditText)view.findViewById(R.id.beginTime);
final EditText end = (EditText)view.findViewById(R.id.endTime);
Button sbtn = (Button)view.findViewById(R.id.search);
Button clebt = (Button)view.findViewById(R.id.cancel);
begin.setInputType(InputType.TYPE_NULL);
end.setInputType(InputType.TYPE_NULL);
dlg.setContentView(view);
//取消
clebt.setOnClickListener(new OnClickListener() {
@Override
public void onClick(View v) {
// TODO Auto-generated method stub
dlg.dismiss();
}
});
//查询
sbtn.setOnClickListener(new OnClickListener() {
@Override
public void onClick(View v) {
// TODO Auto-generated method stub
String beginTime = begin.getText().toString();
String endTime = end.getText().toString();
if (beginTime.equals("")|| endTime.equals("")) {
Toast.makeText(MainActivity.this, "都不能为空", Toast.LENGTH_LONG).show();
}else if(!isLarge(beginTime, endTime)){
Toast.makeText(MainActivity.this, "结束时间不能比开始时间小", Toast.LENGTH_LONG).show();
} else {
dlg.dismiss();}
}
});
//开始时间
begin.setOnClickListener(new OnClickListener() {
@Override
public void onClick(View v) {
// TODO Auto-generated method stub
final String second = "00";
DatePickerDialog dpg = new DatePickerDialog(MainActivity.this,
new OnDateSetListener() {
@Override
public void onDateSet(DatePicker view, int year, int monthOfYear,
int dayOfMonth) {
// TODO Auto-generated method stub
begin.setText(year+"-"+
format(++monthOfYear)+"-"+
format(dayOfMonth));
TimePickerDialog tpg = new TimePickerDialog(MainActivity.this,
new OnTimeSetListener(){
@Override
public void onTimeSet(
TimePicker arg0, int hourOfDay,
int minute) {
// TODO Auto-generated method stub
begin.setText(begin.getText().toString()
+ " "
+ format(hourOfDay)
+ ":"
+ format(minute)
+ ":" + second);
}},calendar.get(Calendar.HOUR_OF_DAY),
calendar.get(Calendar.MINUTE), true);
tpg.show();
}
}, calendar.get(Calendar.YEAR),
calendar.get(Calendar.MONTH),
calendar.get(Calendar.DAY_OF_MONTH));
dpg.show();
}
});
//结束时间
end.setOnClickListener(new OnClickListener() {
@Override
public void onClick(View v) {
// TODO Auto-generated method stub
final String second = "00";
DatePickerDialog dpg = new DatePickerDialog(MainActivity.this,
new OnDateSetListener() {
@Override
public void onDateSet(DatePicker view, int year, int monthOfYear,
int dayOfMonth) {
// TODO Auto-generated method stub
end.setText(year+"-"+
format(++monthOfYear)+"-"+
format(dayOfMonth));
TimePickerDialog tpg = new TimePickerDialog(MainActivity.this,
new OnTimeSetListener(){
@Override
public void onTimeSet(
TimePicker arg0, int hourOfDay,
int minute) {
// TODO Auto-generated method stub
end.setText(begin.getText().toString()
+ " "
+ format(hourOfDay)
+ ":"
+ format(minute)
+ ":" + second);
}},calendar.get(Calendar.HOUR_OF_DAY),
calendar.get(Calendar.MINUTE), true);
tpg.show();
}
}, calendar.get(Calendar.YEAR),
calendar.get(Calendar.MONTH),
calendar.get(Calendar.DAY_OF_MONTH));
dpg.show();
}
});
}
/**
* 比较两个时间的大小
* @throws ParseException
*
* */
public static boolean isLarge(String beginTime,String endTime) {
boolean flag = false;
try {
SimpleDateFormat sdf = new SimpleDateFormat("yyyy-MM-dd HH:mm:ss");
Date begin = sdf.parse(beginTime);
Date edn = sdf.parse(endTime);
if(edn.getTime() - begin.getTime() >0){
flag = true;
}else {
flag = false;
}
} catch (ParseException e) {
// TODO: handle exception
e.printStackTrace();
}
return flag;
}
/**
* 在一位数字前加0变成两位数字
*
* @param value
* @return
*/
private String format(int value) {
String s = String.valueOf(value);
if (s.length() == 1) {
s = "0" + s;
}
return s;
}
}
(在F:\java\z自定义dialog+点击弹出时间调整那个\MyDialogTheme)
相关文章
- 下面我们来看一篇关于Android子控件超出父控件的范围显示出来方法,希望这篇文章能够帮助到各位朋友,有碰到此问题的朋友可以进来看看哦。 <RelativeLayout xmlns:an...2016-10-02
- 复制代码 代码如下: <td> <a href="/member/life/edit_ppt/<?php echo $v->id;?>" class="btn">编辑</a> <a href="javascript:;" onclick="if(confirm('您确定删除这条记录?')){location.href='/member/life/d...2014-06-07
Android开发中findViewById()函数用法与简化
findViewById方法在android开发中是获取页面控件的值了,有没有发现我们一个页面控件多了会反复研究写findViewById呢,下面我们一起来看它的简化方法。 Android中Fin...2016-09-20- 如果我们的项目需要做来电及短信的功能,那么我们就得在Android模拟器开发这些功能,本来就来告诉我们如何在Android模拟器上模拟来电及来短信的功能。 在Android模拟...2016-09-20
- 夜神android模拟器如何设置代理呢?对于这个问题其实操作起来是非常的简单,下面小编来为各位详细介绍夜神android模拟器设置代理的方法,希望例子能够帮助到各位。 app...2016-09-20
- 为了增强android应用的用户体验,我们可以在一些Button按钮上自定义动态的设置一些样式,比如交互时改变字体、颜色、背景图等。 今天来看一个通过重写Button来动态实...2016-09-20
- 如果我们要在Android应用APP中加载html5页面,我们可以使用WebView,本文我们分享两个WebView加载html5页面实例应用。 实例一:WebView加载html5实现炫酷引导页面大多...2016-09-20
- 深入理解Android中View和ViewGroup从组成架构上看,似乎ViewGroup在View之上,View需要继承ViewGroup,但实际上不是这样的。View是基类,ViewGroup是它的子类。本教程我们深...2016-09-20
- 下面我们来看一篇关于Android自定义WebView网络视频播放控件开发例子,这个文章写得非常的不错下面给各位共享一下吧。 因为业务需要,以下代码均以Youtube网站在线视...2016-10-02
- java开发的Android应用,性能一直是一个大问题,,或许是Java语言本身比较消耗内存。本文我们来谈谈Android 性能优化之MemoryFile文件读写。 Android匿名共享内存对外A...2016-09-20
- TextView默认是横着显示了,今天我们一起来看看Android设置TextView竖着显示如何来实现吧,今天我们就一起来看看操作细节,具体的如下所示。 在开发Android程序的时候,...2016-10-02
android.os.BinderProxy cannot be cast to com解决办法
本文章来给大家介绍关于android.os.BinderProxy cannot be cast to com解决办法,希望此文章对各位有帮助呀。 Android在绑定服务的时候出现java.lang.ClassCastExc...2016-09-20- 这篇文章主要介绍了vscode搭建STM32开发环境的详细过程,本文给大家介绍的非常详细,对大家的学习或工作具有一定的参考借鉴价值,需要的朋友可以参考下...2021-05-02
- 这篇文章主要介绍了Android 实现钉钉自动打卡功能的步骤,帮助大家更好的理解和学习使用Android,感兴趣的朋友可以了解下...2021-03-15
- 下面我们来看一篇关于Android 开发之布局细节对比:RTL模式 ,希望这篇文章对各位同学会带来帮助,具体的细节如下介绍。 前言 讲真,好久没写博客了,2016都过了一半了,赶紧...2016-10-02
- 首先如果要在程序中使用sdcard进行存储,我们必须要在AndroidManifset.xml文件进行下面的权限设置: 在AndroidManifest.xml中加入访问SDCard的权限如下: <!--...2016-09-20
- 下面来给各位简单的介绍一下关于Android开发之PhoneGap打包及错误解决办法,希望碰到此类问题的同学可进入参考一下哦。 在我安装、配置好PhoneGap项目的所有依赖...2016-09-20
- 下面我们一起来看一篇关于 安卓开发之Intent传递Object与List的例子,希望这个例子能够为各位同学带来帮助。 Intent 不仅可以传单个的值,也可以传对象与数据集合...2016-09-20
用Intel HAXM给Android模拟器Emulator加速
Android 模拟器 Emulator 速度真心不给力,, 现在我们来介绍使用 Intel HAXM 技术为 Android 模拟器加速,使模拟器运行度与真机比肩。 周末试玩了一下在Eclipse中使...2016-09-20基于BootStrap Metronic开发框架经验小结【六】对话框及提示框的处理和优化
这篇文章主要介绍了基于BootStrap Metronic开发框架经验小结【六】对话框及提示框的处理和优化的相关知识,主要对比说明在Bootstrap开发中用到的这些技术要点,对此文感兴趣的朋友一起学习吧...2016-05-14