android中利用ContentProvider管理系统联系人
我们都知道ContentProvider是用来共享数据的,然而android本身就提供了大量的ContentProvider,例如联系人信息,系统的多媒体信息等,这些系统的ContentProvider都提供了供其他应用程序访问的Uri,开发者可以通过ContentResolver来调用系统的ContentProvider提供的insert()/update()/delete()/query()方法,从而实现自己的需求。
1、了解系统联系人的结构
(1)android系统对联系人管理提供了很多的Uri,其中用到最多的几个如下:
ContactsContract.Contacts.CONTENT_URI:管理联系人的Uri
ContactsContract.CommonDataKinds.Phone.CONTENT_URI:管理联系人电话的Uri
ContactsContract.CommonDataKinds.Email.CONTENT_URI:管理联系人邮箱的Uri
ContactsContract.CommonDataKinds.StructuredPostal.CONTENT_URI:管理联系人地址的Uri
我们可以根据系统提供的这些Uri去操作系统联系人信息,具体的还有很多CONTENT_URI,可以到ContactsContract.class文件中去查看源码。
(2)表结构
我们之前说过,ContentProvider是以表的形式来存放这些数据的,系统联系人也是这样,一般存放在data/data/com.android.providers.contacts/databases/contacts2.db中,我们可以通过adb shell命令行的方式来看,也可以将这个contacts2.db文件导出,通过sqlite工具来查看,这里为了方便我们导出来看一下。
找到对应的文件,然后选中点击右上角的导出按钮,将文件导出到系统中的某一个地方

将导出的文件用工具打开,我这里使用的是:Navicat Premium
表和视图:
我们经常用的到有:contacts、data、raw_contacts三张表:
contacts表:
_id :表的ID,主要用于其它表通过contacts 表中的ID可以查到相应的数据。
display_name: 联系人名称
photo_id:头像的ID,如果没有设置联系人头像,这个字段就为空
times_contacted:通话记录的次数
last_time_contacted: 最后的通话时间
lookup :是一个持久化的储存 因为用户可能会改名子 但是它改不了lookup

data表:
raw_contact_id:通过raw_contact_id可以找到 raw_contact表中相对的数据。
data1 到 data15 这里保存着联系人的信息 联系人名称 联系人电话号码 电子邮件 备注 等等

raw_contacts表:
version :版本号,用于监听变化
deleted :删除标志, 0为默认 1 表示这行数据已经删除
display_name : 联系人名称
last_time_contacts : 最后联系的时间

【说明:由于这些表的字段都特别多,截图不全,可以自己试着导出一份看看】
2、代码实现
(1)首先要在AndroidManifest.xml文件中配置对系统联系人的读写权限:
<!-- 添加操作联系人的权限 -->
<uses-permission android:name="android.permission.READ_CONTACTS" />
<uses-permission android:name="android.permission.WRITE_CONTACTS" />
(2)布局文件
首先是列表展示页面:
<?xml version="1.0" encoding="utf-8"?>
<LinearLayout xmlns:android="http://schemas.android.com/apk/res/android"
android:layout_width="match_parent"
android:layout_height="match_parent"
android:orientation="vertical" >
<TextView
android:layout_width="fill_parent"
android:layout_height="50dp"
android:gravity="center_vertical"
android:text="我的联系人"
android:textSize="25dp" />
<LinearLayout
android:layout_width="fill_parent"
android:layout_height="wrap_content"
android:orientation="horizontal"
android:background="@android:color/darker_gray" >
<TextView
android:id="@+id/id"
android:layout_width="0dp"
android:layout_height="30dp"
android:layout_weight="1"
android:text="ID"
android:gravity="center" />
<TextView
android:id="@+id/name"
android:layout_width="0dp"
android:layout_height="30dp"
android:layout_weight="1"
android:text="姓名"
android:gravity="center" />
<TextView
android:id="@+id/phone"
android:layout_width="0dp"
android:layout_height="30dp"
android:layout_weight="1"
android:text="手机号码"
android:gravity="center" />
</LinearLayout>
<ListView
android:id="@+id/listview"
android:layout_width="fill_parent"
android:layout_height="wrap_content"
android:layout_gravity="center"
android:divider="#FF0000"
android:dividerHeight="1dp"
android:focusable="true"
android:minHeight="40dp"
android:footerDividersEnabled="false" >
</ListView>
</LinearLayout>
列表展示中需要用的listview页面布局:
<?xml version="1.0" encoding="utf-8"?>
<LinearLayout xmlns:android="http://schemas.android.com/apk/res/android"
android:layout_width="match_parent"
android:layout_height="match_parent"
android:orientation="horizontal" >
<TextView
android:id="@+id/id"
android:layout_width="0dp"
android:layout_weight="1"
android:gravity="center"
android:layout_height="40dp"
/>
<TextView
android:id="@+id/name"
android:layout_width="0dp"
android:layout_weight="1"
android:gravity="center"
android:layout_height="40dp"
/>
<TextView
android:id="@+id/phone"
android:layout_width="0dp"
android:layout_weight="1"
android:gravity="center"
android:layout_height="40dp"
/>
</LinearLayout>
添加联系人界面:
<?xml version="1.0" encoding="utf-8"?>
<LinearLayout xmlns:android="http://schemas.android.com/apk/res/android"
android:layout_width="match_parent"
android:layout_height="match_parent"
android:orientation="vertical" >
<LinearLayout
android:layout_width="fill_parent"
android:layout_height="50dp"
android:layout_gravity="center"
android:orientation="horizontal" >
<TextView
android:layout_width="100dp"
android:layout_height="wrap_content"
android:layout_marginRight="20dp"
android:gravity="center_vertical|right"
android:text="姓名:"
android:textSize="20dp" />
<EditText
android:id="@+id/name"
android:layout_width="match_parent"
android:layout_height="wrap_content" />
</LinearLayout>
<LinearLayout
android:layout_width="fill_parent"
android:layout_height="50dp"
android:layout_gravity="center"
android:orientation="horizontal" >
<TextView
android:layout_width="100dp"
android:layout_height="wrap_content"
android:gravity="center_vertical|right"
android:layout_marginRight="20dp"
android:text="手机号码:"
android:textSize="20dp" />
<EditText
android:id="@+id/phone"
android:layout_width="match_parent"
android:layout_height="wrap_content" />
</LinearLayout>
<LinearLayout
android:layout_width="fill_parent"
android:layout_height="50dp"
android:layout_gravity="center"
android:gravity="center"
android:orientation="horizontal" >
<Button
android:id="@+id/save"
android:layout_width="wrap_content"
android:layout_height="wrap_content"
android:text="保存"
android:textSize="20sp"
/>
<Button
android:id="@+id/cancel"
android:layout_width="wrap_content"
android:layout_height="wrap_content"
android:text="取消"
android:layout_marginLeft="30dp"
android:textSize="20sp"
/>
</LinearLayout>
</LinearLayout>
联系人详细界面:
<?xml version="1.0" encoding="utf-8"?>
<RelativeLayout xmlns:android="http://schemas.android.com/apk/res/android"
android:layout_width="match_parent"
android:layout_height="wrap_content"
android:layout_marginBottom="10dp"
android:layout_marginLeft="10dp"
android:layout_marginRight="10dp"
android:layout_marginTop="10dp"
android:background="@android:color/darker_gray" >
<TextView
android:id="@+id/tv_name"
android:layout_width="80dp"
android:layout_height="wrap_content"
android:layout_marginTop="20dp"
android:background="@android:color/white"
android:gravity="center_vertical|right"
android:text="姓名:"
android:textSize="20sp" />
<TextView
android:id="@+id/et_name"
android:layout_width="match_parent"
android:layout_height="wrap_content"
android:layout_alignTop="@+id/tv_name"
android:layout_toRightOf="@+id/tv_name"
android:background="@android:color/white"
android:gravity="center_vertical"
android:text=""
android:textSize="20sp" />
<TextView
android:id="@+id/tv_phone"
android:layout_width="80dp"
android:layout_height="wrap_content"
android:layout_below="@+id/tv_name"
android:layout_marginTop="20dp"
android:background="@android:color/white"
android:gravity="center_vertical|right"
android:text="手机号:"
android:textSize="20sp" />
<TextView
android:id="@+id/et_phone"
android:layout_width="match_parent"
android:layout_height="wrap_content"
android:layout_alignTop="@+id/tv_phone"
android:layout_toRightOf="@+id/tv_phone"
android:background="@android:color/white"
android:gravity="center_vertical"
android:text=""
android:textSize="20sp" />
<TextView
android:id="@+id/tv_email"
android:layout_width="80dp"
android:layout_height="wrap_content"
android:layout_below="@+id/tv_phone"
android:layout_marginTop="20dp"
android:background="@android:color/white"
android:gravity="center_vertical|right"
android:text="Email:"
android:textSize="20sp" />
<TextView
android:id="@+id/et_email"
android:layout_width="match_parent"
android:layout_height="wrap_content"
android:layout_alignTop="@+id/tv_email"
android:layout_toRightOf="@+id/tv_email"
android:background="@android:color/white"
android:gravity="center_vertical"
android:text=""
android:textSize="20sp" />
<TextView
android:id="@+id/tv_address"
android:layout_width="80dp"
android:layout_height="wrap_content"
android:layout_below="@+id/tv_email"
android:layout_marginTop="20dp"
android:background="@android:color/white"
android:gravity="center_vertical|right"
android:text="地址:"
android:textSize="20sp" />
<TextView
android:id="@+id/et_address"
android:layout_width="match_parent"
android:layout_height="wrap_content"
android:layout_alignTop="@+id/tv_address"
android:layout_toRightOf="@+id/tv_address"
android:background="@android:color/white"
android:gravity="center_vertical"
android:text=""
android:textSize="20sp" />
</RelativeLayout>
程序中需要用的menu菜单配置在menu文件中:
<?xml version="1.0" encoding="utf-8"?>
<menu xmlns:android="http://schemas.android.com/apk/res/android" >
<group android:id="@+id/group1">
<item android:id="@+id/detail" android:title="详情"></item>
<item android:id="@+id/update" android:title="修改"></item>
<item android:id="@+id/delete" android:title="删除"></item>
</group>
</menu>
(3)Activity代码:
列表页面以及适配器Adapter
ContactsActivity.java
package com.demo.contentprovider;
import java.util.ArrayList;
import android.app.Activity;
import android.app.AlertDialog;
import android.content.ContentResolver;
import android.content.DialogInterface;
import android.content.DialogInterface.OnClickListener;
import android.content.Intent;
import android.database.Cursor;
import android.os.Bundle;
import android.provider.ContactsContract;
import android.view.Menu;
import android.view.MenuItem;
import android.view.View;
import android.widget.AdapterView;
import android.widget.AdapterView.OnItemLongClickListener;
import android.widget.ListView;
import android.widget.PopupMenu;
import android.widget.PopupMenu.OnMenuItemClickListener;
import android.widget.Toast;
import com.demo.adapter.ContactsAdapter;
import com.demo.model.Contact;
/**
* 手机联系人操作
* @author yinbenyang
*/
public class ContactsActivity extends Activity {
private static final int ADD = 0;
private static final int REQUEST_ADD = 100;
// 存储联系人的列表
private ArrayList<Contact> contactList = null;
// 联系人适配器
private ContactsAdapter adapter;
private ListView listview;
// 弹出式菜单
public PopupMenu popupmenu = null;
@Override
protected void onCreate(Bundle savedInstanceState) {
super.onCreate(savedInstanceState);
setContentView(R.layout.contentprovider);
listview = (ListView) findViewById(R.id.listview);
init();
listview.setOnItemLongClickListener(new OnItemLongClickListenerImpl());
// registerForContextMenu(listview);
}
// ----------------------------------------------------选项菜单---------------------------------------------------
@Override
public boolean onCreateOptionsMenu(Menu menu) {
// TODO Auto-generated method stub
menu.add(0, ADD, 0, "添加");
return super.onCreateOptionsMenu(menu);
}
@Override
public boolean onOptionsItemSelected(MenuItem item) {
// TODO Auto-generated method stub
switch (item.getItemId()) {
case ADD:
Intent intent = new Intent(this, AddContactActivity.class);
startActivityForResult(intent, REQUEST_ADD);
break;
default:
break;
}
return true;
}
@Override
protected void onActivityResult(int requestCode, int resultCode, Intent data) {
// TODO Auto-generated method stub
switch (requestCode) {
case REQUEST_ADD:
init();
break;
default:
break;
}
super.onActivityResult(requestCode, resultCode, data);
}
// 初始化,获取联系人
private void init() {
ContentResolver resolver = getContentResolver();
/**
* ContactsContract.Contacts.CONTENT_URI:手机联系人的Uri:content://com.android
* .contacts/contacts
* sort_key_alt:它里面保存的是联系人名字的拼音字母,例如联系人名字是“李明”,则sort_key保存的是“LI李MING明”,
* 这样如果是按sort_key或sort_key_alt排序的话,就可以将联系人按顺序排列
*/
Cursor cursor = resolver.query(ContactsContract.Contacts.CONTENT_URI,
null, null, null, "sort_key_alt");
contactList = new ArrayList<Contact>();
while (cursor.moveToNext()) {
Contact contact = new Contact();
String phoneNumber = null;
String name = cursor.getString(cursor
.getColumnIndex(ContactsContract.Contacts.DISPLAY_NAME));
String id = cursor.getString(cursor
.getColumnIndex(ContactsContract.Contacts._ID));
Cursor phoneCursor = resolver.query(
ContactsContract.CommonDataKinds.Phone.CONTENT_URI, null,
ContactsContract.CommonDataKinds.Phone.CONTACT_ID + " = "
+ id, null, null);
while (phoneCursor.moveToNext()) {
phoneNumber = phoneCursor
.getString(phoneCursor
.getColumnIndex(ContactsContract.CommonDataKinds.Phone.NUMBER));
}
contact.setId(Integer.parseInt(id));
contact.setName(name);
contact.setPhone(phoneNumber);
contactList.add(contact);
}
adapter = new ContactsAdapter(this, contactList);
listview.setAdapter(adapter);
}
private class OnItemLongClickListenerImpl implements
OnItemLongClickListener {
@Override
public boolean onItemLongClick(AdapterView<?> parent, View view,
final int position, long id) {
final ContentResolver resolver = getContentResolver();
popupmenu = new PopupMenu(ContactsActivity.this, listview);
popupmenu.getMenuInflater().inflate(R.menu.my_menu,
popupmenu.getMenu());
popupmenu.setOnMenuItemClickListener(new OnMenuItemClickListener() {
@Override
public boolean onMenuItemClick(MenuItem item) {
switch (item.getItemId()) {
case R.id.detail:
String id = contactList.get(position).getId() + "";
Intent intent = new Intent(ContactsActivity.this,
ContactDetailActivity.class);
intent.putExtra("id", id);
startActivity(intent);
break;
case R.id.update:
Toast.makeText(ContactsActivity.this, "执行修改操作",
Toast.LENGTH_SHORT).show();
break;
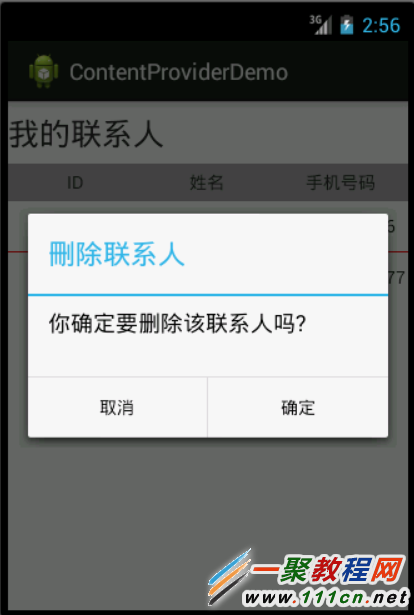
case R.id.delete:
new AlertDialog.Builder(ContactsActivity.this)
.setTitle("?h除联系人")
.setMessage("你确定要删除该联系人吗?")
.setPositiveButton("确定", new OnClickListener() {
@Override
public void onClick(DialogInterface dialog,
int which) {
int i = resolver
.delete(ContactsContract.RawContacts.CONTENT_URI,
ContactsContract.Data._ID
+ " = "
+ contactList
.get(position)
.getId(),
null);
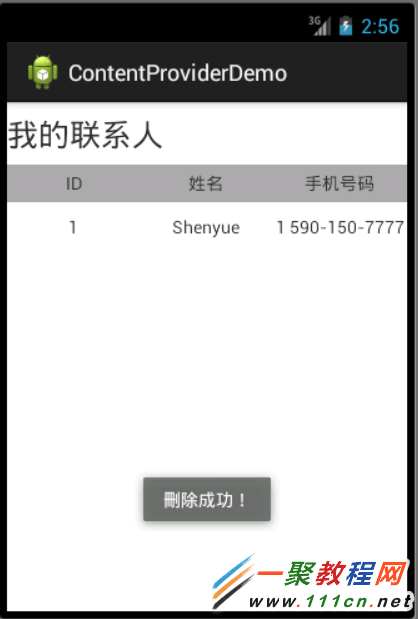
Toast.makeText(ContactsActivity.this,
i == 1 ? "?h除成功!" : "?h除失?。?quot;,
Toast.LENGTH_SHORT).show();
init();
}
})
.setNegativeButton("取消", new OnClickListener() {
@Override
public void onClick(DialogInterface dialog,
int which) {
dialog.dismiss();
}
}).create().show();
break;
default:
break;
}
// Toast.makeText(ContactsActivity.this,
// "你点击了:" + item.getTitle(), Toast.LENGTH_SHORT)
// .show();
// popupmenu.dismiss();
return true;
}
});
popupmenu.show();
return true;
}
}
}
/**
* <!-- 联系人相关的uri --> content://com.android.contacts/contacts 操作的数据是联系人信息Uri
* content://com.android.contacts/data/phones 联系人电话Uri
* content://com.android.contacts/data/emails 联系人Email Uri
*/
ContactsAdapter.java
package com.demo.adapter;
import java.util.ArrayList;
import android.content.Context;
import android.view.View;
import android.view.ViewGroup;
import android.widget.BaseAdapter;
import android.widget.TextView;
import com.demo.contentprovider.R;
import com.demo.model.Contact;
/**
* 联系人的Adapter
*
* @author yinbenyang
*/
public class ContactsAdapter extends BaseAdapter {
private Context context;
private ArrayList<Contact> listContact;
public ContactsAdapter(Context context, ArrayList<Contact> listContact) {
this.context = context;
this.listContact = listContact;
}
@Override
public int getCount() {
return listContact.size();
}
@Override
public Object getItem(int position) {
return listContact.get(position);
}
@Override
public long getItemId(int position) {
return position;
}
@Override
public View getView(int position, View convertView, ViewGroup parent) {
ViewHolder holder = null;
if (convertView == null) {
convertView = View
.inflate(context, R.layout.listview_contact, null);
holder = new ViewHolder();
holder.id = (TextView) convertView.findViewById(R.id.id);
holder.name = (TextView) convertView.findViewById(R.id.name);
holder.phone = (TextView) convertView.findViewById(R.id.phone);
convertView.setTag(holder);
} else {
holder = (ViewHolder) convertView.getTag();
}
Contact con = listContact.get(position);
holder.id.setText(con.getId().toString());
holder.name.setText(con.getName());
holder.phone.setText(con.getPhone());
return convertView;
}
static class ViewHolder {
TextView id;
TextView name;
TextView phone;
}
}
添加联系人Activity:
AddContactActivity.java
package com.demo.contentprovider;
import android.app.Activity;
import android.content.ContentUris;
import android.content.ContentValues;
import android.net.Uri;
import android.os.Bundle;
import android.provider.ContactsContract;
import android.provider.ContactsContract.CommonDataKinds.Phone;
import android.provider.ContactsContract.CommonDataKinds.StructuredName;
import android.provider.ContactsContract.Data;
import android.provider.ContactsContract.RawContacts;
import android.view.View;
import android.view.View.OnClickListener;
import android.widget.Button;
import android.widget.EditText;
/**
* 添加联系人信息
* @author yinbenyang
*
*/
public class AddContactActivity extends Activity implements OnClickListener{
private EditText name,phone;
private Button save,cancel;
@Override
protected void onCreate(Bundle savedInstanceState) {
// TODO Auto-generated method stub
super.onCreate(savedInstanceState);
setContentView(R.layout.addcontact);
name = (EditText) findViewById(R.id.name);
phone = (EditText) findViewById(R.id.phone);
save = (Button) findViewById(R.id.save);
cancel = (Button) findViewById(R.id.cancel);
save.setOnClickListener(this);
cancel.setOnClickListener(this);
}
@Override
public void onClick(View v) {
// TODO Auto-generated method stub
switch (v.getId()) {
case R.id.save:
String _name = name.getText().toString().replaceAll(" ", "");
String _phone = phone.getText().toString().replaceAll(" ","");
ContentValues values = new ContentValues();
//首先向RawContacts.CONTENT_URI执行一个空值插入,目的是获取系统返回的rawContactId
Uri rawContactUri =getContentResolver().insert(RawContacts.CONTENT_URI, values);
long rawContactId = ContentUris.parseId(rawContactUri);
//往data表入姓名数据
values.clear();
values.put(Data.RAW_CONTACT_ID, rawContactId);
//设置内容类型
values.put(Data.MIMETYPE, StructuredName.CONTENT_ITEM_TYPE);
//设置内容名字
values.put(StructuredName.GIVEN_NAME, _name);
getContentResolver().insert(
ContactsContract.Data.CONTENT_URI, values);
//往data表入电话数据
values.clear();
values.put(Data.RAW_CONTACT_ID, rawContactId);
values.put(Data.MIMETYPE, Phone.CONTENT_ITEM_TYPE);
//设置电话号码
values.put(Phone.NUMBER, _phone);
//设置电话类型
values.put(Phone.TYPE, Phone.TYPE_MOBILE);
getContentResolver().insert(
ContactsContract.Data.CONTENT_URI, values);
this.finish();
break;
case R.id.cancel:
this.finish();
break;
default:
break;
}
}
}
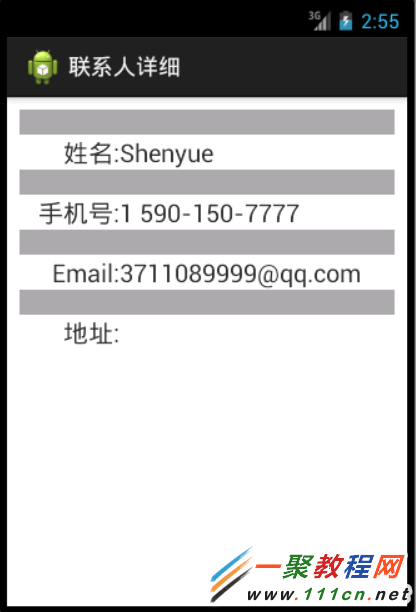
联系人详细页面:
ContactDetailActivity.java
package com.demo.contentprovider;
import android.app.Activity;
import android.content.ContentResolver;
import android.content.Intent;
import android.database.Cursor;
import android.os.Bundle;
import android.provider.ContactsContract;
import android.widget.TextView;
/**
* 联系人详细信息
*
* @author yinbenyang
*
*/
public class ContactDetailActivity extends Activity {
private TextView et_name, et_phone, et_email, et_address;
@Override
protected void onCreate(Bundle savedInstanceState) {
super.onCreate(savedInstanceState);
setContentView(R.layout.contactdetail);
et_name = (TextView) findViewById(R.id.et_name);
et_phone = (TextView) findViewById(R.id.et_phone);
et_email = (TextView) findViewById(R.id.et_email);
et_address = (TextView) findViewById(R.id.et_address);
Intent intent = getIntent();
String id = intent.getStringExtra("id");
ContentResolver resolver = getContentResolver();
// 查找姓名
Cursor nameCursor = resolver.query(
ContactsContract.Contacts.CONTENT_URI,
null,
ContactsContract.Contacts._ID + " = " + id,
null, null);
while(nameCursor.moveToNext()){
et_name.setText(nameCursor.getString(nameCursor.getColumnIndex(ContactsContract.Contacts.DISPLAY_NAME)));
}
// 查找手机号
Cursor phoneCursor = resolver.query(
ContactsContract.CommonDataKinds.Phone.CONTENT_URI, null,
ContactsContract.CommonDataKinds.Phone.CONTACT_ID + " = " + id,
null, null);
while (phoneCursor.moveToNext()) {
et_phone.setText(phoneCursor.getString(phoneCursor
.getColumnIndex(ContactsContract.CommonDataKinds.Phone.NUMBER)));
}
// 查找邮箱
Cursor emailCursor = resolver.query(
ContactsContract.CommonDataKinds.Email.CONTENT_URI, null,
ContactsContract.CommonDataKinds.Email.CONTACT_ID + " = " + id,
null, null);
while (emailCursor.moveToNext()) {
et_email.setText(emailCursor.getString(emailCursor
.getColumnIndex(ContactsContract.CommonDataKinds.Email.DATA)));
}
// 查找地址
Cursor addressCursor = resolver.query(
ContactsContract.CommonDataKinds.StructuredPostal.CONTENT_URI,
null,
ContactsContract.CommonDataKinds.StructuredPostal.CONTACT_ID
+ " = " + id, null, null);
while (addressCursor.moveToNext()) {
et_address
.setText(addressCursor.getString(addressCursor
.getColumnIndex(ContactsContract.CommonDataKinds.StructuredPostal.DATA)));
}
}
}
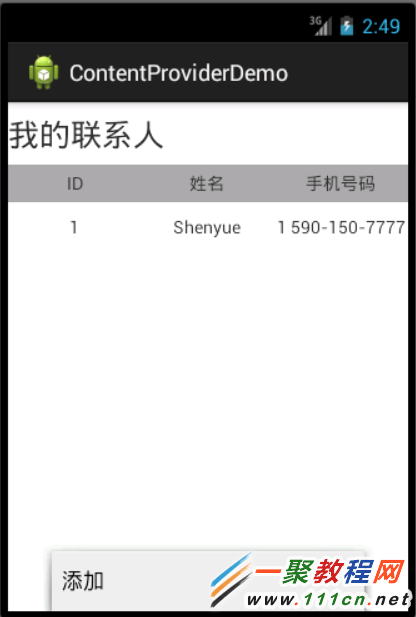
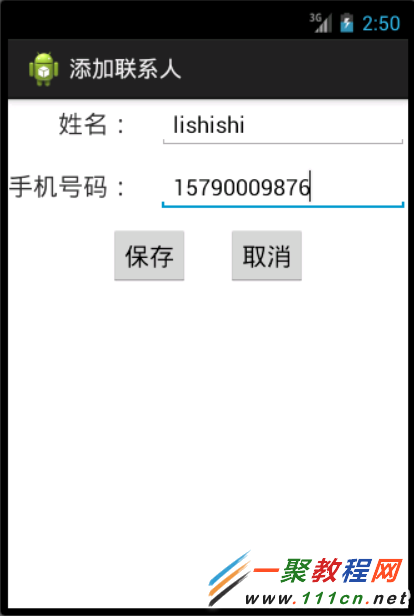
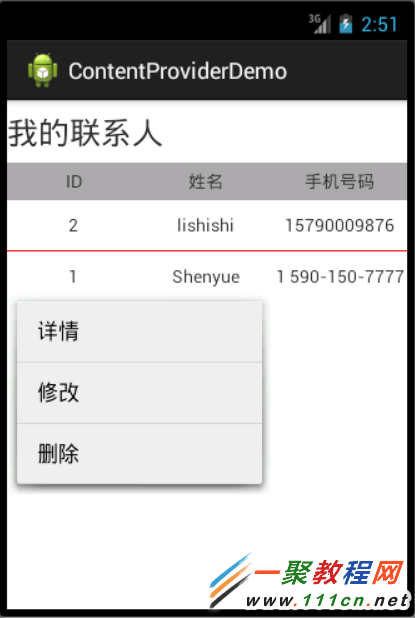
最后效果图如下。可以实现联系人的添加,删除和修改功能:
这里我们采用经典的左中右布局,也可以根据项目需要自行调整,比如在右侧再加一个控件,或者将标题偏左都可以
注:其中应用到了上一篇文章中的ButtonM控件,大家可以先简单了解一下。
还是先来看一下效果图: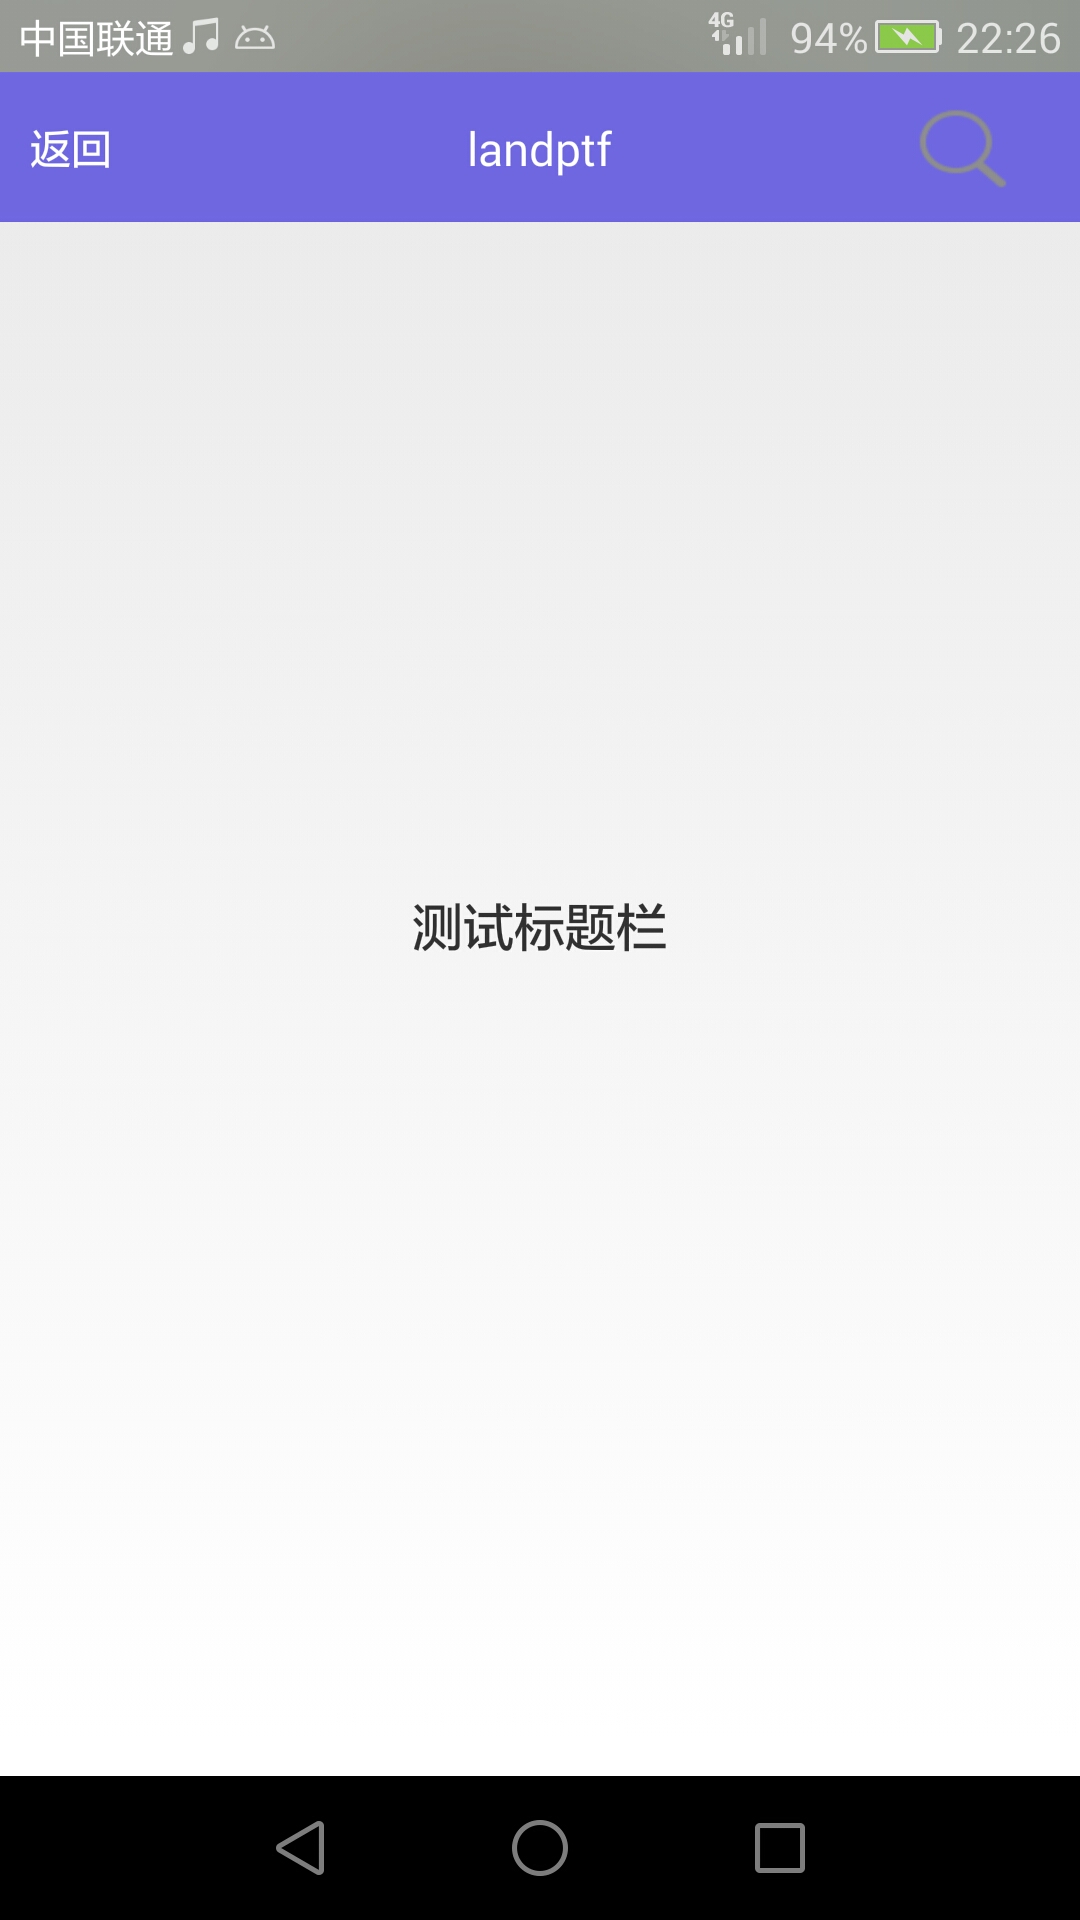

下面来看代码实现,共四个文件两个java类,两个布局文件
1 TitleBarM.java
package landptf.control;
import android.content.Context;
import android.graphics.Color;
import android.util.AttributeSet;
import android.util.TypedValue;
import android.view.View;
import android.widget.RelativeLayout;
import android.widget.TextView;
/**
* 继承RelativeLayout,自定义标题栏
* @author landptf
* @date 2015-6-10
*/
public class TitleBarM extends RelativeLayout{
private Context context;
//定义三个控件,
private ButtonM btnLeft;
private TextView tvTitle;
private ButtonM btnRight;
//定义左侧控件的接口
private OnClickListenerL onClickListenerL = null;
//定义右侧控件的接口
private OnClickListenerR onClickListenerR = null;
public interface OnClickListenerL{
//定义一个方法
public void onClick(View v);
}
public interface OnClickListenerR{
//定义一个方法
public void onClick(View v);
}
/**
* 为左侧控件绑定事件
* @param onClickListenerL
*/
public void setOnClickLisenerL(OnClickListenerL onClickListenerL) {
this.onClickListenerL = onClickListenerL;
}
/**
* 为右侧控件绑定事件
* @param onClickListenerR
*/
public void setOnClickLisenerR(OnClickListenerR onClickListenerR) {
this.onClickListenerR = onClickListenerR;
}
public TitleBarM(Context context) {
this(context, null);
}
public TitleBarM(Context context, AttributeSet attrs) {
this(context, attrs,0);
}
public TitleBarM(Context context, AttributeSet attrs, int defStyle) {
super(context, attrs, defStyle);
this.context = context;
//设置RelativeLayout的布局
setLayoutParams(new LayoutParams(LayoutParams.MATCH_PARENT,LayoutParams.MATCH_PARENT));
//设置默认的背景色
setBackgroundColor(Color.parseColor("#B674D2"));
init();
}
private void init() {
//初始化左侧ButtonM
btnLeft = new ButtonM(context);
RelativeLayout.LayoutParams lp=new RelativeLayout.LayoutParams(LayoutParams.WRAP_CONTENT,LayoutParams.WRAP_CONTENT);
//垂直居中
lp.addRule(RelativeLayout.CENTER_VERTICAL);
//设置距离左侧10dp
lp.leftMargin = dp2px(context, 10);
btnLeft.setLayoutParams(lp);
btnLeft.setTextSize(16);//设置字体大小,默认为16
btnLeft.setTextColori(Color.WHITE);//默认字体颜色为白色
btnLeft.setTextColorSelected("#909090");//按下后的字体颜色
//定义其点击事件
btnLeft.setOnClickListener(new OnClickListener() {
@Override
public void onClick(View v) {
if (onClickListenerL != null) {
onClickListenerL.onClick(v);
}
}
});
//初始化中间标题控件
tvTitle = new TextView(context);
lp=new RelativeLayout.LayoutParams(LayoutParams.WRAP_CONTENT,LayoutParams.WRAP_CONTENT);
//使其处于父控件的中间位置,也有一些APP的标题偏左,可根据项目需要自行调整,也可动态设置
lp.addRule(RelativeLayout.CENTER_IN_PARENT);
tvTitle.setLayoutParams(lp);
//设置标题文字颜色
tvTitle.setTextColor(Color.WHITE);
//设置标题文字大小
tvTitle.setTextSize(18);//默认为18
//初始化右侧ButtonM
btnRight = new ButtonM(context);
lp=new RelativeLayout.LayoutParams(LayoutParams.WRAP_CONTENT,LayoutParams.WRAP_CONTENT);
lp.rightMargin = dp2px(context, 10);
//垂直居中
lp.addRule(RelativeLayout.CENTER_VERTICAL);
//居于父控件的右侧
lp.addRule(RelativeLayout.ALIGN_PARENT_RIGHT);
btnRight.setLayoutParams(lp);
btnRight.setTextSize(16);//默认有16
btnRight.setVisibility(View.GONE); //默认隐藏右侧控件
btnRight.setTextColori(Color.WHITE);
btnRight.setTextColorSelected("#909090");
btnRight.setOnClickListener(new OnClickListener() {
@Override
public void onClick(View v) {
if (onClickListenerR != null) {
onClickListenerR.onClick(v);
}
}
});
//分别将三个控件加入到容器中
addView(btnLeft);
addView(tvTitle);
addView(btnRight);
}
/**
* 设置标题栏的背景色 ,String
* @param backColors
*/
public void setBackColor(String backColors) {
setBackgroundColor(Color.parseColor(backColors));
}
/**
* 设置标题栏的背景色 ,int
* @param backColori
*/
public void setBackColor(int backColori) {
setBackgroundColor(backColori);
}
/**
* 设置左侧控件显示的文字
* @param leftText
*/
public void setLeftText(String leftText) {
btnLeft.setText(leftText);
}
/**
* 设置左侧控件的背景图
* @param leftBackImage
*/
public void setLeftBackImage(int leftBackImage) {
if (leftBackImage != 0) {
btnLeft.setBackGroundImage(leftBackImage);
}
}
/**
* 设置左侧控件选中的背景图
* @param leftBackImageSeleted
*/
public void setLeftBackImageSeleted(int leftBackImageSeleted) {
if (leftBackImageSeleted != 0) {
btnLeft.setBackGroundImageSeleted(leftBackImageSeleted);
}
}
/**
* 设置左侧控件显示属性,默认为显示
* @param leftVisible
*/
public void setLeftVisible(boolean leftVisible) {
btnLeft.setVisibility(leftVisible ? View.VISIBLE : View.GONE);
}
/**
* 设置左侧控件显示的字体大小
* @param leftTextSize
*/
public void setLeftTextSize(float leftTextSize) {
btnLeft.setTextSize(leftTextSize);
}
/**
* 设置中间控件显示属性,默认为显示
* @param leftVisible
*/
public void setTitleVisible(boolean titleVisible) {
tvTitle.setVisibility(titleVisible ? View.VISIBLE : View.GONE);
}
/**
* 设置中间控件的文字
* @param titleText
*/
public void setTitleText(String titleText) {
tvTitle.setText(titleText);
}
/**
* 设置中间控件的文字的大小
* @param titleTextSize
*/
public void setTitleTextSize(float titleTextSize) {
tvTitle.setTextSize(titleTextSize);
}
/**
* 设置右侧控件显示的文字
* @param leftText
*/
public void setRightText(String rightText) {
btnRight.setText(rightText);
}
/**
* 设置右侧控件的背景图
* @param leftBackImage
*/
public void setRightBackImage(int rightBackImage) {
if (rightBackImage != 0) {
btnRight.setBackGroundImage(rightBackImage);
}
}
/**
* 设置右侧控件选中的背景图
* @param leftBackImageSeleted
*/
public void setRightBackImageSeleted(int rightBackImageSeleted) {
if (rightBackImageSeleted != 0) {
btnRight.setBackGroundImageSeleted(rightBackImageSeleted);
}
}
/**
* 设置右侧控件显示的字体大小
* @param leftTextSize
*/
public void setRightTextSize(float rightTextSize) {
btnRight.setTextSize(rightTextSize);
}
/**
* 设置右侧控件显示属性,默认为隐藏
* @param leftVisible
*/
public void setRightVisible(boolean rightVisible) {
btnRight.setVisibility(rightVisible ? View.VISIBLE : View.GONE);
}
//定义一个私有方法dp2px
private int dp2px(Context context, float dpVal) {
return (int) TypedValue.applyDimension(TypedValue.COMPLEX_UNIT_DIP,
dpVal, context.getResources().getDisplayMetrics());
}
}
以上定义了一些public方法,可根据具体项目需求扩展或减少。
2 child_titlebarm.xml 这里将标题栏单独写成一个布局文件,在其他布局文件中直接include即可
<?xml version="1.0" encoding="utf-8"?>
<LinearLayout xmlns:android="http://schemas.android.com/apk/res/android"
android:layout_width="match_parent"
android:layout_height="50dp"
android:orientation="vertical" >
<landptf.control.TitleBarM
android:id="@+id/tbm_title"
android:layout_width="match_parent"
android:layout_height="match_parent" >
</landptf.control.TitleBarM>
</LinearLayout>
这里标题栏的高低默认设成50dp
3 activity_titlebar.xml
<?xml version="1.0" encoding="utf-8"?>
<RelativeLayout xmlns:android="http://schemas.android.com/apk/res/android"
xmlns:tools="http://schemas.android.com/tools"
android:layout_width="match_parent"
android:layout_height="match_parent"
tools:ignore="HardcodedText" >
<include
android:id="@+id/title"
layout="@layout/child_titlebarm" />
<TextView
android:id="@+id/tv_content"
android:layout_width="wrap_content"
android:layout_height="wrap_content"
android:layout_centerInParent="true"
android:text="测试标题栏"
android:textSize="20sp" />
</RelativeLayout>
里面比较简单只include一个child_titlebarm.xml,又定义一个TextView就不做特别说明
4 TitleBarMActivity.java
package landptf.control;
import landptf.control.TitleBarM.OnClickListenerL;
import landptf.control.TitleBarM.OnClickListenerR;
import android.app.Activity;
import android.os.Bundle;
import android.view.View;
import android.widget.Toast;
/**
* TitleBarM测试类
* @author landptf
* @date 2015-6-10
*/
public class TitleBarMActivity extends Activity{
private TitleBarM tbTitle;
@Override
protected void onCreate(Bundle savedInstanceState) {
super.onCreate(savedInstanceState);
setContentView(R.layout.activity_titlebarm);
initView();
}
private void initView() {
//初始化控件
tbTitle = (TitleBarM) findViewById(R.id.tbm_title);
//先来设置一个背景色,当然你也可以用默认的背景色
tbTitle.setBackColor("#7067E2");
//设置左侧文字显示文字,也可设置背景图
tbTitle.setLeftText("返回");
//设置左侧控件点击事件
tbTitle.setOnClickLisenerL(new OnClickListenerL() {
@Override
public void onClick(View v) {
Toast.makeText(TitleBarMActivity.this, "你点击了返回", Toast.LENGTH_SHORT).show();
}
});
//设置中间的标题
tbTitle.setTitleText("landptf");
//由于我们将右侧的控件默认为隐藏,在此显示出来
tbTitle.setRightVisible(true);
//设置右侧的控件的背景图,这里找了两张搜索的图片
tbTitle.setRightBackImage(R.drawable.title_search);
tbTitle.setRightBackImageSeleted(R.drawable.title_search_selected);
tbTitle.setOnClickLisenerR(new OnClickListenerR() {
@Override
public void onClick(View v) {
Toast.makeText(TitleBarMActivity.this, "你点击了搜索", Toast.LENGTH_SHORT).show();
}
});
}
}
以上便是全部代码,其中使用了上一篇文章中介绍的ButtonM控件,大家也可以根据自己的需要使用其他控件实现。
这里只提供一种思路,不足之处互相交流学习。
在Android众多工具类app中,Last App Switcher绝对算是一个让人用过就不会卸载的工具。LAS这个应用,它的功能很简单,就是通过一个浮动按钮实现在两个应用之间一键切换,但是非常实用,尤其是在边玩边聊天需要频繁切换应用的时候。所以可以看出,想开发一款受欢迎的应用,一定要注重用户体验,只要用户用的爽,功能再再再简单,它也会受欢迎。那么这功能到底有多简单呢?跟我来实现一下就好了。
我就不截图了,下面用官方的截图来说明。这里真心推荐读者下载用一下。谷歌商店的下载地址:Last App Switcher 搞开发的应该都会FQ吧
看下原始程序界面: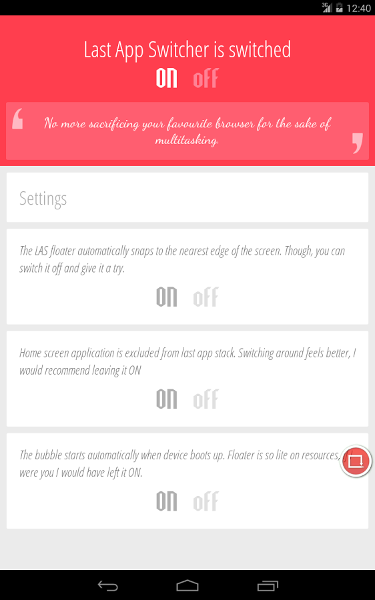
可以看到主界面就是一系列开关选项,同时程序右边有一个浮动的圆形窗口。下面我会按照步骤一步步增加功能。
仿iOS按钮
写demo不需要多好的界面,但也不能太丑,手里有看起来不错的控件就直接拖进来用了。下面是效果图,这一套按钮有好几种,都是仿iOS的,想要的可以点原作者的这篇博客,源码Github地址。
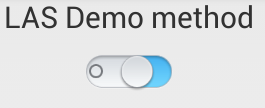
先添加一个开关主功能的按钮:
浮动按钮
可以看到,这个应用的主要功能就在于那个红色的浮动按钮上面。根据程序功能可以知道,这个浮动按钮是由程序开启的服务中创建的。又因为程序的Activity在离开onStart()状态后就会销毁(这样做的原因后面说),之后按钮仍保持其可用状态。所以可以知道是通过startService()启动的服务。下面我们就需要先写一个服务出来,再在服务中绘一个浮动按钮。具体有关服务的细节参考我上一篇博客:博客传送门。
写一个服务FloatButtonService,在AndroidManifest.xml文件添加服务
<service android:name=".FloatButtonService" >
</service>
服务中添加绘制浮动按钮方法,相关说明见注释
private void createFloatView() {
}
方法添加完毕在服务相应的调用位置创建和销毁浮动按钮
@Override
public void onCreate() {
// TODO Auto-generated method stub
super.onCreate();
createFloatView();
}
@Override
public void onDestroy() {
// TODO Auto-generated method stub
super.onDestroy();
if (mFloatLayout != null) {
mWindowManager.removeView(mFloatLayout);
}
}
使用浮动按钮还需要增加权限:
<uses-permission android:name="android.permission.SYSTEM_ALERT_WINDOW" />
这样,我们在MainActivity中就可以为按钮增加响应事件,进行开启和关闭服务了。
将程序从最近任务(last recent tasks)中移除
按下系统导航栏第三个按钮我们就可以看到最近使用过的任务列表,当然,LAS切换程序也是在这里选择最后使用的两个应用程序切换的。所以在切换的时候,把自己的Activity从最近的任务中删掉是很必要的。
前面提到过,就是在Activity的onPause()状态或者onStop()状态中执行finishAndRemoveTask()方法删除任务。但这个方法在API 21也就是Android 5.0才引入。不过,我们还有一个更方便的方法,就是在配置文件的<activity>标签中增加
android:excludeFromRecents="true"
这样不论你是按下back键还是home键,程序都会从最近使用过的任务列表中删除
任务间的切换
将自身Activity从最近任务列表中删除后,我们就可以考虑获取最后两次的任务,然后互相一键切换了。
在浮动按钮的单击事件中添加
首先需要获得ActivityManager的对象
ActivityManager mActivityManager = (ActivityManager) this.getSystemService(Context.ACTIVITY_SERVICE);
要获取任务还需要对应权限
<uses-permission android:name="android.permission.GET_TASKS"/>
有了权限,就可以获取到任务列表了
List<ActivityManager.RecentTaskInfo> mAppList = new ArrayList<ActivityManager.RecentTaskInfo>();
mAppList = mActivityManager.getRecentTasks(3, ActivityManager.RECENT_IGNORE_UNAVAILABLE);
建立一个装有RecentTaskInfo的列表,通过getRecentTasks方法获取系统的最近使用过的应用列表。
关于getRecentTasks方法,第一个参数是一个整型值,是你需要返回的应用数量,但实际上得到的数量可能会比这个值要小。比如
我要得到3个,但后台只开了1个,那么只返回1个。第二个参数是要返回的应用的状态,我选择的是忽略不可用的应用,应该是完全关闭,不在后台的应用。
再说一点,这个方法在Android5.0因为安全问题屏蔽掉了,也就是android5.0以上的版本不能用这个方法。所以我前一阵子在App Store上看到评论都是Android5.0用这个没有效果。现在行不行我倒不知道,闲了再研究吧。(每次我说闲了再做基本都是个坑- -|)
前面的参数我之所以要选择3,是因为我只需要获得最近使用的2个应用,因为每次开新应用,这个应用信息都会存在列表的最上面,所以获取前3个即可。
但为什么是3而不是2呢,因为Android的Home界面也是一个Activity(应该是),我可以选择是否要在切换的时候忽略掉Home界面。所以考虑到Home,就要用3。
Home的包名为com.android.launcher,以此为根据进行判断即可。
private void getAndStartIntent(int i){
ActivityManager.RecentTaskInfo info = mAppList.get(i);
if (null == info)
Toast.makeText(FloatButtonService.this, "No other apps", Toast.LENGTH_SHORT).show();
else if(sp.getBoolean(StringKey.ExcludeHome, false)){ // if set true, do follow func
if(info.baseIntent.getComponent().getPackageName().equals(HOME_PACKAGE)) //exclude HOME
getAndStartIntent(2);
}else
startActivityWithoutAnimation(info);
}
启动一个应用的过程默认是有一个切换动画的,我们的程序就是用来切换程序的,所以取消启动动画是一个比较好的选择。
只用给要启动的intent加一个flag即可(有些情况下不会生效)
intent.addFlags(Intent.FLAG_ACTIVITY_NO_ANIMATION);
开机启动
Android开机启动结束会发送一个BOOT_COMPLETED的广播,我们在程序中建立一个广播接收器来接收这个广播,接收成功就直接启动服务来显示浮动按钮即可。
先建立一个广播接收器 BootReceiver
public class BootReceiver extends BroadcastReceiver {
@Override
public void onReceive(Context context, Intent intent) {
// TODO Auto-generated method stub
if (intent.getAction().equals("android.intent.action.BOOT_COMPLETED")) {// on boot
Intent a = new Intent(context, FloatButtonService.class);
context.startService(a);
}
}
}
在配置文件中,<application>标签下注册广播接收器
<receiver android:name=".BootReceiver" >
<intent-filter>
<action android:name="android.intent.action.BOOT_COMPLETED" />
<category android:name="android.intent.category.LAUNCHER" />
</intent-filter>
</receiver>
然后增加权限
<uses-permission android:name="android.permission.RECEIVE_BOOT_COMPLETED" />
开机启动就完成了。但怎么用开关来控制其是否开机启动呢?
SharedPreferences
用开关控制功能的开启状态,这个状态不能保存在程序中,因为程序是要被关闭的。那么就是要用一些方法保存开关的状态到系统中,然后服务从文件读取状态,控制自己的程序行为。Android中最适合保存配置状态的就是用SharedPreferences了。当我查看LAS应用的数据文件的时候,发现输出的结果的确是这样的。
cat /data/data/com.abhi.lastappswitcher/shared_prefs/com.inpen.lastAppSwitcher.APPLICATION_PREFS.xml
<?xml version='1.0' encoding='utf-8' standalone='yes' ?>
<map>
<boolean name="com.inpen.lastAppSwitcher.PREF_SNAP_TO_EDGE" value="true" />
<int name="com.inpen.lastAppSwitcher.PREF_LAND_HEIGHT" value="800" />
<int name="com.inpen.lastAppSwitcher.PREF_LAND_FLOATER_Y" value="485" />
<int name="com.inpen.lastAppSwitcher.PREF_LAND_WIDTH" value="1280" />
<int name="com.inpen.lastAppSwitcher.PREF_PORT_FLOATER_Y" value="776" />
<int name="com.inpen.lastAppSwitcher.PREF_PORT_WIDTH" value="800" />
<boolean name="com.inpen.lastAppSwitcher.PREF_ERROR_MSG" value="true" />
<boolean name="com.inpen.lastAppSwitcher.PREF_STATUS_BAR_OVERLAY" value="false" />
<int name="com.inpen.lastAppSwitcher.PREF_FLOATER_SIZE" value="55" />
<int name="com.inpen.lastAppSwitcher.PREF_PORT_FLOATER_X" value="765" />
<int name="com.inpen.lastAppSwitcher.PREF_PORT_HEIGHT" value="1280" />
<int name="com.inpen.lastAppSwitcher.PREF_FLOATER_TRANSPARENCY" value="75" />
<int name="currentQuote" value="6" />
<int name="com.inpen.lastAppSwitcher.PREF_SWITCHING_METHOD" value="1" />
<boolean name="com.inpen.lastAppSwitcher.PREF_FLOATER_MOVABLE" value="true" />
<boolean name="com.inpen.lastAppSwitcher.PREF_HAPTIC_FEEDBACK" value="false" />
<int name="com.inpen.lastAppSwitcher.PREF_FLOATER_COLOR" value="0" />
</map>
那么,我们就可以根据自己的需求来写sharedPreferences文件了
先获得 SharedPreferences 的实例
SharedPreferences sp = getSharedPreferences("las_demo", Context.MODE_PRIVATE);
参数1是不带后缀的文件名,根据文件名获取实例,同一个名字的SharedPreferences对象只获得同一个实例;
参数2是模式操作模式:
Context.MODE_PRIVATE:
为默认操作模式,代表该文件是私有数据,只能被应用本身访问,在该模式下,写入的内容会覆盖原文件的内容。
Context.MODE_APPEND:
创建的文件是私有数据,该模式会检查文件是否存在,存在就往文件追加内容,否则就创建新文件。
MODE_WORLD_READABLE:
表示当前文件可以被其他应用读取。
MODE_WORLD_WRITEABLE:
表示当前文件可以被其他应用写入。
获得实例之后要进行初始化,写入一些设定值。这里因为初始化只需要一次,但我没找到判断sharedPreferences文件是否存在的方法(没想用File去查,这个文件存在系统路径,有权限问题,估计不行,有知道的可以告诉我),有一个public abstract boolean contains (String key)方法,但用了感觉没效果,所以我又加了一个key,来保存第一次创建的状态,然后写入其他键-值,保存。
if(!sp.getBoolean(StringKey.FirstCreate, true)){
Editor editor = sp.edit();
editor.putBoolean(StringKey.FirstCreate, true);
editor.putBoolean(StringKey.RunAtStart, false);
editor.putBoolean(StringKey.SnapToEdge, true);
editor.putBoolean(StringKey.StatusBarOverlay, false);
editor.putBoolean(StringKey.ExcludeHome, true);
editor.commit();
}
设置好键-值后就可以根据这些值设置界面里按钮的开关状态和设置程序的一些行为。
if (sp.getBoolean(StringKey.RunAtStart, false))
mBtnRunAtStartup.setChecked(true);
else
mBtnRunAtStartup.setChecked(false);
当然,在手动改变按钮状态的时候也要为某个key重新写入新的value
mBtnRunAtStartup.setOnCheckedChangeListener(new OnCheckedChangeListener() {
@Override
public void onCheckedChanged(CompoundButton buttonView, boolean isChecked) {
// TODO Auto-generated method stub
if (isChecked)
editBoolKey(StringKey.RunAtStart, true);
else
editBoolKey(StringKey.RunAtStart, false);
}
});
private void editBoolKey(String str, boolean b) {
Editor editor = sp.edit();
editor.putBoolean(str, b);
editor.apply();
}
改SharedPreferences的key-value的时候需要获得editor对象实例,设置完成用apply()方法或者commit()方法提交修改。如果有两个editor实例在同时修改,则以最后一次的提交为准。如果不关心返回值,且在应用的主线程里使用,用apply()要比commit()好。
至此,需要开关功能就在功能实现的地方加一层读取SP键值的过程,根据读到的结果决定功能。是否可用。
悬浮按钮显示在status bar上方
按照下面设置windowManager的属性就好,没什么好解释的,放上文档看吧。
wmParams.flags = LayoutParams.FLAG_NOT_TOUCH_MODAL
| LayoutParams.FLAG_NOT_FOCUSABLE
| LayoutParams.FLAG_LAYOUT_IN_SCREEN;
int android.view.WindowManager.LayoutParams.FLAG_NOT_TOUCH_MODAL = 32 [0x20]
Window flag: Even when this window is focusable (its is not set), allow any pointer events outside of the window to be sent to the windows behind it. Otherwise it will consume all pointer events itself, regardless of whether they are inside of the window.
int android.view.WindowManager.LayoutParams.FLAG_NOT_FOCUSABLE = 8 [0x8]
Window flag: this window won't ever get key input focus, so the user can not send key or other button events to it. Those will instead go to whatever focusable window is behind it. This flag will also enable FLAG_NOT_TOUCH_MODAL whether or not that is explicitly set.
Setting this flag also implies that the window will not need to interact with a soft input method, so it will be Z-ordered and positioned independently of any active input method (typically this means it gets Z-ordered on top of the input method, so it can use the full screen for its content and cover the input method if needed. You can use FLAG_ALT_FOCUSABLE_IM to modify this behavior.
int android.view.WindowManager.LayoutParams.FLAG_LAYOUT_IN_SCREEN = 256 [0x100]
Window flag: place the window within the entire screen, ignoring decorations around the border (a.k.a. the status bar). The window must correctly position its contents to take the screen decoration into account. This flag is normally set for you by Window as described in Window.setFlags.
按钮边缘吸附效果
这个应该是最简单的了,在按钮的touch事件中,当移动结束,手指抬起行为ACTION_UP中对位置进行判断,如果按钮的x坐标在屏幕左半边,x设为0,即贴着屏幕左边缘显示,反之一个道理。
今天来看一个通过重写Button来动态实现一些效果,如圆角矩形、圆形、按下改变字体,改变背景色,改变背景图等
在此说明一下,这种实现方式绝对不是唯一的,而且通过xml文件即可简单实现,这样做只是为了将控件的样式完全由代码实现,更方便打包应用于其他项目
下面来看几张效果图:
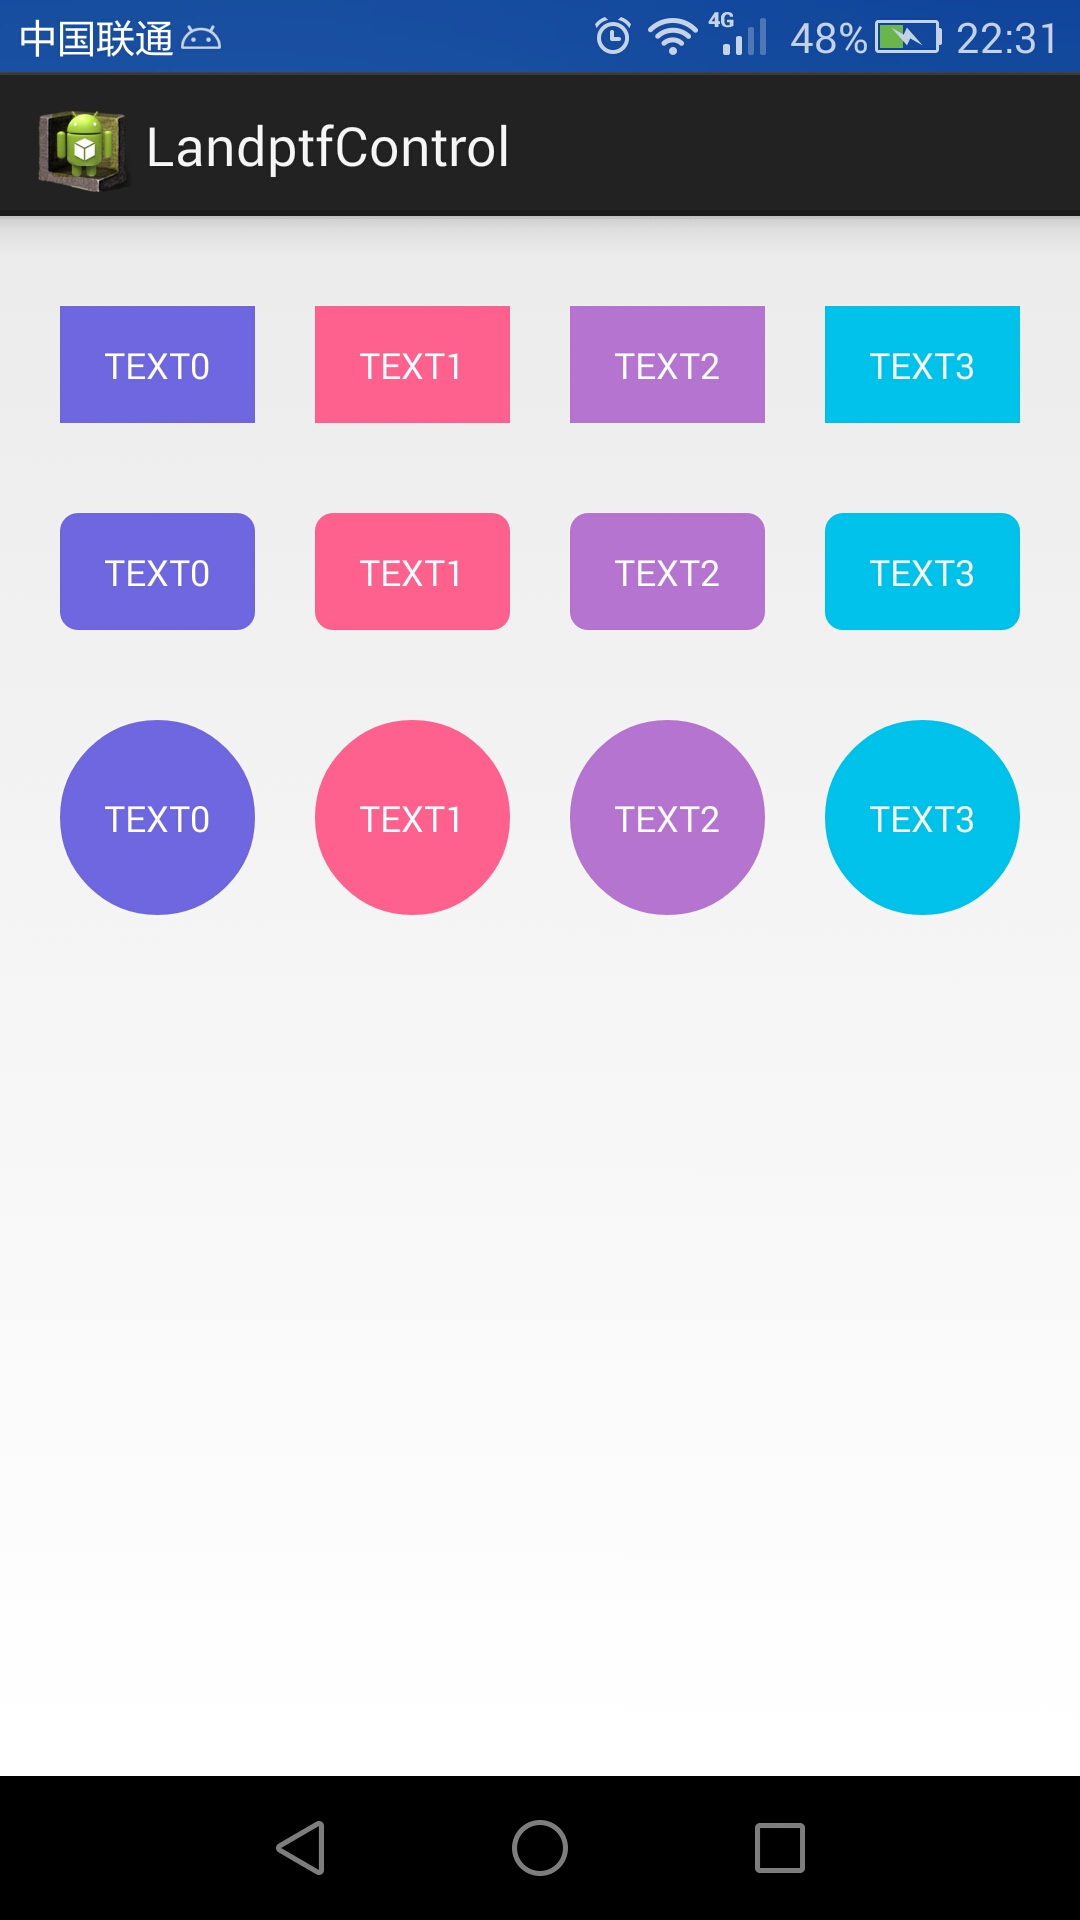

图1 初始状态 图2 按下第一行的TEXT0
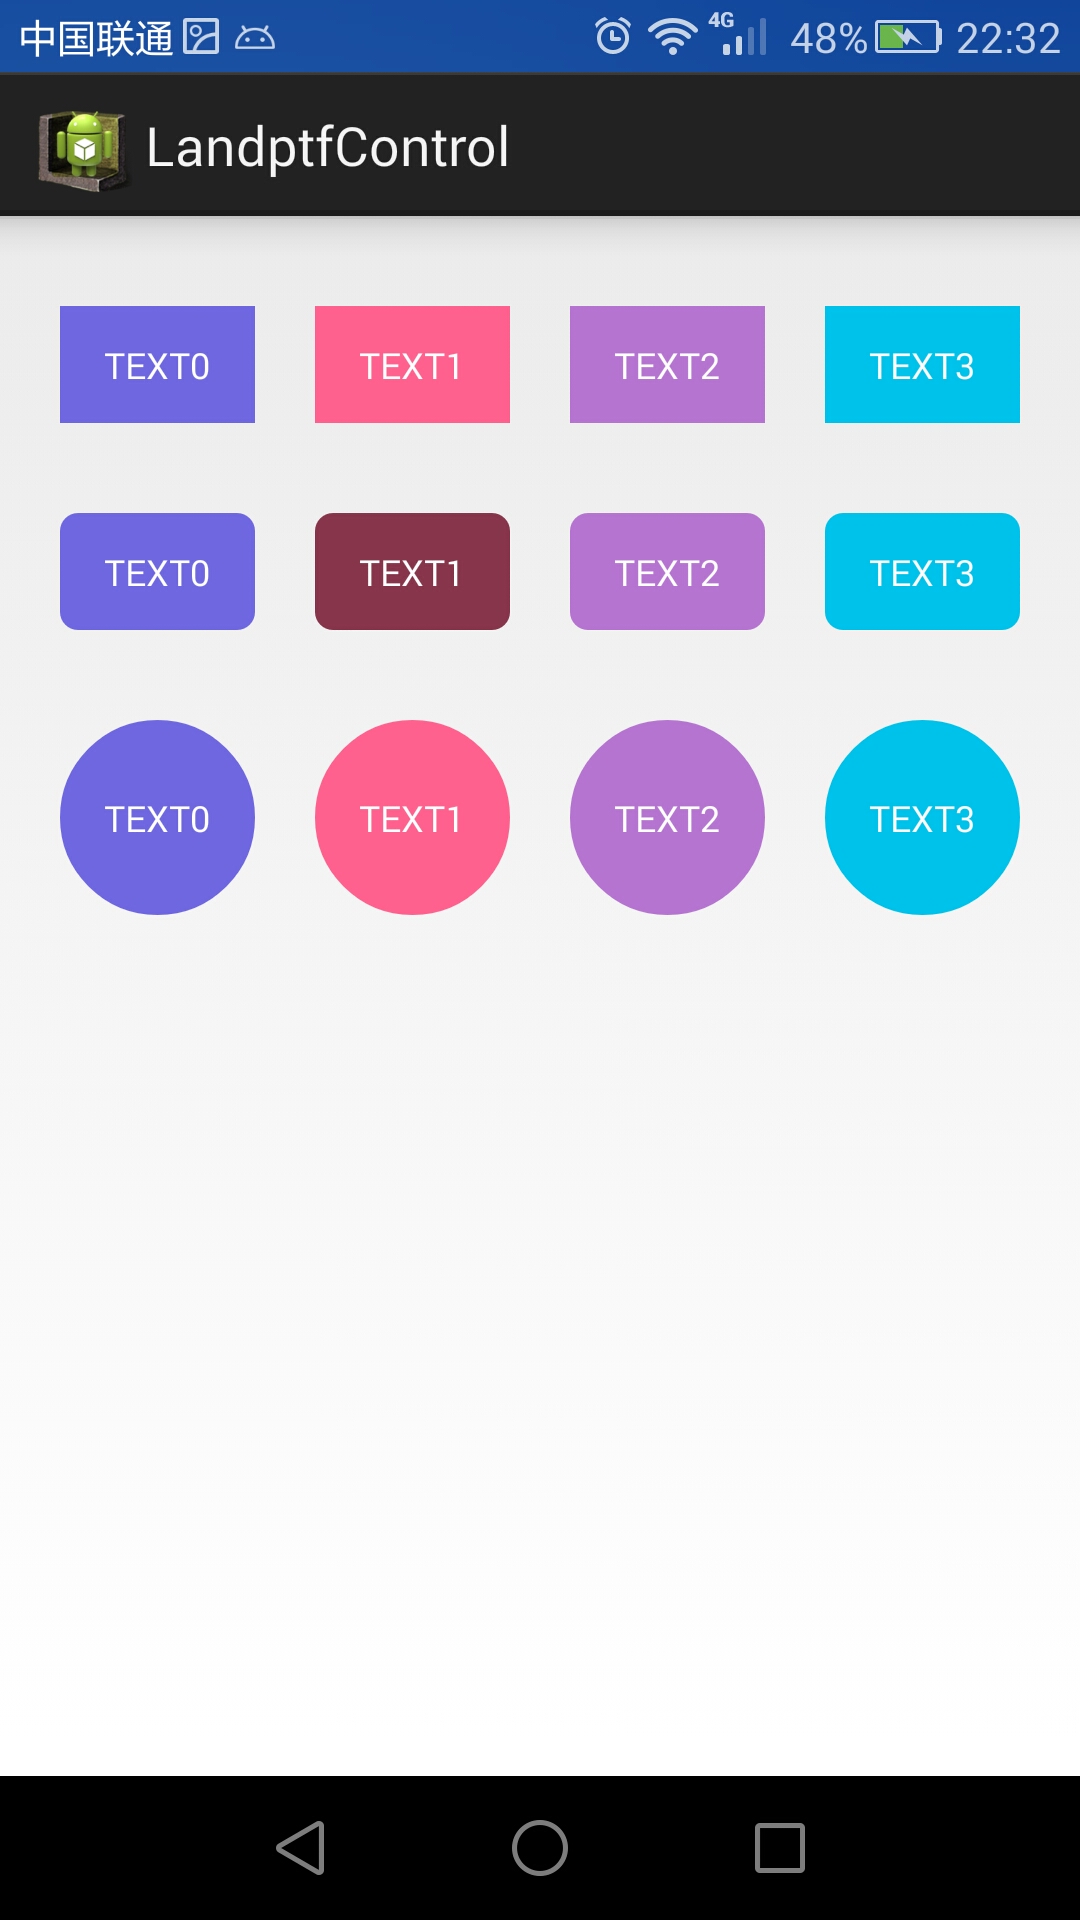
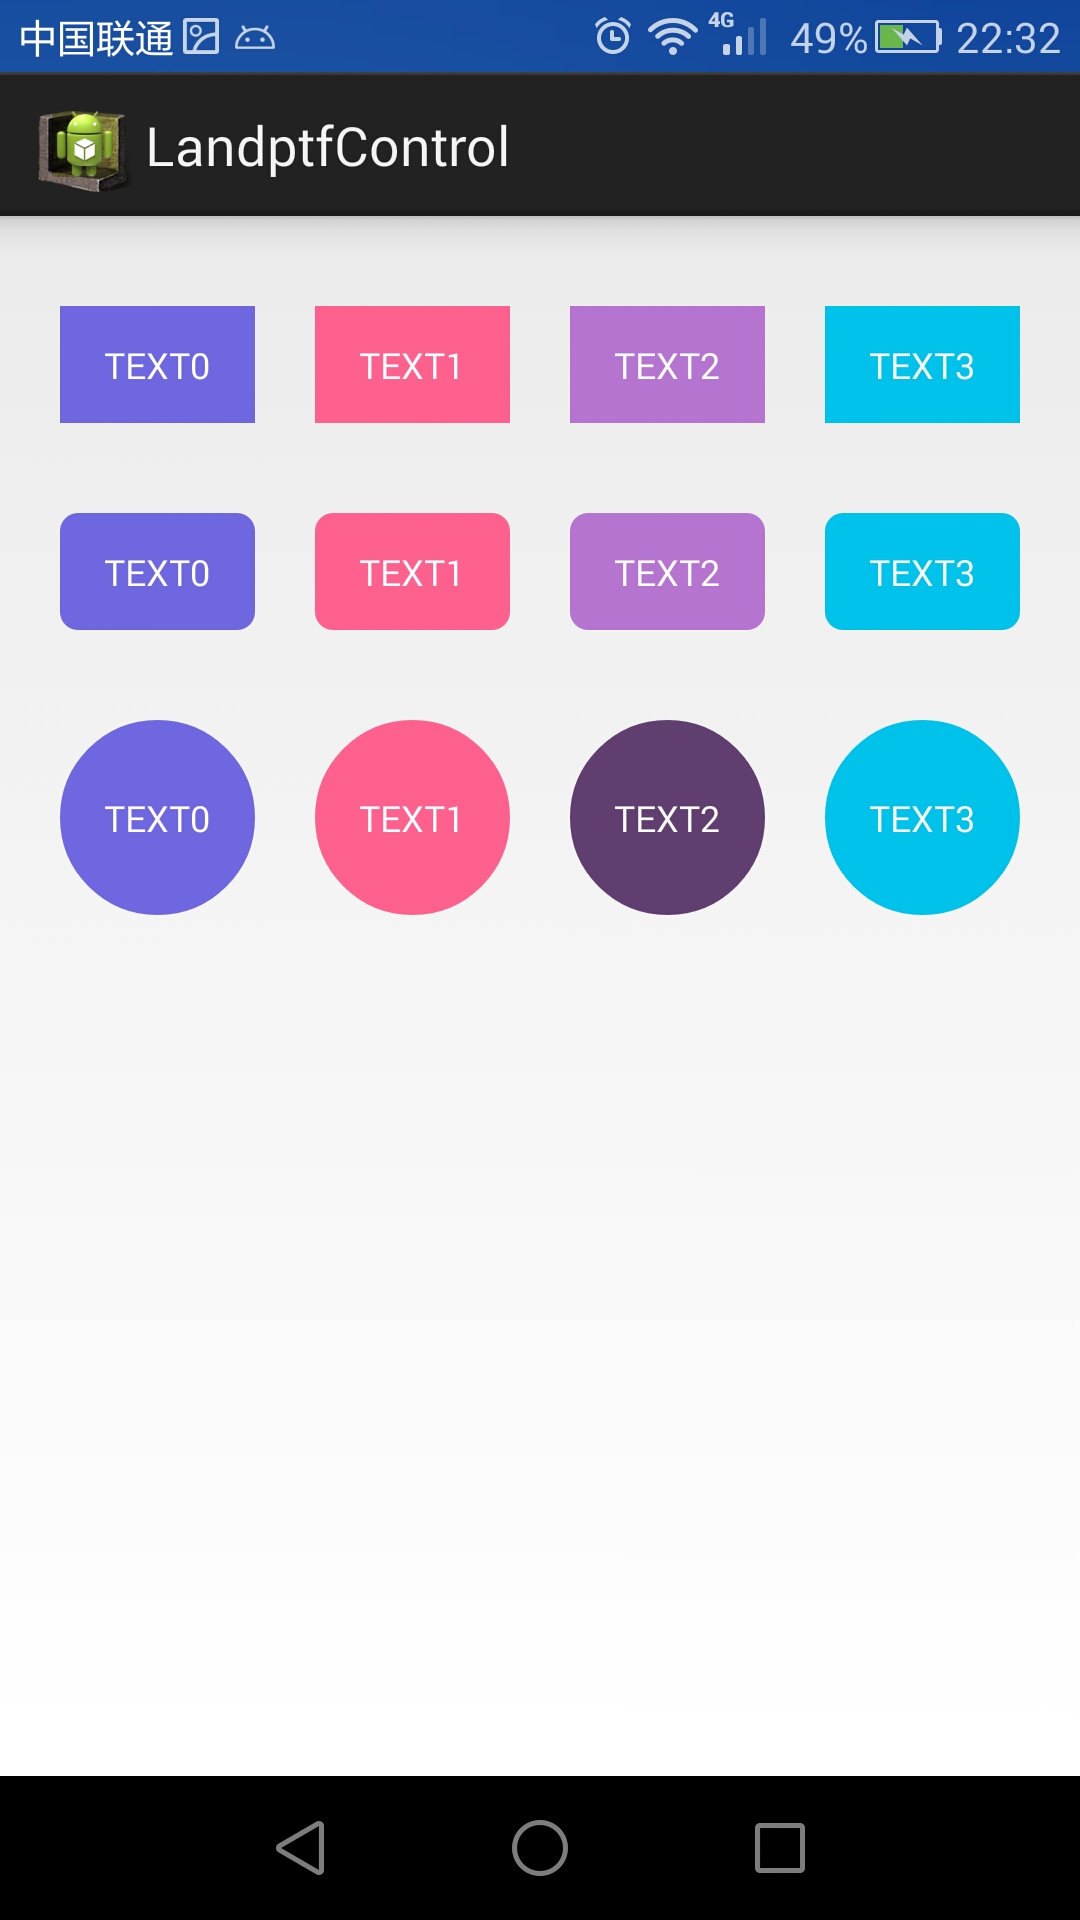
图3 按下第二行的TEXT1 图4 按下第三行的TEXT2,按住截屏时,没有截到Toast的提示
下面看代码,共两个类,一个布局文件
1 ButtonM.java:重写Button,可单独打包应用于其他项目
在此说明一下,这种实现方式绝对不是唯一的,而且通过xml文件即可简单实现,这样做只是为了将控件的样式完全由代码实现,更方便打包应用于其他项目
package landptf.control;
import android.content.Context;
import android.graphics.Color;
import android.graphics.drawable.GradientDrawable;
import android.util.AttributeSet;
import android.view.Gravity;
import android.view.MotionEvent;
import android.view.View;
import android.widget.Button;
/**
* 重写Button,自定义Button样式
* @author landptf
* @date 2015-6-8
*/
public class ButtonM extends Button{
private GradientDrawable gradientDrawable;//控件的样式
private String backColors = "";//背景色,String类型
private int backColori = 0;//背景色,int类型
private String backColorSelecteds = "";//按下后的背景色,String类型
private int backColorSelectedi = 0;//按下后的背景色,int类型
private int backGroundImage = 0;//背景图,只提供了Id
private int backGroundImageSeleted = 0;//按下后的背景图,只提供了Id
private String textColors = "";//文字颜色,String类型
private int textColori = 0;//文字颜色,int类型
private String textColorSeleteds = "";//按下后的文字颜色,String类型
private int textColorSeletedi = 0;//按下后的文字颜色,int类型
private float radius = 8;//圆角半径
private int shape = 0;//圆角样式,矩形、圆形等,由于矩形的Id为0,默认为矩形
private Boolean fillet = false;//是否设置圆角
public ButtonM(Context context, AttributeSet attrs, int defStyle) {
super(context, attrs, defStyle);
init();
}
public ButtonM(Context context, AttributeSet attrs) {
this(context, attrs, 0);
}
public ButtonM(Context context) {
this(context, null);
}
private void init() {
//将Button的默认背景色改为透明,本人不喜欢原来的颜色
if (fillet) {
if (gradientDrawable == null) {
gradientDrawable = new GradientDrawable();
}
gradientDrawable.setColor(Color.TRANSPARENT);
}else {
setBackgroundColor(Color.TRANSPARENT);
}
//设置文字默认居中
setGravity(Gravity.CENTER);
//设置Touch事件
setOnTouchListener(new OnTouchListener() {
@Override
public boolean onTouch(View arg0, MotionEvent event) {
//按下改变样式
setColor(event.getAction());
//此处设置为false,防止Click事件被屏蔽
return false;
}
});
}
//改变样式
private void setColor(int state){
if (state == MotionEvent.ACTION_DOWN) {
//按下
if (backColorSelectedi != 0) {
//先判断是否设置了按下后的背景色int型
if (fillet) {
if (gradientDrawable == null) {
gradientDrawable = new GradientDrawable();
}
gradientDrawable.setColor(backColorSelectedi);
}else {
setBackgroundColor(backColorSelectedi);
}
}else if (!backColorSelecteds.equals("")) {
if (fillet) {
if (gradientDrawable == null) {
gradientDrawable = new GradientDrawable();
}
gradientDrawable.setColor(Color.parseColor(backColorSelecteds));
}else {
setBackgroundColor(Color.parseColor(backColorSelecteds));
}
}
//判断是否设置了按下后文字的颜色
if (textColorSeletedi != 0) {
setTextColor(textColorSeletedi);
}else if (!textColorSeleteds.equals("")) {
setTextColor(Color.parseColor(textColorSeleteds));
}
//判断是否设置了按下后的背景图
if (backGroundImageSeleted != 0) {
setBackgroundResource(backGroundImageSeleted);
}
}
if (state == MotionEvent.ACTION_UP) {
//抬起
if (backColori == 0 && backColors.equals("")) {
//如果没有设置背景色,默认改为透明
if (fillet) {
if (gradientDrawable == null) {
gradientDrawable = new GradientDrawable();
}
gradientDrawable.setColor(Color.TRANSPARENT);
}else {
setBackgroundColor(Color.TRANSPARENT);
}
}else if(backColori != 0){
if (fillet) {
if (gradientDrawable == null) {
gradientDrawable = new GradientDrawable();
}
gradientDrawable.setColor(backColori);
}else {
setBackgroundColor(backColori);
}
}else {
if (fillet) {
if (gradientDrawable == null) {
gradientDrawable = new GradientDrawable();
}
gradientDrawable.setColor(Color.parseColor(backColors));
}else {
setBackgroundColor(Color.parseColor(backColors));
}
}
//如果为设置字体颜色,默认为黑色
if (textColori == 0 && textColors.equals("")) {
setTextColor(Color.BLACK);
}else if (textColori != 0) {
setTextColor(textColori);
}else {
setTextColor(Color.parseColor(textColors));
}
if (backGroundImage != 0) {
setBackgroundResource(backGroundImage);
}
}
}
/**
* 设置按钮的背景色,如果未设置则默认为透明
* @param backColor
*/
public void setBackColor(String backColor) {
this.backColors = backColor;
if (backColor.equals("")) {
if (fillet) {
if (gradientDrawable == null) {
gradientDrawable = new GradientDrawable();
}
gradientDrawable.setColor(Color.TRANSPARENT);
}else {
setBackgroundColor(Color.TRANSPARENT);
}
}else {
if (fillet) {
if (gradientDrawable == null) {
gradientDrawable = new GradientDrawable();
}
gradientDrawable.setColor(Color.parseColor(backColor));
}else {
setBackgroundColor(Color.parseColor(backColor));
}
}
}
/**
* 设置按钮的背景色,如果未设置则默认为透明
* @param backColor
*/
public void setBackColor(int backColor) {
this.backColori = backColor;
if (backColori == 0) {
if (fillet) {
if (gradientDrawable == null) {
gradientDrawable = new GradientDrawable();
}
gradientDrawable.setColor(Color.TRANSPARENT);
}else {
setBackgroundColor(Color.TRANSPARENT);
}
}else {
if (fillet) {
if (gradientDrawable == null) {
gradientDrawable = new GradientDrawable();
}
gradientDrawable.setColor(backColor);
}else {
setBackgroundColor(backColor);
}
}
}
/**
* 设置按钮按下后的颜色
* @param backColorSelected
*/
public void setBackColorSelected(int backColorSelected) {
this.backColorSelectedi = backColorSelected;
}
/**
* 设置按钮按下后的颜色
* @param backColorSelected
*/
public void setBackColorSelected(String backColorSelected) {
this.backColorSelecteds = backColorSelected;
}
/**
* 设置按钮的背景图
* @param backGroundImage
*/
public void setBackGroundImage(int backGroundImage) {
this.backGroundImage = backGroundImage;
if (backGroundImage != 0) {
setBackgroundResource(backGroundImage);
}
}
/**
* 设置按钮按下的背景图
* @param backGroundImageSeleted
*/
public void setBackGroundImageSeleted(int backGroundImageSeleted) {
this.backGroundImageSeleted = backGroundImageSeleted;
}
/**
* 设置按钮圆角半径大小
* @param radius
*/
public void setRadius(float radius) {
if (gradientDrawable == null) {
gradientDrawable = new GradientDrawable();
}
gradientDrawable.setCornerRadius(radius);
}
/**
* 设置按钮文字颜色
* @param textColor
*/
public void setTextColors(String textColor) {
this.textColors = textColor;
setTextColor(Color.parseColor(textColor));
}
/**
* 设置按钮文字颜色
* @param textColor
*/
public void setTextColori(int textColor) {
this.textColori = textColor;
setTextColor(textColor);
}
/**
* 设置按钮按下的文字颜色
* @param textColor
*/
public void setTextColorSelected(String textColor) {
this.textColorSeleteds = textColor;
}
/**
* 设置按钮按下的文字颜色
* @param textColor
*/
public void setTextColorSelected(int textColor) {
this.textColorSeletedi = textColor;
}
/**
* 按钮的形状
* @param shape
*/
public void setShape(int shape) {
this.shape = shape;
}
/**
* 设置其是否为圆角
* @param fillet
*/
@SuppressWarnings("deprecation")
public void setFillet(Boolean fillet) {
this.fillet = fillet;
if (fillet) {
if (gradientDrawable == null) {
gradientDrawable = new GradientDrawable();
}
//GradientDrawable.RECTANGLE
gradientDrawable.setShape(shape);
gradientDrawable.setCornerRadius(radius);
setBackgroundDrawable(gradientDrawable);
}
}
}
2 activity_buttonm.xml 布局文件,为了演示效果定义了三个空的LinearLayout,下面将分别为其添加子控件
<?xml version="1.0" encoding="utf-8"?>
<LinearLayout xmlns:android="http://schemas.android.com/apk/res/android"
android:layout_width="match_parent"
android:layout_height="match_parent"
android:orientation="vertical" >
<LinearLayout
android:id="@+id/ll_button1"
android:layout_width="match_parent"
android:layout_height="wrap_content"
android:layout_marginTop="30dp"
android:orientation="horizontal">
</LinearLayout>
<LinearLayout
android:id="@+id/ll_button2"
android:layout_width="match_parent"
android:layout_height="wrap_content"
android:layout_marginTop="30dp"
android:orientation="horizontal">
</LinearLayout>
<LinearLayout
android:id="@+id/ll_button3"
android:layout_width="match_parent"
android:layout_height="wrap_content"
android:layout_marginTop="30dp"
android:orientation="horizontal">
</LinearLayout>
</LinearLayout>
3 ButtonMActivity.java:ButtonM测试类
package landptf.control;
import android.app.Activity;
import android.graphics.Color;
import android.graphics.drawable.GradientDrawable;
import android.os.Bundle;
import android.view.View;
import android.view.View.OnClickListener;
import android.view.ViewGroup.LayoutParams;
import android.widget.LinearLayout;
import android.widget.Toast;
/**
* ButtonM测试类
* @author landptf
* @date 2015-6-8
*/
public class ButtonMActivity extends Activity{
//定义三个空布局用来装载Button控件,只为演示效果,实际开发中不推荐使用
private LinearLayout llButtonM1;
private LinearLayout llButtonM2;
private LinearLayout llButtonM3;
//定义三个ButtonM数组
private ButtonM[] buttonM1;
private ButtonM[] buttonM2;
private ButtonM[] buttonM3;
//定义两组颜色值,按下与未按下的按钮背景色
private static final String[] colorList = {"#7067E2","#FF618F","#B674D2","#00C2EB"};
private static final String[] colorSelectedList = {"#3C3779","#88354C","#613E70","#00677D"};
@Override
protected void onCreate(Bundle savedInstanceState) {
super.onCreate(savedInstanceState);
setContentView(R.layout.activity_buttonm);
initView();
}
//初始化控件
private void initView() {
//实例化布局控件
llButtonM1 = (LinearLayout) findViewById(R.id.ll_button1);
llButtonM2 = (LinearLayout) findViewById(R.id.ll_button2);
llButtonM3 = (LinearLayout) findViewById(R.id.ll_button3);
//实例化控件数组,各定义4个
buttonM1 = new ButtonM[4];
buttonM2 = new ButtonM[4];
buttonM3 = new ButtonM[4];
//获取屏幕的宽度,每行四个Button,间隙为60共300,除4为每个控件的宽度
@SuppressWarnings("deprecation")
int btnWidth = (getWindowManager().getDefaultDisplay().getWidth() - 300)/4;
//定义第一个布局
LinearLayout.LayoutParams lp1;
for (int i = 0; i < 4; i++) {
//为buttonM1设置样式,直角矩形
buttonM1[i] = new ButtonM(this);
//字体颜色
buttonM1[i].setTextColori(android.graphics.Color.WHITE);
//字体大小
buttonM1[i].setTextSize(14);
//背景色
buttonM1[i].setBackColor(Color.parseColor(colorList[i]));
//选中的背景色
buttonM1[i].setBackColorSelected(Color.parseColor(colorSelectedList[i]));
//文字提示
buttonM1[i].setText("TEXT" + i);
//此处设置Id的值为i,否则onClick中v.getId()将永远为-1
buttonM1[i].setId(i);
//定义buttonM1的布局,宽度自适应,高度为宽度的0.6倍,权重为1
//也可以写成lp1 = new LinearLayout.LayoutParams(btnWidth,(int) (btnWidth * 0.6));
lp1 = new LinearLayout.LayoutParams(LayoutParams.WRAP_CONTENT,(int) (btnWidth * 0.6), 1.0f);
//控件距离其右侧控件的距离,此处为60
lp1.setMargins(0,0,60,0);
buttonM1[i].setLayoutParams(lp1);
//设置buttonM1的点击事件
buttonM1[i].setOnClickListener(new OnClickListener() {
@Override
public void onClick(View v) {
Toast.makeText(ButtonMActivity.this, "您选择了第" + v.getId() + "个", Toast.LENGTH_SHORT).show();
}
});
//设置PaddingLeft为60
llButtonM1.setPadding(60, 0, 0, 0);
//将buttonM1添加到llButtonM1中
llButtonM1.addView(buttonM1[i]);
}
//定义第二个布局
LinearLayout.LayoutParams lp2;
for (int i = 0; i < 4; i++) {
//为buttonM2设置样式,圆角矩形
buttonM2[i] = new ButtonM(this);
buttonM2[i].setTextColori(android.graphics.Color.WHITE);
buttonM2[i].setTextSize(14);
//设置是否为圆角
buttonM2[i].setFillet(true);
//设置圆角的半径大小
buttonM2[i].setRadius(18);
buttonM2[i].setBackColor(Color.parseColor(colorList[i]));
buttonM2[i].setBackColorSelected(Color.parseColor(colorSelectedList[i]));
buttonM2[i].setText("TEXT" + i);
buttonM2[i].setId(i);
lp2 = new LinearLayout.LayoutParams(LayoutParams.WRAP_CONTENT,(int) (btnWidth * 0.6), 1.0f);
lp2.setMargins(0,0,60,0);
buttonM2[i].setLayoutParams(lp2);
buttonM2[i].setOnClickListener(new OnClickListener() {
@Override
public void onClick(View v) {
Toast.makeText(ButtonMActivity.this, "您选择了第" + v.getId() + "个", Toast.LENGTH_SHORT).show();
}
});
llButtonM2.setPadding(60, 0, 0, 0);
llButtonM2.addView(buttonM2[i]);
}
//定义第三个布局
LinearLayout.LayoutParams lp3;
for (int i = 0; i < 4; i++) {
//为buttonM3设置样式,圆形
buttonM3[i] = new ButtonM(this);
buttonM3[i].setTextColori(android.graphics.Color.WHITE);
buttonM3[i].setTextSize(14);
//设置为圆形,默认为矩形,GradientDrawable.RECTANGLE
buttonM3[i].setShape(GradientDrawable.OVAL);
buttonM3[i].setFillet(true);
buttonM3[i].setBackColor(Color.parseColor(colorList[i]));
buttonM3[i].setBackColorSelected(Color.parseColor(colorSelectedList[i]));
buttonM3[i].setText("TEXT" + i);
buttonM3[i].setId(i);
lp3 = new LinearLayout.LayoutParams(btnWidth,btnWidth);
lp3.setMargins(0,0,60,0);
buttonM3[i].setLayoutParams(lp3);
buttonM3[i].setOnClickListener(new OnClickListener() {
@Override
public void onClick(View v) {
Toast.makeText(ButtonMActivity.this, "您选择了第" + v.getId() + "个", Toast.LENGTH_SHORT).show();
}
});
llButtonM3.setPadding(60, 0, 0, 0);
llButtonM3.addView(buttonM3[i]);
}
}
}
注释基本都说明了,可以慢慢积累这些控件,最终形成一个自己的控件库,在不同项目中完善,使之越来越强大
明天给大家介绍一下通过继承RelativeLayout,实现多个控件的组合,让不同项目应用,可避免每次都要重写
动画效果图如下:
下面要介绍的其中一种Activity的切换效果(如上图).当前后两个Activity有共同的UI元素时候,适合用这种动画效果,给用户连贯性的体验.
实现步骤
1. 新建一个Android应用Project,里面有两个Activity;
2. 下面是MainActivity的代码和XML布局;
代码和布局都非常简单.解释一下onClick()方法的代码.
makeSceneTransactionAnimation()方法第二个参数是用来告诉指定共同的UI元素是哪一个,这里是shareView.
makeSceneTransactionAnimation()方法第三个参数是"robot",和XML布局里面的android:transactionName="robot"的值是一一对应的.
package com.example.garena.myapplication;
import android.app.ActionBar;
import android.app.Activity;
import android.app.ActivityOptions;
import android.content.Intent;
import android.os.Bundle;
import android.view.View;
public class MainActivity extends Activity {
@Override
protected void onCreate(Bundle savedInstanceState) {
super.onCreate(savedInstanceState);
setContentView(R.layout.activity_main);
final View shareView = findViewById(R.id.share_element_image_view);
shareView.setOnClickListener(new View.OnClickListener() {
@Override
public void onClick(View v) {
Intent intent = new Intent(MainActivity.this, SecondActivity.class);
ActivityOptions options = ActivityOptions
.makeSceneTransitionAnimation(MainActivity.this, shareView, "robot");
startActivity(intent, options.toBundle());
}
});
ActionBar actionBar = getActionBar();
if (actionBar != null) {
actionBar.setTitle(R.string.first_activity);
}
}
}
<LinearLayout xmlns:android="http://schemas.android.com/apk/res/android"
xmlns:tools="http://schemas.android.com/tools"
android:layout_width="match_parent"
android:layout_height="match_parent"
android:orientation="vertical"
android:paddingBottom="@dimen/activity_vertical_margin"
android:paddingLeft="@dimen/activity_horizontal_margin"
android:paddingRight="@dimen/activity_horizontal_margin"
android:paddingTop="@dimen/activity_vertical_margin"
tools:context=".MainActivity">
<TextView
android:layout_width="wrap_content"
android:layout_height="wrap_content"
android:text="@string/hello_world" />
<ImageView
android:id="@+id/share_element_image_view"
android:layout_width="wrap_content"
android:layout_height="wrap_content"
android:src="@drawable/ic_launcher"
android:transitionName="robot" />
</LinearLayout>
3. 下面是SecondActivity的代码和布局;
在onClick()方法里面,调用finishAfterTransaction()来finish activity.
在XML布局里面,同样是需要用android:transactionName="roboto"来标识共同的UI元素.
package com.example.garena.myapplication;
import android.app.ActionBar;
import android.app.Activity;
import android.os.Bundle;
import android.view.View;
public class SecondActivity extends Activity {
@Override
protected void onCreate(Bundle savedInstanceState) {
super.onCreate(savedInstanceState);
setContentView(R.layout.second_activity);
ActionBar actionBar = getActionBar();
if (actionBar != null) {
actionBar.setTitle(R.string.second_activity);
}
View btnBack = findViewById(R.id.btn_back);
btnBack.setOnClickListener(new View.OnClickListener() {
@Override
public void onClick(View v) {
finishAfterTransition();
}
});
}
}
<?xml version="1.0" encoding="utf-8"?>
<LinearLayout xmlns:android="http://schemas.android.com/apk/res/android"
android:layout_width="match_parent"
android:layout_height="match_parent"
android:gravity="center"
android:orientation="vertical">
<ImageView
android:id="@+id/title_icon_image_view"
android:layout_width="wrap_content"
android:layout_height="wrap_content"
android:src="@drawable/ic_launcher"
android:transitionName="robot" />
<Button
android:id="@+id/btn_back"
android:layout_width="wrap_content"
android:layout_height="wrap_content"
android:text="@string/back" />
</LinearLayout>
4. 运行效果(如上图);
从最终运行的效果图可以看到,点击小机器人的图标进入SecondActivity时,能看到小机器人图标移动到SecondActivity这个小机器人图标的位置.
点击SecondActivity的Back按钮,小机器人图标会移动到MainActivity中小机器人图标的位置.
相关文章
- 下面我们来看一篇关于Android子控件超出父控件的范围显示出来方法,希望这篇文章能够帮助到各位朋友,有碰到此问题的朋友可以进来看看哦。 <RelativeLayout xmlns:an...2016-10-02
Android开发中findViewById()函数用法与简化
findViewById方法在android开发中是获取页面控件的值了,有没有发现我们一个页面控件多了会反复研究写findViewById呢,下面我们一起来看它的简化方法。 Android中Fin...2016-09-20- 如果我们的项目需要做来电及短信的功能,那么我们就得在Android模拟器开发这些功能,本来就来告诉我们如何在Android模拟器上模拟来电及来短信的功能。 在Android模拟...2016-09-20
- 夜神android模拟器如何设置代理呢?对于这个问题其实操作起来是非常的简单,下面小编来为各位详细介绍夜神android模拟器设置代理的方法,希望例子能够帮助到各位。 app...2016-09-20
- 为了增强android应用的用户体验,我们可以在一些Button按钮上自定义动态的设置一些样式,比如交互时改变字体、颜色、背景图等。 今天来看一个通过重写Button来动态实...2016-09-20
- 这篇文章主要为大家详细介绍了python实现学生通讯录管理系统,文中示例代码介绍的非常详细,具有一定的参考价值,感兴趣的小伙伴们可以参考一下...2021-02-25
- 如果我们要在Android应用APP中加载html5页面,我们可以使用WebView,本文我们分享两个WebView加载html5页面实例应用。 实例一:WebView加载html5实现炫酷引导页面大多...2016-09-20
- 深入理解Android中View和ViewGroup从组成架构上看,似乎ViewGroup在View之上,View需要继承ViewGroup,但实际上不是这样的。View是基类,ViewGroup是它的子类。本教程我们深...2016-09-20
- 下面我们来看一篇关于Android自定义WebView网络视频播放控件开发例子,这个文章写得非常的不错下面给各位共享一下吧。 因为业务需要,以下代码均以Youtube网站在线视...2016-10-02
- java开发的Android应用,性能一直是一个大问题,,或许是Java语言本身比较消耗内存。本文我们来谈谈Android 性能优化之MemoryFile文件读写。 Android匿名共享内存对外A...2016-09-20
- TextView默认是横着显示了,今天我们一起来看看Android设置TextView竖着显示如何来实现吧,今天我们就一起来看看操作细节,具体的如下所示。 在开发Android程序的时候,...2016-10-02
android.os.BinderProxy cannot be cast to com解决办法
本文章来给大家介绍关于android.os.BinderProxy cannot be cast to com解决办法,希望此文章对各位有帮助呀。 Android在绑定服务的时候出现java.lang.ClassCastExc...2016-09-20- 这篇文章主要介绍了Android 实现钉钉自动打卡功能的步骤,帮助大家更好的理解和学习使用Android,感兴趣的朋友可以了解下...2021-03-15
- 下面我们来看一篇关于Android 开发之布局细节对比:RTL模式 ,希望这篇文章对各位同学会带来帮助,具体的细节如下介绍。 前言 讲真,好久没写博客了,2016都过了一半了,赶紧...2016-10-02
- 首先如果要在程序中使用sdcard进行存储,我们必须要在AndroidManifset.xml文件进行下面的权限设置: 在AndroidManifest.xml中加入访问SDCard的权限如下: <!--...2016-09-20
- 下面来给各位简单的介绍一下关于Android开发之PhoneGap打包及错误解决办法,希望碰到此类问题的同学可进入参考一下哦。 在我安装、配置好PhoneGap项目的所有依赖...2016-09-20
- 护卫神·主机管理系统该版本支持在Windows Server 200320082012,含32位和64位,直接开设配置WEB站、FTP站,以及SQL Server和MySQL,是您开设和管理虚拟主机的绝好帮手。但是对于新用户可能在使用上有一些困难,因此请仔细阅读如下说明文档...2016-01-27
用Intel HAXM给Android模拟器Emulator加速
Android 模拟器 Emulator 速度真心不给力,, 现在我们来介绍使用 Intel HAXM 技术为 Android 模拟器加速,使模拟器运行度与真机比肩。 周末试玩了一下在Eclipse中使...2016-09-20- 在安卓开发时我碰到一个问题就是需要实现全屏,但又需要我们来判断出用户是使用了全屏或非全屏了,下面我分别找了两段代码,大家可参考。 先来看一个android屏幕全屏实...2016-09-20
Android开发中布局中的onClick简单完成多控件时的监听的利与弊
本文章来为各位介绍一篇关于Android开发中布局中的onClick简单完成多控件时的监听的利与弊的例子,希望这个例子能够帮助到各位朋友. 首先在一个控件加上这么一句:and...2016-09-20