Android获取短信验证码实例教程及自动填写
短信验证需要服务器端生成一个验证码,然后发送到用户输入的手机上,这个过程需要服务器主动向客户发送验证短信,所以这是就需要一个移动或联通的发送短息接口,由于本人目前尚处于学生阶段,没有获得这个接口的权限,所以我就选择了借助网上的移动开发服务平台,来完成这个功能的实现,这里我借用的平台是:http://dashboard.mob.com/,大家可以关注一下,这个平台为我们开发移动应用提供了很好的技术指导,可以大大缩短我们的开发周期。废话不多说,下面开始我们今天的重点。
官方为我们提供了两种设计方式:第一种调用内部GUI实现;另一种通过自定义GUI实现,对于第一种方式,我就不再多讲,因为官方文档提供了很详细的实行步骤,大家只需要按照上面的步骤去实现即可,没有难度。本篇我将带领大家通过自定义GUI实现短信验证功能。首先开发之前你可以先查阅一下官方提供的无GUI API,然后下载一下官方提供的dome,做好这些工作之后,我们就可以开始我们的设计了。
1、将demo中的libs下的SMSSDK-1.1.5.jar和armeabi文件夹拷贝到我们项目的libs目录下,这是官方提供的类库jar包。
2、在AndroidManifest.xml文件添加权限和声明Action:
<?xml version="1.0" encoding="utf-8"?>
<manifest xmlns:android="http://schemas.android.com/apk/res/android"
package="com.example.android_sms"
android:versionCode="1"
android:versionName="1.0" >
<uses-sdk
android:minSdkVersion="8"
android:targetSdkVersion="18" />
<uses-permission android:name="android.permission.READ_CONTACTS" />
<uses-permission android:name="android.permission.READ_PHONE_STATE" />
<uses-permission android:name="android.permission.WRITE_EXTERNAL_STORAGE" />
<uses-permission android:name="android.permission.ACCESS_NETWORK_STATE" />
<uses-permission android:name="android.permission.ACCESS_WIFI_STATE" />
<uses-permission android:name="android.permission.INTERNET" />
<uses-permission android:name="android.permission.RECEIVE_SMS" />
<uses-permission android:name="android.permission.GET_TASKS" />
<uses-permission android:name="android.permission.ACCESS_FINE_LOCATION" />
<application
android:allowBackup="true"
android:icon="@drawable/ic_launcher"
android:label="@string/app_name"
android:theme="@style/AppTheme" >
<activity
android:name="com.example.android_sms.MainActivity"
android:label="@string/app_name" >
<intent-filter>
<action android:name="android.intent.action.MAIN" />
<category android:name="android.intent.category.LAUNCHER" />
</intent-filter>
</activity>
<activity
android:name="cn.smssdk.SMSSDKUIShell"
android:configChanges="keyboardHidden|orientation|screenSize"
android:theme="@android:style/Theme.Translucent.NoTitleBar"
android:windowSoftInputMode="stateHidden|adjustResize" />
</application>
</manifest>
3、设计我们的布局文件:
<RelativeLayout xmlns:android="http://schemas.android.com/apk/res/android"
xmlns:tools="http://schemas.android.com/tools"
android:layout_width="match_parent"
android:layout_height="match_parent"
tools:context=".MainActivity" >
<TextView
android:id="@+id/textView2"
android:layout_width="wrap_content"
android:layout_height="wrap_content"
android:layout_centerHorizontal="true"
android:layout_marginTop="20dp"
android:text="短信验证"
android:textColor="#00ffaa"
android:textSize="20dp" />
<TextView
android:id="@+id/textView1"
android:layout_width="wrap_content"
android:layout_height="wrap_content"
android:layout_alignParentLeft="true"
android:layout_below="@+id/textView2"
android:layout_marginLeft="20dp"
android:layout_marginTop="20dp"
android:text="手机号:" />
<EditText
android:id="@+id/phone"
android:layout_width="wrap_content"
android:layout_height="wrap_content"
android:layout_alignBaseline="@+id/textView1"
android:layout_alignBottom="@+id/textView1"
android:layout_toRightOf="@+id/textView1"
android:maxLength="11"
android:ems="11"
android:inputType="phone" >
<requestFocus />
</EditText>
<TextView
android:id="@+id/textView3"
android:layout_width="wrap_content"
android:layout_height="wrap_content"
android:layout_alignLeft="@+id/textView1"
android:layout_marginTop="40dp"
android:layout_below="@+id/phone"
android:text="验证码:"/>
<EditText
android:id="@+id/cord"
android:layout_width="wrap_content"
android:layout_height="wrap_content"
android:layout_marginTop="20dp"
android:layout_alignBaseline="@+id/textView3"
android:layout_alignBottom="@+id/textView3"
android:layout_alignLeft="@+id/phone"
android:ems="4"
android:maxLength="4"
android:inputType="phone" />
<Button
android:id="@+id/getcord"
style="?android:attr/buttonStyleSmall"
android:layout_width="wrap_content"
android:layout_height="wrap_content"
android:layout_alignTop="@+id/cord"
android:layout_marginLeft="20dp"
android:layout_marginTop="10dp"
android:layout_toRightOf="@+id/cord"
android:visibility="visible"
android:text="获取验证码" />
<Button
android:id="@+id/savecord"
android:layout_width="fill_parent"
android:layout_height="wrap_content"
android:layout_below="@+id/cord"
android:layout_margin="20dp"
android:text="验证" />
<TextView
android:id="@+id/now"
android:layout_width="fill_parent"
android:layout_height="wrap_content"
android:layout_above="@+id/savecord"
android:layout_toRightOf="@+id/cord"
android:gravity="center_horizontal"
android:visibility="gone"
android:text="提示信息"
android:textColor="#aaaaaa" />
</RelativeLayout>
4、我们的MainActivity:
/**
* 自定义GUI短信验证
* @time: 2015年7月4日
*/
public class MainActivity extends Activity implements OnClickListener{
private EditText phone;
private EditText cord;
private TextView now;
private Button getCord;
private Button saveCord;
private String iPhone;
private String iCord;
private int time = 60;
private boolean flag = true;
@Override
protected void onCreate(Bundle savedInstanceState) {
super.onCreate(savedInstanceState);
requestWindowFeature(Window.FEATURE_NO_TITLE);
setContentView(R.layout.activity_main);
init();
SMSSDK.initSDK(this, "<您的appkey>", "<您的appsecret>");
EventHandler eh=new EventHandler(){
@Override
public void afterEvent(int event, int result, Object data) {
Message msg = new Message();
msg.arg1 = event;
msg.arg2 = result;
msg.obj = data;
handler.sendMessage(msg);
}
};
SMSSDK.registerEventHandler(eh);
}
private void init() {
phone = (EditText) findViewById(R.id.phone);
cord = (EditText) findViewById(R.id.cord);
now = (TextView) findViewById(R.id.now);
getCord = (Button) findViewById(R.id.getcord);
saveCord = (Button) findViewById(R.id.savecord);
getCord.setOnClickListener(this);
saveCord.setOnClickListener(this);
}
@Override
public void onClick(View v) {
switch (v.getId()) {
case R.id.getcord:
if(!TextUtils.isEmpty(phone.getText().toString().trim())){
if(phone.getText().toString().trim().length()==11){
iPhone = phone.getText().toString().trim();
SMSSDK.getVerificationCode("86",iPhone);
cord.requestFocus();
getCord.setVisibility(View.GONE);
}else{
Toast.makeText(MainActivity.this, "请输入完整电话号码", Toast.LENGTH_LONG).show();
phone.requestFocus();
}
}else{
Toast.makeText(MainActivity.this, "请输入您的电话号码", Toast.LENGTH_LONG).show();
phone.requestFocus();
}
break;
case R.id.savecord:
if(!TextUtils.isEmpty(cord.getText().toString().trim())){
if(cord.getText().toString().trim().length()==4){
iCord = cord.getText().toString().trim();
SMSSDK.submitVerificationCode("86", iPhone, iCord);
flag = false;
}else{
Toast.makeText(MainActivity.this, "请输入完整验证码", Toast.LENGTH_LONG).show();
cord.requestFocus();
}
}else{
Toast.makeText(MainActivity.this, "请输入验证码", Toast.LENGTH_LONG).show();
cord.requestFocus();
}
break;
default:
break;
}
}
//验证码送成功后提示文字
private void reminderText() {
now.setVisibility(View.VISIBLE);
handlerText.sendEmptyMessageDelayed(1, 1000);
}
Handler handlerText =new Handler(){
public void handleMessage(Message msg) {
if(msg.what==1){
if(time>0){
now.setText("验证码已发送"+time+"秒");
time--;
handlerText.sendEmptyMessageDelayed(1, 1000);
}else{
now.setText("提示信息");
time = 60;
now.setVisibility(View.GONE);
getCord.setVisibility(View.VISIBLE);
}
}else{
cord.setText("");
now.setText("提示信息");
time = 60;
now.setVisibility(View.GONE);
getCord.setVisibility(View.VISIBLE);
}
};
};
Handler handler=new Handler(){
@Override
public void handleMessage(Message msg) {
// TODO Auto-generated method stub
super.handleMessage(msg);
int event = msg.arg1;
int result = msg.arg2;
Object data = msg.obj;
Log.e("event", "event="+event);
if (result == SMSSDK.RESULT_COMPLETE) {
//短信注册成功后,返回MainActivity,然后提示新好友
if (event == SMSSDK.EVENT_SUBMIT_VERIFICATION_CODE) {//提交验证码成功,验证通过
Toast.makeText(getApplicationContext(), "验证码校验成功", Toast.LENGTH_SHORT).show();
handlerText.sendEmptyMessage(2);
} else if (event == SMSSDK.EVENT_GET_VERIFICATION_CODE){//服务器验证码发送成功
reminderText();
Toast.makeText(getApplicationContext(), "验证码已经发送", Toast.LENGTH_SHORT).show();
}else if (event ==SMSSDK.EVENT_GET_SUPPORTED_COUNTRIES){//返回支持发送验证码的国家列表
Toast.makeText(getApplicationContext(), "获取国家列表成功", Toast.LENGTH_SHORT).show();
}
} else {
if(flag){
getCord.setVisibility(View.VISIBLE);
Toast.makeText(MainActivity.this, "验证码获取失败,请重新获取", Toast.LENGTH_SHORT).show();
phone.requestFocus();
}else{
((Throwable) data).printStackTrace();
int resId = getStringRes(MainActivity.this, "smssdk_network_error");
Toast.makeText(MainActivity.this, "验证码错误", Toast.LENGTH_SHORT).show();
cord.selectAll();
if (resId > 0) {
Toast.makeText(MainActivity.this, resId, Toast.LENGTH_SHORT).show();
}
}
}
}
};
@Override
protected void onDestroy() {
super.onDestroy();
SMSSDK.unregisterAllEventHandler();
}
}
注:appkey和appsecret:在http://dashboard.mob.com/注册一个账号后,创建一个发送短信的应用,系统会自动为生成appkey和appsecret
handlerText是我自定义设计的Handker对象,用于当服务器发送验证码后,提醒用户注意。
最后附图两张,供大家参考:

android获取短信验证码并自动填写的实现
现在的应用在注册登录或者修改密码中都用到了短信验证码,那在android中是如何实现获取短信验证码并自动填写的呢?
首先,需要要在manifest中注册接收和读取短信的权限:
<uses-permission android:name="android.permission.RECEIVE_SMS"></uses-permission>
<uses-permission android:name="android.permission.READ_SMS"/>
实现一个广播SMSBroadcastReceiver来监听短信:
package com.example.receive;
import java.text.SimpleDateFormat;
import java.util.Date;
import android.content.BroadcastReceiver;
import android.content.Context;
import android.content.Intent;
import android.telephony.SmsMessage;
/**
* 短信监听
* @author
*
*/
public class SMSBroadcastReceiver extends BroadcastReceiver {
private static MessageListener mMessageListener;
public static final String SMS_RECEIVED_ACTION = "android.provider.Telephony.SMS_RECEIVED";
public SMSBroadcastReceiver() {
super();
}
@Override
public void onReceive(Context context, Intent intent) {
if (intent.getAction().equals(SMS_RECEIVED_ACTION)) {
Object[] pdus = (Object[]) intent.getExtras().get("pdus");
for(Object pdu:pdus) {
SmsMessage smsMessage = SmsMessage.createFromPdu((byte [])pdu);
String sender = smsMessage.getDisplayOriginatingAddress();
//短信内容
String content = smsMessage.getDisplayMessageBody();
long date = smsMessage.getTimestampMillis();
Date tiemDate = new Date(date);
SimpleDateFormat simpleDateFormat = new SimpleDateFormat("yyyy-MM-dd HH:mm:ss");
String time = simpleDateFormat.format(tiemDate);
//过滤不需要读取的短信的发送号码
if ("+8613450214963".equals(sender)) {
mMessageListener.onReceived(content);
abortBroadcast();
}
}
}
}
//回调接口
public interface MessageListener {
public void onReceived(String message);
}
public void setOnReceivedMessageListener(MessageListener messageListener) {
this.mMessageListener = messageListener;
}
}
在需要填写验证码的Activity中,生产SMSBroadcastReceiver的实例,实现onReceived的回调接口。为了节约系统资源,我们使用动态注册注销广播的方法。
package com.example.smstest;
import com.example.receive.SMSBroadcastReceiver;
import android.os.Bundle;
import android.app.Activity;
import android.content.IntentFilter;
import android.view.Menu;
import android.widget.EditText;
public class MainActivity extends Activity {
private EditText edtPassword;
private SMSBroadcastReceiver mSMSBroadcastReceiver;
private static final String ACTION = "android.provider.Telephony.SMS_RECEIVED";
@Override
protected void onCreate(Bundle savedInstanceState) {
super.onCreate(savedInstanceState);
setContentView(R.layout.activity_main);
edtPassword = (EditText) findViewById(R.id.password);
}
@Override
protected void onStart() {
super.onStart();
//生成广播处理
mSMSBroadcastReceiver = new SMSBroadcastReceiver();
//实例化过滤器并设置要过滤的广播
IntentFilter intentFilter = new IntentFilter(ACTION);
intentFilter.setPriority(Integer.MAX_VALUE);
//注册广播
this.registerReceiver(mSMSBroadcastReceiver, intentFilter);
mSMSBroadcastReceiver.setOnReceivedMessageListener(new SMSBroadcastReceiver.MessageListener() {
@Override
public void onReceived(String message) {
edtPassword.setText(message);
}
});
}
@Override
protected void onDestroy() {
super.onDestroy();
//注销短信监听广播
this.unregisterReceiver(mSMSBroadcastReceiver);
}
}
Android开发中使用HttpClient来开发Http程序来完成简单的网络通信,其实使用HttpUrlConnection也可以实现,不过HttpClient可以完成HttpUrlConnection的所有功能,并且还自己增加了其他的功能,那相比之下就直接使用HttpClient就得了...Http通信有两种方式,相比大家都清楚,一种是使用GET请求,另一种则是使用POST请求来完成...GET请求可以获取静态页面,也可以把参数放在URL参数后面进行传递...POST与GET不同的地方就在于这里,POST请求无法将数据放到字符串的后面...而是放在Http传递的数据当中...这些参数会通过cookie或者是session来进行传递...POST更加适合传递保密的数据信息...比如说用户的账户密码...这样使用GET方式就不是很合理了...因此把保密的数据信息放入到Http请求数据中更加的安全...
那么Android是如何通过Http请求来实现GET或者是POST请求呢?这里简单的介绍一下...先介绍一下GET方式...如何使用GET请求来获取数据信息....GET请求需要几个步骤...
首先:我们需要建立GET对象...通过创建对象来告诉服务器我们使用的GET请求来获取数据信息的...因为Http请求是以URL的形式进行来完成数据传递的...因此我们需要传递一个URL来实例化对象...我这个地址是服务器上的一个jsp文件...通过使用Http请求来获取JSP界面的数据信息...
String path="http://10.0.2.2:8080/JSP/text.jsp":
HttpGet get=new HttpGet(path);
然后我们需要使用DefaultHttpClient类中的execute()方法来发送Http GET请求...并返回一个HttpResponse对象,HttpResponse对象的目的是当一个Http连接建立成功之后,我们就可以使用其类中的方法来获取到服务器的响应信息...
HttpClient client=new DefaultHttpClient();
HttpResponse response=client.execute(get);
最后我们就可以通过HttpResponse对象来获取服务器的响应数据信息了...这里我使用了一个getEntity()方法来返回响应信息,然后获取GET提交的URL后面的数据信息...
if(response.getStatusLine().getStatusCode()==HttpStatuse.SC_OK){
String result=EntityUtils.toString(resopnse.getEntity());
tv.setText(result);
}
最后我们需要在AndroidManifest.xml文件中配置权限属性...只需要添加<user-permission android:name="android.permission.INTERNET"/>那么简单的举一个小例子来实现Http的GET请求...
首先我们先写一个JSP页面.....这个页面要在Tomcat上进行发布...当没有参数值进行传递的时候,会显示Your message are wrong!这个信息...
<%
String name=request.getParameter("name");
String password=request.getParameter("password");
if("DARKER".equals(name) && "4968188".equals(password)){
out.println("Receive name is:"+name);
out.println("Receive password is:"+password);%>
Your message are right!
<%}else{
out.println("Receive name is:"+name);
out.println("Receive password is:"+password); %>
Your message are wrong!
<%}%>
然后有了这个东西,我们就可以通过Http传递数据信息来提交数据...然后通过这个界面返回的信息来告知我们服务器响应的信息数据...一个简单的布局文件...就一个文本框...目的就是为了返回服务器的响应信息...
<LinearLayout xmlns:android="http://schemas.android.com/apk/res/android"
xmlns:tools="http://schemas.android.com/tools"
android:layout_width="fill_parent"
android:layout_height="fill_parent"
android:orientation="vertical"
tools:context=".MainActivity" >
<TextView
android:id="@+id/msg"
android:layout_width="wrap_content"
android:layout_height="wrap_content"/>
</LinearLayout>
如何实现才是一个重要的过程...在实现的过程中会出现一个问题,就是在Android2.3版本以后就不允许在主线程中去使用Http请求了...相信大部分的学习资料上都没有这个提示问题,但是确实是存在着这样一个问题的...那么上有政策那么就下有对策...我们可以使用三种方法去解决这个问题...非常的简单,也很好理解...那么既然我们无法在主线程中去使用Http请求,那么我们可以新开启一个线程啊...或者是我们可以去使用异步线程类AsyncTask去实现不就完了吗...还有一种方法就是在主线程中加入某些东西...就是下面的在setContentView()这个函数下面加入的那两句话...但是这种方法在网上说并不是很推荐...因此本人也没怎么研究...其他两种方式先对就很好理解...这三种方式我都进行了列举...只要使用其中的任意一种方式就可以实现Http的GET请求....
package com.example.httpclient;
/* HttpCilent 通过Get与服务器进行通信...
* HttpClient比HttpUrlConnection更加的有优势...前者能做后者所有能做的事情...
* 那就干脆就使用这种方式吧....
*
*
* */
import java.io.IOException;
import org.apache.http.HttpResponse;
import org.apache.http.HttpStatus;
import org.apache.http.client.ClientProtocolException;
import org.apache.http.client.HttpClient;
import org.apache.http.client.methods.HttpGet;
import org.apache.http.impl.client.DefaultHttpClient;
import org.apache.http.util.EntityUtils;
import android.os.AsyncTask;
import android.os.Bundle;
import android.os.StrictMode;
import android.app.Activity;
import android.view.Menu;
import android.widget.TextView;
public class MainActivity extends Activity {
/*
* 由于在Android2.3版本以后就不允许在主线程使用Http请求...
* 但是我们可以使用其他的方法来解决这个问题...
* 第一种方法在主线程onCreate()方法中加入StrictMode方法..不过这种方法不被推荐...
* 第二种使用异步线程AsyncTask<Param,Progress,Result>也可以实现...在异步线程中完成Http请求..
* 第三种方法单开启一个线程Runnable()来实现,其实也是延续异步线程的思想...
*
* */
private TextView tv;
// private String path="http://10.0.2.2:8080/JSP/get.jsp?name=DARKER&password=49681888";
@Override
protected void onCreate(Bundle savedInstanceState) {
super.onCreate(savedInstanceState);
setContentView(R.layout.activity_main);
// StrictMode.setThreadPolicy(new StrictMode.ThreadPolicy.Builder().detectDiskReads().detectDiskWrites().detectNetwork().penaltyLog().build());
// StrictMode.setVmPolicy(new StrictMode.VmPolicy.Builder().detectLeakedSqlLiteObjects().detectLeakedClosableObjects().penaltyLog().penaltyDeath().build());
tv=(TextView) findViewById(R.id.msg);
new Thread(runnable).start();
// HttpGet httpRequest=new HttpGet(path);
// HttpClient httpcilents=new DefaultHttpClient();
// try {
// HttpResponse response=httpcilents.execute(httpRequest);
// if(response.getStatusLine().getStatusCode()==HttpStatus.SC_OK){
// String result=EntityUtils.toString(response.getEntity());
// tv.setText(result);
// }else{
// tv.setText("请求错误");
// }
// } catch (ClientProtocolException e) {
// // TODO Auto-generated catch block
// e.printStackTrace();
// } catch (IOException e) {
// // TODO Auto-generated catch block
// e.printStackTrace();
// }
}
@SuppressWarnings("unused")
private class http extends AsyncTask<Integer, Integer, Integer>{
@Override
protected Integer doInBackground(Integer... params) {
// TODO Auto-generated method stub
String url="http://10.0.2.2:8080/JSP/get.jsp?name=DARKER&password=49681888";
HttpGet hget=new HttpGet(url);
HttpClient htclient=new DefaultHttpClient();
try {
HttpResponse hresonse=htclient.execute(hget);
if(hresonse.getStatusLine().getStatusCode()==HttpStatus.SC_OK){
String resul=EntityUtils.toString(hresonse.getEntity());
tv.setText(resul);
}else{
tv.setText("连接失败...");
}
} catch (ClientProtocolException e) {
// TODO Auto-generated catch block
e.printStackTrace();
} catch (IOException e) {
// TODO Auto-generated catch block
e.printStackTrace();
}
return null;
}
}
Runnable runnable=new Runnable() {
String path_1="http://10.0.2.2:8080/JSP/get.jsp?name=DARKER&password=49681888";
@Override
public void run() {
// TODO Auto-generated method stub
HttpGet get=new HttpGet(path_1);
HttpClient cilent=new DefaultHttpClient();
try {
HttpResponse responses=cilent.execute(get);
if(responses.getStatusLine().getStatusCode()==HttpStatus.SC_OK){
String result_1=EntityUtils.toString(responses.getEntity());
tv.setText(result_1);
}else{
tv.setText("无法获取信息...");
}
} catch (ClientProtocolException e) {
// TODO Auto-generated catch block
e.printStackTrace();
} catch (IOException e) {
// TODO Auto-generated catch block
e.printStackTrace();
}
}
};
@Override
public boolean onCreateOptionsMenu(Menu menu) {
// Inflate the menu; this adds items to the action bar if it is present.
getMenuInflater().inflate(R.menu.main, menu);
return true;
}
}
其实上面代码使用异步线程类是没问题的,不过上面的代码会报错,由于我的代码写错了位置...这个错误其实是在doInBackground()方法中出现的...因为在这个方法中是不能够更新控件的数据信息的...这个问题我将在下面进行解决....下面是实现Http的POST请求...然后解决刚才说的问题....下面使用了Handler类...简答的说一下这个类...其实这个类并不是用在这个异步线程类里面的...这个异步线程类内部还有三个没有实现的方法...就是onPreExecute(),publishProgress(),onProgressUpdate()...这三个方法内部都可以完成控件数据信息的更新,唯独这个doInBackground()是无法实现的...使用一个AsyncTask类,再使用Handler是完全没有必要的...其实Handler和AsyncTask是为了实现子线程无法去更新主线程中控件的数据信息而存在的...因为控件对于线程来说是不安全的,因此在子线程中也就无法完成主线程中控件数据信息的更新操作...但是在Android中往往是需要这样做的...因此出现了这两个类去解决这个问题...
首先说一句主要的事,就是使用到了Runnable并不代表一定使用到了多线程...就拿上面那个Runnable类来说,这个runnable虽然重写了run()方法,并且还在主函数中使用了start进行调用,但是这个线程仍然是属于主线程Activity的,并不属于我们单独开启了一个新的线程,然后去执行任务...这是必然的,否则一定会报错...因为在一个新的线程内部是无法去更新主线程中控件的数据信息的...然后在说一下Handler是如何能够完成在子线程中能够对主线程中的控件完成对数据的更新...首先Handler通过传递Message或者是Runnable对象...一般来说都是Message对数据进行封装...Handler主要用来与Looper进行沟通..把信息加入到特定的Looper消息队列中,或者是获取Looper的信息,然后调用handlemessage方法来对获取的信息进行操作...然后将Message发送到MessageQueue中,MessageQueue是一个线性队列,用来保存获取到的消息数据...当Looper发现MessageQueue中有未处理的信息就将这个信息广播出去...Looper就是对MessageQueue队列中然后主线程Handler接收到信息,然后做相应的处理...最后完成更新操作...这就是实现的一个过程...
package com.example.httpclientpost;
import java.io.IOException;
import java.io.UnsupportedEncodingException;
import java.util.ArrayList;
import java.util.List;
import org.apache.http.HttpEntity;
import org.apache.http.HttpResponse;
import org.apache.http.HttpStatus;
import org.apache.http.NameValuePair;
import org.apache.http.client.ClientProtocolException;
import org.apache.http.client.HttpClient;
import org.apache.http.client.entity.UrlEncodedFormEntity;
import org.apache.http.client.methods.HttpPost;
import org.apache.http.impl.client.DefaultHttpClient;
import org.apache.http.message.BasicNameValuePair;
import org.apache.http.util.EntityUtils;
import android.os.AsyncTask;
import android.os.Bundle;
import android.os.Handler;
import android.os.Message;
import android.annotation.SuppressLint;
import android.app.Activity;
import android.view.Menu;
import android.widget.TextView;
public class MainActivity extends Activity {
TextView tv;
String result;
@SuppressLint("HandlerLeak")
private Handler handler=new Handler(){
@Override
public void handleMessage(Message msg){
if(msg.what==1){
tv.setText(result);
}else{
tv.setText("无法连接服务器...");
}
}
};
@Override
protected void onCreate(Bundle savedInstanceState) {
super.onCreate(savedInstanceState);
setContentView(R.layout.activity_main);
tv=(TextView) findViewById(R.id.show);
http h=new http();
h.execute();
}
class http extends AsyncTask<Integer, Integer, Integer>{
String url="http://10.0.2.2:8080/JSP/get.jsp";
@Override
protected Integer doInBackground(Integer... params) {
// TODO Auto-generated method stub
HttpPost post=new HttpPost(url);
List<NameValuePair> param=new ArrayList<NameValuePair>();
param.add(new BasicNameValuePair("name", "DARKER"));
param.add(new BasicNameValuePair("password", "49681888"));
try {
HttpEntity entity=new UrlEncodedFormEntity(param,"gb2312");
post.setEntity(entity);
HttpClient client=new DefaultHttpClient();
HttpResponse response=client.execute(post);
if(response.getStatusLine().getStatusCode()==HttpStatus.SC_OK){
result=EntityUtils.toString(response.getEntity());
Message msg=new Message();
msg.what=1;
handler.sendMessage(msg);
}else{
Message msg=new Message();
msg.what=0;
handler.sendMessage(msg);
}
}catch (UnsupportedEncodingException e) {
// TODO Auto-generated catch block
e.printStackTrace();
} catch (ClientProtocolException e) {
// TODO Auto-generated catch block
e.printStackTrace();
} catch (IOException e) {
// TODO Auto-generated catch block
e.printStackTrace();
}
return null;
}
}
@Override
public boolean onCreateOptionsMenu(Menu menu) {
// Inflate the menu; this adds items to the action bar if it is present.
getMenuInflater().inflate(R.menu.main, menu);
return true;
}
}
其实我觉得使用Android中使用AsyncTask这个异步线程类其实就行,因为这个异步线程类是结合了handler+Thread才得以实现的,当然我们也可以使用handler去进行处理,个人推荐还是使用这个异步线程类更好...好了有点说跑题了...返回Http的POST请求,Http的POST请求比GET能多了一点东西,它使用NameValuePair以键值对的形式对数据进行保存...并且POST请求需要制定字符集...否则数据会出现乱码现象...剩下的东西基本就类似了...这样就实现了Http的POST请求
PopupWindow用法
使用PopupWindow可实现弹出窗口效果,,其实和AlertDialog一样,也是一种对话框,两者也经常混用,但是也各有特点。下面就看看使用方法。
首先初始化一个PopupWindow,指定窗口大小参数。
PopupWindow mPop = new PopupWindow(getLayoutInflater().inflate(R.layout.window, null),
LayoutParams.WRAP_CONTENT, LayoutParams.WRAP_CONTENT);
也可以分开写:
LayoutInflater mLayoutInflater = (LayoutInflater) getSystemService(LAYOUT_INFLATER_SERVICE);
//自定义布局
ViewGroup menuView = (ViewGroup) mLayoutInflater.inflate(
R.layout.window, null, true);
PopupWindow mPop = new PopupWindow(menuView, LayoutParams.WRAP_CONTENT,
LayoutParams.WRAP_CONTENT, true);
当然也可以手动设置PopupWindow大小。
mPop.setContentView(menuView );//设置包含视图
mPop.setWidth(int )
mPop.setHeight(int )//设置弹出框大小
设置进场动画:
mPop.setAnimationStyle(R.style.AnimationPreview);//设置动画样式
mPop.setOutsideTouchable(true);//这里设置显示PopuWindow之后在外面点击是否有效。如果为false的话,那么点击PopuWindow外面并不会关闭PopuWindow。当然这里很明显只能在Touchable下才能使用。
当有mPop.setFocusable(false);的时候,说明PopuWindow不能获得焦点,即使设置设置了背景不为空也不能点击外面消失,只能由dismiss()消失,但是外面的View的事件还是可以触发,back键也可以顺利dismiss掉。当设置为popuWindow.setFocusable(true);的时候,加上下面两行设置背景代码,点击外面和Back键才会消失。
mPop.setFocusable(true);
需要顺利让PopUpWindow dimiss(即点击PopuWindow之外的地方此或者back键PopuWindow会消失);PopUpWindow的背景不能为空。必须在popuWindow.showAsDropDown(v);或者其它的显示PopuWindow方法之前设置它的背景不为空:
mPop.setBackgroundDrawable(new ColorDrawable(0));
mPop.showAsDropDown(anchor, 0, 0);//设置显示PopupWindow的位置位于View的左下方,x,y表示坐标偏移量
mPop.showAtLocation(findViewById(R.id.parent), Gravity.LEFT, 0, -90);(以某个View为参考),表示弹出窗口以parent组件为参考,位于左侧,偏移-90。
mPop.setOnDismissListenerd(new PopupWindow.OnDismissListener(){})//设置窗口消失事件
注:window.xml为布局文件
总结:
1、为PopupWindow的view布局,通过LayoutInflator获取布局的view.如:
LayoutInflater inflater =(LayoutInflater)
this.anchor.getContext().getSystemService(Context.LAYOUT_INFLATER_SERVICE);
View textEntryView = inflater.inflate(R.layout.paopao_alert_dialog, null);
2、显示位置,可以有很多方式设置显示方式
pop.showAtLocation(findViewById(R.id.ll2), Gravity.LEFT, 0, -90);
或者
pop.showAsDropDown(View anchor, int xoff, int yoff)
3、进出场动画
pop.setAnimationStyle(R.style.PopupAnimation);
4、点击PopupWindow区域外部,PopupWindow消失
this.window = new PopupWindow(anchor.getContext());
this.window.setTouchInterceptor(new OnTouchListener() {
@Override
public boolean onTouch(View v, MotionEvent event) {
if(event.getAction() ==MotionEvent.ACTION_OUTSIDE) {
BetterPopupWindow.this.window.dismiss();
return true;
}
return false;
}
});
PopupWindow 自适应宽度实例
@Override
protected void onMeasure(int widthMeasureSpec, int heightMeasureSpec) {
int maxWidth = meathureWidthByChilds() + getPaddingLeft() + getPaddingRight(); super.onMeasure(MeasureSpec.makeMeasureSpec(maxWidth,MeasureSpec.EXACTLY),heightMeasureSpec);
}
public int meathureWidthByChilds() {
int maxWidth = 0;
View view = null;
for (int i = 0; i < getAdapter().getCount(); i++) {
view = getAdapter().getView(i, view, this);
view.measure(MeasureSpec.UNSPECIFIED, MeasureSpec.UNSPECIFIED);
if (view.getMeasuredWidth() > maxWidth){
maxWidth = view.getMeasuredWidth();
}
}
return maxWidth;
}
PopupWindow自适应布局
Android自带的Menu菜单,常常无法满足我们的需求,所以就只有自己写menu菜单,通常的选择是用PopupWindow来实现自定义的menu菜单,先看代码,再来说明要注意的几点:
View menuView = inflater.inflate(R.layout.menu_popwindow, null);
final PopupWindow p = new PopupWindow(mContext);
p.setContentView(menuView);
p.setWidth(ViewGroup.LayoutParams.FILL_PARENT);
p.setHeight(ViewGroup.LayoutParams.WRAP_CONTENT);
p.setAnimationStyle(R.style.MenuWindow);
p.setOnDismissListener(this);
p.setOutsideTouchable(false);
p.setBackgroundDrawable(new ColorDrawable(android.R.color.transparent));
p.setFocusable(true); // 如果把焦点设置为false,则其他部份是可以点击的,也就是说传递事件时,不会先走PopupWindow
mPopwindow = p;
来说明其中的几点:
1. 为了让PopupWindow自适应屏幕的宽度,设置宽度时用ViewGroup.LayoutParams.FILL_PARENT,为了自适应子布局的高度,设置高度时用ViewGroup.LayoutParams.WRAP_CONTENT
2. 由于PopupWindow类没有继承ViewGroup类,所以inflater.inflate(int resource, ViewGroup root)方法的第二个参数只能传为null,传null会使最外层布局的android:layout_xxx都不起作用。所以高度是以第二层布局为主
3. 为了设置背景和边距,其背景只能设置在第二层布局里,因第一层布局的android:layout_marginXxx不起作用,而设置android:padding_Xxx不会影响背景。
4. menu有一个特点,就是点外部,menu菜单要消失,要实现这个,有几个属性要一起设置:p.setOutsideTouchable(false);p.setBackgroundDrawable();p.setFocusable(true);
Genymotion模拟器提供了Android虚拟环境,为安卓开发测试人员带来了极大的便利。Genymotion的启动速度比Eclipse自带的模拟器要快得多,运行起来非常的流畅,堪称Eclipse拥趸的调试神器!
Genymotion兼容的操作系统有:Microsoft Windows 32/64 bits、Mac OSX 10.5+ 、 Linux 32/64 bits
Genymotion官网:https://www.genymotion.com

Android Studio本身的模拟器已经很强大,所以Genymotion还是配合Eclipse使用比较多一点,下面也是基于Eclipse编辑器进行讲解。
1、翻墙
Genymotion的使用需要注册账户并登录,但如果没有翻墙的话,注册和登录都是很难操作成功的。
在这里介绍个VPN,可以免费使用一段时间,足够安装完环境了。
Green VPN官网:https://www.igreenjsq.co
在官网注册一个账户,打开注册时填写的邮箱激活一下账户。下载PC客户端,登录账号,直接点击“链接”按钮:

VPN连接成功了,但对于一个程序员来说,上个技术类的网站都要翻墙,简直是一种耻辱!
2、注册账号并下载安装Genymotion
Genymotion基于VirtualBox虚拟机才能运行,在下载Genymotion时应选择相应的版本(软件下载不需要翻墙):

“Get Genymotion (without VirtualBox) (24.03MB)”版本适合于已经安装了VirtualBox的电脑,“Get Genymotion (126.02MB)”版本适合于尚未安装VirtualBox的电脑,安装该版本完成的时候会提示是否安装VirtualBox环境,点击“是”按钮,就顺带的把VirtualBox也安装了:

3、添加虚拟机
运行Genymotion,软件会提示是否添加一个虚拟设备:

点击“Yes”,弹出登录界面:

动不动就要登录,这也是我非常想吐槽的一个地方!
如果安装了翻墙软件,登录是没问题的;没有安装翻墙软件的话,也可以在网上找一个代理IP,设置一下:

登录成功后会出现一个设备列表:

选择需要用到的虚拟设备进行安装,120MB左右一个,下载过程可以不开VPN。
4、Eclipse安装Genymotion插件

Name:Genymobile Location:http://plugins.genymotion.com/eclipse/ ,点击“OK”

选择并下载(记得开VPN):

安装完成,重新启动Eclipse,可以看到重启后软件界面多了一个小图标:

点击图标,提示需要配置Genymotion安装的目录:

点击“OK”,进入配置界面:

点击“OK”进入虚拟设备选择界面,选择相应的虚拟设备,并启动:

Genymotion启动成功:

运行一个测试程序:

程序已经成功的在Genymotion模拟器中运行了:

PS:关闭Genymotion运行程序的话,默认启动的是Eclipse自带的模拟器。
现在,我们的Genymotion模拟器安装就告一段落了。
android通过子线程来实现动画的实例
Android动画,一般是相对原始位置进行参照,本文我们来看看通过子线程修改物体位置实现动画的实例。
布局文件:
<RelativeLayout xmlns:android="http://schemas.android.com/apk/res/android"
xmlns:tools="http://schemas.android.com/tools"
android:layout_width="match_parent"
android:layout_height="match_parent"
tools:context=".MainActivity" >
<TextView
android:id="@+id/show"
android:layout_marginLeft="20dp"
android:layout_marginTop="40dp"
android:layout_width="wrap_content"
android:layout_height="wrap_content"
android:text="@string/hello_world" />
<Button
android:id="@+id/button1"
android:onClick="MyCLick"
android:layout_width="wrap_content"
android:layout_height="wrap_content"
android:layout_alignParentBottom="true"
android:layout_alignParentRight="true"
android:text="行动" />
<Button
android:id="@+id/button2"
android:onClick="MyCLick"
android:layout_width="wrap_content"
android:layout_height="wrap_content"
android:layout_alignParentBottom="true"
android:layout_marginRight="28dp"
android:layout_toLeftOf="@+id/button1"
android:text="获取位置" />
</RelativeLayout>
动画代码:
public class MainActivity extends Activity {
TextView textView;
MyRuns myRuns;
@Override
protected void onCreate(Bundle savedInstanceState) {
super.onCreate(savedInstanceState);
setContentView(R.layout.activity_main);
textView = (TextView) findViewById(R.id.show);
myRuns=new MyRuns(new MyHead(textView, 4, 8), true);//位移动画
}
static class MyHead extends Handler {// 坐标动画
View view;// 操作元素
float cx;
float cy;
public MyHead(View view, float cx, float cy) {
super();
this.view = view;
this.cx = cx;
this.cy = cy;
}
@Override
public void handleMessage(Message msg) {
// 更新ui
view.setX(view.getX() + cx);
view.setY(view.getY() + cy);
super.handleMessage(msg);
}
}
// 子线程更新位置
class MyRuns implements Runnable {//更新UI界面
MyHead head;
boolean isFire = false;
public MyRuns(MyHead head, boolean isFire) {
super();
this.head = head;
this.isFire = isFire;
}
public boolean isFire() {
return isFire;
}
public void setFire(boolean isFire) {
this.isFire = isFire;
}
@Override
public void run() {
// TODO Auto-generated method stub
try {
while (true) {
if (!isFire) {
break;//停止动画
}
Thread.sleep(80);
Message message = new Message();
message.what = 3;
message.obj = "";
head.sendMessage(message);
}
} catch (Exception e) {
// TODO: handle exception
}
}
}
//开始运动
void StartThreed(MyRuns myRuns){
myRuns.setFire(true);//开启
new Thread(myRuns).start();
}
public void MyCLick(View view) {
if (view.getId() == R.id.button1) {
StartThreed(myRuns);
} else if (view.getId() == R.id.button2) {
myRuns.setFire(false);//结束子线程
Toast.makeText(getApplicationContext(),
"坐标" + textView.getX() + "||" + textView.getY(),
Toast.LENGTH_SHORT).show();
}
}
}
Android 动画原理
Android 平台提供了一套完整的动画框架,使得开发者可以用它来开发各种动画效果。Android 动画框架详解由原理篇和实例篇两部分组成。本文是第一部分原理篇,主要分析 Tween 动画的实现原理, 最后简单介绍在 Android 中如何通过播放 Gif 文件来实现动画。第二部分实例篇将在原理篇的基础上,向您展示一个动画实例的实现。
Android 平台提供了一套完整的动画框架,使得开发者可以用它来开发各种动画效果,本文将向读者阐述 Android 的动画框架是如何实现的。 任何一个框架都有其优势和局限性,只有明白了其实现原理,开发者才能知道哪些功能可以利用框架来实现,哪些功能须用其他途径实现。Android 平台提供了两类动画,一类是 Tween 动画,即通过对场景里的对象不断做图像变换 ( 平移、缩放、旋转 ) 产生动画效果;第二类是 Frame 动画,即顺序播放事先做好的图像,跟电影类似。本文是由两部分组成的有关 Android 动画框架详解的第一部分原理篇, 主要分析 Tween 动画的实现原理, 最后简单介绍在 Android 中如何通过播放 Gif 文件来实现动画。我们先看一下动画示例来一点感性认识。
Android 动画使用示例
使用动画示例程序的效果是点击按钮,TextView 旋转一周。读者也可以参看 Apidemos 中包 com.example.android.apis.animationview 下面的 Transition3d 和 com.example.android.apis.view 下面的 Animation1/Animation2/Animation3 示例代码。
清单 1. 代码直接使用动画
package com.ray.animation;
import android.app.Activity;
import android.os.Bundle;
import android.view.View;
import android.view.View.OnClickListener;
import android.view.animation.AccelerateDecelerateInterpolator;
import android.view.animation.Animation;
import android.view.animation.RotateAnimation;
import android.widget.Button;
public class TestAnimation extends Activity implements OnClickListener
{
public void onCreate(Bundle savedInstanceState)
{
super.onCreate(savedInstanceState);
setContentView(R.layout.main);
Button btn =(Button)findViewById(R.id.Button);
btn.setOnClickListener(this);
}
public void onClick(View v)
{
Animation anim=null;
anim=new?RotateAnimation(0.0f,+360.0f);
anim.setInterpolator(new AccelerateDecelerateInterpolator());
anim.setDuration(3000);
findViewById(R.id.TextView01).startAnimation(anim);
}
}
使用 XML 文件方式,在打开 Eclipse 中新建的 Android 工程的 res 目录中新建 anim 文件夹,然后在 anim 目录中新建一个 myanim.xml( 注意文件名小写 ),内容如下 :
图 1. 使用 xml 文件方式
<?xml version="1.0" encoding="utf-8"?>
<set xmlns:android="http://schemas.android.com/apk/res/android">
<rotate
android:interpolator="@android:anim/acclerate_decelerate_interpolator"
android:formDegress="0"
android:toDegress="+360"
android:duration="3000" />
<!--rotate 旋转动画效果
属性:
interpolator 指定一个动画的插入器,用来控制动画的速度变化
fromDegress 动画起始时物件的角度
toDegress 动画结束时物件的旋转角度,正代表顺时针
duration 动画的持续时间,以毫秒为单位-->
/set>
其中的 java 代码如下:
package com.ray.animation;
import android.app.Activity;
import android.os.Bundle;
import android.view.View;
import android.view.View.OnClickListener;
import android.view.animation.Animation;
import android.view.animation.AnimationUtils;
import android.widget.Button;
import android.widget.TextView;
public class TestAnimation extends Activity implements OnClickListener
{
public void onCreate(Bundle savedInstanceState)
{
super.onCreate(savedInstanceState);
setContentView(R.layout.main);
Button btn =(Button)findViewById(R.id.Button01);
btn.setOnClickListener(this);
}
@Override
public void onClick(View v)
{
Animation anim=AnimationUtils.loadAnimation(this,R.anim.my_rotate_action);
findViewById(R.id.TextView01).startAnimation(anim);
}
}
Android 动画框架原理
现有的 Android 动画框架是建立在 View 的级别上的,在 View 类中有一个接口 startAnimation 来使动画开始,startAnimation 函数会将一个 Animation 类别的参数传给 View,这个 Animation 是用来指定我们使用的是哪种动画,现有的动画有平移,缩放,旋转以及 alpha 变换等。如果需要更复杂的效果,我们还可以将这些动画组合起来,这些在下面会讨论到。
要了解 Android 动画是如何画出来的,我们首先要了解 Android 的 View 是如何组织在一起,以及他们是如何画自己的内容的。每一个窗口就是一棵 View 树,下面以我们写的 android_tabwidget_tutorial.doc 中的 tab 控件的窗口为例,通过 android 工具 hierarchyviewer 得到的窗口 View Tree 如下图 1 所示:
图 2. 界面 View 结构图
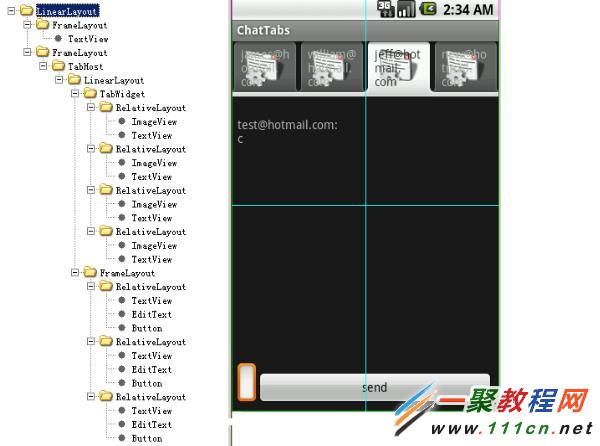
图 3. 界面 View 结构和显示对应图

其实这个图不是完整的,没有把 RootView 和 DecorView 画出来,RootView 只有一个孩子就是 DecorView,这里整个 View Tree 都是 DecorView 的子 View,它们是从 android1.5/frameworks/base/core/res/res/layout/screen_title.xml 这个 layout 文件 infalte 出来的,感兴趣的读者可以参看 frameworks\policies\base\phone\com\android\internal\policy\Imp\PhoneWindow.java 中 generateLayout 函数部分的代码。我们可以修改布局文件和代码来做一些比较 cool 的事情,如象 Windows 的缩小 / 关闭按钮等。标题窗口以下部分的 FrameLayou 就是为了让程序员通过 setContentView 来设置用户需要的窗口内容。因为整个 View 的布局就是一棵树,所以绘制的时候也是按照树形结构遍历来让每个 View 进行绘制。ViewRoot.java 中的 draw 函数准备好 Canvas 后会调用 mView.draw(canvas),其中 mView 就是调用 ViewRoot.setView 时设置的 DecorView。然后看一下 View.java 中的 draw 函数:
递归的绘制整个窗口需要按顺序执行以下几个步骤:
绘制背景;
如果需要,保存画布(canvas)的层为淡入或淡出做准备;
绘制 View 本身的内容,通过调用 View.onDraw(canvas) 函数实现,通过这个我们应该能看出来 onDraw 函数重载的重要性,onDraw 函数中绘制线条 / 圆 / 文字等功能会调用 Canvas 中对应的功能。下面我们会 drawLine 函数为例进行说明;
绘制自己的孩子(通常也是一个 view 系统),通过 dispatchDraw(canvas) 实现,参看 ViewGroup.Java 中的代码可知,dispatchDraw->drawChild->child.draw(canvas) 这样的调用过程被用来保证每个子 View 的 draw 函数都被调用,通过这种递归调用从而让整个 View 树中的所有 View 的内容都得到绘制。在调用每个子 View 的 draw 函数之前,需要绘制的 View 的绘制位置是在 Canvas 通过 translate 函数调用来进行切换的,窗口中的所有 View 是共用一个 Canvas 对象
如果需要,绘制淡入淡出相关的内容并恢复保存的画布所在的层(layer)
绘制修饰的内容(例如滚动条),这个可知要实现滚动条效果并不需要 ScrollView,可以在 View 中完成的,不过有一些小技巧,具体实现可以参看我们的 TextViewExample 示例代码
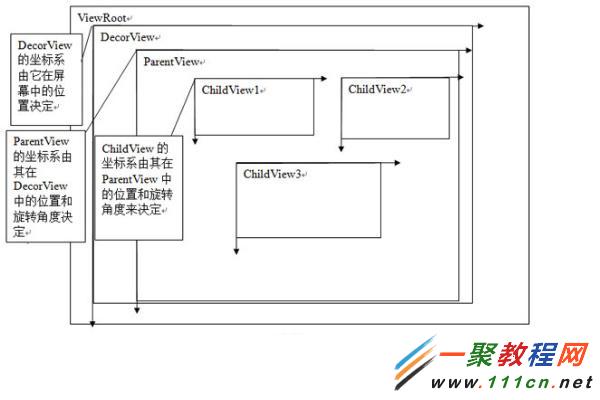
当一个 ChildView 要重画时,它会调用其成员函数 invalidate() 函数将通知其 ParentView 这个 ChildView 要重画,这个过程一直向上遍历到 ViewRoot,当 ViewRoot 收到这个通知后就会调用上面提到的 ViewRoot 中的 draw 函数从而完成绘制。View::onDraw() 有一个画布参数 Canvas, 画布顾名思义就是画东西的地方,Android 会为每一个 View 设置好画布,View 就可以调用 Canvas 的方法,比如:drawText, drawBitmap, drawPath 等等去画内容。每一个 ChildView 的画布是由其 ParentView 设置的,ParentView 根据 ChildView 在其内部的布局来调整 Canvas,其中画布的属性之一就是定义和 ChildView 相关的坐标系,默认是横轴为 X 轴,从左至右,值逐渐增大,竖轴为 Y 轴,从上至下,值逐渐增大 , 见下图 :
图 4. 窗口坐标系
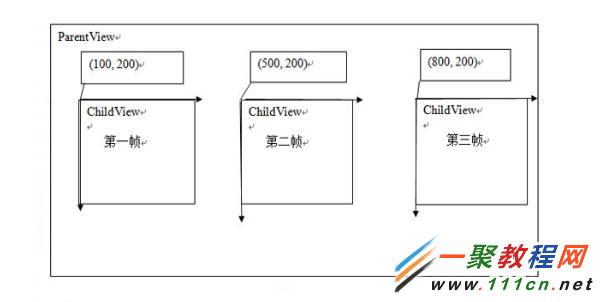
Android 动画就是通过 ParentView 来不断调整 ChildView 的画布坐标系来实现的,下面以平移动画来做示例,见下图 4,假设在动画开始时 ChildView 在 ParentView 中的初始位置在 (100,200) 处,这时 ParentView 会根据这个坐标来设置 ChildView 的画布,在 ParentView 的 dispatchDraw 中它发现 ChildView 有一个平移动画,而且当前的平移位置是 (100, 200),于是它通过调用画布的函数 traslate(100, 200) 来告诉 ChildView 在这个位置开始画,这就是动画的第一帧。如果 ParentView 发现 ChildView 有动画,就会不断的调用 invalidate() 这个函数,这样就会导致自己会不断的重画,就会不断的调用 dispatchDraw 这个函数,这样就产生了动画的后续帧,当再次进入 dispatchDraw 时,ParentView 根据平移动画产生出第二帧的平移位置 (500, 200),然后继续执行上述操作,然后产生第三帧,第四帧,直到动画播完。具体算法描述如清单 2:
清单 2. 算法
dispatchDraw()
{
....
Animation a = ChildView.getAnimation()
Transformation tm = a.getTransformation();
Use tm to set ChildView's Canvas;
Invalidate();
....
}
图 5. 平移动画示意图
以上是以平移动画为例子来说明动画的产生过程,这其中又涉及到两个重要的类型,Animation 和 Transformation,这两个类是实现动画的主要的类,Animation 中主要定义了动画的一些属性比如开始时间、持续时间、是否重复播放等,这个类主要有两个重要的函数:getTransformation 和 applyTransformation,在 getTransformation 中 Animation 会根据动画的属性来产生一系列的差值点,然后将这些差值点传给 applyTransformation,这个函数将根据这些点来生成不同的 Transformation,Transformation 中包含一个矩阵和 alpha 值,矩阵是用来做平移、旋转和缩放动画的,而 alpha 值是用来做 alpha 动画的(简单理解的话,alpha 动画相当于不断变换透明度或颜色来实现动画),以上面的平移矩阵为例子,当调用 dispatchDraw 时会调用 getTransformation 来得到当前的 Transformation,这个 Transformation 中的矩阵如下:
图 6. 矩阵变换图

所以具体的动画只需要重载 applyTransformation 这个函数即可,类层次图如下:
图 7. 动画类继承关系图
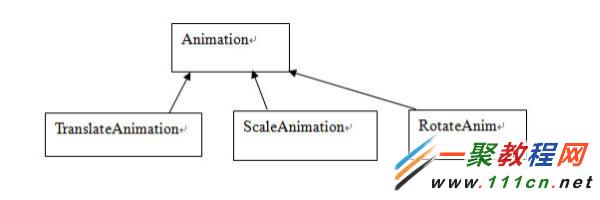
用户可以定义自己的动画类,只需要继承 Animation 类,然后重载 applyTransformation 这个函数。对动画来说其行为主要靠差值点来决定的,比如,我们想开始动画是逐渐加快的或者逐渐变慢的,或者先快后慢的,或者是匀速的,这些功能的实现主要是靠差值函数来实现的,Android 提供了 一个 Interpolator 的基类,你要实现什么样的速度可以重载其函数 getInterpolation,在 Animation 的 getTransformation 中生成差值点时,会用到这个函数。
从上面的动画机制的分析可知某一个 View 的动画的绘制并不是由他自己完成的而是由它的父 view 完成,所有我们要注意上面 TextView 旋转一周的动画示例程序中动画的效果并不是由 TextView 来绘制的,而是由它的父 View 来做的。findViewById(R.id.TextView01).startAnimation(anim) 这个代码其实是给这个 TextView 设置了一个 animation,而不是进行实际的动画绘制,代码如下 :
public void startAnimation(Animation animation)
{
animation.setStartTime(Animation.START_ON_FIRST_FRAME);
setAnimation(animation); invalidate();
}
其他的动画机制的代码感兴趣的读者请自己阅读,希望通过原理的讲解以后看起来会轻松点,呵呵。
以上就是 Android 的动画框架的原理,了解了原理对我们的开发来说就可以清晰的把握动画的每一帧是怎样生成的,这样便于开发和调试。它把动画的播放 / 绘制交给父 View 去处理而不是让子 View 本身去绘制,这种从更高的层次上去控制的方式便于把动画机制做成一个易用的框架,如果用户要在某个 view 中使用动画,只需要在 xml 描述文件或代码中指定就可以了,从而把动画的实现和 View 本身内容的绘制(象 TextView 里面的文字显示)分离开了,起到了减少耦合和提高易用性的效果。
动画实现示例
在这个例子中,将要实现一个绕 Y 轴旋转的动画,这样可以看到 3D 透视投影的效果,代码如下 ( 清单 4):
清单 3. 实现一个绕 Y 轴旋转的动画
package com.example.android.apis.animation;
import android.view.animation.Animation;
import android.view.animation.Transformation;
import android.graphics.Camera;
import android.graphics.Matrix;
/**
* An animation that rotates the view on the Y axis between two specified angles.
* This animation also adds a translation on the Z axis (depth) to improve the effect.
*/
public class Rotate3dAnimation extends Animation
{
private final float mFromDegrees;
private final float mToDegrees;
private final float mCenterX;
private final float mCenterY;
private final float mDepthZ;
private final boolean mReverse;
private Camera mCamera;
/**
* Creates a new 3D rotation on the Y axis. The rotation is defined by its
* start angle and its end angle. Both angles are in degrees. The rotation
* is performed around a center point on the 2D space, definied by a pair
* of X and Y coordinates, called centerX and centerY. When the animation
* starts, a translation on the Z axis (depth) is performed. The length
* of the translation can be specified, as well as whether the translation
* should be reversed in time.
*
* @param fromDegrees the start angle of the 3D rotation
* @param toDegrees the end angle of the 3D rotation
* @param centerX the X center of the 3D rotation
* @param centerY the Y center of the 3D rotation
* @param reverse true if the translation should be reversed, false otherwise
*/
public Rotate3dAnimation(float fromDegrees, float toDegrees,
float centerX, float centerY,
float depthZ, boolean reverse)
{
mFromDegrees = fromDegrees;
mToDegrees = toDegrees;
mCenterX = centerX;
mCenterY = centerY;
mDepthZ = depthZ;
mReverse = reverse;
}
@Override
public void initialize(int width, int height, int parentWidth, int parentHeight)
{
super.initialize(width, height, parentWidth, parentHeight);
mCamera = new Camera();
}
@Override
protected void applyTransformation(float interpolatedTime, Transformation t)
{
final float fromDegrees = mFromDegrees;
float degrees = fromDegrees + ((mToDegrees - fromDegrees) * interpolatedTime);
final float centerX = mCenterX;
final float centerY = mCenterY;
final Camera camera = mCamera;
final Matrix matrix = t.getMatrix();
camera.save();
if (mReverse)
{
camera.translate(0.0f, 0.0f, mDepthZ * interpolatedTime);
}
else
{
camera.translate(0.0f, 0.0f, mDepthZ * (1.0f - interpolatedTime));
}
camera.rotateY(degrees);
camera.getMatrix(matrix);
camera.restore();
matrix.preTranslate(-centerX, -centerY);
matrix.postTranslate(centerX, centerY);
}
}
在这个例子中我们重载了 applyTransformation 函数,interpolatedTime 就是 getTransformation 函 数传下来的差值点,在这里做了一个线性插值算法来生成中间角度:float degrees = fromDegrees + ((mToDegrees - fromDegrees) * interpolatedTime); Camera 类是用来实现绕 Y 轴旋转后透视投影的,我们只需要其返回的 Matrix 值 , 这个值会赋给 Transformation 中的矩阵成员,当 ParentView 去为 ChildView 设置画布时,就会用它来设置坐标系,这样 ChildView 画出来的效果就是一个绕 Y 轴旋转同时带有透视投影的效果。利用这个动画便可以作出像立体翻页等比较酷的效果。如何使用这个 animation 请见 ApiDemos 程序包 com.example.android.apis.animation 中的 Transition3d.java 代码。
Android 中显示 Gif 格式图
有关这一部分,本文将不做详细介绍。 感兴趣的读者请参看 Apidemos 中 com.example.android.apis.graphics 下面的 BitmapDecode.java 中的示例代码。
这里先简单说明一下,它的实现是通过 Movie 这个类来对 Gif 文件进行读取和解码的,同时在 onDraw 函数中不断的绘制每一帧图片完成的,这个示例代码在 onDraw 中调用 invalidate 来反复让 View 失效来让系统不断调用 SampleView 的 onDraw 函数;至于选出哪一帧图片进行绘制则是传入系统当前时间给 Movie 类,然后让它根据时间顺序来选出帧图片。反复让 View 失效的方式比较耗资源,绘制效果允许的话可以采取延时让 View 失效的方式来减小 CPU 消耗。
目前使用这个方式播放一些 Gif 格式的动画时会出现花屏的现象,这是因为 Android 中使用的 libgif 库是比较老的版本,新的 tag 不支持,所以导致花屏,解决办法有制作 Gif 图片时别使用太新的 tag 或完善 android 中对应的 libgif 库。
结束语
本文介绍了 Android 动画框架的基本原理,可以帮助开发者深入理解 Android 的动画是如何实现的,从而能够充分利用 android 现有框架来做出够眩、够酷的动画效果。
相关文章
- 下面本文章来给大家介绍在php中成员变量的一些对比了,文章举了四个例子在这例子中分别对不同成员变量进行测试与获取操作,下面一起来看看。 有如下4个代码示例,你认...2016-11-25
- php 获取用户IP与IE信息程序 function onlineip() { global $_SERVER; if(getenv('HTTP_CLIENT_IP')) { $onlineip = getenv('HTTP_CLIENT_IP');...2016-11-25
- php获取一个文件夹的mtime的程序了,这个就是时间问题了,对于这个问题我们来看小编整理的几个例子,具体的操作例子如下所示。 php很容易获取到一个文件夹的mtime,可以...2016-11-25
- 下面我们来看一篇关于Android子控件超出父控件的范围显示出来方法,希望这篇文章能够帮助到各位朋友,有碰到此问题的朋友可以进来看看哦。 <RelativeLayout xmlns:an...2016-10-02
- 获取网站icon,常用最简单的方法就是通过website/favicon.ico来获取,不过由于很多网站都是在页面里面设置favicon,所以此方法很多情况都不可用。 更好的办法是通过google提供的服务来实现:http://www.google.com/s2/favi...2014-06-07
- 主要功能:获取浏览器显示区域(可视区域)的高度 : $(window).height(); 获取浏览器显示区域(可视区域)的宽度 :$(window).width(); 获取页面的文档高度 $(document).height(); 获取页面的文档宽度 :$(document).width();...2015-10-21
- 最近想自学PHP ,做了个验证码,但不知道怎么搞的,总出现一个如下图的小红叉,但验证码就是显示不出来,原因如下 未修改之前,出现如下错误; (1)修改步骤如下,原因如下,原因是apache权限没开, (2)点击打开php.int., 搜索extension=ph...2013-10-04
Android开发中findViewById()函数用法与简化
findViewById方法在android开发中是获取页面控件的值了,有没有发现我们一个页面控件多了会反复研究写findViewById呢,下面我们一起来看它的简化方法。 Android中Fin...2016-09-20- 如果我们的项目需要做来电及短信的功能,那么我们就得在Android模拟器开发这些功能,本来就来告诉我们如何在Android模拟器上模拟来电及来短信的功能。 在Android模拟...2016-09-20
- jquery中jquery.offset().top / left用于获取div距离窗口的距离,jquery.position().top / left 用于获取距离父级div的距离(必须是绝对定位的div)。 (1)先介绍jquery.offset().top / left css: 复制代码 代码如下: *{ mar...2013-10-13
- 夜神android模拟器如何设置代理呢?对于这个问题其实操作起来是非常的简单,下面小编来为各位详细介绍夜神android模拟器设置代理的方法,希望例子能够帮助到各位。 app...2016-09-20
- 1、先讲讲JQuery的概念,JQuery首先是由一个 America 的叫什么 John Resig的人创建的,后来又很多的JS高手也加入了这个团队。其实 JQuery是一个JavaScript的类库,这个类库集合了很多功能方法,利用类库你可以用简单的一些代...2014-05-31
- 为了增强android应用的用户体验,我们可以在一些Button按钮上自定义动态的设置一些样式,比如交互时改变字体、颜色、背景图等。 今天来看一个通过重写Button来动态实...2016-09-20
- 如果我们要在Android应用APP中加载html5页面,我们可以使用WebView,本文我们分享两个WebView加载html5页面实例应用。 实例一:WebView加载html5实现炫酷引导页面大多...2016-09-20
jQuery Real Person验证码插件防止表单自动提交
本文介绍的jQuery插件有点特殊,防自动提交表单的验证工具,就是我们经常用到的验证码工具,先给大家看看效果。效果图如下: 使用说明 需要使用jQuery库文件和Real Person库文件 同时需要自定义验证码显示的CSS样式 使用实例...2015-11-08- 深入理解Android中View和ViewGroup从组成架构上看,似乎ViewGroup在View之上,View需要继承ViewGroup,但实际上不是这样的。View是基类,ViewGroup是它的子类。本教程我们深...2016-09-20
- 这篇文章主要为大家详细介绍了JS实现随机生成验证码,文中示例代码介绍的非常详细,具有一定的参考价值,感兴趣的小伙伴们可以参考一下...2021-09-06
- 下面我们来看一篇关于Android自定义WebView网络视频播放控件开发例子,这个文章写得非常的不错下面给各位共享一下吧。 因为业务需要,以下代码均以Youtube网站在线视...2016-10-02
- java开发的Android应用,性能一直是一个大问题,,或许是Java语言本身比较消耗内存。本文我们来谈谈Android 性能优化之MemoryFile文件读写。 Android匿名共享内存对外A...2016-09-20
- TextView默认是横着显示了,今天我们一起来看看Android设置TextView竖着显示如何来实现吧,今天我们就一起来看看操作细节,具体的如下所示。 在开发Android程序的时候,...2016-10-02