Android仿360浮动小球及开机自启动开发
先看下图所示,那个百分号的浮动小球。
如图片左上角所示,球中还会显示当前手机的运行状况,向下拉动还会有弹射来达到加速、清理等目的。
那好,先来实现一个类似的小球(仅限于形状,功能你懂得)。
查阅了相关资料,整个界面除了小球以外,其他部分均是做透明处理。
1、由于用到了CompatModeWrapper,所以需要在AndroidManifest.xml中添加以下权限:
<uses-permission android:name="android.permission.SYSTEM_ALERT_WINDOW" />
要想在应用中被启动为一个Activity或Service,需要注册,这里是Service:
<service android:name=".Service1" />
2、界面透明化处理,整体代码如下:
package com.XXX.autostart;
import android.view.View;
import android.app.Service;
import android.content.Intent;
import android.graphics.PixelFormat;
import android.os.Handler;
import android.os.IBinder;
import android.view.Gravity;
import android.view.LayoutInflater;
import android.view.MotionEvent;
import android.view.WindowManager;
import android.view.View.OnClickListener;
import android.view.View.OnTouchListener;
import android.view.WindowManager.LayoutParams;
import android.widget.ImageButton;
import android.widget.LinearLayout;
public class Service1 extends Service
{
LinearLayout mFloatLayout;
WindowManager.LayoutParams wmParams;
WindowManager mWindowManager;
ImageButton mFloatView;
@Override
public void onCreate()
{
// TODO Auto-generated method stub
super.onCreate();
createFloatView();
}
@Override
public IBinder onBind(Intent intent)
{
// TODO Auto-generated method stub
return null;
}
private void createFloatView()
{
wmParams = new WindowManager.LayoutParams();
mWindowManager = (WindowManager)getApplication().getSystemService(getApplication().WINDOW_SERVICE);
wmParams.type = LayoutParams.TYPE_PHONE;
wmParams.format = PixelFormat.RGBA_8888;
wmParams.flags = LayoutParams.FLAG_NOT_FOCUSABLE;
wmParams.gravity = Gravity.LEFT | Gravity.TOP;
wmParams.x = 0;
wmParams.y = 0;
wmParams.width = WindowManager.LayoutParams.WRAP_CONTENT;
wmParams.height = WindowManager.LayoutParams.WRAP_CONTENT;
LayoutInflater inflater = LayoutInflater.from(getApplication());
mFloatLayout = (LinearLayout) inflater.inflate(R.layout.float_layout, null);
mWindowManager.addView(mFloatLayout, wmParams);
mFloatView = (ImageButton)mFloatLayout.findViewById(R.id.float_id);
mFloatLayout.measure(View.MeasureSpec.makeMeasureSpec(0,
View.MeasureSpec.UNSPECIFIED), View.MeasureSpec
.makeMeasureSpec(0, View.MeasureSpec.UNSPECIFIED));
mFloatView.setOnTouchListener(new OnTouchListener() {
@Override
public boolean onTouch(View v, MotionEvent event) {
// TODO Auto-generated method stub
wmParams.x = (int) event.getRawX() - mFloatView.getMeasuredWidth() / 2;
wmParams.y = (int) event.getRawY() - mFloatView.getMeasuredHeight() / 2 - 25;
mWindowManager.updateViewLayout(mFloatLayout, wmParams);
return false;
}
});
mFloatView.setOnClickListener(new OnClickListener() {
@Override
public void onClick(View v) {
// TODO Auto-generated method stub
mFloatView.setVisibility(View.INVISIBLE);
Handler handler = new Handler();
handler.postDelayed(new Runnable() {
public void run() {
mFloatView.setVisibility(View.VISIBLE);
}
}, 3000);
}
});
}
@Override
public void onDestroy()
{
// TODO Auto-generated method stub
super.onDestroy();
if(mFloatLayout != null)
{
mWindowManager.removeView(mFloatLayout);
}
}
}
这里是利用ImageButton组件来实现小球,关键在于其显示的图片是圆形。
因此,要想将浮动窗口实现为其他形状,只需制作相应的图片赋给组件。
对于小球的功能,只是实现了在手机屏幕上随意拖动,单击消失三秒后重现。
3、浮动小球有了,怎么让它启动呢?注意上面实现的类Service1,继承的是Service。
在ManiActivity.java中,让其显现的方式很简单,代码如下:
finish();
Intent intent = new Intent(getApplicationContext(), Service1.class);
startService(intent);
注意,这里对于MainActivity类不需要做任何处理,新建工程时默认就好。当然,要实现其他功能例外。
代码finish();可加可不加,加上之后使得程序一运行就只剩下小球,原来的界面让其消失。
效果图如下,图形找的是红色小火焰。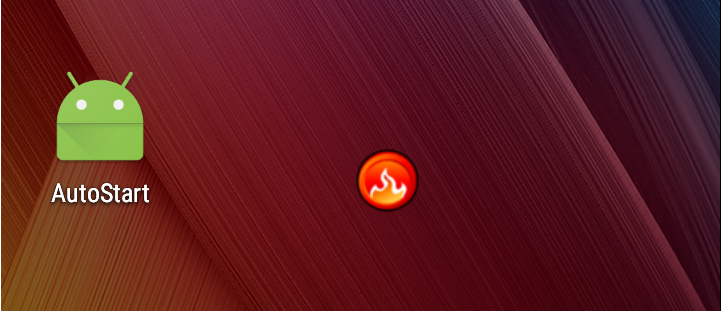
4、到此,浮动小球就实现了,那怎么让它开机自启动呢?
其实也很简单,用到了BroadcastReceiver。
还是先添加权限:
<uses-permission android:name="android.permission.RECEIVE_BOOT_COMPLETED" />
另外,对于系统的广播消息,要想在开机等时刻能够捕获到,还需添加以下内容:
<receiver android:name=".BootBroadcastReceiver">
<intent-filter>
<action android:name="android.intent.action.BOOT_COMPLETED" />
</intent-filter>
</receiver>
实现代码如下:
package com.XXX.autostart;
import android.content.BroadcastReceiver;
import android.content.Context;
import android.content.Intent;
public class BootBroadcastReceiver extends BroadcastReceiver {
static final String ACTION = "android.intent.action.BOOT_COMPLETED";
@Override
public void onReceive(Context context, Intent intent) {
if (intent.getAction().equals(ACTION)) {
Intent intent1 = new Intent(context, Service1.class);
intent1.addFlags(Intent.FLAG_ACTIVITY_NEW_TASK);
context.startService(intent1);
}
}
}
将手机ReBoot,可以发现红色小球会自行启动,不过速度比较慢(和360安全卫士相比)。
Android开机自启动程序实例
背景知识:当Android启动时,会发出一个系统广播,内容为ACTION_BOOT_COMPLETED,它的字
符串常量表示为 android.intent.action.BOOT_COMPLETED。只要在程序中“捕捉”到这个消息,再启动之
即可。记住,Android框架说:Don''t call me, I''ll call you back。我们要做的是做好接收这个消息的准备,而
实现的手段就是实现一个BroadcastReceiver。
1、界面Activity,BootStartDemo.java文件
public class BootStartDemo extends Activity {
/** Called when the activity is first created. */
@Override
public void onCreate(Bundle savedInstanceState) {
super.onCreate(savedInstanceState);
// 无title
requestWindowFeature(Window.FEATURE_NO_TITLE);
// 全屏
getWindow().setFlags(WindowManager.LayoutParams.FLAG_FULLSCREEN,
WindowManager.LayoutParams.FLAG_FULLSCREEN);
setContentView(R.layout.main);
new Thread() {
public void run() {
try {
/* 10秒后关闭页面*/
sleep(10000);
} catch (Exception e) {
e.printStackTrace();
} finally {
finish(); // 关闭页面
}
}
}.start();
}
}
这段代码很简单,当Activity 启动时,会显示TextView,用它显示你想显示的字样,并且这个页面只显示10秒后消失。
2、接收广播消息:BootBroadcastReceiver.java
public class BootBroadcastReceiver extends BroadcastReceiver {
static final String action_boot="android.intent.action.BOOT_COMPLETED";
@Override
public void onReceive(Context context, Intent intent) {
if (intent.getAction().equals(action_boot)){
Intent ootStartIntent=new Intent(context,BootStartDemo.class);
ootStartIntent.addFlags(Intent.FLAG_ACTIVITY_NEW_TASK);
context.startActivity(ootStartIntent);
}
}
}
该类继续自 BroadcastReceiver,覆载方法 onReceive 中,检测接收到的 Intent 是否符合
BOOT_COMPLETED,如果符合,则启动BootStartDemo这个Activity。
3、配置文件
(1)AndroidManifest.xml :
<?xml version="1.0" encoding="utf-8"?>
<!-- 这是一个开机自启动程序 -->
<manifest xmlns:android="http://schemas.android.com/apk/res/android"
package="com.ajie.bootstartdemo"
android:versionCode="1"
android:versionName="1.0">
<application android:icon="@drawable/icon" android:label="@string/app_name">
<activity android:name=".BootStartDemo"
android:label="@string/app_name">
<intent-filter>
<action android:name="android.intent.action.MAIN" />
<category android:name="android.intent.category.LAUNCHER" />
</intent-filter>
</activity>
<span style="color: #ff00ff;"><receiver android:name=".BootBroadcastReceiver">
<intent-filter>
<action android:name="android.intent.action.BOOT_COMPLETED" />
<category android:name="android.intent.category.HOME" />
</intent-filter>
</receiver>
</span> </application>
<span style="color: #ff00ff;"><strong><uses-permission android:name="android.permission.RECEIVE_BOOT_COMPLETED"></uses-permission></strong>
</span></manifest>
注意其中颜色标红那一部分,该节点向系统注册了一个 receiver,子节点 intent-filter 表示接收
android.intent.action.BOOT_COMPLETED 消息。并且还要配置android.permission.RECEIVE_BOOT_COMPLETED权限。
(2)Layout文件,main.xml
<?xml version="1.0" encoding="utf-8"?>
<LinearLayout xmlns:android="http://schemas.android.com/apk/res/android"
android:orientation="vertical"
android:layout_width="fill_parent"
android:layout_height="fill_parent"
>
<TextView
android:layout_width="fill_parent"
android:layout_height="fill_parent"
android:text="@string/boottext"
android:textColor="#5F2DD2"
android:background="#FFFFFF"
android:textSize="60px"
android:gravity="center_horizontal"
/>
</LinearLayout>
完成后,编译出apk包,安装到模拟器或手机中。关机,重新开机,就会显示BootStartDemo这个Activity显示出来的页面。
Android开发实例 四则运算计算器
先看计算器效果图
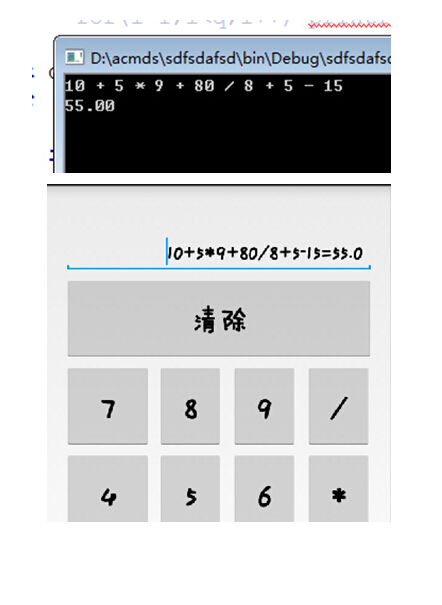
【技术】
关于这个计算器的一些技术,其核心是把中缀表达式转化为后缀表达式,这个时候需要使用一个最基础的数据结构——栈。
具体的操作原理可以参考这个博客 http://www.nowamagic.net/librarys/veda/detail/2307
然而,对于这个问题,早在上学期就已经解决了,但是那时候纯粹是为了Accepted HDU 1237 http://acm.hdu.edu.cn/showproblem.php?pid=1237 并没有为了要做出一个真正意义上能用的计算器App。这次开发的时候,直接把当年写的很挫的代码拉了下来用。
Android开发似乎用的都是Java,不得不说这是一种很好的语言,集成了很多很多有用的功能,需要的时候只需调用一下就行,不像C/C++那样,都要自己纯手打。
计算器核心代码
#include<stdio.h>
#include<string.h>
// + 999991
// - 999992
// * 999993
// / 999994
int stack1[1000];
double stack2[1000];
int a[1000], b[1000];
int main()
{
    int i;
    char s[1000];
    while (gets(s))
    {
        if (strlen(s) == 1 && s[0] == '0')break;
        int y = strlen(s);
        s[y] = ' '; s[y + 1] = '\0';
        int top1 = -1, top2 = -1, q = 1, sum = 0;
        for (i = 0; i<strlen(s); i++)
        {
            if (s[i] == ' ' && (s[i - 1]<'0' || s[i - 1]>'9')) continue;
            else if (s[i] == ' ')a[q] = sum, sum = 0, q++;
            else if (s[i] == '+')a[q] = 999991, q++;
            else if (s[i] == '-')a[q] = 999992, q++;
            else if (s[i] == '*')a[q] = 999993, q++;
            else if (s[i] == '/')a[q] = 999994, q++;
            else if (s[i] >= '0'&&s[i] <= '9') sum = 10 * sum + (s[i] - '0');
        }
        //1到q-1;
        //    for(i=1;i<q;i++) printf("%d\n",a[i]);
        int qq = -1;
        for (i = 1; i<q; i++)
        {
            if (a[i]<999991) qq++, b[qq] = a[i];
            else if (a[i] >= 999991)
            {
                if (top1 == -1)//栈为空
                {
                    top1++;
                    stack1[top1] = a[i];
                }
                else
                {
                    if (a[i] == 999991 || a[i] == 999992)
                    {
                        while (1)
                        {
                            qq++;
                            b[qq] = stack1[top1];
                            top1--;
                            if (top1 == -1) break;
                        }
                        top1++;
                        stack1[top1] = a[i];
                    }
                    else if (a[i] == 999993 || a[i] == 999994)
                    {
                        while (1)
                        {
                            if (stack1[top1] == 999991 || stack1[top1] == 999992 || top1 == -1) break;
                            qq++;
                            b[qq] = stack1[top1];
                            top1--;
                        }
                        top1++;
                        stack1[top1] = a[i];
                    }
                }
            }
        }
        for (i = top1; i >= 0; i--) qq++, b[qq] = stack1[i];
        for (i = 0; i <= qq; i++)
        {
            if (top2 == -1)
            {
                top2++;
                stack2[top2] = b[i];
            }
            else if (b[i]<999991) top2++, stack2[top2] = b[i];
            else if (b[i] == 999991)top2--, stack2[top2] = stack2[top2] + stack2[top2 + 1];
            else if (b[i] == 999992)top2--, stack2[top2] = stack2[top2] - stack2[top2 + 1];
            else if (b[i] == 999993)top2--, stack2[top2] = stack2[top2] * stack2[top2 + 1];
            else if (b[i] == 999994)top2--, stack2[top2] = 1.0*stack2[top2] / stack2[top2 + 1];
        }
        printf("%.2lf\n", stack2[0]);
    }
    return 0;
}
Android应用开发 标准体重计算器
应用的操作和原理
目标Android应用的操作过程是这样的:选择你的性别,然后输入你的身高,点查看计算结果的按钮就在Toast中显示你的标准体重。力求操作简单,结果显示清楚。
标准体重的计算公式:
男性:(身高cm-80)×70?=标准体重
女性:(身高cm-70)×60?=标准体重
应用的源码
BMIActivity.java:
package com.lingdududu.bmi;

import java.text.DecimalFormat;
import java.text.NumberFormat;
import android.app.Activity;
import android.os.Bundle;
import android.view.View;
import android.view.View.OnClickListener;
import android.widget.Button;
import android.widget.EditText;
import android.widget.RadioButton;
import android.widget.Toast;
/*
* @author lingdududu * 该程序的功能是用户选择自己的性别和输入自己的身高,然后点击按钮,就能在Toast显示出自己的标准体重
*/
public class BMIActivity extends Activity {
/** Called when the activity is first created. */
    private Button countButton;
    private EditText heighText;
    private RadioButton maleBtn, femaleBtn;
    String sex = "";
    double height;
    @Override
    public void onCreate(Bundle savedInstanceState) {
        super.onCreate(savedInstanceState);
        setContentView(R.layout.main);
        //调用创建视图的函数
        creadView();
        //调用性别选择的函数
        sexChoose();
        //调用Button注册监听器的函数
        setListener();
   }

    //响应Button事件的函数
    private void setListener() {
        countButton.setOnClickListener(countListner);
    }

    private OnClickListener countListner = new OnClickListener() {

        @Override
        public void onClick(View v) {
            // TODO Auto-generated method stub
            Toast.makeText(BMIActivity.this, "你是一位"+sexChoose()+"\n"
                           +"你的身高为"+Double.parseDouble(heighText.getText().toString())+"cm"
                           +"\n你的标准体重为"+getWeight(sexChoose(), height)+"kg", Toast.LENGTH_LONG)
                           .show();
        }
    };

    //性别选择的函数
    private String sexChoose(){
        if (maleBtn.isChecked()) {
            sex = "男性";
        }
        else if(femaleBtn.isChecked()){
            sex = "女性";
        }
        return sex;
    }

    //创建视图的函数
    public void creadView(){
        //txt=(TextView)findViewById(R.id.txt);
        countButton=(Button)findViewById(R.id.btn);
        heighText=(EditText)findViewById(R.id.etx);
        maleBtn=(RadioButton)findViewById(R.id.male);
        femaleBtn=(RadioButton)findViewById(R.id.female);
        //txt.setBackgroundResource(R.drawable.bg);
    }

    //标准体重格式化输出的函数
    private String format(double num) {
        NumberFormat formatter = new DecimalFormat("0.00");
        String str = formatter.format(num);
        return str;
        }

    //得到标准体重的函数
    private String getWeight(String sex, double height) {
        height = Double.parseDouble(heighText.getText().toString());
        String weight = "";
        if (sex.equals("男性")) {
              weight =format((height - 80) * 0.7);
        }
        else {
              weight = format((height - 70) * 0.6);
        }
        return weight;
       }
   }
main.xml:
XML/HTML代码
    <?xml version="1.0" encoding="utf-8"?>
    <LinearLayout xmlns:android="http://schemas.android.com/apk/res/android"
        android:orientation="vertical"
        android:layout_width="fill_parent"
        android:layout_height="fill_parent"
        android:background="@drawable/pic"
        >
        <TextView
            android:id="@+id/txt"
            android:layout_width="fill_parent"
            android:layout_height="wrap_content"
            android:gravity="center"
            android:text="@string/hello"
            android:textSize="16px"
            />
       <TextView
            android:layout_width="fill_parent"
            android:layout_height="wrap_content"
            android:text="@string/sex"
            />
       <RadioGroup
          android:layout_width="fill_parent"
          android:layout_height="wrap_content"
          android:orientation="horizontal"
          >
          <RadioButton
               android:id="@+id/male"
               android:layout_width="wrap_content"
               android:layout_height="wrap_content"
               android:text="男"
               />
          <RadioButton
               android:id="@+id/female"
               android:layout_width="wrap_content"
               android:layout_height="wrap_content"
               android:text="女"
               />
       </RadioGroup>
       <TextView
            android:layout_width="fill_parent"
            android:layout_height="26px"
            android:text="@string/heigh"
            />
       <EditText
            android:id="@+id/etx"
            android:layout_width="fill_parent"
            android:layout_height="wrap_content"
            />
       <Button
             android:id="@+id/btn"
             android:layout_width="fill_parent"
             android:layout_height="wrap_content"
             android:text="@string/count"
             />
    </LinearLayout>
应用效果图

Android控件中的TextView控件只有一个输入框,但是为了用于的操作方便我们应该实现一些功能:
1. 可以直接将内容删除的功能按钮
2. 可以记录用户以前输入的数据,同时能够将数据通过下拉显示,点击的时候实现输入
先上图:


下拉的图片没有做,所以和删除的图片使用同一个了,同志们可以直接在xml文件中更换就行了
分析:
肯定要使用自定义view来实现的,我们知道自定义view大概可以分为三类:自绘控件,组合控件,继承控件,我们这里是要进行增强的textView的功能,所以我这里使用的
是组合控件的方式来进行实现
既然使用组合控件,那么我们就来看看到底要使用什么控件来组合呢:
1. 其中一个必须是textView了
2. 下拉的那两个按钮是什么,当然是imageView了
3. 还有一个下拉列表,。。。。那就使用popwindow了
思路:
1. 如何实现直接删除用户的输入
使用addTextChangedListener监听textView内容的变化的时间根据内容的变化进行确定是否显示删除按钮,同时绑定删除按钮的点击事件
2.如何实现下拉显示用户输入过的数据,以及选中的时候实现输入
我们通过下拉按钮的点击进行确定popwindow窗口的显示,在popwindow的界面有一个listview,在这个listview的adpater中进行绑定条目的点击事件
那么我们在adapter中绑定的事件,如何控制整个控件的功能输入呢,这里就是用handler了,在创建adapter的时候将handler传递过去,
然后当点击事件发生的时候我们使用handler进行send消息就行了,当然我们在send消息的时候将当前点击的数据传递过来就行了
上代码:
1. 控件主体代码
/**
 * 自定义的控件,自带删除的按钮,下拉按钮
 * @author zcs
 * */
public class EditTextClearSelect extends FrameLayout {

    private EditText editText;  //显示的editText输入框
    private ImageButton clearImageButton;  //显示的用于进行删除editText中内容的按钮
    private ImageButton selectImageButton;  //显示的用于下拉editText中内容的按钮

    //PopupWindow对象  ,用于已下拉形式显示数据
    private PopupWindow selectPopupWindow= null;
    //自定义Adapter
    private ECS_OptionsAdapter optionsAdapter = null;
    //下拉框选项数据源
    private ArrayList<String> datas = new ArrayList<String>();
    //下拉框依附组件
    private LinearLayout parent;
    //展示所有下拉选项的ListView
    private ListView listView = null;
    //用来处理选中或者删除下拉项消息
    private Handler handler;

    public EditTextClearSelect(Context context) {
        super(context);
    }
    //用于对自定义的控件进行初始化
    public EditTextClearSelect(Context context, AttributeSet attrs){
        super(context, attrs);
        //调用初始化自定义控件的方法
        init(context,attrs);
    }

    /**
     * 初始化下拉功能使用的组件
     */
    private void initWedget(Context context){
        //初始化Handler,用来处理消息
        handler = new Handler(){
            public void handleMessage(Message msg) {
                //当adapter中传递过来消息以后根据选中的id,将对应的值填写到EditText组件中
                Bundle data = msg.getData();
                //选中下拉项,下拉框消失
                int selIndex = data.getInt("selIndex");
                editText.setText(datas.get(selIndex));
                dismiss();
            }
        };

        //如果没有数据,则下拉菜单不显示
        if( !(datas.size() > 0) ){
            selectImageButton.setVisibility(View.GONE);
        }

        //设置点击下拉箭头图片事件,点击弹出PopupWindow浮动下拉框
        selectImageButton.setOnClickListener(new View.OnClickListener() {
            @Override
            public void onClick(View v) {
                 //获取下拉框依附的组件宽度,然后重新设置popWindow的宽度
                selectPopupWindow.setWidth(parent.getWidth());
                //显示PopupWindow窗口
                popupWindwShowing();
            }
        });

        //初始化PopupWindow
        initPopuWindow(context);
    }

    /**
     * 初始化PopupWindow
     */
    private void initPopuWindow(Context context){

        //PopupWindow浮动下拉框布局
        View loginwindow = LayoutInflater.from(context).inflate(R.layout.wecs_options, null);
        listView = (ListView) loginwindow.findViewById(R.id.list);

        //设置自定义Adapter
        optionsAdapter = new ECS_OptionsAdapter(context,handler,datas);
        listView.setAdapter(optionsAdapter);

        selectPopupWindow = new PopupWindow(loginwindow, 0,LayoutParams.WRAP_CONTENT, true);
        selectPopupWindow.setOutsideTouchable(true);
        //实现当点击屏幕其他地方的时候将当前的pop关闭
        selectPopupWindow.setBackgroundDrawable(new BitmapDrawable());
    }

    /**
     * 显示PopupWindow窗口
     * @param popupwindow
     */
    public void popupWindwShowing() {
       //将pop窗口在自定义控件的底部显示
       selectPopupWindow.showAsDropDown(parent);
    }

    /**
     * PopupWindow消失
     */
    public void dismiss(){
        selectPopupWindow.dismiss();
    }

     /**
     * 初始化,包括增加删除按钮,下拉按钮
     */
    public void init(Context context,AttributeSet attrs){
        //获取自定义控件的界面,相当于当前的自定义View就使用的View
        View view = LayoutInflater.from(context).inflate(R.layout.weight_edit_clear_select, this, true);

        parent =  (LinearLayout) view.findViewById(R.id.parent);  //当前的自定义控件
        editText = (EditText) view.findViewById(R.id.et);  //输入框
        clearImageButton = (ImageButton) view.findViewById(R.id.clear_ib); //删除按钮
        selectImageButton = (ImageButton) view.findViewById(R.id.select_id); //下拉按钮

        //当点击删除按钮的会后将输入框数据清空
        clearImageButton.setOnClickListener(new OnClickListener() {
            @Override
            public void onClick(View v) {
                editText.setText("");
            }
        });
        //根据输入框中的内容,决定是否显示删除按钮
        editText.addTextChangedListener(new TextWatcher(){
            @Override
            public void onTextChanged(CharSequence s, int start, int before, int count) {
                if (s.length() > 0) {
                    //输入框有内容,显示按钮
                    editText.setSelection(s.length());
                    clearImageButton.setVisibility(View.VISIBLE);
                } else {
                    clearImageButton.setVisibility(View.GONE);
                }
            }
            @Override
            public void beforeTextChanged(CharSequence s, int start, int count,
                    int after) {
            }
            @Override
            public void afterTextChanged(Editable s) {
            }

        });

        //初始化pop组件,设置下拉按钮的功能
        initWedget(context);

        //将属性值设置到控件中
        TypedArray a = context.obtainStyledAttributes(attrs, R.styleable.EditTextClearSelect);
        //输入框的默认的显示文本
        CharSequence text = a.getText(R.styleable.EditTextClearSelect_textECS);
        CharSequence hint = a.getText(R.styleable.EditTextClearSelect_hintECS);
        CharSequence parent_width  = a.getText(R.styleable.EditTextClearSelect_layout_width);

        if (text!=null&&!"".equals(text.toString().trim())) {
            editText.setText(text);
            //设置光标位置
            editText.setSelection(text.length());
            this.clearImageButton.setVisibility(View.VISIBLE);
        }
        if (hint!=null&&!"".equals(hint.toString().trim())) {
            editText.setHint(hint);
        }
        if(parent_width!=null && !"".equals(parent_width.toString().trim()) ){
            //设置当前控件的宽度,为屏幕的百度比有参数进行设置
            LayoutParams parent_lp = (LayoutParams) parent.getLayoutParams();
            parent_lp.width = (int) (AppUtil.getScreenDispaly(context)[0] * ( (Double)(Double.parseDouble(parent_width.toString()) / 100) ));
            Log.i("控件宽度", parent_lp.width+"");
            parent.setLayoutParams(parent_lp);
        }
        a.recycle();
    }

    /**
     * 获得输入的值
     * @return
     */
    public String getText(){
        return this.editText.getText().toString();
    }

    /**
     * 设置值
     * @param text
     */
    public void setText(String text){
        this.editText.setText(text);
    }

    /**
     * 设置默认值
     * @param hint
     */
    public void setHint(String hint){
        this.editText.setHint(hint);
    }

    /**
     * 获得输入框控件
     * @return
     */
    public EditText getEditText(){
        return this.editText;
    }

    /**
     * 获得消除按钮
     * @return
     */
    public ImageButton getClearImageButton(){
        return this.clearImageButton;
    }

    //设置下拉列表中的选项值
    public void setOptionsValue(ArrayList<String> inDatas){
        datas.clear();
        if( (inDatas ==null) || !(inDatas.size() > 0) ){
            selectImageButton.setVisibility(View.GONE);
        }else{
            selectImageButton.setVisibility(View.VISIBLE);
            datas.addAll(inDatas);
        }
        optionsAdapter.notifyDataSetChanged();
    }
2. popwindow里面listview的适配器
public class ECS_OptionsAdapter extends BaseAdapter {

        private ArrayList<String> list = new ArrayList<String>();
        private Context context = null;
        //传递过来的hanler,用于进行通知操作(这里是通知自定义的view要继续修改editText中的数据)
        private Handler handler;

        public ECS_OptionsAdapter(Context context,Handler handler,ArrayList<String> list){
            this.context = context;
            this.handler = handler;
            this.list = list;
        }

        @Override
        public int getCount() {
            return list.size();
        }

        @Override
        public Object getItem(int position) {
            return list.get(position);
        }

        @Override
        public long getItemId(int position) {
            return position;
        }

        @Override
        public View getView(final int position, View convertView, ViewGroup parent) {

            ViewHolder holder = null;
            if (convertView == null) {
                holder = new ViewHolder();
                //下拉项布局
                convertView = LayoutInflater.from(context).inflate(R.layout.wecs_option_item, null);
                holder.textView = (TextView) convertView.findViewById(R.id.item_text);
                convertView.setTag(holder);
            } else {
                holder = (ViewHolder) convertView.getTag();
            }
            holder.textView.setText(list.get(position));
            //为下拉框选项文字部分设置事件,最终效果是点击将其文字填充到文本框
            holder.textView.setOnClickListener(new View.OnClickListener() {
                @Override
                public void onClick(View v) {
                    //当点击的时候进行发送消息,通知组件进行修改数据
                    Message msg = new Message();
                    //设置要传递的数据
                    Bundle data = new Bundle();
                    //设置选中索引
                    data.putInt("selIndex", position);
                    msg.setData(data);
                    //发出消息
                    handler.sendMessage(msg);
                }
            });
            return convertView;
        }

    }

    class ViewHolder {
        TextView textView;
    }
3. 使用
private EditTextClearSelect etcs;

@Override
protected void onCreate(Bundle savedInstanceState) {
    super.onCreate(savedInstanceState);
    setContentView(R.layout.activity_main);
    init();
}

//初始化
private void init(){
    String selectDatas = "admin,login,user";
    etcs = (EditTextClearSelect) findViewById(R.id.username_edit);
    //为控件设置下拉的数据
    etcs.setOptionsValue( new ArrayList<String>(Arrays.asList(selectDatas.split(","))) );

}
Android中自定义textview可以进行自体设置
面是代码:
package com.windy.androidfont;
import android.content.Context;
import android.graphics.Typeface;
import android.util.AttributeSet;
import android.widget.TextView;
public class FontTextView extends TextView {
    private Context mContext;
    private String TypefaceName = "";
    public String getTypefaceName() {
        return TypefaceName;
    }
    public void setTypefaceName(String typefaceName) {
        TypefaceName = typefaceName;
        Typeface typeface = Typeface.createFromAsset(mContext.getAssets(), "font/" + TypefaceName + ".ttf");
        this.setTypeface(typeface);
        System.gc();
    }
    public FontTextView(Context context, AttributeSet attrs, int defStyle) {
        super(context, attrs, defStyle);
        this.mContext = context;
        int resouceId = attrs.getAttributeResourceValue(null, "typefaceName", 0);
        if (resouceId != 0) {
            TypefaceName = context.getResources().getString(resouceId);
        } else {
            TypefaceName = attrs.getAttributeValue(null, "typefaceName");
        }
        if (TypefaceName != null && !"".equals(TypefaceName)) {
            Typeface typeface = Typeface.createFromAsset(context.getAssets(), "font/" + TypefaceName + ".ttf");
            this.setTypeface(typeface);
        }
    }
    public FontTextView(Context context, AttributeSet attrs) {
        super(context, attrs);
        this.mContext = context;
        // 先判断是否配置的资源文件
        int resouceId = attrs.getAttributeResourceValue(null, "typefaceName", 0);
        if (resouceId != 0) {
            TypefaceName = context.getResources().getString(resouceId);
        } else {
            TypefaceName = attrs.getAttributeValue(null, "typefaceName");
        }
        if (TypefaceName != null && !"".equals(TypefaceName)) {
            Typeface typeface = Typeface.createFromAsset(context.getAssets(), "font/" + TypefaceName + ".ttf");
            this.setTypeface(typeface);
        }
    }
    public FontTextView(Context context) {
        super(context);
        this.mContext = context;
        // TypefaceName = attrs.getAttributeValue(null, "TypefaceName");
        if (TypefaceName != null && !"".equals(TypefaceName)) {
            Typeface typeface = Typeface.createFromAsset(context.getAssets(), "font/" + TypefaceName + ".ttf");
            this.setTypeface(typeface);
        }
    }
}
下面是布局:
<com.example.androidfont.FontTextView
        android:id="@+id/fontTextView1"
        android:layout_width="wrap_content"
        android:layout_height="wrap_content"
        android:layout_marginTop="69dp"
        typefaceName="pop"
        android:text="FontTextView"
        android:textSize="30sp" />
大字体是要设置的属性,pop是字体库的名字
注意:自体库文件我这里放到了assets中的font文件夹中给个截图吧:
strings.xml文件中的截图:可以把字体的配置放到字符串资源中,这样就能统一进行更改了,如果你的需要中要动态的进行配置的话,可以对FontTextView进行改写,我的想法是在将自体配置放进prefrence中进行配置,这样就可以直接在FontTextView中进行改写了,本来想把这个类写的完成呢,由于时间关系就没写,有需求的可以自己去实现。就说这么多吧。
Android自定义View的实现
很多时候系统自带的View满足不了设计的要求,就需要自定义View控件。自定义View首先要实现一个继承自View的类。添加类的构造方法,override父类的方法,如onDraw,(onMeasure)等。如果自定义的View有自己的属性,需要在values下建立attrs.xml文件,在其中定义属性,同时代码也要做修改。
一个简单的例子:
·新建一个MyView类,继承自TextView,并添加构造方法:
package com.example.xhelloworld;
import android.content.Context;
import android.widget.TextView;
public class MyView extends TextView{
    public MyView(Context context) {
       super(context);
       // TODO Auto-generated constructor stub
    }
}
·再在主activity中调用。方法是setContentView(new MyView(this));这句
package com.example.xhelloworld;
import android.app.Activity;
import android.os.Bundle;
import android.view.Menu;
public class NewView extends Activity {
@Override
public void onCreate(Bundle savedInstanceState) {
super.onCreate(savedInstanceState);
//setContentView(R.layout.activity_newview);
setContentView(new MyView(this));
}
@Override
public boolean onCreateOptionsMenu(Menu menu) {
getMenuInflater().inflate(R.menu.activity_newview, menu);
return true;
}
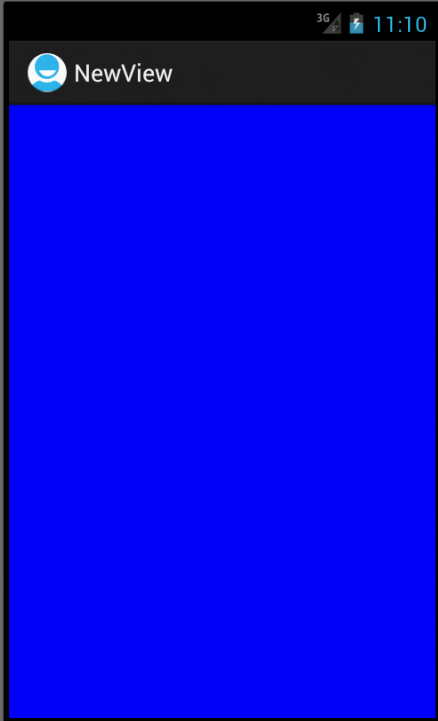
}运行后的结果为:

这样一个简单的自定义View就可以使用了。可以改变一下背景颜色,在MyView类中添加:
@Override
    protected void onDraw(Canvas canvas) {
       // TODO Auto-generated method stub
       super.onDraw(canvas);
       canvas.drawColor(Color.BLUE);
    }
即可完成。运行结果
上面的例子很简单,没有涉及到属性的添加。使用范围很小,不能在布局文件中使用。如果要在布局文件中用到,还需要添加一个构造方法:
public MyView(Context context,AttributeSet attrs){
       super(context, attrs);
    }
当然,上面只是在code中做的修改,在xml文件(main.xml)中也需要进行如下操作:
<com.example.xhelloworld.NewView
        android:layout_width="wrap_content"
        android:layout_height="wrap_content"
        />
至少在xml文件中写上上面的内容。其中com.example.xhelloworld.NewView这句是需要显示的控件所代表的类。Com.example.xhelloworld是类的包名,NewView是类名。这个类肯定是继承自View的自定义类(其实就是,使我们自己写的,这是废话了。。。),可以是在工程中直接源码添加xxxx.java的,也可以是在libs目录下自己新添加的jar包里面的。如果是jar包里面的一个类,则路径就是jar包里面,这个类的路径。
完成上面的两步之后就可以在代码中实例化这个布局文件了
@Override
    public void onCreate(Bundle savedInstanceState) {
        super.onCreate(savedInstanceState);
        setContentView(R.layout.main);
        //setContentView(new MyView(this));
显示的效果同上图。
下面介绍如何实现自定义View的属性设置。实现自定义View的属性设置,需要:
·在values目录下建立attrs.xml文件,添加属性内容
·在布局文件中添加新的命名空间xmlns,然后可以使用命名空间给自定义的空间设置属性
·设置完属性之后,当然还要对其进行处理。在自定义View类中的构造方法中进行处理
根据这三步给一个例子进行说明一下
首先添加attrs.xml文件,在定义属性
<resources>
    <declare-styleable name="MyView">
    <attr name="textColor" format="color"/>
    <attr name="textSize" format="dimension"/>
    declare-styleable>
resources>
然后在布局文件中完成:
xmlns:my=http://schemas.android.com/apk/res/com.example.xhelloworld
<com.example.xhelloworld.MyView
       android:layout_width="fill_parent"
       android:layout_height="wrap_content"
       my:textColor="#FFFFFFFF"
       my:textSize="22dp"
    />
注:这步我在实现的时候出错,问题是显示找不到属性textColor和textSize,这奇怪的错误。解决方法是,在写my:textColor="#FFFFFFFF" 时,写到my之后,按alt+/,这是会自动添加一个xmlns,和my的路径是一样的,用生成的这个替换掉my就可以了。奇葩的问题就用奇葩的方法解决。起初我也不知道怎么弄,瞎搞出来的。
最后在MyView.java中添加另一个构造方法,并添加代码来处理从xml中获得的属性
public MyView(Context context,AttributeSet attrs){
       super(context, attrs);
         mPaint = new Paint();
        //TypedArray是一个用来存放由context.obtainStyledAttributes获得的属性的数组
        //在使用完成后,一定要调用recycle方法
        //属性的名称是styleable中的名称+“_”+属性名称
        //TypedArray array = context.obtainStyledAttributes(attrs, R.styleable.MyView);
        TypedArray array = context.obtainStyledAttributes(attrs, R.styleable.MyView);
        int textColor = array.getColor(R.styleable.MyView_textColor, 0XFF00FF00); //提供默认值,放置未指定
        float textSize = array.getDimension(R.styleable.MyView_textSize, 36);
        mPaint.setColor(textColor);
        mPaint.setTextSize(textSize);
        array.recycle(); //一定要调用,否则这次的设定会对下次的使用造成影响

    }
完成之后就已经实现了自定视图的构造,自定义视图属性的添加很处理。现在完成的是一般的自定义视图,继承自TextView或者View等视图,也就是通过程序主UI线程完成更新的视图,如果是自定义SurfaceView,实现方法有所不同。
添加完之后肯定有很多疑问,自己去做可能还不能理解。这里再对上面操作进行解释说明。
背后的事
View类的构造方法:
·public view(Context context) 当在代码中创建对象时会被调用
·public View (Context context, AttributeSet attrs)
官方的文档是:
Constructor that is called when inflating a view from XML. This is called when a view is being constructed from an XML file, supplying attributes that were specified in the XML file. This version uses a default style of 0, so the only attribute values applied are those in the Context's Theme and the given AttributeSet
大致应该是这个方法是通过xml文件来创建一个view对象的时候调用。很显然xml文件一般是布局文件,就是现实控件的时候调用,而布局文件中免不了会有属性的设置,如android:layout_width等,对这些属性的设置对应的处理代码也在这个方法中完成。
两个参数
Context The Context the view is running in, through which it can access the current theme, resources, etc.
Attrs The attributes of the XML tag that is inflating the view
·public View (Context context, AttributeSet attrs,int defStyle)
Perform inflation from XML and apply a class-specific base style. This constructor of View allows subclasses to use their own base style when they are inflating. For example, a Button class's constructor would call this version of the super class constructor and supply R.attr.buttonStyle fordefStyle; this allows the theme's button style to modify all of the base view attributes (in particular its background) as well as the Button class's attributes.
看的不太懂,没用到,下放一下吧额
这就是为什么要添加上面的两个构造方法的原因。
ListView 与 ScrollView 同在一界面会导致ListView 显示变形,ListView只显示出了一个条目的高度,本文我们来谈谈如何解决Android应用中ListView 和 ScrollView 共生的问题。
一开始就想着用一个ScrollView把主要内容和评论区的ListView包起来,然后添加各个控件的内容即可,但是写出来之后发现ListView只显示出了一个条目的高度,并且不能滑动,网上搜了一下发现原因是ScrollView和ListView都是可滑动的,把它们放在一块会有冲突,最后还是ScrollView获得了焦点,ListView不能滑动。网上的解决方法最多的是在加载ListView时用getMeasure计算每个条目和分割线的高度,然后相加,把结果设置为ListView控件的高度,不过貌似是只适用于ListView每个条目高度都一样的情况(没有试过,很奇怪为什么会这样)。要么就是自定义一个继承自ListView的控件,也是事先设置好ListView的高度,但这样总归比较麻烦,而且准确度不如由系统自己构造好。
懒癌发作实在不想自己去做这些事情,于是便想试一下比较投机的方法,就是在ListView的Adapter的getView方法中根据position构造不同的界面,即如果position是0,则用原来主要信息的xml文件取inflate convertView,否则就用评论条目的xml去inflate,经试验果然可行。之后不死心想看下有没有更好的实现方法,去overflow上找了一下,发现有人推荐的方法和我的差不多,所以认为这种方法是比较好的,不需要做额外的工作,只需要把inflate的工作由主Activity放在Adapter里就可以了。
getView方法
@Override
public View getView(int position, View convertView, ViewGroup parent)
{
    /*主信息界面*/
    if(0 == position)
    {
        MainHolder holder = null;
        convertView = inflater.inflate(R.layout.info, parent, false);
        holder = new MainHolder();
        convertView.setTag(holder);
                ······
                ······
    }
    /*评论界面*/
    else
    {
        ItemHolder holder = null;
        convertView = inflater.inflate(R.layout.item, parent, false);
        holder = new ItemHolder();
        convertView.setTag(holder);
        ······
        ······
        return convertView;
    }
}
另一个方法解决
Android 解决ListView 和 ScrollView 共存冲突的问题
ListView 与 ScrollView 同在一界面会导致ListView 显示变形,因为ListView 也有自带的滚动事件,故无法与ScrollView 相容,可能造成的现象是ListView 只能显示一行或者两行,其他数据在那一点儿宽的地方做滚动,甚不雅观。
下面是我的一个实现 步骤:
1、继承LinearLayout,既然会冲突那就不用ListView 改成线性布局做动态布局效果
2、继承BaseAdapter ,可以参照一下Android app源码中 Widget 目录下的SimpleAdapter 为前面扩展的LinearLayout做数据。
3、模拟数据填充扩展后的BaseAdapter 为扩展后的LinearLayout 加载数据
第一步:新建LinearLayoutForListView 类使其扩展LinearLayout重写以下两个方法:
Code highlighting produced by Actipro CodeHighlighter (freeware)http://www.CodeHighlighter.com/-->public LinearLayoutForListView(Context context) {
    super(context);
}
public LinearLayoutForListView(Context context, AttributeSet attrs) {
    super(context, attrs);
    // TODO Auto-generated constructor stub
}
这两个方法可选,不过建议都写上,第一个方法可以让我们通过 编程的方式 实例化出来,第二个方法可以允许我们通过 XML的方式注册 控件,可以在第二个方法里面为扩展的复合组件加属性。
为其添加get / set 方法
/**
     * 获取Adapter
     *
     * @return adapter
     */
    public AdapterForLinearLayout getAdpater() {
        return adapter;
    }
    /**
     * 设置数据
     *
     * @param adpater
     */
    public void setAdapter(AdapterForLinearLayout adpater) {
        this.adapter = adpater;
        bindLinearLayout();
    }
    /**
     * 获取点击事件
     *
     * @return
     */
    public OnClickListener getOnclickListner() {
        return onClickListener;
    }
    /**
     * 设置点击事件
     *
     * @param onClickListener
     */
    public void setOnclickLinstener(OnClickListener onClickListener) {
        this.onClickListener = onClickListener;
    }
第二步:新建AdapterForLinearLayout 类继承自BaseAdapter,并为其添加构造函数
private LayoutInflater mInflater;
    private int resource;
    private List<? extends Map<String, ?>> data;
    private String[] from;
    private int[] to;
    public AdapterForLinearLayout(Context context,
            List<? extends Map<String, ?>> data, int resouce, String[] from,
            int[] to) {
        this.data = data;
        this.resource = resouce;
        this.data = data;
        this.from = from;
        this.to = to;
        this.mInflater = (LayoutInflater) context
                .getSystemService(Context.LAYOUT_INFLATER_SERVICE);
    }
此构造函数模仿 simpleAdapter 通过传进来的resouce 为布局设置数据。通过继承BaseAdapter 重要的实现方法在下面getView ,此方法判断通过传进来的 String[] from 与 int[] to 为分别查找出View 并为View 设置相应的Text,代码如下:
@Override
    public View getView(int position, View convertView, ViewGroup parent) {
        // TODO Auto-generated method stub
        convertView = mInflater.inflate(resource, null);
        Map<String, ?> item = data.get(position);
        int count = to.length;
        for (int i = 0; i < count; i++) {
            View v = convertView.findViewById(to[i]);
            bindView(v, item, from[i]);
        }
        convertView.setTag(position);
        return convertView;
    }
    /**
     * 绑定视图
     * @param view
     * @param item
     * @param from
     */
    private void bindView(View view, Map<String, ?> item, String from) {
        Object data = item.get(from);
        if (view instanceof TextView) {
            ((TextView) view).setText(data == null ? "" : data.toString());
        }
    }
Tip:
BindView 方法是一个自定义方法,在方法体内可以为通过判断使本类更具灵活性,如上,你不仅可以判断是TextView 并且可以传入任何你想要的View 只要在方法体内加入相应判断即可,数据可以通过data 做相应处理,具体如何操作读者可另行测试。
convertView.setTag(position); 此句代码为View 设置tag 在以后我们可以通过 getTag 找出下标,后文有介绍如何通过下标操作数据。
下面是两个类的全部代码,读者可以无须更改直接使用:
LinearLayoutForListView
package com.terry.widget;
import android.content.Context;
import android.util.AttributeSet;
import android.util.Log;
import android.view.View;
import android.widget.LinearLayout;
public class LinearLayoutForListView extends LinearLayout {
    private AdapterForLinearLayout adapter;
    private OnClickListener onClickListener = null;
    /**
     * 绑定布局
     */
    public void bindLinearLayout() {
        int count = adapter.getCount();
        for (int i = 0; i < count; i++) {
            View v = adapter.getView(i, null, null);
            v.setOnClickListener(this.onClickListener);
            if (i == count - 1) {
                LinearLayout ly = (LinearLayout) v;
                ly.removeViewAt(2);
            }
            addView(v, i);
        }
        Log.v("countTAG", "" + count);
    }
    public LinearLayoutForListView(Context context) {
        super(context);
    }
    public LinearLayoutForListView(Context context, AttributeSet attrs) {
        super(context, attrs);
        // TODO Auto-generated constructor stub
    }
    /**
     * 获取Adapter
     *
     * @return adapter
     */
    public AdapterForLinearLayout getAdpater() {
        return adapter;
    }
    /**
     * 设置数据
     *
     * @param adpater
     */
    public void setAdapter(AdapterForLinearLayout adpater) {
        this.adapter = adpater;
        bindLinearLayout();
    }
    /**
     * 获取点击事件
     *
     * @return
     */
    public OnClickListener getOnclickListner() {
        return onClickListener;
    }
    /**
     * 设置点击事件
     *
     * @param onClickListener
     */
    public void setOnclickLinstener(OnClickListener onClickListener) {
        this.onClickListener = onClickListener;
    }
}
AdapterForLinearLayout
package com.terry.widget;
import java.util.List;
import java.util.Map;
import android.content.Context;
import android.view.LayoutInflater;
import android.view.View;
import android.view.ViewGroup;
import android.widget.BaseAdapter;
import android.widget.TextView;
public class AdapterForLinearLayout extends BaseAdapter {
private LayoutInflater mInflater;
private int resource;
private List<? extends Map<String, ?>> data;
private String[] from;
private int[] to;
public AdapterForLinearLayout(Context context,
List<? extends Map<String, ?>> data, int resouce, String[] from,
int[] to) {
this.data = data;
this.resource = resouce;
this.data = data;
this.from = from;
this.to = to;
this.mInflater = (LayoutInflater) context
.getSystemService(Context.LAYOUT_INFLATER_SERVICE);
}
@Override
public int getCount() {
// TODO Auto-generated method stub
return data.size();
}
@Override
public Object getItem(int position) {
// TODO Auto-generated method stub
return data.get(position);
}
@SuppressWarnings("unchecked")
public String get(int position, Object key) {
Map<String, ?> map = (Map<String, ?>) getItem(position);
return map.get(key).toString();
}
@Override
public long getItemId(int position) {
// TODO Auto-generated method stub
return position;
}
@Override
public View getView(int position, View convertView, ViewGroup parent) {
// TODO Auto-generated method stub
convertView = mInflater.inflate(resource, null);
Map<String, ?> item = data.get(position);
int count = to.length;
for (int i = 0; i < count; i++) {
View v = convertView.findViewById(to[i]);
bindView(v, item, from[i]);
}
convertView.setTag(position);
return convertView;
}
/**
* 绑定视图
* @param view
* @param item
* @param from
*/
private void bindView(View view, Map<String, ?> item, String from) {
Object data = item.get(from);
if (view instanceof TextView) {
((TextView) view).setText(data == null ? "" : data.toString());
}
}
}
对应的XML 如下:
<?xml version="1.0" encoding="UTF-8"?>
<LinearLayout xmlns:android="http://schemas.android.com/apk/res/android"
    android:orientation="vertical" android:layout_width="fill_parent"
    android:layout_height="fill_parent">
    <TextView android:id="@+id/TextView01"
        android:layout_marginLeft="10px" android:textAppearance="?android:attr/textAppearanceLarge"
        android:layout_width="wrap_content" android:layout_height="wrap_content">
    </TextView>
    <TextView android:id="@+id/TextView02" android:layout_width="wrap_content"
        android:textAppearance="?android:attr/textAppearanceSmall"
        android:layout_marginLeft="10px" android:layout_height="wrap_content">
    </TextView>
    <View android:layout_height="1px" android:background="#FFFFFF"
        android:layout_width="fill_parent"></View>
</LinearLayout>
第三步:主页面使用控件并为其设置数据
XML如下:
<com.terry.widget.LinearLayoutForListView
                    android:orientation="vertical" android:layout_width="450px"
                    android:layout_height="fill_parent" android:id="@+id/ListView01">
                </com.terry.widget.LinearLayoutForListView>
加载数据如下:
lv = (LinearLayoutForListView) findViewById(R.id.ListView01);
    for (int i = 0; i < 10; i++) {
        HashMap<String, Object> map = new HashMap<String, Object>();
        map.put("key_name", "name" + i);
        map.put("value_name", "value" + i);
        list.add(map);
    }
    final AdapterForLinearLayout Layoutadpater = new AdapterForLinearLayout(
            this, list, R.layout.test, new String[] { "key_name",
                    "value_name" }, new int[] { R.id.TextView01,
                    R.id.TextView02 });
事件操作,并通过下标得到数据源:
lv.setOnclickLinstener(new OnClickListener() {
        @Override
        public void onClick(View v) {
            // TODO Auto-generated method stub
            Toast.makeText(
                    BlueToothActivity.this,
                    Layoutadpater.get(Integer.parseInt(v.getTag()
                            .toString()), "key_name"), 1000).show();
        }
    });
    lv.setAdapter(Layoutadpater);
Tip:get方法是在Layoutadpater 封装的一个通过下标获取相应数据的方法请参考上文。
至此完成。有碰到这个问题的朋友可以试试。
先看看效果吧:
这是个自定义的view,我这里就不去深究了,看demo界面的代码,看看如何使用的。
MainActivity.java
/**
 * demo主界面
 * @author jan
 */
public class MainActivity extends Activity implements OnProgressBarListener {

    private Timer timer;
    //进度条组件
    private NumberProgressBar bnp;

    @Override
    protected void onCreate(Bundle savedInstanceState) {
        super.onCreate(savedInstanceState);
        setContentView(R.layout.activity_main);
        bnp = (NumberProgressBar) findViewById(R.id.numberbar1);
        bnp.setOnProgressBarListener(this);
        //创建一个定时任务,模拟进度更新
        timer = new Timer();
        timer.schedule(new TimerTask() {
            @Override
            public void run() {
                runOnUiThread(new Runnable() {
                    @Override
                    public void run() {
                        //递增progress数值
                        bnp.incrementProgressBy(5);
                    }
                });
            }
        }, 1000, 100);
    }

    @Override
    protected void onDestroy() {
        super.onDestroy();
        //最后别忘了取消定时任务
        timer.cancel();
    }
    /**
     * 实现对进度实时监听,max默认为100
     */
    @Override
    public void onProgressChange(int current, int max) {
        if (current == max) {
            Toast.makeText(getApplicationContext(), getString(R.string.finish),
                    Toast.LENGTH_SHORT).show();
            bnp.setProgress(0);
        }
    }
}
2.在我们的xml布局文件中加入他,别忘了加定义命名空间:xmlns:custom="http://schemas.android.com/apk/res-auto":
<com.daimajia.numberprogressbar.NumberProgressBar
        android:id="@+id/numberbar1"
        style="@style/NumberProgressBar_Default"
        android:layout_width="wrap_content"
        android:layout_height="wrap_content"
        android:padding="20dp"
        custom:progress_current="0" />
3.他的style设定有以下属性:
<style name="NumberProgressBar_Default">
        <item name="android:layout_height">wrap_content</item>
        <item name="android:layout_width">match_parent</item>

        <item name="progress_max">100</item>
        <item name="progress_current">0</item>

        <item name="progress_unreached_color">#CCCCCC</item>
        <item name="progress_reached_color">#3498DB</item>

        <item name="progress_text_size">14sp</item>
        <item name="progress_text_color">#3498DB</item>

        <item name="progress_reached_bar_height">6.5dp</item>
        <item name="progress_unreached_bar_height">5.75dp</item>
    </style>
4.再来看看他的源代码吧。
public class NumberProgressBar extends View {

    private int mMaxProgress = 100;

    /**
     * Current progress, can not exceed the max progress.
     */
    private int mCurrentProgress = 0;

    /**
     * The progress area bar color.
     */
    private int mReachedBarColor;

    /**
     * The bar unreached area color.
     */
    private int mUnreachedBarColor;

    /**
     * The progress text color.
     */
    private int mTextColor;

    /**
     * The progress text size.
     */
    private float mTextSize;

    /**
     * The height of the reached area.
     */
    private float mReachedBarHeight;

    /**
     * The height of the unreached area.
     */
    private float mUnreachedBarHeight;

    /**
     * The suffix of the number.
     */
    private String mSuffix = "%";

    /**
     * The prefix.
     */
    private String mPrefix = "";


    private final int default_text_color = Color.rgb(66, 145, 241);
    private final int default_reached_color = Color.rgb(66, 145, 241);
    private final int default_unreached_color = Color.rgb(204, 204, 204);
    private final float default_progress_text_offset;
    private final float default_text_size;
    private final float default_reached_bar_height;
    private final float default_unreached_bar_height;

    /**
     * For save and restore instance of progressbar.
     */
    private static final String INSTANCE_STATE = "saved_instance";
    private static final String INSTANCE_TEXT_COLOR = "text_color";
    private static final String INSTANCE_TEXT_SIZE = "text_size";
    private static final String INSTANCE_REACHED_BAR_HEIGHT = "reached_bar_height";
    private static final String INSTANCE_REACHED_BAR_COLOR = "reached_bar_color";
    private static final String INSTANCE_UNREACHED_BAR_HEIGHT = "unreached_bar_height";
    private static final String INSTANCE_UNREACHED_BAR_COLOR = "unreached_bar_color";
    private static final String INSTANCE_MAX = "max";
    private static final String INSTANCE_PROGRESS = "progress";
    private static final String INSTANCE_SUFFIX = "suffix";
    private static final String INSTANCE_PREFIX = "prefix";
    private static final String INSTANCE_TEXT_VISIBILITY = "text_visibility";

    private static final int PROGRESS_TEXT_VISIBLE = 0;


    /**
     * The width of the text that to be drawn.
     */
    private float mDrawTextWidth;

    /**
     * The drawn text start.
     */
    private float mDrawTextStart;

    /**
     * The drawn text end.
     */
    private float mDrawTextEnd;

    /**
     * The text that to be drawn in onDraw().
     */
    private String mCurrentDrawText;

    /**
     * The Paint of the reached area.
     */
    private Paint mReachedBarPaint;
    /**
     * The Paint of the unreached area.
     */
    private Paint mUnreachedBarPaint;
    /**
     * The Paint of the progress text.
     */
    private Paint mTextPaint;

    /**
     * Unreached bar area to draw rect.
     */
    private RectF mUnreachedRectF = new RectF(0, 0, 0, 0);
    /**
     * Reached bar area rect.
     */
    private RectF mReachedRectF = new RectF(0, 0, 0, 0);

    /**
     * The progress text offset.
     */
    private float mOffset;

    /**
     * Determine if need to draw unreached area.
     */
    private boolean mDrawUnreachedBar = true;

    private boolean mDrawReachedBar = true;

    private boolean mIfDrawText = true;

    /**
     * Listener
     */
    private OnProgressBarListener mListener;

    public enum ProgressTextVisibility {
        Visible, Invisible
    }

    public NumberProgressBar(Context context) {
        this(context, null);
    }

    public NumberProgressBar(Context context, AttributeSet attrs) {
        this(context, attrs, R.attr.numberProgressBarStyle);
    }

    public NumberProgressBar(Context context, AttributeSet attrs, int defStyleAttr) {
        super(context, attrs, defStyleAttr);

        default_reached_bar_height = dp2px(1.5f);
        default_unreached_bar_height = dp2px(1.0f);
        default_text_size = sp2px(10);
        default_progress_text_offset = dp2px(3.0f);

        //load styled attributes.
        final TypedArray attributes = context.getTheme().obtainStyledAttributes(attrs, R.styleable.NumberProgressBar,
                defStyleAttr, 0);

        mReachedBarColor = attributes.getColor(R.styleable.NumberProgressBar_progress_reached_color, default_reached_color);
        mUnreachedBarColor = attributes.getColor(R.styleable.NumberProgressBar_progress_unreached_color, default_unreached_color);
        mTextColor = attributes.getColor(R.styleable.NumberProgressBar_progress_text_color, default_text_color);
        mTextSize = attributes.getDimension(R.styleable.NumberProgressBar_progress_text_size, default_text_size);

        mReachedBarHeight = attributes.getDimension(R.styleable.NumberProgressBar_progress_reached_bar_height, default_reached_bar_height);
        mUnreachedBarHeight = attributes.getDimension(R.styleable.NumberProgressBar_progress_unreached_bar_height, default_unreached_bar_height);
        mOffset = attributes.getDimension(R.styleable.NumberProgressBar_progress_text_offset, default_progress_text_offset);

        int textVisible = attributes.getInt(R.styleable.NumberProgressBar_progress_text_visibility, PROGRESS_TEXT_VISIBLE);
        if (textVisible != PROGRESS_TEXT_VISIBLE) {
            mIfDrawText = false;
        }

        setProgress(attributes.getInt(R.styleable.NumberProgressBar_progress_current, 0));
        setMax(attributes.getInt(R.styleable.NumberProgressBar_progress_max, 100));

        attributes.recycle();
        initializePainters();
    }

    @Override
    protected int getSuggestedMinimumWidth() {
        return (int) mTextSize;
    }

    @Override
    protected int getSuggestedMinimumHeight() {
        return Math.max((int) mTextSize, Math.max((int) mReachedBarHeight, (int) mUnreachedBarHeight));
    }

    @Override
    protected void onMeasure(int widthMeasureSpec, int heightMeasureSpec) {
        setMeasuredDimension(measure(widthMeasureSpec, true), measure(heightMeasureSpec, false));
    }

    private int measure(int measureSpec, boolean isWidth) {
        int result;
        int mode = MeasureSpec.getMode(measureSpec);
        int size = MeasureSpec.getSize(measureSpec);
        int padding = isWidth ? getPaddingLeft() + getPaddingRight() : getPaddingTop() + getPaddingBottom();
        if (mode == MeasureSpec.EXACTLY) {
            result = size;
        } else {
            result = isWidth ? getSuggestedMinimumWidth() : getSuggestedMinimumHeight();
            result += padding;
            if (mode == MeasureSpec.AT_MOST) {
                if (isWidth) {
                    result = Math.max(result, size);
                } else {
                    result = Math.min(result, size);
                }
            }
        }
        return result;
    }

    @Override
    protected void onDraw(Canvas canvas) {
        if (mIfDrawText) {
            calculateDrawRectF();
        } else {
            calculateDrawRectFWithoutProgressText();
        }

        if (mDrawReachedBar) {
            canvas.drawRect(mReachedRectF, mReachedBarPaint);
        }

        if (mDrawUnreachedBar) {
            canvas.drawRect(mUnreachedRectF, mUnreachedBarPaint);
        }

        if (mIfDrawText)
            canvas.drawText(mCurrentDrawText, mDrawTextStart, mDrawTextEnd, mTextPaint);
    }

    private void initializePainters() {
        mReachedBarPaint = new Paint(Paint.ANTI_ALIAS_FLAG);
        mReachedBarPaint.setColor(mReachedBarColor);

        mUnreachedBarPaint = new Paint(Paint.ANTI_ALIAS_FLAG);
        mUnreachedBarPaint.setColor(mUnreachedBarColor);

        mTextPaint = new Paint(Paint.ANTI_ALIAS_FLAG);
        mTextPaint.setColor(mTextColor);
        mTextPaint.setTextSize(mTextSize);
    }


    private void calculateDrawRectFWithoutProgressText() {
        mReachedRectF.left = getPaddingLeft();
        mReachedRectF.top = getHeight() / 2.0f - mReachedBarHeight / 2.0f;
        mReachedRectF.right = (getWidth() - getPaddingLeft() - getPaddingRight()) / (getMax() * 1.0f) * getProgress() + getPaddingLeft();
        mReachedRectF.bottom = getHeight() / 2.0f + mReachedBarHeight / 2.0f;

        mUnreachedRectF.left = mReachedRectF.right;
        mUnreachedRectF.right = getWidth() - getPaddingRight();
        mUnreachedRectF.top = getHeight() / 2.0f + -mUnreachedBarHeight / 2.0f;
        mUnreachedRectF.bottom = getHeight() / 2.0f + mUnreachedBarHeight / 2.0f;
    }

    private void calculateDrawRectF() {

        mCurrentDrawText = String.format("%d", getProgress() * 100 / getMax());
        mCurrentDrawText = mPrefix + mCurrentDrawText + mSuffix;
        mDrawTextWidth = mTextPaint.measureText(mCurrentDrawText);

        if (getProgress() == 0) {
            mDrawReachedBar = false;
            mDrawTextStart = getPaddingLeft();
        } else {
            mDrawReachedBar = true;
            mReachedRectF.left = getPaddingLeft();
            mReachedRectF.top = getHeight() / 2.0f - mReachedBarHeight / 2.0f;
            mReachedRectF.right = (getWidth() - getPaddingLeft() - getPaddingRight()) / (getMax() * 1.0f) * getProgress() - mOffset + getPaddingLeft();
            mReachedRectF.bottom = getHeight() / 2.0f + mReachedBarHeight / 2.0f;
            mDrawTextStart = (mReachedRectF.right + mOffset);
        }

        mDrawTextEnd = (int) ((getHeight() / 2.0f) - ((mTextPaint.descent() + mTextPaint.ascent()) / 2.0f));

        if ((mDrawTextStart + mDrawTextWidth) >= getWidth() - getPaddingRight()) {
            mDrawTextStart = getWidth() - getPaddingRight() - mDrawTextWidth;
            mReachedRectF.right = mDrawTextStart - mOffset;
        }

        float unreachedBarStart = mDrawTextStart + mDrawTextWidth + mOffset;
        if (unreachedBarStart >= getWidth() - getPaddingRight()) {
            mDrawUnreachedBar = false;
        } else {
            mDrawUnreachedBar = true;
            mUnreachedRectF.left = unreachedBarStart;
            mUnreachedRectF.right = getWidth() - getPaddingRight();
            mUnreachedRectF.top = getHeight() / 2.0f + -mUnreachedBarHeight / 2.0f;
            mUnreachedRectF.bottom = getHeight() / 2.0f + mUnreachedBarHeight / 2.0f;
        }
    }

    /**
     * Get progress text color.
     *
     * @return progress text color.
     */
    public int getTextColor() {
        return mTextColor;
    }

    /**
     * Get progress text size.
     *
     * @return progress text size.
     */
    public float getProgressTextSize() {
        return mTextSize;
    }

    public int getUnreachedBarColor() {
        return mUnreachedBarColor;
    }

    public int getReachedBarColor() {
        return mReachedBarColor;
    }

    public int getProgress() {
        return mCurrentProgress;
    }

    public int getMax() {
        return mMaxProgress;
    }

    public float getReachedBarHeight() {
        return mReachedBarHeight;
    }

    public float getUnreachedBarHeight() {
        return mUnreachedBarHeight;
    }

    public void setProgressTextSize(float textSize) {
        this.mTextSize = textSize;
        mTextPaint.setTextSize(mTextSize);
        invalidate();
    }

    public void setProgressTextColor(int textColor) {
        this.mTextColor = textColor;
        mTextPaint.setColor(mTextColor);
        invalidate();
    }

    public void setUnreachedBarColor(int barColor) {
        this.mUnreachedBarColor = barColor;
        mUnreachedBarPaint.setColor(mReachedBarColor);
        invalidate();
    }

    public void setReachedBarColor(int progressColor) {
        this.mReachedBarColor = progressColor;
        mReachedBarPaint.setColor(mReachedBarColor);
        invalidate();
    }

    public void setReachedBarHeight(float height) {
        mReachedBarHeight = height;
    }

    public void setUnreachedBarHeight(float height) {
        mUnreachedBarHeight = height;
    }

    public void setMax(int maxProgress) {
        if (maxProgress > 0) {
            this.mMaxProgress = maxProgress;
            invalidate();
        }
    }

    public void setSuffix(String suffix) {
        if (suffix == null) {
            mSuffix = "";
        } else {
            mSuffix = suffix;
        }
    }

    public String getSuffix() {
        return mSuffix;
    }

    public void setPrefix(String prefix) {
        if (prefix == null)
            mPrefix = "";
        else {
            mPrefix = prefix;
        }
    }

    public String getPrefix() {
        return mPrefix;
    }

    public void incrementProgressBy(int by) {
        if (by > 0) {
            setProgress(getProgress() + by);
        }

        if(mListener != null){
            mListener.onProgressChange(getProgress(), getMax());
        }
    }

    public void setProgress(int progress) {
        if (progress <= getMax() && progress >= 0) {
            this.mCurrentProgress = progress;
            invalidate();
        }
    }

    @Override
    protected Parcelable onSaveInstanceState() {
        final Bundle bundle = new Bundle();
        bundle.putParcelable(INSTANCE_STATE, super.onSaveInstanceState());
        bundle.putInt(INSTANCE_TEXT_COLOR, getTextColor());
        bundle.putFloat(INSTANCE_TEXT_SIZE, getProgressTextSize());
        bundle.putFloat(INSTANCE_REACHED_BAR_HEIGHT, getReachedBarHeight());
        bundle.putFloat(INSTANCE_UNREACHED_BAR_HEIGHT, getUnreachedBarHeight());
        bundle.putInt(INSTANCE_REACHED_BAR_COLOR, getReachedBarColor());
        bundle.putInt(INSTANCE_UNREACHED_BAR_COLOR, getUnreachedBarColor());
        bundle.putInt(INSTANCE_MAX, getMax());
        bundle.putInt(INSTANCE_PROGRESS, getProgress());
        bundle.putString(INSTANCE_SUFFIX, getSuffix());
        bundle.putString(INSTANCE_PREFIX, getPrefix());
        bundle.putBoolean(INSTANCE_TEXT_VISIBILITY, getProgressTextVisibility());
        return bundle;
    }

    @Override
    protected void onRestoreInstanceState(Parcelable state) {
        if (state instanceof Bundle) {
            final Bundle bundle = (Bundle) state;
            mTextColor = bundle.getInt(INSTANCE_TEXT_COLOR);
            mTextSize = bundle.getFloat(INSTANCE_TEXT_SIZE);
            mReachedBarHeight = bundle.getFloat(INSTANCE_REACHED_BAR_HEIGHT);
            mUnreachedBarHeight = bundle.getFloat(INSTANCE_UNREACHED_BAR_HEIGHT);
            mReachedBarColor = bundle.getInt(INSTANCE_REACHED_BAR_COLOR);
            mUnreachedBarColor = bundle.getInt(INSTANCE_UNREACHED_BAR_COLOR);
            initializePainters();
            setMax(bundle.getInt(INSTANCE_MAX));
            setProgress(bundle.getInt(INSTANCE_PROGRESS));
            setPrefix(bundle.getString(INSTANCE_PREFIX));
            setSuffix(bundle.getString(INSTANCE_SUFFIX));
            setProgressTextVisibility(bundle.getBoolean(INSTANCE_TEXT_VISIBILITY) ? Visible : Invisible);
            super.onRestoreInstanceState(bundle.getParcelable(INSTANCE_STATE));
            return;
        }
        super.onRestoreInstanceState(state);
    }

    public float dp2px(float dp) {
        final float scale = getResources().getDisplayMetrics().density;
        return dp * scale + 0.5f;
    }

    public float sp2px(float sp) {
        final float scale = getResources().getDisplayMetrics().scaledDensity;
        return sp * scale;
    }

    public void setProgressTextVisibility(ProgressTextVisibility visibility) {
        mIfDrawText = visibility == Visible;
        invalidate();
    }

    public boolean getProgressTextVisibility() {
        return mIfDrawText;
    }

    public void setOnProgressBarListener(OnProgressBarListener listener){
        mListener = listener;
    }
}
其实还是很简单的,没啥好说的了,有兴趣的可以下代码看看。
ndroid UI设计与开发 自定义进度条
国际惯例,先看效果图吧

实现步骤一:先定义进度条的风格样式
<!-- 自定义进度条 -->
<style name="ProgressBar_Mini" parent="@android:style/Widget.ProgressBar.Horizontal">
    <item name="android:maxHeight">50dip</item>
    <item name="android:minHeight">8dip</item>
    <item name="android:indeterminateOnly">false</item>
    <item name="android:indeterminateDrawable">@android:drawable/progress_indeterminate_horizontal</item>
    <item name="android:progressDrawable">@drawable/progressbar_mini</item>
</style>
实现步骤二:定义样式style中用到的@drawable/progressbar_mini资源文件。可以再xml中绘制进度条的不同样式(圆角,直角……)和颜色。
<?xml version="1.0" encoding="utf-8"?>
<layer-list xmlns:android="http://schemas.android.com/apk/res/android" >
    <item android:id="@android:id/background">
         <shape >
                <corners android:radius="5dip" />
                <gradient
                    android:angle="270"
                    android:centerY="0.75"
                    android:endColor="#F5F5F5"
                    android:startColor="#BEBEBE" />
            </shape>
    </item>

    <item android:id="@android:id/secondaryProgress">

        <clip >
            <shape >
                <corners android:radius="0dip" />
                <gradient
                    android:angle="270"
                    android:centerY="0.75"
                   android:endColor="#165CBC"
                    android:startColor="#85B0E9" />
            </shape>
        </clip>
    </item>

    <item android:id="@android:id/progress">

        <clip >
            <shape >
                <corners android:radius="5dip" />
                <gradient
                    android:angle="270"
                    android:centerY="0.75"
                   android:endColor="#165CBC"
                    android:startColor="#85B0E9" />
            </shape>

        </clip>
    </item>
</layer-list>
实现步骤三:写java文件,定义进度条上显示的文字。
public class MyProgressBar extends ProgressBar {
    private String text_progress;
    private Paint mPaint;//画笔
    public MyProgressBar(Context context) {
        super(context);
        initPaint();
    }
    public MyProgressBar(Context context, AttributeSet attrs) {
        super(context, attrs);
        initPaint();
    }
    public MyProgressBar(Context context, AttributeSet attrs, int defStyle) {
        super(context, attrs, defStyle);
        initPaint();
    }

    @Override
    public synchronized void setProgress(int progress) {
        super.setProgress(progress);
        setTextProgress(progress);
    }
    @Override
    protected synchronized void onDraw(Canvas canvas) {
        // TODO Auto-generated method stub
        super.onDraw(canvas);
        Rect rect=new Rect();
        this.mPaint.getTextBounds(this.text_progress, 0, this.text_progress.length(), rect);
        int x = (getWidth() / 2) - rect.centerX();
        int y = (getHeight() / 2) - rect.centerY();
        canvas.drawText(this.text_progress, x, y, this.mPaint);
    }
    /**
     *
     *description: 初始化画笔
     *Create by lll on 2013-8-13 下午1:41:49
     */
    private void initPaint(){
        this.mPaint=new Paint();
        this.mPaint.setAntiAlias(true);
        this.mPaint.setColor(Color.WHITE);
    }
    private void setTextProgress(int progress){
        int i = (int) ((progress * 1.0f / this.getMax()) * 100);
        this.text_progress = String.valueOf(i) + "%";
    }
}
最后一步:xml文件中引用自定义的进度条:
 <com.example.widgetshop.MyProgressBar
    android:id="@+id/progressBar1"
    style="@style/ProgressBar_Mini"
    android:layout_width="match_parent"
    android:layout_height="wrap_content"
    android:progress="100"
    android:layout_marginTop="24dp" />
OK,一个简单的更改背景和样式其带文字显示的进度条就完成。
相关文章
- 这篇文章主要介绍了Tomcat配置及如何在Eclipse中启动,本文给大家介绍的非常详细,对大家的学习或工作具有一定的参考借鉴价值,需要的朋友可以参考下...2021-02-04
- 下面我们来看一篇关于Android子控件超出父控件的范围显示出来方法,希望这篇文章能够帮助到各位朋友,有碰到此问题的朋友可以进来看看哦。 <RelativeLayout xmlns:an...2016-10-02
Android开发中findViewById()函数用法与简化
findViewById方法在android开发中是获取页面控件的值了,有没有发现我们一个页面控件多了会反复研究写findViewById呢,下面我们一起来看它的简化方法。 Android中Fin...2016-09-20- 如果我们的项目需要做来电及短信的功能,那么我们就得在Android模拟器开发这些功能,本来就来告诉我们如何在Android模拟器上模拟来电及来短信的功能。 在Android模拟...2016-09-20
- 夜神android模拟器如何设置代理呢?对于这个问题其实操作起来是非常的简单,下面小编来为各位详细介绍夜神android模拟器设置代理的方法,希望例子能够帮助到各位。 app...2016-09-20
- 为了增强android应用的用户体验,我们可以在一些Button按钮上自定义动态的设置一些样式,比如交互时改变字体、颜色、背景图等。 今天来看一个通过重写Button来动态实...2016-09-20
php-fpm 启动报please specify user and group other than root, pool ‘default’
本文章来给大家介绍关于php-fpm 启动报please specify user and group other than root, pool ‘default’的解决办法。 安装PHP ,配置fpm 成功后启动发现报错: St...2016-11-25- 如果我们要在Android应用APP中加载html5页面,我们可以使用WebView,本文我们分享两个WebView加载html5页面实例应用。 实例一:WebView加载html5实现炫酷引导页面大多...2016-09-20
- 这篇文章主要介绍了IDEA 2021.2 启动报错及激活教程,文章开头给大家介绍了idea2021最新激活方法,关于idea2021启动报错的问题小编也给大家介绍的非常详细,需要的朋友可以参考下...2021-10-15
- 深入理解Android中View和ViewGroup从组成架构上看,似乎ViewGroup在View之上,View需要继承ViewGroup,但实际上不是这样的。View是基类,ViewGroup是它的子类。本教程我们深...2016-09-20
- 下面我们来看一篇关于Android自定义WebView网络视频播放控件开发例子,这个文章写得非常的不错下面给各位共享一下吧。 因为业务需要,以下代码均以Youtube网站在线视...2016-10-02
- 在程序执行中会遇到启动本软件的exe问,或者启用其它的exe文件,已达到执行某些操作的作用。下面是两种最常见的启动exe文件。...2020-06-25
- java开发的Android应用,性能一直是一个大问题,,或许是Java语言本身比较消耗内存。本文我们来谈谈Android 性能优化之MemoryFile文件读写。 Android匿名共享内存对外A...2016-09-20
- TextView默认是横着显示了,今天我们一起来看看Android设置TextView竖着显示如何来实现吧,今天我们就一起来看看操作细节,具体的如下所示。 在开发Android程序的时候,...2016-10-02
- 这篇文章主要介绍了Jrebel启动失败解决方案详解,文中通过示例代码介绍的非常详细,对大家的学习或者工作具有一定的参考学习价值,需要的朋友可以参考下...2020-07-07
android.os.BinderProxy cannot be cast to com解决办法
本文章来给大家介绍关于android.os.BinderProxy cannot be cast to com解决办法,希望此文章对各位有帮助呀。 Android在绑定服务的时候出现java.lang.ClassCastExc...2016-09-20- 这篇文章主要介绍了vscode搭建STM32开发环境的详细过程,本文给大家介绍的非常详细,对大家的学习或工作具有一定的参考借鉴价值,需要的朋友可以参考下...2021-05-02
- 这篇文章主要介绍了springBoot 项目排除数据库启动方式,具有很好的参考价值,希望对大家有所帮助。如有错误或未考虑完全的地方,望不吝赐教...2021-09-10
- centos6.2,停止mysqld然后修改/etc/my.cnf datadir的位置,启动mysqld提示FAILED,查看日志 复制代码 代码如下: 120609 11:31:31 mysqld_safe mysqld from pid file /var/run/mysqld/mysqld.pid ended 120609 11:35:12 my...2015-03-15
- 这篇文章主要介绍了Android 实现钉钉自动打卡功能的步骤,帮助大家更好的理解和学习使用Android,感兴趣的朋友可以了解下...2021-03-15