Android开发之断点调试空指针
安卓程序中,遇到最多报错,其中一种空指针问题,空指针说起来:好解决! 也不好解决.
好解决的是说:明显的空指针问题,没有实例化类,控件或者id 找错的。都会出现空指针问题。
不好解决的空指针是:通常是这种情况,在一个请求里面,又写了一个网络请求。就相当于在一个线程里面又开了一个线程。因为我们不能确定第一个线程是否执行完毕了,或者说执行了一半的时候,不能确保线程执行完毕的情况。当然这种情况不一定就是网络请求才会出现。也有可能是执行了非常耗时的工作。所以,不推荐在一个线程中,又开启另一个耗时的线程。如果遇到特殊情况,非要开启一个线程的,请确保两个线程都能执行完毕。
遇到空指针的问题,如何解决才是最关键的: 通常我们发现空指针的问题的是,程序崩溃停止运行,通过log 日志打印,我们可以从控制台中,直接定位到某一行,那说明就是这一行报了空指针的问题。因为是一行代码 :实例如下:
doSetLocation(res_city_id,latitude,lontitude);
像上面的这行代码,一共传了三个参数,既然这行报了空指针,一定有的参数值是空的,没有获取到值,或者说没有赋值成功。解决方法是:首先你可以自己确定有哪些参数是一定不为空的,有哪些是可能为空的。至于怎么看,要根据实际情况来看,也可以凭借经验,哪一个可能为空。
当我们不确定哪一个参数为空的时候,就需要手动调试,而断点调试则是我们调试手段最常用,并且是最有效的一个手段。它可以帮你定位到每一个参数的传值情况,这样就能一步一步找出问题所在。
还有一种情况是,断点也找不到的错误。因为断点调试,直接跳出方法,不执行。这个也常见,但是也必须要解决的问题。
之前就遇到了,下面一段代码如下:
private List<NameValuePair> params;

 public JSONParser(Context context,Boolean isLoginOrRegister){

this.isLoginOrRegister=isLoginOrRegister;

this.context=context;

init();

}

 public String makeHttpRequest2(String url, String method, String jsonStr) {

 try {

else if (method == "GET") {

// request method is GET


String paramString = URLEncodedUtils.format(params, "utf-8");

url += "?" + paramString;

HttpGet httpGet = new HttpGet(url);

} catch (Exception e) {

e.printStackTrace();

}

return json;

}
使用情况如下,当我走”GET“方法时。直接抛出空指针异常,没有走里面的方法。当我定位报错信息时,显示 params 报空。当时一看到这也是蒙了。因为怕什么来什么,网络请求经常用,但是封装网络请求却是不太了解。因为params为空,就去找 params 在哪里初始化,这时候,会发现。最上面的两个构造方法,
有一个带params的参数的构造方法,一个却是不带params的构造方法。而我使用的恰好是不带params 参数的构造方法。当时我发现没有这个参数,就把参数加上去不就可以了吗,后来发现加上去也是错的。
首先搞清构造方法是什么?构造方法是,构造方法是在你调用的时候,他就帮你实例化参数,或者实例化一些需要new 出来的类。
发现了这个,你就会发现第二个构造方法,虽然使用了params 但是却没有实例化。找到问题解决问题就很方便了。只需要在构造方法里面实例化即可。不使用参数方式的实例化。
public JSONParser(Context context,Boolean isLoginOrRegister){

   this.isLoginOrRegister=isLoginOrRegister;

   this.context=context;

   params=new ArrayList<NameValuePair>();

   init();

 }
Studio:Fetching Android SDK component information错误怎么办呢,下面我们就一起来看看此问题的解决办法。 安装好AndroidStudio 之后,出现如下页面,叉掉重新打开也不行,就求救“度娘”:算是解决了:

首先这个报错原因是说:Studio 打开的时候,可能弹出“Fetching Android SDK component information” 要获取 sdk 组件的信息,这个获取过程可能会很长,也不一定能够成功的获取。所以会出现这种报错信息。
解决方法如下:
找到AndroidStudio 安装目录,找到bin 目录,打开bin 目录,找到 idea.properties文件。打开此文件,打开方式,随便自己,只要能打开就行:
然后在文件的末尾加上这样一句话:
disable.android.first.run=true
这句话的意思就是:打开AndroidStudio 的时候,不去获取 Android SDK 的信息,这样就不会报错了。然后重启 Studio 即可。
本文我们对Android Touch事件传递机制全面剖析,Touch事件在Android应用中非常广泛,网上关于Touch事件的传递的文章真的很多,但是很少有系统性的。先来看一张图

版权申明:这是csdn上别人的图,我觉得有用,就拿过来了,
然后简单说明下:
总的来说,触摸事件是从最外层的ViewGroup,一级一级传递进来的
和这相关的每个View的回调方法有三个,dispatchTouchEvent,onInterceptTouchEvent,以及大家都熟悉的ouTouchEvent
事件传递到一个View(ViewGroup),先回调到dispatchTouchEvent()方法,这里如果不super的话,就直接只执行当前代码了,super的话,到onInterceptTouchEvent()方法,这里比较关键,返回false的话,说明不拦截,继续往下传,true的话,说明拦截,直接截断了传递链,然后转到本View的ouTouchEvent方法,整个就结束了。
继续传递的话,如果都没有拦截,就从子View的onTouchEvent方法一直传上来,传到顶层的View,假如传递链中间一个View的onTouchEvent返回true的话,
说明这个View已经处理事件了,就到此为止了,不往上传递了。
Android Touch事件传递机制解析
android系统中的每个View的子类都具有下面三个和TouchEvent处理密切相关的方法:
1)public boolean dispatchTouchEvent(MotionEvent ev) 这个方法用来分发TouchEvent
2)public boolean onInterceptTouchEvent(MotionEvent ev) 这个方法用来拦截TouchEvent
3)public boolean onTouchEvent(MotionEvent ev) 这个方法用来处理TouchEvent
测试程序界面
下述3个Layout包含关系见如下界面图。

状态1:由center处理Touch事件
Xml如下:
<?xml version="1.0" encoding="utf-8"?>
<LinearLayout xmlns:android="http://schemas.android.com/apk/res/android"
    android:layout_width="fill_parent"
    android:layout_height="fill_parent"
    android:orientation="vertical" >
    <dk.touch.MyLayout
        android:id="@+id/out"
        android:layout_width="fill_parent"
        android:layout_height="fill_parent"
        android:gravity="center"
            android:background="#ff345600"
         >
        <dk.touch.MyLayout
            android:id="@+id/middle"
            android:layout_width="200dp"
            android:layout_height="200dp"
            android:gravity="center"
            android:background="#ff885678"
            >
            <dk.touch.MyLayout
                android:id="@+id/center"
                android:layout_width="50dp"
                android:layout_height="50dp"
                android:background="#ff345678"
                android:focusable="true"
                android:focusableInTouchMode="true"
                android:clickable="true"
                 >
            </dk.touch.MyLayout>
        </dk.touch.MyLayout>
    </dk.touch.MyLayout>
</LinearLayout>
注意:只有center这个部分是会处理/消费 Touch事件。

事件传递记录结果如上图。
由于Down、Move、Up事件处理流程略微不同,故分开分析。
ACTION_DOWN事件处理流程:

首先触摸事件发生时(ACTION_DOWN),由系统调用Activity的dispatchTouchEvent方法,分发该事件。根据触摸事件的坐标,将此事件传递给out的dispatchTouchEvent处理,out则调用onInterceptTouchEvent 判断事件是由自己处理,还是继续分发给子View。此处由于out不处理Touch事件,故根据事件发生坐标,将事件传递给out的直接子View(即middle)。
Middle及Center中事件处理过程同上。但是由于Center组件是clickable 表示其能处理Touch事件,故center中的onInterceptTouchEvent方法将事件传递给center自己的onTouchEvent方法处理。至此,此Touch事件已被处理,不继续进行传递。
Move和 up 事件处理流程类似,但是再center内的dispatchTouchEvent方法内被直接分配给onTouchEvent处理,不需经过onInterceptTouchEvent判断。这是由于,android系统中将1个down事件、n个move事件、1个up事件整体作为一次逻辑上的触控操作,Down事件已经确定了处理事件的对象,则后续的move、up事件也确定了处理事件的对象。
状态2:都不处理事件
Xml如下:
<?xml version="1.0" encoding="utf-8"?>
<LinearLayout xmlns:android="http://schemas.android.com/apk/res/android"
    android:layout_width="fill_parent"
    android:layout_height="fill_parent"
    android:orientation="vertical" >
    <dk.touch.MyLayout
        android:id="@+id/out"
        android:layout_width="fill_parent"
        android:layout_height="fill_parent"
        android:gravity="center"
            android:background="#ff345600"
         >
        <dk.touch.MyLayout
            android:id="@+id/middle"
            android:layout_width="200dp"
            android:layout_height="200dp"
            android:gravity="center"
            android:background="#ff885678"
            >
            <dk.touch.MyLayout
                android:id="@+id/center"
                android:layout_width="50dp"
                android:layout_height="50dp"
                android:background="#ff345678"
                 >
            </dk.touch.MyLayout>
        </dk.touch.MyLayout>
    </dk.touch.MyLayout>
</LinearLayout>
轻触center部分logcat输出结果

Action_down事件处理流程:

事件处理流程大致同上,区别是此状态下,所有组件都不会处理事件,事件并不会被center的onTouchEvent方法“消费”,则事件会层层逆向传递回到Activity,若Activity也不对此事件进行处理,此事件相当于消失了(无效果)。
对于后续的move、up事件,由于第一个down事件已经确定由Activity处理事件,故up事有由Activity的dispatchTouchEvent直接分发给自己的onTouchEvent方法处理。
源代码:
package dk.touch;
import android.app.Activity;
import android.os.Bundle;
import android.view.MotionEvent;
public class MainActivity extends Activity{

    @Override
    protected void onCreate(Bundle savedInstanceState) {
        super.onCreate(savedInstanceState);
        setContentView(R.layout.main);

        MyLayout out=(MyLayout) findViewById(R.id.out);
        out.setName("out");

        MyLayout middle=(MyLayout) findViewById(R.id.middle);
        middle.setName("middle");

        MyLayout center=(MyLayout) findViewById(R.id.center);
        center.setName("center");
    }
    @Override
    public boolean dispatchTouchEvent(MotionEvent ev) {
        int action=ev.getAction();
        String actionName="";
        switch(action)
        {
        case MotionEvent.ACTION_DOWN:
            actionName="ACTION_DOWN";
            break;
        case MotionEvent.ACTION_MOVE:
            actionName="ACTION_MOVE";
            break;
        case MotionEvent.ACTION_UP:
            actionName="ACTION_UP";
            break;
        }
        System.out.println("Activity"+"|"+actionName+":dispatchTouchEvent");
        return super.dispatchTouchEvent(ev);
    }
    @Override
    public boolean onTouchEvent(MotionEvent event) {
        int action=event.getAction();
        String actionName="";
        switch(action)
        {
        case MotionEvent.ACTION_DOWN:
            actionName="ACTION_DOWN";
            break;
        case MotionEvent.ACTION_MOVE:
            actionName="ACTION_MOVE";
            break;
        case MotionEvent.ACTION_UP:
            actionName="ACTION_UP";
            break;
        }

        System.out.println("Activity"+"|"+actionName+":onTouchEvent");
        return super.onTouchEvent(event);
    }


}
package dk.touch;
import android.content.Context;
import android.util.AttributeSet;
import android.view.MotionEvent;
import android.widget.LinearLayout;
public class MyLayout extends LinearLayout {
    private String name="";
    public MyLayout(Context context, AttributeSet attrs) {
        super(context, attrs);
    }
    @Override
    public boolean onTouchEvent(MotionEvent event) {
        int action=event.getAction();
        String actionName="";
        switch(action)
        {
        case MotionEvent.ACTION_DOWN:
            actionName="ACTION_DOWN";
            break;
        case MotionEvent.ACTION_MOVE:
            actionName="ACTION_MOVE";
            break;
        case MotionEvent.ACTION_UP:
            actionName="ACTION_UP";
            break;
        }
        System.out.println(name+"|"+actionName+":onTouchEvent");
        return super.onTouchEvent(event);
    }
    @Override
    public boolean dispatchTouchEvent(MotionEvent ev) {
        int action=ev.getAction();
        String actionName="";
        switch(action)
        {
        case MotionEvent.ACTION_DOWN:
            actionName="ACTION_DOWN";
            break;
        case MotionEvent.ACTION_MOVE:
            actionName="ACTION_MOVE";
            break;
        case MotionEvent.ACTION_UP:
            actionName="ACTION_UP";
            break;
        }
        System.out.println(name+"|"+actionName+":dispatchTouchEvent");
        return super.dispatchTouchEvent(ev);
    }
    @Override
    public boolean onInterceptTouchEvent(MotionEvent ev) {
        int action=ev.getAction();
        String actionName="";
        switch(action)
        {
        case MotionEvent.ACTION_DOWN:
            actionName="ACTION_DOWN";
            break;
        case MotionEvent.ACTION_MOVE:
            actionName="ACTION_MOVE";
            break;
        case MotionEvent.ACTION_UP:
            actionName="ACTION_UP";
            break;
        }
        System.out.println(name+"|"+actionName+":onInterceptTouchEvent");
        return super.onInterceptTouchEvent(ev);
    }
    public String getName() {
        return name;
    }
    public void setName(String name) {
        this.name = name;
    }

}Android Studio打开一个工程的截图:

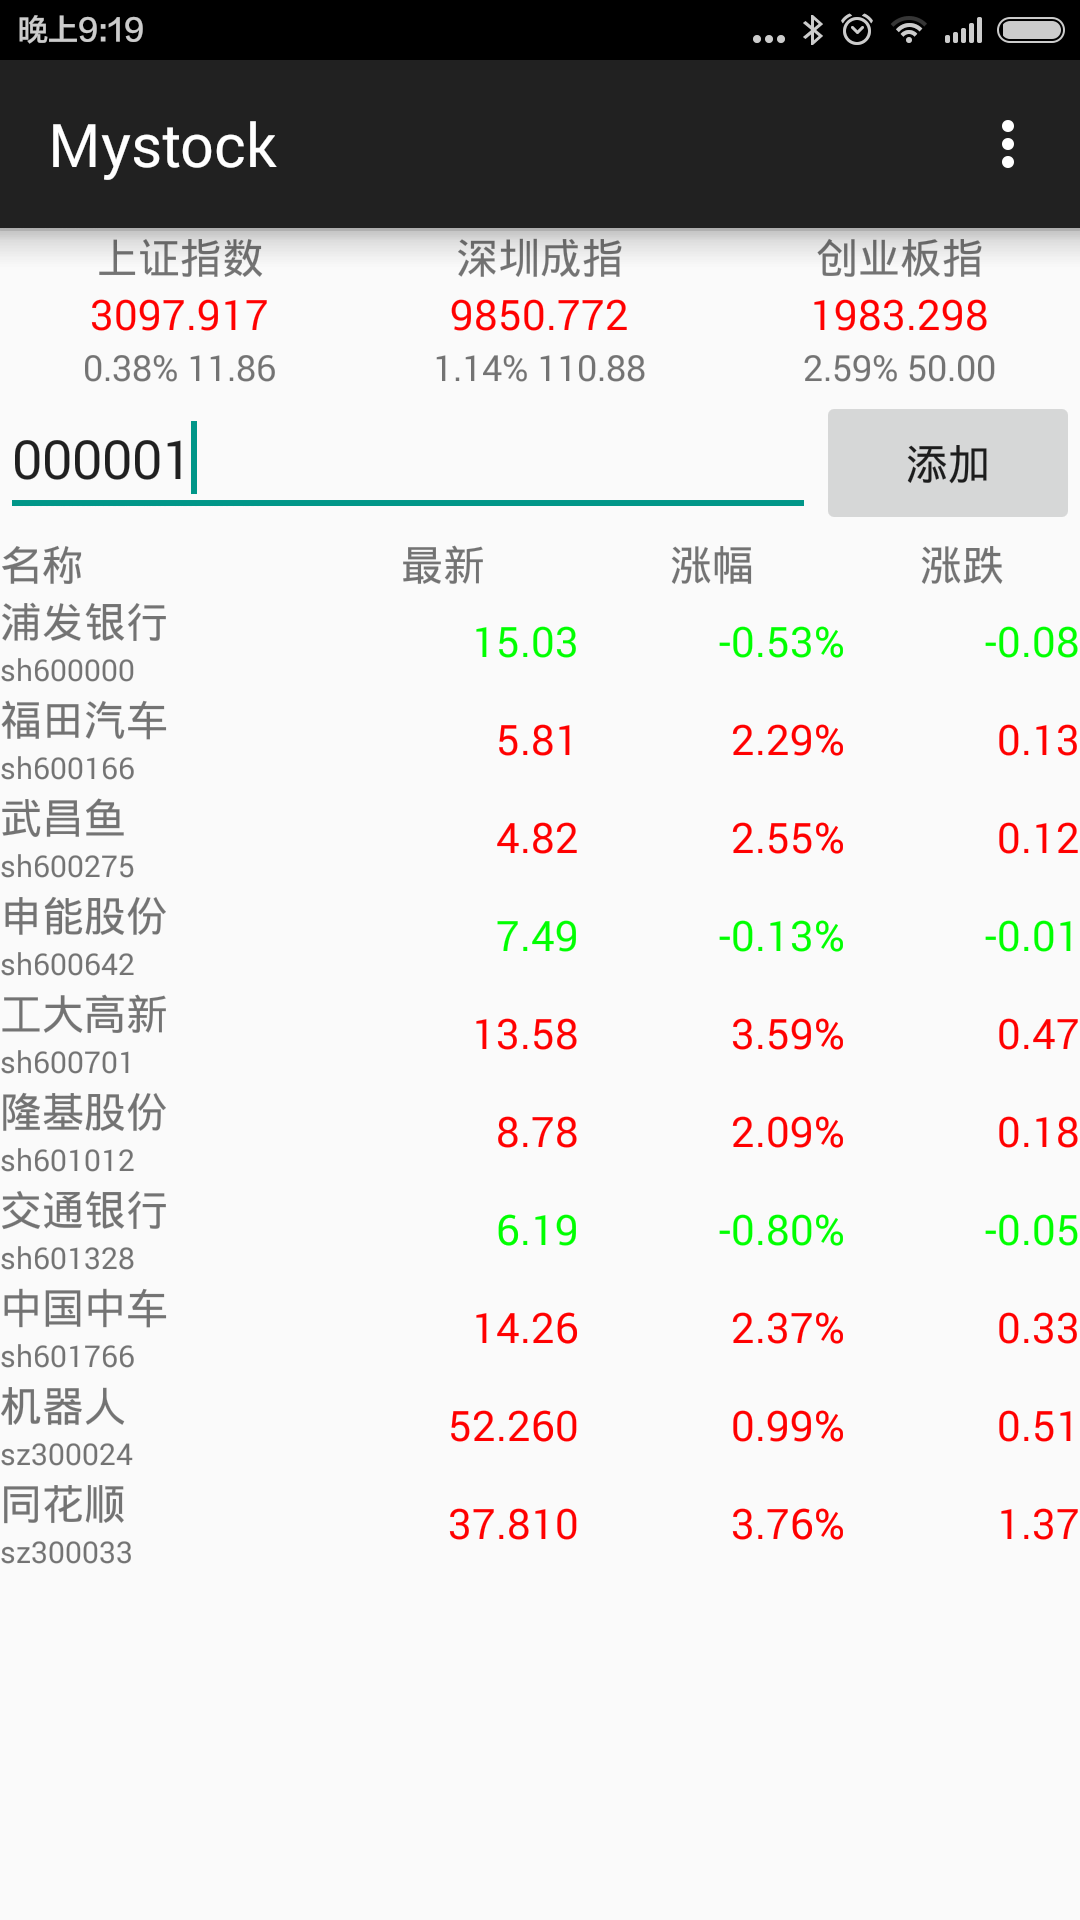
Mystock的实现步骤
1.以下是activa_main.xml的内容。上面一排是三个TextView,分别用来显示上证指数,深圳成指,创业板指。中间一排是一个EditText和一个Button,用来添加股票。下面是一个Table,用来显示添加的股票列表。
<LinearLayout xmlns:android="http://schemas.android.com/apk/res/android"
    xmlns:tools="http://schemas.android.com/tools" android:layout_width="match_parent"
    android:layout_height="match_parent" android:orientation="vertical"  tools:context=".MainActivity">
    <LinearLayout
        android:layout_width="match_parent"
        android:layout_height="wrap_content"
        android:orientation="horizontal">
        <LinearLayout
            android:layout_width="0dp"
            android:layout_weight="0.33"
            android:layout_height="wrap_content"
            android:orientation="vertical"
            android:gravity="center" >
            <TextView
                android:layout_width="wrap_content"
                android:layout_height="wrap_content"
                android:text="@string/stock_sh_name"/>
            <TextView
                android:layout_width="wrap_content"
                android:layout_height="wrap_content"
                android:id="@+id/stock_sh_index"/>
            <TextView
                android:layout_width="wrap_content"
                android:layout_height="wrap_content"
                android:textSize="12sp"
                android:id="@+id/stock_sh_change"/>
        </LinearLayout>
        <LinearLayout
            android:layout_width="0dp"
            android:layout_weight="0.33"
            android:layout_height="wrap_content"
            android:orientation="vertical"
            android:gravity="center" >
            <TextView
                android:layout_width="wrap_content"
                android:layout_height="wrap_content"
                android:text="@string/stock_sz_name"/>
            <TextView
                android:layout_width="wrap_content"
                android:layout_height="wrap_content"
                android:id="@+id/stock_sz_index"/>
            <TextView
                android:layout_width="wrap_content"
                android:layout_height="wrap_content"
                android:textSize="12sp"
                android:id="@+id/stock_sz_change"/>
        </LinearLayout>
        <LinearLayout
            android:layout_width="0dp"
            android:layout_weight="0.33"
            android:layout_height="wrap_content"
            android:orientation="vertical"
            android:gravity="center" >
            <TextView
                android:layout_width="wrap_content"
                android:layout_height="wrap_content"
                android:text="@string/stock_chuang_name"/>
            <TextView
                android:layout_width="wrap_content"
                android:layout_height="wrap_content"
                android:id="@+id/stock_chuang_index"/>
            <TextView
                android:layout_width="wrap_content"
                android:layout_height="wrap_content"
                android:textSize="12sp"
                android:id="@+id/stock_chuang_change"/>
        </LinearLayout>
    </LinearLayout>
    <LinearLayout
        android:orientation="horizontal"
        android:layout_width="match_parent"
        android:layout_height="wrap_content">
        <EditText
            android:layout_width="wrap_content"
            android:layout_height="wrap_content"
            android:inputType="number"
            android:maxLength="6"
            android:id="@+id/editText_stockId"
            android:layout_weight="1" />
        <Button
            android:layout_width="wrap_content"
            android:layout_height="wrap_content"
            android:text="@string/button_add_label"
            android:onClick="addStock" />
    </LinearLayout>
    <!--ListView
        android:layout_width="wrap_content"
        android:layout_height="wrap_content"
        android:id="@+id/listView" /-->
    <ScrollView
        android:layout_width="match_parent"
        android:layout_height="wrap_content">
        <TableLayout
            android:layout_width="match_parent"
            android:layout_height="wrap_content"
            android:id="@+id/stock_table"></TableLayout>
    </ScrollView>
</LinearLayout>
应用截图如下:
2.数据获取,这里使用sina提供的接口来实时获取股票数据,代码如下:
public void querySinaStocks(String list){
    // Instantiate the RequestQueue.
    RequestQueue queue = Volley.newRequestQueue(this);
    String url ="http://hq.sinajs.cn/list=" + list;
    //http://hq.sinajs.cn/list=sh600000,sh600536
    // Request a string response from the provided URL.
    StringRequest stringRequest = new StringRequest(Request.Method.GET, url,
            new Response.Listener<String>() {
                @Override
                public void onResponse(String response) {
                    updateStockListView(sinaResponseToStocks(response));
                }
            },
            new Response.ErrorListener() {
                @Override
                public void onErrorResponse(VolleyError error) {
                }
            });
    queue.add(stringRequest);
}
这里发送Http请求用到了Volley,需要在build.gradle里面添加dependencies:compile 'com.mcxiaoke.volley:library:1.0.19'。
3.定时刷新股票数据,使用了Timer,每隔两秒发送请求获取数据,代码如下:
Timer timer = new Timer("RefreshStocks");
timer.schedule(new TimerTask() {
    @Override
    public void run() {
        refreshStocks();
    }
}, 0, 2000);
private void refreshStocks(){
String ids = "";
for (String id : StockIds_){
    ids += id;
    ids += ",";
}
querySinaStocks(ids);
}
4.在程序退出时存储股票代码,下次打开App时,可以显示上次的股票列表。代码如下。
private void saveStocksToPreferences(){
    String ids = "";
    for (String id : StockIds_){
        ids += id;
        ids += ",";
    }
    SharedPreferences sharedPref = getPreferences(Context.MODE_PRIVATE);
    SharedPreferences.Editor editor = sharedPref.edit();
    editor.putString(StockIdsKey_, ids);
    editor.commit();
}
@Override
public void onDestroy() {
    super.onDestroy();  // Always call the superclass
    saveStocksToPreferences();
}
5.删除选中的股票,在menu_main.xml里面添加一个action。
<menu xmlns:android="http://schemas.android.com/apk/res/android"
    xmlns:app="http://schemas.android.com/apk/res-auto"
    xmlns:tools="http://schemas.android.com/tools" tools:context=".MainActivity">
    <item android:id="@+id/action_settings" android:title="@string/action_settings"
        android:orderInCategory="100" app:showAsAction="never" />
    <item android:id="@+id/action_delete" android:title="@string/action_delete"
        android:orderInCategory="100" app:showAsAction="never" />
</menu>
代码响应事件并删除:
@Override
public boolean onOptionsItemSelected(MenuItem item) {
    // Handle action bar item clicks here. The action bar will
    // automatically handle clicks on the Home/Up button, so long
    // as you specify a parent activity in AndroidManifest.xml.
    int id = item.getItemId();
    //noinspection SimplifiableIfStatement
    if (id == R.id.action_settings) {
        return true;
    }
    else if(id == R.id.action_delete){
        if(SelectedStockItems_.isEmpty())
            return true;
        for (String selectedId : SelectedStockItems_){
            StockIds_.remove(selectedId);
            TableLayout table = (TableLayout)findViewById(R.id.stock_table);
            int count = table.getChildCount();
            for (int i = 1; i < count; i++){
                TableRow row = (TableRow)table.getChildAt(i);
                LinearLayout nameId = (LinearLayout)row.getChildAt(0);
                TextView idText = (TextView)nameId.getChildAt(1);
                if(idText != null && idText.getText().toString() == selectedId){
                    table.removeView(row);
                    break;
                }
            }
        }
        SelectedStockItems_.clear();
    }
    return super.onOptionsItemSelected(item);
}
屏幕截图:

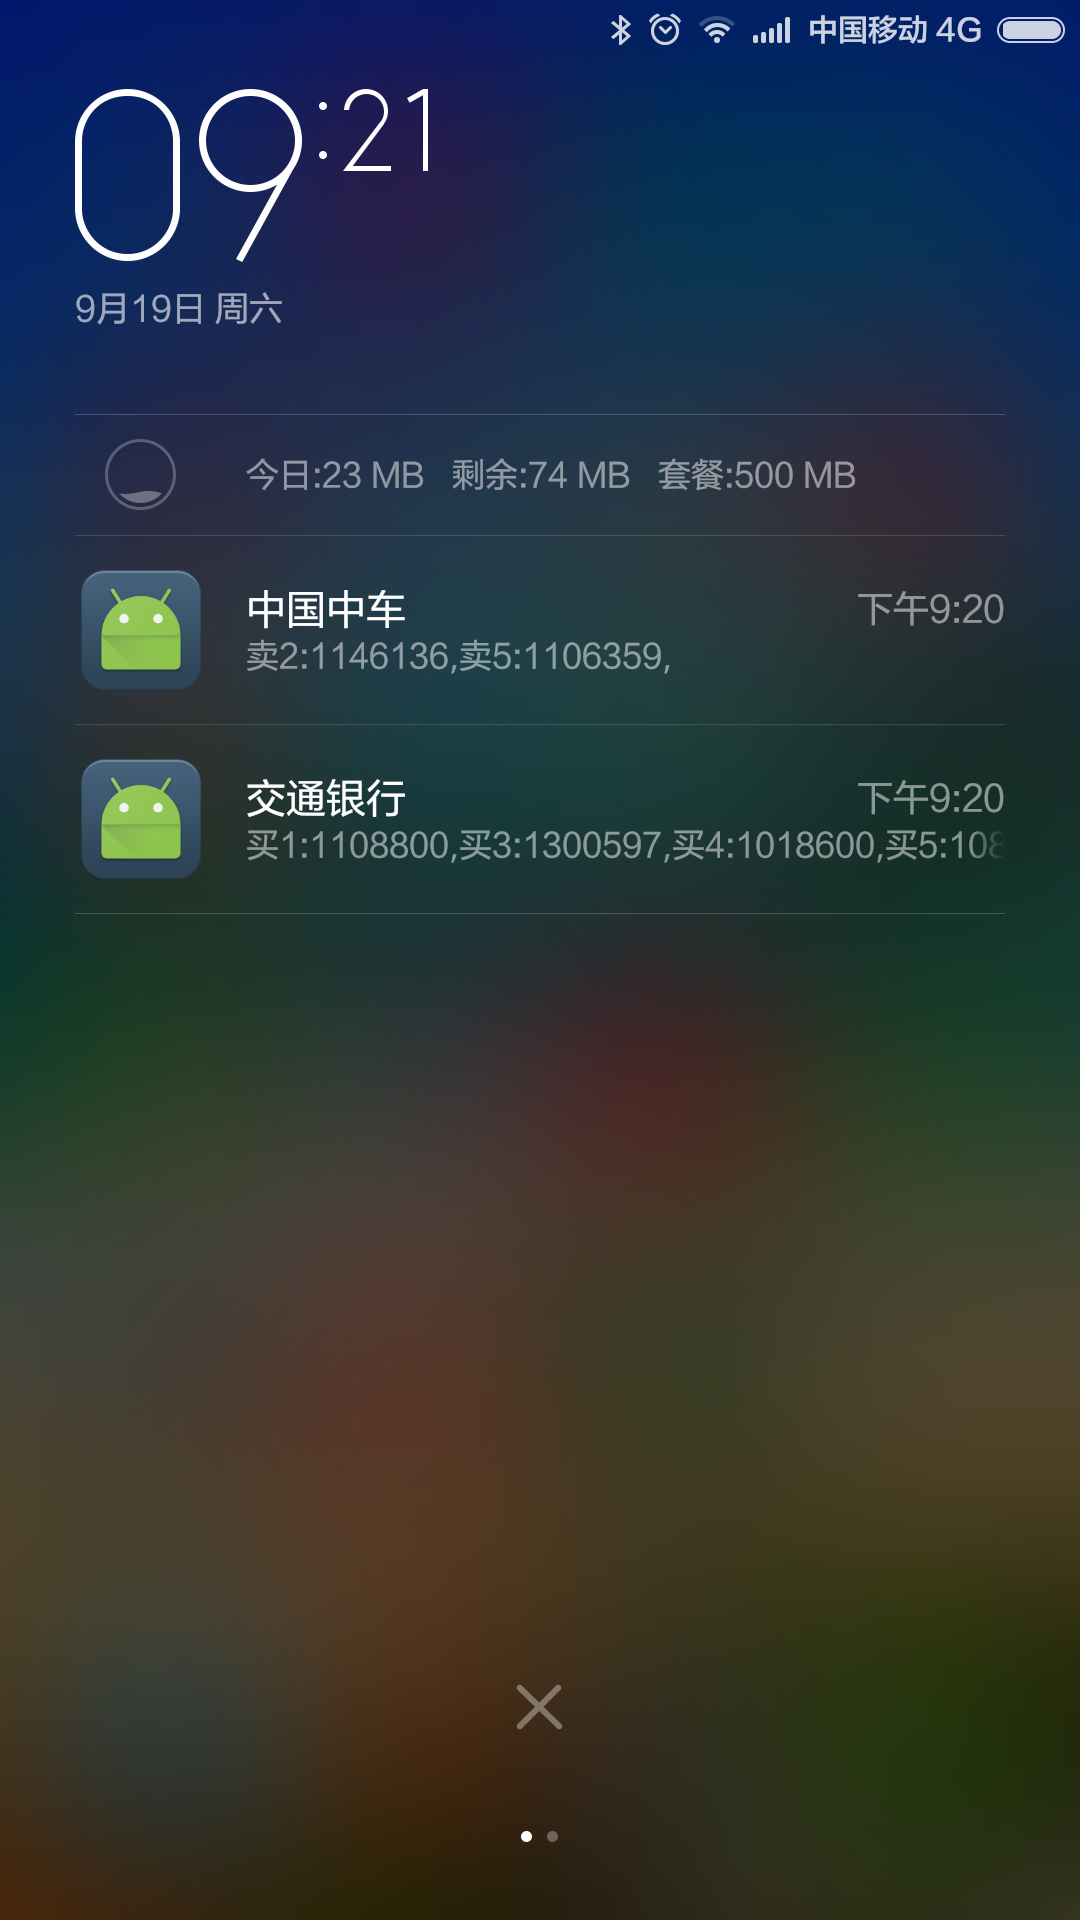
6.当有大额委托挂单时,发送消息提醒,代码如下:
{
...
            String text = "";
            String sBuy = getResources().getString(R.string.stock_buy);
            String sSell = getResources().getString(R.string.stock_sell);
            if(Double.parseDouble(stock.b1_ )>= StockLargeTrade_) {
                text += sBuy + "1:" + stock.b1_ + ",";
            }
            if(Double.parseDouble(stock.b2_ )>= StockLargeTrade_) {
                text += sBuy + "2:" + stock.b2_ + ",";
            }
            if(Double.parseDouble(stock.b3_ )>= StockLargeTrade_) {
                text += sBuy + "3:" + stock.b3_ + ",";
            }
            if(Double.parseDouble(stock.b4_ )>= StockLargeTrade_) {
                text += sBuy + "4:" + stock.b4_ + ",";
            }
            if(Double.parseDouble(stock.b5_ )>= StockLargeTrade_) {
                text += sBuy + "5:" + stock.b5_ + ",";
            }
            if(Double.parseDouble(stock.s1_ )>= StockLargeTrade_) {
                text += sSell + "1:" + stock.s1_ + ",";
            }
            if(Double.parseDouble(stock.s2_ )>= StockLargeTrade_) {
                text += sSell + "2:" + stock.s2_ + ",";
            }
            if(Double.parseDouble(stock.s3_ )>= StockLargeTrade_) {
                text += sSell + "3:" + stock.s3_ + ",";
            }
            if(Double.parseDouble(stock.s4_ )>= StockLargeTrade_) {
                text += sSell + "4:" + stock.s4_ + ",";
            }
            if(Double.parseDouble(stock.s5_ )>= StockLargeTrade_) {
                text += sSell + "5:" + stock.s5_ + ",";
            }
            if(text.length() > 0)
                sendNotifation(Integer.parseInt(sid), stock.name_, text);
...
}
public void sendNotifation(int id, String title, String text){
    NotificationCompat.Builder nBuilder =
            new NotificationCompat.Builder(this);
    nBuilder.setSmallIcon(R.drawable.ic_launcher);
    nBuilder.setContentTitle(title);
    nBuilder.setContentText(text);
    nBuilder.setVibrate(new long[]{100, 100, 100});
    nBuilder.setLights(Color.RED, 1000, 1000);
    NotificationManager notifyMgr = (NotificationManager) getSystemService(NOTIFICATION_SERVICE);
    notifyMgr.notify(id, nBuilder.build());
}
屏幕截图:
源代码:https://github.com/ldlchina/Mystock
深入理解Android中View
这回我们是深入到View内部,去研究View,去了解View的工作,抛弃其他因素,以便为以后能灵活的使用自定义空间打下一定的基础。希望有志同道合的朋友一起来探讨,深入Android内部,深入理解Android。
一、View是什么?
View是什么了,每个人都有自己的理解。在Android的官方文档中是这样描述的:这个类表示了用户界面的基本构建模块。一个View占用了屏幕上的一个矩形区域并且负责界面绘制和事件处理。View是用来构建用户界面组件(Button,Textfields等等)的基类。ViewGroup子类是各种布局的基类,它是个包含其他View(或其他ViewGroups)和定义这些View布局参数的容器。
其实说白了,View就是一个矩形区域,我们可以在这个区域上定义自己的控件。
注明:有对系统回调不太了解的回头看看回调,这样有助于对文章的理解。
二、View创建的一个概述:
在API中对View的回调流程有以个详细的描述,下面给出了原文翻译:(翻译有点仓促,大家多多包涵,有啥错的地方麻烦告知下我,我好改过来)
1.Creation :创建
----Constructors(构造器)
There is a form of the constructor that arecalled when the view is created from code and a form that is called when theview is inflated from a layout file. The second form should parse and apply anyattributes defined in the layout file.在构造器中有个一个表单当View从代码中创建和从Layout File 文件中创建时。第二个表单应该解析和应用一些在Layout File中定义的属性。
---- onFinishInflate()
Called after a view and all of itschildren has been inflated from XML.当View和他的所有子View从XML中解析完成后调用。
2. Layout :布局
----onMeasure(int, int)
Called to determine the size requirementsfor this view and all of its children. 确定View和它所有的子View要求的尺寸时调用
---- onLayout(boolean, int, int,int, int)
Calledwhen this view should assign a size and position to all of its children当这个View为其所有的子View指派一个尺寸和位置时调用
---- onSizeChanged(int, int, int,int)
Calledwhen the size of this view has changed.当这个View的尺寸改变后调用
3. Drawing :绘制
---- onDraw(Canvas)
Calledwhen the view should render its content.当View给定其内容时调用
4.Event processing :事件流程
----onKeyDown(int, KeyEvent)
Calledwhen a new key event occurs.当一个新的键按下时
---- onKeyUp(int, KeyEvent)
Calledwhen a key up event occurs.当一个键弹起时
----onTrackballEvent(MotionEvent)
Calledwhen a trackball motion event occurs.当滚迹球事件发生时。
----onTouchEvent(MotionEvent)
Calledwhen a touch screen motion event occurs.当一个触摸屏事件发生时。
5. Focus :焦点
---- onFocusChanged(boolean, int,Rect)
onFocusChanged(boolean,int, Rect)当View得到和失去焦点时调用
---- onWindowFocusChanged(boolean)
Called when the windowcontaining the view gains or loses focus.当Window包含的View得到或失去焦点时调用。
根据View里面方法调用流程的概述,我们来重写其中的几个回调方法来直观的了解下这个调用,具体代码这里就不贴了,代码见测试包:DEMO_View调用流程.rar,调用的log显示:
这样大家就对View的调用有了个大概的认识,下面将针对View的标志系统、View的的布局参数系统等做一个简单的描述。
三、View的标志(Flag)系统
在一个系统中往往使用标志来指示系统中的某些参数,这里对View的标志系统做一些简单的介绍,这样大家可以借鉴下,以后也可以用这种表示方法。
一般而言标志都是成对出现的也就是表示相反两个属性,对于这种属性的表示方法我们使用一位的0和1就可以表示。如果有多个成对属性,如果每对属性都用一个int值来标志是不方便的。这种情况通常是用一个int的各个位来分别表示每个标志,在处理器中有一个标志位就是采用这种方式设计的。
我们先来看看位运算。位运算符包括: 与(&)、非(~)、或(|)、异或(^)
&: 当两边操作数的位同时为1时,结果为1,否则为0。如1100&1010=1000
|: 当两边操作数的位有一边为1时,结果为1,否则为0。如1100|1010=1110
~: 0变1,1变0
^: 两边的位不同时,结果为1,否则为0.如1100^1010=0110
在View系统使用mViewFlags来表征这些属性,其设置的主要方法如下
void setFlag(int mask, int falg)
{
    int old = mViewFlags;①
    mViewFlags = (mViewFlags & ~mask) | (mask & falg);②
int changed = mViewFlags ^ old;// 获取改变的位,方法是对改变的位置1③
... ...
}
其中mask指的是标志位所在的位,falg表示的标志位。下面举个例子:
public static final int VISIBLE = 0x00000000;
public static final int INVISIBLE = 0x00000004;
public static final int GONE = 0x00000008;
static final int VISIBILITY_MASK = 0x0000000C;
其中VISIBLE和INVISIBLE和GONE就是标志位,VISIBILITY_MASK是标志位所在的位,也就有VISIBLE+INVISIBLE+GON=VISIBILITY_MASK。看不懂的把上面四个转换为二进制就看出来了。
为什么要使用VISIBILITY_MASK?会不会有些多余呢?我们来看View中的计算公式:
mViewFlags = (mViewFlags & ~mask) | (mask & falg);②
其中mViewFlags & ~mask是用来将mViewFlags中表示该标志的位置零。mask & falg是用来获得标志位。举个例子:
假设mViewFlags的二进制表示为110000;flag为INVISIBLE我们将上面的标志位转换为二进制VISIBLE 0000、INVISIBLE 0100、GONE 1000、VISIBILITY_MASK 1100。
mViewFlags & ~mask=110000 & 0011 = 110000(上面所用的标志位占用的是最后四位,我们通过这个运算来将这个标志位置零)。
mask & falg = 1100 & 0100 =0100(获得标志)。
110000 | 0100(通过或运算来计算出最后的标志)。
一般而言:在多个同种类型的标志中,通常使用0来作为默认的标志。关于上面的标志系统的其他具体使用我们就不再深入,有兴趣的可以自行深入,有啥好的想法在群里分享下。
四、MeasureSpec
在View系统中,指定宽和高,以及指定布局的属性,是由MeasureSpec来封装的。下面是各个模式的标志位表示。
private static final int MODE_SHIFT = 30;
private static final int MODE_MASK  = 0x3 << MODE_SHIFT;
/**
 * Measure specification mode: The parent has not imposed any constraint
 * on the child. It can be whatever size it wants.
 */
public static final int UNSPECIFIED = 0 << MODE_SHIFT;
/**
 * Measure specification mode: The parent has determined an exact size
 * for the child. The child is going to be given those bounds regardless
 * of how big it wants to be.
 */
public static final int EXACTLY     = 1 << MODE_SHIFT;
/**
 * Measure specification mode: The child can be as large as it wants up
 * to the specified size.
 */
public static final int AT_MOST     = 2 << MODE_SHIFT;
在这个解析系统中是通过移位来存放更多的数据,现在每个数据标志位都向左移动了30位。这样表示一个View大小是很方便的,我们来看下面的方法:
public static int makeMeasureSpec(int size, int mode) {
    return size + mode;
}
通过这个方法就可以制作一个含有两个参数的int值,这个参数包含一个mode标志和一个宽或高的表示。
我们通过如下方法来获取到mode:
public static int getMode(int measureSpec) {
    return (measureSpec & MODE_MASK);
}
我们也可以用下面方法来获取高或宽的数据表示:
public static int getSize(int measureSpec) {
    return (measureSpec & ~MODE_MASK);
}
五、几个重要方法简介
正如第二节写的那个调用流程一样,这几个重要的方法是系统回调是调用的,同样对于这几个方法也是自定义组件的重要的方法。
在这节里我们主要是了解这些方法的用途,以期在自定义组件时可以对这些方法得心应手。
5.1 onFinishInflate()
这个是当系统解析XML完成,并且将子View全部添加完成之后调用这个方法,我们通常重写这个方法,在这个方法中查找并获得子View引用,当然前提是这个View中有子View所以一般都是继承ViewGroup时用这个方法比较多,比如抽屉效果中:
@Override
protected void onFinishInflate() {
mHandle = findViewById(mHandleId);
if (mHandle == null) {
    throw new IllegalArgumentException("The handle attribute is must refer to an"
            + " existing child.");
}
mHandle.setOnClickListener(new DrawerToggler());

mContent = findViewById(mContentId);
if (mContent == null) {
    throw new IllegalArgumentException("The content attribute is must refer to an"
            + " existing child.");
}
mContent.setVisibility(View.GONE);
}
通过重写这个方法来获取手柄的View和要显示内容的View。
5.2 onMeasure(int, int)
测量这个View的高和宽。通过调用这个方法来设置View的测量后的高和宽,其最终调用的方法是:
protected final void setMeasuredDimension(int measuredWidth, int measuredHeight) {
    mMeasuredWidth = measuredWidth;
    mMeasuredHeight = measuredHeight;

    mPrivateFlags |= MEASURED_DIMENSION_SET;
}
可见其最终是将高和宽保存在mMeasuredWidth、mMeasuredHeight这两个参数中。
其实调用onMeasure(int, int)的方法的不是系统,而是
public final voidmeasure(int widthMeasureSpec, int heightMeasureSpec)
这个才是系统回调的方法,然后通过这个方法调用onMeasure(int, int)方法,个人感觉这种设计就是把系统方法和用户可以重写的方法分离开,这样避免一些不必要的错误。
在这个方法中主要是用来初始化各个子View的布局参数,我们来看看抽屉中的实现:
@Override
protected void onMeasure(int widthMeasureSpec, int heightMeasureSpec) {
    int widthSpecMode = MeasureSpec.getMode(widthMeasureSpec);
    int widthSpecSize =  MeasureSpec.getSize(widthMeasureSpec);

    int heightSpecMode = MeasureSpec.getMode(heightMeasureSpec);
    int heightSpecSize =  MeasureSpec.getSize(heightMeasureSpec);

    if (widthSpecMode == MeasureSpec.UNSPECIFIED || heightSpecMode == MeasureSpec.UNSPECIFIED) {
        throw new RuntimeException("SlidingDrawer cannot have UNSPECIFIED dimensions");
    }

    final View handle = mHandle;
    measureChild(handle, widthMeasureSpec, heightMeasureSpec);

    if (mVertical) {
        int height = heightSpecSize - handle.getMeasuredHeight() - mTopOffset;
        mContent.measure(MeasureSpec.makeMeasureSpec(widthSpecSize, MeasureSpec.EXACTLY),
                MeasureSpec.makeMeasureSpec(height, MeasureSpec.EXACTLY));
    } else {
        int width = widthSpecSize - handle.getMeasuredWidth() - mTopOffset;
        mContent.measure(MeasureSpec.makeMeasureSpec(width, MeasureSpec.EXACTLY),
                MeasureSpec.makeMeasureSpec(heightSpecSize, MeasureSpec.EXACTLY));
    }

    setMeasuredDimension(widthSpecSize, heightSpecSize);
}
刚才我们已经获取到mHandle和mContent的引用,因为onFinishInflate()方法调用在onMeasure(int, int)方法之前,所以这个不会出现nullPoint。我们可以看到在这个方法中主要就是为mHandle和mContent指定了布局参数。这里用到了MeasureSpec。
5.3 onLayout(boolean, int, int,int, int)
onLayout是用来指定各个子View的位置,这个方法和上面方法类似,也不是真正的系统回调函数,真正的回调函数是Layout。这个方法的使用主要在ViewGroup中。这里不再详述。我们在ViewGroup讲解时再去了解这个方法。
5.4 onSizeChanged(int, int, int,int)
这个是当View的大小改变时调用,这个也不再详述,基本上用的也比较少。
5.5 onDraw(android.graphics.Canvas)
这个方法相信大家都不会陌生了,在我以前的博客里也有这个方法的使用。当然那个比较入门,比较肤浅,呵呵。这里我们深入进去,类似于onMeasure(int, int),其实这个方法是由draw(Canvas)方法调用的。在这个方法中有一个对这个方法的描述:
/*
* Draw traversal performs several drawing steps which must be executed
* in the appropriate order:
*
* 1. Draw the background
* 2. If necessary, save the canvas' layers to prepare for fading
* 3. Draw view's content
* 4. Draw children
* 5. If necessary, draw the fading edges and restore layers
* 6. Draw decorations (scrollbars for instance)
*/
我们可以看到:
首先是绘制背景
其次如果需要准备层之间的阴影
然后绘制内容(这个内容就是调用我们的onDraw方法)
再绘制children(dispatchDraw(canvas);)这个方法的调用主要实现在ViewGroup中,和继承ViewGroup的组件中。
如果需要绘制层之间的阴影。
绘制装饰,也就是scrollbars。
dispatchDraw(canvas);这也是一个重要的方法,用于绘制子组件用的。下面是抽屉中的实现方法。也比较简单,大家自行阅读下也就了解了。
@Override
protected void dispatchDraw(Canvas canvas) {
  final long drawingTime = getDrawingTime();
  final View handle = mHandle;
  final boolean isVertical = mVertical;

  drawChild(canvas, handle, drawingTime);

  if (mTracking || mAnimating) {
      final Bitmap cache = mContent.getDrawingCache();
      if (cache != null) {
          if (isVertical) {
              canvas.drawBitmap(cache, 0, handle.getBottom(), null);
          } else {
              canvas.drawBitmap(cache, handle.getRight(), 0, null);
          }
      } else {
          canvas.save();
          canvas.translate(isVertical ? 0 : handle.getLeft() - mTopOffset,
                  isVertical ? handle.getTop() - mTopOffset : 0);
          drawChild(canvas, mContent, drawingTime);
          canvas.restore();
      }
  } else if (mExpanded) {
      drawChild(canvas, mContent, drawingTime);
  }
}
好了,这个就是View里面的内容,关于事件监听我们这里就不再详细描述,自定义组件的话,下面我们将会讲解深入ViewGroup,ViewGroup中也会去深化View中一些东西。
深入理解Android中ViewGroup
这回我们是深入到ViewGroup内部\,了解ViewGroup的工作,同时会阐述更多有关于View的相关知识。以便为以后能灵活的使用自定义空间打更近一步的基础。希望有志同道合的朋友一起来探讨,深入Android内部,深入理解Android。
一、ViewGroup是什么?
一个ViewGroup是一个可以包含子View的容器,是布局文件和View容器的基类。在这个类里定义了ViewGroup.LayoutParams类,这个类是布局参数的子类。
其实ViewGroup也就是View的容器。通过ViewGroup.LayoutParams来指定子View的参数。
ViewGroup作为一个容器,为了制定这个容器应有的标准所以为其指定了接口
public abstract class ViewGroup extends View implements ViewParent, ViewManager
这两个接口这里不研究,如果涉及到的话会带一下。ViewGroup有小4000行代码,下面我们一个模块一个模块分析。
二、ViewGroup这个容器
ViewGroup是一个容器,其采用一个数组来存储这些子View:
// Child views of this ViewGroup
private View[] mChildren;
由于是通过一个数组来存储View数据的,所以对于ViewGroup来说其必须实现增、删、查的算法。下面我们就来看看其内部实现。
2.1 添加View的算法
protected boolean addViewInLayout(View child, int index, LayoutParams params) {
    return addViewInLayout(child, index, params, false);
}
protected boolean addViewInLayout(View child, int index, LayoutParams params,
        boolean preventRequestLayout) {
    child.mParent = null;
    addViewInner(child, index, params, preventRequestLayout);
    child.mPrivateFlags = (child.mPrivateFlags & ~DIRTY_MASK) | DRAWN;
    return true;
}
private void addViewInner(View child, int index, LayoutParams params,
        boolean preventRequestLayout) {
    ...
    addInArray(child, index);
    ...
}
private void addInArray(View child, int index) {
...
}
上面四个方法就是添加View的核心算法的封装,它们是层层调用的关系。而我们通常调用的addView就是最终通过上面那个来最终达到添加到ViewGroup中的。
2.1.1 我们先来分析addViewInner方法:
首先是对子View是否已经包含到一个父容器中,主要的防止添加一个已经有父容器的View,因为添加一个拥有父容器的View时会碰到各种问题。比如记录本身父容器算法的问题、本身被多个父容器包含时更新的处理等等一系列的问题都会出现。
if (child.getParent() != null) {
throw new IllegalStateException("The specified child already has a parent. " +
"You must call removeView() on the child's parent first.");
}
然后就是对子View布局参数的处理。
调用addInArray来添加View
父View为当前的ViewGroup
焦点的处理。
当前View的AttachInfo信息,这个信息是用来在窗口处理中用的。Android的窗口系统就是用过AttachInfo来判断View的所属窗口的,这个了解下就行。详细信息设计到Android框架层的一些东西。
AttachInfo ai = mAttachInfo;
        if (ai != null) {
            boolean lastKeepOn = ai.mKeepScreenOn;
            ai.mKeepScreenOn = false;
            child.dispatchAttachedToWindow(mAttachInfo, (mViewFlags&VISIBILITY_MASK));
            if (ai.mKeepScreenOn) {
                needGlobalAttributesUpdate(true);
            }
            ai.mKeepScreenOn = lastKeepOn;
        }
View树改变的监听
if (mOnHierarchyChangeListener != null) {
mOnHierarchyChangeListener.onChildViewAdded(this, child);
}
子View中的mViewFlags的设置:
if ((child.mViewFlags & DUPLICATE_PARENT_STATE) == DUPLICATE_PARENT_STATE) {
mGroupFlags |= FLAG_NOTIFY_CHILDREN_ON_DRAWABLE_STATE_CHANGE;
}
2.1.2 addInArray
这个里面的实现主要是有个知识点,以前也没用过arraycopy,这里具体实现就不多加描述了。
System.arraycopy(children, 0, mChildren, 0, index);
System.arraycopy(children, index, mChildren, index + 1, count - index);
2.2 移除View
移除View的几种方式:
移除指定的View。
移除从指定位置的View
移除从指定位置开始的多个View
移除所有的View
其中具体涉及到的方法就有好多了,不过最终对要删除的子View中所做的无非就是下列的事情:
如果拥有焦点则清楚焦点
将要删除的View从当前的window中解除关系。
设置View树改变的事件监听,我们可以通过监听OnHierarchyChangeListener事件来进行一些相应的处理。
从父容器的子容器数组中删除。
具体的内容这里就不一一贴出来了,大家回头看看源码就哦了。
2.3 查询
这个就简单了,就是直接从数组中取出就可以了:
public View getChildAt(int index) {
try {
return mChildren[index];
} catch (IndexOutOfBoundsException ex) {
return null;
}
}
分析到这儿,其实我们已经相当于分析了ViewGroup四分之一的代码了,呵呵。
三、onFinishInflate
我们一般使用View的流程是在onCreate中使用setContentView来设置要显示Layout文件或直接创建一个View,在当设置了ContentView之后系统会对这个View进行解析,然后回调当前视图View中的onFinishInflate方法。只有解析了这个View我们才能在这个View容器中获取到拥有Id的组件,同样因为系统解析完View之后才会调用onFinishInflate方法,所以我们自定义组件时可以onFinishInflate方法中获取指定子View的引用。
四、测量组件
在ViewGroup中提供了测量子组件的三个方法。
//1、measureChild(View, int, int),为子组件添加Padding
    protected void measureChild(View child, int parentWidthMeasureSpec,
            int parentHeightMeasureSpec) {
        final LayoutParams lp = child.getLayoutParams();

        final int childWidthMeasureSpec = getChildMeasureSpec(parentWidthMeasureSpec,
                mPaddingLeft + mPaddingRight, lp.width);
        final int childHeightMeasureSpec = getChildMeasureSpec(parentHeightMeasureSpec,
                mPaddingTop + mPaddingBottom, lp.height);

        child.measure(childWidthMeasureSpec, childHeightMeasureSpec);
    }
//2、measureChildren(int, int)根据指定的高和宽来测量所有子View中显示参数非GONE的组件。
protected void measureChildren(int widthMeasureSpec, int heightMeasureSpec) {
final int size = mChildrenCount;
final View[] children = mChildren;
for (int i = 0; i < size; ++i) {
final View child = children[i];
if ((child.mViewFlags & VISIBILITY_MASK) != GONE) {
measureChild(child, widthMeasureSpec, heightMeasureSpec);
}
}
}
3、measureChildWithMargins(View, int, int, int, int)测量指定的子组件,为子组件添加Padding和Margin。
protected void measureChildWithMargins(View child,
        int parentWidthMeasureSpec, int widthUsed,
        int parentHeightMeasureSpec, int heightUsed) {
    final MarginLayoutParams lp = (MarginLayoutParams) child.getLayoutParams();

    final int childWidthMeasureSpec = getChildMeasureSpec(parentWidthMeasureSpec,
            mPaddingLeft + mPaddingRight + lp.leftMargin + lp.rightMargin
                    + widthUsed, lp.width);
    final int childHeightMeasureSpec = getChildMeasureSpec(parentHeightMeasureSpec,
            mPaddingTop + mPaddingBottom + lp.topMargin + lp.bottomMargin
                    + heightUsed, lp.height);

    child.measure(childWidthMeasureSpec, childHeightMeasureSpec);
}
上面三个方法都是为子组件设置了布局参数。最终调用的方法是子组件的measure方法。在View中我们知道这个调用实际上就是设置了子组件的布局参数并且调用onMeasure方法,最终设置了View测量后的高度和宽度。
五、onLayout
这个函数是一个抽象函数,要求实现ViewGroup的函数必须实现这个函数,这也就是ViewGroup是一个抽象函数的原因。因为各种组件实现的布局方式不一样,而onLayout是必须被重载的函数。
@Override
protected abstract void onLayout(boolean changed,
        int l, int t, int r, int b);
来看View中layout方法:
public final void layout(int l, int t, int r, int b) {
    boolean changed = setFrame(l, t, r, b);
    if (changed || (mPrivateFlags & LAYOUT_REQUIRED) == LAYOUT_REQUIRED) {
        if (ViewDebug.TRACE_HIERARCHY) {
            ViewDebug.trace(this, ViewDebug.HierarchyTraceType.ON_LAYOUT);
        }

        onLayout(changed, l, t, r, b);
        mPrivateFlags &= ~LAYOUT_REQUIRED;
    }
    mPrivateFlags &= ~FORCE_LAYOUT;
}
在这个方法中调用了setFrame方法,这个方法是用来设置View中的上下左右边距用的
 protected boolean setFrame(int left, int top, int right, int bottom) {
        boolean changed = false;
        //.......
        if (mLeft != left || mRight != right || mTop != top || mBottom != bottom) {
            changed = true;

            // Remember our drawn bit
            int drawn = mPrivateFlags & DRAWN;

            // Invalidate our old position
            invalidate();


            int oldWidth = mRight - mLeft;
            int oldHeight = mBottom - mTop;

            mLeft = left;
            mTop = top;
            mRight = right;
            mBottom = bottom;

            mPrivateFlags |= HAS_BOUNDS;

            int newWidth = right - left;
            int newHeight = bottom - top;

            if (newWidth != oldWidth || newHeight != oldHeight) {
                onSizeChanged(newWidth, newHeight, oldWidth, oldHeight);
            }

            if ((mViewFlags & VISIBILITY_MASK) == VISIBLE) {
                // If we are visible, force the DRAWN bit to on so that
                // this invalidate will go through (at least to our parent).
                // This is because someone may have invalidated this view
                // before this call to setFrame came in, therby clearing
                // the DRAWN bit.
                mPrivateFlags |= DRAWN;
                invalidate();
            }

            // Reset drawn bit to original value (invalidate turns it off)
            mPrivateFlags |= drawn;

            mBackgroundSizeChanged = true;
        }
        return changed;
    }
//我们可以看到如果新的高度和宽度改变之后会调用重新设置View的四个参数:
    //protected int mLeft;
    //protected int mRight;
    //protected int mTop;
    //protected int mBottom;
//这四个参数指定了View将要布局的位置。而绘制的时候是通过这四个参数来绘制,所以我们在View中调用layout方法可以实现指定子View中布局。
六、ViewGroup的绘制。
ViewGroup的绘制实际上是调用的dispatchDraw,绘制时需要考虑动画问题,而动画的实现实际上就通过dispatchDraw来实现的。
我们不用理会太多的细节,直接看其绘制子组件调用的是drawChild方法,这个里面具体的东西就多了,涉及到动画效果的处理,如果有机会的话再写,我们只要知道这个方法的功能就行。
这里有个demo贴出其中的代码大家可以测试下。
public ViewGroup01(Context context)
{
    super(context);
    Button mButton = new Button(context);
    mButton.setText("测试");
    addView(mButton);
}

@Override
protected void onLayout(boolean changed, int l, int t, int r, int b)
{
    View v = getChildAt(0);
    if(v != null)
        {
        v.layout(120, 120, 250, 250);
        }
}
@Override
protected void dispatchDraw(Canvas canvas)
{
    super.dispatchDraw(canvas);
    View v = getChildAt(0);
    if(v != null)
        {
        drawChild(canvas, v, getDrawingTime());
        }
}
七、效果图片:

相关文章
- 下面我们来看一篇关于Android子控件超出父控件的范围显示出来方法,希望这篇文章能够帮助到各位朋友,有碰到此问题的朋友可以进来看看哦。 <RelativeLayout xmlns:an...2016-10-02
- 在开发过程中,使用Visual Studio的断点调试功能可以很方便帮我们调试发现程序存在的错误,同样Visual Studio也支持对SQL Server里面的存储过程进行调试,下面就让我们看看具体的调试方法。...2021-09-22
Android开发中findViewById()函数用法与简化
findViewById方法在android开发中是获取页面控件的值了,有没有发现我们一个页面控件多了会反复研究写findViewById呢,下面我们一起来看它的简化方法。 Android中Fin...2016-09-20- 如果我们的项目需要做来电及短信的功能,那么我们就得在Android模拟器开发这些功能,本来就来告诉我们如何在Android模拟器上模拟来电及来短信的功能。 在Android模拟...2016-09-20
- 夜神android模拟器如何设置代理呢?对于这个问题其实操作起来是非常的简单,下面小编来为各位详细介绍夜神android模拟器设置代理的方法,希望例子能够帮助到各位。 app...2016-09-20
- 为了增强android应用的用户体验,我们可以在一些Button按钮上自定义动态的设置一些样式,比如交互时改变字体、颜色、背景图等。 今天来看一个通过重写Button来动态实...2016-09-20
- 如果我们要在Android应用APP中加载html5页面,我们可以使用WebView,本文我们分享两个WebView加载html5页面实例应用。 实例一:WebView加载html5实现炫酷引导页面大多...2016-09-20
- 深入理解Android中View和ViewGroup从组成架构上看,似乎ViewGroup在View之上,View需要继承ViewGroup,但实际上不是这样的。View是基类,ViewGroup是它的子类。本教程我们深...2016-09-20
- 下面我们来看一篇关于Android自定义WebView网络视频播放控件开发例子,这个文章写得非常的不错下面给各位共享一下吧。 因为业务需要,以下代码均以Youtube网站在线视...2016-10-02
- java开发的Android应用,性能一直是一个大问题,,或许是Java语言本身比较消耗内存。本文我们来谈谈Android 性能优化之MemoryFile文件读写。 Android匿名共享内存对外A...2016-09-20
- TextView默认是横着显示了,今天我们一起来看看Android设置TextView竖着显示如何来实现吧,今天我们就一起来看看操作细节,具体的如下所示。 在开发Android程序的时候,...2016-10-02
- 现在我们介绍一种在Node下检查简单错误的JS代码验证工具JSHint。 JSHint的具体介绍参考http://www.jshint.com/about/,说直白点儿,JSHint就是一个检查JS代码规范与否的工具,它可以用来检查任何(包括server端和client端...2014-05-31
android.os.BinderProxy cannot be cast to com解决办法
本文章来给大家介绍关于android.os.BinderProxy cannot be cast to com解决办法,希望此文章对各位有帮助呀。 Android在绑定服务的时候出现java.lang.ClassCastExc...2016-09-20- 这篇文章主要介绍了Android 实现钉钉自动打卡功能的步骤,帮助大家更好的理解和学习使用Android,感兴趣的朋友可以了解下...2021-03-15
- 下面我们来看一篇关于Android 开发之布局细节对比:RTL模式 ,希望这篇文章对各位同学会带来帮助,具体的细节如下介绍。 前言 讲真,好久没写博客了,2016都过了一半了,赶紧...2016-10-02
- 首先如果要在程序中使用sdcard进行存储,我们必须要在AndroidManifset.xml文件进行下面的权限设置: 在AndroidManifest.xml中加入访问SDCard的权限如下: <!--...2016-09-20
- 下面来给各位简单的介绍一下关于Android开发之PhoneGap打包及错误解决办法,希望碰到此类问题的同学可进入参考一下哦。 在我安装、配置好PhoneGap项目的所有依赖...2016-09-20
- 首先,在各个浏览器中,断点调试支持的最好的当然是Firefox,Firefox不仅可以使用Firebug调试页面js脚本,还可以用高级调试工具例如JavaScript Debugger (Venkman) 来调试Firefox扩展里的js。除此之外,Firefox还支持一些更为...2015-10-23
- 这篇文章主要给大家介绍了关于C#客户端程序Visual Studio远程调试的相关资料,文中通过示例代码介绍的非常详细,对大家的学习或者工作具有一定的参考学习价值,需要的朋友们下面来一起学习学习吧...2020-06-25
- 这篇文章主要介绍了idea 无法debug调试的解决方案,文中通过示例代码介绍的非常详细,对大家的学习或者工作具有一定的参考学习价值,需要的朋友们下面随着小编来一起学习学习吧...2020-09-09