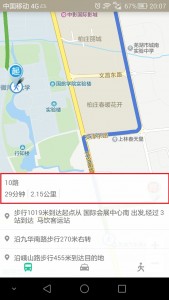
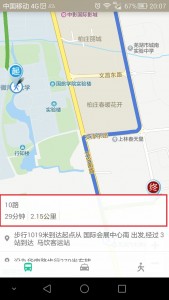
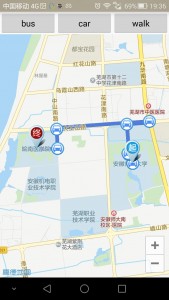
Android通过滑动控制ListView的高度
1、获取ListView的LayoutParams:
LayoutParams params= listView.getLayoutParams();
2、为RelativeLayout设置手势监听:
mRlBus.setOnTouchListener(new View.OnTouchListener() {//mRlBus为红框处外层布局
float y=0;//在此处定义一个y,接收Y坐标
@Override
public boolean onTouch(View v, MotionEvent event) {
case MotionEvent.ACTION_DOWN:
y=event.getY();//当手指按在RelativeLayout的某个地方时触发,获取当前纵坐标.
break;
case MotionEvent.ACTION_MOVE:
float x= event.getY()-y;//在此定义一个x,意思为滑动的每一刻,当前时刻的纵坐标减去最初刚按下手指的纵坐标
if(x>0||params.height<=250){//如果手指是向下滑(x=0)或者ListView的高度小于250,
params.height= (int) (params.height-x); //则执行降低或者升高ListView的操作
if(params.height>250){//这个步骤的意思为:假设用户很快速的往上滑,可能造成高度大于250
params.height=250;//如果过高,那么固定为250
}
}
if(params.height<0){//这个步骤的意思为:假设用户很快速的往下滑,可能造成高度小于0,造成ListView选取滑动之前的高度为当前高度
params.height=0;
}
listView.setLayoutParams(params);
break;
case MotionEvent.ACTION_UP:
break;
}
}
});


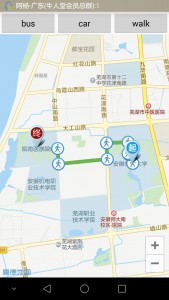
沉浸很简单,两句代码搞定:
在Activity中的setContentView(R.layout.activity_main);之前加上:
if (Build.VERSION.SDK_INT >= Build.VERSION_CODES.KITKAT) {
// 透明状态栏
getWindow().addFlags(WindowManager.LayoutParams.FLAG_TRANSLUCENT_STATUS);
// 透明导航栏
getWindow().addFlags(WindowManager.LayoutParams.FLAG_TRANSLUCENT_NAVIGATION);
}
再说固定颜色的设置,需要一个依赖的java文件,先贴出来等会要用。还有一个要注意的地方,这种方式需要在当前activity的布局文件中的最外层加上android:fitsSystemWindows=”true”这个属性。
import android.annotation.SuppressLint;
import android.annotation.TargetApi;
import android.app.Activity;
import android.content.Context;
import android.content.res.Configuration;
import android.content.res.Resources;
import android.content.res.TypedArray;
import android.graphics.drawable.Drawable;
import android.os.Build;
import android.util.DisplayMetrics;
import android.util.TypedValue;
import android.view.Gravity;
import android.view.View;
import android.view.ViewConfiguration;
import android.view.ViewGroup;
import android.view.Window;
import android.view.WindowManager;
import android.widget.FrameLayout.LayoutParams;
import java.lang.reflect.Method;
@SuppressWarnings({ "unchecked", "rawtypes" })
public class SystemStatusManager
{
static
{
if (Build.VERSION.SDK_INT >= Build.VERSION_CODES.KITKAT) {
try {
Class c = Class.forName("android.os.SystemProperties");
Method m = c.getDeclaredMethod("get", String.class);
m.setAccessible(true);
sNavBarOverride = (String) m.invoke(null, "qemu.hw.mainkeys");
} catch (Throwable e) {
sNavBarOverride = null;
}
}
}
/**
* The default system bar tint color value.
*/
public static final int DEFAULT_TINT_COLOR = 0x99000000;
private static String sNavBarOverride;
private final SystemBarConfig mConfig;
private boolean mStatusBarAvailable;
private boolean mNavBarAvailable;
private boolean mStatusBarTintEnabled;
private boolean mNavBarTintEnabled;
private View mStatusBarTintView;
private View mNavBarTintView;
/**
* Constructor. Call this in the host activity onCreate method after its
* content view has been set. You should always create new instances when
* the host activity is recreated.
*
* @param activity The host activity.
*/
@TargetApi(19)
public SystemStatusManager(Activity activity) {
Window win = activity.getWindow();
ViewGroup decorViewGroup = (ViewGroup) win.getDecorView();
if (Build.VERSION.SDK_INT >= Build.VERSION_CODES.KITKAT) {
// check theme attrs
int[] attrs = {android.R.attr.windowTranslucentStatus,
android.R.attr.windowTranslucentNavigation};
TypedArray a = activity.obtainStyledAttributes(attrs);
try {
mStatusBarAvailable = a.getBoolean(0, false);
mNavBarAvailable = a.getBoolean(1, false);
} finally {
a.recycle();
}
// check window flags
WindowManager.LayoutParams winParams = win.getAttributes();
int bits = WindowManager.LayoutParams.FLAG_TRANSLUCENT_STATUS;
if ((winParams.flags & bits) != 0) {
mStatusBarAvailable = true;
}
bits = WindowManager.LayoutParams.FLAG_TRANSLUCENT_NAVIGATION;
if ((winParams.flags & bits) != 0) {
mNavBarAvailable = true;
}
}
mConfig = new SystemBarConfig(activity, mStatusBarAvailable, mNavBarAvailable);
// device might not have virtual navigation keys
if (!mConfig.hasNavigtionBar()) {
mNavBarAvailable = false;
}
if (mStatusBarAvailable) {
setupStatusBarView(activity, decorViewGroup);
}
if (mNavBarAvailable) {
setupNavBarView(activity, decorViewGroup);
}
}
/**
* Enable tinting of the system status bar.
*
* If the platform is running Jelly Bean or earlier, or translucent system
* UI modes have not been enabled in either the theme or via window flags,
* then this method does nothing.
*
* @param enabled True to enable tinting, false to disable it (default).
*/
public void setStatusBarTintEnabled(boolean enabled) {
mStatusBarTintEnabled = enabled;
if (mStatusBarAvailable) {
mStatusBarTintView.setVisibility(enabled ? View.VISIBLE : View.GONE);
}
}
/**
* Enable tinting of the system navigation bar.
*
* If the platform does not have soft navigation keys, is running Jelly Bean
* or earlier, or translucent system UI modes have not been enabled in either
* the theme or via window flags, then this method does nothing.
*
* @param enabled True to enable tinting, false to disable it (default).
*/
public void setNavigationBarTintEnabled(boolean enabled) {
mNavBarTintEnabled = enabled;
if (mNavBarAvailable) {
mNavBarTintView.setVisibility(enabled ? View.VISIBLE : View.GONE);
}
}
/**
* Apply the specified color tint to all system UI bars.
*
* @param color The color of the background tint.
*/
public void setTintColor(int color) {
setStatusBarTintColor(color);
setNavigationBarTintColor(color);
}
/**
* Apply the specified drawable or color resource to all system UI bars.
*
* @param res The identifier of the resource.
*/
public void setTintResource(int res) {
setStatusBarTintResource(res);
setNavigationBarTintResource(res);
}
/**
* Apply the specified drawable to all system UI bars.
*
* @param drawable The drawable to use as the background, or null to remove it.
*/
public void setTintDrawable(Drawable drawable) {
setStatusBarTintDrawable(drawable);
setNavigationBarTintDrawable(drawable);
}
/**
* Apply the specified alpha to all system UI bars.
*
* @param alpha The alpha to use
*/
public void setTintAlpha(float alpha) {
setStatusBarAlpha(alpha);
setNavigationBarAlpha(alpha);
}
/**
* Apply the specified color tint to the system status bar.
*
* @param color The color of the background tint.
*/
public void setStatusBarTintColor(int color) {
if (mStatusBarAvailable) {
mStatusBarTintView.setBackgroundColor(color);
}
}
/**
* Apply the specified drawable or color resource to the system status bar.
*
* @param res The identifier of the resource.
*/
public void setStatusBarTintResource(int res) {
if (mStatusBarAvailable) {
mStatusBarTintView.setBackgroundResource(res);
}
}
/**
* Apply the specified drawable to the system status bar.
*
* @param drawable The drawable to use as the background, or null to remove it.
*/
@SuppressWarnings("deprecation")
public void setStatusBarTintDrawable(Drawable drawable) {
if (mStatusBarAvailable) {
mStatusBarTintView.setBackgroundDrawable(drawable);
}
}
/**
* Apply the specified alpha to the system status bar.
*
* @param alpha The alpha to use
*/
@TargetApi(11)
public void setStatusBarAlpha(float alpha) {
if (mStatusBarAvailable && Build.VERSION.SDK_INT >= Build.VERSION_CODES.HONEYCOMB) {
mStatusBarTintView.setAlpha(alpha);
}
}
/**
* Apply the specified color tint to the system navigation bar.
*
* @param color The color of the background tint.
*/
public void setNavigationBarTintColor(int color) {
if (mNavBarAvailable) {
mNavBarTintView.setBackgroundColor(color);
}
}
/**
* Apply the specified drawable or color resource to the system navigation bar.
*
* @param res The identifier of the resource.
*/
public void setNavigationBarTintResource(int res) {
if (mNavBarAvailable) {
mNavBarTintView.setBackgroundResource(res);
}
}
/**
* Apply the specified drawable to the system navigation bar.
*
* @param drawable The drawable to use as the background, or null to remove it.
*/
@SuppressWarnings("deprecation")
public void setNavigationBarTintDrawable(Drawable drawable) {
if (mNavBarAvailable) {
mNavBarTintView.setBackgroundDrawable(drawable);
}
}
/**
* Apply the specified alpha to the system navigation bar.
*
* @param alpha The alpha to use
*/
@TargetApi(11)
public void setNavigationBarAlpha(float alpha) {
if (mNavBarAvailable && Build.VERSION.SDK_INT >= Build.VERSION_CODES.HONEYCOMB) {
mNavBarTintView.setAlpha(alpha);
}
}
/**
* Get the system bar configuration.
*
* @return The system bar configuration for the current device configuration.
*/
public SystemBarConfig getConfig() {
return mConfig;
}
/**
* Is tinting enabled for the system status bar?
*
* @return True if enabled, False otherwise.
*/
public boolean isStatusBarTintEnabled() {
return mStatusBarTintEnabled;
}
/**
* Is tinting enabled for the system navigation bar?
*
* @return True if enabled, False otherwise.
*/
public boolean isNavBarTintEnabled() {
return mNavBarTintEnabled;
}
private void setupStatusBarView(Context context, ViewGroup decorViewGroup) {
mStatusBarTintView = new View(context);
LayoutParams params = new LayoutParams(LayoutParams.MATCH_PARENT, mConfig.getStatusBarHeight());
params.gravity = Gravity.TOP;
if (mNavBarAvailable && !mConfig.isNavigationAtBottom()) {
params.rightMargin = mConfig.getNavigationBarWidth();
}
mStatusBarTintView.setLayoutParams(params);
mStatusBarTintView.setBackgroundColor(DEFAULT_TINT_COLOR);
mStatusBarTintView.setVisibility(View.GONE);
decorViewGroup.addView(mStatusBarTintView);
}
private void setupNavBarView(Context context, ViewGroup decorViewGroup) {
mNavBarTintView = new View(context);
LayoutParams params;
if (mConfig.isNavigationAtBottom()) {
params = new LayoutParams(LayoutParams.MATCH_PARENT, mConfig.getNavigationBarHeight());
params.gravity = Gravity.BOTTOM;
} else {
params = new LayoutParams(mConfig.getNavigationBarWidth(), LayoutParams.MATCH_PARENT);
params.gravity = Gravity.RIGHT;
}
mNavBarTintView.setLayoutParams(params);
mNavBarTintView.setBackgroundColor(DEFAULT_TINT_COLOR);
mNavBarTintView.setVisibility(View.GONE);
decorViewGroup.addView(mNavBarTintView);
}
/**
* Class which describes system bar sizing and other characteristics for the current
* device configuration.
*
*/
public static class SystemBarConfig {
private static final String STATUS_BAR_HEIGHT_RES_NAME = "status_bar_height";
private static final String NAV_BAR_HEIGHT_RES_NAME = "navigation_bar_height";
private static final String NAV_BAR_HEIGHT_LANDSCAPE_RES_NAME = "navigation_bar_height_landscape";
private static final String NAV_BAR_WIDTH_RES_NAME = "navigation_bar_width";
private static final String SHOW_NAV_BAR_RES_NAME = "config_showNavigationBar";
private final boolean mTranslucentStatusBar;
private final boolean mTranslucentNavBar;
private final int mStatusBarHeight;
private final int mActionBarHeight;
private final boolean mHasNavigationBar;
private final int mNavigationBarHeight;
private final int mNavigationBarWidth;
private final boolean mInPortrait;
private final float mSmallestWidthDp;
private SystemBarConfig(Activity activity, boolean translucentStatusBar, boolean traslucentNavBar) {
Resources res = activity.getResources();
mInPortrait = (res.getConfiguration().orientation == Configuration.ORIENTATION_PORTRAIT);
mSmallestWidthDp = getSmallestWidthDp(activity);
mStatusBarHeight = getInternalDimensionSize(res, STATUS_BAR_HEIGHT_RES_NAME);
mActionBarHeight = getActionBarHeight(activity);
mNavigationBarHeight = getNavigationBarHeight(activity);
mNavigationBarWidth = getNavigationBarWidth(activity);
mHasNavigationBar = (mNavigationBarHeight > 0);
mTranslucentStatusBar = translucentStatusBar;
mTranslucentNavBar = traslucentNavBar;
}
@TargetApi(14)
private int getActionBarHeight(Context context) {
int result = 0;
if (Build.VERSION.SDK_INT >= Build.VERSION_CODES.ICE_CREAM_SANDWICH) {
TypedValue tv = new TypedValue();
context.getTheme().resolveAttribute(android.R.attr.actionBarSize, tv, true);
result = TypedValue.complexToDimensionPixelSize(tv.data, context.getResources().getDisplayMetrics());
}
return result;
}
@TargetApi(14)
private int getNavigationBarHeight(Context context) {
Resources res = context.getResources();
int result = 0;
if (Build.VERSION.SDK_INT >= Build.VERSION_CODES.ICE_CREAM_SANDWICH) {
if (hasNavBar(context)) {
String key;
if (mInPortrait) {
key = NAV_BAR_HEIGHT_RES_NAME;
} else {
key = NAV_BAR_HEIGHT_LANDSCAPE_RES_NAME;
}
return getInternalDimensionSize(res, key);
}
}
return result;
}
@TargetApi(14)
private int getNavigationBarWidth(Context context) {
Resources res = context.getResources();
int result = 0;
if (Build.VERSION.SDK_INT >= Build.VERSION_CODES.ICE_CREAM_SANDWICH) {
if (hasNavBar(context)) {
return getInternalDimensionSize(res, NAV_BAR_WIDTH_RES_NAME);
}
}
return result;
}
@TargetApi(14)
private boolean hasNavBar(Context context) {
Resources res = context.getResources();
int resourceId = res.getIdentifier(SHOW_NAV_BAR_RES_NAME, "bool", "android");
if (resourceId != 0) {
boolean hasNav = res.getBoolean(resourceId);
// check override flag (see static block)
if ("1".equals(sNavBarOverride)) {
hasNav = false;
} else if ("0".equals(sNavBarOverride)) {
hasNav = true;
}
return hasNav;
} else { // fallback
return !ViewConfiguration.get(context).hasPermanentMenuKey();
}
}
private int getInternalDimensionSize(Resources res, String key) {
int result = 0;
int resourceId = res.getIdentifier(key, "dimen", "android");
if (resourceId > 0) {
result = res.getDimensionPixelSize(resourceId);
}
return result;
}
@SuppressLint("NewApi")
private float getSmallestWidthDp(Activity activity) {
DisplayMetrics metrics = new DisplayMetrics();
if (Build.VERSION.SDK_INT >= Build.VERSION_CODES.JELLY_BEAN) {
activity.getWindowManager().getDefaultDisplay().getRealMetrics(metrics);
} else {
activity.getWindowManager().getDefaultDisplay().getMetrics(metrics);
}
float widthDp = metrics.widthPixels / metrics.density;
float heightDp = metrics.heightPixels / metrics.density;
return Math.min(widthDp, heightDp);
}
/**
* Should a navigation bar appear at the bottom of the screen in the current
* device configuration? A navigation bar may appear on the right side of
* the screen in certain configurations.
*
* @return True if navigation should appear at the bottom of the screen, False otherwise.
*/
public boolean isNavigationAtBottom() {
return (mSmallestWidthDp >= 600 || mInPortrait);
}
/**
* Get the height of the system status bar.
*
* @return The height of the status bar (in pixels).
*/
public int getStatusBarHeight() {
return mStatusBarHeight;
}
/**
* Get the height of the action bar.
*
* @return The height of the action bar (in pixels).
*/
public int getActionBarHeight() {
return mActionBarHeight;
}
/**
* Does this device have a system navigation bar?
*
* @return True if this device uses soft key navigation, False otherwise.
*/
public boolean hasNavigtionBar() {
return mHasNavigationBar;
}
/**
* Get the height of the system navigation bar.
*
* @return The height of the navigation bar (in pixels). If the device does not have
* soft navigation keys, this will always return 0.
*/
public int getNavigationBarHeight() {
return mNavigationBarHeight;
}
/**
* Get the width of the system navigation bar when it is placed vertically on the screen.
*
* @return The width of the navigation bar (in pixels). If the device does not have
* soft navigation keys, this will always return 0.
*/
public int getNavigationBarWidth() {
return mNavigationBarWidth;
}
/**
* Get the layout inset for any system UI that appears at the top of the screen.
*
* @param withActionBar True to include the height of the action bar, False otherwise.
* @return The layout inset (in pixels).
*/
public int getPixelInsetTop(boolean withActionBar) {
return (mTranslucentStatusBar ? mStatusBarHeight : 0) + (withActionBar ? mActionBarHeight : 0);
}
/**
* Get the layout inset for any system UI that appears at the bottom of the screen.
*
* @return The layout inset (in pixels).
*/
public int getPixelInsetBottom() {
if (mTranslucentNavBar && isNavigationAtBottom()) {
return mNavigationBarHeight;
} else {
return 0;
}
}
/**
* Get the layout inset for any system UI that appears at the right of the screen.
*
* @return The layout inset (in pixels).
*/
public int getPixelInsetRight() {
if (mTranslucentNavBar && !isNavigationAtBottom()) {
return mNavigationBarWidth;
} else {
return 0;
}
}
}
}
好了,然后我把主activity贴出来吧。
public class MainActivity extends Activity {
@Override
protected void onCreate(Bundle savedInstanceState) {
super.onCreate(savedInstanceState);
setTranslucentStatus();
setContentView(R.layout.activity_main);
}
private void setTranslucentStatus() {
if (Build.VERSION.SDK_INT >= Build.VERSION_CODES.KITKAT) {
// 透明状态栏
getWindow().addFlags(WindowManager.LayoutParams.FLAG_TRANSLUCENT_STATUS);
// 透明导航栏
getWindow().addFlags(WindowManager.LayoutParams.FLAG_TRANSLUCENT_NAVIGATION);
SystemStatusManager tintManager = new SystemStatusManager(this);
tintManager.setStatusBarTintEnabled(true);
tintManager.setStatusBarTintResource(R.color.red);//你要设置的颜色
getWindow().getDecorView().setFitsSystemWindows(true);
}
}
}
好了,这就实现了上面效果图的第二张,固定的状态栏颜色。
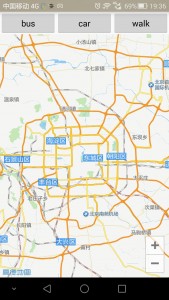 ,默认为北京
上次写了一篇EditText只能输入金额的博客,后来发现一个bug,当还未输入数字的情况下输入小数点程序就崩了,我去测了一下支付宝,看看会怎么样,我先输入小数点,程序正常,我再输入数字,可以正常输入,但是不够完美,因为”.562“是多少钱呢,我要补充的就是当还未输入数字的情况下输入小数点时,个位数字自动补零。鉴于那个代码比较冗余我就又去网上查资料,综合下来总结了一个比较好的实现方式,给EditText添加监听。
public class Money {
public static void setPricePoint(final EditText editText) {
editText.addTextChangedListener(new TextWatcher() {
@Override
public void onTextChanged(CharSequence s, int start, int before,
int count) {
if (s.toString().contains(".")) {
if (s.length() - 1 - s.toString().indexOf(".") > 2) {
s = s.toString().subSequence(0,
s.toString().indexOf(".") + 3);
editText.setText(s);
editText.setSelection(s.length());
}
}
if (s.toString().trim().substring(0).equals(".")) {
s = "0" + s;
editText.setText(s);
editText.setSelection(2);
}
if (s.toString().startsWith("0") && s.toString().trim().length() > 1) {
if (!s.toString().substring(1, 2).equals(".")) {
editText.setText(s.subSequence(0, 1));
editText.setSelection(1);
return;
}
}
}
@Override
public void beforeTextChanged(CharSequence s, int start, int count, int after) {
}
@Override
public void afterTextChanged(Editable s) {
// TODO Auto-generated method stub
}
});
}
}
使用起来就很简单了
tv_price = (EditText)findViewById(R.id.tv_price);
Money.setPricePoint(tv_price);
iOS设置UIButton上字体的对齐方式/大小、颜色
设置UIButton上字体的对齐方式,不是用:
[payWayButton.titleLabel setTextAlignment:UITextAlignmentCenter];
而是用:
[payWayButton setContentHorizontalAlignment:UIControlContentHorizontalAlignmentCenter];
设置UIButton的文字显示位置、字体的大小、字体的颜色
btn.frame = CGRectMake(x, y, width, height);
[btn setTitle: @"search" forState: UIControlStateNormal];
//设置按钮上的自体的大小
//[btn setFont: [UIFont systemFontSize: 14.0]]; //这种可以用来设置字体的大小,但是可能会在将来的SDK版本中去除改方法
//应该使用
btn.titleLabel.font = [UIFont systemFontOfSize: 14.0];
[btn seBackgroundColor: [UIColor blueColor]];
//最后将按钮加入到指定视图superView
[superView addSubview: btn];
==========================================================
tvnamelabel=[[UIButton alloc]initWithFrame:CGRectMake(5,5,200,40)];
这样初始化的button,文字默认颜色是白色的,所有如果背景也是白色的话,是看不到文字的,
btn.contentHorizontalAlignment=UIControlContentHorizontalAlignmentLeft ;//设置文字位置,现设为居左,默认的是居中
[btn setTitle:@“title”forState:UIControlStateNormal];// 添加文字
有些时候我们想让UIButton的title居左对齐,我们设置
btn.textLabel.textAlignment = UITextAlignmentLeft
是没有作用的,我们需要设置
btn.contentHorizontalAlignment = UIControlContentHorizonAlignmentLeft;
但是问题又出来,此时文字会紧贴到做边框,我们可以设置
btn.contentEdgeInsets = UIEdgeInsetsMake(0,10, 0, 0);
使文字距离做边框保持10个像素的距离。
=======================================================
设置UIButton上字体的颜色设置UIButton上字体的颜色,不是用:
[btn.titleLabel setTextColor:[UIColorblackColor]];
btn.titleLabel.textColor=[UIColor redColor];
而是用:
[btn setTitleColor:[UIColor blackColor]forState:UIControlStateNormal];
相关文章
- 下面我们来看一篇关于Android子控件超出父控件的范围显示出来方法,希望这篇文章能够帮助到各位朋友,有碰到此问题的朋友可以进来看看哦。 <RelativeLayout xmlns:an...2016-10-02
Android开发中findViewById()函数用法与简化
findViewById方法在android开发中是获取页面控件的值了,有没有发现我们一个页面控件多了会反复研究写findViewById呢,下面我们一起来看它的简化方法。 Android中Fin...2016-09-20- 如果我们的项目需要做来电及短信的功能,那么我们就得在Android模拟器开发这些功能,本来就来告诉我们如何在Android模拟器上模拟来电及来短信的功能。 在Android模拟...2016-09-20
- 夜神android模拟器如何设置代理呢?对于这个问题其实操作起来是非常的简单,下面小编来为各位详细介绍夜神android模拟器设置代理的方法,希望例子能够帮助到各位。 app...2016-09-20
- 为了增强android应用的用户体验,我们可以在一些Button按钮上自定义动态的设置一些样式,比如交互时改变字体、颜色、背景图等。 今天来看一个通过重写Button来动态实...2016-09-20
- 如果我们要在Android应用APP中加载html5页面,我们可以使用WebView,本文我们分享两个WebView加载html5页面实例应用。 实例一:WebView加载html5实现炫酷引导页面大多...2016-09-20
- 深入理解Android中View和ViewGroup从组成架构上看,似乎ViewGroup在View之上,View需要继承ViewGroup,但实际上不是这样的。View是基类,ViewGroup是它的子类。本教程我们深...2016-09-20
- 下面我们来看一篇关于Android自定义WebView网络视频播放控件开发例子,这个文章写得非常的不错下面给各位共享一下吧。 因为业务需要,以下代码均以Youtube网站在线视...2016-10-02
- java开发的Android应用,性能一直是一个大问题,,或许是Java语言本身比较消耗内存。本文我们来谈谈Android 性能优化之MemoryFile文件读写。 Android匿名共享内存对外A...2016-09-20
- TextView默认是横着显示了,今天我们一起来看看Android设置TextView竖着显示如何来实现吧,今天我们就一起来看看操作细节,具体的如下所示。 在开发Android程序的时候,...2016-10-02
android.os.BinderProxy cannot be cast to com解决办法
本文章来给大家介绍关于android.os.BinderProxy cannot be cast to com解决办法,希望此文章对各位有帮助呀。 Android在绑定服务的时候出现java.lang.ClassCastExc...2016-09-20- 这篇文章主要介绍了Android 实现钉钉自动打卡功能的步骤,帮助大家更好的理解和学习使用Android,感兴趣的朋友可以了解下...2021-03-15
- 下面我们来看一篇关于Android 开发之布局细节对比:RTL模式 ,希望这篇文章对各位同学会带来帮助,具体的细节如下介绍。 前言 讲真,好久没写博客了,2016都过了一半了,赶紧...2016-10-02
- 这篇文章主要介绍了C#实现带进度条的ListView 的相关资料,需要的朋友可以参考下...2020-06-25
- 首先如果要在程序中使用sdcard进行存储,我们必须要在AndroidManifset.xml文件进行下面的权限设置: 在AndroidManifest.xml中加入访问SDCard的权限如下: <!--...2016-09-20
- 下面来给各位简单的介绍一下关于Android开发之PhoneGap打包及错误解决办法,希望碰到此类问题的同学可进入参考一下哦。 在我安装、配置好PhoneGap项目的所有依赖...2016-09-20
用Intel HAXM给Android模拟器Emulator加速
Android 模拟器 Emulator 速度真心不给力,, 现在我们来介绍使用 Intel HAXM 技术为 Android 模拟器加速,使模拟器运行度与真机比肩。 周末试玩了一下在Eclipse中使...2016-09-20- 在安卓开发时我碰到一个问题就是需要实现全屏,但又需要我们来判断出用户是使用了全屏或非全屏了,下面我分别找了两段代码,大家可参考。 先来看一个android屏幕全屏实...2016-09-20
Android开发中布局中的onClick简单完成多控件时的监听的利与弊
本文章来为各位介绍一篇关于Android开发中布局中的onClick简单完成多控件时的监听的利与弊的例子,希望这个例子能够帮助到各位朋友. 首先在一个控件加上这么一句:and...2016-09-20- 这篇文章主要介绍了Vue 自适应高度表格的实现方法,文中通过示例代码介绍的非常详细,对大家的学习或者工作具有一定的参考学习价值,需要的朋友们下面随着小编来一起学习学习吧...2020-05-14