PHP curl封装类(包含读取/写入/读写cookie/post/代理/伪造来源IP)
PHP的curl能够实现许多非常强大的http操作,不过curl原生的写法有些蛋疼,于是自己封装了一个类。
本段代码部分代码来源网络,我自己添加了注释和一些小修改,目前实现的功能有:
构造post参数
读取/写入/读写cookie
伪造来源IP
设置代理
代码会不定时更新。
| 代码如下 | 复制代码 |
|
<?php
publicfunction__construct($url='',$forgeIP=false){ $this->ch=curl_init($url); publicfunctionclose(){ publicfunction__destruct(){ /** /** /** /** /** /** /** /** /** /** } | |
友情提示:关于这人php curl类其实就是把函数功能整理在一起了,然后写成一个class没有其它什么技巧了。
关于PHP session并发及session读写锁问题估计各大程序员都不会想到这个问题,因为一般情况我们不会使用session来做并发操作了,但有时也有可能用到,下面整理一个session并发及session读写锁文章供各位参考。PHP这门程序设计语言简单得令人发指,那是因为PHP的作者们太神通。今天我来谈谈所有的phper都熟悉的session(会话)。
需要说明的是:
4./session/indexFile和/session/indexRedis模板中两个ajax请求,/session/setUserFile和/session/setUserRedis立即执行,/session/setLoginFile和/session/setLoginRedis延迟300ms,是为了模拟同一个用户,同时在两个页面(请求)修改会话数据
执行结果表象:
第一次访问:
第二次访问:
请求:/session/indexredis
第一次访问:
第二次访问:
手册中有这样的描述:
void session_write_close ( void )
Session data is usually stored after your script terminated without the need to call session_write_close(), but as session data is locked to prevent concurrent writes only one script may operate on a session at any time. When using framesets together with sessions you will experience the frames loading one by one due to this locking. You can reduce the time needed to load all the frames by ending the session as soon as all changes to session variables are done.
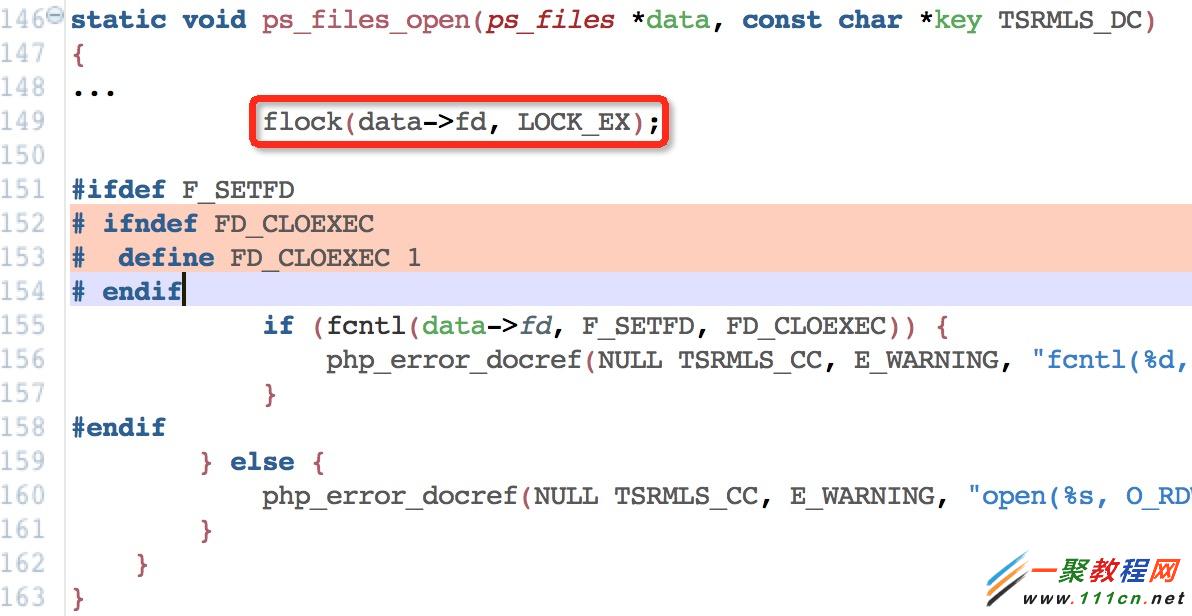
也就是说session是有锁的,为防止并发的写会话数据。php自带的的文件保存会话数据是加了一个互斥锁(session_start()的时候),从而解释了上面呈现的两个请求响应时间相同。但是以redis保存会话数据时,第二个ajax虽然没有阻塞,但是会话数据并没有写入到redis,那我们追溯一下源码就有答案了。

| 代码如下 | 复制代码 |
<?php

final class SessionController extends YafController_Abstract
{
    public function setUserFileAction()
    {
        session_start();
        $_SESSION['user_name'] = 'xudianyang';
        $_SESSION['user_id']   = '123';

        sleep(3);
        echo json_encode($_SESSION);
        return false;
    }

    public function setLoginFileAction()
    {
        session_start();
        $_SESSION['last_time'] = time();

        echo json_encode($_SESSION);
        return false;
    }

    public function indexFileAction()
    {
        // Auto Rend View
    }

    public function getSessionFileAction()
    {
        session_start();
        var_dump($_SESSION);

        return false;
    }

    public function setUserRedisAction()
    {
        $session = CoreFactory::session();
        $session->set('user_name', 'xudianyang');
        $session->set('user_id', '123');

        sleep(3);
        echo json_encode($_SESSION);
        return false;
    }

    public function setLoginRedisAction()
    {
        $session = CoreFactory::session();
        $session->set('last_time', time());

        echo json_encode($_SESSION);
        return false;
    }

    public function indexRedisAction()
    {
        // Auto Rend View
    }

    public function getSessionRedisAction()
    {
        $session = CoreFactory::session();
        var_dump($_SESSION);

        return false;
    }
}
indexfile.phtml
<!DOCTYPE html>
<html>
<head>
  <title>测试session并发锁问题</title>
  <meta charset="utf-8">
  <script type="text/javascript" src="/assets/js/jquery-1.10.2.min.js"></script>
  <script type="text/javascript">
      $.ajax({
          url: "/session/setUserFile",
          type: "get",
          dataType: "json",
          success: function(response){
              console.info(response.last_time);
          }
      });
      setTimeout(function(){
          $.ajax({
              url: "/session/setLoginFile",
              type: "get",
              dataType: "json",
              success: function(response){
                  console.info(response.last_time);
              }
          });
      }, 300);
  </script>
</head>
<body>
同时发起2两个ajax请求
</body>
</html>
indexredis.phtml
<!DOCTYPE html>
<html>
<head>
  <title>测试session并发锁问题</title>
  <meta charset="utf-8">
  <script type="text/javascript" src="/assets/js/jquery-1.10.2.min.js"></script>
  <script type="text/javascript">
      $.ajax({
          url: "/session/setUserRedis",
          type: "get",
          dataType: "json",
          success: function(response){
              console.info(response.last_time);
          }
      });
      setTimeout(function(){
          $.ajax({
              url: "/session/setLoginRedis",
              type: "get",
              dataType: "json",
              success: function(response){
                  console.info(response.last_time);
              }
          });
      }, 300);
  </script>
</head>
<body>
同时发起2两个ajax请求
</body>
</html>
| |
| 代码如下 | 复制代码 |
<?php $access_id = 'ACCESS_ID'; $access_key = 'OSS_ACCESS_KEY'; $url='http://ioutsider.oss-cn-shenzhen.aliyuncs.com';//更改成你自己的地址 $policy = '{"expiration": "2120-01-01T12:00:00.000Z","conditions":[{"bucket": "ioutsider" },["content-length-range", 0, 104857600]]}'; $policy = base64_encode($policy); $signature = base64_encode(hash_hmac('sha1', $policy, $access_key, true));//生成认证签名 ?> <!DOCTYPE html> <html> <head> <title></title> <meta http-equiv="Content-Type" content="text/html; charset=UTF-8"> </head> <body> <div>文件上传</div> <form action="<?php echo $url;?>" method="post" enctype="multipart/form-data"> <label for="file">选择文件:</label> <input type="hidden" name="OSSAccessKeyId" id="OSSAccessKeyId" value="<?php echo $access_id; ?>" /> <input type="hidden" name="policy" id="policy" value='<?php echo $policy; ?>' /> <input type="hidden" name="signature" id="signature" value="<?php echo $signature; ?>" /> <input type="hidden" name="key" id="key" value="${filename}" /> <input type="file" name="file" id="file" /> <br /> <input type="submit" name="submit" value="确定" /> </form> </body> </html> | |
阿里云 OSS 图片上传iframe 实现异步上传 相关代码:
index.php:
| 代码如下 | 复制代码 |
|
<?php <!DOCTYPE html> | |
upload.php
| 代码如下 | 复制代码 |
| <?php $access_id = ''; $access_key = ''; $policy = '{"expiration": "2120-01-01T12:00:00.000Z","conditions":[{"bucket": "ioutsider" },["content-length-range", 0, 104857600]]}'; $policy = base64_encode($policy); $signature = base64_encode(hash_hmac('sha1', $policy, $access_key, true)); $file_name = date('Y') . '/' . date('m') . '/' . md5(microtime(true)) . '.jpg'; //print_r(get_headers('http://ioutsider.oss-cn-shenzhen.aliyuncs.com')); ?> <!DOCTYPE html> <html> <head> <title></title> <meta http-equiv="Content-Type" content="text/html; charset=UTF-8"> <script src="http://filela.b0.upaiyun.com/js/jquery-1.9.0.min.js"></script> </head> <body> <form id="upload" action="http://ioutsider.oss-cn-shenzhen.aliyuncs.com" method="POST" enctype="multipart/form-data"> <label for="file">选择文件:</label> <input type="hidden" name="OSSAccessKeyId" id="OSSAccessKeyId" value="<?php echo $access_id; ?>" /> <input type="hidden" name="policy" id="policy" value='<?php echo $policy; ?>' /> <input type="hidden" name="Signature" id="Signature" value="<?php echo $signature; ?>" /> <!--<input type="hidden" name="key" id="key" value="upload/${filename}" />--> <input type="hidden" name="key" id="key" value="<?php echo $file_name; ?>" /> <input type="hidden" name="success_action_redirect" value="http://iphotos.me/res.php?img=<?php echo $file_name; ?>" /> <input type="file" name="file" id="file" /> <input type="submit" name="upload" value="上传" /> </form> </body> </html> | |
上传成功后跳转的页面:
| 代码如下 | 复制代码 |
|
<!DOCTYPE html> | |
我们跟踪用户信息时需要用到Session和Cookie,比如用户登录验证、记录用户浏览历史,存储购物车数据,限制用户会话有效时间等。今天我们来了解下PHP是如何操作Session和Cookie的。
Session
PHP的$_SESSION可以存储当前用户数据信息,用户访问WEB网站的时候,PHP会给每个访问的用户创建一个session ID,该ID是唯一ID,保存在客户机上,而用户的会话数据是保存到服务端的,PHP可以对每个不同的用户信息进行存储,当会话过期后,用户session信息也会失效。
使用Session,在使用PHP session时,一定要在页头加上session_start(),告诉服务器开始使用session了,而且在它之前应该没有任何输出,否则会报错。
<?php
session_start();
//PHP 代码...
?>
PHP设置与获取Session
我们可以使用PHP的$_SESSION来设置和获取Session数据,如:
<?php
session_start();
//设置一个session值
$_SESSION["name"] = "Hello";
//将session以数组形式保存
$_SESSION["arr"] = array('name' => 'Hello', 'url' => 'http://www.helloweba.com', 'type'=> 'website');
?>
一旦储存了Session数据,我们就可以在网站上使用Session,比如我们在另一个页面就可以获取Session数据:
<?php
session_start();
//获取保存的Session name
echo $_SESSION["name"];
//打印数组session
print_r($_SESSION["arr"]);
?>
PHP删除Session
当不再使用Session时,我们可以使用PHP将session数据删除和清空,方法如下:
<?php
unset($_SESSION["name"]);
?>
如果要清空当前用户所有的Session信息可以使用以下代码:
<?php
session_destroy();
?>
Cookie
Cookie是由用户访问的网站服务端给当前客户机上创建的一个临时文件,用来保存用户信息,以便用户下次继续访问该网站时,网站服务器能识别用户信息,常见的Cookie用来保存用户界面,用户ID等数据。
PHP设置Cookie
我们可以使用PHP的setcookie()在客户端创建cookie,这个函数提供主要的三个参数,cookie名称,值和有效时长。
<?php
$cookie_val = 'Chrome';
setcookie("browser", $cookie_val, time()+3600);
?>
运行以上代码,将会创建一个名称为Chrome的Cookie,并且在客户端保存1个小时,1小时后该cookie信息失效。
PHP接收Cookie
当Cookie创建后,我们很容易就可以获取到cookie值,使用PHP的$_COOKIE,用法如下:
<?php
if(isset($_COOKIE['browser'])) {
echo '您的浏览器是:' . $_COOKIE['browser'];
}
?>
PHP删除Cookie
如果你想彻底在你的机器上删除保存的cookie信息,可以使用以下代码:
<?php
setcookie("browser", "", time()-3600);
?>
以上代码将名称为browser的cookie清空,并将有效期设置到1小时前,完全清空了cookie信息。
此外前端Javascript也有操作cookie的例子,本站有文章介绍。
本文从初学者角度考虑,讲解了PHP入门级的知识:Session和Cookie的应用,我们不必去深究其原理,只要会用就行。2015快要来了,接下来Helloweba打算将几个前端与后端PHP的交互项目分享给大家,当然会用到Session和Cookie了,像WEB聊天室、在线视频、HTML5在线直播等等,敬请期待。
相关文章
- PHPEMS(PHP Exam Management System)在线模拟考试系统基于PHP+Mysql开发,主要用于搭建模拟考试平台,支持多种题型和展现方式,是国内首款支持题冒题和自动评分与教师评分相...2016-11-25
- 这篇文章主要介绍了C#从数据库读取图片并保存的方法,帮助大家更好的理解和使用c#,感兴趣的朋友可以了解下...2021-01-16
- 在php中解析xml文档用专门的函数domdocument来处理,把json在php中也有相关的处理函数,我们要把数据xml 数据存到一个数据再用json_encode直接换成json数据就OK了。...2016-11-25
- 本文实例讲述了JS使用cookie实现DIV提示框只显示一次的方法。分享给大家供大家参考,具体如下:这里运用JavaScript的cookie技术,控制网页上的提示DIV只显示一次,也就是当用户是第一次打开网页的时候才显示,第二次自动隐藏起...2015-11-08
- 什么是SSO?单点登录SSO(Single Sign-On)是身份管理中的一部分。SSO的一种较为通俗的定义是:SSO是指访问同一服务器不同应用中的受保护资源的同一用户,只需要登录一次,即通过一个应用中的安全验证后,再访问其他应用中的受保护...2015-11-08
- 什么是SSO?单点登录SSO(Single Sign-On)是身份管理中的一部分。SSO的一种较为通俗的定义是:SSO是指访问同一服务器不同应用中的受保护资源的同一用户,只需要登录一次,即通过一个应用中的安全验证后,再访问其他应用中的受保护...2015-11-08
- 这篇文章主要介绍了c# 如何对CSV文件操作,帮助大家更好的理解和学习C#,感兴趣的朋友可以了解下...2020-11-03
- 本文主要介绍了python读取和保存mat文件的方法,文中通过示例代码介绍的非常详细,具有一定的参考价值,感兴趣的小伙伴们可以参考一下...2021-08-25
- 首先如果要在程序中使用sdcard进行存储,我们必须要在AndroidManifset.xml文件进行下面的权限设置: 在AndroidManifest.xml中加入访问SDCard的权限如下: <!--...2016-09-20
- 这篇文章主要介绍了vue项目中js-cookie的使用存储token操作,具有很好的参考价值,希望对大家有所帮助。一起跟随小编过来看看吧...2020-11-14
- 什么是cookie? cookie 是存储于访问者的计算机中的变量。每当同一台计算机通过浏览器请求某个页面时,就会发送这个 cookie。你可以使用 JavaScript 来创建和取回 cookie 的值。 有关cookie的例子: 名字 cookie 当访...2014-05-31
- perl CPAN中有一个Tie-File 模块极大方便了对大文件的操作...2020-06-29
python爬虫用request库处理cookie的实例讲解
在本篇内容里小编给大家整理的是一篇关于python爬虫用request库处理cookie的实例讲解内容,有需要的朋友们可以学习参考下。...2021-02-21使用MSScriptControl 在 C# 中读取json数据的方法
下面小编就为大家带来一篇使用MSScriptControl 在 C# 中读取json数据的方法。小编觉得挺不错的,现在就分享给大家,也给大家做个参考。一起跟随小编过来看看吧...2020-06-25- 这篇文章主要介绍了C#实现appSettings节点读取与修改的方法,是非常实用的技巧,需要的朋友可以参考下...2020-06-25
- 本篇文章介绍了,基于C#后台调用跨域MVC服务及带Cookie验证的实现。需要的朋友参考下...2020-06-25
- 这篇文章主要介绍了golang文件读取-按指定BUFF大小读取方式,具有很好的参考价值,希望对大家有所帮助。一起跟随小编过来看看吧...2020-12-22
- 本文主要介绍了Java读取PDF中的表格的方法示例,文中通过示例代码介绍的非常详细,具有一定的参考价值,感兴趣的小伙伴们可以参考一下...2021-10-22
- 这篇文章主要介绍了R语言读取csv文件出错的解决方案,具有很好的参考价值,希望对大家有所帮助。一起跟随小编过来看看吧...2021-05-06
- 下在看一个利用fopen,file_get_contents读取本地服务器中.php文件的代码并显示的一些方法总结 如我有两个文件a.php,b.php。 a.php文件中的语句是: 代码如...2016-11-25
