Swift实现页面元素的绝对定位(水平居中,垂直居中,右上角等等)
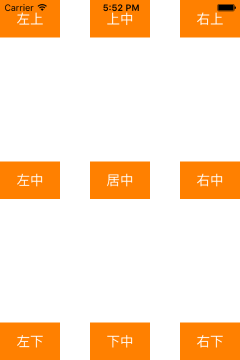
1,各种常见位置的定位
使用按钮演示如何将元件居中(水平居中、垂直居中),以及放置在边角处(左上角,右上角,左下角,右下角)
| 代码如下 | 复制代码 |
|
import UIKit | |
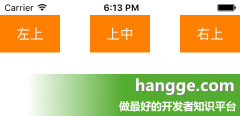
2,定位从状态栏(statusBar)下方开始
有时我们放置的页面元素不想与状态栏重合,而是从状态栏下方开始,那么加上状态栏高度即可。
| 代码如下 | 复制代码 |
| let statusFrame = UIApplication.sharedApplication().statusBarFrame let btn1 = createButton("左上") btn1.frame.origin.y = statusFrame.height self.view.addSubview(btn1) let btn2 = createButton("右上") btn2.frame.origin.x = self.view.bounds.width - btn2.frame.width btn2.frame.origin.y = statusFrame.height self.view.addSubview(btn2) let btn6 = createButton("上中") btn6.center.x = self.view.bounds.width / 2 btn6.frame.origin.y = statusFrame.height self.view.addSubview(btn6) | |
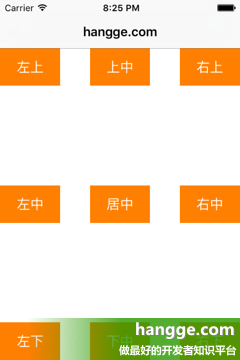
3,定位从导航栏(navigationBar)下方开始
同样的,如果页面上有导航栏,而元素又不想被导航栏遮住。那么将其加上导航栏的坐标和高度即可。
| 代码如下 | 复制代码 |
| import UIKit class ViewController: UIViewController { override func viewDidLoad() { super.viewDidLoad() var marginTop:CGFloat = 0 if let rect = self.navigationController?.navigationBar.frame { marginTop = rect.height + rect.origin.y } let btn1 = createButton("左上") btn1.frame.origin.y = marginTop self.view.addSubview(btn1) let btn2 = createButton("右上") btn2.frame.origin.x = self.view.bounds.width - btn2.frame.width btn2.frame.origin.y = marginTop self.view.addSubview(btn2) let btn6 = createButton("上中") btn6.center.x = self.view.bounds.width / 2 btn6.frame.origin.y = marginTop self.view.addSubview(btn6) let btn3 = createButton("左下") btn3.frame.origin.y = self.view.bounds.height - btn3.frame.height self.view.addSubview(btn3) let btn4 = createButton("右下") btn4.frame.origin = CGPoint(x: self.view.bounds.width - btn4.frame.width, y: self.view.bounds.height - btn4.frame.height) self.view.addSubview(btn4) let btn5 = createButton("居中") btn5.center = CGPoint(x: self.view.bounds.width / 2, y: (self.view.bounds.height + marginTop) / 2) self.view.addSubview(btn5) let btn7 = createButton("左中") btn7.center.y = (self.view.bounds.height + marginTop) / 2 self.view.addSubview(btn7) let btn8 = createButton("右中") btn8.frame.origin.x = self.view.bounds.width - btn8.frame.width btn8.center.y = (self.view.bounds.height + marginTop) / 2 self.view.addSubview(btn8) let btn9 = createButton("下中") btn9.center.x = self.view.bounds.width / 2 btn9.frame.origin.y = self.view.bounds.height - btn9.frame.height self.view.addSubview(btn9) } func createButton(title: String) -> UIButton { //创建一个ContactAdd类型的按钮 let button:UIButton = UIButton(type:.Custom) //设置按钮大小 //button.frame=CGRectMake(0, 0, 80, 50) button.frame.size = CGSize(width: 80, height: 50) //设置按钮文字 button.setTitle(title, forState:UIControlState.Normal) button.backgroundColor=UIColor.orangeColor() return button } override func didReceiveMemoryWarning() { super.didReceiveMemoryWarning() } } | |
iOS设置UIButton上字体的对齐方式/大小、颜色
设置UIButton上字体的对齐方式,不是用:
[payWayButton.titleLabel setTextAlignment:UITextAlignmentCenter];
而是用:
[payWayButton setContentHorizontalAlignment:UIControlContentHorizontalAlignmentCenter];
设置UIButton的文字显示位置、字体的大小、字体的颜色
btn.frame = CGRectMake(x, y, width, height);
[btn setTitle: @"search" forState: UIControlStateNormal];
//设置按钮上的自体的大小
//[btn setFont: [UIFont systemFontSize: 14.0]]; //这种可以用来设置字体的大小,但是可能会在将来的SDK版本中去除改方法
//应该使用
btn.titleLabel.font = [UIFont systemFontOfSize: 14.0];
[btn seBackgroundColor: [UIColor blueColor]];
//最后将按钮加入到指定视图superView
[superView addSubview: btn];
==========================================================
tvnamelabel=[[UIButton alloc]initWithFrame:CGRectMake(5,5,200,40)];
这样初始化的button,文字默认颜色是白色的,所有如果背景也是白色的话,是看不到文字的,
btn.contentHorizontalAlignment=UIControlContentHorizontalAlignmentLeft ;//设置文字位置,现设为居左,默认的是居中
[btn setTitle:@“title”forState:UIControlStateNormal];// 添加文字
有些时候我们想让UIButton的title居左对齐,我们设置
btn.textLabel.textAlignment = UITextAlignmentLeft
是没有作用的,我们需要设置
btn.contentHorizontalAlignment = UIControlContentHorizonAlignmentLeft;
但是问题又出来,此时文字会紧贴到做边框,我们可以设置
btn.contentEdgeInsets = UIEdgeInsetsMake(0,10, 0, 0);
使文字距离做边框保持10个像素的距离。
=======================================================
设置UIButton上字体的颜色设置UIButton上字体的颜色,不是用:
[btn.titleLabel setTextColor:[UIColorblackColor]];
btn.titleLabel.textColor=[UIColor redColor];
而是用:
[btn setTitleColor:[UIColor blackColor]forState:UIControlStateNormal];
首先在一个控件加上这么一句:android:onClick=”doClick”//doClick为方法名,可以自定义
然后在Activity中写上一个doClick方法:
public void doClick(View view){
//多个控件用
switch(view.getId()){
case R.id.xx:
break;
…
}
就可以完成一个控件监听,对于一些不需要定义只需要监听的控件,或者很多需要监听的控件,这种方法多么好用呀~
缺点来了,
1、在Fragment里,就不能用了,在使用Dailog时,也不能用。
2、当你给控件加了这个属性却没在Activity写方法,那么你点击这个控件的时候,程序会崩溃,这也是个小缺陷,不友好。
但是,有些情况下,你还是很值得用这个的,省了很多时间。
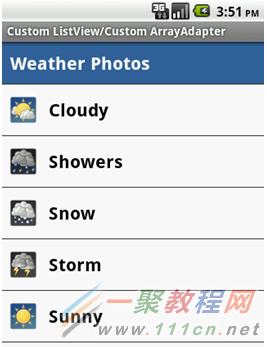
下面我们来看一篇关于使用定制的ArrayAdapter制作ListView的Items的例子,希望这个例子能够给各位同学带来帮助的哦。背景介绍
对于现实世界中的商业移动应用来说,Android的ListView默认的界面外观不是非常有吸引力。它只是使用了内部的TextView控件,在每个ListView的行(Row)里面传递了一个简单的字符串而已。大多数应用,你会想要创建出富含图形界面和呈现给用户视觉体验良好的应用。幸运地是,ListView 是一个非常强大的控件,由于有可定制的item 布局的帮助,它可以被定制从而轻松地适应你的需求。在本文中,我将向你展示怎样创建一个定制的ListView Item(有图标,自定义的header布局)以及怎样使用定制的ArrayAdapter将他们联系起来。我也会向你展示一些性能优化的小方法来优化你的ListView控件的内存占用。下面用一个例子来展示:


一、项目布局
在Eclipse中,创建一个新的Android项目,使用默认的Activity和main.xml布局文件。在main.xml文件中,声明一个ListView控件。
main.xml文件:
1 <?xml version="1.0" encoding="utf-8"?>
2 <LinearLayout
3 xmlns:android=http://schemas.android.com/apk/res/android
4 android:orientation="vertical"
5 android:layout_width="fill_parent"
6 android:layout_height="fill_parent"
7 android:background="#FFFFFF">
8
9 <ListView
10 android:id="@+id/listView1"
11 android:layout_width="fill_parent"
12 android:layout_height="fill_parent" />
13 </LinearLayout>
上面的代码,使用了简单的线性布局方式,内部垂直排列。声明了一个ListView,占据整个父容器,他的android.layout_width和android.layout_width的属性都为fill_parent。ListView有一个唯一的id:listView1,在MainActivity中将用来引用ListView控件。
为了创建定制的header,先在你的工程中创建一个新的xml布局文件:listview_header_row.xml,在里面声明一个TextView控件,属性值见下面的代码。将会创建出一个白色字体,蓝色背景的header。
1 listview_header_row.xml文件:
2 <?xml version="1.0" encoding="utf-8"?>
3 <LinearLayout
4 xmlns:android="http://schemas.android.com/apk/res/android"
5 android:orientation="horizontal"
6 android:layout_width="fill_parent"
7 android:layout_height="fill_parent">
8
9 <TextView android:id="@+id/txtHeader"
10 android:layout_width="fill_parent"
11 android:layout_height="fill_parent"
12 android:gravity="center_vertical"
13 android:layout_alignParentTop="true"
14 android:layout_alignParentBottom="true"
15 android:textStyle="bold"
16 android:textSize="22dp"
17 android:textColor="#FFFFFF"
18 android:padding="10dp"
19 android:text="Weather Photos"
20 android:background="#336699" />
21
22 </LinearLayout>
为了创建定制的ListView的行样式,先在你的工程中创建另一个xml布局文件:listview_item_row.xml。Android 会将这个文件的内容传递给每个ListView的item,你将可以自由的声明任何你想添加进里面的控件。本文中,我使用了一个ImageView来显示天气图标和一个TextView来显示该条item的主题。下面是listview_item_row.xml文件的代码:
1 listview_item_row.xml文件:
2 <?xml version="1.0" encoding="utf-8"?>
3 <LinearLayout
4 xmlns:android="http://schemas.android.com/apk/res/android"
5 android:orientation="horizontal"
6 android:layout_width="fill_parent"
7 android:layout_height="fill_parent"
8 android:padding="10dp">
9
10 <ImageView android:id="@+id/imgIcon"
11 android:layout_width="wrap_content"
12 android:layout_height="fill_parent"
13 android:gravity="center_vertical"
14 android:layout_alignParentTop="true"
15 android:layout_alignParentBottom="true"
16 android:layout_marginRight="15dp"
17 android:layout_marginTop="5dp"
18 android:layout_marginBottom="5dp" />
19
20 <TextView android:id="@+id/txtTitle"
21 android:layout_width="fill_parent"
22 android:layout_height="fill_parent"
23 android:gravity="center_vertical"
24 android:layout_alignParentTop="true"
25 android:layout_alignParentBottom="true"
26 android:textStyle="bold"
27 android:textSize="22dp"
28 android:textColor="#000000"
29 android:layout_marginTop="5dp"
30 android:layout_marginBottom="5dp" />
31
32 </LinearLayout>
本文中,我下载了一些32 X 32像素的PNG格式的图标。如果你愿意,你也可以使用你自己的图标。准备好你的图标,放到你工程的drawable-mdpi文件目录下。接下来,在工程中新建一个java类,命名为Weather.java,这个类将用于创建一个定制的ArrayAdapter来绑定对象到ListView中。下面是Weather.java文件的代码,它有两个简单的属性icon和title,一个普通的构造函数用于初始化属性。
二、项目程序开发
为了方便大家理解,我将程序结构流程画出来:
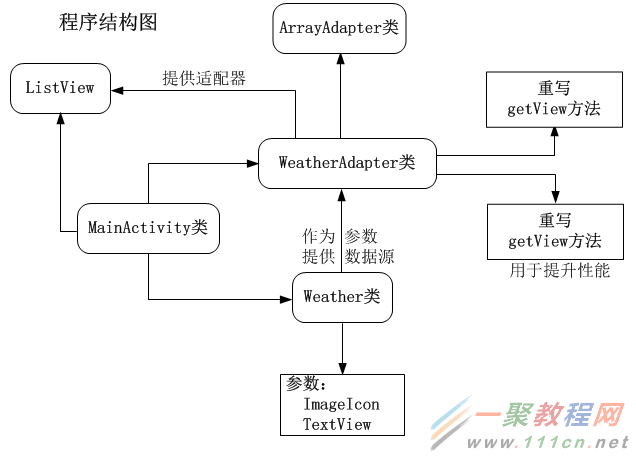
图3. 重要对象关系结构
1 Weather.java文件:
2 public class Weather {
3 public int icon;
4 public String title;
5 public Weather(){
6 super();
7 }
8
9 public Weather(int icon, String title) {
10 super();
11 this.icon = icon;
12 this.title = title;
13 }
14 }
注意,上面listview_item_row.xml文件有两个View,对应于Weather类的两个属性。Weather类的属性值将被显示到这两个View中。为了将这两个View连接起来,你需要创建一个定制的ArrayAdapter,它继承了Android的ArrayAdapter类,并重写了getView方法。添加一个新的java类到你的工程中,命名为WeatherAdapter,具体的实现代码如下:
1 WeatherAdapter.java文件:
2 public class WeatherAdapter extends ArrayAdapter<Weather>{
3
4 Context context;
5 int layoutResourceId;
6 Weather data[] = null;
7
8 public WeatherAdapter(Context context, int layoutResourceId, Weather[] data) {
9 super(context, layoutResourceId, data);
10 this.layoutResourceId = layoutResourceId;
11 this.context = context;
12 this.data = data;
13 }
14
15 @Override
16 public View getView(int position, View convertView, ViewGroup parent) {
17 View row = convertView;
18 WeatherHolder holder = null;
19
20 if(row == null)
21 {
22 LayoutInflater inflater = ((Activity)context).getLayoutInflater();
23 row = inflater.inflate(layoutResourceId, parent, false);
24
25 holder = new WeatherHolder();
26 holder.imgIcon = (ImageView)row.findViewById(R.id.imgIcon);
27 holder.txtTitle = (TextView)row.findViewById(R.id.txtTitle);
28
29 row.setTag(holder);
30 }
31 else
32 {
33 holder = (WeatherHolder)row.getTag();
34 }
35
36 Weather weather = data[position];
37 holder.txtTitle.setText(weather.title);
38 holder.imgIcon.setImageResource(weather.icon);
39
40 return row;
41 }
42
43 static class WeatherHolder
44 {
45 ImageView imgIcon;
46 TextView txtTitle;
47 }
48 }
在上面的代码中,第一个比较重要的是类的构造函数有三个参数,第一个参数是Context对象(我们可以传递当前使用WeatherAdapter类的activity对象的引用,即MainActivity.this对象);第二个参数是resource的id(它是我们想用来呈现每个ListView的item的布局文件的id),在本文中我将传递我创建的listview_item_row.xml布局文件的id;第三个参数是一个Weather对象的数组,用于为Adapter适配器提供显示数据的数据源。
ArrayAdapter的getView方法被重写了。这个方法将被ListView每个 item项调用来创建视图View,它们的属性是我们设置的。getView方法也使用了一个临时的holder类(在WeatherAdapter类内部声明的内部类),这个类将被用于缓存ImageView和TextView,以便它们能够被ListView中的每行重用,这也会为我们带来巨大的性能的提升,由于我们不断地访问两个相同的views(ImageView和TextView)的属性,我们不必为每个ListView的Item查找这两个控件。上面的代码也是用了Android内置的LayoutInflator来解析xml布局文件(用于动态加载xml布局文件,以便能够查找其中的内容)。
最后一点代码是我们应用的MainActivity。里面,我们使用了所有上面声明的对象。下面是MainActivity.java文件的代码:
MainActivity.java文件:
2 public class MainActivity extends Activity {
3
4 private ListView listView1;
5
6 @Override
7 public void onCreate(Bundle savedInstanceState) {
8 super.onCreate(savedInstanceState);
9 setContentView(R.layout.main);
10
11 Weather weather_data[] = new Weather[]
12 {
13 new Weather(R.drawable.weather_cloudy, "Cloudy"),
14 new Weather(R.drawable.weather_showers, "Showers"),
15 new Weather(R.drawable.weather_snow, "Snow"),
16 new Weather(R.drawable.weather_storm, "Storm"),
17 new Weather(R.drawable.weather_sunny, "Sunny")
18 };
19
20 WeatherAdapter adapter = new WeatherAdapter(this,
21 R.layout.listview_item_row, weather_data);
22
23
24 listView1 = (ListView)findViewById(R.id.listView1);
25
26 View header = (View)getLayoutInflater().inflate(R.layout.listview_header_row, null);
27 listView1.addHeaderView(header);
28
29 listView1.setAdapter(adapter);
30 }
MainActivity.java文件中有几个需要解释下的地方,以便你能更好的理解。首先,我们创建了一个Weather对象的数组,icon和title被作为参数传递给了它的构造函数;接下来,WeatherAdapter对象被创建,listview_item_row.xml文件的id和Weather对象数组被传递给了它的构造函数。再一次,我们使用了Android的LayoutInflator来解析listview_item_row.xml布局文件。通过ListView的addHeaderView方法设置ListView的header信息。最后,我们传递定制的Adapter给ListView的setAdapter方法。到现在就可以构建、运行工程了。如果一切实现正确,你会看到下面的内容。
图2. 运行效果
最近有一段时间没写东西了,真是罪过啊!翻译之中有不当之处在所难免,大家相互学习。尊重原创,尊重知识,相信分享的力量!
项目中经常会遇到找回密码的功能,现在找回密码一般都是用手机接收验证码,为了防止多次发送,一般需要设置一个发送间隔,比如60秒。为了让用户更加清楚的感受到这个间隔,于是就出现了倒计时功能.如下图:
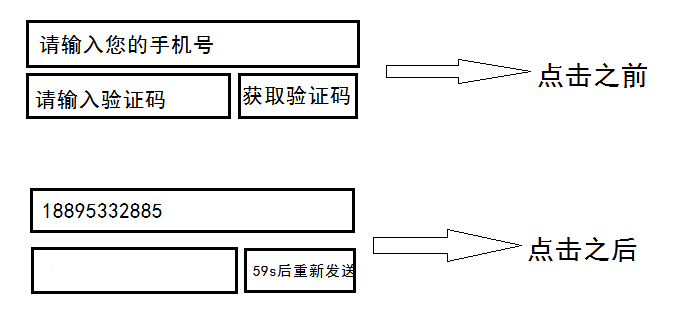 点击之后,获取验证码的那个TextView或者Button变为不可点击,并且它的的text就要每秒变化一次,59,58,57…到最后一秒之后,text重新变为点击获取验证码,而且变为可点击.
看了一些前辈写的倒计时,都是用Handler和TimerTask来实现,然后我发现了一个更加简单的,Android自带的类来写这个功能.
接下来我就以一个简单的例子来实现这个功能。
1、activity_main.XML,为一个Button即可.
<RelativeLayout xmlns:android=”http://schemas.android.com/apk/res/android”
xmlns:tools=”http://schemas.android.com/tools”
android:layout_width=”match_parent”
android:layout_height=”match_parent”
>
<Button
android:textSize=”25dp”
android:id=”@+id/btn_get”
android:layout_width=”fill_parent”
android:layout_height=”fill_parent”
android:text=”点击获取验证码” />
</RelativeLayout>
2、MainActivity.java,既为重头戏,又极为简单.
package com.example.rr;
import android.app.Activity;
import android.graphics.Color;
import android.os.Bundle;
import android.os.CountDownTimer;
import android.util.Log;
import android.view.View;
import android.view.View.OnClickListener;
import android.widget.Button;
public class MainActivity extends Activity {
private Button mButton;//定义一个Button
@Override
protected void onCreate(Bundle savedInstanceState) {
super.onCreate(savedInstanceState);
setContentView(R.layout.activity_main);
mButton=(Button) findViewById(R.id.btn_get);//←←获取按钮ID
//设置监听↓↓
mButton.setOnClickListener(new OnClickListener() {
@Override
public void onClick(View v) {
// TODO Auto-generated method stub
mButton.setClickable(false);
mButton.setTextColor(Color.parseColor(“#FF0000″));
MyTimer myTimer=new MyTimer(5000, 1000);//定义MyTimer的对象
myTimer.start();//启动倒计时
}});
}
private class MyTimer extends CountDownTimer{
//millisInFuture为你设置的此次倒计时的总时长,比如60秒就设置为60000
//countDownInterval为你设置的时间间隔,比如一般为1秒,根据需要自定义。
public MyTimer(long millisInFuture, long countDownInterval) {
super(millisInFuture, countDownInterval);
// TODO Auto-generated constructor stub
}@Override
public void onTick(long millisUntilFinished) {
// TODO Auto-generated method stub
mButton.setText(millisUntilFinished/1000+”秒后重新获取”);
}
//每过你规定的时间间隔做的操作↑↑
//倒计时结束时做的操作↓↓
@Override
public void onFinish() {
// TODO Auto-generated method stub
mButton.setClickable(true);
mButton.setTextColor(Color.parseColor(“#000000”));
mButton.setText(“点击获取验证码”);
}}}
在各个关键点我也做了标注,下面是我给大家录的gif.
timer
大家可以发现有2个问题:
1、在1秒的时候,会停顿大约两秒,这样就给了用户不太好的体验,还以为是手机卡了.为什么会出现这种问题呢?
2、点击Button时,出现的是数字4而不是数字5。
首先我们得知道这种方法的原理是什么,大家先看一下CountDownTimer的源码:
首先大家看一下这句: mStopTimeInFuture = SystemClock.elapsedRealtime() + mMillisInFuture;
再看下下面的这句: final long millisLeft = mStopTimeInFuture – SystemClock.elapsedRealtime();
(注意:SystemClock.elapsedRealtime()返回的是系统运行到现在的时间,每时每刻都在变化);
如果简单的进行数学计算的话,那么一开始mStopTimeInFuture是等于millisLeft的,但是不然,SystemClock.elapsedRealtime()返回的时间,以毫秒为单位,也就是说,从上面运行到下面,也消耗了些许时间,那么millisLeft就是小于5000的。
回到我们的Activity,我们在内部类的OnTick里写了什么?
mButton.setText(millisUntilFinished/1000+”秒后重新获取”);那么4900多除以1000后,返回的数值为4。
解决方案:
在我们实例化MyTimer时,将5000改为6000.
至于在1秒处停顿的情况,我们看一下最下面的if else 语句:
if (millisLeft <= 0) {
onFinish();
} else if (millisLeft < mCountdownInterval) {
// no tick, just delay until done
sendMessageDelayed(obtainMessage(MSG), millisLeft);
} else {
long lastTickStart = SystemClock.elapsedRealtime();
onTick(millisLeft);
在 else if 语句处,当millisLeft<mCountdownInterval=1000,时,只进行停顿,而不调用OnTick方法,也就是说,我们运行程序时,millisLeft的数值从4900多~3900~2900~1900~900,900的时候,运行到这里,就会停顿,而不显示我们在OnTick写的代码.
解决方案:
重写CountDownTimer类。
然后,
1、在else if 中加OnTick(millisLeft);
2、删掉这个if else 语句
OK,我在重写类之后,将if else 语句改为下面的时候,依旧可以完成倒计时功能:
if (millisLeft <= 0) {
onFinish();
} else {
onTick(millisLeft);
sendMessageDelayed(obtainMessage(MSG), 1000);
}
效果gif如下:

是不是写这个类的大牛想复杂了,还是我这个方法有问题呢?有知道的道友可以联系我~万分感谢!
PS:写这个文章浪费了快一下午,原因是网速不好,快写完了,保存草稿,然后出现意外,导致没保存,所以,,,,但是还是希望得到各位的建议和鼓励,谢谢!
相关文章
- 我们经常看到有很多的垂直时间轴用来记录事件进展,而有朋友问我要求分享水平的时间轴,其实水平时间轴的难点在于自适应屏幕尺寸。那么 今天我要给大家分享的是一款支持响应式、支持触屏手势滑动的水平时间轴...2015-12-21
- 这篇文章主要介绍了CSS中position属性之fixed实现div居中的相关资料,需要的朋友可以参考下...2015-12-16
- 这是一款很实用的jQuery焦点图动画插件,跟其他jQuery焦点图插件不同的是,它带有一个水平的滑杆,你可以通过滑动滑杆实现图片的切换,也可以通过点击图片来切换...2016-03-10
- 这篇文章主要介绍了Python 对Excel求和、合并居中的操作,具有很好的参考价值,希望对大家有所帮助。一起跟随小编过来看看吧...2021-03-16
- 水平线对于制作网页的朋友来说一定不会陌生,它在网页的版式设计中是非常有作用的,可以用来分隔文本和对象。在Dreamweaver中依次点击“插入→标准”,然后单击“水...2016-09-20
- <!DOCTYPE html PUBLIC "-//W3C//DTD XHTML 1.0 Transitional//EN" "http://www.w3.org/TR/xhtml1/DTD/xhtml1-transitional.dtd"> <html xmlns="http://www.w3.org/1...2016-09-20
Swift实现页面元素的绝对定位(水平居中,垂直居中,右上角等等)
页面元素的绝对定位许多朋友会想到是css定位了,做手机开发的也需要定位了,我们下面来看一篇Swift实现页面元素的绝对定位(水平居中,垂直居中,右上角等等)的教程,具体的细节如...2016-09-20css利用vertical-align:middle设置图片在div居中
以前我们都是用表格来解决这个问题,今天发现一个可以利用css中的两个属性就能搞定了一个是vertical-align:middle 另一个是display:table-cell有需要的朋友参考一下。...2017-07-06- 2007-07-24的文章 转自http://www.111cn.net/13013/viewspace_12473.html 以下仅供参考,在中国社会环境错综复杂,不同级别的人拿得是相同工资很普遍.高薪关...2016-11-25
- 这篇文章主要介绍了几种css垂直居中的方法,具有一定的参考价值,希望能帮助到有需要的同学 直接进入主题! 一、脱离文档流元素的居中 方法一:margin:auto法 CSS代码:...2017-01-22
- 本文是小编日常遇到的关于html水平垂直居中的一些问题小结,特此分享在脚本之家网站供大家参考...2015-12-16
- 今天小编在这里就来给美图秀秀的这一款软件的使用者们来说下微信头像右上角数字的制作方法,各位想知道具体制作方法的,那么下面就快来跟着小编一起看下教程吧。 给...2016-09-14
- 本文章来给各位同学介绍Android中TextView文字居中与垂直靠左居中设置方法,如果你还是入门级别的androider不防进入参考一下。 有2种方法可以设置TextView文字居中...2016-09-20
- 这篇文章主要介绍了jQuery代码实现对话框右上角菜单带关闭× 的相关资料,需要的朋友可以参考下...2016-05-05
- 在学习的过程中,我希望能够得到css的导航栏也能够居中的效果 但是,使用普通的text-align:center; 不起作用,经过在网上搜索 在经典论坛得到链接,uk的cssplay网站...2017-07-06
- margin居中我们只要定义auto即可了,但是在ie浏览器中有朋友会发现margin居中没有用了,那么IE的margin居中问题要如何来处理呢,下面我们来看看。 自从开始使用vim写wi...2016-09-14
- 垂直居中我们以前可能会用到50%这种办法来实现但是发现兼容性不是很好,下面来为各位总结多种DIV垂直居的完美方法。 利用 CSS 来实现对象的垂直居中有许多不同的方...2016-09-14