Tomcat源码解析之Web请求与处理
前言
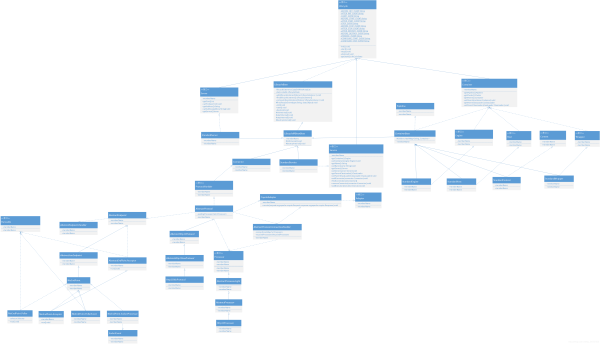
Tomcat最全UML类图
Tomcat请求处理过程:
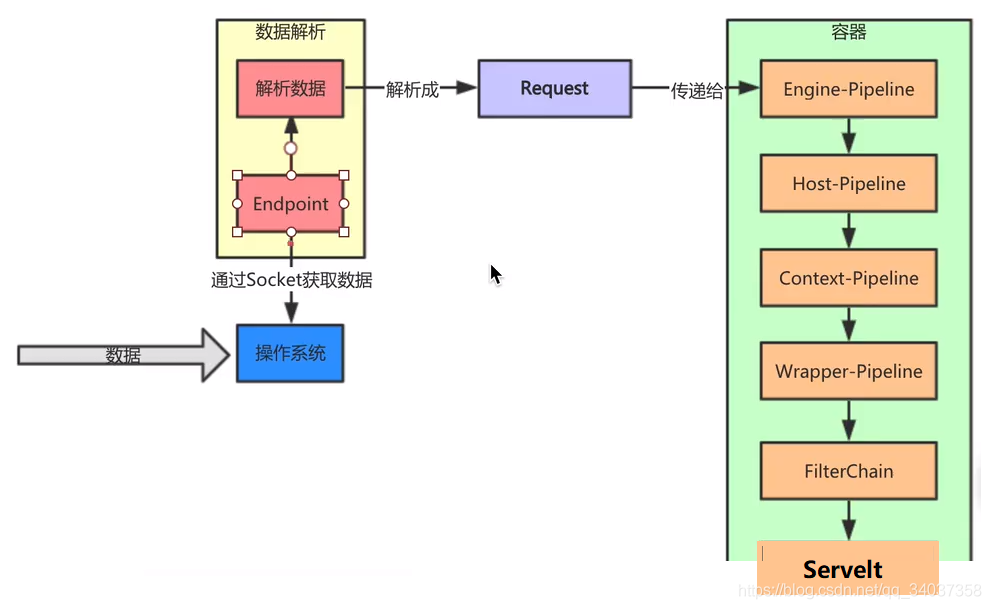
Connector对象创建的时候,会创建Http11NioProtocol的ProtocolHandler,在Connector的startInteral方法中,会启动AbstractProtocol,AbstractProtocol启动NioEndPoint进行监听客户端的请求,EndPoint接受到客户端的请求之后,会交给Container去处理请求。请求从Engine开始经过的所有容器都含有责任链模式,每经过一个容器都会调用该容器的责任链对请求进行处理。

一、EndPoint

默认的EndPoint实现是NioEndPoint,NioEndPoint有四个内部类,分别是Poller、Acceptor、PollerEvent、SocketProcessor、NioSocketWrapper。
(1)Acceptor负责监听用户的请求,监听到用户请求之后,调用getPoller0().register(channel);先将当前请求封装成PollerEvent,new PollerEvent(socket, ka, OP_REGISTER); 将当前请求,封装成注册事件,并添加到PollerEvent队列中,然后将PollerEvent注册到Poller的Selector对象上面。
(2)Poller线程会一直遍历可以处理的事件(netty的selestor),当找到需要处理的事件之后,调用processKey(sk, socketWrapper);对,执行要处理的PollerEvent的run方法,对请求进行处理。
(3)PollerEvent继承自Runnable接口,在其run方法里面,如果是PollerEvent的事件是注册OP_REGISTER,那么就将当前的socket注册到Poller的selector上。
 public void run() {
            if (interestOps == OP_REGISTER) {
                try {
                	// 核心代码,终于找到了!!!!!
                    // 当事件是注册的时候,将当前的NioSocketChannel注册到Poller的Selector上。
                    socket.getIOChannel().register(
                            socket.getPoller().getSelector(), SelectionKey.OP_READ, socketWrapper);
                } catch (Exception x) {
                    log.error(sm.getString("endpoint.nio.registerFail"), x);
                }
            } else {
                final SelectionKey key = socket.getIOChannel().keyFor(socket.getPoller().getSelector());
                try {
                    if (key == null) {

                        // The key was cancelled (e.g. due to socket closure)
                        // and removed from the selector while it was being
                        // processed. Count down the connections at this point
                        // since it won't have been counted down when the socket
                        // closed.
                        // SelectionKey被取消的时候需要将SelectionKey对应的EndPoint的Connection计数器,减一
                        socket.socketWrapper.getEndpoint().countDownConnection();
                        ((NioSocketWrapper) socket.socketWrapper).closed = true;
                    } else {
                        final NioSocketWrapper socketWrapper = (NioSocketWrapper) key.attachment();
                        if (socketWrapper != null) {
                            //we are registering the key to start with, reset the fairness counter.
                            int ops = key.interestOps() | interestOps;
                            socketWrapper.interestOps(ops);
                            key.interestOps(ops);
                        } else {
                            socket.getPoller().cancelledKey(key);
                        }
                    }
                } catch (CancelledKeyException ckx) {
                    try {
                        socket.getPoller().cancelledKey(key);
                    } catch (Exception ignore) {
                    }
                }
            }
        }
(4)Poller线程内会执行keyCount = selector.select(selectorTimeout);获取当前需要处理的SelectionKey的数量,然后当keyCount大于0时,会获取selector的迭代器,遍历所有需要的selectionkey,并对其进行处理。在这里将socket的事件封装成NioSocketWrapper。
// 得到selectedKeys的迭代器
Iterator<SelectionKey> iterator =
         keyCount > 0 ? selector.selectedKeys().iterator() : null;

 // 遍历所有的SelectionKey,并对其进行处理
 while (iterator != null && iterator.hasNext()) {
     SelectionKey sk = iterator.next();
     iterator.remove();
     NioSocketWrapper socketWrapper = (NioSocketWrapper) sk.attachment();
     // Attachment may be null if another thread has called
     // cancelledKey()
     // 如果有attachment,就处理
     if (socketWrapper != null) {
         // 处理事件
         processKey(sk, socketWrapper);
     }
 }
processKey在处理SelectionKey,如果当前Poller已经关闭,就取消key。SelectionKey对应的Channel如果发生读事件,就调用AbatractEndPoint.processSocket执行读操作processSocket(attachment, SocketEvent.OPEN_READ, true),如果SelectionKey对应的Channel发生写事件,就执行processSocket(attachment, SocketEvent.OPEN_WRITE, true);读大于写。socket的事件处理调用的是AbatractEndPoint的processSocket方法。
protected void processKey(SelectionKey sk, NioSocketWrapper attachment) {
	     try {
	         if (close) {
	             // 如果Poller已经关闭了,就取消key
	             cancelledKey(sk);
	         } else if (sk.isValid() && attachment != null) {
	             if (sk.isReadable() || sk.isWritable()) {
	                 if (attachment.getSendfileData() != null) {
	                     processSendfile(sk, attachment, false);
	                 } else {
	                     unreg(sk, attachment, sk.readyOps());
	                     boolean closeSocket = false;
	                     // Read goes before write
	                     // 读优于写
	                     // 如果SelectionKey对应的Channel已经准备好了读
	                     // 就对NioSocketWrapper进行读操作
	                     if (sk.isReadable()) {
	                         if (!processSocket(attachment, SocketEvent.OPEN_READ, true)) {
	                             closeSocket = true;
	                         }
	                     }
	                     // 如果SelectionKey对应的Channel已经准备好了写
	                     // 就对NioSocketWrapper进行写操作
	                     if (!closeSocket && sk.isWritable()) {
	                         if (!processSocket(attachment, SocketEvent.OPEN_WRITE, true)) {
	                             closeSocket = true;
	                         }
	                     }
	                     if (closeSocket) {
	                         // 如果已经关闭了,就取消key
	                         cancelledKey(sk);
	                     }
	                 }
	             }

}
AbatractEndPoint.processSocket方法首先从缓存中获取SocketProcessor类,如果缓存中没有就创建一个,SocketProcessorBase接口对应的就是NioEndPoint.SocketProcessor,也就是Worker。将对应的SocketProcessor类放入到线程池中执行。
 public boolean processSocket(SocketWrapperBase<S> socketWrapper,
                                 SocketEvent event, boolean dispatch) {

	// 得到socket的处理器
	// Connector在构造函数里面已经指定了协议:org.apache.coyote.http11.Http11NioProtocol。
	SocketProcessorBase<S> sc = processorCache.pop();
	if (sc == null) {
	// 如果没有,就创建一个Socket的处理器。创建的时候指定socketWrapper以及socket的事件。
	    sc = createSocketProcessor(socketWrapper, event);
	} else {
	    sc.reset(socketWrapper, event);
	}
	//socket的处理交给了线程池去处理。
	Executor executor = getExecutor();
	if (dispatch && executor != null) {
	    executor.execute(sc);
	} else {
	    sc.run();
	}
(5)NioEndPoint.NioSocketWrapper,是Socket的封装类,增强类,将Socket与其他对象建立关联。
 public static class NioSocketWrapper extends SocketWrapperBase<NioChannel> {
 		private final NioSelectorPool pool;

        private Poller poller = null; // 轮询的Poller
        private int interestOps = 0;
        private CountDownLatch readLatch = null;
        private CountDownLatch writeLatch = null;
        private volatile SendfileData sendfileData = null;
        private volatile long lastRead = System.currentTimeMillis();
        private volatile long lastWrite = lastRead;
        private volatile boolean closed = false;
(6)NioEndPoint.SocketProcessor(Worker)继承了Runnable接口,负责对socket的g各种事件进行处理。读事件、写事件、停止时间、超时事件、断连事件、错误时间、连接失败事件。

SocketProcessor的doRun方法,会根据SocketState进行处理,SocketState 为STOP、DISCONNECT或者ERROR的时候就进行关闭,SocketWrapperBase对应的selector事件,得到指定的Handler处理器进行处理。
@Override
 protected void doRun() {
     NioChannel socket = socketWrapper.getSocket();
     SelectionKey key = socket.getIOChannel().keyFor(socket.getPoller().getSelector());

     try {
         int handshake = -1;

         try {
             if (key != null) {
                 if (socket.isHandshakeComplete()) {
                     // 是否已经握手成功,不需要TLS(加密)握手,就让处理器对socket和event的组合进行处理。
                     handshake = 0;
                 } else if (event == SocketEvent.STOP || event == SocketEvent.DISCONNECT ||
                         event == SocketEvent.ERROR) {
                     // 不能够完成TLS握手,就把他认为是TLS握手失败。
                     handshake = -1;
                 } else {
                     handshake = socket.handshake(key.isReadable(), key.isWritable());
                     // The handshake process reads/writes from/to the
                     // socket. status may therefore be OPEN_WRITE once
                     // the handshake completes. However, the handshake
                     // happens when the socket is opened so the status
                     // must always be OPEN_READ after it completes. It
                     // is OK to always set this as it is only used if
                     // the handshake completes.
                     // 握手从/向socket读/写时,握手一旦完成状态应该为OPEN_WRITE,
                     // 握手是在套接字打开时发生的,因此在完成后状态必须始终为OPEN_READ
                     // 始终设置此选项是可以的,因为它仅在握手完成时使用。
                     event = SocketEvent.OPEN_READ;
                 }
             }
         } catch (IOException x) {
             handshake = -1;
             if (log.isDebugEnabled()) log.debug("Error during SSL handshake", x);
         } catch (CancelledKeyException ckx) {
             handshake = -1;
         }
         if (handshake == 0) {
             SocketState state = SocketState.OPEN;
             // Process the request from this socket
             if (event == null) {
                 // 调用处理器进行处理。
                 // NioEndPoint的默认Handler是Http11的
                 // 这里的Handler是AbstractProtocol.ConnectionHandler
                 // 这个Handler的设置方法是:
                 // 首先在Connector类的构造函数中,将默认的ProtocolHandler设置为org.apache.coyote.http11.Http11NioProtocol
                 // AbstractHttp11Protocol的构造函数里面创建了Handler类ConnectionHandler
                 state = getHandler().process(socketWrapper, SocketEvent.OPEN_READ);
             } else {
                 state = getHandler().process(socketWrapper, event);
             }
             // 如果返回的状态是SocketState,那么就关掉连接
             if (state == SocketState.CLOSED) {
                 close(socket, key);
             }
         } else if (handshake == -1) {
             getHandler().process(socketWrapper, SocketEvent.CONNECT_FAIL);
             close(socket, key);
         } else if (handshake == SelectionKey.OP_READ) {
             // 如果是SelectionKey.OP_READ,也就是读事件的话,就将OP_READ时间设置到socketWrapper
             socketWrapper.registerReadInterest();
         } else if (handshake == SelectionKey.OP_WRITE) {
             // 如果是SelectionKey.OP_WRITE,也就是读事件的话,就将OP_WRITE事件设置到socketWrapper
             socketWrapper.registerWriteInterest();
         }
二、ConnectionHandler
(1)ConnectionHandler用于根据Socket连接找到相应的Engine处理器。
上面是SocketProcessor的doRun方法,执行了getHandler().process(socketWrapper, SocketEvent.OPEN_READ);;process方法是首先在Map缓存中查找当前socket是否存在对应的processor,如果不存在,再去可循环的处理器栈中查找是否存在,如果不存在就创建相应的Processor,然后将新创建的Processor与Socket建立映射,存在connection的Map中。在任何一个阶段得到Processor对象之后,会执行processor的process方法state = processor.process(wrapper, status);
protected static class ConnectionHandler<S> implements AbstractEndpoint.Handler<S> {

        private final AbstractProtocol<S> proto;
        private final RequestGroupInfo global = new RequestGroupInfo();
        private final AtomicLong registerCount = new AtomicLong(0);
        // 终于找到了这个集合,给Socket和处理器建立连接
        // 对每个有效链接都会缓存进这里,用于连接选择一个合适的Processor实现以进行请求处理。
        private final Map<S, Processor> connections = new ConcurrentHashMap<>();
        // 可循环的处理器栈
        private final RecycledProcessors recycledProcessors = new RecycledProcessors(this);


  		@Override
        public SocketState process(SocketWrapperBase<S> wrapper, SocketEvent status) {
            if (getLog().isDebugEnabled()) {
                getLog().debug(sm.getString("abstractConnectionHandler.process",
                        wrapper.getSocket(), status));
            }
            if (wrapper == null) {
                // wrapper == null 表示Socket已经被关闭了,所以不需要做任何操作。
                return SocketState.CLOSED;
            }
            // 得到wrapper内的Socket对象
            S socket = wrapper.getSocket();
            // 从Map缓冲区中得到socket对应的处理器。
            Processor processor = connections.get(socket);
            if (getLog().isDebugEnabled()) {
                getLog().debug(sm.getString("abstractConnectionHandler.connectionsGet",
                        processor, socket));
            }

            // Timeouts are calculated on a dedicated thread and then
            // dispatched. Because of delays in the dispatch process, the
            // timeout may no longer be required. Check here and avoid
            // unnecessary processing.

            // 超时是在专用线程上计算的,然后被调度。
            // 因为调度过程中的延迟,可能不再需要超时。检查这里,避免不必要的处理。
            if (SocketEvent.TIMEOUT == status &&
                    (processor == null ||
                            !processor.isAsync() && !processor.isUpgrade() ||
                            processor.isAsync() && !processor.checkAsyncTimeoutGeneration())) {
                // This is effectively a NO-OP
                return SocketState.OPEN;
            }
            // 如果Map缓存存在该socket相关的处理器
            if (processor != null) {
                // Make sure an async timeout doesn't fire
                // 确保没有触发异步超时
                getProtocol().removeWaitingProcessor(processor);
            } else if (status == SocketEvent.DISCONNECT || status == SocketEvent.ERROR) {
                // Nothing to do. Endpoint requested a close and there is no
                // longer a processor associated with this socket.
                // SocketEvent事件是关闭,或者SocketEvent时间出错,此时不需要做任何操作。
                // Endpoint需要一个CLOSED的信号,并且这里不再有与这个socket有关联了
                return SocketState.CLOSED;
            }

            ContainerThreadMarker.set();

            try {
                // Map缓存不存在该socket相关的处理器
                if (processor == null) {
                    String negotiatedProtocol = wrapper.getNegotiatedProtocol();
                    // OpenSSL typically returns null whereas JSSE typically
                    // returns "" when no protocol is negotiated
                    // OpenSSL通常返回null,而JSSE通常在没有协议协商时返回""
                    if (negotiatedProtocol != null && negotiatedProtocol.length() > 0) {
                        // 获取协商协议
                        UpgradeProtocol upgradeProtocol = getProtocol().getNegotiatedProtocol(negotiatedProtocol);
                        if (upgradeProtocol != null) {
                            // 升级协议为空
                            processor = upgradeProtocol.getProcessor(wrapper, getProtocol().getAdapter());
                            if (getLog().isDebugEnabled()) {
                                getLog().debug(sm.getString("abstractConnectionHandler.processorCreate", processor));
                            }
                        } else if (negotiatedProtocol.equals("http/1.1")) {
                            // Explicitly negotiated the default protocol.
                            // Obtain a processor below.
                        } else {
                            // TODO:
                            // OpenSSL 1.0.2's ALPN callback doesn't support
                            // failing the handshake with an error if no
                            // protocol can be negotiated. Therefore, we need to
                            // fail the connection here. Once this is fixed,
                            // replace the code below with the commented out
                            // block.
                            if (getLog().isDebugEnabled()) {
                                getLog().debug(sm.getString("abstractConnectionHandler.negotiatedProcessor.fail",
                                        negotiatedProtocol));
                            }
                            return SocketState.CLOSED;
                            /*
                             * To replace the code above once OpenSSL 1.1.0 is
                             * used.
                            // Failed to create processor. This is a bug.
                            throw new IllegalStateException(sm.getString(
                                    "abstractConnectionHandler.negotiatedProcessor.fail",
                                    negotiatedProtocol));
                            */
                        }
                    }
                }
                // 经过上面的操作,processor还是null的话。
                if (processor == null) {
                    // 从recycledProcessors可循环processors中获取processor
                    processor = recycledProcessors.pop();
                    if (getLog().isDebugEnabled()) {
                        getLog().debug(sm.getString("abstractConnectionHandler.processorPop", processor));
                    }
                }
                if (processor == null) {
                    // 创建处理器
                    processor = getProtocol().createProcessor();
                    register(processor);
                    if (getLog().isDebugEnabled()) {
                        getLog().debug(sm.getString("abstractConnectionHandler.processorCreate", processor));
                    }
                }
                processor.setSslSupport(
                        wrapper.getSslSupport(getProtocol().getClientCertProvider()));

                // 将socket和processor建立关联。
                connections.put(socket, processor);

                SocketState state = SocketState.CLOSED;
                do {
                    // 调用processor的process方法。
                    state = processor.process(wrapper, status);

                    // processor的process方法返回升级状态
                    if (state == SocketState.UPGRADING) {
                        // Get the HTTP upgrade handler
                        // 得到HTTP的升级句柄
                        UpgradeToken upgradeToken = processor.getUpgradeToken();
                        // Retrieve leftover input
                        // 检索剩余输入
                        ByteBuffer leftOverInput = processor.getLeftoverInput();
                        if (upgradeToken == null) {
                            // Assume direct HTTP/2 connection
                            UpgradeProtocol upgradeProtocol = getProtocol().getUpgradeProtocol("h2c");
                            if (upgradeProtocol != null) {
                                // Release the Http11 processor to be re-used
                                release(processor);
                                // Create the upgrade processor
                                processor = upgradeProtocol.getProcessor(wrapper, getProtocol().getAdapter());
                                wrapper.unRead(leftOverInput);
                                // Associate with the processor with the connection
                                connections.put(socket, processor);
                            } else {
                                if (getLog().isDebugEnabled()) {
                                    getLog().debug(sm.getString(
                                            "abstractConnectionHandler.negotiatedProcessor.fail",
                                            "h2c"));
                                }
                                // Exit loop and trigger appropriate clean-up
                                state = SocketState.CLOSED;
                            }
                        } else {
                            HttpUpgradeHandler httpUpgradeHandler = upgradeToken.getHttpUpgradeHandler();
                            // Release the Http11 processor to be re-used
                            release(processor);
                            // Create the upgrade processor
                            processor = getProtocol().createUpgradeProcessor(wrapper, upgradeToken);
                            if (getLog().isDebugEnabled()) {
                                getLog().debug(sm.getString("abstractConnectionHandler.upgradeCreate",
                                        processor, wrapper));
                            }
                            wrapper.unRead(leftOverInput);
                            // Associate with the processor with the connection
                            connections.put(socket, processor);
                            // Initialise the upgrade handler (which may trigger
                            // some IO using the new protocol which is why the lines
                            // above are necessary)
                            // This cast should be safe. If it fails the error
                            // handling for the surrounding try/catch will deal with
                            // it.
                            if (upgradeToken.getInstanceManager() == null) {
                                httpUpgradeHandler.init((WebConnection) processor);
                            } else {
                                ClassLoader oldCL = upgradeToken.getContextBind().bind(false, null);
                                try {
                                    httpUpgradeHandler.init((WebConnection) processor);
                                } finally {
                                    upgradeToken.getContextBind().unbind(false, oldCL);
                                }
                            }
                        }
                    }
                } while (state == SocketState.UPGRADING);
(2)以Http11协议为例,执行的是Http11Processor,Http11Processor的祖父类AbstractProcessorLight实现了process方法,process调用了service模板方法,service模板方法是由Http11Processor进行实现的。service方法最重要的操作是执行getAdapter().service(request, response);
@Override
    public SocketState service(SocketWrapperBase<?> socketWrapper)
            throws IOException {
		// 上面省略n行
		// 调用Coyote的service方法
		 getAdapter().service(request, response);
		 // 下面省略n行
三、Coyote
回顾一下CoyoteAdapter的创建是在Connector的initInternal方法。
@Override
    public SocketState service(SocketWrapperBase<?> socketWrapper)
            throws IOException {
		// 上面省略n行
		// 调用Coyote的service方法
		 getAdapter().service(request, response);
		 // 下面省略n行
Coyote的作用就是coyote.Request和coyote.Rsponse转成HttpServletRequest和HttpServletRsponse。然后,因为Connector在init的时候,将自己注入到了CoyoteAdapter中,所以,直接通过connector.getService()方法就可以拿到Service,然后从Service开始调用责任链模式,进行处理。
@Override
    public SocketState service(SocketWrapperBase<?> socketWrapper)
            throws IOException {
		// 上面省略n行
		// 调用Coyote的service方法
		 getAdapter().service(request, response);
		 // 下面省略n行
四、容器责任链模式
接下来就是从StandradEngine开始的责任链模式。首先执行StandradEngine的责任链模式,找到合适的Engine,合适的Engine在通过责任链模式找到合适的Context,直到找到StandardWrapperValve。最后执行到StandardWrapperValve的invoke方法。首先查看Context和Wrapper是不是不可用了,如果可用,并且Servelt还没有被初始化,就执行初始化操作。如果是单线程模式就直接返回之前创建好的Servelt,如果是多线程模式,就先创建一个Servelt对象进行返回。
@Override
    public final void invoke(Request request, Response response)
            throws IOException, ServletException {
        // 初始化我们需要的本地变量
        boolean unavailable = false;
        Throwable throwable = null;
        // This should be a Request attribute...
        long t1 = System.currentTimeMillis();
        // 原子类AtomicInteger,CAS操作,表示请求的数量。
        requestCount.incrementAndGet();
        StandardWrapper wrapper = (StandardWrapper) getContainer();
        Servlet servlet = null;
        Context context = (Context) wrapper.getParent();

        // 检查当前的Context应用是否已经被标注为不可以使用
        if (!context.getState().isAvailable()) {
            // 如果当前应用不可以使用的话,就报503错误。
            response.sendError(HttpServletResponse.SC_SERVICE_UNAVAILABLE,
                    sm.getString("standardContext.isUnavailable"));
            unavailable = true;
        }

        // 检查Servelt是否被标记为不可使用
        if (!unavailable && wrapper.isUnavailable()) {
            container.getLogger().info(sm.getString("standardWrapper.isUnavailable",
                    wrapper.getName()));
            long available = wrapper.getAvailable();
            if ((available > 0L) && (available < Long.MAX_VALUE)) {
                response.setDateHeader("Retry-After", available);
                response.sendError(HttpServletResponse.SC_SERVICE_UNAVAILABLE,
                        sm.getString("standardWrapper.isUnavailable",
                                wrapper.getName()));
            } else if (available == Long.MAX_VALUE) {
                response.sendError(HttpServletResponse.SC_NOT_FOUND,
                        sm.getString("standardWrapper.notFound",
                                wrapper.getName()));
            }
            unavailable = true;
        }
        // Servelt是第一次调用的时候初始化
        try {
            if (!unavailable) {
                // 如果此时Servelt还没有被初始化,就分配一个Servelt实例来处理request请求。
                servlet = wrapper.allocate();
            }
        /// 省略代码..........................................
        // // 给该request创建Filter过滤链。Filter过滤链执行完之后,会执行Servelt
        ApplicationFilterChain filterChain =
                ApplicationFilterFactory.createFilterChain(request, wrapper, servlet);

        // Call the filter chain for this request
        // NOTE: This also calls the servlet's service() method
        try {
            if ((servlet != null) && (filterChain != null)) {
                // Swallow output if needed
                if (context.getSwallowOutput()) {
                    try {
                        SystemLogHandler.startCapture();
                        if (request.isAsyncDispatching()) {
                            request.getAsyncContextInternal().doInternalDispatch();
                        } else {
                            // 调用过滤链
                            filterChain.doFilter(request.getRequest(),
                                    response.getResponse());
                        }
        /// 省略代码..........................................
到此这篇关于Tomcat源码解析之Web请求与处理的文章就介绍到这了,更多相关Tomcat的Web请求与处理内容请搜索猪先飞以前的文章或继续浏览下面的相关文章希望大家以后多多支持猪先飞!
相关文章
- 这篇文章主要介绍了Tomcat配置及如何在Eclipse中启动,本文给大家介绍的非常详细,对大家的学习或工作具有一定的参考借鉴价值,需要的朋友可以参考下...2021-02-04
Jenkins+tomcat自动发布的热部署/重启及遇到的问题解决办法(推荐)
这篇文章主要介绍了Jenkins+tomcat自动发布的热部署/重启及遇到的问题解决办法,本文给大家介绍的非常详细,对大家的学习或工作具有一定的参考借鉴价值,需要的朋友可以参考下...2020-07-10- 过滤器Filter是定义于tomcat的servlet-api.jar中的一个接口,接口路径为javax.servlet.Filter。tomcat过滤器采用了典型的过滤器设计模式,过滤器链FilterChain由tomcat维持,链条是可以支持多个过滤器的...2021-06-26
tomcat启动完成执行 某个方法 定时任务(Spring)操作
这篇文章主要介绍了tomcat启动完成执行 某个方法 定时任务(Spring)操作,具有很好的参考价值,希望对大家有所帮助。一起跟随小编过来看看吧...2020-09-25使用Maven 搭建 Spring MVC 本地部署Tomcat的详细教程
这篇文章主要介绍了使用Maven 搭建 Spring MVC 本地部署Tomcat,本文通过图文并茂的形式给大家介绍的非常详细,对大家的学习或工作具有一定的参考借鉴价值,需要的朋友可以参考下...2021-08-16- 这篇文章主要介绍了Tomcat正常访问localhost报404问题解决,文中通过示例代码介绍的非常详细,对大家的学习或者工作具有一定的参考学习价值,需要的朋友们下面随着小编来一起学习学习吧...2021-03-31
- 这篇文章主要介绍了Tomcat首次部署web项目流程图解,文中通过示例代码介绍的非常详细,对大家的学习或者工作具有一定的参考学习价值,需要的朋友可以参考下...2020-12-11
idea2020.3配置maven环境并配置Tomcat的详细教程
这篇文章主要介绍了idea2020.3配置maven环境并配置Tomcat的详细教程,本文通过图文并茂的形式给大家介绍的非常详细,对大家的学习或工作具有一定的参考借鉴价值,需要的朋友可以参考下...2021-03-19Tomcat中catalina.bat设置为UTF-8控制台出现乱码
这篇文章主要介绍了Tomcat中catalina.bat设置为UTF-8控制台出现乱码,文中通过示例代码介绍的非常详细,对大家的学习或者工作具有一定的参考学习价值,需要的朋友们下面随着小编来一起学习学习吧...2021-03-31- 这篇文章主要给大家介绍了关于Tomcat将配置文件放在外部的相关资料,对平时工作来说还是挺实用的,需要的朋友们下面随着小编一起来看看吧...2021-05-16
Oracle利用errorstack追踪tomcat报错ORA-00903 无效表名的问题
这篇文章主要介绍了Oracle利用errorstack追踪tomcat报错ORA-00903 无效表名,本文给大家介绍的非常详细,对大家的学习或工作具有一定的参考借鉴价值,需要的朋友可以参考下...2020-07-11- 这篇文章主要介绍了如何将tomcat源码以maven方式运行,文中通过示例代码介绍的非常详细,对大家的学习或者工作具有一定的参考学习价值,需要的朋友们下面随着小编来一起学习学习吧...2021-03-31
- 这篇文章主要介绍了Tomcat源码解析之Web请求与处理,文中有非常详细的代码示例,对正在学习java的小伙伴们有很好的帮助,需要的朋友可以参考下...2021-05-08
- 这篇文章主要介绍了IDEA 2020 配置Tomcat服务器的详细教程,本文分步骤给大家介绍的非常详细,对大家的学习或工作具有一定的参考借鉴价值,需要的朋友可以参考下...2020-08-05
- 这篇文章主要介绍了SpringBoot内置tomcat启动原理详解,文中通过示例代码介绍的非常详细,对大家的学习或者工作具有一定的参考学习价值,需要的朋友们下面随着小编来一起学习学习吧...2021-04-30
zabbix监控Nginx/Tomcat/MySQL的详细教程
这篇文章主要介绍了zabbix监控Nginx/Tomcat/MySQL的详细教程,本文给大家介绍的非常详细,具有一定的参考借鉴价值,需要的朋友可以参考下...2021-05-07- 平时在使用tomcat做一些服务的时候经常遇到各种乱码问题,下面这篇文章主要给大家介绍了一次tomcat源码启动控制台中文乱码的调试过程,需要的朋友可以参考下...2021-06-01
- tomcat安装好了,准备部署Web项目了,启动tomcat,发现没有反应,本文就来解决一下这个问题,感兴趣的小伙伴们可以参考一下...2021-07-08
- 近日有个项目客户要求能自己配置相关权限。由于历史原因这个项目采用的是公司以前的权限系统...2021-09-22
- 这篇文章主要介绍了解决Spring boot 嵌入的tomcat不启动问题,具有很好的参考价值,希望对大家有所帮助。一起跟随小编过来看看吧...2020-10-11