详解用 python-docx 创建浮动图片
相信大家对python-docx这个常用的操作docx文档的库都不陌生,它支持以内联形状(Inline Shape)的形式插入图片,即图片和文本之间没有重叠,遵循流动版式(flow layout)。但是,截至最新的0.8.10版本,python-docx尚不支持插入浮动图片(floating picture)。这显然不能满足丰富多彩的文档样式的需要,因此本文探究基于python-docx插入浮动图片——剖析xml、追踪源码,最后得到完整代码。
问题提出
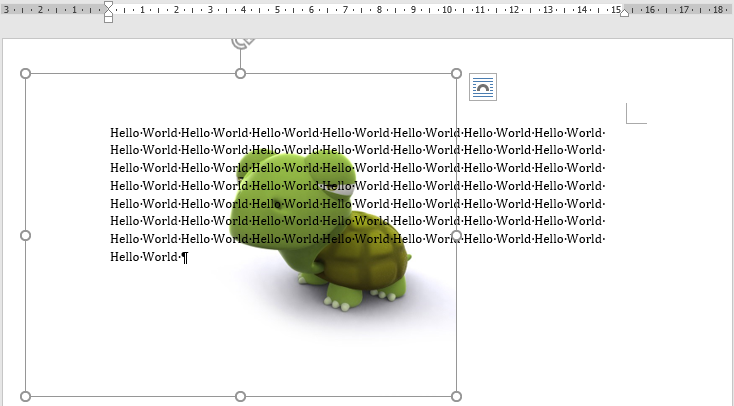
作者在尝试实现PDF文档转docx(pdf2docx:https://github.com/dothinking/pdf2docx,开发中)的过程中遇到一个需求:根据背景图片在PDF页面的具体位置(例如左上角坐标和图片区域的长宽),将其重现到docx页面的相应位置。考虑到背景图片与文本的重叠,这就需要实现精确定位的浮动图片,参考下图示例。

Word中的设置
我们先尝试在Office Word中,手动解决上述问题。具备基础的Word使用经验即可知,通过设置图片版式来控制图片的浮动和具体位置。
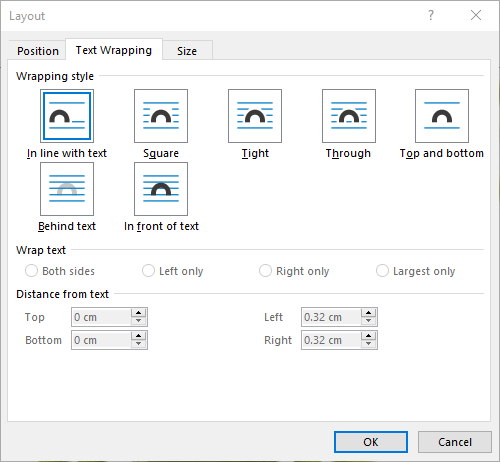
上图版式设置中的文本环绕样式,大体可以分为三类:
| 分类 | 文本重叠 | 自由定位 | 样式名称 |
|---|---|---|---|
| 嵌入型 | 否 | 否 | In line with text |
| 环绕型 | 否 | 是 | Square, Tight, Through, Top and bottom |
| 完全浮动 | 是 | 是 | behind text, In front of text |
例如最常见的嵌入型图片,它占据了整行区域,我们既不能将其与文字重叠,也不能自由放置它的位置,而是由页面排版自动确定。对于环绕型图片,文本可以进入图片所在行,但是无法与之重叠;并且,我们可以用鼠标自由拖动其位置。完全浮动型图片则可以浮于文本上方或者衬于文本下方,同时支持随意放置其位置。
如果需要精确定位,则可在图片版式的位置(Position)选项卡进行设置。它提供了多种定位方式,例如绝对定位——根据图片左上角点距离水平和竖直参考的坐标值来定位。至于参考对象,可以是页面(Page)本身,这样(0, 0)就是页面左上角;也可以是边距(Margin),此时(0, 0)即为正文区域的左上角。
综上,我们需要实现精确定位的衬于文本下方的图片版式。
docx背后的xml
我们还知道,docx文档的背后是xml格式的数据,python-docx正是通过处理xml的方式来读写word文档。所以,接下来先手工创建word文档,然后查看图片部分的xml内容。
作为对比,首先分别创建一个普通嵌入型图片文件和一个衬于文本下方的浮动型图片文件。然后执行查看步骤:右键docx文件 | 7-zip打开压缩包 | word | document.xml,复制文件内容并格式化xml,得到如下的关于图片部分的片段。为了便于对比分析,删除了一些节点属性。
内联图片片段:
<w:drawing>
    <wp:inline>
        <wp:extent cx="3297600" cy="2782800"/>
        <wp:effectExtent l="0" t="0" r="0" b="0"/>
        <wp:docPr id="1" name="Picture 1"/>
        <wp:cNvGraphicFramePr>
            <a:graphicFrameLocks/>
        </wp:cNvGraphicFramePr>
        <a:graphic>
            <a:graphicData>
                <pic:pic>
                    <!-- more pic content -->
                </pic:pic>
            </a:graphicData>
        </a:graphic>
    </wp:inline>
</w:drawing>
浮动图片片段:
<w:drawing>
    <wp:anchor behindDoc="1" locked="0" layoutInCell="1" allowOverlap="1">
        <wp:simplePos x="0" y="0"/>
        <wp:positionH relativeFrom="page">
            <wp:posOffset>285750</wp:posOffset>
        </wp:positionH>
        <wp:positionV relativeFrom="page">
            <wp:posOffset>457200</wp:posOffset>
        </wp:positionV>
        <wp:extent cx="3297600" cy="2782800"/>
        <wp:effectExtent l="0" t="0" r="0" b="0"/>
        <wp:wrapNone/>
        <wp:docPr id="1" name="Picture 1"/>
        <wp:cNvGraphicFramePr>
            <a:graphicFrameLocks/>
        </wp:cNvGraphicFramePr>
        <a:graphic>
            <a:graphicData>
                <pic:pic>
                    <!-- more pic content -->
                </pic:pic>
            </a:graphicData>
        </a:graphic>
    </wp:anchor>
</w:drawing>
对比发现以下相同/相似点:
- 两类图片都放在
<w:drawing>节点下:内联图片<wp:inline>,浮动图片<wp:anchor> - 具备相同的内容节点:
<wp:extent>、<wp:docPr>、<a:graphic>等
除此之外,浮动图片还有一些独有特征,并且我们可以从命名上猜测和解读:
<wp:anchor>节点的behindDoc属性表明图片版式为衬于文本下方
<wp:positionH>和<wp:positionV>节点表明水平和竖直绝对定位方式,其中:
relativeFrom属性指定用于定位的参考对象- 子节点
<wp:posOffset>指定具体坐标值
从内联图片开始
从xml的结构对比来看,我们完全可以根据python-docx对内联图片的实现来插入浮动图片。于是,从插入内联图片的代码入手:
from docx import Document
from docx.shared import Pt

document = Document()
document.add_picture('image.jpg', width=Pt(200))
document.save('output.docx')
从python-docx安装文件夹site-packages/docx进行内容搜索add_picture,得到docx.text.run.add_picture原始定义处:
def add_picture(self, image_path_or_stream, width=None, height=None):
    inline = self.part.new_pic_inline(image_path_or_stream, width, height)
    self._r.add_drawing(inline)
    return InlineShape(inline)
继续搜索new_pic_inline得到docx.parts.story.BaseStoryPart.new_pic_inline。从注释可知这是利用CT_Inline类创建<wp:inline>元素,因此后续创建浮动图片的<wp:anchor>可以在此基础上修改。
def new_pic_inline(self, image_descriptor, width, height):
    """Return a newly-created `w:inline` element.
    The element contains the image specified by *image_descriptor* and is scaled
    based on the values of *width* and *height*.
    """
    rId, image = self.get_or_add_image(image_descriptor)
    cx, cy = image.scaled_dimensions(width, height)
    shape_id, filename = self.next_id, image.filename
    return CT_Inline.new_pic_inline(shape_id, rId, filename, cx, cy)
于是进入CT_Inline类(限于篇幅,删除了前两个类方法new和new_pic_inline的具体代码)——终于见到了一开始探索的xml代码:
class CT_Inline(BaseOxmlElement):
    """
    ``<w:inline>`` element, container for an inline shape.
    """
    @classmethod
    def new(cls, cx, cy, shape_id, pic):
        pass

    @classmethod
    def new_pic_inline(cls, shape_id, rId, filename, cx, cy):
        pass

    @classmethod
    def _inline_xml(cls):
        return (
            '<wp:inline %s>\n'
            '  <wp:extent cx="914400" cy="914400"/>\n'
            '  <wp:docPr id="666" name="unnamed"/>\n'
            '  <wp:cNvGraphicFramePr>\n'
            '    <a:graphicFrameLocks noChangeAspect="1"/>\n'
            '  </wp:cNvGraphicFramePr>\n'
            '  <a:graphic>\n'
            '    <a:graphicData uri="URI not set"/>\n'
            '  </a:graphic>\n'
            '</wp:inline>' % nsdecls('wp', 'a', 'pic', 'r')
        )
简单扫一下CT_Inline类的三个方法,即可将它们联系上:
_inline_xml()方法给出内联图片<wp:inline>的xml结构。new()方法调用_inline_xml(),并为其中的子节点例如<wp:extent>和<wp:docPr>赋值。new_pic_inline()调用new(),同时拼接CT_Picture类的结果(节点<pic:pic>,即图片的具体内容)到<a:graphicData>节点中去。
综上,实现了内联图片的完整xml结构。
插入浮动图片
从xml结构的对比及上述python-docx对内联图片的实现,得到创建浮动图片的思路:
- 初始化
<wp:anchor>结构,例如behindDoc="1"指定图片版式为衬于文本下方 - 使用类似的代码填充
<wp:anchor>元素,尤其是<wp:extent>、<wp:docPr>和<pic:pic> - 填充
<wp:positionH>和<wp:positionV>精确定位图片
具体实践中发现还有关键的一步——注册xml标签名称到对应的类,例如<wp:inline>和CT_Inline:
# docx.oxml.__init__.py
register_element_cls('wp:inline', CT_Inline)
综上,利用python-docx插入浮动图片(衬于文本下方、页面定位)的完整代码如下:
# -*- coding: utf-8 -*-

# filename: add_float_picture.py

'''
Implement floating image based on python-docx.
- Text wrapping style: BEHIND TEXT <wp:anchor behindDoc="1">
- Picture position: top-left corner of PAGE `<wp:positionH relativeFrom="page">`.
Create a docx sample (Layout | Positions | More Layout Options) and explore the
source xml (Open as a zip | word | document.xml) to implement other text wrapping
styles and position modes per `CT_Anchor._anchor_xml()`.
'''

from docx.oxml import parse_xml, register_element_cls
from docx.oxml.ns import nsdecls
from docx.oxml.shape import CT_Picture
from docx.oxml.xmlchemy import BaseOxmlElement, OneAndOnlyOne

# refer to docx.oxml.shape.CT_Inline
class CT_Anchor(BaseOxmlElement):
    """
    ``<w:anchor>`` element, container for a floating image.
    """
    extent = OneAndOnlyOne('wp:extent')
    docPr = OneAndOnlyOne('wp:docPr')
    graphic = OneAndOnlyOne('a:graphic')

    @classmethod
    def new(cls, cx, cy, shape_id, pic, pos_x, pos_y):
        """
        Return a new ``<wp:anchor>`` element populated with the values passed
        as parameters.
        """
        anchor = parse_xml(cls._anchor_xml(pos_x, pos_y))
        anchor.extent.cx = cx
        anchor.extent.cy = cy
        anchor.docPr.id = shape_id
        anchor.docPr.name = 'Picture %d' % shape_id
        anchor.graphic.graphicData.uri = (
            'http://schemas.openxmlformats.org/drawingml/2006/picture'
        )
        anchor.graphic.graphicData._insert_pic(pic)
        return anchor

    @classmethod
    def new_pic_anchor(cls, shape_id, rId, filename, cx, cy, pos_x, pos_y):
        """
        Return a new `wp:anchor` element containing the `pic:pic` element
        specified by the argument values.
        """
        pic_id = 0  # Word doesn't seem to use this, but does not omit it
        pic = CT_Picture.new(pic_id, filename, rId, cx, cy)
        anchor = cls.new(cx, cy, shape_id, pic, pos_x, pos_y)
        anchor.graphic.graphicData._insert_pic(pic)
        return anchor
    @classmethod
    def _anchor_xml(cls, pos_x, pos_y):
        return (
            '<wp:anchor distT="0" distB="0" distL="0" distR="0" simplePos="0" relativeHeight="0" \n'
            '           behindDoc="1" locked="0" layoutInCell="1" allowOverlap="1" \n'
            '           %s>\n'
            '  <wp:simplePos x="0" y="0"/>\n'
            '  <wp:positionH relativeFrom="page">\n'
            '    <wp:posOffset>%d</wp:posOffset>\n'
            '  </wp:positionH>\n'
            '  <wp:positionV relativeFrom="page">\n'
            '    <wp:posOffset>%d</wp:posOffset>\n'
            '  </wp:positionV>\n'
            '  <wp:extent cx="914400" cy="914400"/>\n'
            '  <wp:wrapNone/>\n'
            '  <wp:docPr id="666" name="unnamed"/>\n'
            '  <wp:cNvGraphicFramePr>\n'
            '    <a:graphicFrameLocks noChangeAspect="1"/>\n'
            '  </wp:cNvGraphicFramePr>\n'
            '  <a:graphic>\n'
            '    <a:graphicData uri="URI not set"/>\n'
            '  </a:graphic>\n'
            '</wp:anchor>' % ( nsdecls('wp', 'a', 'pic', 'r'), int(pos_x), int(pos_y) )
        )
# refer to docx.parts.story.BaseStoryPart.new_pic_inline
def new_pic_anchor(part, image_descriptor, width, height, pos_x, pos_y):
    """Return a newly-created `w:anchor` element.
    The element contains the image specified by *image_descriptor* and is scaled
    based on the values of *width* and *height*.
    """
    rId, image = part.get_or_add_image(image_descriptor)
    cx, cy = image.scaled_dimensions(width, height)
    shape_id, filename = part.next_id, image.filename
    return CT_Anchor.new_pic_anchor(shape_id, rId, filename, cx, cy, pos_x, pos_y)
# refer to docx.text.run.add_picture
def add_float_picture(p, image_path_or_stream, width=None, height=None, pos_x=0, pos_y=0):
    """Add float picture at fixed position `pos_x` and `pos_y` to the top-left point of page.
    """
    run = p.add_run()
    anchor = new_pic_anchor(run.part, image_path_or_stream, width, height, pos_x, pos_y)
    run._r.add_drawing(anchor)
# refer to docx.oxml.__init__.py
register_element_cls('wp:anchor', CT_Anchor)
示例
最后,来一个例子看看结果吧:
from docx import Document
from docx.shared import Inches, Pt
from add_float_picture import add_float_picture

if __name__ == '__main__':

    document = Document()

    # add a floating picture
    p = document.add_paragraph()
    add_float_picture(p, 'test.png', width=Inches(5.0), pos_x=Pt(20), pos_y=Pt(30))

    # add text
    p.add_run('Hello World '*50)

    document.save('output.docx')
作者:crazyhat,Python及科学计算爱好者
到此这篇关于详解用 python-docx 创建浮动图片的文章就介绍到这了,更多相关python-docx 浮动图片内容请搜索猪先飞以前的文章或继续浏览下面的相关文章希望大家以后多多支持猪先飞!
相关文章
- 这篇文章主要介绍了python-opencv-画外接矩形框的实例代码,代码简单易懂,对大家的学习或工作具有一定的参考借鉴价值,需要的朋友可以参考下...2021-09-04
Python astype(np.float)函数使用方法解析
这篇文章主要介绍了Python astype(np.float)函数使用方法解析,文中通过示例代码介绍的非常详细,对大家的学习或者工作具有一定的参考学习价值,需要的朋友可以参考下...2020-06-08- 2022虎年新年即将来临,小编为大家带来了一个利用Python编写的虎年烟花特效,堪称全网最绚烂,文中的示例代码简洁易懂,感兴趣的同学可以动手试一试...2022-02-14
- 在本篇文章里小编给大家分享的是一篇关于python中numpy.empty()函数实例讲解内容,对此有兴趣的朋友们可以学习下。...2021-02-06
python-for x in range的用法(注意要点、细节)
这篇文章主要介绍了python-for x in range的用法,具有很好的参考价值,希望对大家有所帮助。一起跟随小编过来看看吧...2021-05-10- 这篇文章主要介绍了Python 图片转数组,二进制互转操作,具有很好的参考价值,希望对大家有所帮助。一起跟随小编过来看看吧...2021-03-09
- 这篇文章主要介绍了Python中的imread()函数用法说明,具有很好的参考价值,希望对大家有所帮助。一起跟随小编过来看看吧...2021-03-16
- 这篇文章主要介绍了python如何实现b站直播自动发送弹幕,帮助大家更好的理解和学习使用python,感兴趣的朋友可以了解下...2021-02-20
python Matplotlib基础--如何添加文本和标注
这篇文章主要介绍了python Matplotlib基础--如何添加文本和标注,帮助大家更好的利用Matplotlib绘制图表,感兴趣的朋友可以了解下...2021-01-26- 这篇文章主要介绍了解决python 使用openpyxl读写大文件的坑,具有很好的参考价值,希望对大家有所帮助。一起跟随小编过来看看吧...2021-03-13
- 今天小编就为大家分享一篇python 计算方位角实例(根据两点的坐标计算),具有很好的参考价值,希望对大家有所帮助。一起跟随小编过来看看吧...2020-04-27
- 这篇文章主要为大家详细介绍了python实现双色球随机选号,文中示例代码介绍的非常详细,具有一定的参考价值,感兴趣的小伙伴们可以参考一下...2020-05-02
- 在本篇文章里小编给大家整理的是一篇关于python中使用np.delete()的实例方法,对此有兴趣的朋友们可以学习参考下。...2021-02-01
- 这篇文章主要介绍了使用Python的pencolor函数实现渐变色功能,本文通过实例代码给大家介绍的非常详细,对大家的学习或工作具有一定的参考借鉴价值,需要的朋友可以参考下...2021-03-09
- 这篇文章主要介绍了python自动化办公操作PPT的实现,文中通过示例代码介绍的非常详细,对大家的学习或者工作具有一定的参考学习价值,需要的朋友们下面随着小编来一起学习学习吧...2021-02-05
Python getsizeof()和getsize()区分详解
这篇文章主要介绍了Python getsizeof()和getsize()区分详解,文中通过示例代码介绍的非常详细,对大家的学习或者工作具有一定的参考学习价值,需要的朋友们下面随着小编来一起学习学习吧...2020-11-20- 这篇文章主要为大家详细介绍了python实现学生通讯录管理系统,文中示例代码介绍的非常详细,具有一定的参考价值,感兴趣的小伙伴们可以参考一下...2021-02-25
- 这篇文章主要介绍了PyTorch一小时掌握之迁移学习篇,本文给大家介绍的非常详细,对大家的学习或工作具有一定的参考借鉴价值,需要的朋友可以参考下...2021-09-08
- 这篇文章主要介绍了解决python 两个时间戳相减出现结果错误的问题,具有很好的参考价值,希望对大家有所帮助。一起跟随小编过来看看吧...2021-03-12
- 这篇文章主要介绍了Python绘制的爱心树与表白代码,本文通过实例代码给大家介绍的非常详细,对大家的学习或工作具有一定的参考借鉴价值,需要的朋友可以参考下...2021-04-06