Pytorch 的损失函数Loss function使用详解
1.损失函数
损失函数,又叫目标函数,是编译一个神经网络模型必须的两个要素之一。另一个必不可少的要素是优化器。
损失函数是指用于计算标签值和预测值之间差异的函数,在机器学习过程中,有多种损失函数可供选择,典型的有距离向量,绝对值向量等。
损失Loss必须是标量,因为向量无法比较大小(向量本身需要通过范数等标量来比较)。
损失函数一般分为4种,平方损失函数,对数损失函数,HingeLoss 0-1 损失函数,绝对值损失函数。
我们先定义两个二维数组,然后用不同的损失函数计算其损失值。
import torch
from torch.autograd import Variable
import torch.nn as nn
import torch.nn.functional as F
sample = Variable(torch.ones(2,2))
a=torch.Tensor(2,2)
a[0,0]=0
a[0,1]=1
a[1,0]=2
a[1,1]=3
target = Variable (a)
sample 的值为:[[1,1],[1,1]]。
target 的值为:[[0,1],[2,3]]。
1 nn.L1Loss
L1Loss 计算方法很简单,取预测值和真实值的绝对误差的平均数即可。
criterion = nn.L1Loss()
loss = criterion(sample, target)
print(loss)
最后结果是:1。
它的计算逻辑是这样的:
先计算绝对差总和:|0-1|+|1-1|+|2-1|+|3-1|=4;
然后再平均:4/4=1。
2 nn.SmoothL1Loss
SmoothL1Loss 也叫作 Huber Loss,误差在 (-1,1) 上是平方损失,其他情况是 L1 损失。
criterion = nn.SmoothL1Loss()
loss = criterion(sample, target)
print(loss)
最后结果是:0.625。
3 nn.MSELoss
平方损失函数。其计算公式是预测值和真实值之间的平方和的平均数。
criterion = nn.MSELoss()
loss = criterion(sample, target)
print(loss)
最后结果是:1.5。
4 nn.CrossEntropyLoss
交叉熵损失函数
花了点时间才能看懂它。
首先,先看几个例子,
需要注意的是,target输入必须是 tensor long 类型(int64位)
import torch
# cross entropy loss
pred = np.array([[0.8, 2.0, 1.2]])
CELoss = torch.nn.CrossEntropyLoss()
for k in range(3):
  target = np.array([k])
  loss2 = CELoss(torch.from_numpy(pred), torch.from_numpy(target).long())
  print(loss2)
Output:
tensor(1.7599, dtype=torch.float64)
tensor(0.5599, dtype=torch.float64)
tensor(1.3599, dtype=torch.float64)
如果,改成pred = np.array([[0.8, 2.0, 2.0]]),输出,
tensor(2.0334, dtype=torch.float64)
tensor(0.8334, dtype=torch.float64)
tensor(0.8334, dtype=torch.float64)
后面两个输出一样。
先看它的公式,就明白怎么回事了:
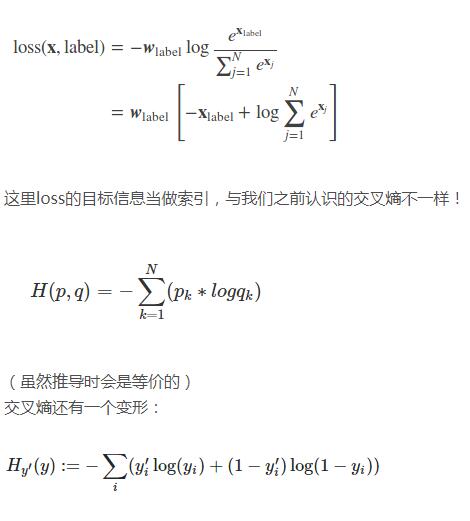
(这个应该是有两个标准交叉熵组成了,后面一个算是预测错误的交叉熵?反正,数值会变大了)
使用 numpy来实现是这样的:
pred = np.array([[0.8, 2.0, 2.0]])
nClass = pred.shape[1]
target = np.array([0])

def labelEncoder(y):
  tmp = np.zeros(shape = (y.shape[0], nClass))
  for i in range(y.shape[0]):
    tmp[i][y[i]] = 1
  return tmp
def crossEntropy(pred, target):
  target = labelEncoder(target)
  pred = softmax(pred)
  H = -np.sum(target*np.log(pred))
  return H
H = crossEntropy(pred, target)
输出:
2.0334282107562287
对上了!
再回头看看,公式

这里,就是class 就是索引,(调用 nn.CrossEntropyLoss需要注意),这里把Softmax求p 和 ylog(p)写在一起,一开始还没反应过来。
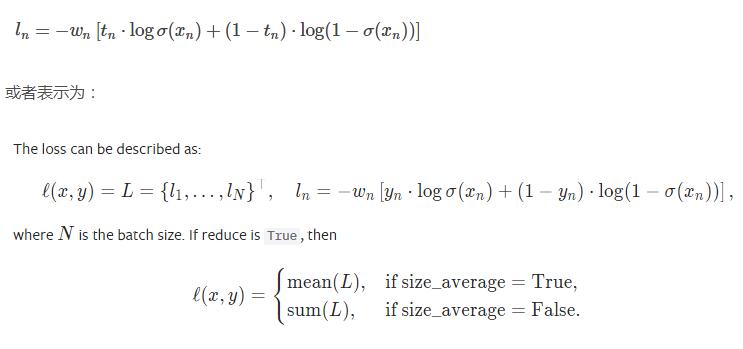
5.nn.BCELoss
二分类交叉熵的含义其实在交叉熵上面提过,就是把{y, 1-y}当做两项分布,计算出来的loss就比交叉熵大(也就是包含的信息更多了,因为包含了正类和负类的loss了)。

最后结果是:-13.8155。
6 nn.NLLLoss
负对数似然损失函数(Negative Log Likelihood)

在前面接上一个 LogSoftMax 层就等价于交叉熵损失了。注意这里的 xlabel 和上个交叉熵损失里的不一样,这里是经过 log 运算后的数值。这个损失函数一般也是用在图像识别模型上。
NLLLoss 的 输入 是一个对数概率向量和一个目标标签(不需要是one-hot编码形式的). 它不会为我们计算对数概率. 适合网络的最后一层是log_softmax. 损失函数 nn.CrossEntropyLoss() 与 NLLLoss() 相同, 唯一的不同是它为我们去做 softmax.
Nn.NLLLoss 和 nn.CrossEntropyLoss 的功能是非常相似的!通常都是用在多分类模型中,实际应用中我们一般用 NLLLoss 比较多。
7 nn.NLLLoss2d
和上面类似,但是多了几个维度,一般用在图片上。
input, (N, C, H, W)
target, (N, H, W)
比如用全卷积网络做分类时,最后图片的每个点都会预测一个类别标签。
criterion = nn.NLLLoss2d()
loss = criterion(sample, target)
print(loss)
最后结果是:报错,看来不能直接这么用!
8 .BCEWithLogitsLoss 与 MultilabelSoftMarginLoss
BCEWithLogitsLoss :
这里,主要x,y的顺序,x为predict的输出(还没有sigmoid);y为真实标签,一般是[0,1],但是真实标签也可以是概率表示,如[0.1, 0.9].
可以看出,这里与 BCELoss相比,它帮你做sigmoid 操作,不需要你输出时加激活函数。
MultiLabelSoftMarginLoss :

可以看出, 后者是前者权值为1时的特例。
import torch
from torch.autograd import Variable
from torch import nn
x = Variable(torch.randn(10, 3))
y = Variable(torch.FloatTensor(10, 3).random_(2))

# double the loss for class 1
class_weight = torch.FloatTensor([1.0, 2.0, 1.0])
# double the loss for last sample
element_weight = torch.FloatTensor([1.0]*9 + [2.0]).view(-1, 1)
element_weight = element_weight.repeat(1, 3)

bce_criterion = nn.BCEWithLogitsLoss(weight=None, reduce=False)
multi_criterion = nn.MultiLabelSoftMarginLoss(weight=None, reduce=False)

bce_criterion_class = nn.BCEWithLogitsLoss(weight=class_weight, reduce=False)
multi_criterion_class = nn.MultiLabelSoftMarginLoss(weight=class_weight,
                          reduce=False)

bce_criterion_element = nn.BCEWithLogitsLoss(weight=element_weight, reduce=False)
multi_criterion_element = nn.MultiLabelSoftMarginLoss(weight=element_weight,
                           reduce=False)

bce_loss = bce_criterion(x, y)
multi_loss = multi_criterion(x, y)

bce_loss_class = bce_criterion_class(x, y)
multi_loss_class = multi_criterion_class(x, y)

print(bce_loss_class)
print(multi_loss_class)

print('bce_loss',bce_loss)
print('bce loss mean', torch.mean(bce_loss, dim = 1))
print('multi_loss', multi_loss)
9.比较BCEWithLogitsLoss和TensorFlow的 sigmoid_cross_entropy_with_logits;softmax_cross_entropy_with_logits
pytorch BCEwithLogitsLoss 参考前面8的介绍。
from torch import nn
from torch.autograd import Variable
bce_criterion = nn.BCEWithLogitsLoss(weight = None, reduce = False)
y = Variable(torch.tensor([[1,0,0],[0,1,0],[0,0,1],[1,1,0],[0,1,0]],dtype=torch.float64))
logits = Variable(torch.tensor([[12,3,2],[3,10,1],[1,2,5],[4,6.5,1.2],[3,6,1]],dtype=torch.float64))
bce_criterion(logits, y)
result:
tensor([[6.1442e-06, 3.0486e+00, 2.1269e+00],
    [3.0486e+00, 4.5399e-05, 1.3133e+00],
    [1.3133e+00, 2.1269e+00, 6.7153e-03],
    [1.8150e-02, 1.5023e-03, 1.4633e+00],
    [3.0486e+00, 2.4757e-03, 1.3133e+00]], dtype=torch.float64)
如果使用 TensorFlow的sigmoid_cross_entropy_with_logits,
y = np.array([[1,0,0],[0,1,0],[0,0,1],[1,1,0],[0,1,0]])
logits = np.array([[12,3,2],[3,10,1],[1,2,5],[4,6.5,1.2],[3,6,1]]).astype(np.float32)

sess =tf.Session()
y = np.array(y).astype(np.float32) # labels是float64的数据类型
E2 = sess.run(tf.nn.sigmoid_cross_entropy_with_logits(labels=y,logits=logits))
print(E2)
result
[[6.1441933e-06 3.0485873e+00 2.1269281e+00]
 [3.0485873e+00 4.5398901e-05 1.3132617e+00]
 [1.3132617e+00 2.1269281e+00 6.7153485e-03]
 [1.8149929e-02 1.5023102e-03 1.4632825e+00]
 [3.0485873e+00 2.4756852e-03 1.3132617e+00]]
从结果来看,两个是等价的。
其实,两个损失函数都是,先预测结果sigmoid,再求交叉熵。
Keras binary_crossentropy 也是调用 Tf sigmoid_cross_entropy_with_logits.
keras binary_crossentropy 源码;
def loss_fn(y_true, y_pred, e=0.1):
  bce_loss = K.binary_crossentropy(y_true, y_pred)
  return K.mean(bce_loss, axis = -1)

y = K.variable([[1,0,0],[0,1,0],[0,0,1],[1,1,0],[0,1,0]])
logits = K.variable([[12,3,2],[3,10,1],[1,2,5],[4,6.5,1.2],[3,6,1]])
res = loss_fn(logits, y)
print(K.get_value(res))

from keras.losses import binary_crossentropy
print(K.get_value(binary_crossentropy(logits, y)))
result:
[-31.59192  -26.336359  -5.1384177 -38.72286  -5.0798492]
[-31.59192  -26.336359  -5.1384177 -38.72286  -5.0798492]
同样,如果是softmax_cross_entropy_with_logits的话,
y = np.array([[1,0,0],[0,1,0],[0,0,1],[1,1,0],[0,1,0]])
logits = np.array([[12,3,2],[3,10,1],[1,2,5],[4,6.5,1.2],[3,6,1]]).astype(np.float32)

sess =tf.Session()
y = np.array(y).astype(np.float32) # labels是float64的数据类型
E2 = sess.run(tf.nn.softmax_cross_entropy_with_logits(labels=y,
                                   logits=logits))
print(E2)
result:
[1.6878611e-04 1.0346780e-03 6.5883912e-02 2.6669841e+00 5.4985214e-02]
发现维度都已经变了,这个是 N*1维了。
即使,把上面sigmoid_cross_entropy_with_logits的结果维度改变,也是 [1.725174 1.4539648 1.1489683 0.49431157 1.4547749 ],两者还是不一样。
关于选用softmax_cross_entropy_with_logits还是sigmoid_cross_entropy_with_logits,使用softmax,精度会更好,数值稳定性更好,同时,会依赖超参数。
2 其他不常用loss
| 函数 | 作用 |
|---|---|
| AdaptiveLogSoftmaxWithLoss | 用于不平衡类 |
以上这篇Pytorch 的损失函数Loss function使用详解就是小编分享给大家的全部内容了,希望能给大家一个参考,也希望大家多多支持猪先飞。
相关文章
pytorch nn.Conv2d()中的padding以及输出大小方式
今天小编就为大家分享一篇pytorch nn.Conv2d()中的padding以及输出大小方式,具有很好的参考价值,希望对大家有所帮助。一起跟随小编过来看看吧...2020-04-27- 这篇文章主要介绍了PyTorch一小时掌握之迁移学习篇,本文给大家介绍的非常详细,对大家的学习或工作具有一定的参考借鉴价值,需要的朋友可以参考下...2021-09-08
Linux安装Pytorch1.8GPU(CUDA11.1)的实现
这篇文章主要介绍了Linux安装Pytorch1.8GPU(CUDA11.1)的实现,文中通过示例代码介绍的非常详细,对大家的学习或者工作具有一定的参考学习价值,需要的朋友们下面随着小编来一起学习学习吧...2021-03-25- 这篇文章主要介绍了Pytorch之扩充tensor的操作,具有很好的参考价值,希望对大家有所帮助。一起跟随小编过来看看吧...2021-03-05
- 今天小编就为大家分享一篇pytorch 自定义卷积核进行卷积操作方式,具有很好的参考价值,希望对大家有所帮助。一起跟随小编过来看看吧...2020-05-06
- 这篇文章主要介绍了解决pytorch 交叉熵损失输出为负数的问题,具有很好的参考价值,希望对大家有所帮助。一起跟随小编过来看看吧...2020-07-08
pytorch绘制并显示loss曲线和acc曲线,LeNet5识别图像准确率
今天小编就为大家分享一篇pytorch绘制并显示loss曲线和acc曲线,LeNet5识别图像准确率,具有很好的参考价值,希望对大家有所帮助。一起跟随小编过来看看吧...2020-05-02- 这篇文章主要介绍了pytorch 实现冻结部分参数训练另一部分,具有很好的参考价值,希望对大家有所帮助。一起跟随小编过来看看吧...2021-03-27
从Pytorch模型pth文件中读取参数成numpy矩阵的操作
这篇文章主要介绍了从Pytorch模型pth文件中读取参数成numpy矩阵的操作,具有很好的参考价值,希望对大家有所帮助。一起跟随小编过来看看吧...2021-03-04Pytorch 的损失函数Loss function使用详解
今天小编就为大家分享一篇Pytorch 的损失函数Loss function使用详解,具有很好的参考价值,希望对大家有所帮助。一起跟随小编过来看看吧...2020-05-02- 今天小编就为大家分享一篇pytorch中的上采样以及各种反操作,求逆操作详解,具有很好的参考价值,希望对大家有所帮助。一起跟随小编过来看看吧...2020-04-30
- 这篇文章主要介绍了基于Pytorch版yolov5的滑块验证码破解思路详解,本文给大家介绍的非常详细,对大家的学习或工作具有一定的参考借鉴价值,需要的朋友可以参考下...2021-02-25
pytorch中交叉熵损失(nn.CrossEntropyLoss())的计算过程详解
今天小编就为大家分享一篇pytorch中交叉熵损失(nn.CrossEntropyLoss())的计算过程详解,具有很好的参考价值,希望对大家有所帮助。一起跟随小编过来看看吧...2020-05-02- 这篇文章主要介绍了pytorch深度学习中对softmax实现进行了详细解析,有需要的朋友可以借鉴参考下,希望能够有所帮助,祝大家多多进步...2021-09-30
- 今天小编就为大家分享一篇Pytorch 计算误判率,计算准确率,计算召回率的例子,具有很好的参考价值,希望对大家有所帮助。一起跟随小编过来看看吧...2020-04-27
- 今天小编就为大家分享一篇Pytorch实现LSTM和GRU示例,具有很好的参考价值,希望对大家有所帮助。一起跟随小编过来看看吧...2020-04-27
- 这篇文章主要介绍了Pytorch如何切换 cpu和gpu的使用详解,文中通过示例代码介绍的非常详细,对大家的学习或者工作具有一定的参考学习价值,需要的朋友们下面随着小编来一起学习学习吧...2021-03-01
- 今天小编就为大家分享一篇pytorch动态网络以及权重共享实例,具有很好的参考价值,希望对大家有所帮助。一起跟随小编过来看看吧...2020-04-29
- 这篇文章主要介绍了解决Pytorch修改预训练模型时遇到key不匹配的情况,具有很好的参考价值,希望对大家有所帮助。如有错误或未考虑完全的地方,望不吝赐教...2021-06-05
- 这篇文章主要介绍了pytorch中的squeeze函数、cat函数使用,具有很好的参考价值,希望对大家有所帮助。如有错误或未考虑完全的地方,望不吝赐教...2021-05-20