PHP中使用OpenSSL生成证书及加密解密
依赖于OpenSSL扩展
| 代码如下 | 复制代码 |
/*加密解密*/ functionauthcode($string,$operation='E') { $ssl_public=file_get_contents(DATA_PATH."/conf/cert_public.key"); $ssl_private=file_get_contents(DATA_PATH."/conf/cert_private.pem"); $pi_key= openssl_pkey_get_private($ssl_private);//这个函数可用来判断私钥是否是可用的,可用返回资源id Resource id $pu_key= openssl_pkey_get_public($ssl_public);//这个函数可用来判断公钥是否是可用的 if(false == ($pi_key||$pu_key))return'证书错误' $data=""; if($operation=='D'){ openssl_private_decrypt(base64_decode($string),$data,$pi_key);//私钥解密 }else{ openssl_public_encrypt($string,$data,$pu_key);//公钥加密 $data=base64_encode($data); } return$data; } /*生成证书*/ functionexportOpenSSLFile(){ $config=array( "digest_alg" =>"sha512", "private_key_bits"=> 4096, //字节数 512 1024 2048 4096 等 "private_key_type"=> OPENSSL_KEYTYPE_RSA, //加密类型 ); $res= openssl_pkey_new($config); if($res== false)returnfalse; openssl_pkey_export($res,$private_key); $public_key= openssl_pkey_get_details($res); $public_key=$public_key["key"]; file_put_contents(DATA_PATH."/conf/cert_public.key",$public_key); file_put_contents(DATA_PATH."/conf/cert_private.pem",$private_key); openssl_free_key($res); } | |
这篇文章介绍了php实现36进制与10进制转换功能的实例,代码简单易懂,有兴趣的同学可以参考一下
本文实例讲述了php实现36进制与10进制转换功能。分享给大家供大家参考,具体如下:
| 代码如下 | 复制代码 |
/** * @desc im:十进制数转换成三十六机制数 * @param (int)$num 十进制数 * return 返回:三十六进制数 */ functionget_char($num) { $num=intval($num); if($num<= 0) returnfalse; $charArr=array("0","1","2","3","4","5","6","7","8","9",'A','B','C','D','E','F','G','H','I','J','K','L','M','N','O','P','Q','R','S','T','U','V','W','X','Y','Z'); $char='' do{ $key= ($num- 1) % 36; $char=$charArr[$key] .$char; $num=floor(($num-$key) / 36); }while($num> 0); return$char; } /** * @desc im:三十六进制数转换成十机制数 * @param (string)$char 三十六进制数 * return 返回:十进制数 */ functionget_num($char){ $array=array("0","1","2","3","4","5","6","7","8","9","A","B","C","D","E","F","G","H","I","J","K","L","M","N","O","P","Q","R","S","T","U","V","W","X","Y","Z"); $len=strlen($char); for($i=0;$i<$len;$i++){ $index=array_search($char[$i],$array); $sum+=($index+1)*pow(36,$len-$i-1); } return$sum; } | |
使用实例:
| 代码如下 | 复制代码 |
echo"get_char:".get_char(514549)." echo"get_num:".get_num('A0ZZ')." | |
小编推荐的这篇文章介绍了php使用preg_match()函数验证ip地址的方法,有需要的同学可以参考一下
本文实例讲述了php使用preg_match()函数验证ip地址的方法。分享给大家供大家参考,具体如下:
| 代码如下 | 复制代码 |
|
<?php
/*
*@return Boolen
*@param String $ip 要匹配的ip地址
*@param String $pat 匹配的正则规则
*@param Boolen 匹配成功后返回的布尔值
*preg_match()
*0为不成功,1为成功
*/
functionfun($ip){
//0.0.0.0--- 255.255.255.255
$pat="/^(((1?\d{1,2})|(2[0-4]\d)|(25[0-5]))\.){3}((1?\d{1,2})|(2[0-4]\d)|(25[0-5]))$/";
if(preg_match($pat,$ip)){
$num= preg_match($pat,$ip);
return$num;
}else{
$num= preg_match($pat,$ip);
return$num;
}
}
echofun("255.255.255.255");
| |
1.开始
在网站上传图片过程,经常用到缩略图功能。这里我自己写了一个图片处理的Image类,能生成缩略图,并且可以添加水印图。
2.如何生成缩略图
生成缩略图,关键的是如何计算缩放比率。
这里,我根据图片等比缩放,宽高的几种常见变化,得出一个算缩放比率算法是,使用新图(即缩略图)的宽高,分别除以原图的宽高,看哪个值大,就取它作为缩放比率:
缩放比率 = Max( { 新图高度 / 原图高度 , 新图宽度 / 原图宽度 } )
也就是:
If ( (新图高度 / 原图高度) > (新图宽度 / 原图宽度 ) ) {
缩放比率 = 新图高度 / 原图高度;
}ELSE {
缩放比率 = 新图宽度 / 原图宽度;
}
这里列出场景的图片缩放场景,及处理方法:
e.g
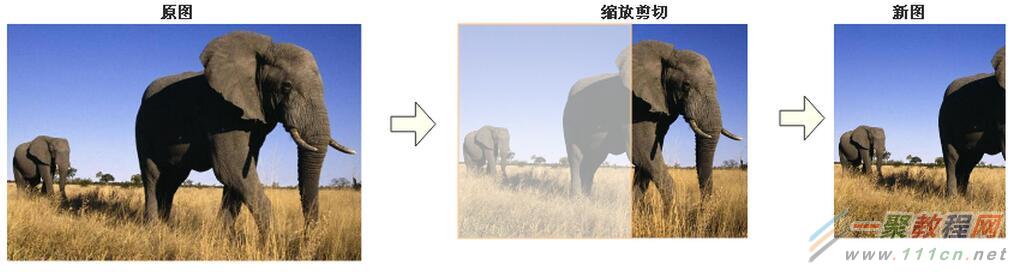
场景1,原图比新图大的情况, 缩放比率 = 新图宽度 / 原图宽度 :
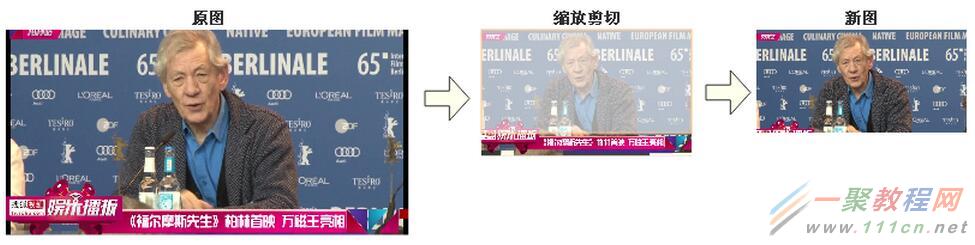
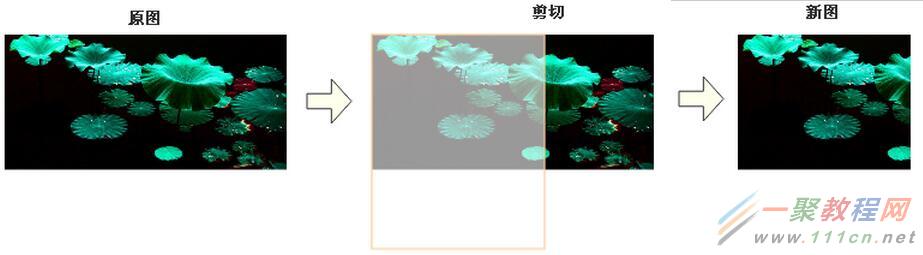
场景2,原图比新图大的情况,b. 缩放比率 = 新图高度 / 原图高度 :
场景3,原图比新图大的情况,而且新图宽高相等,即新图形状是正方形,那么上面的缩放算法也是适用的。
场景4,如果 “新图宽度 >= 原图宽度” ,同时 “新图高度 >= 原图高度”,那么不缩放图片,也不放大图片,保持原图。

场景5,如果 “新图宽度 < 原图宽度”,同时 “新图高度 >= 原图高度” ,那么先设置 “新图高度= 原图高度”,再剪切。
场景6,如果 “新图高度 < 原图高度”,同时 “新图宽度 >= 原图宽度” ,那么先设置 “新图宽度= 原图宽度”,再剪切。

3.如何添加水印图片
添加水印很容易,我这里没考虑那么复杂,主要是控制水印位置在图片的右下角,和控制水印在图片中的大小。如,当目标图片与水印图大小接近,那么需要先等比缩放水印图片,再添加水印图片。
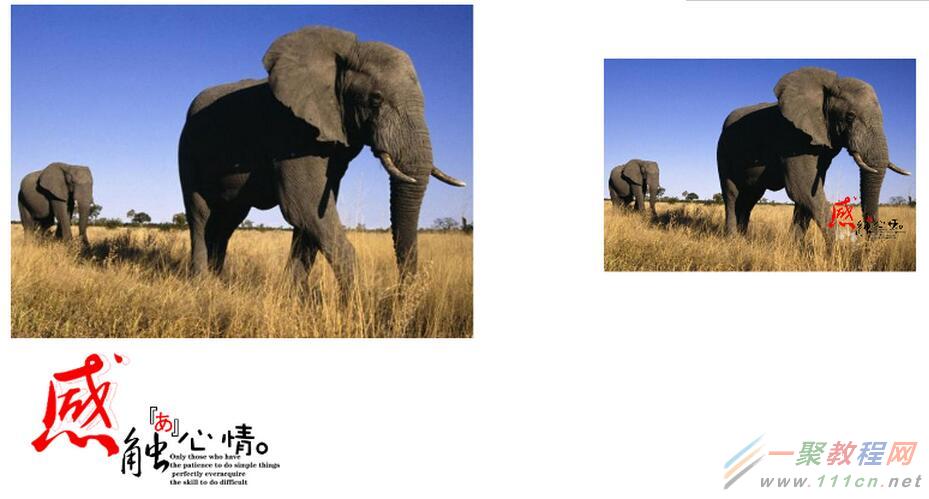
左边两幅图,上面是原图,下面是水印图,右边的缩放后加水印的新图。
4.类图
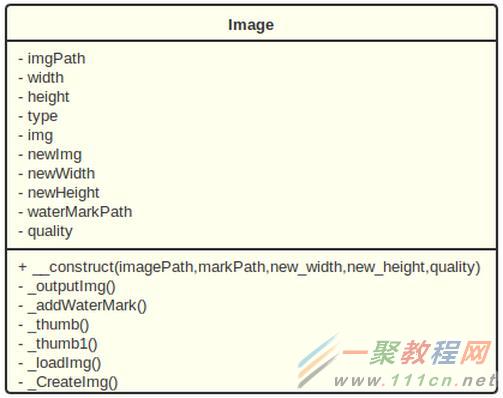
5.PHP代码
5.1. 构造函数 __construct()
在Image类中,除了构造函数__construct()是public,其它函数都为private.也就是在函数__construct()中,直接完成了生成缩略图和添加水印图的功能。如果,只生成缩略图而不需要添加水印,那么直接在__construct()的参数$markPath,设置为null即可。
其中,“$this->quality = $quality ? $quality : 75;” 控制输出为JPG图片时,控制图片质量(0-100),默认值为75;
|
/**
* Image constructor.
* @param string $imagePath 图片路径
* @param string $markPath 水印图片路径
* @param int $new_width 缩略图宽度
* @param int $new_height 缩略图高度
* @param int $quality JPG图片格输出质量
*/
publicfunction__construct(string$imagePath,
string$markPath= null,
int$new_width= null,
int$new_height= null,
int$quality= 75)
{
$this->imgPath =$_SERVER['DOCUMENT_ROOT'] .$imagePath;
$this->waterMarkPath =$markPath;
$this->newWidth =$new_width?$new_width:$this->width;
$this->newHeight =$new_height?$new_height:$this->height;
$this->quality =$quality?$quality: 75;
list($this->width,$this->height,$this->type) =getimagesize($this->imgPath);
$this->img =$this->_loadImg($this->imgPath,$this->type);
//生成缩略图
$this->_thumb();
//添加水印图片
if(!empty($this->waterMarkPath))$this->_addWaterMark();
//输出图片
$this->_outputImg();
}
|
Note: 先生成缩略图,再在新图上添加水印 图片。
5.2. 生成缩略图函数_thumb()
|
/**
* 缩略图(按等比例,根据设置的宽度和高度进行裁剪)
*/
privatefunction_thumb()
{
//如果原图本身小于缩略图,按原图长高
if($this->newWidth >$this->width)$this->newWidth =$this->width;
if($this->newHeight >$this->height)$this->newHeight =$this->height;
//背景图长高
$gd_width=$this->newWidth;
$gd_height=$this->newHeight;
//如果缩略图宽高,其中有一边等于原图的宽高,就直接裁剪
if($gd_width==$this->width ||$gd_height==$this->height) {
$this->newWidth =$this->width;
$this->newHeight =$this->height;
}else{
//计算缩放比率
$per= 1;
if(($this->newHeight /$this->height) > ($this->newWidth /$this->width)) {
$per=$this->newHeight /$this->height;
}else{
$per=$this->newWidth /$this->width;
}
if($per< 1) {
$this->newWidth =$this->width *$per;
$this->newHeight =$this->height *$per;
}
}
$this->newImg =$this->_CreateImg($gd_width,$gd_height,$this->type);
imagecopyresampled($this->newImg,$this->img, 0, 0, 0, 0,$this->newWidth,$this->newHeight,$this->width,$this->height);
}
|
生成缩略图函数_thumb() ,是按照前面的分析来进行编码。
5.3. 添加水印图片函数 _addWaterMark()
|
/**
* 添加水印
*/
privatefunction_addWaterMark()
{
$ratio= 1 / 5;//水印缩放比率
$Width= imagesx($this->newImg);
$Height= imagesy($this->newImg);
$n_width=$Width*$ratio;
$n_height=$Width*$ratio;
list($markWidth,$markHeight,$markType) =getimagesize($this->waterMarkPath);
if($n_width>$markWidth)$n_width=$markWidth;
if($n_height>$markHeight)$n_height=$markHeight;
$Img=$this->_loadImg($this->waterMarkPath,$markType);
$Img=$this->_thumb1($Img,$markWidth,$markHeight,$markType,$n_width,$n_height);
$markWidth= imagesx($Img);
$markHeight= imagesy($Img);
imagecopyresampled($this->newImg,$Img,$Width-$markWidth- 10,$Height-$markHeight- 10, 0, 0,$markWidth,$markHeight,$markWidth,$markHeight);
imagedestroy($Img);
}
|
在添加水印图片中,用到一个_thumb1()函数来缩放水印图片:
|
/**
* 缩略图(按等比例)
* @param resource $img 图像流
* @param int $width
* @param int $height
* @param int $type
* @param int $new_width
* @param int $new_height
* @return resource
*/
privatefunction_thumb1($img,$width,$height,$type,$new_width,$new_height)
{
if($width<$height) {
$new_width= ($new_height/$height) *$width;
}else{
$new_height= ($new_width/$width) *$height;
}
$newImg=$this->_CreateImg($new_width,$new_height,$type);
imagecopyresampled($newImg,$img, 0, 0, 0, 0,$new_width,$new_height,$width,$height);
return$newImg;
}
|
5.4. 完整代码:
|
<?php
/**
* 图片处理,生成缩略图和添加水印图片
* Created by PhpStorm.
* User: andy
* Date: 17-1-3
* Time: 上午11:55
*/
classImage
{
//原图
private$imgPath;//图片地址
private$width; //图片宽度
private$height;//图片高度
private$type; //图片类型
private$img; //图片(图像流)
//缩略图
private$newImg;//缩略图(图像流)
private$newWidth;
private$newHeight;
//水印图路径
private$waterMarkPath;
//输出图像质量,jpg有效
private$quality;
/**
* Image constructor.
* @param string $imagePath 图片路径
* @param string $markPath 水印图片路径
* @param int $new_width 缩略图宽度
* @param int $new_height 缩略图高度
* @param int $quality JPG图片格输出质量
*/
publicfunction__construct(string$imagePath,
string$markPath= null,
int$new_width= null,
int$new_height= null,
int$quality= 75)
{
$this->imgPath =$_SERVER['DOCUMENT_ROOT'] .$imagePath;
$this->waterMarkPath =$markPath;
$this->newWidth =$new_width?$new_width:$this->width;
$this->newHeight =$new_height?$new_height:$this->height;
$this->quality =$quality?$quality: 75;
list($this->width,$this->height,$this->type) =getimagesize($this->imgPath);
$this->img =$this->_loadImg($this->imgPath,$this->type);
//生成缩略图
$this->_thumb();
//添加水印图片
if(!empty($this->waterMarkPath))$this->_addWaterMark();
//输出图片
$this->_outputImg();
}
/**
*图片输出
*/
privatefunction_outputImg()
{
switch($this->type) {
case1:// GIF
imagegif($this->newImg,$this->imgPath);
break;
case2:// JPG
if(intval($this->quality) < 0 ||intval($this->quality) > 100)$this->quality = 75;
imagejpeg($this->newImg,$this->imgPath,$this->quality);
break;
case3:// PNG
imagepng($this->newImg,$this->imgPath);
break;
}
imagedestroy($this->newImg);
imagedestroy($this->img);
}
/**
* 添加水印
*/
privatefunction_addWaterMark()
{
$ratio= 1 / 5;//水印缩放比率
$Width= imagesx($this->newImg);
$Height= imagesy($this->newImg);
$n_width=$Width*$ratio;
$n_height=$Width*$ratio;
list($markWidth,$markHeight,$markType) =getimagesize($this->waterMarkPath);
if($n_width>$markWidth)$n_width=$markWidth;
if($n_height>$markHeight)$n_height=$markHeight;
$Img=$this->_loadImg($this->waterMarkPath,$markType);
$Img=$this->_thumb1($Img,$markWidth,$markHeight,$markType,$n_width,$n_height);
$markWidth= imagesx($Img);
$markHeight= imagesy($Img);
imagecopyresampled($this->newImg,$Img,$Width-$markWidth- 10,$Height-$markHeight- 10, 0, 0,$markWidth,$markHeight,$markWidth,$markHeight);
imagedestroy($Img);
}
/**
* 缩略图(按等比例,根据设置的宽度和高度进行裁剪)
*/
privatefunction_thumb()
{
//如果原图本身小于缩略图,按原图长高
if($this->newWidth >$this->width)$this->newWidth =$this->width;
if($this->newHeight >$this->height)$this->newHeight =$this->height;
//背景图长高
$gd_width=$this->newWidth;
$gd_height=$this->newHeight;
//如果缩略图宽高,其中有一边等于原图的宽高,就直接裁剪
if($gd_width==$this->width ||$gd_height==$this->height) {
$this->newWidth =$this->width;
$this->newHeight =$this->height;
}else{
//计算缩放比率
$per= 1;
if(($this->newHeight /$this->height) > ($this->newWidth /$this->width)) {
$per=$this->newHeight /$this->height;
}else{
$per=$this->newWidth /$this->width;
}
if($per< 1) {
$this->newWidth =$this->width *$per;
$this->newHeight =$this->height *$per;
}
}
$this->newImg =$this->_CreateImg($gd_width,$gd_height,$this->type);
imagecopyresampled($this->newImg,$this->img, 0, 0, 0, 0,$this->newWidth,$this->newHeight,$this->width,$this->height);
}
/**
* 缩略图(按等比例)
* @param resource $img 图像流
* @param int $width
* @param int $height
* @param int $type
* @param int $new_width
* @param int $new_height
* @return resource
*/
privatefunction_thumb1($img,$width,$height,$type,$new_width,$new_height)
{
if($width<$height) {
$new_width= ($new_height/$height) *$width;
}else{
$new_height= ($new_width/$width) *$height;
}
$newImg=$this->_CreateImg($new_width,$new_height,$type);
imagecopyresampled($newImg,$img, 0, 0, 0, 0,$new_width,$new_height,$width,$height);
return$newImg;
}
/**
* 加载图片
* @param string $imgPath
* @param int $type
* @return resource
*/
privatefunction_loadImg($imgPath,$type)
{
switch($type) {
case1:// GIF
$img= imagecreatefromgif($imgPath);
break;
case2:// JPG
$img= imagecreatefromjpeg($imgPath);
break;
case3:// PNG
$img= imagecreatefrompng($imgPath);
break;
default://其他类型
Tool::alertBack('不支持当前图片类型.'.$type);
break;
}
return$img;
}
/**
* 创建一个背景图像
* @param int $width
* @param int $height
* @param int $type
* @return resource
*/
privatefunction_CreateImg($width,$height,$type)
{
$img= imagecreatetruecolor($width,$height);
switch($type) {
case3://png
imagecolortransparent($img, 0);//设置背景为透明的
imagealphablending($img, false);
imagesavealpha($img, true);
break;
case4://gif
imagecolortransparent($img, 0);
break;
}
return$img;
}
}
|
6.调用
调用非常简单,在引入类后,直接new 并输入对应参数即可:
e.g.
new Image($_path, MARK, 400, 200, 100);
7.小结
这个Image 类能够生成缩略图,不出现黑边,添加水印图,能根据图片的大小缩放水印图。当然有个缺点,就是不能缩放GIF的动画,因为涉及到帧的处理,比较麻烦。
相关文章
- 关于AES加密的算法我们就不说了,这里主要给各位演示了三个关于AES算法实现的加密例子,希望本文章能给你带来帮助。 话不多说,先放上代码,一共有两个文件:AES.php(aes算...2016-11-25
- 分享一个PHP加密解密的函数,此函数实现了对部分变量值的加密的功能。 加密代码如下: /* *功能:对字符串进行加密处理 *参数一:需要加密的内容 *参数二:密钥 */ function passport_encrypt($str,$key){ //加密函数 srand(...2015-10-30
- 这篇文章主要介绍了C# 获取硬盘号,CPU信息,加密解密技术的步骤,帮助大家更好的理解和学习c#,感兴趣的朋友可以了解下...2021-01-16
- 复制代码 代码如下:<?php/***功能:对字符串进行加密处理*参数一:需要加密的内容*参数二:密钥*/function passport_encrypt($str,$key){ //加密函数srand((double)microtime() * 1000000);$encrypt_key=md5(rand(0, 32000...2014-06-07
解决php中openssl pkey_new()创建中文数字证书乱码问题
使用openssl生成证书如果是纯数字的肯定是没有任何的问题了,但是碰到中文数字时会发现就出问题了,证书变成了乱码了,下文来看解决办法。 用openssl创建证书时, 编码...2016-11-25- 这篇文章主要介绍了Java 自动安装校验TLS/SSL证书的示例,帮助大家更好的理解和使用Java,感兴趣的朋友可以了解下...2020-10-21
- 本篇文章是对VC对自定义资源加密解密(AES)进行了详细的分析介绍,需要的朋友参考下...2020-04-25
- 这篇文章主要给大家介绍了关于C#开发中经常用的加密解密方法的相关资料,文中通过示例代码介绍的非常详细,对大家学习或者使用C#具有一定的参考学习价值,需要的朋友们下面来一起学习学习吧...2020-06-25
- 这些都是php自带函数 echo $_SERVER["CERT_FLAGS"]."";//使用证书的标识,1或0 echo $_SERVER["CERT_ISSUER"]."";//颁发机构 echo $_SERV R["CERT_SERIALNUMBER"]."...2016-11-25
节省成本配置网站HTTPS加密网址(6个免费SSL证书申请网站)
在这篇文章中,老左整理目前看到的一些免费SSL证书,如果有需要降低成本配置网站HTTPS加密的,可以选择使用,需要的朋友可以参考下 以前,如果我们需要将网站配置SSL证书,...2017-07-06- PHP中怎么使用OpenSSL生成证书及加密解密?对此有疑问的同学快来看看这篇文章吧,希望能帮助到大家。 依赖于OpenSSL扩展 代码如下复制代码 /*加密解密*/functi...2017-07-06
- 这篇文章主要介绍了解决docker的tls(ssl)证书过期问题,具有很好的参考价值,希望对大家有所帮助。一起跟随小编过来看看吧...2021-03-29
- 文章给大家介绍基于openssl使用DSA算法生成签名实例,生成签名方法很简单,我们需要懂得中间的原理就比较复杂了,大家一起来看看吧。 命令: openssl> dgst -dss1 -sign...2016-11-25
PHP开启mcrypt扩展和SSL(OpenSSL)的方法详解
我们知道PHP开启mcrypt扩展和SSL(OpenSSL)在windows或linux中要使用都需要开启才可以具体我们以 windows为例子。 打开php.ini, 将“;extension=php_openssl....2016-11-25- 加密解密是通过两个对应的函数来进行操作了我们对些数字需要加密传输时就会用到了,下面我们来看一对php加密解密算法,希望对各位有用。 加密: function string_secr...2016-11-25
- 一个文件夹加密小工具,该工具是操作文件夹名称的方法实现文件夹的一般加密,文件夹中的文件(视频、图片等)都原封不动的保存在那里...2020-06-25
- 这篇文章主要为大家详细介绍了.net core使用MD5加密解密字符串,具有一定的参考价值,感兴趣的小伙伴们可以参考一下...2021-09-22
- 前面我有讲过利用其它的算法生成签名,下面我们同样在利用openssl生成签名,希望此文章对各位同学会有所帮助哦。 实例 代码如下 复制代码 <?php...2016-11-25
- php加密,php类,php分享 php 代码加密类,大家可以根据自己的需求进行修改,原类如下,希望能分享给大家。本次在ubuntu下测试没有问题。 <?php class Encryptio...2016-11-25
- 下面我们一起来看看关于php 使用openssl_verify验证签名实例程序,希望本文章对各位同学会有所帮助。 代码如下 复制代码 <?php /** ...2016-11-25