PHPCMS遭遇会员投稿审核无效的解决方法
今天接到主编那边的反馈,说本站的会员投稿平台,后台无法审核文章了,赶紧看看吧
本来想偷个懒,去度娘那里搜搜,看有相同情况的解决方案没,结果大失所望,虽然也有几个类似的情况,要么没解决,要么就是原因跟本站不同。
得了,毛主席他老人家教导我们,自己动手,丰衣足食!
先找到审核的相关程序页
/phpcms/modules/content/content.php中的pass()方法,检查了下,并无被修改的现象
去审核页面按F12调试,控制台也无报错情况
真是奇了怪了,
查看下源码,发现了这段
| 代码如下 | 复制代码 |
<script type="text/javascript">art.dialog({lock:false,title:'管理操作',mouse:true, id:'content_m', content:'<span id=cloading ><a href=\'javascript:ajax_manage(1)\'>通过审核</a> | <a href=\'javascript:ajax_manage(2)\'>退稿</a> | <a href=\'javascript:ajax_manage(3)\'>删除</a></span>',left:'100%',top:'100%',width:200,height:50,drag:true, fixed:true}); functionajax_manage(type) { if(type==1) { $.get('?m=content&c=content&a=pass&ajax_preview=1&catid=6&steps=1&id=533&pc_hash=4KwIwD'); }elseif(type==2) { $.get('?m=content&c=content&a=pass&ajax_preview=1&reject=1&catid=6&steps=1&id=533&pc_hash=4KwIwD'); }elseif(type==3) { $.get('?m=content&c=content&a=delete&ajax_preview=1&dosubmit=1&catid=6&steps=1&id=533&pc_hash=4KwIwD'); } $('#cloading').html('<font color=red>操作成功!<span id="secondid">2</span>秒后自动离开...</font>'); setInterval('set_time()', 1000); setInterval('window.close()', 2000); } functionset_time() { $('#secondid').html(1); } </script> | |
怪不得不报错。。。
好了,我们把审核链接单独拿出来 http://yourdomain.com/index.php?m=content&c=content&a=pass&ajax_preview=1&catid=6&steps=1&id=533&pc_hash=4KwIwD
放到浏览器地址栏执行一下
果然,有了错误提示了
| MySQL Error : Table'.\***\v9_search'is markedascrashedandshould be repaired MySQL Errno : 145 Message : Table'.\***\v9_search'is markedascrashedandshould be repaired |
原来是search表需要修复下。。。那就修修吧,修完之后,果然审核功能正常了
这篇文章介绍了laravel5.2实现区分前后台用户登录的方法,很实用,有需要的同学可以参考一下本文1.前台登录
直接使用laravel自带的auth
php artisan make:auth |
然后可以查看路由文件:
Route::group(['middleware'=>'web'],function() { Route::auth(); Route::get('/home','HomeController@index'); }); |
执行php artisan migrate
会发现生成了两张表。
2.后台登录
编辑配置文件
config\auth.php
添加guards中的admin和providers中的admins
<?php return[ 'defaults'=> [ 'guard'=>'web', 'passwords'=>'users', ], 'guards'=> [ 'web'=> [ 'driver'=>'session', 'provider'=>'users', ], 'admin'=> [ 'driver'=>'session', 'provider'=>'admins', ], 'api'=> [ 'driver'=>'token', 'provider'=>'users', ], ], 'providers'=> [ 'users'=> [ 'driver'=>'eloquent', 'model'=> App\User::class, ], 'admins'=> [ 'driver'=>'eloquent', 'model'=> App\Admin::class, ], ], 'passwords'=> [ 'users'=> [ 'provider'=>'users', 'email'=>'auth.emails.password', 'table'=>'password_resets', 'expire'=> 60, ], ], ]; |
3.创建数据模型
执行php artisan make:model Admin --migration
然后修改database\migrations中的数据表结构,复制user表的就可以
执行php artisan migrate 会发现生成了admin表
4.定义后台路由
这里我直接定义了一个路由组
Route::group(['prefix'=>'admin','middleware'=>'admin'],function() { Route::get('login','Admin\AuthController@getLogin'); Route::post('login','Admin\AuthController@postLogin'); Route::get('register','Admin\AuthController@getRegister'); Route::post('register','Admin\AuthController@postRegister'); Route::get('logout','Admin\AuthController@logout'); Route::get('/','Admin\AdminController@index'); }); |
5.创建控制器
执行
php artisan make:controller Admin/AuthController php artisan make:controller Admin/AdminController |
AuthController.php可参照Auth中的AuthController.php
<?php namespaceApp\Http\Controllers\Admin; useApp\Admin; useValidator; useApp\Http\Controllers\Controller; useIlluminate\Foundation\Auth\ThrottlesLogins; useIlluminate\Foundation\Auth\AuthenticatesAndRegistersUsers; classAuthControllerextendsController { useAuthenticatesAndRegistersUsers, ThrottlesLogins; protected$redirectTo='/admin' protected$guard='admin' protected$loginView='admin.login' protected$registerView='admin.register' publicfunction__construct() { $this->middleware('guest:admin', ['except'=>'logout']); } protectedfunctionvalidator(array$data) { returnValidator::make($data, [ 'name'=>'required|max:255', 'email'=>'required|email|max:255|unique:admins', 'password'=>'required|confirmed|min:6', ]); } protectedfunctioncreate(array$data) { returnAdmin::create([ 'name'=>$data['name'], 'email'=>$data['email'], 'password'=> bcrypt($data['password']), ]); } } |
AdminController.php
<?php namespaceApp\Http\Controllers\Admin; useIlluminate\Http\Request; useApp\Http\Requests; useApp\Http\Controllers\Controller; useAuth; classAdminControllerextendsController { publicfunction__construct() { $this->middleware('auth:admin'); } publicfunctionindex() { $admin= Auth::guard('admin')->user(); returnview('admin.home'); } } |
6.创建视图
这里直接复制auth中的视图和home.blade.php到一个新的admin文件夹中。
修改login和register中表单的action,添加上admin前缀
修改layouts中的app.blade.php
@if(Auth::guest('admin'))
@else
{{ Auth::guard('admin')->user()->name }}
@endif
|
现在试一下前后台分别登录吧!
7.可能遇到的页面跳转问题
如果你遇到了这种情况可以尝试修改一下Middleware\Authenticate.php
returnredirect()->guest($guard.'/login'); |
本文实例讲述了php获取当前url地址的方法。分享给大家供大家参考,具体如下:
js 获取:
top.location.href //顶级窗口的地址 this.location.href//当前窗口的地址 |
php获取当前url地址:
#测试网址: http://localhost/blog/testurl.php?id=5 //获取域名或主机地址
echo$_SERVER['HTTP_HOST']." //获取网页地址
echo$_SERVER['PHP_SELF']." //获取网址参数
echo$_SERVER["QUERY_STRING"]." //获取用户代理
echo$_SERVER['HTTP_REFERER']." //获取完整的url echo'http://'.$_SERVER['HTTP_HOST'].$_SERVER['REQUEST_URI']; echo'http://'.$_SERVER['HTTP_HOST'].$_SERVER['PHP_SELF'].'?'.$_SERVER['QUERY_STRING']; #http://localhost/blog/testurl.php?id=5 //包含端口号的完整url echo'http://'.$_SERVER['SERVER_NAME'].':'.$_SERVER["SERVER_PORT"].$_SERVER["REQUEST_URI"]; #http://localhost:80/blog/testurl.php?id=5 //只取路径 $url='http://'.$_SERVER['SERVER_NAME'].$_SERVER["REQUEST_URI"]; echodirname($url); #http://localhost/blog |
PHP解析验证码类
1.开始
在网上看到使用PHP写的ValidateCode生成验证码类,感觉不错,特拿来分析学习一下。
2.类图
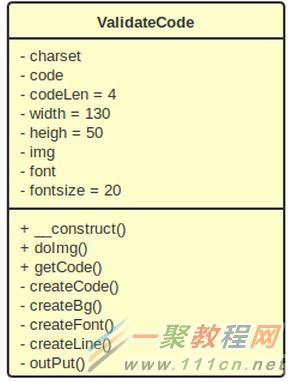
3.验证码类部分代码
3.1 定义变量
|
1
2
3
4
5
6
7
8
9
10
11
|
//随机因子
private$charset='abcdefghjkmnprstuvwxyzABCDEFGJKMNPRSTUVWXYZ23456789';
private$code;
private$codeLen= 4;
private$width= 130;
private$heigh= 50;
private$img;//图像
private$font;//字体
private$fontsize= 20;
|
$charset 是随机因子,这里是去掉了几个不容易区分的字符,如字母"i,l,o,q",数字"0,1"。有必要可以加入一些中文或其他字符或算式等。
$codeLen表示验证码长度,常见4位。
3.2构造函数,设置验证码字体,生成一个真彩色图像img
|
1
2
3
4
5
|
publicfunction__construct()
{
$this->font = ROOT_PATH.'/font/Chowderhead.ttf';
$this->img = imagecreatetruecolor($this->width,$this->heigh);
}
|
3.3从随机因子中随机抽取4个字符,作为$code验证码.
|
1
2
3
4
5
6
7
8
|
//生成随机码
privatefunctioncreateCode()
{
$_len=strlen($this->charset) - 1;
for($i= 0;$i<$this->codeLen;$i++) {
$this->code .=$this->charset[mt_rand(0,$_len)];
}
}
|
3.4生成验证码背景色.
|
1
2
3
4
5
6
7
|
//生成背景
privatefunctioncreateBg()
{
$color= imagecolorallocate($this->img, mt_rand(157, 255), mt_rand(157, 255), mt_rand(157, 255));
imagefilledrectangle($this->img, 0,$this->heigh,$this->width, 0,$color);
}
|
其中mt_rand(157, 255),目的是随机取比较浅的颜色。
3.5在图像上生成文字.
|
1
2
3
4
5
6
7
8
9
10
|
//生成文字
privatefunctioncreateFont()
{
$_x=$this->width /$this->codeLen;
$_y=$this->heigh / 2;
for($i= 0;$i<$this->codeLen;$i++) {
$color= imagecolorallocate($this->img, mt_rand(0, 156), mt_rand(0, 156), mt_rand(0, 156));
imagettftext($this->img,$this->fontsize, mt_rand(-30, 30),$_x*$i+ mt_rand(3, 5),$_y+ mt_rand(2, 4),$color,$this->font,$this->code[$i]);
}
}
|
在图像上生成验证码文字,主要考虑文字在图像上的位置和每一个文字颜色。
控制第n个文字的x轴位置 = (图像宽度 / 验证码长度) * (n-1) + 随机的偏移数; 其中n = {d1....n}
控制第n个文字的y轴位置 = 图像高度 / 2 + 随机的偏移数;
mt_rand(0, 156) 随机取文字颜色,0-156目的是取比较深的颜色。
mt_rand(-30, 30) 随机的文字旋转。
3.6在图像上生成线条和雪花
|
1
2
3
4
5
6
7
8
9
10
11
12
|
//生成线条,雪花
privatefunctioncreateLine()
{
for($i= 0;$i< 15;$i++) {
$color= imagecolorallocate($this->img, mt_rand(0, 156), mt_rand(0, 156), mt_rand(0, 156));
imageline($this->img, mt_rand(0,$this->width), mt_rand(0,$this->heigh), mt_rand(0,$this->width), mt_rand(0,$this->heigh),$color);
}
for($i= 0;$i< 150;$i++) {
$color= imagecolorallocate($this->img, mt_rand(200, 255), mt_rand(200, 255), mt_rand(200, 255));
imagestring($this->img, mt_rand(1, 5), mt_rand(0,$this->width), mt_rand(0,$this->heigh),'#',$color);
}
}
|
画线条的时候,取比较深的颜色值,而画雪花的时候取比较淡的颜色值,目的是尽可能的不影响人眼识别验证码,又能干扰自动识别验证码机制。
3.7对外生成验证码图像,供外部调用。
|
1
2
3
4
5
6
7
8
9
10
|
//对外生成
publicfunctiondoImg()
{
$this->createBg(); //1.创建验证码背景
$this->createCode(); //2.生成随机码
$this->createLine(); //3.生成线条和雪花
$this->createFont(); //4.生成文字
$this->outPut(); //5.输出验证码图像
}
|
3.8完整代码:
|
1
2
3
4
5
6
7
8
9
10
11
12
13
14
15
16
17
18
19
20
21
22
23
24
25
26
27
28
29
30
31
32
33
34
35
36
37
38
39
40
41
42
43
44
45
46
47
48
49
50
51
52
53
54
55
56
57
58
59
60
61
62
63
64
65
66
67
68
69
70
71
72
73
74
75
76
77
78
79
80
81
82
83
84
85
86
87
88
89
90
91
92
93
94
95
96
97
|
<?php
/**
* Created by PhpStorm.
* User: andy
* Date: 16-12-22
* Time: 下午1:20
*/
classValidateCode
{
//随机因子
private$charset='abcdefghjkmnprstuvwxyzABCDEFGJKMNPRSTUVWXYZ23456789';
private$code;
private$codeLen= 4;
private$width= 130;
private$heigh= 50;
private$img;//图像
private$font;//字体
private$fontsize= 20;
publicfunction__construct()
{
$this->font = ROOT_PATH.'/font/Chowderhead.ttf';
$this->img = imagecreatetruecolor($this->width,$this->heigh);
}
//生成随机码
privatefunctioncreateCode()
{
$_len=strlen($this->charset) - 1;
for($i= 0;$i<$this->codeLen;$i++) {
$this->code .=$this->charset[mt_rand(0,$_len)];
}
}
//生成背景
privatefunctioncreateBg()
{
$color= imagecolorallocate($this->img, mt_rand(157, 255), mt_rand(157, 255), mt_rand(157, 255));
imagefilledrectangle($this->img, 0,$this->heigh,$this->width, 0,$color);
}
//生成文字
privatefunctioncreateFont()
{
$_x=$this->width /$this->codeLen;
$_y=$this->heigh / 2;
for($i= 0;$i<$this->codeLen;$i++) {
$color= imagecolorallocate($this->img, mt_rand(0, 156), mt_rand(0, 156), mt_rand(0, 156));
imagettftext($this->img,$this->fontsize, mt_rand(-30, 30),$_x*$i+ mt_rand(3, 5),$_y+ mt_rand(2, 4),$color,$this->font,$this->code[$i]);
}
}
//生成线条,雪花
privatefunctioncreateLine()
{
for($i= 0;$i< 15;$i++) {
$color= imagecolorallocate($this->img, mt_rand(0, 156), mt_rand(0, 156), mt_rand(0, 156));
imageline($this->img, mt_rand(0,$this->width), mt_rand(0,$this->heigh), mt_rand(0,$this->width), mt_rand(0,$this->heigh),$color);
}
for($i= 0;$i< 150;$i++) {
$color= imagecolorallocate($this->img, mt_rand(200, 255), mt_rand(200, 255), mt_rand(200, 255));
imagestring($this->img, mt_rand(1, 5), mt_rand(0,$this->width), mt_rand(0,$this->heigh),'#',$color);
}
}
//输出图像
privatefunctionoutPut()
{
header('Content-Type: image/png');
imagepng($this->img);
imagedestroy($this->img);
}
//对外生成
publicfunctiondoImg()
{
$this->createBg(); //1.创建验证码背景
$this->createCode(); //2.生成随机码
$this->createLine(); //3.生成线条和雪花
$this->createFont(); //4.生成文字
$this->outPut(); //5.输出验证码图像
}
//获取验证码
publicfunctiongetCode()
{
returnstrtolower($this->code);
}
}
|
4.测试
测试代码:
|
1
2
3
4
5
6
7
8
9
10
11
12
13
|
<?php
/**
* Created by PhpStorm.
* User: andy
* Date: 16-12-22
* Time: 下午1:20
*/
define('ROOT_PATH', dirname(__FILE__));
require_onceROOT_PATH.'/includes/ValidateCode.class.php';
$_vc=newValidateCode();
echo$_vc->doImg();
|
生成验证码:
5.应用
|
1
2
3
|
<label>
<imgsrc="../config/code.php"onclick="javascript:this.src='../config/code.php?tm='+Math.random();"/>
</label>
|
上面onclick代码是点击验证码图片,能自动刷新验证码。
code.php:
|
1
2
3
4
5
6
7
8
9
10
11
12
|
<?php
/**
* Created by PhpStorm.
* User: andy
* Date: 16-12-22
* Time: 下午3:43
*/
requiresubstr(dirname(__FILE__),0,-7).'/init.inc.php';
$_vc=newValidateCode();
echo$_vc->doImg();
$_SESSION['ValidateCode']=$_vc->getCode();
|
有关应用的完整代码可以从https://git.oschina.net/andywww/myTest 的CMS1.0 文件里下载。
6.小结
在独立测试过程,没发现什么问题;但应用到项目的时候,刚开始发现无法生成验证码图片,网上找了一下,有的说是在outPut()函数中,
在header('Content-Type: image/png'); 这行代码前面增加了一行ob_clean()代码,可以解决验证码这块问题。虽然此方法简单,但这可能会引起其他缓冲数据问题,因为db_clean()功能就是丢弃输出缓冲区中的内容。
相关文章
php 中file_get_contents超时问题的解决方法
file_get_contents超时我知道最多的原因就是你机器访问远程机器过慢,导致php脚本超时了,但也有其它很多原因,下面我来总结file_get_contents超时问题的解决方法总结。...2016-11-25- 相信很多站长都遇到过这样一个问题,访问页面时出现408错误,下面一聚教程网将为大家介绍408错误出现的原因以及408错误的解决办法。 HTTP 408错误出现原因: HTT...2017-01-22
- 最近想自学PHP ,做了个验证码,但不知道怎么搞的,总出现一个如下图的小红叉,但验证码就是显示不出来,原因如下 未修改之前,出现如下错误; (1)修改步骤如下,原因如下,原因是apache权限没开, (2)点击打开php.int., 搜索extension=ph...2013-10-04
安卓手机wifi打不开修复教程,安卓手机wifi打不开解决方法
手机wifi打不开?让小编来告诉你如何解决。还不知道的朋友快来看看。 手机wifi是现在生活中最常用的手机功能,但是遇到手机wifi打不开的情况该怎么办呢?如果手机wifi...2016-12-21连接MySql速度慢的解决方法(skip-name-resolve)
最近在Linux服务器上安装MySql5后,本地使用客户端连MySql速度超慢,本地程序连接也超慢。 解决方法:在配置文件my.cnf的[mysqld]下加入skip-name-resolve。原因是默认安装的MySql开启了DNS的反向解析。如果禁用的话就不能...2015-10-21总结android studio注意事项及打不开等问题解决方法
经过一段时间的使用,总结了android studio打不开等问题的6种解决方法及android studio注意事项,希望对大家有所帮助。 1 首次运行,建立好项目需要下载一些东西,如果...2016-09-20MySQL ERROR 2013 (HY000)错误解决方法
当通过 TCP/IP 连接 MySQL 远程主机时,出现 ERROR 2013 (HY000): Lost connection to MySQL server at 'reading initial communication packet', system error: 104 。如果是在linux shell命令行中直接打 mysql 命令,...2015-03-15IE6-IE9中tbody的innerHTML不能赋值的解决方法
IE6-IE9中tbody的innerHTML不能赋值,重现代码如下 复制代码 代码如下: <!DOCTYPE html> <html> <head> <meta charset="utf-8"/> <title>IE6-IE9中tbody的innerHTML不能复制bug</title> </head> <body style="height:3...2014-06-07- centos6.2,停止mysqld然后修改/etc/my.cnf datadir的位置,启动mysqld提示FAILED,查看日志 复制代码 代码如下: 120609 11:31:31 mysqld_safe mysqld from pid file /var/run/mysqld/mysqld.pid ended 120609 11:35:12 my...2015-03-15
- 小米手机如果想要刷机就必须要先解锁验证才可以,那么,如果遇到小米解锁验证失败以及小米解锁工具登录失败的现象怎么办呢?对此,本文就为大家进行解答,有需要的朋友来看看。...2016-12-21
Photoshop提示“此产品的许可证已过期"及“无法开始您的Adobe Photoshop CS5.1 订阅”解决方法
首先不要鄙视我用Photoshop盗版,实在是贵。现在我们来看看如果你的Photoshop提示“此产品的许可证已过期",还有“无法开始您的Adobe Photoshop CS5.1 订阅”如何解决吧...2016-09-14- 今天小编在这里就来给各位photoshop的这一款软件的使用者们来详细的说一下软件的字体出现了乱码这一问题的解决方法,那么各位有出现这个问题的,下面就来跟着小编一起看...2016-09-14
- 有部分小伙伴表示自己遇到了51模拟器程序不能打开的情况,那么51模拟器打不开怎么回事?下面我就来为大家分享一下解决的方法,有需要的小伙伴就来看一看吧。  &...2017-07-06
CentOS下php使用127.0.0.1不能连接mysql的解决方法
php代码很简单:复制代码 代码如下: $server="127.0.0.1"; println("Begin"); $link = mysql_connect($server,"mysql","mysql"); if (!$link) { die('Could not connect: ' . mysql_error().mysql_errno()); } lin...2015-03-15PHP is_subclass_of函数的一个BUG和解决方法
is_subclass_of的作用:复制代码 代码如下:bool is_subclass_of ( object object, string class_name )如果对象 object 所属类是类 class_name 的子类,则返回 TRUE,否则返回 FALSE。注: 自 PHP 5.0.3 起也可以用一个字符...2014-06-07mysql too many open connections问题解决方法
曾经以为在my.cnf写入max_connections = 2000就可以改变mysql的最大并发量,今天查到一个命令,发现服务器的mysql最大连接数为151.控制台,连接上mysql复制代码 代码如下:show variables;这条命令可以看到所有基础配置如果...2014-05-31mysql报错:MySQL server version for the right syntax to use near type=InnoDB的解决方法
这篇文章主要介绍了mysql报错:MySQL server version for the right syntax to use near type=InnoDB的解决方法,涉及MySQL语句的使用技巧,需要的朋友可以参考下...2016-01-15Can't connect to MySQL server on 'localhost' (10048)问题解决方法
解决Can't connect to MySQL server on 'localhost' (10048), 一般见于使用mysql的windows 2003服务器. 错误的出现的原因: 应用程序需要快速释放和创建新连接, 但是由于 TIME_WAIT 中存在的连接超过默认值,导致较...2013-10-04- PHPMailer在SAE上无法发送邮件怎么回事呢,我们以前在php5.2.7版本中使用了PHPMailer是可以发,但移到sae中发现无法发邮件了,那么此问题如何解决 在SAE上直接用5.2.7...2016-11-25
帝国CMS登录后台提示"您的Cookie没有开启,不能登陆成功"的解决方法
如果没有动过文件特别是/e/config/config.php文件的话!请按照如下操作肯定就OK了! 到你的主机或者服务器环境里找到php.ini文件(如果不知道在哪联系你的空间商就行了) 找到如下...2016-05-19