php 关闭错误提示方法总结与性能分析
一,关闭notice错误提示
1、在php.ini文件中改动error_reporting
改为:
| 代码如下 | 复制代码 |
|
error_reporting=E_ALL & ~E_NOTICE |
|
2、如果你不能操作php.ini文件,你可以使用如下方法
在你想禁止notice错误提示的页面中加入如下代码:
| 代码如下 | 复制代码 |
|
error_reporting(E_ALL^E_NOTICE); |
|
这样出现错误就不会再有任何提示了
二、关闭全部错误提示
php.ini中
打开PHP安装目录下的php.ini文件
| 代码如下 | 复制代码 |
|
找到display_errors = On 修改为 display_errors = off |
|
注意:如果你已经把PHP.ini文件复制到windows目录下,那么必须同时把 c:windows/php.ini里的display_errors = On 修改为display_errors = off
php程序开启
| 代码如下 | 复制代码 |
|
<?php
|
|
在性能上关闭错误提示会给服务器性能负载加大不少哦
测试1:
在关闭错误显示的情况下,测试未初始化变量和已初始化变量在10000000次循环中的性能
变量已初始化的循环代码如下:
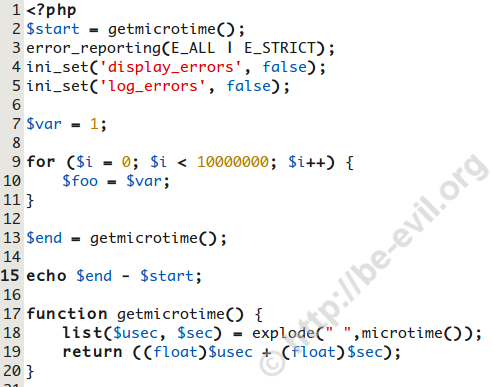
变量未初始化的循环代码如下:

测试成绩:
初始化:平均 5.28 秒
未初始化:平均 17.2 秒
性能差距:3.25倍
平均时间表:
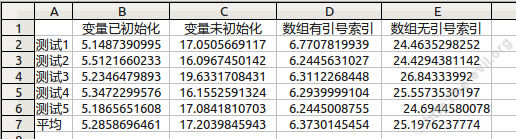
我们可以看到,关闭掉PHP错误输出并不会关闭php内核对错误的处理,代码中如果有大量的Notice级别的错误,还是会降低php程序的性能。
本文章介绍了关于php分多步填写投票调查表单实现方法,大致为 把用户填写的内容获取之后保存在一个隐藏中,然后最后一步就一次提交给数据库。1.php
| 代码如下 | 复制代码 |
| <form name=form1 id=form1 method=post action=2.php> 基本信息1:<input type=text name=base1 /> 基本信息2:<input type=text name=base2 /> <input type=submit value="下一步"> </form> |
|
2.php
| 代码如下 | 复制代码 |
| <form name=form2 id=form2 method=post action=3.php> 产品名称:<input type=text name=prcname /> 产品价格:<input type=text name=price /> 产品型号:<input type=text name=prcXH /> <input type=hidden name=base1 value="<?php echo $_REQUEST['base1'] ?>" /> <input type=hidden name=base2 value="<?php echo $_REQUEST['base2'] ?>" /> <input type=submit value=下一步 /> </form> |
|
3.php
| 代码如下 | 复制代码 |
|
<form name=form3 id=form3 method=post action=4.php> |
|
4.php
| 代码如下 | 复制代码 |
|
<?php $sql1="insert into [base_table](base1,base2) values('{$base1}','{$base2}')"; echo "写入完成"; |
|
总结
这种做的问题在于如果用户不小心关闭了页面数据将要重新再填写一次哦,不过这种方法很多大型网站都是这样做的,包括百度的百科里面的新手升级也是这样处理的。
多文件上传是PHP中的一个基础应用,反正PHPer都会遇到的问题,现在就介绍一个功能完善、强大的多文件上传类给大家吧,能用上这个类的地方会很多。
| 代码如下 | 复制代码 |
|
<?php class Upload{
function Upload($savePath, $fileFormat='',$maxSize = 0, $overwrite = 0) { // 上传 // 单个文件上传 if ($thumbWidth == 0) $thumbWidth = 1; // 文件格式检查,MIME检测 // 设置上传文件的最大字节限制 // 设置覆盖模式
// 设置缩略图 // 设置文件保存名 // 删除文件 // 返回上传文件的信息 // 得到错误信息 ?> <?php if($_FILES['uploadinput']['name'] <> ""){ ?> |
|
tomcat中配置如下:
| 代码如下 | 复制代码 |
|
<mime-mapping> |
|
对于如上配置,当访问扩展名txt或jpg的资源时就出现下载提示框,如果只需要对某些提到的资源让其出现下载提示框,上述配置就不行了,解决的方法是在资源的response头中设置content-type即可,例如:
php 中
| 代码如下 | 复制代码 |
|
header("Content-type:application/octet-stream"); |
|
下载文件程序
| 代码如下 | 复制代码 |
| <? header("content-type:text/html; charset=utf-8"); $file_name=$_GET['name']; //服务器的真实文件名 $file_realName=urldecode($_GET['real']); //数据库的文件名urlencode编码过的 $file_dir="upload/"; $file = fopen($file_dir . $file_name,"r"); // 打开文件 // 输入文件标签 header( "Pragma: public" ); header( "Expires: 0" ); Header("Content-type: application/octet-stream"); Header("Accept-Ranges: bytes"); Header("Accept-Length: ".filesize($file_dir . $file_name)); Header("Content-Disposition: attachment; filename=" . iconv("UTF-8","GB2312//TRANSLIT",$file_realName)); // 输出文件内容 echo fread($file,filesize($file_dir . $file_name)); fclose($file); exit; ?> |
|
java 中
| 代码如下 | 复制代码 |
| response.setContentType("application/octet-stream"); resp.setHeader("Content-Disposition", "attachment;filename="downloaded.txt"); |
|
如果需要为下载设置一个保存的名字,可以用Content-Disposition属性来指定。
实例
| 代码如下 | 复制代码 |
|
<%@page language="java" contentType="application/x-msdownload" import="java.io.*,java.net.*" pageEncoding="gbk"%><% |
|
下面程序运行结果为()
| 代码如下 | 复制代码 |
|
?$numb=array( A.3 |
|
答案:B
count函数中如果mode被设置为 COUNT_RECURSIVE(或 1),则会递归底计算多维数组中的数组的元素个数(也就是你结果的12)。如果不设置mode默认为0 。不检测多维数组(数组中的数组)(结果3)。
首先遍历的是外面的数组array得出有两个元素(”color1″,”color2″,”color3″) 为3
再遍历(”color1″,”color2″,”color3″)数组得出的是9个元素 为9
结果就是3+9=12
参考
| 代码如下 | 复制代码 |
|
<?php echo(count($fruits[0])); |
|
你说的可能是用其他方式定义的数组,比如直接用:
| 代码如下 | 复制代码 |
|
<?php echo(count($fruits[0])); |
|
这样那就输出3,因为php中的数组不要求索引必须连续,参考手册上有如下一段:
数组
PHP 中的数组实际上是一个有序图。图是一种把 values 映射到 keys 的类型。此类型在很多方面做了优化,因此你可以把它当成真正的数组来使用,或列表(矢量),散列表(是图的一种实现),字典,集合,栈,队列以及更多可能性。因为可以用另一个 PHP 数组作为值,也可以很容易地模拟树。
实例
获得二维或多维数组的第一维的长度,这是个常用的程序判断,比如你读取的数组是一个二维数组:
| 代码如下 | 复制代码 |
| <?php $arr=array( 0=>array('title' => '新闻1', 'viewnum' => 123, 'content' => 'ZAQXSWedcrfv'), 1=>array('title' => '新闻2', 'viewnum' => 99, 'content' => 'QWERTYUIOPZXCVBNM') ); ?> |
|
如果你想统计数组$arr的长度,也就是说该二维数组只有两条新闻,你想要的数字也是2,但是如果使用count($arr)不同版本的php,统计的结果是不一样的;
后来在php手册中发现,count函数还有第二个参数,解释如下:
count函数有两个参数:
0(或COUNT_NORMAL)为默认,不检测多维数组(数组中的数组);
1(或COUNT_RECURSIVE)为检测多维数组,
所以如果要判断读取的数组$arr是不是有新闻信息,就要这样写了:
| 代码如下 | 复制代码 |
| <?php if(is_array($arr) && count($arr,COUNT_NORMAL)>0 ) { ..... } else { ..... } ?> |
|
你可以使用这样的代码来测试该函数:
| 代码如下 | 复制代码 |
| <?php $arr=array( 0=>array('title' => '新闻1', 'viewnum' => 123, 'content' => 'ZAQXSWedcrfv'), 1=>array('title' => '新闻2', 'viewnum' => 99, 'content' => 'QWERTYUIOPZXCVBNM') ); echo '不统计多维数组:'.count($arr,0);//count($arr,COUNT_NORMAL) echo "<br/>"; echo '统计多维数组:'.count($arr,1);//count($arr,COUNT_RECURSIVE) ?> |
|
好了,到此位置,已经解决php中获取二维或多维数组的第一维长度的问题
相关文章
php错误提示 open_basedir restriction in effect 解决
今天在帮助一个朋友配置一台服务器时发现网站配置好了缓存目录读写不成功,在打开错误时发现提示 Warning: file_exists() [function.file-exists]: open_basedir restr...2016-11-25- 这篇文章主要介绍了Postgresl 如何选择正确的关闭模式,具有很好的参考价值,希望对大家有所帮助。一起跟随小编过来看看吧...2021-01-18
- 很多初学者都想把默认的C#关闭按钮事件弄明白,本文就介绍一下C#窗体关闭事件,文中通过示例代码介绍的非常详细,具有一定的参考价值,感兴趣的小伙伴们可以参考一下...2021-10-31
- 20岁老牌网页程序语言PHP,最快将在10月底释出PHP 7新版,这是十年来的首次大改版,最大特色是在性能上的大突破,能比前一版PHP 5快上一倍,PHP之父Rasmus Lerdorf表示,甚至能比HHVM虚拟机下的PHP程序性能更快。HHVM 是脸书为自...2015-11-24
- 这篇文章主要介绍了C#实现延时并自动关闭MessageBox的方法,非常实用的功能,需要的朋友可以参考下...2020-06-25
利用 Chrome Dev Tools 进行页面性能分析的步骤说明(前端性能优化)
这篇文章主要介绍了利用 Chrome Dev Tools 进行页面性能分析的步骤说明(前端性能优化),本文给大家介绍的非常想详细,对大家的学习或工作具有一定的参考借鉴价值,需要的朋友可以参考下...2021-02-24- 这篇文章主要介绍了C#窗体编程不显示最小化、最大化、关闭按钮的方法,即windows forms编程中取消最小化、最大化、关闭按钮,需要的朋友可以参考下...2020-06-25
- 这篇文章主要介绍了JavaScript提高网站性能优化的建议(二)的相关资料,需要的朋友可以参考下...2016-07-29
- 这篇文章主要介绍了提升jQuery的性能需要做好的七件事,希望真的帮助大家提升jQuery性能,需要的朋友可以参考下...2016-01-14
- 这篇文章主要介绍了Python爬虫之Selenium实现关闭浏览器,文中通过示例代码介绍的非常详细,对大家的学习或者工作具有一定的参考学习价值,需要的朋友们下面随着小编来一起学习学习吧...2020-12-04
- php测试性能代码 function microtime_float () { list ($usec, $sec) = explode(" ", microtime()); return ((float) $usec + (float) $sec); } functio...2016-11-25
- 这篇文章主要介绍了如何用Node.js编写内存效率高的应用程序,对Node.js感兴趣的同学,可以参考下...2021-05-01
- 下面小编就为大家带来一篇c# 实现子窗口关闭父窗口也关闭的简单实例。小编觉得挺不错的,现在就分享给大家,也给大家做个参考。一起跟随小编过来看看吧...2020-06-25
Notice:undefined index ..错误提示解决方法
这句是在php开发中会碰的一些问题,看这提示我们都知道是变量未定义,那么下面来解决Notice:undefined index方法, 一,这个因为是变量未定义我们只要找到相关的位置加...2016-11-25vivo手机怎么关闭充电提示音 vivo手机充电提示音关闭方法
vivo手机充电提示音在哪里设置?如何快速关闭充电提示音?很多人喜欢充电提示音的同时,也有很多人不喜欢,觉得这个充电提示音有点烦,那么我们就来学习一下充电提示音的设置方法...2020-12-08- 文章介绍了css中空路径对页面性能影响的解决方案,这个可能很多美工朋友不会去注意这一点,下面我们来看看吧。 在写 CSS 的时候,用 background:url(#) 还是会对页面进...2017-07-06
- 这篇文章主要介绍了Redis 执行性能测试的方法,文中讲解非常细致,帮助大家更好的理解和学习redis,感兴趣的朋友可以了解下...2021-01-15
- 一.Join语法概述join 用于多表中字段之间的联系,语法如下:复制代码 代码如下:... FROM table1 INNER|LEFT|RIGHT JOIN table2 ON conditionatable1:左表;table2:右表。JOIN 按照功能大致分为如下三类:INNER JOIN(内连接,或...2014-05-31
- 这篇文章主要介绍了C#导出数据到excel如何提升性能,文中通过示例代码介绍的非常详细,对大家的学习或者工作具有一定的参考学习价值,需要的朋友可以参考下...2020-07-13
- 开发中需要传递变参,考虑使用 dynamic 还是 Dictionary,dynamic 的编码体验显著优于 Dictionary,如果性能差距不大的话,我会选择使用dynamic。下面通过本文给大家详细介绍下C#中Dynamic和Dictionary性能比较,一起看看吧...2020-06-25