php版微信JS-SDK地理位置与腾讯地图API实例
根据前面几个地理位置教程,最终把腾讯地图的Web Service API 写完善的类,call不同接口时,注意不同的参数,因为每个差数都稍有不同,是直接影响到显示结果,所以详细请查看官方的文档 Web Service API文档
继续以TP为框架给代码和实例效果!
QQMapModel类:
<?php
namespace Home\Model;
class QQMapModel {
const
SEARCH_API = 'http://apis.map.qq.com/ws/place/v1/search',
SUGGESTION_API = 'http://apis.map.qq.com/ws/place/v1/suggestion',
GEOCODER_API = 'http://apis.map.qq.com/ws/geocoder/v1',
LIST_API = 'http://apis.map.qq.com/ws/district/v1/list',
TRANSLATE_API = 'http://apis.map.qq.com/ws/coord/v1/translate',
PANO_API = 'http://apis.map.qq.com/ws/streetview/v1/getpano';
public
$error_number, $error, $appKey;
protected static
$_instance;
static public function getInstance(array $options = array()) {
if (empty(self::$_instance)) {
self::$_instance = new static($options);
}
return self::$_instance;
}
public function __construct(array $options = array()) {
if(count($options))
$this->appKey = $options['appkey'];
}
public function call($url, array $params = array(), $format_result = true) {
$param = array_merge(array('key' => $this->appKey), $params);
$url = $url.'?'.http_build_query($param);
$ch = curl_init($url);
curl_setopt_array($ch, array(
CURLOPT_RETURNTRANSFER => 1,
CURLOPT_FOLLOWLOCATION => 1,
CURLOPT_AUTOREFERER => 1,
CURLOPT_SSL_VERIFYHOST => 0,
CURLOPT_SSL_VERIFYPEER => 0,
CURLOPT_VERBOSE => 1,
));
$res = curl_exec($ch);
$this->error_number = curl_errno($ch);
$this->error = curl_error($ch);
if (curl_errno($ch)) {
return false;
}
curl_close($ch);
return ($format_result ? $this->parseResult($res) : $res);
}
protected function parseResult($res) {
$res = json_decode($res, true);
if ($res['status'] !== 0) {
$this->error_number = $res['status'];
$this->error = $res['message'];
return false;
}
return $res;
}
//取街景图接口
public function streetImage($pano, $otherParam = array()) { //max 960x640
$param = array(
'size' => '620x380',
'pano' => $pano,
'heading' => 0,
'pitch' => 0,
'key' => $this->appKey,
);
if(count($otherParam))
$param = array_merge($param, $otherParam);
return 'http://apis.map.qq.com/ws/streetview/v1/image?' . http_build_query($param);
}
//新静态图v2接口
public function staticMap($point, $otherParam = array()) {
$param = array(
'size' => '620*380',
'center' => $point,
'zoom' => 13,
'format' => 'png',
'maptype' => 'roadmap',
'markers' => $point,
'key' => $this->appKey,
);
if(count($otherParam))
$param = array_merge($param, $otherParam);
return 'http://apis.map.qq.com/ws/staticmap/v2/?' . http_build_query($param);
}
//旧静态图v1版接口 $point参数 先经度再纬度与上面的相反
public static function mapImage($point, $otherParam = array()) {
$param = array(
'size' => '620*380',
'center' => $point,
'zoom' => 13,
'format' => 'png',
'markers' => $point,
);
if(count($otherParam))
$param = array_merge($param, $otherParam);
return 'http://st.map.qq.com/api?' . http_build_query($param);
}
}
ImageCacheModel类新封装一个缓存图片方法:
public static function getApiImg($points, $search, $slug = 'marker') {
$fileName = md5($points);
self::$FULL_CACHE_DIR = C('PUBLIC_FULL_DIR') . self::CACHE_DIR;
$cacheImg = self::$FULL_CACHE_DIR . '/' . $fileName . self::$TYPE;
if (file_exists($cacheImg)) {
return self::CACHE_DIR . $fileName . self::$TYPE;
} else {
$map = QQMapModel::getInstance(array(
'appkey' => 'CZQBZ-RC53V-2RQPX-UFNBE-VDH2J-DFBFJ'
));
$res = $map->call(QQMapModel::SEARCH_API, array(
'keyword' => $search,
'boundary' => "nearby($points,1000)"
));
if ($res) {
$imageUrl = '';
switch($slug) {
case 'marker' :
$label = array();
foreach ($res['data'] as $data) {
//API要求标题不要长过13字符
$label[] = mb_substr($data['title'], 0, 13, 'utf-8') . '|' . $data['location']['lat'] . ',' . $data['location']['lng'];
}
$labels = implode('|', $label);
$labels = 'border:1|size:10|color:brown|bgcolor:orange|' . $labels;
$imageUrl = $map->staticMap($points, array('labels' => $labels, 'zoom' => 15));
break;
case 'label' :
$marker = array();
foreach($res['data'] as $data) {
$lat = $data['location']['lat'];
$lng = $data['location']['lng'];
$marker[] = $lat.','.$lng;
}
$markers = implode('|', $marker);
$markers = 'color:blue|label:H|'.$markers;
$imageUrl = $map->staticMap($points, array('markers' => $markers, 'zoom' => 15));
break;
}
if($imageUrl) {
self::saveCacheImg($imageUrl, $fileName);
return self::CACHE_DIR . $fileName . self::$TYPE;
}
}
}
return self::CACHE_DIR.'default'.self::$TYPE;
}
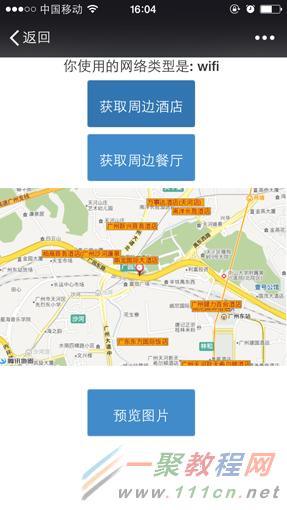
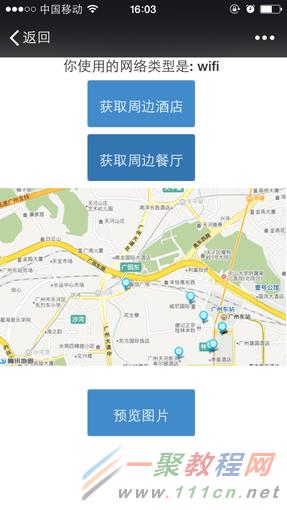
上面段代码,我主要调用了search接口,并根据参数让生成的地图是图标还是标签文字来显示。
Controller里加入跳转的URL:(因为Layout与之前差不多,这里就不写了)
public function apimapAction() {
layout('Layout/apimap');
$this->display();
}
public function maphotelAction() {
layout(false);
if(I('pos','')) {
$target = ImageCacheModel::getApiImg(I('pos'),'酒店','marker');
$url = __ROOT__.$target;
redirect($url);
}
}
public function mapfoodAction() {
layout(false);
if(I('pos','')) {
$target = ImageCacheModel::getApiImg(I('pos'), '美食', 'label');
$url = __ROOT__.$target;
redirect($url);
}
}
目前Web Service API提供了6个接口,包括根据地址解析或者逆解析,还有坐标转换,我做测试时发现腾讯上的经纬度转成百度后还是编差太大,似乎不同地图API间的经纬度转没什么意义。这些接口就由你们来试了,一通百通~
以酒店查询标签文本的效果图:
根据《微信JS-SDK地理位置接口例子》中的QQMapModel和ImageCacheModel类进行扩展。看了下腾讯地图有个静态图的V2版,我顺便也加上去,继续围绕腾讯地图把取街景的接口写上。由于是Demo,像取街景有几个参数可以自行定义,我只用默认!不多说看码吧
QQMapModel.class.php: (注:API_KEY 用QQ在官方申请,目前免费)
<?php
namespace Home\Model;
class QQMapModel {
const
PANO_API = 'http://apis.map.qq.com/ws/streetview/v1/getpano',
API_KEY = 'CZQBZ-RC53V-2RQPX-UFNBE-FCH2J-DF00';
static public function call($url, array $params = null) {
$url = $url.'?'.http_build_query($params);
$ch = curl_init($url);
curl_setopt_array($ch, array(
CURLOPT_RETURNTRANSFER => 1,
CURLOPT_FOLLOWLOCATION => 1,
CURLOPT_AUTOREFERER => 1,
CURLOPT_SSL_VERIFYHOST => 0,
CURLOPT_SSL_VERIFYPEER => 0,
CURLOPT_VERBOSE => 1,
));
$result = curl_exec($ch);
if (curl_errno($ch)) {
return false;
}
curl_close($ch);
return $result;
}
//新静态图v2接口
static function staticMap($point, $otherParam = array()) {
$pos = explode(',', $point);
$posStr = $pos[1].','.$pos[0];
$param = array(
'size' => '620*380',
'center' => $posStr,
'zoom' => 13,
'format' => 'png',
'maptype' => 'roadmap',
'markers' => $posStr,
'key' => self::API_KEY,
);
if(count($otherParam))
$param = array_merge($param, $otherParam);
return 'http://apis.map.qq.com/ws/staticmap/v2/?' . http_build_query($param);
}
//取街景图接口
static function streetView($pano, $otherParam = array()) { //max 960x640
$param = array(
'size' => '620x380',
'pano' => $pano,
'heading' => 0,
'pitch' => 0,
'key' => self::API_KEY,
);
if(count($otherParam))
$param = array_merge($param, $otherParam);
return 'http://apis.map.qq.com/ws/streetview/v1/image?' . http_build_query($param);
}
//街景图的ID接口
static function getPano($location, $otherParam = array()) {
$param = array(
'location' => $location,
'radius' => 200,
'output' => 'json',
'key' => self::API_KEY,
);
if(count($otherParam))
$param = array_merge($param, $otherParam);
$result = self::call(self::PANO_API, $param);
if ($result) {
return json_decode($result, 1);
}
return false;
}
//静态图v1版接口
static function mapImage($point, $otherParam = array()) {
$param = array(
'size' => '620*380',
'center' => $point,
'zoom' => 13,
'format' => 'png',
'markers' => $point,
);
if(count($otherParam))
$param = array_merge($param, $otherParam);
return 'http://st.map.qq.com/api?' . http_build_query($param);
}
}
ImageCacheModel类:(只是在上篇教程上加多个静态方法处理街景的缓存)
public static function getStreetCacheImg($points) {
$fileName = md5($points);
self::$FULL_CACHE_DIR = C('PUBLIC_FULL_DIR').self::CACHE_DIR;
$cacheImg = self::$FULL_CACHE_DIR.'/'.$fileName.self::$TYPE;
if(file_exists($cacheImg)) {
return self::CACHE_DIR.$fileName.self::$TYPE;
} else {
$res = QQMapModel::getPano($points);
if($res['status'] === 0) {
$pano = $res['detail']['id'];
$imageUrl = QQMapModel::streetView($pano);
self::saveCacheImg($imageUrl, $fileName);
return self::CACHE_DIR.$fileName.self::$TYPE;
}
return self::CACHE_DIR.'default'.self::$TYPE;
}
}
然后Controller里的处理:(至于Layout模版里的AJAX调用与上篇地理接口差不多,这里就不写了)
public function streetpicAction() {
layout(false);
if(I('pos','')) {
$target = ImageCacheModel::getStreetCacheImg(I('pos'));
$url = __ROOT__.$target;
redirect($url);
}
}
本想这个接口很简单不想写写的,因为看文档它跟图像接口差不多。不过给新用JS-SDK的朋友参照下也好。因为在群中有人说录音后不能转发给用户,经测试是完全可以的,只是时间显示上不对。显示1秒,但不影响播放长度。例子中,我用AJAX提交上传后的media_id,和写固定的open_id 传到后台,调用客服接口发出,注意48小时!这意味着将本地的localId转为serverId后,可以下传回自己服务器,因为微信服务器只保存3天,继续用TP作为框架。
首先是Layout\record.phtml:
<!DOCTYPE html>
<html lang="en">
<head>
<meta charset="UTF-8">
<title></title>
<link href="__PUBLIC__/css/bootstrap.min.css" rel="stylesheet" />
</head>
<body>
{__CONTENT__}
</body>
<script type="text/javascript">
window.jQuery || document.write("<script src='__PUBLIC__/js/jquery-1.10.2.min.js'>"+"<"+"/script>");
</script>
<script src="http://res.wx.qq.com/open/js/jweixin-1.0.0.js"></script>
<script>
wx.config({
debug: false,
appId: '{$signPackage["appId"]}',
timestamp: {$signPackage["timestamp"]},
nonceStr: '{$signPackage["nonceStr"]}',
signature: '{$signPackage["signature"]}',
jsApiList: [
'checkJsApi',
'startRecord',
'stopRecord',
'onVoiceRecordEnd',
'playVoice',
'pauseVoice',
'stopVoice',
'onVoicePlayEnd',
'uploadVoice',
'downloadVoice',
'getNetworkType'
]
});
wx.ready(function () {
var record = {
localId: '',
serverId: ''
};
wx.getNetworkType({
success: function (res) {
var networkType = res.networkType; // 返回网络类型2g,3g,4g,wifi
jQuery(function() {
$('#networkType').html(networkType);
});
}
});
document.querySelector('#record').onclick = function () {
$("#record h2").html('录音中...');
wx.startRecord();
};
document.querySelector('#stoprecord').onclick = function() {
wx.stopRecord({
success: function (res) {
record.localId = res.localId;
$("#record h2").html('开始录音');
}
});
};
wx.onVoiceRecordEnd({
complete: function (res) {
record.localId = res.localId;
$("#record h2").html('开始录音');
}
});
wx.onVoicePlayEnd({
success: function (res) {
//record.localId = res.localId; // 返回音频的本地ID
alert('播放完毕');
}
});
document.querySelector('#playrecord').onclick = function() {
if(record.localId == '') {
alert('你还没录音');
return;
}
wx.playVoice({
localId: record.localId
});
};
document.querySelector('#uploadrecord').onclick = function() {
if(record.localId == '') {
alert('你还没录音localId');
return;
}
wx.uploadVoice({
localId: record.localId,
isShowProgressTips: 1,
success: function (res) {
record.serverId = res.serverId;
$.getJSON('http://www.demo.com/tp/home/index/sendrecord',{openid:'oHdUGj7hZfJfr4ILMB5rgctpNrOw', media_id:record.serverId}, function(data) {
if(data)
alert('发送成功');
});
}
});
};
document.querySelector('#downloadrecord').onclick = function() {
if(record.serverId == '') {
alert('你还没上传录音');
return;
}
wx.downloadVoice({
serverId: record.serverId,
isShowProgressTips: 1,
success: function (res) {
record.localId = res.localId;
alert(record.localId);
}
});
};
});
wx.error(function(res){
var str = res.errMsg;
var reg = /invalid signature$/;
var r = str.match(reg);
if(r !== null) {
jQuery(function(){
$.getJSON('http://www.demo.com/tp/home/index/ticket', function(data) {
if(data) {
alert('ticket update');
location = location;
window.navigate(location);
}
});
});
}
});
</script>
</html>
视图views\Index\record.phtml
<style>
.text-center {text-align: center;}
.btn-hight {height:100px;width:230px;}
#img img{width:200px;}
</style>
<div class="col-lg-12 col-sm-12" style="margin: 12px auto 10px;">
<div class="form-group text-center">
<h2>你使用的网络类型是: <span id="networkType"></span></h2>
</div>
<div class="form-group text-center">
<button id="record" type="button" class="btn btn-primary btn-hight"><h2>开始录音</h2></button>
</div>
<div class="form-group text-center">
<button id="stoprecord" type="button" class="btn btn-warning btn-hight"><h2>停止录音</h2></button>
</div>
<div class="form-group text-center">
<button id="playrecord" type="button" class="btn btn-primary btn-hight"><h2>播放录音</h2></button>
</div>
<div class="form-group text-center">
<button id="pauserecord" type="button" class="btn btn-success btn-hight"><h2>暂停播放</h2></button>
</div>
<div class="form-group text-center">
<button id="uploadrecord" type="button" class="btn btn-danger btn-hight"><h2>上传录音</h2></button>
</div>
<div class="form-group text-center">
<button id="downloadrecord" type="button" class="btn btn-info btn-hight"><h2>下载录音</h2></button>
</div>
</div>
Controller里就加入的方法:
public function recordAction() {
layout('Layout\record');
$this->display();
}
public function sendrecordAction() {
if(IS_AJAX) {
$openid = I('openid','');
$media_id = I('media_id','');
$res = $this->api->call('/message/custom/send', array(
'touser' => $openid,
'msgtype' => 'voice',
'voice' => array('media_id' => $media_id),
), WechatJSAPI::JSON);
if($res)
$this->ajaxReturn(true);
$this->ajaxReturn(false);
}
}
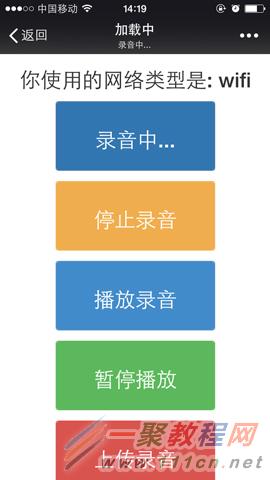
录音效果图(第一次会弹出提示要授权)
上传中效果图:

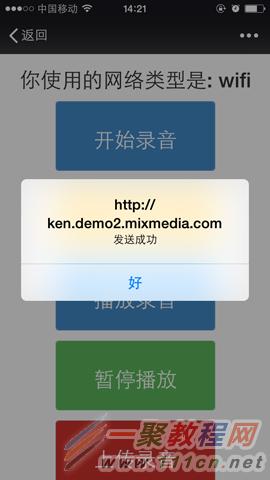
上传接着发客服消息效果图:
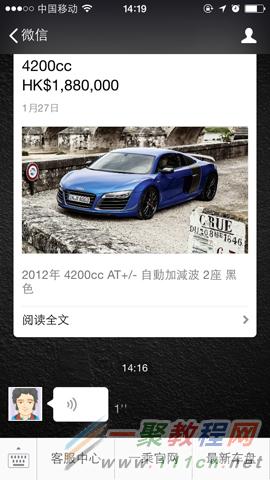
最后在服务号看到的效果图(注意最长60秒,它都只显示1″,但不影响你录制时的长度播放)
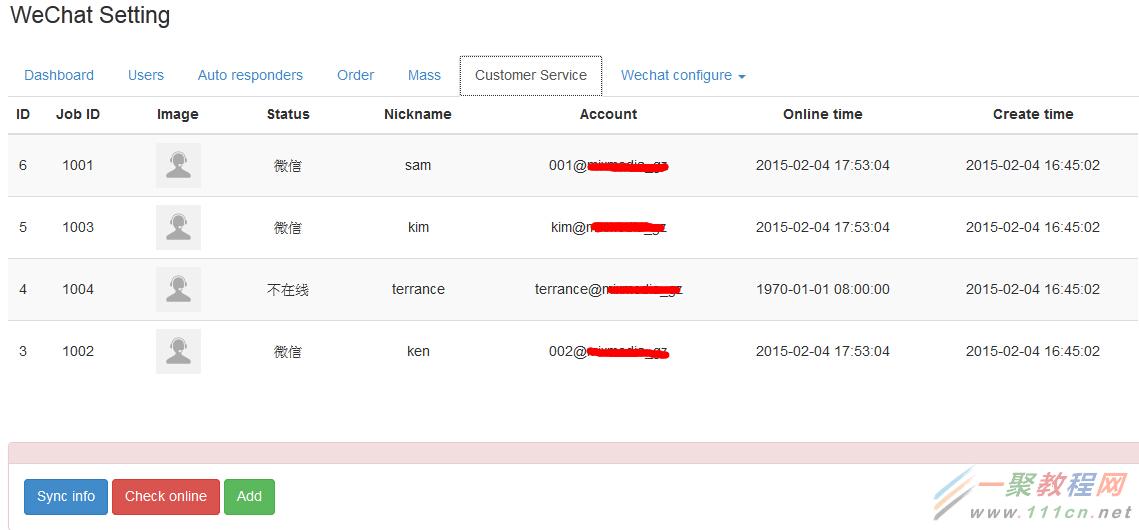
无奈之下找微信官方客服,一番令人无语的问答后,最终解决了!原来是API的URL上的/customservice/kfacount/中的kfaccount少了个c,真是操啊!!
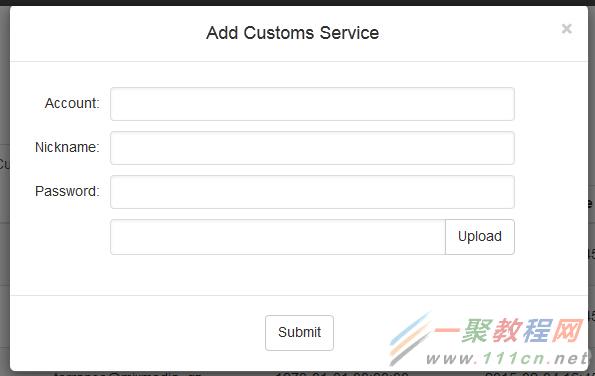
以下代码只作参考,毕竟大家所写的方式不同,我的处理过程是,取到表单数据后,先提交给多客服的add接口,成功后,再upload头像,最后再写进数据库!流程处理的代码如下:
/*
* 添加多客服帐号
*/
public function add_customer() {
$data = array();
foreach($_POST['customer'] as $items ) {
if( ! empty($items['value'])) {
$key = $items['name'];
$val = $items['value'];
if($key == 'media_file') {
$img_url = $val;
continue;
}
if($key == 'password') {
$original_pass = $val;
$val = md5($val);
}
$data[$key] = $val;
}
}
$res = $this->call('/kfaccount/add', $data, self::JSON, self::API_TYPE_SERVICE);
if($res) {
if($img_url) {
$this->upload_customer_header($img_url, $data['kf_account']);
$data['local_headimgurl'] = $img_url;
}
global $wpdb;
$table = $wpdb->prefix.'wechat_customer';
if( ! empty($original_pass)) $data['password'] = $original_pass;
$wpdb->insert($table, array_merge($data, array('create_time' => time())));
exit('ok');
}
exit('errcode: '.$this->_error_number.' errmsg: '.$this->_error);
}
要改Wechat-JSON.php API类,新增多客服接口上传方法:
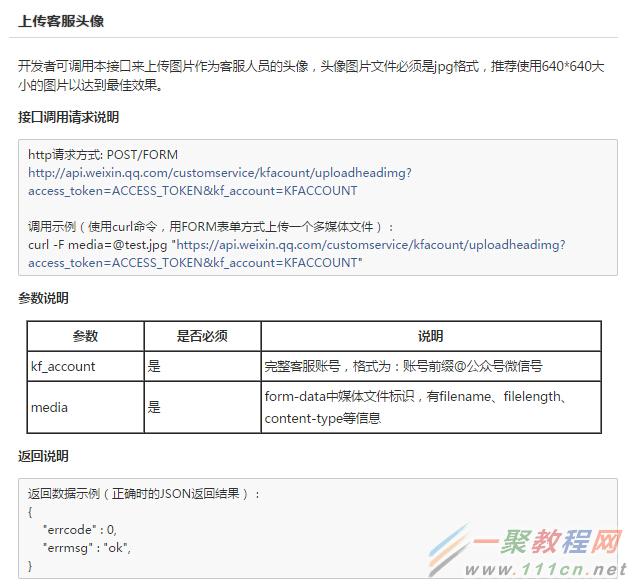
//上传多客服头像 必须是jpg格式,推荐640*640大小的图片以达到最佳效果
public function CustomerHeaderUpload($file_full_path, $account = '') {
$this->_access_token = $this->getAccessToken();
$res = false;
if ($this->_access_token) {
$url = 'https://api.weixin.qq.com/customservice/kfaccount/uploadheadimg?';
$url = $url.'access_token='.$this->_access_token.'&kf_account='.$account;
$res = $this->request($url, array(
'media' => '@'.$file_full_path,
), self::POST);
}
return $res;
}
这是在RFC2397中定义的Data URI scheme,目的是将一些小的数据,直接嵌入到网页中,从而不用再从外部文件载入,比如上面那串字符,其实是一张图片,将这些字符复制黏贴到火狐的地址栏中并转到,就能看到了。
在上面的Data URI中,data表示取得数据的协定名称,image/jpeg是数据类型名称,base64是数据的编码方法,逗号后面就是这个image/jpeg文件base64编码后的数据。
目前Data URI scheme支持的类型有:
data:text/plain,文本数据
data:text/html,HTML代码
data:text/html;base64,base64编码的HTML代码
data:text/css,CSS代码
data:text/css;base64,base64编码的CSS代码
data:text/javascript,javascript代码
data:text/javascript;base64,base64编码的Javascript代码
data:image/gif;base64,base64编码的gif图片数据
data:image/png;base64,base64编码的png图片数据
data:image/jpeg;base64,base64编码的jpeg图片数据
data:image/x-icon;base64,base64编码的icon图片数据
$img_file = 'https://img.alicdn.com/bao/uploaded/TB1eaiELpXXXXcPXpXXSutbFXXX.jpg';
$img_info = getimagesize($img_file);
$img_src = "data:{$img_info['mime']};base64," . base64_encode(file_get_contents($img_file));
exit("<img src='{$img_src}' />");
相关文章
iOS设置UIButton文字显示位置和字体大小、颜色的方法
这篇文章给大家分享了iOS如何设置UIButton的文字显示位置和字体的大小、颜色,文中给出了示例代码,相信对大家的学习和理解很有帮助,有需要的朋友们下面来一起看看吧。...2020-06-30- 这篇文章主要为大家详细介绍了C#微信开发之发送模板消息的相关资料,具有一定的参考价值,感兴趣的小伙伴们可以参考一下...2020-06-25
- 这篇文章主要介绍了iOS新版微信底部返回横条问题的解决,文中通过示例代码介绍的非常详细,对大家的学习或者工作具有一定的参考学习价值,需要的朋友们下面随着小编来一起学习学习吧...2020-06-30
- 为公司系统业务需要,这几天了解了一下微信和支付宝扫码支付的接口,并用c#实现了微信和支付宝扫码支付的功能。需要的朋友跟随小编一起看看吧...2020-06-25
- 这篇文章主要介绍了Python爬取微信小程序通用方法代码实例详解,文中通过示例代码介绍的非常详细,对大家的学习或者工作具有一定的参考学习价值,需要的朋友可以参考下...2020-09-29
- 这篇文章主要介绍了C#实现的微信网页授权操作逻辑封装,分析了微信网页授权操作的原理、步骤并给出了C#实现的网页授权操作逻辑封装类,需要的朋友可以参考下...2020-06-25
- 这篇文章主要介绍了iOS新版微信底部工具栏遮挡问题完美解决,文中通过示例代码介绍的非常详细,对大家的学习或者工作具有一定的参考学习价值,需要的朋友们下面随着小编来一起学习学习吧...2020-06-30
- 这篇文章主要为大家详细介绍了C#图像识别,微信跳一跳机器人,具有一定的参考价值,感兴趣的小伙伴们可以参考一下...2020-06-25
- 这篇文章主要介绍了基于JavaScript获取鼠标位置的各种方法 ,需要的朋友可以参考下...2015-12-18
- 这篇文章主要介绍了简单用VBS调用企业微信机器人发定时消息的方法,文中通过示例代码介绍的非常详细,对大家的学习或者工作具有一定的参考学习价值,需要的朋友们下面随着小编来一起学习学习吧...2020-12-08
- 这篇文章主要介绍了python实现企业微信定时发送文本消息的实例代码,本文给大家介绍的非常详细,对大家的学习或工作具有一定的参考借鉴价值,需要的朋友可以参考下...2020-11-25
- 在网页中,我们可以将JavaScript代码放在html文件中任何位置,但一般放在head或body标签里面。一般来说,<script>元素放在哪里与其的功能作用是紧密相关的,通过本文我们一起学习下...2016-01-18
- 六月才刚刚过半,就已经相继有中兴、华为被美国起诉,此次微信也未能幸免,被美国一家叫Uniloc的公司起诉,理由是微信的语音群聊、视频聊天等功能侵犯其两项与电话会议技术相关的专利,该公司要求微信立即中止这些功能。...2016-07-04
- 这篇文章主要为大家详细介绍了原生JS实现微信通讯录,文中示例代码介绍的非常详细,具有一定的参考价值,感兴趣的小伙伴们可以参考一下...2020-06-19
- 这篇文章主要介绍了HTML5实现微信拍摄上传照片功能,实现HTML5 Canvas手机拍摄,本地压缩上传图片时遇到问题的解决方法,具有一定的参考价值,感兴趣的小伙伴们可以参考一下...2017-04-27
- 这篇文章主要介绍了解决微信授权成功后点击按返回键出现空白页和报错的问题,文中通过示例代码介绍的非常详细,对大家的学习或者工作具有一定的参考学习价值,需要的朋友们下面随着小编来一起学习学习吧...2020-06-08
- 这篇文章主要介绍了使用JavaScript脚本判断网页是否在微信中被打开的方法,在各种使用微信参加活动的移动版页面上经常可以用到,需要的朋友可以参考下...2016-03-09
- 这篇文章主要介绍了微信小程序点击滚动到指定位置的实现,文中通过示例代码介绍的非常详细,对大家的学习或者工作具有一定的参考学习价值,需要的朋友们下面随着小编来一起学习学习吧...2020-05-23
- 这篇文章主要介绍了JS实现设置ff与ie元素绝对位置的方法,涉及JavaScript针对页面元素及元素属性的相关操作技巧,需要的朋友可以参考下...2016-03-10
JavaScript结合Bootstrap仿微信后台多图文界面管理
这篇文章主要为大家详细介绍了js结合Bootstrap仿微信后台多图文界面管理,具有一定的参考价值,感兴趣的小伙伴们可以参考一下...2016-07-29