vue如何使用driver.js实现项目功能向导指引
介绍
https://github.com/kamranahmedse/driver.js
driver.js 是一个轻量级、无依赖的原生JavaScript引擎,在整个页面中驱动用户的注意力,强大的、高度可定制的原生JavaScript引擎,无外部依赖,支持所有主流浏览器。
安装
npm install driver.js
使用
import Driver from 'driver.js';
import 'driver.js/dist/driver.min.css';
突出显示单个元素
const driver = new Driver();
driver.highlight('#create-post');
高亮和弹出窗口
const driver = new Driver();
driver.highlight({
  element: '#some-element',
  popover: {
    title: 'Title for the Popover',
    description: 'Description for it',
  }
});
定位弹出窗口
const driver = new Driver();
driver.highlight({
  element: '#some-element',
  popover: {
    title: 'Title for the Popover',
    description: 'Description for it',
    // position can be left, left-center, left-bottom, top,
    // top-center, top-right, right, right-center, right-bottom,
    // bottom, bottom-center, bottom-right, mid-center
    position: 'left',
  }
});
还可以使用offset属性为弹窗位置添加偏移量
const driver = new Driver();
driver.highlight({
  element: '#some-element',
  popover: {
    title: 'Title for the Popover',
    description: 'Description for it',
    position: 'bottom',
    // Will show it 20 pixels away from the actual position of popover
    // You may also provide the negative values
    offset: 20,
  }
});
创建功能介绍
功能介绍在新用户入门时很有用,可以让他们了解应用程序的不同部分。您可以使用驱动程序无缝创建它们。定义步骤,并在你想开始展示时调用start。用户将能够使用键盘或使用弹出窗口上的按钮来控制步骤。
const driver = new Driver();

// Define the steps for introduction
driver.defineSteps([
  {
    element: '#first-element-introduction',
    popover: {
      className: 'first-step-popover-class',
      title: 'Title on Popover',
      description: 'Body of the popover',
      position: 'left'
    }
  },
  {
    element: '#second-element-introduction',
    popover: {
      title: 'Title on Popover',
      description: 'Body of the popover',
      position: 'top'
    }
  },
  {
    element: '#third-element-introduction',
    popover: {
      title: 'Title on Popover',
      description: 'Body of the popover',
      position: 'right'
    }
  },
]);

// Start the introduction
driver.start();
异步操作
对于转换步骤之间的任何异步操作,可以将执行延迟到操作完成。你所要做的就是在 onNext 或 onPrevious 回调函数中使用driver.preventMove() 停止过渡,并使用 driver.moveNext() 手动初始化它。这是一个示例实现,它将在第二步停止4秒钟,然后进入下一步。
const driver = new Driver();

// Define the steps for introduction
driver.defineSteps([
  {
    element: '#first-element-introduction',
    popover: {
      title: 'Title on Popover',
      description: 'Body of the popover',
      position: 'left'
    }
  },
  {
    element: '#second-element-introduction',
    popover: {
      title: 'Title on Popover',
      description: 'Body of the popover',
      position: 'top'
    },
    onNext: () => {
      // Prevent moving to the next step
      driver.preventMove();

      // Perform some action or create the element to move to
      // And then move to that element
      setTimeout(() => {
        driver.moveNext();
      }, 4000);
    }
  },
  {
    element: '#third-element-introduction',
    popover: {
      title: 'Title on Popover',
      description: 'Body of the popover',
      position: 'right'
    }
  },
]);

// Start the introduction
driver.start();
配置
const driver = new Driver({
  className: 'scoped-class',        // 封装driver.js弹窗的类名
  animate: true,                    // 是否进行动画
  opacity: 0.75,                    // 背景不透明度(0表示只有弹窗,没有覆盖层)
  padding: 10,                      // 元素到边缘的距离
  allowClose: true,                 // 点击覆盖层是否应该关闭
  overlayClickNext: false,          // 下一步点击覆盖层是否应该移动
  doneBtnText: 'Done',              // final按钮文本
  closeBtnText: 'Close',            // 关闭按钮文本
  stageBackground: '#ffffff',       // 高亮元素背后的舞台背景颜色
  nextBtnText: 'Next',              // 下一步按钮文本
  prevBtnText: 'Previous',          // 前一步按钮文本
  showButtons: false,               // 在页脚不显示控制按钮
  keyboardControl: true,            // 允许通过键盘控制(esc键关闭,箭头键移动)
  scrollIntoViewOptions: {},        // 如果可能的话,我们使用`scrollIntoView()`,如果你想要任何选项,在这里传递
  onHighlightStarted: (Element) => {}, // 当元素将要高亮时调用
  onHighlighted: (Element) => {},      // 当元素完全高亮时调用
  onDeselected: (Element) => {},       // 当元素被取消选择时调用
  onReset: (Element) => {},            // 当覆盖层即将被清除时调用
  onNext: (Element) => {},             // 当移动到下一个步骤时调用
  onPrevious: (Element) => {},         // 在任何步骤中移动到上一步时调用
});
定义步骤
定义步骤时可以传递的一组选项 defineSteps 或传递给 highlight 方法的对象:
const stepDefinition = {
  element: '#some-item',        // 要突出显示的查询选择器字符串或节点
  stageBackground: '#ffffff',   // 这将覆盖在驱动程序中设置的
  popover: {                    // 如果为空或未指定弹窗,则不会有弹窗
    className: 'popover-class', // 除了驱动程序选项中的一般类名外,还要包装这个特定步骤弹出窗口
    title: 'Title',             // popover 标题
    description: 'Description', // popover 描述
    showButtons: false,         // 在页脚不显示控制按钮
    doneBtnText: 'Done',        // 最后一个按钮文本
    closeBtnText: 'Close',      // 关闭按钮文本
    nextBtnText: 'Next',        // 下一个按钮文本
    prevBtnText: 'Previous',    // 上一个按钮文本
  },
  onNext: () => {},             // 从当前步骤移动到下一步时调用
  onPrevious: () => {},         // 从当前步骤移动到上一步时调用
};
突出显示单个元素时的效果
const driver = new Driver(driverOptions);
driver.highlight(stepDefinition);
创建一个分步指南:
const driver = new Driver(driverOptions);
driver.defineSteps([
    stepDefinition1,
    stepDefinition2,
    stepDefinition3,
    stepDefinition4,
]);
API方法
下面是可用的方法集:
const driver = new Driver(driverOptions);

// 检查driver是否激活
if (driver.isActivated) {
    console.log('Driver is active');
}

// 在步骤指南中,可以调用以下方法
driver.defineSteps([ stepDefinition1, stepDefinition2, stepDefinition3 ]);
driver.start(stepNumber = 0);  // 定义开始步骤
driver.moveNext();             // 移动到“步骤”列表中的下一步
driver.movePrevious();         // 移动到“步骤”列表中的上一步
driver.hasNextStep();          // 检查是否有下一步要移动
driver.hasPreviousStep();      // 检查是否有要移动到的上一个步骤

// 阻止当前移动,如果你想,可以在`onNext`或`onPrevious`中使用,执行一些异步任务,然后手动切换到下一步
driver.preventMove();

// 使用查询选择器或步骤定义突出显示元素
driver.highlight(string|stepDefinition);

// 重新定位弹出窗口并突出显示元素
driver.refresh();

// 重置覆盖层并清空屏幕
driver.reset();

// 另外,你可以传递一个布尔参数
// 立即清除,不做动画等
// 在你运行的时候可能有用
// driver程序运行时的不同实例
driver.reset(clearImmediately = false);

// 检查是否有高亮的元素
if(driver.hasHighlightedElement()) {
    console.log('There is an element highlighted');
}

// 获取屏幕上当前高亮显示的元素,would be an instance of `/src/core/element.js`
const activeElement = driver.getHighlightedElement();

// 获取最后一个高亮显示的元素, would be an instance of `/src/core/element.js`
const lastActiveElement = driver.getLastHighlightedElement();

activeElement.getCalculatedPosition(); // 获取活动元素的屏幕坐标
activeElement.hidePopover();           // 隐藏弹出窗口
activeElement.showPopover();           // 显示弹出窗口

activeElement.getNode();  // 获取这个元素后面的DOM元素
别忘了给触发 driver 的 click 绑定添加 e.stopPropagation()。
实战
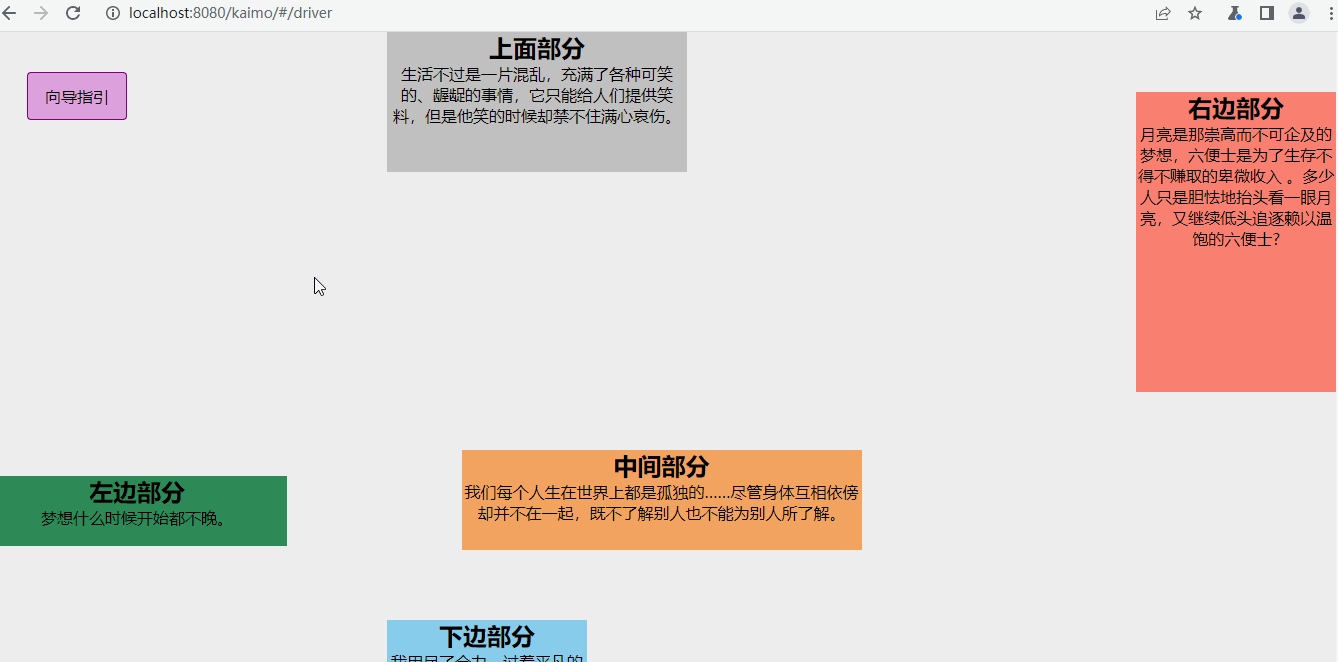
下面是我实现的一个 vue 的 demo,用的 driver.js 是 0.9.8。
<template>
    <div class='driver-demo'>
        <div class="btn" @click="handleClick">向导指引</div>
        <!-- 上 -->
        <div id="step-item-1" class="top">
            <h2>上面部分</h2>
            <section>生活不过是一片混乱,充满了各种可笑的、龌龊的事情,它只能给人们提供笑料,但是他笑的时候却禁不住满心哀伤。</section>
        </div>
        <!-- 右 -->
        <div id="step-item-2" class="right">
            <h2>右边部分</h2>
            <section>
                月亮是那崇高而不可企及的梦想,六便士是为了生存不得不赚取的卑微收入 。多少人只是胆怯地抬头看一眼月亮,又继续低头追逐赖以温饱的六便士?
            </section>
        </div>
        <!-- 下 -->
        <div id="step-item-3" class="bottom">
            <h2>下边部分</h2>
            <section>我用尽了全力,过着平凡的一生。</section>
        </div>
        <!-- 左 -->
        <div id="step-item-4" class="left">
            <h2>左边部分</h2>
            <section>梦想什么时候开始都不晚。</section>
        </div>
        <!-- 中 -->
        <div id="step-item-5" class="center">
            <h2>中间部分</h2>
            <section>
                我们每个人生在世界上都是孤独的……尽管身体互相依傍却并不在一起,既不了解别人也不能为别人所了解。
            </section>
        </div>
    </div>
</template>

<script>
// 引入资源
import Driver from 'driver.js';
import 'driver.js/dist/driver.min.css';

export default {
    name: 'DriverDemo',
    data () {
        return {
            driverOptions: {
                className: 'kaimo-driver',        // 封装driver.js弹窗的类名
                animate: true,                    // 是否进行动画
                opacity: 0.5,                    // 背景不透明度(0表示只有弹窗,没有覆盖层)
                padding: 20,                      // 元素到边缘的距离
                allowClose: true,                 // 点击覆盖层是否应该关闭
                overlayClickNext: false,          // 下一步点击覆盖层是否应该移动
                doneBtnText: '确定',              // final按钮文本
                closeBtnText: '我知道了',            // 关闭按钮文本
                stageBackground: '#fff',       // 高亮元素背后的舞台背景颜色
                nextBtnText: '下一步',              // 下一步按钮文本
                prevBtnText: '上一步',          // 前一步按钮文本
                showButtons: true,               // 在页脚不显示控制按钮
                keyboardControl: true,            // 允许通过键盘控制(esc键关闭,箭头键移动)
                scrollIntoViewOptions: {},        // 如果可能的话,我们使用`scrollIntoView()`,如果你想要任何选项,在这里传递
                onHighlightStarted: (Element) => {}, // 当元素将要高亮时调用
                onHighlighted: (Element) => {},      // 当元素完全高亮时调用
                onDeselected: (Element) => {},       // 当元素被取消选择时调用
                onReset: (Element) => {},            // 当覆盖层即将被清除时调用
                onNext: (Element) => {},             // 当移动到下一个步骤时调用
                onPrevious: (Element) => {},         // 在任何步骤中移动到上一步时调用
            }
        };
    },
    methods: {
        handleClick(e) {
            // 阻止点击事件进一步传播,不加的话指引打开会关闭
            e.stopPropagation();

            // 初始化
            const driver = new Driver(this.driverOptions);
            // 自定义几个步骤
            driver.defineSteps([
                this.stepDefinition1(),
                this.stepDefinition2(),
                this.stepDefinition3(),
                this.stepDefinition4(),
                this.stepDefinition5(),
            ]);
            // 开始进行向导,默认从0开始也就是步骤1,也可以自己调整其他步骤(0可以不写)
            driver.start(0);
        },
        stepDefinition1() {
            return {
                element: '#step-item-1',        // 要突出显示的查询选择器字符串或节点
                // stageBackground: '#ffffff',   // 这将覆盖在驱动程序中设置的
                popover: {                    // 如果为空或未指定弹窗,则不会有弹窗
                    className: 'popover-class', // 除了驱动程序选项中的一般类名外,还要包装这个特定步骤弹出窗口
                    title: '步骤1',             // popover 标题
                    description: '这是步骤1的向导描述', // popover 描述
                    // showButtons: true,         // 在页脚不显示控制按钮
                    // doneBtnText: 'Done',        // 最后一个按钮文本
                    // closeBtnText: 'Close',      // 关闭按钮文本
                    // nextBtnText: 'Next',        // 下一个按钮文本
                    // prevBtnText: 'Previous',    // 上一个按钮文本
                },
                onNext: () => { // 从当前步骤移动到下一步时调用
                    console.log("步骤1:onNext");
                },
                onPrevious: () => { // 从当前步骤移动到上一步时调用
                    console.log("步骤1:onPrevious");
                },
            };
        },
        stepDefinition2() {
            return {
                element: '#step-item-2',        // 要突出显示的查询选择器字符串或节点
                popover: {                    // 如果为空或未指定弹窗,则不会有弹窗
                    className: 'popover-class', // 除了驱动程序选项中的一般类名外,还要包装这个特定步骤弹出窗口
                    title: '步骤2',             // popover 标题
                    description: '这是步骤2的向导描述', // popover 描述
                    position: 'left-center'
                },
                onNext: () => { // 从当前步骤移动到下一步时调用
                    console.log("步骤2:onNext");
                },
                onPrevious: () => { // 从当前步骤移动到上一步时调用
                    console.log("步骤2:onPrevious");
                },
            };
        },
        stepDefinition3() {
            return {
                element: '#step-item-3',        // 要突出显示的查询选择器字符串或节点
                popover: {                    // 如果为空或未指定弹窗,则不会有弹窗
                    className: 'popover-class', // 除了驱动程序选项中的一般类名外,还要包装这个特定步骤弹出窗口
                    title: '步骤3',             // popover 标题
                    description: '这是步骤3的向导描述', // popover 描述
                },
                onNext: () => { // 从当前步骤移动到下一步时调用
                    console.log("步骤3:onNext");
                },
                onPrevious: () => { // 从当前步骤移动到上一步时调用
                    console.log("步骤3:onPrevious");
                },
            };
        },
        stepDefinition4() {
            return {
                element: '#step-item-4',        // 要突出显示的查询选择器字符串或节点
                popover: {                    // 如果为空或未指定弹窗,则不会有弹窗
                    className: 'popover-class', // 除了驱动程序选项中的一般类名外,还要包装这个特定步骤弹出窗口
                    title: '步骤4',             // popover 标题
                    description: '这是步骤4的向导描述', // popover 描述
                    position: 'right-center'
                },
                onNext: () => { // 从当前步骤移动到下一步时调用
                    console.log("步骤4:onNext");
                },
                onPrevious: () => { // 从当前步骤移动到上一步时调用
                    console.log("步骤4:onPrevious");
                },
            };
        },
        stepDefinition5() {
            return {
                element: '#step-item-5',        // 要突出显示的查询选择器字符串或节点
                popover: {                    // 如果为空或未指定弹窗,则不会有弹窗
                    className: 'popover-class', // 除了驱动程序选项中的一般类名外,还要包装这个特定步骤弹出窗口
                    title: '步骤5',             // popover 标题
                    description: '这是步骤5的向导描述', // popover 描述
                },
                onNext: () => { // 从当前步骤移动到下一步时调用
                    console.log("步骤5:onNext");
                },
                onPrevious: () => { // 从当前步骤移动到上一步时调用
                    console.log("步骤5:onPrevious");
                },
            };
        }
    },
};
</script>

<style lang="scss" scoped>
.driver-demo {
    position: relative;
    text-align: center;
    background-color: #eee;
    padding: 40px;
    .btn {
        width: 100px;
        height: 48px;
        line-height: 48px;
        border: 1px solid purple;
        background-color: plum;
        border-radius: 4px;
        cursor: pointer;
    }
    .top {
        position: absolute;
        top: 0;
        left: 400px;
        width: 300px;
        height: 140px;
        background-color: silver;
    }
    .right {
        position: absolute;
        top: 60px;
        right: 0;
        width: 200px;
        height: 300px;
        background-color: salmon;
    }
    .bottom {
        position: absolute;
        bottom: 200px;
        left: 400px;
        width: 200px;
        height: 100px;
        background-color: skyblue;
    }
    .left {
        position: absolute;
        top: 50%;
        left: 0;
        width: 300px;
        height: 70px;
        background-color: seagreen;
    }
    .center {
        margin: 330px auto;
        width: 400px;
        height: 100px;
        background-color: sandybrown;
    }
}
</style>
效果
实现的功能向导指引效果如下:
到此这篇关于vue里使用driver.js实现项目功能向导指引的文章就介绍到这了,更多相关vue项目功能向导指引内容请搜索猪先飞以前的文章或继续浏览下面的相关文章希望大家以后多多支持猪先飞!
原文出处:https://blog.csdn.net/kaimo313/article/details/129314336
相关文章
- 这篇文章主要介绍了vue中activated的用法,帮助大家更好的理解和使用vue框架,感兴趣的朋友可以了解下...2021-01-03
基于vue-simple-uploader封装文件分片上传、秒传及断点续传的全局上传插件功能
这篇文章主要介绍了基于vue-simple-uploader封装文件分片上传、秒传及断点续传的全局上传插件,本文给大家介绍的非常详细,对大家的学习或工作具有一定的参考借鉴价值,需要的朋友可以参考下...2021-02-23Antd-vue Table组件添加Click事件,实现点击某行数据教程
这篇文章主要介绍了Antd-vue Table组件添加Click事件,实现点击某行数据教程,具有很好的参考价值,希望对大家有所帮助。一起跟随小编过来看看吧...2020-11-17- 这篇文章主要介绍了Vue组件跨层级获取组件操作,具有很好的参考价值,希望对大家有所帮助。一起跟随小编过来看看吧...2020-07-28
- 这篇文章主要介绍了vue 实现动态路由的方法,文中示例代码非常详细,帮助大家更好的理解和学习,感兴趣的朋友可以了解下...2020-07-06
- 这篇文章主要介绍了Vue基于localStorage存储信息代码实例,文中通过示例代码介绍的非常详细,对大家的学习或者工作具有一定的参考学习价值,需要的朋友可以参考下...2020-11-16
- 这篇文章主要介绍了vue 获取到数据但却渲染不到页面上的解决方法,文中通过示例代码介绍的非常详细,对大家的学习或者工作具有一定的参考学习价值,需要的朋友们下面随着小编来一起学习学习吧...2020-11-19
antdesign-vue结合sortablejs实现两个table相互拖拽排序功能
这篇文章主要介绍了antdesign-vue结合sortablejs实现两个table相互拖拽排序功能,本文通过实例图文相结合给大家介绍的非常详细,对大家的学习或工作具有一定的参考借鉴价值,需要的朋友可以参考下...2021-01-09- 这篇文章主要介绍了vue 监听 Treeselect 选择项的改变操作,具有很好的参考价值,希望对大家有所帮助。一起跟随小编过来看看吧...2020-09-01
- 最常见的多环境配置,就是开发环境配置,和生产环境配置,本文主要介绍了vue项目多环境配置的实现,感兴趣的可以了解一下...2021-07-20
- 这篇文章主要介绍了Vue 3.0 中 jsx 语法使用,帮助大家更好的理解和使用vue框架,感兴趣的朋友可以了解下...2020-11-13
vue项目页面嵌入代码块vue-prism-editor的实现
这篇文章主要介绍了vue项目页面嵌入代码块vue-prism-editor的实现,本文给大家介绍的非常详细,对大家的学习或工作具有一定的参考借鉴价值,需要的朋友可以参考下...2020-10-30解决vue的router组件component在import时不能使用变量问题
这篇文章主要介绍了解决vue的router组件component在import时不能使用变量问题,具有很好的参考价值,希望对大家有所帮助。一起跟随小编过来看看吧...2020-07-27vue Treeselect下拉树只能选择第N级元素实现代码
这篇文章主要介绍了vue Treeselect下拉树只能选择第N级元素实现代码,具有很好的参考价值,希望对大家有所帮助。一起跟随小编过来看看吧...2020-09-01- 这篇文章主要为大家详细介绍了vue实现同时设置多个倒计时,文中示例代码介绍的非常详细,具有一定的参考价值,感兴趣的小伙伴们可以参考一下...2021-05-20
Ant design vue table 单击行选中 勾选checkbox教程
这篇文章主要介绍了Ant design vue table 单击行选中 勾选checkbox教程,具有很好的参考价值,希望对大家有所帮助。一起跟随小编过来看看吧...2020-10-25- 这篇文章主要介绍了Vue select 绑定动态变量的实例讲解,具有很好的参考价值,希望对大家有所帮助。一起跟随小编过来看看吧...2020-10-23
- 这篇文章主要为大家详细介绍了vue实现div单选多选功能,文中示例代码介绍的非常详细,具有一定的参考价值,感兴趣的小伙伴们可以参考一下...2020-07-16
vuejs element table 表格添加行,修改,单独删除行,批量删除行操作
这篇文章主要介绍了vuejs element table 表格添加行,修改,单独删除行,批量删除行操作,具有很好的参考价值,希望对大家有所帮助。一起跟随小编过来看看吧...2020-07-18- 这篇文章主要介绍了vue treeselect获取当前选中项的label实例,具有很好的参考价值,希望对大家有所帮助。一起跟随小编过来看看吧...2020-09-01