Vue+Openlayer批量设置闪烁点的实现代码(基于postrender机制)
更新时间:2021年9月1日 21:30 点击:2579
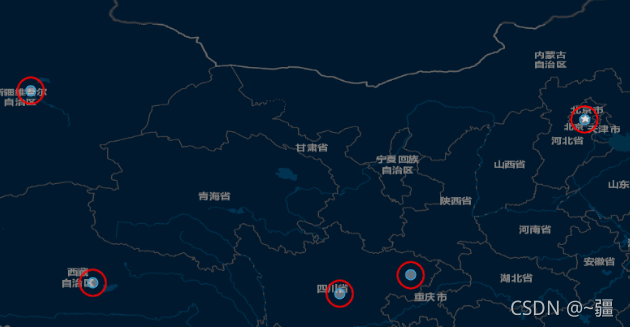
效果图:
实现代码:
<template>
  <div id="map" style="width: 100vw; height: 100vh" />
</template>
<script>
import "ol/ol.css";
import TileLayer from "ol/layer/Tile";
import VectorLayer from "ol/layer/Vector";
import VectorSource from "ol/source/Vector";
import XYZ from "ol/source/XYZ";
import { Map, View, Feature } from "ol";
import { Style, Circle, Stroke } from "ol/style";
import { Point } from "ol/geom";
import { getVectorContext } from "ol/render";

// 边界json数据
export default {
  data() {
    return {
      map: {},
      coordinates: [
        { x: "106.918082", y: "31.441314" }, //重庆
        { x: "86.36158200334317", y: "41.42448570787448" }, //新疆
        { x: "89.71757707811526", y: "31.02619817424643" }, //西藏
        { x: "116.31694544853109", y: "39.868508850821115" }, //北京
        { x: "103.07940932026341", y: "30.438580338450862" }, //成都
      ],
      speed: 0.3,
    };
  },
  mounted() {
    this.initMap();
    this.addDynamicPoints(this.coordinates);
  },
  methods: {
    /**
     * 初始化地图
     */
    initMap() {
      this.map = new Map({
        target: "map",
        layers: [
          new TileLayer({
            source: new XYZ({
              url: "http://map.geoq.cn/ArcGIS/rest/services/ChinaOnlineStreetPurplishBlue/MapServer/tile/{z}/{y}/{x}",
            }),
          }),
        ],
        view: new View({
          projection: "EPSG:4326",
          center: [108.522097, 37.272848],
          zoom: 4.7,
        }),
      });
    },
    /**
     * 批量添加闪烁点
     */
    addDynamicPoints(coordinates) {
      // 设置图层
      let pointLayer = new VectorLayer({ source: new VectorSource() });
      // 添加图层
      this.map.addLayer(pointLayer);
      // 循环添加feature
      let pointFeature = [];
      for (let i = 0; i < coordinates.length; i++) {
        // 创建feature,一个feature就是一个点坐标信息
        const feature = new Feature({
          geometry: new Point([coordinates[i].x, coordinates[i].y]),
        });
        pointFeature.push(feature);
      }
      //把要素集合添加到图层
      pointLayer.getSource().addFeatures(pointFeature);
      // 关键的地方在此:监听postrender事件,在里面重新设置circle的样式
      let radius = 0;
      pointLayer.on("postrender", (e) => {
        if (radius >= 20) radius = 0;
        let opacity = (20 - radius) * (1 / 20); //不透明度
        let pointStyle = new Style({
          image: new Circle({
            radius: radius,
            stroke: new Stroke({
              color: "rgba(255,0,0" + opacity + ")",
              width: 3 - radius / 10, //设置宽度
            }),
          }),
        });
        // 获取矢量要素上下文
        let vectorContext = getVectorContext(e);
        vectorContext.setStyle(pointStyle);
        pointFeature.forEach((feature) => {
          vectorContext.drawGeometry(feature.getGeometry());
        });
        radius = radius + this.speed; //调整闪烁速度
        //请求地图渲染(在下一个动画帧处)
        this.map.render();
      });
    },
  },
};
</script>
参考文章
到此这篇关于Vue+Openlayer批量设置闪烁点的实现代码(基于postrender机制)的文章就介绍到这了,更多相关Vue Openlayer闪烁点内容请搜索猪先飞以前的文章或继续浏览下面的相关文章希望大家以后多多支持猪先飞!
相关文章
- 这篇文章主要介绍了vue中activated的用法,帮助大家更好的理解和使用vue框架,感兴趣的朋友可以了解下...2021-01-03
基于vue-simple-uploader封装文件分片上传、秒传及断点续传的全局上传插件功能
这篇文章主要介绍了基于vue-simple-uploader封装文件分片上传、秒传及断点续传的全局上传插件,本文给大家介绍的非常详细,对大家的学习或工作具有一定的参考借鉴价值,需要的朋友可以参考下...2021-02-23Antd-vue Table组件添加Click事件,实现点击某行数据教程
这篇文章主要介绍了Antd-vue Table组件添加Click事件,实现点击某行数据教程,具有很好的参考价值,希望对大家有所帮助。一起跟随小编过来看看吧...2020-11-17- 这篇文章主要介绍了vue 实现动态路由的方法,文中示例代码非常详细,帮助大家更好的理解和学习,感兴趣的朋友可以了解下...2020-07-06
- 这篇文章主要介绍了Vue组件跨层级获取组件操作,具有很好的参考价值,希望对大家有所帮助。一起跟随小编过来看看吧...2020-07-28
- 这篇文章主要介绍了vue 监听 Treeselect 选择项的改变操作,具有很好的参考价值,希望对大家有所帮助。一起跟随小编过来看看吧...2020-09-01
- 这篇文章主要介绍了Vue基于localStorage存储信息代码实例,文中通过示例代码介绍的非常详细,对大家的学习或者工作具有一定的参考学习价值,需要的朋友可以参考下...2020-11-16
- 这篇文章主要介绍了vue 获取到数据但却渲染不到页面上的解决方法,文中通过示例代码介绍的非常详细,对大家的学习或者工作具有一定的参考学习价值,需要的朋友们下面随着小编来一起学习学习吧...2020-11-19
antdesign-vue结合sortablejs实现两个table相互拖拽排序功能
这篇文章主要介绍了antdesign-vue结合sortablejs实现两个table相互拖拽排序功能,本文通过实例图文相结合给大家介绍的非常详细,对大家的学习或工作具有一定的参考借鉴价值,需要的朋友可以参考下...2021-01-09- 最常见的多环境配置,就是开发环境配置,和生产环境配置,本文主要介绍了vue项目多环境配置的实现,感兴趣的可以了解一下...2021-07-20
vue项目页面嵌入代码块vue-prism-editor的实现
这篇文章主要介绍了vue项目页面嵌入代码块vue-prism-editor的实现,本文给大家介绍的非常详细,对大家的学习或工作具有一定的参考借鉴价值,需要的朋友可以参考下...2020-10-30vuejs element table 表格添加行,修改,单独删除行,批量删除行操作
这篇文章主要介绍了vuejs element table 表格添加行,修改,单独删除行,批量删除行操作,具有很好的参考价值,希望对大家有所帮助。一起跟随小编过来看看吧...2020-07-18- 这篇文章主要介绍了Vue 3.0 中 jsx 语法使用,帮助大家更好的理解和使用vue框架,感兴趣的朋友可以了解下...2020-11-13
解决vue的router组件component在import时不能使用变量问题
这篇文章主要介绍了解决vue的router组件component在import时不能使用变量问题,具有很好的参考价值,希望对大家有所帮助。一起跟随小编过来看看吧...2020-07-27vue Treeselect下拉树只能选择第N级元素实现代码
这篇文章主要介绍了vue Treeselect下拉树只能选择第N级元素实现代码,具有很好的参考价值,希望对大家有所帮助。一起跟随小编过来看看吧...2020-09-01- 这篇文章主要为大家详细介绍了vue实现同时设置多个倒计时,文中示例代码介绍的非常详细,具有一定的参考价值,感兴趣的小伙伴们可以参考一下...2021-05-20
Ant design vue table 单击行选中 勾选checkbox教程
这篇文章主要介绍了Ant design vue table 单击行选中 勾选checkbox教程,具有很好的参考价值,希望对大家有所帮助。一起跟随小编过来看看吧...2020-10-25- 这篇文章主要为大家详细介绍了vue实现div单选多选功能,文中示例代码介绍的非常详细,具有一定的参考价值,感兴趣的小伙伴们可以参考一下...2020-07-16
- 这篇文章主要介绍了vue treeselect获取当前选中项的label实例,具有很好的参考价值,希望对大家有所帮助。一起跟随小编过来看看吧...2020-09-01
- 这篇文章主要介绍了Vue select 绑定动态变量的实例讲解,具有很好的参考价值,希望对大家有所帮助。一起跟随小编过来看看吧...2020-10-23