C#实现Excel动态生成PivotTable
更新时间:2020年6月25日 11:24 点击:1778
Excel 中的透视表对于数据分析来说,非常的方便,而且很多业务人员对于Excel的操作也是非常熟悉的,因此用Excel作为分析数据的界面,不失为一种很好的选择。那么如何用C#从数据库中抓取数据,并在Excel 动态生成PivotTable呢?下面结合实例来说明。
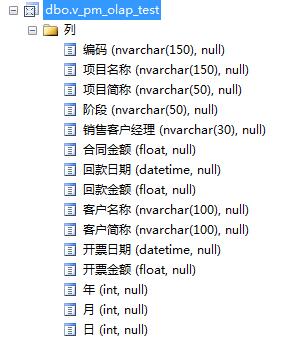
一般来说,数据库的设计都遵循规范化的原则,从而减少数据的冗余,但是对于数据分析来说,数据冗余能够提高数据加载的速度,因此为了演示透视表,这里现在数据库中建立一个视图,将需要分析的数据整合到一个视图中。如下图所示:
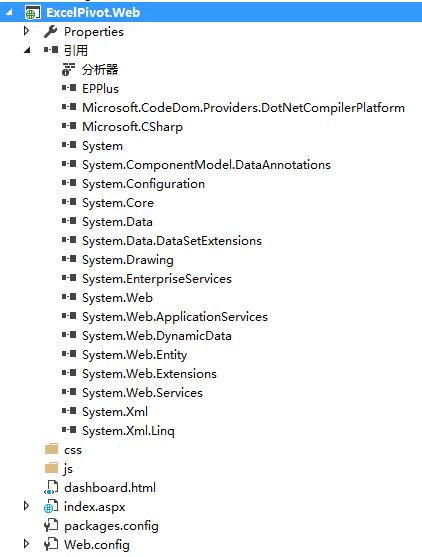
数据源准备好后,我们先来建立一个web应用程序,然后用NuGet加载Epplus程序包,如下图所示:
在index.aspx前台页面中,编写如下脚本:
<%@ Page Language="C#" AutoEventWireup="true" CodeBehind="index.aspx.cs" Inherits="ExcelPivot.Web.index" %>

<!DOCTYPE html>
<html xmlns="http://www.w3.org/1999/xhtml">
<head runat="server">
<meta http-equiv="Content-Type" content="text/html; charset=utf-8"/>
  <title>Excel PivotTable</title>
  <link rel="stylesheet" type="text/css" href="css/style.css" />
</head>
<body>
  <form id="form1" runat="server">
    <div id="container">

      <div id="contents">

        <div id="post">
          <header>
            <h1> Excel PivotTable </h1>
          </header>
          <div id="metro-array" style="display: inline-block;">
            <div style="width: 230px; height: 230px; float: left; ">

              <a class="metro-tile" style="cursor: pointer; width: 230px; height: 110px; display: block; background-color:#ff0000; color: #fff; margin-bottom: 10px;">

                 <input type="button" runat="server" id="Button1" name="btn1" value="回款情况分析" onserverclick="btn1_ServerClick"
                          style="background-color:transparent; color:white; font-size:16px;float:left; border:0; width:230px; height:110px; cursor:pointer;"/>

              </a>

              <a class="metro-tile" style="cursor: pointer; width: 230px; height: 110px; display: block; background-color:#ff6a00; color: #fff;">
                 <input type="button" runat="server" id="Button2" name="btn1" value="sampe1" onserverclick="btn1_ServerClick"
                          style="background-color:transparent; color:white; font-size:16px;float:left; border:0; width:230px; height:110px; cursor:pointer;"/>
              </a>
            </div>

            <div style="width: 230px; height: 230px; float: left; margin-left: 10px">

              <a class="metro-tile" style="cursor: pointer; width: 230px; height: 230px; display: block; background-color:#ffd800; color: #fff">
                 <input type="button" runat="server" id="btn1" name="btn1" value="sampe1" onserverclick="btn1_ServerClick"
                          style="background-color:transparent; color:white; font-size:16px;float:left; border:0; width:230px; height:230px; cursor:pointer;"/>
              </a>

            </div>

            <div style="width: 230px; height: 230px; float: left; margin-left: 10px">

              <a class="metro-tile" style="cursor: pointer; width: 230px; height: 110px; display: block; background-color:#0094ff; color: #fff; margin-bottom: 10px;">
                 <input type="button" runat="server" id="Button3" name="btn1" value="sampe1" onserverclick="btn1_ServerClick"
                          style="background-color:transparent; color:white; font-size:16px;float:left; border:0; width:230px; height:110px; cursor:pointer;"/>
              </a>

              <a class="metro-tile" style="cursor: pointer; width: 110px; height: 110px; margin-right: 10px; display: block; float: left; background-color: #4800ff; color: #fff;">
                 <input type="button" runat="server" id="Button4" name="btn1" value="sampe1" onserverclick="btn1_ServerClick"
                          style="background-color:transparent; color:white; font-size:16px;float:left; border:0; width:110px; height:110px; cursor:pointer;"/>
              </a>

              <a class="metro-tile" style="cursor: pointer; width: 110px; height: 110px; display: block; background-color: #b200ff; float: right; color: #fff;">
                 <input type="button" runat="server" id="Button5" name="btn1" value="sampe1" onserverclick="btn1_ServerClick"
                          style="background-color:transparent; color:white; font-size:16px;float:left; border:0; width:110px; height:110px; cursor:pointer;"/>
              </a>
            </div>

          </div>
        </div>

      </div>
    </div>
  </form>
</body>
  <script src="js/tileJs.js" type="text/javascript"></script>
</html>
其中 TileJs是一个开源的构建类似win8 Metro风格的javascript库。
编写后台脚本:
using System;
using System.Collections.Generic;
using System.Linq;
using System.Web;
using System.Web.UI;
using System.Web.UI.WebControls;
using OfficeOpenXml;
using OfficeOpenXml.Table;
using OfficeOpenXml.ConditionalFormatting;
using OfficeOpenXml.Style;
using OfficeOpenXml.Utils;
using OfficeOpenXml.Table.PivotTable;
using System.IO;
using System.Data.SqlClient;
using System.Data;
namespace ExcelPivot.Web
{
  public partial class index : System.Web.UI.Page
  {
    protected void Page_Load(object sender, EventArgs e)
    {

    }
    private DataTable getDataSource()
    {
      //createDataTable();
      //return ProductInfo;

      SqlConnection conn = new SqlConnection();
      conn.ConnectionString = "Data Source=.;Initial Catalog=olap;Persist Security Info=True;User ID=sa;Password=sa";
      conn.Open();

      SqlDataAdapter ada = new SqlDataAdapter("select * from v_pm_olap_test", conn);
      DataSet ds = new DataSet();
      ada.Fill(ds);

      return ds.Tables[0];


    }

    protected void btn1_ServerClick(object sender, EventArgs e)
    {
      try
      {
        DataTable table = getDataSource();
        string path = "_demo_" + System.Guid.NewGuid().ToString().Replace("-", "_") + ".xls";
        //string path = "_demo.xls";
        FileInfo fileInfo = new FileInfo(path);
        var excel = new ExcelPackage(fileInfo);

        var wsPivot = excel.Workbook.Worksheets.Add("Pivot");
        var wsData = excel.Workbook.Worksheets.Add("Data");
        wsData.Cells["A1"].LoadFromDataTable(table, true, OfficeOpenXml.Table.TableStyles.Medium6);
        if (table.Rows.Count != 0)
        {
          foreach (DataColumn col in table.Columns)
          {

            if (col.DataType == typeof(System.DateTime))
            {
              var colNumber = col.Ordinal + 1;
              var range = wsData.Cells[2, colNumber, table.Rows.Count + 1, colNumber];
              range.Style.Numberformat.Format = "yyyy-MM-dd";
            }
            else
            {

            }
          }
        }

        var dataRange = wsData.Cells[wsData.Dimension.Address.ToString()];
        dataRange.AutoFitColumns();
        var pivotTable = wsPivot.PivotTables.Add(wsPivot.Cells["A1"], dataRange, "Pivot");
        pivotTable.MultipleFieldFilters = true;
        pivotTable.RowGrandTotals = true;
        pivotTable.ColumGrandTotals = true;
        pivotTable.Compact = true;
        pivotTable.CompactData = true;
        pivotTable.GridDropZones = false;
        pivotTable.Outline = false;
        pivotTable.OutlineData = false;
        pivotTable.ShowError = true;
        pivotTable.ErrorCaption = "[error]";
        pivotTable.ShowHeaders = true;
        pivotTable.UseAutoFormatting = true;
        pivotTable.ApplyWidthHeightFormats = true;
        pivotTable.ShowDrill = true;
        pivotTable.FirstDataCol = 3;
        //pivotTable.RowHeaderCaption = "行";

        //row field
        var field004 = pivotTable.Fields["销售客户经理"];
        pivotTable.RowFields.Add(field004);

        var field001 = pivotTable.Fields["项目简称"];
        pivotTable.RowFields.Add(field001);
        //field001.ShowAll = false;

        //column field
        var field002 = pivotTable.Fields["年"];
        pivotTable.ColumnFields.Add(field002);
        field002.Sort = OfficeOpenXml.Table.PivotTable.eSortType.Ascending;
        var field005 = pivotTable.Fields["月"];
        pivotTable.ColumnFields.Add(field005);
        field005.Sort = OfficeOpenXml.Table.PivotTable.eSortType.Ascending;

        //data field
        var field003 = pivotTable.Fields["回款金额"];
        field003.Sort = OfficeOpenXml.Table.PivotTable.eSortType.Descending;
        pivotTable.DataFields.Add(field003);

        pivotTable.RowGrandTotals = false;
        pivotTable.ColumGrandTotals = false;

        //save file
        excel.Save();
        //open excel file
        string file = @"C:\Windows\explorer.exe";
        System.Diagnostics.Process.Start(file, path);

      }
      catch (Exception ex)
      {
       Response.Write(ex.Message);
      }
    }
  }
}
编译运行,如下图所示:
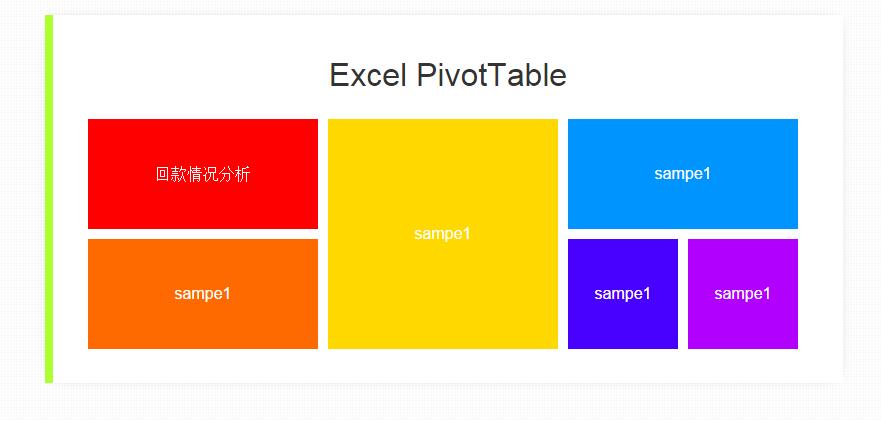
单击 [回款情况分析],稍等片刻,会打开Excel,并自动生成透视表,如下图所示:

以上就是本文的全部内容,希望对大家的学习有所帮助
相关文章
- 这篇文章主要介绍了C# 字段和属性的的相关资料,文中示例代码非常详细,供大家参考和学习,感兴趣的朋友可以了解下...2020-11-03
- 我们在使用C#做项目的时候,基本上都需要制作登录界面,那么今天我们就来一步步看看,如果简单的实现登录界面呢,本文给出2个例子,由简入难,希望大家能够喜欢。...2020-06-25
- 这篇文章主要介绍了C#中截取字符串的的基本方法,文中通过示例代码介绍的非常详细,对大家的学习或者工作具有一定的参考学习价值,需要的朋友们下面随着小编来一起学习学习吧...2020-11-03
- 这篇文章主要介绍了C#实现简单的Http请求的方法,以实例形式较为详细的分析了C#实现Http请求的具体方法,需要的朋友可以参考下...2020-06-25
- 本文给大家分享C#连接SQL数据库和查询数据功能的操作技巧,本文通过图文并茂的形式给大家介绍的非常详细,需要的朋友参考下吧...2021-05-17
- 本文主要介绍了C#中new的几种用法,具有很好的参考价值,下面跟着小编一起来看下吧...2020-06-25
使用Visual Studio2019创建C#项目(窗体应用程序、控制台应用程序、Web应用程序)
这篇文章主要介绍了使用Visual Studio2019创建C#项目(窗体应用程序、控制台应用程序、Web应用程序),小编觉得挺不错的,现在分享给大家,也给大家做个参考。一起跟随小编过来看看吧...2020-06-25- 这篇文章主要介绍了C#开发Windows窗体应用程序的简单操作步骤,具有很好的参考价值,希望对大家有所帮助。一起跟随小编过来看看吧...2021-04-12
- 这篇文章主要介绍了C#从数据库读取图片并保存的方法,帮助大家更好的理解和使用c#,感兴趣的朋友可以了解下...2021-01-16
- 最近做一个小项目不可避免的需要前端脚本与后台进行交互。由于是在asp.net中实现,故问题演化成asp.net中jiavascript与后台c#如何进行交互。...2020-06-25
- 本文通过例子,讲述了C++调用C#的DLL程序的方法,作出了以下总结,下面就让我们一起来学习吧。...2020-06-25
- 轻松学习C#的基础入门,了解C#最基本的知识点,C#是一种简洁的,类型安全的一种完全面向对象的开发语言,是Microsoft专门基于.NET Framework平台开发的而量身定做的高级程序设计语言,需要的朋友可以参考下...2020-06-25
- 本文主要介绍了C#变量命名规则小结,文中介绍的非常详细,具有一定的参考价值,感兴趣的小伙伴们可以参考一下...2021-09-09
- 这篇文章主要介绍了C#绘制曲线图的方法,以完整实例形式较为详细的分析了C#进行曲线绘制的具体步骤与相关技巧,具有一定参考借鉴价值,需要的朋友可以参考下...2020-06-25
- 本文主要介绍了C# 中取绝对值的函数。具有很好的参考价值。下面跟着小编一起来看下吧...2020-06-25
- 这篇文章主要介绍了c#自带缓存使用方法,包括获取数据缓存、设置数据缓存、移除指定数据缓存等方法,需要的朋友可以参考下...2020-06-25
- 这篇文章主要介绍了c#中(&&,||)与(&,|)的区别详解,文中通过示例代码介绍的非常详细,对大家的学习或者工作具有一定的参考学习价值,需要的朋友们下面随着小编来一起学习学习吧...2020-06-25
- 下面小编就为大家带来一篇C#学习笔记- 随机函数Random()的用法详解。小编觉得挺不错的,现在就分享给大家,也给大家做个参考。一起跟随小编过来看看吧...2020-06-25
- 这篇文章主要用实例讲解C#递归算法的概念以及用法,文中代码非常详细,帮助大家更好的参考和学习,感兴趣的朋友可以了解下...2020-06-25
- 这篇文章主要介绍了C#中list用法,结合实例形式分析了C#中list排序、运算、转换等常见操作技巧,具有一定参考借鉴价值,需要的朋友可以参考下...2020-06-25