QT串口通信的实现方法
前言:如果用qt写程序作为上位机,然后通过和usb和下位机通信的时候,就需要用到qt中的串口通信了。
使用qt中的串口通信的时候需要用到的两个头文件分别为:
#include <QtSerialPort/QSerialPort>
#include <QtSerialPort/QSerialPortInfo>
除了加上面两个头文件之外,还需要在工程文件中加下面一行代码:
QT += serialport
我们一般都需要先定义一个全局的串口对象,记得在自己的头文件中添加上:
QSerialPort *serial;
到这里我们就可以调用qt串口通信中的函数了,一般来讲qt串口通信需要经过7步:
1、设置串口名(如COM1)
 serial = new QSerialPort;
 serial->setPortName(ui->PortBox->currentText());
这里我使用自动寻找可用串口的方法,直接自动设置了
foreach (const QSerialPortInfo &info,QSerialPortInfo::availablePorts())
    {
        QSerialPort serial;
        serial.setPort(info);
        if(serial.open(QIODevice::ReadWrite))
        {
            ui->PortBox->addItem(serial.portName());
            serial.close();
        }
    }
2、打开串口
serial->open(QIODevice::ReadWrite);
3、设置波特率(如115200)
serial->setBaudRate(QSerialPort::Baud115200);//设置波特率为115200
4、设置数据位(如8)
serial->setDataBits(QSerialPort::Data8);//设置数据位8
5、设置校验位(如0)
serial->setParity(QSerialPort::NoParity); //校验位设置为0
6、设置停止位(如1)
serial->setStopBits(QSerialPort::OneStop);//停止位设置为1
7、设置流控制
serial->setFlowControl(QSerialPort::NoFlowControl);//设置为无流控制
到这里串口通信的设置就完成了,下面我们需要实现对数据的发送和接收
1、连接数据接收槽函数,下位机中一有数据发送过来的时候就会响应这个槽函数
QObject::connect(serial,&QSerialPort::readyRead,this,&MainWindow::ReadData);
2、从上位机发送数据到下位机
serial->write(ui->textEdit_2->toPlainText().toLatin1());
主要使用的函数就这些了,我们来看看代码:
1、工程文件SerialPortTool.pro
#-------------------------------------------------
#
# Project created by QtCreator 2017-11-17T15:43:04
#
#-------------------------------------------------

QT       += core gui
QT       += serialport

greaterThan(QT_MAJOR_VERSION, 4): QT += widgets

TARGET = SerialPortTool
TEMPLATE = app

# The following define makes your compiler emit warnings if you use
# any feature of Qt which as been marked as deprecated (the exact warnings
# depend on your compiler). Please consult the documentation of the
# deprecated API in order to know how to port your code away from it.
DEFINES += QT_DEPRECATED_WARNINGS

# You can also make your code fail to compile if you use deprecated APIs.
# In order to do so, uncomment the following line.
# You can also select to disable deprecated APIs only up to a certain version of Qt.
#DEFINES += QT_DISABLE_DEPRECATED_BEFORE=0x060000    # disables all the APIs deprecated before Qt 6.0.0


SOURCES += \
        main.cpp \
        mainwindow.cpp

HEADERS += \
        mainwindow.h

FORMS += \
        mainwindow.ui
2、头文件mainwindow.h
#ifndef MAINWINDOW_H
#define MAINWINDOW_H

#include <QMainWindow>
#include <QDebug>
#include <QtSerialPort/QSerialPort>
#include <QtSerialPort/QSerialPortInfo>

namespace Ui {
class MainWindow;
}

class MainWindow : public QMainWindow
{
    Q_OBJECT

public:
    explicit MainWindow(QWidget *parent = 0);
    ~MainWindow();

private slots:
    void on_OpenSerialButton_clicked();

    void ReadData();

    void on_SendButton_clicked();

private:
    Ui::MainWindow *ui;
    QSerialPort *serial;
};

#endif // MAINWINDOW_H
3、源文件mainwindow.cpp
#include "mainwindow.h"
#include "ui_mainwindow.h"


MainWindow::MainWindow(QWidget *parent) :
    QMainWindow(parent),
    ui(new Ui::MainWindow)
{
    ui->setupUi(this);

    //查找可用的串口
    foreach (const QSerialPortInfo &info,QSerialPortInfo::availablePorts())
    {
        QSerialPort serial;
        serial.setPort(info);
        if(serial.open(QIODevice::ReadWrite))
        {
            ui->PortBox->addItem(serial.portName());
            serial.close();
        }
    }
    //设置波特率下拉菜单默认显示第0项
    ui->BaudBox->setCurrentIndex(0);

}

MainWindow::~MainWindow()
{
    delete ui;
}

void MainWindow::on_OpenSerialButton_clicked()
{
    if(ui->OpenSerialButton->text() == tr("打开串口"))
    {
        serial = new QSerialPort;
        //设置串口名
        serial->setPortName(ui->PortBox->currentText());
        //打开串口
        serial->open(QIODevice::ReadWrite);
        //设置波特率
        serial->setBaudRate(QSerialPort::Baud115200);//设置波特率为115200
        //设置数据位数
        switch (ui->BitBox->currentIndex())
        {
        case 8:
            serial->setDataBits(QSerialPort::Data8);//设置数据位8
            break;
        default:
            break;
        }
        //设置校验位
        switch (ui->ParityBox->currentIndex())
        {
        case 0:
            serial->setParity(QSerialPort::NoParity);
            break;
        default:
            break;
        }
        //设置停止位
        switch (ui->BitBox->currentIndex())
        {
        case 1:
            serial->setStopBits(QSerialPort::OneStop);//停止位设置为1
            break;
        case 2:
            serial->setStopBits(QSerialPort::TwoStop);
        default:
            break;
        }
        //设置流控制
        serial->setFlowControl(QSerialPort::NoFlowControl);//设置为无流控制

        //关闭设置菜单使能
        ui->PortBox->setEnabled(false);
        ui->BaudBox->setEnabled(false);
        ui->BitBox->setEnabled(false);
        ui->ParityBox->setEnabled(false);
        ui->StopBox->setEnabled(false);
        ui->OpenSerialButton->setText(tr("关闭串口"));

        //连接信号槽
        QObject::connect(serial,&QSerialPort::readyRead,this,&MainWindow::ReadData);
    }
    else
    {
        //关闭串口
        serial->clear();
        serial->close();
        serial->deleteLater();

        //恢复设置使能
        ui->PortBox->setEnabled(true);
        ui->BaudBox->setEnabled(true);
        ui->BitBox->setEnabled(true);
        ui->ParityBox->setEnabled(true);
        ui->StopBox->setEnabled(true);
        ui->OpenSerialButton->setText(tr("打开串口"));

    }


}
//读取接收到的信息
void MainWindow::ReadData()
{
    QByteArray buf;
    buf = serial->readAll();
    if(!buf.isEmpty())
    {
        QString str = ui->textEdit->toPlainText();
        str+=tr(buf);
        ui->textEdit->clear();
        ui->textEdit->append(str);

    }
    buf.clear();
}

//发送按钮槽函数
void MainWindow::on_SendButton_clicked()
{
    serial->write(ui->textEdit_2->toPlainText().toLatin1());
}
4、界面文件mainwindow.ui
<?xml version="1.0" encoding="UTF-8"?>
<ui version="4.0">
 <class>MainWindow</class>
 <widget class="QMainWindow" name="MainWindow">
  <property name="geometry">
   <rect>
    <x>0</x>
    <y>0</y>
    <width>547</width>
    <height>470</height>
   </rect>
  </property>
  <property name="windowTitle">
   <string>MainWindow</string>
  </property>
  <widget class="QWidget" name="centralWidget">
   <widget class="QLabel" name="label">
    <property name="geometry">
     <rect>
      <x>10</x>
      <y>50</y>
      <width>54</width>
      <height>12</height>
     </rect>
    </property>
    <property name="text">
     <string>串口</string>
    </property>
   </widget>
   <widget class="QLabel" name="label_2">
    <property name="geometry">
     <rect>
      <x>10</x>
      <y>90</y>
      <width>54</width>
      <height>12</height>
     </rect>
    </property>
    <property name="text">
     <string>波特率</string>
    </property>
   </widget>
   <widget class="QLabel" name="label_3">
    <property name="geometry">
     <rect>
      <x>10</x>
      <y>130</y>
      <width>54</width>
      <height>12</height>
     </rect>
    </property>
    <property name="text">
     <string>数据位</string>
    </property>
   </widget>
   <widget class="QComboBox" name="PortBox">
    <property name="geometry">
     <rect>
      <x>100</x>
      <y>50</y>
      <width>69</width>
      <height>22</height>
     </rect>
    </property>
   </widget>
   <widget class="QComboBox" name="BaudBox">
    <property name="geometry">
     <rect>
      <x>100</x>
      <y>90</y>
      <width>69</width>
      <height>22</height>
     </rect>
    </property>
    <property name="currentIndex">
     <number>0</number>
    </property>
    <item>
     <property name="text">
      <string>9600</string>
     </property>
    </item>
    <item>
     <property name="text">
      <string>19200</string>
     </property>
    </item>
    <item>
     <property name="text">
      <string>38400</string>
     </property>
    </item>
    <item>
     <property name="text">
      <string>57600</string>
     </property>
    </item>
    <item>
     <property name="text">
      <string>115200</string>
     </property>
    </item>
   </widget>
   <widget class="QComboBox" name="BitBox">
    <property name="geometry">
     <rect>
      <x>100</x>
      <y>120</y>
      <width>69</width>
      <height>22</height>
     </rect>
    </property>
    <property name="currentIndex">
     <number>0</number>
    </property>
    <item>
     <property name="text">
      <string>8</string>
     </property>
    </item>
   </widget>
   <widget class="QComboBox" name="ParityBox">
    <property name="geometry">
     <rect>
      <x>100</x>
      <y>160</y>
      <width>69</width>
      <height>22</height>
     </rect>
    </property>
    <item>
     <property name="text">
      <string>0</string>
     </property>
    </item>
   </widget>
   <widget class="QLabel" name="label_4">
    <property name="geometry">
     <rect>
      <x>10</x>
      <y>160</y>
      <width>61</width>
      <height>16</height>
     </rect>
    </property>
    <property name="text">
     <string>校验位</string>
    </property>
   </widget>
   <widget class="QLabel" name="label_6">
    <property name="geometry">
     <rect>
      <x>10</x>
      <y>200</y>
      <width>54</width>
      <height>12</height>
     </rect>
    </property>
    <property name="text">
     <string>停止位</string>
    </property>
   </widget>
   <widget class="QComboBox" name="StopBox">
    <property name="geometry">
     <rect>
      <x>100</x>
      <y>200</y>
      <width>69</width>
      <height>22</height>
     </rect>
    </property>
    <item>
     <property name="text">
      <string>1</string>
     </property>
    </item>
   </widget>
   <widget class="QPushButton" name="OpenSerialButton">
    <property name="geometry">
     <rect>
      <x>100</x>
      <y>240</y>
      <width>71</width>
      <height>23</height>
     </rect>
    </property>
    <property name="text">
     <string>打开串口</string>
    </property>
   </widget>
   <widget class="QTextEdit" name="textEdit">
    <property name="geometry">
     <rect>
      <x>200</x>
      <y>30</y>
      <width>221</width>
      <height>291</height>
     </rect>
    </property>
   </widget>
   <widget class="QTextEdit" name="textEdit_2">
    <property name="geometry">
     <rect>
      <x>200</x>
      <y>330</y>
      <width>221</width>
      <height>31</height>
     </rect>
    </property>
   </widget>
   <widget class="QPushButton" name="SendButton">
    <property name="geometry">
     <rect>
      <x>430</x>
      <y>330</y>
      <width>75</width>
      <height>31</height>
     </rect>
    </property>
    <property name="text">
     <string>发送</string>
    </property>
   </widget>
  </widget>
  <widget class="QMenuBar" name="menuBar">
   <property name="geometry">
    <rect>
     <x>0</x>
     <y>0</y>
     <width>547</width>
     <height>23</height>
    </rect>
   </property>
  </widget>
  <widget class="QToolBar" name="mainToolBar">
   <attribute name="toolBarArea">
    <enum>TopToolBarArea</enum>
   </attribute>
   <attribute name="toolBarBreak">
    <bool>false</bool>
   </attribute>
  </widget>
  <widget class="QStatusBar" name="statusBar"/>
 </widget>
 <layoutdefault spacing="6" margin="11"/>
 <resources/>
 <connections/>
</ui>
效果图如下,自己设置对应下位机的波特率就可以实现数据收发了
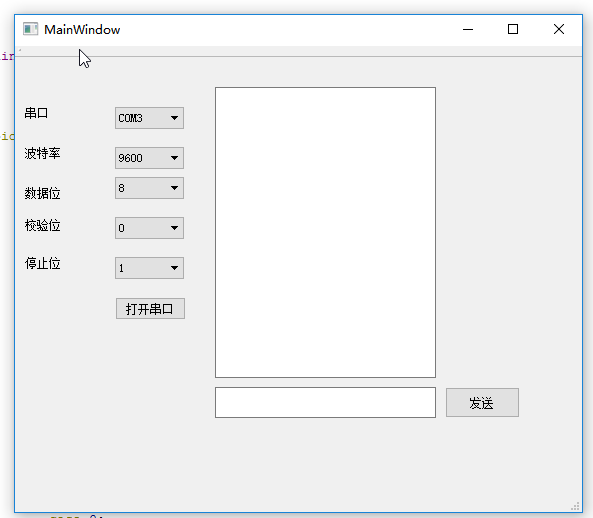
这里注意一下,使用串口通信的时候是按字节发送的,所以如果你定义一个char buff[10],而且你想这样定义buff[0] = '255'发送255这个字符给下位机的时候,下位机是接收不完整的,经过测试发现发送大于或等于10的字符是会被截断的,只会留下最后一个字符,比如说发送10字符的时候,下位机很有可能只能接收到0这个字符,当然如果想要完整的发送过去的话可以定义成字符串形式。比如char buff[] ="255",这样就可以发送一个完整的255过去了,但是需要注意的是这是一个字符串不是一个字符,所以如果你在下位机如果要根据上位机发送的数据来处理一些事情的时候一定要清楚你发送的是字符还是字符串。
到此这篇关于QT串口通信的实现方法的文章就介绍到这了,更多相关QT串口通信内容请搜索猪先飞以前的文章或继续浏览下面的相关文章希望大家以后多多支持猪先飞!
相关文章
- 在.NET平台下创建C#串口通信程序,.NET 2.0提供了串口通信的功能,其命名空间是System.IO.Ports,创建C#串口通信程序的具体实现是如何的呢?让我们开始吧...2020-06-25
- 下面小编就为大家分享一篇Qt 使用Poppler实现pdf阅读器的示例代码,具有很好的参考价值,希望对大家有所帮助。一起跟随小编过来看看吧...2020-04-25
- 这篇文章主要介绍了将matplotlib绘图嵌入pyqt的方法示例,文中通过示例代码介绍的非常详细,对大家的学习或者工作具有一定的参考学习价值,需要的朋友们下面随着小编来一起学习学习吧...2020-04-27
- 在前一篇中我们介绍了键盘和鼠标事件,其实还有一个非常常用的事件,就是定时器事件,如果要对程序实现时间上的控制,那么就要使用到定时器。而随机数也是很常用的一个功能,在我们要想产生一个随机的结果时就要使用到随机数。本文我们就来简单介绍一下定时器和随机数。...2020-04-25
- 这篇文章主要给大家介绍了关于教你3分钟如何发布Qt程序的相关资料,文中通过实例代码结束的非常详细,对大家的学习或者工作具有一定的参考学习价值,需要的朋友们下面来一起学习学习吧...2020-08-24
- 这篇文章主要为大家详细介绍了Qt实现闹钟小程序,利用Qt的designer设计需要的闹钟界面,具有一定的参考价值,感兴趣的小伙伴们可以参考一下...2020-04-25
- 本文主要介绍了Qt使用windeployqt工具实现程序打包发布方法,文中通过示例代码介绍的非常详细,具有一定的参考价值,感兴趣的小伙伴们可以参考一下...2021-11-01
- 信号和槽是Qt特有的信息传输机制,本文主要介绍了浅谈Qt信号与槽的各种连接方式,文中通过示例代码介绍的非常详细,具有一定的参考价值,感兴趣的小伙伴们可以参考一下...2021-09-02
- 这篇文章主要介绍了PyQt QMainWindow的使用示例,帮助大家更好的理解和学习使用pyqt,感兴趣的朋友可以了解下...2021-03-20
- 本文主要介绍了Qt实现UDP多线程数据处理及发送的简单实例,文中通过示例代码介绍的非常详细,具有一定的参考价值,感兴趣的小伙伴们可以参考一下...2021-10-21
- 这篇文章主要为大家详细介绍了Qt自定义控件实现线条型加载条,文中示例代码介绍的非常详细,具有一定的参考价值,感兴趣的小伙伴们可以参考一下...2020-04-25
- 这篇文章主要为大家详细介绍了Qt自定义控件实现圆圈加载进度条,文中示例代码介绍的非常详细,具有一定的参考价值,感兴趣的小伙伴们可以参考一下...2020-04-25
- 这篇文章主要为大家详细介绍了Qt实现Flappy Bird游戏,具有一定的参考价值,感兴趣的小伙伴们可以参考一下...2020-04-25
- 这篇文章主要为大家详细介绍了Qt使用QPainter绘制3D立方体,文中示例代码介绍的非常详细,具有一定的参考价值,感兴趣的小伙伴们可以参考一下...2020-08-21
- 本篇文章是对Visual C++进行串口通信编程进行了详细的分析介绍,需要的朋友参考下...2020-04-25
- 这篇文章主要为大家详细介绍了Qt实现进程界面之间的鼠标焦点切换,文中示例代码介绍的非常详细,具有一定的参考价值,感兴趣的小伙伴们可以参考一下...2020-09-25
- 下面小编就为大家带来一篇QT开发应用程序的欢迎界面实例。小编觉得挺不错的,现在就分享给大家,也给大家做个参考。一起跟随小编过来看看吧...2020-04-25
- 本文主要介绍了Qt实现网络聊天室,实现一个在线聊天室, 使用tcp对客户端和服务器端进行通讯。具有一定的参考价值,具有一定的参考价值,...2021-06-23
- 如果用qt写程序作为上位机,然后通过和usb和下位机通信的时候,就需要用到qt中的串口通信了。本文介绍了QT串口通信的实现方法,感兴趣的小伙伴们可以参考一下...2021-05-20
- 本文将介绍Qt之ui在程序中的使用-多继承法,需要的朋友可以参考...2020-04-25