Android开发中Service应用于广播接收者教程
什么是服务:长期后台运行的没有界面的组件,
android是应用场景:
天气预报:后台的连接服务器的逻辑,每隔一段时间获取最新的天气信息
股票显示:后台的连接服务器的逻辑,每隔一段时间获取最新的股票信息
mp3播放器: 后台长期的播放音乐。
new Thread(){}.start(); 子线程没有界面,也是长期后台运行的。
android系统进程管理是按照一定的规则的:
1.应用程序一旦被打开 通常情况下关闭(清空任务栈)后进程不会停止。方面下一次快速启动。
带来内存不足的问题。
2.Android系统有一套 内存清理机制。 按照优先级去回收系统的内存。
进程分为5个等级的优先级:(从高到低)
1.Foreground process 前台进程 用户正在玩的应用程序对应的进程
2.Visible process 可视进程 用户仍然可以看到这个进程的界面。
3.Service process服务进程 应用程序有一个服务组件在后台运行。
4.Background process 后台进程 应用程序没有服务在运行 并且最小化 (activity onstop)
5.Empty process 空进程 没有任何运行的activity, 任务栈空了
长期后台运行的组件,不要在activity开启子线程。
应该是创建服务,在服务里面开启子线程。
服务的目的:
1.长期后台运行。
2.提高进程的优先级,系统不容易回收掉进程,即便回收了,内存充足的时候,把进程重新创建。
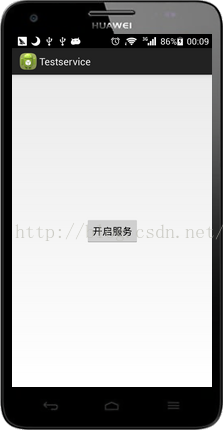
案例场景:使用一个按钮开启服务,在控制台打印服务启动状况。程序界面如下:
2 Android清单文件如下:
<?xml version="1.0" encoding="utf-8"?>
<manifest xmlns:android="http://schemas.android.com/apk/res/android"
package="com.itheima.testservice"
android:versionCode="1"
android:versionName="1.0" >
<uses-sdk
android:minSdkVersion="8"
android:targetSdkVersion="19" />
<application
android:allowBackup="true"
android:icon="@drawable/ic_launcher"
android:label="@string/app_name"
android:theme="@style/AppTheme" >
<activity
android:name="com.itheima.testservice.MainActivity"
android:label="@string/app_name" >
<intent-filter>
<action android:name="android.intent.action.MAIN" />
<category android:name="android.intent.category.LAUNCHER" />
</intent-filter>
</activity>
<service android:name="com.itheima.testservice.MyService"></service>
</application>
</manifest>
3 布局文件如下:
<RelativeLayout xmlns:android="http://schemas.android.com/apk/res/android"
xmlns:tools="http://schemas.android.com/tools"
android:layout_width="match_parent"
android:layout_height="match_parent"
tools:context=".MainActivity" >
<Button
android:onClick="click"
android:layout_width="wrap_content"
android:layout_height="wrap_content"
android:layout_centerHorizontal="true"
android:layout_centerVertical="true"
android:text="开启服务"/>
</RelativeLayout>
4 MainActivity的代码如下:
package com.itheima.testservice;
import android.app.Activity;
import android.content.Intent;
import android.os.Bundle;
import android.view.View;
public class MainActivity extends Activity {
@Override
protected void onCreate(Bundle savedInstanceState) {
super.onCreate(savedInstanceState);
setContentView(R.layout.activity_main);
}
public void click(View view) {
Intent intent = new Intent(this,MyService.class);
startService(intent);
}
}
5 MyService的代码如下:
package com.itheima.testservice;
import android.app.Service;
import android.content.Intent;
import android.os.IBinder;
public class MyService extends Service {
@Override
public IBinder onBind(Intent intent) {
return null;
}
//oncreate ondestory onstart onstop onresume onpause
@Override
public void onCreate() {
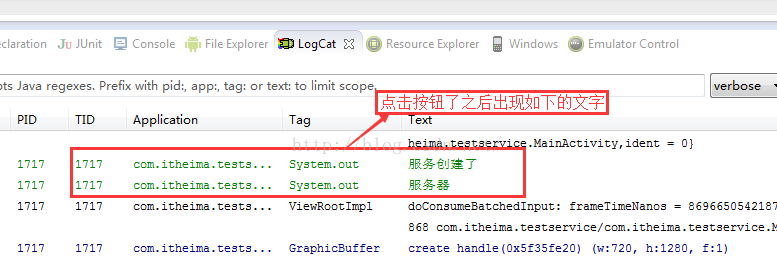
System.out.println("服务创建了");
super.onCreate();
}
@Override
public int onStartCommand(Intent intent, int flags, int startId) {
System.out.println("服务器");
return super.onStartCommand(intent, flags, startId);
}
@Override
public void onDestroy() {
System.out.println("服务器销毁了");
super.onDestroy();
}
}
6.关于接受者的说明
四大组件:
Activity
Content provider 内容提供者
Broadcast receiver 广播接受者
Service 服务
电台: 发送广播
收音机: 接受广播
android系统下的广播:
电池电量低。
电池充电完毕
短信到来了
程序安装卸载
sd卡卸载 安装
1.写一个类继承广播接受者
2.在清单文件配置关心的动作
3.一旦广播事件发生了,就会执行广播接受者的onreceive方法
Android通过广播接收者调用服务内方法
Android通过广播接收者调用服务内方法 以及利用代码注册广播接收器(4大组件中唯一可以使用代码声明的组件(activity receiver provider service))
服务;
package com.pas.callmethod;
import android.app.Service;
import android.content.BroadcastReceiver;
import android.content.Context;
import android.content.Intent;
import android.content.IntentFilter;
import android.os.IBinder;
import android.widget.Toast;
public class MyService extends Service
{
private MyReciver receiver;
@Override
public void onCreate()
{
//采用代码方式注册广播接收者
receiver=new MyReciver();
IntentFilter filter=new IntentFilter();
filter.addAction("com.pas.call");
registerReceiver(receiver, filter);
super.onCreate();
}
@Override
public void onDestroy()
{
unregisterReceiver(receiver);
receiver=null;
super.onDestroy();
}
@Override
public IBinder onBind(Intent arg0)
{
return null;
}
private void method_inservice()
{
Toast.makeText(getApplicationContext(), "我的服务的方法……", Toast.LENGTH_SHORT).show();
}
private class MyReciver extends BroadcastReceiver
{
@Override
public void onReceive(Context arg0, Intent arg1)
{
System.out.println("内部接收者");
method_inservice();
}
}
}
MAINAC:
package com.pas.callmethod;
import android.os.Bundle;
import android.app.Activity;
import android.content.Intent;
import android.view.Menu;
import android.view.View;
public class MainActivity extends Activity
{
@Override
protected void onCreate(Bundle savedInstanceState)
{
super.onCreate(savedInstanceState);
setContentView(R.layout.activity_main);
Intent intent=new Intent(this,MyService.class);
startService(intent);
}
@Override
public boolean onCreateOptionsMenu(Menu menu)
{
// Inflate the menu; this adds items to the action bar if it is present.
getMenuInflater().inflate(R.menu.main, menu);
return true;
}
public void call(View v)
{
//发送自定义广播
Intent intent=new Intent();
intent.setAction("com.pas.call");
sendBroadcast(intent);
}
}
编译环境:ubuntu 12.04
NDK版本:android-ndk-r8d
ffmpeg版本:1.2
新建Android工程,在工程目录中创建jni文件夹
1、在jni目录下添加如下文件Android.mk ,内容如下:
include $(all-subdir-makefiles)
2.在jni/ffmpeg下添加Android.mk内容如下:
3.在jni/ffmpeg下添加av.mk
4.在jni/ffmpeg/libavformat下添加Android,mk内容如下:
5. 在jni/ffmpeg/libavcodec下添加Android,mk内容如下:
6.在jni/ffmpeg/libavutil libpostproc libswscale libswresample 下添加Android,mk内容如下:
7.在jni/ffmpeg 下添加可执行文件config.sh, 内容如下
上面PREBUILT PLATFORM的路径自己根据NDK的路径自己更改,并增加可执行权限,命令如下:
chmod +x config.sh
4、命令行到jni/ffmpeg目录下执行
./config.sh
5、修改
a、删除 libavformat libavcodec libavutil libpostproc libswscale libswresample 目录下Makefile下的
include $(SUBDIR)../config.mak
b、删除libavcodec libavutil libswresample目录下Makefile下的
log2_tab.o \
c、修改jni/ffmpeg/config.h下的
#define avrestrict restrict为#define restrict
e、把 ffmpeg/libavutil/time.h更名为avtime.h,
同时修改下面文件中的引用libavutil/time.h为libavutil/avtime.h
ffmpeg/libavformat/avformat.h:211
ffmpeg/libavformat/avio.c:25
ffmpeg/libavformat/hls.c:33
ffmpeg/libavformat/mux.c:39:30
ffmpeg/libavformat/utils.c:40
ffmpeg/libavutil/time.c:36
6、接下来就是编译了
cd ..
命令行到项目project目录下执行
$NDK/ndk-build
问题一:
Install : libffplay.so => libs/armeabi-v7a/libffplay.so
Install : libiptv_media_player_jni.so => libs/armeabi-v7a/libiptv_media_player_jni.so
/home/rds/share/xiongms/android-ndk-r8d/toolchains/arm-linux-androideabi-4.6/prebuilt/linux-x86/bin/../lib/gcc/arm-linux-androideabi/4.6/../../../../arm-linux-androideabi/bin/ld: warning: hidden symbol '__aeabi_atexit' in ./obj/local/armeabi-v7a/libgnustl_static.a(atexit_arm.o)
is referenced by DSO ./obj/local/armeabi-v7a/libffplay.so
/home/rds/share/xiongms/android-ndk-r8d/toolchains/arm-linux-androideabi-4.6/prebuilt/linux-x86/bin/../lib/gcc/arm-linux-androideabi/4.6/../../../../arm-linux-androideabi/bin/ld: ./obj/local/armeabi-v7a/libswscale.a(swscale.o): in function swScale:jni/libffmpeg/libswscale/swscale.c:426:
error: undefined reference to 'av_get_cpu_flags'
/home/rds/share/xiongms/android-ndk-r8d/toolchains/arm-linux-androideabi-4.6/prebuilt/linux-x86/bin/../lib/gcc/arm-linux-androideabi/4.6/../../../../arm-linux-androideabi/bin/ld: ./obj/local/armeabi-v7a/libswscale.a(utils.o): in function sws_init_context:jni/libffmpeg/libswscale/utils.c:917:
error: undefined reference to 'av_get_cpu_flags'
/home/rds/share/xiongms/android-ndk-r8d/toolchains/arm-linux-androideabi-4.6/prebuilt/linux-x86/bin/../lib/gcc/arm-linux-androideabi/4.6/../../../../arm-linux-androideabi/bin/ld: ./obj/local/armeabi-v7a/libswresample.a(resample.o): in function multiple_resample:jni/libffmpeg/libswresample/resample.c:315:
error: undefined reference to 'av_get_cpu_flags'
将Android.mk中的
LOCAL_STATIC_LIBRARIES := libavformat libavcodec libavutil libpostproc libswscale libswresample libmediaplayer
改为
LOCAL_WHOLE_STATIC_LIBRARIES := libavformat libavcodec libavutil libpostproc libswscale libswresample libmediaplayer
有时我们的Android APP需要内嵌现成的wap手机网站,本文我们来介绍两个Android内嵌wap站的实例方法,而且嵌入的网页后界面效果和app差不多。我们的内嵌Android APP手机站点m.baidu.com,不能显示标题栏,点击网页的超链接,不会弹出系统自带浏览器。
布局web.xml 在layouts目录下新建布局文件web.xml,内容如下
<?xml version="1.0" encoding="utf-8"?>
<linearlayout xmlns:android="http://schemas.android.com/apk/res/android" android:orientation="vertical" android:layout_width="fill_parent" android:layout_height="fill_parent">
<webview android:id="@+id/webView" android:layout_width="fill_parent" android:layout_height="wrap_content" android:layout_weight="1.0">
</webview></linearlayout>
布局文件写好了,那么我们开始写代码了,我把整个代码都拷贝到下面
package cn.afcu.sdk;
import android.os.Bundle;
import android.view.View;
import android.webkit.WebSettings;
import android.webkit.WebView;
import android.webkit.WebViewClient;
public class Web extends MainActivity {
private WebView webView;
@Override
protected void onCreate(Bundle savedInstanceState) {
// TODO Auto-generated method stub
super.onCreate(savedInstanceState);
setContentView(R.layout.web);
webView = (WebView) findViewById(R.id.webView);
openBrowser();
webView.setWebViewClient(new WebViewClient() {
public boolean shouldOverrideUrlLoading(WebView view, String url)
{ // 重写此方法表明点击网页里面的链接还是在当前的webview里跳转,不跳到浏览器那边
view.loadUrl(url);
return true;
}
});
}
//利用webView的loadUrl方法
public void openBrowser() {
webView.setScrollBarStyle(View.SCROLLBARS_OUTSIDE_OVERLAY);//滚动条在WebView内侧显示
webView.setScrollBarStyle(View.SCROLLBARS_INSIDE_OVERLAY);//滚动条在WebView外侧显示
webView.setVerticalScrollBarEnabled(false); //垂直不显示
WebSettings webSettings = webView.getSettings();
webSettings.setJavaScriptEnabled(true);
webView.loadUrl("http://www.baidu.com");
}
}
Andriod使用webview控件往APP里内嵌网页
1.布局文件片段:res-layout
<WebView android:id="@+id/Toweb"
android:layout_width="fill_parent"
android:layout_height="fill_parent" />
2.Java片段:src
@Override
protected void onCreate(Bundle savedInstanceState) {
super.onCreate(savedInstanceState);
setContentView(R.layout.activity_main);
//WebView
WebView browser=(WebView)findViewById(R.id.Toweb);
browser.loadUrl("http://www.baidu.com");
//设置可自由缩放网页
browser.getSettings().setSupportZoom(true);
browser.getSettings().setBuiltInZoomControls(true);
// 如果页面中链接,如果希望点击链接继续在当前browser中响应,
// 而不是新开Android的系统browser中响应该链接,必须覆盖webview的WebViewClient对象
browser.setWebViewClient(new WebViewClient() {
public boolean shouldOverrideUrlLoading(WebView view, String url)
{
// 重写此方法表明点击网页里面的链接还是在当前的webview里跳转,不跳到浏览器那边
view.loadUrl(url);
return true;
}
});
}
//go back
@Override
public boolean onKeyDown(int keyCode, KeyEvent event) {
WebView browser=(WebView)findViewById(R.id.Toweb);
// Check if the key event was the Back button and if there's history
if ((keyCode == KeyEvent.KEYCODE_BACK) && browser.canGoBack()) {
browser.goBack();
return true;
}
// return true;
// If it wasn't the Back key or there's no web page history, bubble up to the default
// system behavior (probably exit the activity)
return super.onKeyDown(keyCode, event);
}
3. AndroidManifest.xml 设置权限,否则无法访问
<!--添加该权限,webview可以访问网页-->
<uses-permission android:name="android.permission.INTERNET"></uses-permission>
Android开发中使用HttpClient来开发Http程序来完成简单的网络通信,其实使用HttpUrlConnection也可以实现,不过HttpClient可以完成HttpUrlConnection的所有功能,并且还自己增加了其他的功能,那相比之下就直接使用HttpClient就得了...Http通信有两种方式,相比大家都清楚,一种是使用GET请求,另一种则是使用POST请求来完成...GET请求可以获取静态页面,也可以把参数放在URL参数后面进行传递...POST与GET不同的地方就在于这里,POST请求无法将数据放到字符串的后面...而是放在Http传递的数据当中...这些参数会通过cookie或者是session来进行传递...POST更加适合传递保密的数据信息...比如说用户的账户密码...这样使用GET方式就不是很合理了...因此把保密的数据信息放入到Http请求数据中更加的安全...
那么Android是如何通过Http请求来实现GET或者是POST请求呢?这里简单的介绍一下...先介绍一下GET方式...如何使用GET请求来获取数据信息....GET请求需要几个步骤...
首先:我们需要建立GET对象...通过创建对象来告诉服务器我们使用的GET请求来获取数据信息的...因为Http请求是以URL的形式进行来完成数据传递的...因此我们需要传递一个URL来实例化对象...我这个地址是服务器上的一个jsp文件...通过使用Http请求来获取JSP界面的数据信息...
String path="http://10.0.2.2:8080/JSP/text.jsp":
HttpGet get=new HttpGet(path);
然后我们需要使用DefaultHttpClient类中的execute()方法来发送Http GET请求...并返回一个HttpResponse对象,HttpResponse对象的目的是当一个Http连接建立成功之后,我们就可以使用其类中的方法来获取到服务器的响应信息...
HttpClient client=new DefaultHttpClient();
HttpResponse response=client.execute(get);
最后我们就可以通过HttpResponse对象来获取服务器的响应数据信息了...这里我使用了一个getEntity()方法来返回响应信息,然后获取GET提交的URL后面的数据信息...
if(response.getStatusLine().getStatusCode()==HttpStatuse.SC_OK){
String result=EntityUtils.toString(resopnse.getEntity());
tv.setText(result);
}
最后我们需要在AndroidManifest.xml文件中配置权限属性...只需要添加<user-permission android:name="android.permission.INTERNET"/>那么简单的举一个小例子来实现Http的GET请求...
首先我们先写一个JSP页面.....这个页面要在Tomcat上进行发布...当没有参数值进行传递的时候,会显示Your message are wrong!这个信息...
<%
String name=request.getParameter("name");
String password=request.getParameter("password");
if("DARKER".equals(name) && "4968188".equals(password)){
out.println("Receive name is:"+name);
out.println("Receive password is:"+password);%>
Your message are right!
<%}else{
out.println("Receive name is:"+name);
out.println("Receive password is:"+password); %>
Your message are wrong!
<%}%>
然后有了这个东西,我们就可以通过Http传递数据信息来提交数据...然后通过这个界面返回的信息来告知我们服务器响应的信息数据...一个简单的布局文件...就一个文本框...目的就是为了返回服务器的响应信息...
<LinearLayout xmlns:android="http://schemas.android.com/apk/res/android"
xmlns:tools="http://schemas.android.com/tools"
android:layout_width="fill_parent"
android:layout_height="fill_parent"
android:orientation="vertical"
tools:context=".MainActivity" >
<TextView
android:id="@+id/msg"
android:layout_width="wrap_content"
android:layout_height="wrap_content"/>
</LinearLayout>
如何实现才是一个重要的过程...在实现的过程中会出现一个问题,就是在Android2.3版本以后就不允许在主线程中去使用Http请求了...相信大部分的学习资料上都没有这个提示问题,但是确实是存在着这样一个问题的...那么上有政策那么就下有对策...我们可以使用三种方法去解决这个问题...非常的简单,也很好理解...那么既然我们无法在主线程中去使用Http请求,那么我们可以新开启一个线程啊...或者是我们可以去使用异步线程类AsyncTask去实现不就完了吗...还有一种方法就是在主线程中加入某些东西...就是下面的在setContentView()这个函数下面加入的那两句话...但是这种方法在网上说并不是很推荐...因此本人也没怎么研究...其他两种方式先对就很好理解...这三种方式我都进行了列举...只要使用其中的任意一种方式就可以实现Http的GET请求....
package com.example.httpclient;
/* HttpCilent 通过Get与服务器进行通信...
* HttpClient比HttpUrlConnection更加的有优势...前者能做后者所有能做的事情...
* 那就干脆就使用这种方式吧....
*
*
* */
import java.io.IOException;
import org.apache.http.HttpResponse;
import org.apache.http.HttpStatus;
import org.apache.http.client.ClientProtocolException;
import org.apache.http.client.HttpClient;
import org.apache.http.client.methods.HttpGet;
import org.apache.http.impl.client.DefaultHttpClient;
import org.apache.http.util.EntityUtils;
import android.os.AsyncTask;
import android.os.Bundle;
import android.os.StrictMode;
import android.app.Activity;
import android.view.Menu;
import android.widget.TextView;
public class MainActivity extends Activity {
/*
* 由于在Android2.3版本以后就不允许在主线程使用Http请求...
* 但是我们可以使用其他的方法来解决这个问题...
* 第一种方法在主线程onCreate()方法中加入StrictMode方法..不过这种方法不被推荐...
* 第二种使用异步线程AsyncTask<Param,Progress,Result>也可以实现...在异步线程中完成Http请求..
* 第三种方法单开启一个线程Runnable()来实现,其实也是延续异步线程的思想...
*
* */
private TextView tv;
// private String path="http://10.0.2.2:8080/JSP/get.jsp?name=DARKER&password=49681888";
@Override
protected void onCreate(Bundle savedInstanceState) {
super.onCreate(savedInstanceState);
setContentView(R.layout.activity_main);
// StrictMode.setThreadPolicy(new StrictMode.ThreadPolicy.Builder().detectDiskReads().detectDiskWrites().detectNetwork().penaltyLog().build());
// StrictMode.setVmPolicy(new StrictMode.VmPolicy.Builder().detectLeakedSqlLiteObjects().detectLeakedClosableObjects().penaltyLog().penaltyDeath().build());
tv=(TextView) findViewById(R.id.msg);
new Thread(runnable).start();
// HttpGet httpRequest=new HttpGet(path);
// HttpClient httpcilents=new DefaultHttpClient();
// try {
// HttpResponse response=httpcilents.execute(httpRequest);
// if(response.getStatusLine().getStatusCode()==HttpStatus.SC_OK){
// String result=EntityUtils.toString(response.getEntity());
// tv.setText(result);
// }else{
// tv.setText("请求错误");
// }
// } catch (ClientProtocolException e) {
// // TODO Auto-generated catch block
// e.printStackTrace();
// } catch (IOException e) {
// // TODO Auto-generated catch block
// e.printStackTrace();
// }
}
@SuppressWarnings("unused")
private class http extends AsyncTask<Integer, Integer, Integer>{
@Override
protected Integer doInBackground(Integer... params) {
// TODO Auto-generated method stub
String url="http://10.0.2.2:8080/JSP/get.jsp?name=DARKER&password=49681888";
HttpGet hget=new HttpGet(url);
HttpClient htclient=new DefaultHttpClient();
try {
HttpResponse hresonse=htclient.execute(hget);
if(hresonse.getStatusLine().getStatusCode()==HttpStatus.SC_OK){
String resul=EntityUtils.toString(hresonse.getEntity());
tv.setText(resul);
}else{
tv.setText("连接失败...");
}
} catch (ClientProtocolException e) {
// TODO Auto-generated catch block
e.printStackTrace();
} catch (IOException e) {
// TODO Auto-generated catch block
e.printStackTrace();
}
return null;
}
}
Runnable runnable=new Runnable() {
String path_1="http://10.0.2.2:8080/JSP/get.jsp?name=DARKER&password=49681888";
@Override
public void run() {
// TODO Auto-generated method stub
HttpGet get=new HttpGet(path_1);
HttpClient cilent=new DefaultHttpClient();
try {
HttpResponse responses=cilent.execute(get);
if(responses.getStatusLine().getStatusCode()==HttpStatus.SC_OK){
String result_1=EntityUtils.toString(responses.getEntity());
tv.setText(result_1);
}else{
tv.setText("无法获取信息...");
}
} catch (ClientProtocolException e) {
// TODO Auto-generated catch block
e.printStackTrace();
} catch (IOException e) {
// TODO Auto-generated catch block
e.printStackTrace();
}
}
};
@Override
public boolean onCreateOptionsMenu(Menu menu) {
// Inflate the menu; this adds items to the action bar if it is present.
getMenuInflater().inflate(R.menu.main, menu);
return true;
}
}
其实上面代码使用异步线程类是没问题的,不过上面的代码会报错,由于我的代码写错了位置...这个错误其实是在doInBackground()方法中出现的...因为在这个方法中是不能够更新控件的数据信息的...这个问题我将在下面进行解决....下面是实现Http的POST请求...然后解决刚才说的问题....下面使用了Handler类...简答的说一下这个类...其实这个类并不是用在这个异步线程类里面的...这个异步线程类内部还有三个没有实现的方法...就是onPreExecute(),publishProgress(),onProgressUpdate()...这三个方法内部都可以完成控件数据信息的更新,唯独这个doInBackground()是无法实现的...使用一个AsyncTask类,再使用Handler是完全没有必要的...其实Handler和AsyncTask是为了实现子线程无法去更新主线程中控件的数据信息而存在的...因为控件对于线程来说是不安全的,因此在子线程中也就无法完成主线程中控件数据信息的更新操作...但是在Android中往往是需要这样做的...因此出现了这两个类去解决这个问题...
首先说一句主要的事,就是使用到了Runnable并不代表一定使用到了多线程...就拿上面那个Runnable类来说,这个runnable虽然重写了run()方法,并且还在主函数中使用了start进行调用,但是这个线程仍然是属于主线程Activity的,并不属于我们单独开启了一个新的线程,然后去执行任务...这是必然的,否则一定会报错...因为在一个新的线程内部是无法去更新主线程中控件的数据信息的...然后在说一下Handler是如何能够完成在子线程中能够对主线程中的控件完成对数据的更新...首先Handler通过传递Message或者是Runnable对象...一般来说都是Message对数据进行封装...Handler主要用来与Looper进行沟通..把信息加入到特定的Looper消息队列中,或者是获取Looper的信息,然后调用handlemessage方法来对获取的信息进行操作...然后将Message发送到MessageQueue中,MessageQueue是一个线性队列,用来保存获取到的消息数据...当Looper发现MessageQueue中有未处理的信息就将这个信息广播出去...Looper就是对MessageQueue队列中然后主线程Handler接收到信息,然后做相应的处理...最后完成更新操作...这就是实现的一个过程...
package com.example.httpclientpost;
import java.io.IOException;
import java.io.UnsupportedEncodingException;
import java.util.ArrayList;
import java.util.List;
import org.apache.http.HttpEntity;
import org.apache.http.HttpResponse;
import org.apache.http.HttpStatus;
import org.apache.http.NameValuePair;
import org.apache.http.client.ClientProtocolException;
import org.apache.http.client.HttpClient;
import org.apache.http.client.entity.UrlEncodedFormEntity;
import org.apache.http.client.methods.HttpPost;
import org.apache.http.impl.client.DefaultHttpClient;
import org.apache.http.message.BasicNameValuePair;
import org.apache.http.util.EntityUtils;
import android.os.AsyncTask;
import android.os.Bundle;
import android.os.Handler;
import android.os.Message;
import android.annotation.SuppressLint;
import android.app.Activity;
import android.view.Menu;
import android.widget.TextView;
public class MainActivity extends Activity {
TextView tv;
String result;
@SuppressLint("HandlerLeak")
private Handler handler=new Handler(){
@Override
public void handleMessage(Message msg){
if(msg.what==1){
tv.setText(result);
}else{
tv.setText("无法连接服务器...");
}
}
};
@Override
protected void onCreate(Bundle savedInstanceState) {
super.onCreate(savedInstanceState);
setContentView(R.layout.activity_main);
tv=(TextView) findViewById(R.id.show);
http h=new http();
h.execute();
}
class http extends AsyncTask<Integer, Integer, Integer>{
String url="http://10.0.2.2:8080/JSP/get.jsp";
@Override
protected Integer doInBackground(Integer... params) {
// TODO Auto-generated method stub
HttpPost post=new HttpPost(url);
List<NameValuePair> param=new ArrayList<NameValuePair>();
param.add(new BasicNameValuePair("name", "DARKER"));
param.add(new BasicNameValuePair("password", "49681888"));
try {
HttpEntity entity=new UrlEncodedFormEntity(param,"gb2312");
post.setEntity(entity);
HttpClient client=new DefaultHttpClient();
HttpResponse response=client.execute(post);
if(response.getStatusLine().getStatusCode()==HttpStatus.SC_OK){
result=EntityUtils.toString(response.getEntity());
Message msg=new Message();
msg.what=1;
handler.sendMessage(msg);
}else{
Message msg=new Message();
msg.what=0;
handler.sendMessage(msg);
}
}catch (UnsupportedEncodingException e) {
// TODO Auto-generated catch block
e.printStackTrace();
} catch (ClientProtocolException e) {
// TODO Auto-generated catch block
e.printStackTrace();
} catch (IOException e) {
// TODO Auto-generated catch block
e.printStackTrace();
}
return null;
}
}
@Override
public boolean onCreateOptionsMenu(Menu menu) {
// Inflate the menu; this adds items to the action bar if it is present.
getMenuInflater().inflate(R.menu.main, menu);
return true;
}
}
其实我觉得使用Android中使用AsyncTask这个异步线程类其实就行,因为这个异步线程类是结合了handler+Thread才得以实现的,当然我们也可以使用handler去进行处理,个人推荐还是使用这个异步线程类更好...好了有点说跑题了...返回Http的POST请求,Http的POST请求比GET能多了一点东西,它使用NameValuePair以键值对的形式对数据进行保存...并且POST请求需要制定字符集...否则数据会出现乱码现象...剩下的东西基本就类似了...这样就实现了Http的POST请求
短信验证需要服务器端生成一个验证码,然后发送到用户输入的手机上,这个过程需要服务器主动向客户发送验证短信,所以这是就需要一个移动或联通的发送短息接口,由于本人目前尚处于学生阶段,没有获得这个接口的权限,所以我就选择了借助网上的移动开发服务平台,来完成这个功能的实现,这里我借用的平台是:http://dashboard.mob.com/,大家可以关注一下,这个平台为我们开发移动应用提供了很好的技术指导,可以大大缩短我们的开发周期。废话不多说,下面开始我们今天的重点。
官方为我们提供了两种设计方式:第一种调用内部GUI实现;另一种通过自定义GUI实现,对于第一种方式,我就不再多讲,因为官方文档提供了很详细的实行步骤,大家只需要按照上面的步骤去实现即可,没有难度。本篇我将带领大家通过自定义GUI实现短信验证功能。首先开发之前你可以先查阅一下官方提供的无GUI API,然后下载一下官方提供的dome,做好这些工作之后,我们就可以开始我们的设计了。
1、将demo中的libs下的SMSSDK-1.1.5.jar和armeabi文件夹拷贝到我们项目的libs目录下,这是官方提供的类库jar包。
2、在AndroidManifest.xml文件添加权限和声明Action:
<?xml version="1.0" encoding="utf-8"?>
<manifest xmlns:android="http://schemas.android.com/apk/res/android"
package="com.example.android_sms"
android:versionCode="1"
android:versionName="1.0" >
<uses-sdk
android:minSdkVersion="8"
android:targetSdkVersion="18" />
<uses-permission android:name="android.permission.READ_CONTACTS" />
<uses-permission android:name="android.permission.READ_PHONE_STATE" />
<uses-permission android:name="android.permission.WRITE_EXTERNAL_STORAGE" />
<uses-permission android:name="android.permission.ACCESS_NETWORK_STATE" />
<uses-permission android:name="android.permission.ACCESS_WIFI_STATE" />
<uses-permission android:name="android.permission.INTERNET" />
<uses-permission android:name="android.permission.RECEIVE_SMS" />
<uses-permission android:name="android.permission.GET_TASKS" />
<uses-permission android:name="android.permission.ACCESS_FINE_LOCATION" />
<application
android:allowBackup="true"
android:icon="@drawable/ic_launcher"
android:label="@string/app_name"
android:theme="@style/AppTheme" >
<activity
android:name="com.example.android_sms.MainActivity"
android:label="@string/app_name" >
<intent-filter>
<action android:name="android.intent.action.MAIN" />
<category android:name="android.intent.category.LAUNCHER" />
</intent-filter>
</activity>
<activity
android:name="cn.smssdk.SMSSDKUIShell"
android:configChanges="keyboardHidden|orientation|screenSize"
android:theme="@android:style/Theme.Translucent.NoTitleBar"
android:windowSoftInputMode="stateHidden|adjustResize" />
</application>
</manifest>
3、设计我们的布局文件:
<RelativeLayout xmlns:android="http://schemas.android.com/apk/res/android"
xmlns:tools="http://schemas.android.com/tools"
android:layout_width="match_parent"
android:layout_height="match_parent"
tools:context=".MainActivity" >
<TextView
android:id="@+id/textView2"
android:layout_width="wrap_content"
android:layout_height="wrap_content"
android:layout_centerHorizontal="true"
android:layout_marginTop="20dp"
android:text="短信验证"
android:textColor="#00ffaa"
android:textSize="20dp" />
<TextView
android:id="@+id/textView1"
android:layout_width="wrap_content"
android:layout_height="wrap_content"
android:layout_alignParentLeft="true"
android:layout_below="@+id/textView2"
android:layout_marginLeft="20dp"
android:layout_marginTop="20dp"
android:text="手机号:" />
<EditText
android:id="@+id/phone"
android:layout_width="wrap_content"
android:layout_height="wrap_content"
android:layout_alignBaseline="@+id/textView1"
android:layout_alignBottom="@+id/textView1"
android:layout_toRightOf="@+id/textView1"
android:maxLength="11"
android:ems="11"
android:inputType="phone" >
<requestFocus />
</EditText>
<TextView
android:id="@+id/textView3"
android:layout_width="wrap_content"
android:layout_height="wrap_content"
android:layout_alignLeft="@+id/textView1"
android:layout_marginTop="40dp"
android:layout_below="@+id/phone"
android:text="验证码:"/>
<EditText
android:id="@+id/cord"
android:layout_width="wrap_content"
android:layout_height="wrap_content"
android:layout_marginTop="20dp"
android:layout_alignBaseline="@+id/textView3"
android:layout_alignBottom="@+id/textView3"
android:layout_alignLeft="@+id/phone"
android:ems="4"
android:maxLength="4"
android:inputType="phone" />
<Button
android:id="@+id/getcord"
style="?android:attr/buttonStyleSmall"
android:layout_width="wrap_content"
android:layout_height="wrap_content"
android:layout_alignTop="@+id/cord"
android:layout_marginLeft="20dp"
android:layout_marginTop="10dp"
android:layout_toRightOf="@+id/cord"
android:visibility="visible"
android:text="获取验证码" />
<Button
android:id="@+id/savecord"
android:layout_width="fill_parent"
android:layout_height="wrap_content"
android:layout_below="@+id/cord"
android:layout_margin="20dp"
android:text="验证" />
<TextView
android:id="@+id/now"
android:layout_width="fill_parent"
android:layout_height="wrap_content"
android:layout_above="@+id/savecord"
android:layout_toRightOf="@+id/cord"
android:gravity="center_horizontal"
android:visibility="gone"
android:text="提示信息"
android:textColor="#aaaaaa" />
</RelativeLayout>
4、我们的MainActivity:
/**
* 自定义GUI短信验证
* @time: 2015年7月4日
*/
public class MainActivity extends Activity implements OnClickListener{
private EditText phone;
private EditText cord;
private TextView now;
private Button getCord;
private Button saveCord;
private String iPhone;
private String iCord;
private int time = 60;
private boolean flag = true;
@Override
protected void onCreate(Bundle savedInstanceState) {
super.onCreate(savedInstanceState);
requestWindowFeature(Window.FEATURE_NO_TITLE);
setContentView(R.layout.activity_main);
init();
SMSSDK.initSDK(this, "<您的appkey>", "<您的appsecret>");
EventHandler eh=new EventHandler(){
@Override
public void afterEvent(int event, int result, Object data) {
Message msg = new Message();
msg.arg1 = event;
msg.arg2 = result;
msg.obj = data;
handler.sendMessage(msg);
}
};
SMSSDK.registerEventHandler(eh);
}
private void init() {
phone = (EditText) findViewById(R.id.phone);
cord = (EditText) findViewById(R.id.cord);
now = (TextView) findViewById(R.id.now);
getCord = (Button) findViewById(R.id.getcord);
saveCord = (Button) findViewById(R.id.savecord);
getCord.setOnClickListener(this);
saveCord.setOnClickListener(this);
}
@Override
public void onClick(View v) {
switch (v.getId()) {
case R.id.getcord:
if(!TextUtils.isEmpty(phone.getText().toString().trim())){
if(phone.getText().toString().trim().length()==11){
iPhone = phone.getText().toString().trim();
SMSSDK.getVerificationCode("86",iPhone);
cord.requestFocus();
getCord.setVisibility(View.GONE);
}else{
Toast.makeText(MainActivity.this, "请输入完整电话号码", Toast.LENGTH_LONG).show();
phone.requestFocus();
}
}else{
Toast.makeText(MainActivity.this, "请输入您的电话号码", Toast.LENGTH_LONG).show();
phone.requestFocus();
}
break;
case R.id.savecord:
if(!TextUtils.isEmpty(cord.getText().toString().trim())){
if(cord.getText().toString().trim().length()==4){
iCord = cord.getText().toString().trim();
SMSSDK.submitVerificationCode("86", iPhone, iCord);
flag = false;
}else{
Toast.makeText(MainActivity.this, "请输入完整验证码", Toast.LENGTH_LONG).show();
cord.requestFocus();
}
}else{
Toast.makeText(MainActivity.this, "请输入验证码", Toast.LENGTH_LONG).show();
cord.requestFocus();
}
break;
default:
break;
}
}
//验证码送成功后提示文字
private void reminderText() {
now.setVisibility(View.VISIBLE);
handlerText.sendEmptyMessageDelayed(1, 1000);
}
Handler handlerText =new Handler(){
public void handleMessage(Message msg) {
if(msg.what==1){
if(time>0){
now.setText("验证码已发送"+time+"秒");
time--;
handlerText.sendEmptyMessageDelayed(1, 1000);
}else{
now.setText("提示信息");
time = 60;
now.setVisibility(View.GONE);
getCord.setVisibility(View.VISIBLE);
}
}else{
cord.setText("");
now.setText("提示信息");
time = 60;
now.setVisibility(View.GONE);
getCord.setVisibility(View.VISIBLE);
}
};
};
Handler handler=new Handler(){
@Override
public void handleMessage(Message msg) {
// TODO Auto-generated method stub
super.handleMessage(msg);
int event = msg.arg1;
int result = msg.arg2;
Object data = msg.obj;
Log.e("event", "event="+event);
if (result == SMSSDK.RESULT_COMPLETE) {
//短信注册成功后,返回MainActivity,然后提示新好友
if (event == SMSSDK.EVENT_SUBMIT_VERIFICATION_CODE) {//提交验证码成功,验证通过
Toast.makeText(getApplicationContext(), "验证码校验成功", Toast.LENGTH_SHORT).show();
handlerText.sendEmptyMessage(2);
} else if (event == SMSSDK.EVENT_GET_VERIFICATION_CODE){//服务器验证码发送成功
reminderText();
Toast.makeText(getApplicationContext(), "验证码已经发送", Toast.LENGTH_SHORT).show();
}else if (event ==SMSSDK.EVENT_GET_SUPPORTED_COUNTRIES){//返回支持发送验证码的国家列表
Toast.makeText(getApplicationContext(), "获取国家列表成功", Toast.LENGTH_SHORT).show();
}
} else {
if(flag){
getCord.setVisibility(View.VISIBLE);
Toast.makeText(MainActivity.this, "验证码获取失败,请重新获取", Toast.LENGTH_SHORT).show();
phone.requestFocus();
}else{
((Throwable) data).printStackTrace();
int resId = getStringRes(MainActivity.this, "smssdk_network_error");
Toast.makeText(MainActivity.this, "验证码错误", Toast.LENGTH_SHORT).show();
cord.selectAll();
if (resId > 0) {
Toast.makeText(MainActivity.this, resId, Toast.LENGTH_SHORT).show();
}
}
}
}
};
@Override
protected void onDestroy() {
super.onDestroy();
SMSSDK.unregisterAllEventHandler();
}
}
注:appkey和appsecret:在http://dashboard.mob.com/注册一个账号后,创建一个发送短信的应用,系统会自动为生成appkey和appsecret
handlerText是我自定义设计的Handker对象,用于当服务器发送验证码后,提醒用户注意。
最后附图两张,供大家参考:

android获取短信验证码并自动填写的实现
现在的应用在注册登录或者修改密码中都用到了短信验证码,那在android中是如何实现获取短信验证码并自动填写的呢?
首先,需要要在manifest中注册接收和读取短信的权限:
<uses-permission android:name="android.permission.RECEIVE_SMS"></uses-permission>
<uses-permission android:name="android.permission.READ_SMS"/>
实现一个广播SMSBroadcastReceiver来监听短信:
package com.example.receive;
import java.text.SimpleDateFormat;
import java.util.Date;
import android.content.BroadcastReceiver;
import android.content.Context;
import android.content.Intent;
import android.telephony.SmsMessage;
/**
* 短信监听
* @author
*
*/
public class SMSBroadcastReceiver extends BroadcastReceiver {
private static MessageListener mMessageListener;
public static final String SMS_RECEIVED_ACTION = "android.provider.Telephony.SMS_RECEIVED";
public SMSBroadcastReceiver() {
super();
}
@Override
public void onReceive(Context context, Intent intent) {
if (intent.getAction().equals(SMS_RECEIVED_ACTION)) {
Object[] pdus = (Object[]) intent.getExtras().get("pdus");
for(Object pdu:pdus) {
SmsMessage smsMessage = SmsMessage.createFromPdu((byte [])pdu);
String sender = smsMessage.getDisplayOriginatingAddress();
//短信内容
String content = smsMessage.getDisplayMessageBody();
long date = smsMessage.getTimestampMillis();
Date tiemDate = new Date(date);
SimpleDateFormat simpleDateFormat = new SimpleDateFormat("yyyy-MM-dd HH:mm:ss");
String time = simpleDateFormat.format(tiemDate);
//过滤不需要读取的短信的发送号码
if ("+8613450214963".equals(sender)) {
mMessageListener.onReceived(content);
abortBroadcast();
}
}
}
}
//回调接口
public interface MessageListener {
public void onReceived(String message);
}
public void setOnReceivedMessageListener(MessageListener messageListener) {
this.mMessageListener = messageListener;
}
}
在需要填写验证码的Activity中,生产SMSBroadcastReceiver的实例,实现onReceived的回调接口。为了节约系统资源,我们使用动态注册注销广播的方法。
package com.example.smstest;
import com.example.receive.SMSBroadcastReceiver;
import android.os.Bundle;
import android.app.Activity;
import android.content.IntentFilter;
import android.view.Menu;
import android.widget.EditText;
public class MainActivity extends Activity {
private EditText edtPassword;
private SMSBroadcastReceiver mSMSBroadcastReceiver;
private static final String ACTION = "android.provider.Telephony.SMS_RECEIVED";
@Override
protected void onCreate(Bundle savedInstanceState) {
super.onCreate(savedInstanceState);
setContentView(R.layout.activity_main);
edtPassword = (EditText) findViewById(R.id.password);
}
@Override
protected void onStart() {
super.onStart();
//生成广播处理
mSMSBroadcastReceiver = new SMSBroadcastReceiver();
//实例化过滤器并设置要过滤的广播
IntentFilter intentFilter = new IntentFilter(ACTION);
intentFilter.setPriority(Integer.MAX_VALUE);
//注册广播
this.registerReceiver(mSMSBroadcastReceiver, intentFilter);
mSMSBroadcastReceiver.setOnReceivedMessageListener(new SMSBroadcastReceiver.MessageListener() {
@Override
public void onReceived(String message) {
edtPassword.setText(message);
}
});
}
@Override
protected void onDestroy() {
super.onDestroy();
//注销短信监听广播
this.unregisterReceiver(mSMSBroadcastReceiver);
}
}
相关文章
- 下面我们来看一篇关于Android子控件超出父控件的范围显示出来方法,希望这篇文章能够帮助到各位朋友,有碰到此问题的朋友可以进来看看哦。 <RelativeLayout xmlns:an...2016-10-02
- 这篇文章主要介绍了c# 三种方法调用WebService接口的相关资料,文中示例代码非常详细,帮助大家更好的理解和学习,感兴趣的朋友可以了解下...2020-07-07
C#使用Http Post方式传递Json数据字符串调用Web Service
这篇文章主要为大家详细介绍了C#使用Http Post方式传递Json数据字符串调用Web Service,具有一定的参考价值,感兴趣的小伙伴们可以参考一下...2020-06-25Android开发中findViewById()函数用法与简化
findViewById方法在android开发中是获取页面控件的值了,有没有发现我们一个页面控件多了会反复研究写findViewById呢,下面我们一起来看它的简化方法。 Android中Fin...2016-09-20- 如果我们的项目需要做来电及短信的功能,那么我们就得在Android模拟器开发这些功能,本来就来告诉我们如何在Android模拟器上模拟来电及来短信的功能。 在Android模拟...2016-09-20
- 夜神android模拟器如何设置代理呢?对于这个问题其实操作起来是非常的简单,下面小编来为各位详细介绍夜神android模拟器设置代理的方法,希望例子能够帮助到各位。 app...2016-09-20
- 为了增强android应用的用户体验,我们可以在一些Button按钮上自定义动态的设置一些样式,比如交互时改变字体、颜色、背景图等。 今天来看一个通过重写Button来动态实...2016-09-20
- 如果我们要在Android应用APP中加载html5页面,我们可以使用WebView,本文我们分享两个WebView加载html5页面实例应用。 实例一:WebView加载html5实现炫酷引导页面大多...2016-09-20
- 深入理解Android中View和ViewGroup从组成架构上看,似乎ViewGroup在View之上,View需要继承ViewGroup,但实际上不是这样的。View是基类,ViewGroup是它的子类。本教程我们深...2016-09-20
- 下面我们来看一篇关于Android自定义WebView网络视频播放控件开发例子,这个文章写得非常的不错下面给各位共享一下吧。 因为业务需要,以下代码均以Youtube网站在线视...2016-10-02
- java开发的Android应用,性能一直是一个大问题,,或许是Java语言本身比较消耗内存。本文我们来谈谈Android 性能优化之MemoryFile文件读写。 Android匿名共享内存对外A...2016-09-20
- TextView默认是横着显示了,今天我们一起来看看Android设置TextView竖着显示如何来实现吧,今天我们就一起来看看操作细节,具体的如下所示。 在开发Android程序的时候,...2016-10-02
- 这篇文章介绍了c#动态调用Webservice的两种方法实例,有需要的朋友可以参考一下...2020-06-25
android.os.BinderProxy cannot be cast to com解决办法
本文章来给大家介绍关于android.os.BinderProxy cannot be cast to com解决办法,希望此文章对各位有帮助呀。 Android在绑定服务的时候出现java.lang.ClassCastExc...2016-09-20- 这篇文章主要给大家介绍了关于c#中的WebService及其调用方式的相关资料,文中通过示例代码介绍的非常详细,对大家的学习或者工作具有一定的参考学习价值,需要的朋友们下面随着小编来一起学习学习吧...2020-06-25
- 这篇文章主要介绍了Android 实现钉钉自动打卡功能的步骤,帮助大家更好的理解和学习使用Android,感兴趣的朋友可以了解下...2021-03-15
- 下面我们来看一篇关于Android 开发之布局细节对比:RTL模式 ,希望这篇文章对各位同学会带来帮助,具体的细节如下介绍。 前言 讲真,好久没写博客了,2016都过了一半了,赶紧...2016-10-02
- 首先如果要在程序中使用sdcard进行存储,我们必须要在AndroidManifset.xml文件进行下面的权限设置: 在AndroidManifest.xml中加入访问SDCard的权限如下: <!--...2016-09-20
- 下面来给各位简单的介绍一下关于Android开发之PhoneGap打包及错误解决办法,希望碰到此类问题的同学可进入参考一下哦。 在我安装、配置好PhoneGap项目的所有依赖...2016-09-20
用Intel HAXM给Android模拟器Emulator加速
Android 模拟器 Emulator 速度真心不给力,, 现在我们来介绍使用 Intel HAXM 技术为 Android 模拟器加速,使模拟器运行度与真机比肩。 周末试玩了一下在Eclipse中使...2016-09-20