Android高德地图自定义Markers的例子
之前的博客里说了地图的嵌入和定位,今天就说说在地图上显示一些我们想要的。在地图中有自带的Markers(标记),但是它只显示一个椭圆的图标,一般是不符合我们的需求的,这样就要我们自己来自定义。首先标记有下面一些属性;
1.position(Required) 在地图上标记位置的经纬度值。参数不能为空。
2.title 当用户点击标记,在信息窗口上显示的字符串。
3.snippet 附加文本,显示在标题下方。
4.draggable 如果您允许用户可以自由移动标记,设置为“ true ”。默认情况下为“ false ”。
5.visible 设置“ false ”,标记不可见。默认情况下为“ true ”。
6.anchor图标摆放在地图上的基准点。默认情况下,锚点是从图片下沿的中间处。
7.perspective设置 true,标记有近大远小效果。默认情况下为 false。
8.可以通过Marker.setRotateAngle() 方法设置标记的旋转角度,从正北开始,逆时针计算。如设置旋转90度,Marker.setRotateAngle(90)
9.通过setFlat() 方法设置标志是否贴地显示
自定义图标通常由 BitmapDescriptor 设置。我们可以在类 BitmapDescriptorFactory 使用以下其中一种方法定义。
1.fromAsset(String assetName) 在 assets 目录中使用图像创建自定义标记。
2.fromBitmap (Bitmap image) 使用位图图像创建自定义标记。
3.fromFile (String path) 指定路径的文件创建自定义图标。
4.fromResource (int resourceId) 使用已经存在的资源创建自定义图标。
先看一下要实现的效果:
 地图自带标记
  实现效果
实现效果
实现思路是:自定义布局,获取数据填入相应位置,然后将view转成Bitmap,调用AMap.addMarker(markerOptions) 方法添加到地图上。
自定义布局并填充数据:
for (int i = 0; i < positionEneityList.size(); i++) {

    if (positionEneityList.get(i).getType().equals("1")) {

       View view = View.inflate(getActivity(),R.layout.view_day, null);

       TextView tv_price = (TextView) view.findViewById(R.id.tv_price);

       TextView tv_price_status = (TextView) view.findViewById(R.id.tv_price_status);

       tv_price.setText(positionEneityList.get(i).getPrice());

       tv_price_status.setText("元/时");

       Bitmap bitmap = CommentActivity.convertViewToBitmap(view);

       drawMarkerOnMap(new LatLng(Double.parseDouble(positionEneityList.get(i).getLatitude())

, Double.parseDouble(positionEneityList.get(i).getLongitude())), bitmap, positionEneityList.get(i).getId());

    }

 }
2.转成Bitmap:
//view 转bitmap

public static Bitmap convertViewToBitmap(View view) {

    view.measure(View.MeasureSpec.makeMeasureSpec(0, View.MeasureSpec.UNSPECIFIED), View.MeasureSpec.makeMeasureSpec(0, View.MeasureSpec.UNSPECIFIED));

    view.layout(0, 0, view.getMeasuredWidth(), view.getMeasuredHeight());

    view.buildDrawingCache();

    Bitmap bitmap = view.getDrawingCache();

    return bitmap;

}
3.添加到地图上:
/**

 * 在地图上画marker

 *

 * @param point      marker坐标点位置(example:LatLng point = new LatLng(39.963175,

 *                   116.400244); )

 * @param markerIcon 图标

 * @return Marker对象

 */

private Marker drawMarkerOnMap(LatLng point, Bitmap markerIcon, String id) {

    if (aMap != null && point != null) {

        Marker marker = aMap.addMarker(new MarkerOptions().anchor(0.5f, 1)

                .position(point)

                .title(id)

                .icon(BitmapDescriptorFactory.fromBitmap(markerIcon)));


        return marker;

    }

    return null;


}
这样就实现了上述效果。
在上一篇已经写了嵌入高德地图,这里来说一下怎么实现定位,并显示定位的图标。
public class FragmentMap extends Fragment implements LocationSource, AMapLocationListener{
private static FragmentMap fragment = null;
@ViewInject(R.id.map)
private MapView mapView;
private AMap aMap;
private View mapLayout;
private OnLocationChangedListener mListener;
private LocationManagerProxy mAMapLocationManager;
public static Fragment newInstance() {
if (fragment == null) {
synchronized (FragmentMap.class) {
if (fragment == null) {
fragment = new FragmentMap();
}
}
}
return fragment;
}
public View onCreateView(LayoutInflater inflater, ViewGroup container,
Bundle savedInstanceState) {
if (mapLayout == null) {
mapLayout = inflater.inflate(R.layout.fragment_map, null);
ViewUtils.inject(this, mapLayout);
mapView.onCreate(savedInstanceState);
if (aMap == null) {
aMap = mapView.getMap();
aMap.setLocationSource(this);// 设置定位监听
aMap.getUiSettings().setMyLocationButtonEnabled(true);// 设置默认定位按钮是否显示
aMap.setMyLocationEnabled(true);// 设置为true表示显示定位层并可触发定位,false表示隐藏定位层并不可触发定位,默认是false
// 自定义系统定位蓝点
MyLocationStyle myLocationStyle = new MyLocationStyle();
// 自定义定位蓝点图标
myLocationStyle.myLocationIcon(BitmapDescriptorFactory.fromResource(R.mipmap.content_btn_location));
// 将自定义的 myLocationStyle 对象添加到地图上
aMap.setMyLocationStyle(myLocationStyle);
// 构造 LocationManagerProxy 对象
mAMapLocationManager = LocationManagerProxy.getInstance(getActivity());
}
} else {
if (mapLayout.getParent() != null) {
((ViewGroup) mapLayout.getParent()).removeView(mapLayout);
}
}
return mapLayout;
}
@Override
public void onAttach(Activity activity) {
super.onAttach(activity);
}
@Override
public void onCreate(Bundle savedInstanceState) {
super.onCreate(savedInstanceState);
}
@Override
public void onResume() {
super.onResume();
mapView.onResume();
}
/**
* 方法必须重写
* map的生命周期方法
*/
@Override
public void onPause() {
super.onPause();
mapView.onPause();
deactivate();
}
/**
* 方法必须重写
* map的生命周期方法
*/
@Override
public void onSaveInstanceState(Bundle outState) {
super.onSaveInstanceState(outState);
mapView.onSaveInstanceState(outState);
}
/**
* 方法必须重写
* map的生命周期方法
*/
@Override
public void onDestroy() {
super.onDestroy();
mapView.onDestroy();
}
@Override
public void onLocationChanged(AMapLocation aMapLocation) {
if (mListener != null &amp;&amp; aMapLocation != null) {
if (aMapLocation.getAMapException().getErrorCode() == 0) {
mListener.onLocationChanged(aMapLocation);// 显示系统小蓝点
//获取位置信息
geoLat = aMapLocation.getLatitude();
geoLng = aMapLocation.getLongitude();
aMap.moveCamera(CameraUpdateFactory.zoomTo(14));
}
}
}
@Override
public void onLocationChanged(Location location) {
}
@Override
public void onStatusChanged(String provider, int status, Bundle extras) {
}
@Override
public void onProviderEnabled(String provider) {
}
@Override
public void onProviderDisabled(String provider) {
}
//激活定位
@Override
public void activate(OnLocationChangedListener listener) {
mListener = listener;
if (mAMapLocationManager == null) {
mAMapLocationManager = LocationManagerProxy.getInstance(getActivity());
//此方法为每隔固定时间会发起一次定位请求,为了减少电量消耗或网络流量消耗,
//注意设置合适的定位时间的间隔,并且在合适时间调用removeUpdates()方法来取消定位请求
//在定位结束后,在合适的生命周期调用destroy()方法
//其中如果间隔时间为-1,则定位只定一次
mAMapLocationManager.requestLocationData(LocationProviderProxy.AMapNetwork, 60 * 1000, 10, this);
}
}
//停止定位
@Override
public void deactivate() {
mListener = null;
if (mAMapLocationManager != null) {
mAMapLocationManager.removeUpdates(this);
mAMapLocationManager.destroy();
}
mAMapLocationManager = null;
}
} 本文章来为各位介绍一篇关于Android开发之高德地图聚合Markers的例子,希望例子能够对各位朋友有用。 上一篇说了在地图上实现了自定义Markers,但是markers太多在地图上显示的就会密密麻麻,重叠覆盖,这里就介绍一下markers的聚合。先看一下封装好的聚合类。
public class MarkerClusterYellow {
    private Activity activity;
    private MarkerOptions options;
    private ArrayList<MarkerOptions>includeMarkers;
    private LatLngBounds bounds;// 创建区域

/**
*
* @param activity
* @param firstMarkers
* @param projection
* @param gridSize
* 区域大小参数
*/
   public MarkerClusterYellow(Activity activity, MarkerOptions firstMarkers,
         Projection projection, int gridSize) {
         options = new MarkerOptions();
         this.activity = activity;
         Point point = projection.toScreenLocation(firstMarkers.getPosition());
         Point southwestPoint = new Point(point.x - gridSize, point.y + gridSize);
         Point northeastPoint = new Point(point.x + gridSize, point.y - gridSize);
         bounds = new LatLngBounds(
         projection.fromScreenLocation(southwestPoint),
         projection.fromScreenLocation(northeastPoint));
         options.anchor(0.5f, 0.5f).title(firstMarkers.getTitle())
         .position(firstMarkers.getPosition())
         .icon(firstMarkers.getIcon())
         .snippet(firstMarkers.getSnippet());
         includeMarkers = new ArrayList<MarkerOptions>();
         includeMarkers.add(firstMarkers);
     }

/**
* 添加marker
*/
  public void addMarker(MarkerOptions markerOptions) {
      includeMarkers.add(markerOptions);// 添加到列表中
  }

/**
* 设置聚合点的中心位置以及图标
*/
public void setpositionAndIcon(String text) {
    String id="";
    int size = includeMarkers.size();
    if (size == 1) {
         return;
     }
   double lat = 0.0;
   double lng = 0.0;
   String snippet = "";
   for (MarkerOptions op : includeMarkers) {
       lat += op.getPosition().latitude;
       lng += op.getPosition().longitude;
       snippet += op.getTitle() + "\n";
       id=id+op.getTitle()+",";
    }
   options.position(new LatLng(lat / size, lng / size));// 设置中心位置为聚集点的平均距离
   options.title(id);
   options.snippet(snippet);
   int iconType = size / 2;

   switch (iconType) {

          default:
               options.icon(BitmapDescriptorFactory
               .fromBitmap(getViewBitmap(getView(size,text,
               R.mipmap.content_icon_positions_yellow))));
          break;
         }
    }

   public LatLngBounds getBounds() {
       return bounds;
   }

   public MarkerOptions getOptions() {
        return options;
   }

   public void setOptions(MarkerOptions options) {
          this.options = options;
   }

   public View getView(int carNum,String text,int resourceId) {
        View view = activity.getLayoutInflater().inflate(R.layout.my_car_cluster_view, null);
        TextView carNumTextView = (TextView) view.findViewById(R.id.my_car_num);
        TextView tv_price = (TextView) view.findViewById(R.id.tv_price);
        TextView tv_price_status = (TextView) view.findViewById(R.id.tv_price_status);
        tv_price.setText(text);
        tv_price_status.setText("元/天");
        tv_price.setTextColor(Color.parseColor("#FFBB18"));
        tv_price_status.setTextColor(Color.parseColor("#FFBB18"));
        LinearLayout myCarLayout = (LinearLayout) view.findViewById(R.id.my_car_bg);
        myCarLayout.setBackgroundResource(resourceId);
        carNumTextView.setText(String.valueOf(carNum));
        return view;
   }

/**
* 把一个view转化成bitmap对象
*/
public static Bitmap getViewBitmap(View view) {view.measure(MeasureSpec.makeMeasureSpec(0, MeasureSpec.UNSPECIFIED),
         MeasureSpec.makeMeasureSpec(0, MeasureSpec.UNSPECIFIED));
        view.layout(0, 0, view.getMeasuredWidth(), view.getMeasuredHeight());
        view.buildDrawingCache();
        Bitmap bitmap = view.getDrawingCache();
        return bitmap;
     }
}
在前一篇博客的基础上我们进行聚合,只需要做以下操作:
public class FragmentMap extends Fragment implements LocationSource, AMapLocationListener,OnCameraChangeListener {
private static FragmentMap fragment = null;
@ViewInject(R.id.map)
private MapView mapView;
private AMap aMap;
private View mapLayout;
private OnLocationChangedListener mListener;
private LocationManagerProxy mAMapLocationManager;
private List<PositionEneity> positionEneityList = new ArrayList<PositionEneity>();
private ArrayList<MarkerOptions> markerOptionsListYellow = new ArrayList<MarkerOptions>();// 所有的marker
private ArrayList<MarkerOptions> markerOptionsListInViewYellow= new ArrayList<MarkerOptions>();// 视野内的marker
String yellow="";
private int height;// 屏幕高度(px)
private int width;// 屏幕宽度(px)
private int gridSize = 50;// marker点区域大小
Handler handler = new Handler() {
@Override
public void handleMessage(android.os.Message msg) {
super.handleMessage(msg);
if (msg.what == 0) {
resetMarks();// 更新markers
}
}
};
public static Fragment newInstance() {
if (fragment == null) {
synchronized (FragmentMap.class) {
if (fragment == null) {
fragment = new FragmentMap();
}
}
}
return fragment;
}
public View onCreateView(LayoutInflater inflater, ViewGroup container,Bundle savedInstanceState) {
if (mapLayout == null) {
mapLayout = inflater.inflate(R.layout.fragment_map, null);
ViewUtils.inject(this, mapLayout);
mapView.onCreate(savedInstanceState);
DisplayMetrics dm = new DisplayMetrics();
getActivity().getWindowManager().getDefaultDisplay().getMetrics(dm);
width = dm.widthPixels;
height = dm.heightPixels;
if (aMap == null) {
aMap = mapView.getMap();
aMap.setLocationSource(this);// 设置定位监听
aMap.getUiSettings().setMyLocationButtonEnabled(true);// 设置默认定位按钮是否显示
aMap.setMyLocationEnabled(true);// 设置为true表示显示定位层并可触发定位,false表示隐藏定位层并不可触发定位,默认是false
}
} else {
if (mapLayout.getParent() != null) {
((ViewGroup) mapLayout.getParent()).removeView(mapLayout);
}
}
aMap.setOnCameraChangeListener(this);
return mapLayout;
}
/**
* 获取视野内的marker 根据聚合算法合成自定义的marker 显示视野内的marker
*/
<strong> private void resetMarks() {
// 开始刷新界面
Projection projection = aMap.getProjection();
Point p = null;
markerOptionsListInViewYellow.clear();
// 获取在当前视野内的marker;提高效率
for (MarkerOptions mp : markerOptionsListYellow) {
p = projection.toScreenLocation(mp.getPosition());
if (p.x < 0 || p.y < 0 || p.x > width || p.y > height) {
// 不添加到计算的列表中
} else {
markerOptionsListInViewYellow.add(mp);
}
}
// 自定义的聚合类MarkerCluster
ArrayList<MarkerClusterYellow> clustersMarkeryellow = new ArrayList<MarkerClusterYellow>();
for (MarkerOptions mp : markerOptionsListInViewYellow) {
if (clustersMarkeryellow.size() == 0) {
clustersMarkeryellow.add(new MarkerClusterYellow(getActivity(), mp,
projection, gridSize));//gridSize 根据自己需求调整
} else {
boolean isIn = false;
for (MarkerClusterYellow cluster : clustersMarkeryellow) {
if (cluster.getBounds().contains(mp.getPosition())) {
cluster.addMarker(mp);
isIn = true;
break;
}
}
if (!isIn) {
clustersMarkeryellow.add(new MarkerClusterYellow(getActivity(), mp, projection, gridSize));
}
}
}
// 先清除地图上所有覆盖物
aMap.clear();
for (MarkerClusterYellow markerClusterYellow : clustersMarkeryellow) {
markerClusterYellow.setpositionAndIcon(yellow);// 设置聚合点的位置和icon
aMap.addMarker(markerClusterYellow.getOptions());// 重新添加
}
}
private void initview() {
for (int i = 0; i < positionEneityList.size(); i++) {
if (positionEneityList.get(i).getType().equals("2")) {
yellow=positionEneityList.get(i).getPrice();
View view01 = View.inflate(getActivity(),R.layout.view_everyday, null);
TextView tv_price = (TextView) view01.findViewById(R.id.tv_price);
TextView tv_price_status = (TextView) view01.findViewById(R.id.tv_price_status);
tv_price.setText(positionEneityList.get(i).getPrice());
tv_price_status.setText("元/天");
Bitmap bitmap = CommentActivity.convertViewToBitmap(view01);
<strong> markerOptionsListYellow.add(new MarkerOptions() .position(new LatLng(Double.parseDouble(positionEneityList.get(i).getLatitude())
, Double.parseDouble(positionEneityList.get(i).getLongitude()))).icon(BitmapDescriptorFactory.fromBitmap(bitmap))
.title(positionEneityList.get(i).getId()));
}
}
}
@Override
public void onCameraChange(CameraPosition cameraPosition) {
}
@Override
public void onCameraChangeFinish(CameraPosition cameraPosition) {
handler.sendEmptyMessage(0);// 更新界面marker
}
}
定位和地图显示部分请参考之前的博客:
为了解决android手机适配问题,我们经常想如果可以按照百分比的方式进行界面布局,这样适配各种屏幕就简单多了吧!现在谷歌正式提供百分比布局支持库(android-support-percent-lib)。
这个库提供了:
两种布局供大家使用: PercentRelativeLayout、PercentFrameLayout,通过名字就可以看出,这是继承自FrameLayout和RelativeLayout两个容器类;
支持的属性有:
layout_widthPercent、layout_heightPercent、
layout_marginPercent、layout_marginLeftPercent、
layout_marginTopPercent、layout_marginRightPercent、
layout_marginBottomPercent、layout_marginStartPercent、layout_marginEndPercent。
可以看到支持宽高,以及margin。
也就是说,大家只要在开发过程中使用PercentRelativeLayout、PercentFrameLayout替换FrameLayout、RelativeLayout即可。
使用:
关于使用,其实及其简单,并且github上也有例子,android-percent-support-lib-sample。
使用Android studio在build.gradle添加以下信息就可以获取支持库,当然了,如果你没有下载到该支持库会提示你下载。
{5330C3E9-D43A-40E0-A247-83C217BE9A84}
PercentRelativeLayout使用小例子:
布局文件如下:
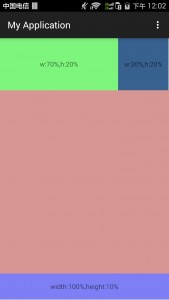
 <android.support.percent.PercentRelativeLayout

    xmlns:android="
http://schemas.android.com/apk/res/android
"

    xmlns:app="
http://schemas.android.com/apk/res-auto
"

    android:layout_width="match_parent"

    android:layout_height="match_parent">


    <TextView

        android:id="@+id/row_one_item_one"

        android:layout_width="0dp"

        android:layout_height="0dp"

        android:layout_alignParentTop="true"

        android:background="#7700ff00"

        android:text="w:70%,h:20%"

        android:gravity="center"

        app:layout_heightPercent="20%"

        app:layout_widthPercent="70%"/>


    <TextView

        android:id="@+id/row_one_item_two"

        android:layout_width="0dp"

        android:layout_height="0dp"

        android:layout_toRightOf="@+id/row_one_item_one"

        android:background="#396190"

        android:text="w:30%,h:20%"

        app:layout_heightPercent="20%"

        android:gravity="center"

        app:layout_widthPercent="30%"/>


    <ImageView

        android:id="@+id/row_two_item_one"

        android:layout_width="match_parent"

        android:layout_height="0dp"

        android:scaleType="centerCrop"

        android:layout_below="@+id/row_one_item_one"

        android:background="#d89695"

        app:layout_heightPercent="70%"/>


    <TextView

        android:layout_width="0dp"

        android:layout_height="0dp"

        android:layout_below="@id/row_two_item_one"

        android:background="#770000ff"

        android:gravity="center"

        android:text="width:100%,height:10%"

        app:layout_heightPercent="10%"

        app:layout_widthPercent="100%"/>


</android.support.percent.PercentRelativeLayout
效果图如下
因为没有LinearLayout我们可以自己来自定义。刚好在网上看到有自定义好的PercentLinearlayout,分享给大家
public class PercentLinearlayout extends LinearLayout{

    private PercentLayoutHelper mPercentLayoutHelper;


    public PercentLinearlayout(Context context, AttributeSet attrs)

    {

        super(context, attrs);


        mPercentLayoutHelper = new PercentLayoutHelper(this);

    }


    @Override

    protected void onMeasure(int widthMeasureSpec, int heightMeasureSpec)

    {

        mPercentLayoutHelper.adjustChildren(widthMeasureSpec, heightMeasureSpec);

        super.onMeasure(widthMeasureSpec, heightMeasureSpec);

        if (mPercentLayoutHelper.handleMeasuredStateTooSmall())

        {

            super.onMeasure(widthMeasureSpec, heightMeasureSpec);

        }

    }


    @Override

    protected void onLayout(boolean changed, int l, int t, int r, int b)

    {

        super.onLayout(changed, l, t, r, b);

        mPercentLayoutHelper.restoreOriginalParams();

    }


    @Override

    public LayoutParams generateLayoutParams(AttributeSet attrs)

    {

        return new LayoutParams(getContext(), attrs);

    }


    public static class LayoutParams extends LinearLayout.LayoutParams

            implements PercentLayoutHelper.PercentLayoutParams

    {

        private PercentLayoutHelper.PercentLayoutInfo mPercentLayoutInfo;


        public LayoutParams(Context c, AttributeSet attrs)

        {

            super(c, attrs);

            mPercentLayoutInfo = PercentLayoutHelper.getPercentLayoutInfo(c, attrs);

        }


        @Override

        public PercentLayoutHelper.PercentLayoutInfo getPercentLayoutInfo()

        {

            return mPercentLayoutInfo;

        }


        @Override

        protected void setBaseAttributes(TypedArray a, int widthAttr, int heightAttr)

        {

            PercentLayoutHelper.fetchWidthAndHeight(this, a, widthAttr, heightAttr);

        }


        public LayoutParams(int width, int height) {

            super(width, height);

        }


        public LayoutParams(ViewGroup.LayoutParams source) {

            super(source);

        }


        public LayoutParams(MarginLayoutParams source) {

            super(source);

        }


    }


}
使用效果如下:
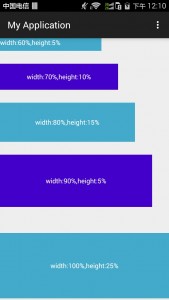
先上效果图:
原理图:
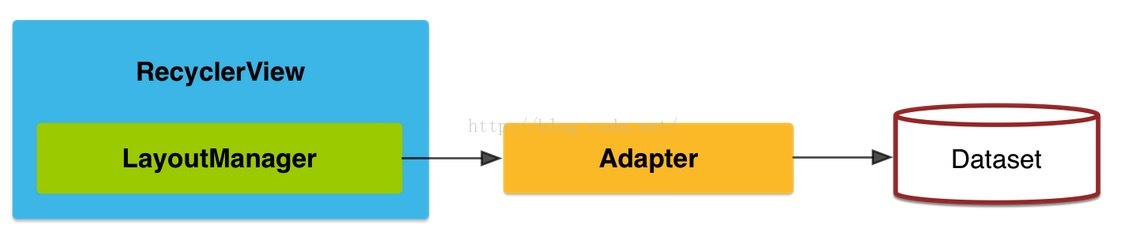
这是RecycleView的工作原理:
1.LayoutManager用来处理RecycleView的“列表”样式,Support包默认包含了:LinearLayoutManager 横向或纵向的滚动列表、
GridLayoutManager 网格列表、StaggeredGridLayoutManager 交错的网格列表。
2.Adapter负责处理RecycleView的数据和样式
3.在传统的ListView中有一种常见的写法是使用ViewHolder来缓存数据集,在新版的RecycleView内置了ViewHolder这一模块,所以在Adapter内部新建内部类ViewHolder。
4.RecycleView 和listView的一个区别就是本身不处理点击事件,点击事件应该绑在ViewHolder里面,可以直接写也可以通过接口绑在Adapter里面来实现。
首先添加数据集:
package com.lfk.drawapictiure.Info;
/**
 * Created by liufengkai on 15/9/13.
 */
public class MenuInfo {
    private String paint_name;
    private String paint_time;
    private String paint_root;
    private String paint_img_root;
    public MenuInfo(String paint_name, String paint_time,
                    String paint_root, String paint_img_root) {
        this.paint_name = paint_name;
        this.paint_time = paint_time;
        this.paint_root = paint_root;
        this.paint_img_root = paint_img_root;
    }
    public String getPaint_name() {
        return paint_name;
    }
    public String getPaint_time() {
        return paint_time;
    }
    public String getPaint_root() {
        return paint_root;
    }
    public String getPaint_img_root() {
        return paint_img_root;
    }
}
实现继承自RecycleView的Adapter中间要包裹自己实现的ViewHolder,onCreateviewHolder函数和onBindViewHolder实现了ListView里面getView的工作,分别为找到控件和控件赋值,
实现点击的接口,设置接口并且绑在ViewHolder的itemView里面即根视图中。
public class MainLayoutAdapter extends RecyclerView.Adapter<MainLayoutAdapter.MainViewHolder> {
    private LayoutInflater inflater;
    private ArrayList<MenuInfo> userList;
    private Context context;
    private MainItemClickListener itemClickListener;
    public MainLayoutAdapter(ArrayList<MenuInfo> userList, Context context) {
        this.userList = userList;
        this.context = context;
        this.inflater = LayoutInflater.from(context);
    }
    public void setItemClickListener(MainItemClickListener itemClickListener) {
        this.itemClickListener = itemClickListener;
    }
  //onCreateviewHolder函数和onBindViewHolder实现了ListView里面getView的工作,分别为找到控件和控件赋值
    @Override
    public MainLayoutAdapter.MainViewHolder onCreateViewHolder(ViewGroup parent, int viewType) {
        View wrapper = inflater.inflate(R.layout.draw_item, parent, false);
        return new MainViewHolder(
                wrapper,
                (TextView)wrapper.findViewById(R.id.paint_name),
                (TextView)wrapper.findViewById(R.id.paint_time),
                (TextView)wrapper.findViewById(R.id.paint_root),
                (ImageView)wrapper.findViewById(R.id.paint_img));
    }
    @Override
    public void onBindViewHolder(MainViewHolder holder, int position) {
        MenuInfo menuInfo = userList.get(position);
        holder.paint_img.setImageURI(Uri.parse(menuInfo.getPaint_img_root()));
        holder.paint_name.setText(menuInfo.getPaint_name());
        holder.paint_time.setText(menuInfo.getPaint_time());
        holder.paint_root.setText(menuInfo.getPaint_root());
    }
    @Override
    public int getItemCount() {
        return userList.size();
    }
    public class MainViewHolder extends RecyclerView.ViewHolder implements View.OnClickListener,View.OnLongClickListener{
        private TextView paint_name;
        private TextView paint_time;
        private TextView paint_root;
        private ImageView paint_img;
        public MainViewHolder(View itemView, TextView paint_name,
                          TextView paint_time, TextView paint_root,
                          ImageView paint_img) {
            super(itemView);
            itemView.setOnClickListener(this);
            this.paint_name = paint_name;
            this.paint_time = paint_time;
            this.paint_root = paint_root;
            this.paint_img = paint_img;
        }
        @Override
        public void onClick(View view) {
            MenuInfo menuInfo = userList.get(getAdapterPosition());
            itemClickListener.onItemClick(view,menuInfo.getPaint_name(),menuInfo.getPaint_root());
        }
        @Override
        public boolean onLongClick(View view) {
            return false;
        }
    }
}
Activity中的使用:
package com.lfk.drawapictiure.Fragment;
import android.content.Intent;
import android.net.Uri;
import android.os.Bundle;
import android.os.Environment;
import android.support.v7.widget.LinearLayoutManager;
import android.support.v7.widget.RecyclerView;
import android.view.LayoutInflater;
import android.view.View;
import android.view.ViewGroup;
import com.lfk.drawapictiure.Adapter.MainLayoutAdapter;
import com.lfk.drawapictiure.Info.MenuInfo;
import com.lfk.drawapictiure.InterFace.MainItemClickListener;
import com.lfk.drawapictiure.MainActivity;
import com.lfk.drawapictiure.R;
import java.util.ArrayList;
public class PaintFragment extends android.support.v4.app.Fragment {
    private RecyclerView mRecyclerView;
    private MainLayoutAdapter mAdapter;
    private RecyclerView.LayoutManager mLayoutManager;
    private String path = Environment.getExternalStorageDirectory().getPath() + "/DrawAPicture";
    public static PaintFragment newInstance() {
        return new PaintFragment();
    }
    public PaintFragment() {
        // Required empty public constructor
    }
    @Override
    public void onCreate(Bundle savedInstanceState) {
        super.onCreate(savedInstanceState);
    }
    @Override
    public View onCreateView(LayoutInflater inflater, ViewGroup container,
                             Bundle savedInstanceState) {
        View wrapper = inflater.inflate(R.layout.fragment_paint, container, false);
        mRecyclerView = (RecyclerView)wrapper.findViewById(R.id.paint_recycle_view);
        mLayoutManager = new LinearLayoutManager(getActivity());
        mRecyclerView.setLayoutManager(mLayoutManager); //绑上列表管理器
        ArrayList<MenuInfo> arrayList = new ArrayList<>();
        arrayList.add(new MenuInfo("刘丰恺","09-13 05:28",path+"/"+"12138.lfk",path+"/"+"6826.jpg"));
        arrayList.add(new MenuInfo("刘丰恺","09-13 05:28",path+"/"+"12138.lfk",path+"/"+"6826.jpg"));
        arrayList.add(new MenuInfo("刘丰恺","09-13 05:28",path+"/"+"12138.lfk",path+"/"+"6826.jpg"));
        arrayList.add(new MenuInfo("刘丰恺","09-13 05:28",path+"/"+"12138.lfk",path+"/"+"6826.jpg"));
        mAdapter = new MainLayoutAdapter(arrayList, getActivity());
      // 设置点击事件
        mAdapter.setItemClickListener(new MainItemClickListener() {
            @Override
            public void onItemClick(View view, String name, String path) {
                Intent intent = new Intent(getActivity(), MainActivity.class);
                intent.setData(Uri.parse(path));
                startActivity(intent);
            }
        });
      //绑定数据集
        mRecyclerView.setAdapter(mAdapter);
        return wrapper;
    }
}
其中的子布局使用了CardView:
我设置的东西只有:
card_view:cardCornerRadius="4dp"  //设定圆角半径
card_view:cardElevation="8dp"//设定阴影
<?xml version="1.0" encoding="utf-8"?>
<android.support.v7.widget.CardView
    xmlns:android="http://schemas.android.com/apk/res/android"
    xmlns:card_view="http://schemas.android.com/apk/res-auto"
    android:background="@drawable/list_item_selector"
    android:layout_width="match_parent"
    android:layout_height="wrap_content"
    card_view:cardCornerRadius="4dp"
    card_view:
    android:layout_margin="@dimen/card_margin">
    <RelativeLayout
        android:layout_marginTop="16dp"
        android:layout_marginLeft="16dp"
        android:layout_marginRight="16dp"
        android:layout_marginBottom="16dp"
        android:layout_width="match_parent"
        android:layout_height="wrap_content">
        <ImageView
            android:maxHeight="100dp"
            android:layout_marginTop="8dp"
            android:layout_below="@+id/line_view"
            android:layout_width="match_parent"
            android:layout_height="wrap_content"
            android:id="@+id/paint_img"
            android:src="@mipmap/ic_launcher" />
        <TextView
            android:id="@+id/paint_name"
            android:textColor="#000"
            android:textSize="18sp"
            android:text="项目名"
            android:layout_alignParentRight="true"
            android:singleLine="true"
            android:layout_width="wrap_content"
            android:layout_height="wrap_content" />
        <TextView
            android:id="@+id/paint_time"
            android:text="项目时间"
            android:textColor="@color/black"
            android:textSize="18sp"
            android:singleLine="true"
            android:layout_width="wrap_content"
            android:layout_height="wrap_content" />
        <View
            android:id="@+id/line_view"
            android:background="@color/gray"
            android:layout_below="@+id/paint_time"
            android:layout_width="match_parent"
            android:layout_height="1dp"/>
        <TextView
            android:id="@+id/paint_root"
            android:visibility="invisible"
            android:layout_width="wrap_content"
            android:layout_height="wrap_content" />
    </RelativeLayout>
</android.support.v7.widget.CardView>
Android L——RecyclerView,CardView导入和使用
这篇文章是ANDROID L——Material Design详解(UI控件)的一个补充或者说是应用实例,如果有时间建议大家稍微浏览一下上篇文章。
本文主要介绍Android L新增加的两个UI控件RecyclerView,CardView的导入和使用。
RecyclerView是ListView的升级版
CardView则是Google提供的一个卡片式视图组件
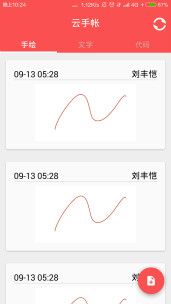
本例就是使用RecyclerView来展示多个CardView的一个小例子,先看下效果图:
导入RecyclerView,CardView
由于RecyclerView,CardView是放在support library v7包中,所以我们想要使用就必须要导包。
下面就介绍下在Eclipse和Android Studio中是如何导入这两个包的。
Eclipse:

第一步:通过SDK manager下载/更新Android Support Libraries(5.0版本最新为21)
第二步:导入CardView和RecyclerView项目(都在support v7中)
1.在Eclipse中点击Import,导入Android项目
2.导入CardView和RecycleView,路径为your sdk path\extras\android\support\v7\cardview(RecycleView则为相同目录下的recyclerview)
3.导入时记得将工程copy到本地并建议重命名,这样方便以后管理例如:

第三步:设置Library
1..将两个工程设置为Library
2..在主工程中引入这两个Library例如:
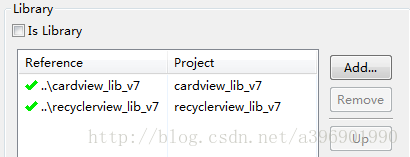
通过这三步就可以将这两个包导入进来了。
Android Studio
Android Stuido相对于Eclipse简单的多:
第一步:
首先要确保已经将Android Support Libraries升级到最新.
第二步:
打开项目中的build.gradle文件,在dependencies中添加如下代码。
dependencies {
compile 'com.android.support:recyclerview-v7:21.+'
compile 'com.android.support:cardview-v7:21.+'
}
第三步:
重新Build一下工程。
Build完成后就会发现这两个包就已经导入进来了
代码介绍:
主题:
首先这个黑色基调的主题是使用了Material.Dark.ActionBar样式。
设置方法:修改values-v21文件夹下styles.xml文件:
<resources>
    <style name="AppTheme" parent="android:ThemeOverlay.Material.Dark.ActionBar">
    </style>
</resources>
布局文件:
recycler_view.xml(RecyclerView布局文件):
<?xml version="1.0" encoding="utf-8"?>
<FrameLayout xmlns:android="http://schemas.android.com/apk/res/android"
    xmlns:tools="http://schemas.android.com/tools"
    android:layout_width="match_parent"
    android:layout_height="match_parent"
    tools:context=".MyActivity">
    <android.support.v7.widget.RecyclerView
        android:id="@+id/list"
        android:layout_width="match_parent"
        android:layout_height="match_parent"
        tools:context=".MyActivity" />
</FrameLayout>
FrameLayout里包含了RecyclerView控件
card_view.xml(CardView布局文件):
<android.support.v7.widget.CardView xmlns:android="http://schemas.android.com/apk/res/android"
    xmlns:card_view="http://schemas.android.com/apk/res-auto"
    android:layout_width="match_parent"
    android:layout_height="match_parent"
    android:layout_margin="5dp"
    android:orientation="horizontal"
    card_view:cardBackgroundColor="@color/cardview_dark_background"
    card_view:cardCornerRadius="5dp" >
    <RelativeLayout
        android:layout_width="match_parent"
        android:layout_height="100dp"
        android:padding="5dp" >
        <ImageView
            android:id="@+id/pic"
            android:layout_width="match_parent"
            android:layout_height="match_parent"
            android:layout_centerInParent="true"
            android:scaleType="centerCrop" />
        <TextView
            android:clickable="true"
            android:id="@+id/name"
            android:layout_width="match_parent"
            android:layout_height="match_parent"
            android:layout_marginBottom="10dp"
            android:layout_marginRight="10dp"
            android:gravity="right|bottom"
            android:textColor="@android:color/white"
            android:textSize="24sp" />
    </RelativeLayout>
</android.support.v7.widget.CardView>
CardView视图中包含了一个ImageView和一个TextView分别显示图片和文字信息
唯一需要介绍的就是在布局文件中使用了,如下两个属性:
card_view:cardBackgroundColor="@color/cardview_dark_background"
card_view:cardCornerRadius="5dp"
他俩的作用分别是设置CardView的背景颜色和外围的圆角大小(注意要使用card_view命名空间)
代码:
Actor类(封装数据的Model类):
public class Actor
{
    String name;
    String picName;
    public Actor(String name, String picName)
    {
        this.name = name;
        this.picName = picName;
    }
    public int getImageResourceId( Context context )
    {
        try
        {
            return context.getResources().getIdentifier(this.picName, "drawable", context.getPackageName());
        }
        catch (Exception e)
        {
            e.printStackTrace();
            return -1;
        }
    }
}
封装了演员的名字和图片名,getImageResourceId()方法的作用就是根据图片命找到系统资源
MyActivity(程序主控制Activity)
public class MyActivity
    extends Activity
{
    private RecyclerView mRecyclerView;
    private MyAdapter myAdapter;
    private List<Actor> actors = new ArrayList<Actor>();
    private String[] names = { "朱茵", "张柏芝", "张敏", "巩俐", "黄圣依", "赵薇", "莫文蔚", "如花" };
    private String[] pics = { "p1", "p2", "p3", "p4", "p5", "p6", "p7", "p8" };
    @Override
    protected void onCreate( Bundle savedInstanceState )
    {
        super.onCreate(savedInstanceState);
        setContentView(R.layout.recycler_view);
        actors.add(new Actor("朱茵", "p1"));
        getActionBar().setTitle("那些年我们追的星女郎");
        // 拿到RecyclerView
        mRecyclerView = (RecyclerView) findViewById(R.id.list);
        // 设置LinearLayoutManager
        mRecyclerView.setLayoutManager(new LinearLayoutManager(this));
        // 设置ItemAnimator
        mRecyclerView.setItemAnimator(new DefaultItemAnimator());
        // 设置固定大小
        mRecyclerView.setHasFixedSize(true);
        // 初始化自定义的适配器
        myAdapter = new MyAdapter(this, actors);
        // 为mRecyclerView设置适配器
        mRecyclerView.setAdapter(myAdapter);
    }
    @Override
    public boolean onCreateOptionsMenu(Menu menu) {
        getMenuInflater().inflate(R.menu.menu, menu);
        return true;
    }
    @Override
    public boolean onOptionsItemSelected(MenuItem item) {
        switch(item.getItemId()) {
            // 当点击actionbar上的添加按钮时,向adapter中添加一个新数据并通知刷新
            case R.id.action_add:
                if (myAdapter.getItemCount() != names.length) {
                    actors.add(new Actor(names[myAdapter.getItemCount()], pics[myAdapter.getItemCount()]));
                    mRecyclerView.scrollToPosition(myAdapter.getItemCount() - 1);
                    myAdapter.notifyDataSetChanged();
                }
                return true;
            // 当点击actionbar上的删除按钮时,向adapter中移除最后一个数据并通知刷新
            case R.id.action_remove:
                if (myAdapter.getItemCount() != 0) {
                    actors.remove(myAdapter.getItemCount()-1);
                    mRecyclerView.scrollToPosition(myAdapter.getItemCount() - 1);
                    myAdapter.notifyDataSetChanged();
                }
                return true;
        }
        return super.onOptionsItemSelected(item);
    }
}
MyAdapter(自定义适配器类)
public class MyAdapter
    extends RecyclerView.Adapter<MyAdapter.ViewHolder>
{
    private List<Actor> actors;
    private Context mContext;
    public MyAdapter( Context context , List<Actor> actors)
    {
        this.mContext = context;
        this.actors = actors;
    }
    @Override
    public ViewHolder onCreateViewHolder( ViewGroup viewGroup, int i )
    {
        // 给ViewHolder设置布局文件
        View v = LayoutInflater.from(viewGroup.getContext()).inflate(R.layout.card_view, viewGroup, false);
        return new ViewHolder(v);
    }
    @Override
    public void onBindViewHolder( ViewHolder viewHolder, int i )
    {
        // 给ViewHolder设置元素
        Actor p = actors.get(i);
        viewHolder.mTextView.setText(p.name);
        viewHolder.mImageView.setImageDrawable(mContext.getDrawable(p.getImageResourceId(mContext)));
    }
    @Override
    public int getItemCount()
    {
        // 返回数据总数
        return actors == null ? 0 : actors.size();
    }
    // 重写的自定义ViewHolder
    public static class ViewHolder
        extends RecyclerView.ViewHolder
    {
        public TextView mTextView;
        public ImageView mImageView;
        public ViewHolder( View v )
        {
            super(v);
            mTextView = (TextView) v.findViewById(R.id.name);
            mImageView = (ImageView) v.findViewById(R.id.pic);
        }
    }
}
所有代码介绍完毕了,可以总结为以下两点:
RecyclerView:
理解为之前的ListView,不过需要设置LinearLayoutManager(目前资料不多我也有点迷糊以后再补充)和ItemAnimator(为每个条目设置操作动画)两个新属性
RecyclerView.Adapter:
理解为默认自带和基于ViewHolder的新的适配器,只不过回调方法稍有不同,但本质都是一样的。
相关文章
- 下面我们来看一篇关于Android子控件超出父控件的范围显示出来方法,希望这篇文章能够帮助到各位朋友,有碰到此问题的朋友可以进来看看哦。 <RelativeLayout xmlns:an...2016-10-02
- 这篇文章主要给大家介绍了关于C#创建自定义控件及添加自定义属性和事件使用的相关资料,文中通过示例代码介绍的非常详细,对大家学习或者使用C#具有一定的参考学习价值,需要的朋友们下面来一起学习学习吧...2020-06-25
- 本文实例讲述了JS实现自定义简单网页软键盘效果。分享给大家供大家参考,具体如下:这是一款自定义的简单点的网页软键盘,没有使用任何控件,仅是为了练习JavaScript编写水平,安全性方面没有过多考虑,有顾虑的可以不用,目的是学...2015-11-08
- 采用CSS覆盖的方法就可以了,但是官方是不允许这么做的...2013-10-13
Android开发中findViewById()函数用法与简化
findViewById方法在android开发中是获取页面控件的值了,有没有发现我们一个页面控件多了会反复研究写findViewById呢,下面我们一起来看它的简化方法。 Android中Fin...2016-09-20- 如果我们的项目需要做来电及短信的功能,那么我们就得在Android模拟器开发这些功能,本来就来告诉我们如何在Android模拟器上模拟来电及来短信的功能。 在Android模拟...2016-09-20
- 夜神android模拟器如何设置代理呢?对于这个问题其实操作起来是非常的简单,下面小编来为各位详细介绍夜神android模拟器设置代理的方法,希望例子能够帮助到各位。 app...2016-09-20
- 为了增强android应用的用户体验,我们可以在一些Button按钮上自定义动态的设置一些样式,比如交互时改变字体、颜色、背景图等。 今天来看一个通过重写Button来动态实...2016-09-20
- 如果我们要在Android应用APP中加载html5页面,我们可以使用WebView,本文我们分享两个WebView加载html5页面实例应用。 实例一:WebView加载html5实现炫酷引导页面大多...2016-09-20
- 深入理解Android中View和ViewGroup从组成架构上看,似乎ViewGroup在View之上,View需要继承ViewGroup,但实际上不是这样的。View是基类,ViewGroup是它的子类。本教程我们深...2016-09-20
- overlay就是在地图上以另外一种形式浮现在地图上,常见的地图覆盖物为这三种类型,如:popup 弹窗、label标注信息、text文本信息等,接下来跟随小编看下openlayers6之地图覆盖物overlay详解,一起看看吧...2021-09-15
- 下面我们来看一篇关于Android自定义WebView网络视频播放控件开发例子,这个文章写得非常的不错下面给各位共享一下吧。 因为业务需要,以下代码均以Youtube网站在线视...2016-10-02
- 自定义一个jquery模态窗口插件,将它集成到现有平台框架中时,它只能在mainFrame窗口中显示,无法在顶层窗口显示. 解决这个问题的办法: 通过以下代码就可能实现在顶层窗口弹窗 复制代码 代码如下: $(window.top.documen...2014-05-31
- java开发的Android应用,性能一直是一个大问题,,或许是Java语言本身比较消耗内存。本文我们来谈谈Android 性能优化之MemoryFile文件读写。 Android匿名共享内存对外A...2016-09-20
- 这篇文章主要介绍了自定义feignClient的常见坑及解决方案,具有很好的参考价值,希望对大家有所帮助。如有错误或未考虑完全的地方,望不吝赐教...2021-10-20
- TextView默认是横着显示了,今天我们一起来看看Android设置TextView竖着显示如何来实现吧,今天我们就一起来看看操作细节,具体的如下所示。 在开发Android程序的时候,...2016-10-02
- 今天小编就为大家分享一篇pytorch 自定义卷积核进行卷积操作方式,具有很好的参考价值,希望对大家有所帮助。一起跟随小编过来看看吧...2020-05-06
android.os.BinderProxy cannot be cast to com解决办法
本文章来给大家介绍关于android.os.BinderProxy cannot be cast to com解决办法,希望此文章对各位有帮助呀。 Android在绑定服务的时候出现java.lang.ClassCastExc...2016-09-20- 这篇文章主要介绍了Android 实现钉钉自动打卡功能的步骤,帮助大家更好的理解和学习使用Android,感兴趣的朋友可以了解下...2021-03-15
如何根据百度地图计算出两地之间的驾驶距离(两种语言js和C#)
以下是使用js代码实现百度地图计算两地距离,代码如下所示:<script src="js/jquery-1.9.0.js" type="text/javascript" language="javascript"></script><script language="javascript" type="text/javascript" src="js/...2015-10-30