Android多线程详细教程
在Android应用的开发过程中,我们不可避免的要使用多线程,获取服务器数据、下载网络数据、遍历文件目录查找特定文件等等耗时的工作都离不开线程的知识。Android继承了Java的多线程体系,同时又实现了许多更加简易的API来操作线程。通过这些API,我们可以方便快捷的实现线程的创建、线程间的交互。我打算记下最近自己学习Android多线程机制时的学习笔记,一来可以供以后翻阅查看,二来为那些正疑惑与此的朋友提供一条解决问题的途径。
先大致说一下我想写的内容:
一、AsyncTask
二、Thread 与 Handler
三、HandlerThread
全部内容分为3篇Bolg。
下面正式开始第一部分吧!
一、AsyncTask
(0)参考文档:http://developer.android.com/reference/android/os/AsyncTask.html
(1)简单介绍:
AsyncTask这是一个很便捷的关于线程的API,它将比较耗时(几秒)的工作放在非UI线程中运行,然后将结果的展示放在UI线程中。整个过程不涉及到任何关于Thread、Handler及Message等的处理。
先来说说AsyncTask的构造吧,它接收3个泛型参数,分别代表了后台工作的传入参数类型、进度的参数类型、结果的参数类型。每一个的具体含义会在接下来的AsyncTask的执行过程中讲到。要想使用AsyncTask就必须拓展为它的子类同时指定3个泛型参数,然后在子类的中重写几个重要的方法。下面就AsyncTask的执行过程来写。
(2)AsyncTask的执行过程:
AsyncTask中的回调方法有:
onPreExecute(),UI线程中执行,一般用来处理执行异步任务前的准备工作,比如弹出一个进度条,展现一个对话框告知用户正在执行一项任务。
doInBackground(Params...),在非UI线程中执行,这里是异步任务的核心,所有需要耗时的工作全在这里执行,因为不是在UI线程中,因此不会存在阻塞UI线程的危险,不会引发ANR错误。
onProgressUpdate(Progress...),在UI 线程中执行,一般用来更新任务执行的进度,它的调用时在publishProgress(Progress...)调用之后接着被调用的,我们可以在doInBackground(Params...)中多次调用publishProgress(Progress...)来告知用户任务的执行状态。
onPostExecute(Result),在UI线程中执行,任务完成后(doInBackground(Params...)执行结束)且任务没被取消时,会执行该方法,用来处理异步任务得到的结果。
onCancelled(Result),在UI线程中执行,当任务以柔和的方式结束(AsyncTask.cancel(false))这个方法会取代onPostExecute(Result)得以执行(当然这里也要看程序的执行逻辑,有没有在doInBackground(Params...)中检测任务是否被取消)
关于泛型参数:
三个泛型参数分别是:Params,Progress,Result。在上面的回调方法接受中我们可以看到它们分别所处那个方法,Params是启动异步任务时传入的参数,比如启动异步任务从网上下载一张图片传入图片的URL地址。Progress是进度参数类型,调用publishProgress(Progress...)时的参数需和Progress类型相容。比如用一个整数去描述进度,Progress及时Integer。Result是结果参数类型,异步任务完成后,如需返回一个结果,那么这个结果的类型就是Result类型。特别地,可以用Void去代替任何一个或多个泛型参数,这样做就以为着不需要参数。
(3)一个简单的例子:
话说百闻不如一见,下面我就用一个极简单的例子说明AsyncTask的使用过程。先说我要干啥,我用一个异步任务来更新一个进度条(简单吧!粗暴吧!颤抖吧,地球人!O(∩_∩)O)
注:示例没什么格式,强迫症患者见谅!!
先给出布局:
<?xml version="1.0" encoding="utf-8"?>
<RelativeLayout
    xmlns:android="http://schemas.android.com/apk/res/android"
    android:layout_width="match_parent"
    android:layout_height="match_parent"
    android:layout_margin="15dp">
    <TextView
        android:layout_width="wrap_content"
        android:layout_height="wrap_content"
        android:layout_centerHorizontal="true"
        android:text="AsyncTask示例"
        android:textSize="30sp"/>
    <ProgressBar
        android:id="@+id/progress"
        style="@android:style/Widget.ProgressBar.Horizontal"
        android:layout_width="match_parent"
        android:layout_height="wrap_content"
        android:layout_centerInParent="true"/>
    <Button
        android:id="@+id/cancel"
        android:layout_width="match_parent"
        android:layout_height="wrap_content"
        android:layout_alignParentBottom="true"
        android:text="cancel"/>
    <Button
        android:id="@+id/start"
        android:layout_width="match_parent"
        android:layout_height="wrap_content"
        android:layout_above="@+id/cancel"
        android:text="start"/>
</RelativeLayout>
下面是AsyncTask的逻辑代码:
package comfallblank.github.asynctasktest;
import android.os.AsyncTask;
import android.os.Bundle;
import android.support.v7.app.AppCompatActivity;
import android.util.Log;
import android.view.View;
import android.widget.Button;
import android.widget.ProgressBar;
public class MainActivity extends AppCompatActivity {
    private ProgressBar mProgressBar;
    private Button mStartButton;
    private Button mCancelButton;
    @Override
    protected void onCreate(Bundle savedInstanceState) {
        super.onCreate(savedInstanceState);
        setContentView(R.layout.activity_main);
        mProgressBar = (ProgressBar) findViewById(R.id.progress);
        //设置ProgressBar暂时不可见,一会在异步任务的中显示它。
        mProgressBar.setVisibility(View.GONE);
        final MyTask myTask =  new MyTask();
        mStartButton = (Button) findViewById(R.id.start);
        mStartButton.setOnClickListener(new View.OnClickListener() {
            @Override
            public void onClick(View view) {
                myTask.execute();
            }
        });
        mCancelButton = (Button) findViewById(R.id.cancel);
        mCancelButton.setOnClickListener(new View.OnClickListener() {
            @Override
            public void onClick(View view) {
                myTask.cancel(false);
            }
        });
    }
   private class MyTask extends AsyncTask<Void,Integer,String>{
       private static final  String TAG = "MyTask";
       @Override
       protected void onPreExecute() {
           super.onPreExecute();
           //准备工作,显示进度条
           mProgressBar.setVisibility(View.VISIBLE);
           //打印日志,查看执行路径,下同
           Log.d(TAG,"onPreExecute");
       }
       @Override
       protected String doInBackground(Void... voids) {
           Log.d(TAG,"doInBackground");
           //每1s对进度条更新10%
           synchronized (this){
               for (int i = 1;i<=10;i++){
                   try {
                       Thread.sleep(1000*1);
                       publishProgress(i*10);
                       if (isCancelled()){
                           return "Task cancelled";
                       }
                   } catch (InterruptedException e) {
                       e.printStackTrace();
                   }
               }
           }
           return "Task executed";
       }
       @Override
       protected void onProgressUpdate(Integer... values) {
           super.onProgressUpdate(values);
           mProgressBar.setProgress(values[0]);
           Log.d(TAG,"onProgressUpdate");
       }
       @Override
       protected void onPostExecute(String s) {
           super.onPostExecute(s);
           Log.d(TAG, s);
           Log.d(TAG,"onPostExecute");
       }
       @Override
       protected void onCancelled(String s) {
           super.onCancelled(s);
           Log.d(TAG, s);
           Log.d(TAG, "onCancelled");
       }
   }
}
LogCat日志:
执行完毕,没有中途取消任务:
10-06 13:55:05.871 6737-6737/comfallblank.github.asynctasktest D/MyTask: onPreExecute
10-06 13:55:05.891 6737-13040/comfallblank.github.asynctasktest D/MyTask: doInBackground
10-06 13:55:06.922 6737-6737/comfallblank.github.asynctasktest D/MyTask: onProgressUpdate
10-06 13:55:07.923 6737-6737/comfallblank.github.asynctasktest D/MyTask: onProgressUpdate
10-06 13:55:08.914 6737-6737/comfallblank.github.asynctasktest D/MyTask: onProgressUpdate
10-06 13:55:09.925 6737-6737/comfallblank.github.asynctasktest D/MyTask: onProgressUpdate
10-06 13:55:09.975 6737-6753/comfallblank.github.asynctasktest W/art: Suspending all threads took: 18.035ms
10-06 13:55:10.926 6737-6737/comfallblank.github.asynctasktest D/MyTask: onProgressUpdate
10-06 13:55:11.937 6737-6737/comfallblank.github.asynctasktest D/MyTask: onProgressUpdate
10-06 13:55:12.938 6737-6737/comfallblank.github.asynctasktest D/MyTask: onProgressUpdate
10-06 13:55:13.939 6737-6737/comfallblank.github.asynctasktest D/MyTask: onProgressUpdate
10-06 13:55:14.950 6737-6737/comfallblank.github.asynctasktest D/MyTask: onProgressUpdate
10-06 13:55:15.951 6737-6737/comfallblank.github.asynctasktest D/MyTask: onProgressUpdate
10-06 13:55:15.971 6737-6737/comfallblank.github.asynctasktest D/MyTask: Task executed
10-06 13:55:15.971 6737-6737/comfallblank.github.asynctasktest D/MyTask: onPostExecute
中途取消任务:
10-06 13:56:10.644 14129-14129/comfallblank.github.asynctasktest D/MyTask: onPreExecute
10-06 13:56:10.654 14129-14302/comfallblank.github.asynctasktest D/MyTask: doInBackground
10-06 13:56:11.665 14129-14129/comfallblank.github.asynctasktest D/MyTask: onProgressUpdate
10-06 13:56:12.666 14129-14129/comfallblank.github.asynctasktest D/MyTask: onProgressUpdate
10-06 13:56:13.667 14129-14129/comfallblank.github.asynctasktest D/MyTask: onProgressUpdate
10-06 13:56:14.668 14129-14129/comfallblank.github.asynctasktest D/MyTask: onProgressUpdate
10-06 13:56:15.689 14129-14129/comfallblank.github.asynctasktest D/MyTask: Task cancelled
10-06 13:56:15.689 14129-14129/comfallblank.github.asynctasktest D/MyTask: onCancelled
关于AsyncTask的一些注意事项:
(1)AsyncTask对象只能使用一次,也就是说一个对象执行完毕或者中途被cancel后,不能再次调用execute().
(2)AsyncTask.execute()只能在主线程中调用。
(3)AsyncTask不能处理并发,多个AsyncTask也是有执行顺序的,且同一个应用的所有AsyncTask都是在同一进程中执行,按照队列排序依次执行。
(4)AsyncTask只能处理那些耗时不是特别长的任务,对于需要长时间执行的任务最好自己实现Thread。
AsyncTask很方便,它屏蔽了所有Thread、Handler、Looper、Message及Messagequene的细节,这或许就是封装的魅力吧!但当你真正明白了Android的线程通讯之后你就会明白那些良好设计带来的美感。
二、Thread 与 Handler
本节涉及的概念较多,有Thread,Handler,Looper,Message,MessageQuene,对于Looper和MessageQueue只是简单的谈及它们在线程通信中的作用,Thread,Handler及Message我会尽力讲清楚些。
1.Thread基础:
1)参考文档:http://developer.android.com/reference/java/lang/Thread.html
我包括我的好些朋友学东西时都会忽略官方文档的重要性,其中很大的原因是因为英文的缘故吧,但其实看懂文档要求英语能力并不高。看别人写的文章、博客、书籍,听别人讲技术,那始终是经过他人过滤后的知识,而这一切未必是你需要的。前车之鉴固然重要,但并不是每一个老人的话都得听。歪果仁写东西有个特点就是他不仅把原理给你讲清楚了,还爱举列子,该怎么做不建议怎么做都会涉及。说了这么多,就是建议自己去看看Android的开发文档,从Guide到Reference内化出自己的知识体系。
2)简单介绍:
看Android的Thread继承树,我们就知道它完全继承了Java的线程体系,在这就不赘言过多的Thread细节了,我就如何开启一个线程讲一讲。开启一个新线程有两种方法,第一种是拓展Thread类,在子类中重写run()方法;第二种是声明Thread对象时传入一个Runnable对象,因为只涉及到一个抽象方法,Runnable对象可以用jdk8的Lambda表达式来代替,这样使得线程的创建变得更加简单。创建好了线程后,如何让线程开始执行呢?调用Thread.run()即可让线程进入待执行队列,当获得CPU时间时它就运行起来了。具体的用法例子会在后面的示例中展现。
2.Handler基础:
1)参考文档:http://developer.android.com/reference/android/os/Handler.html
2)概述:
之前看过一部美剧《天蝎计划》,在介绍团队负责人时,这样说道”He is our goverment handler“。Android中的Handler就是这样一个概念,它是线程通信的发送者和处理者,线程要进行通信时会让handler发出相应的消息,通过Looper传递,Handler发出的消息会在目的线程中得以执行。再举个栗子吧,这是我在《Android编程权威指南》中看到的,它是这么描述线程通信的:两个线程的通信就好像现实中的两个人通过信件来通信,消息队列(MessageQueue)相对于通信时候的信箱;Message(消息)相当于信件;Looper相当于邮递员,它是MessageQueue的操作者;Handler时线程通信的发出者和处理者;每当Thread想要进行通信,它会让Handler投递一个Message给相应的MessageQueue,Looper会一直循环将MessageQueue里的Message发向它的目的地,到达目的地后Looper通知相应的Handler来处理消息。
每一个Handler都是和唯一的Looper对象绑定的,也就是说一个Handler既仅可以个一个Looper绑定,但一个Looper可以有好几个Handler与之关联。Looper操作的MessageQueue是Handler取得消息进行处理和发出消息的地方。
3)使用介绍:
前面说过每一个Handler都是和特别的Looper绑定好的,同时Handler又是处理消息的地方,所以Handler中既要说明和哪个Looper绑定,又要告知怎么处理消息。所以Handler有4个构造方法,下面我来一一介绍:
Handler()这是无参数构造方法,它默认和当前线程的Looper绑定,未指定消息的处理方式。
Handler(Looper looper)它需要一个Looper对象作为参数传入,构成出来的Handler对象将和给定的Looper对象绑定。
Handler(Handler.Callback callback)它需要一个Handler.Callback对象作为参数传入,构造处理的对象和当前线程的Looper绑定并用传入的Handler.Callback对象来处理消息。
Handler(Looper looper,(Handler.Callback callback)这是第二种和第三种的结合,构成出一个和指定Looper绑定并用指定Callback的回调方法处理消息的Handler对像
还有一种使用Handler的方法就是自己拓展Handler类,在子类中实现handlerMessage(Message msg)(这就是接口Callback中的抽象方法),这也是我用的比较多的方式。
Handler的使用就是发送和处理消息,处理消息是在Callback接口中定义好的,当Looper操作的MessageQueue中有消息时,Looper对通知所有与它绑定的Handler调用handlerMessage(Message msg)去处理消息。那怎么发送消息呢?Hander中有一个方法叫sendMessage(Message msg),当调用这个方法后Handler就往Looper操作的MessageQueue中投递一个Message对象,发送消息就算是完成了。简单吧?so easy!
关于Handler的其他方法还请查看文档,将主干的部分弄清楚了,指端末节随着使用慢慢就熟络了。一口气吃不成胖子。对了,下面的Message部分还会提及Handler的一些内容。
3.Message基础:
1)参考文档:http://developer.android.com/reference/android/os/Message.html
2)使用介绍:
线程通信既然叫通信肯定有一个消息的载体,Message就是这个消息的载体,它包含了线程想要通信的全部内容,比如线程运行后得到的结果就和可以包含在Message中。关于Message的构造本来可以按正常的方式构造(就是new一个Message对象,词穷不知道怎么说,就叫它”正常的方式“O(∩_∩)O~),但官方推荐的做法是通过Handler.obtainMessage()获得Message对象,因为这样的Message是从即将被回收的Message中取得的,会避免GC的反复运行和减少运行时的内存消耗。
Message是消息的携带者,它有许多的携带消息的方法,比如setData(Bundle),Message.obj,Message.arg1,Message.arg2等等,需要特别说明的是Message里有一个公开的整形的全局变量what,即Message.what,它一般用来阐述消息的类型,Handler的handlerMessage(Message msg)通常会先检验Message的what变量,然后在决定如何处理。毕竟一个应用中和主线程通信的不可能只用一个线程,一种消息。
4.Looper与MessageQueue简单介绍:
1)参考文档:
Looper:http://developer.android.com/reference/android/os/Looper.html
MessageQueue:http://developer.android.com/reference/android/os/MessageQueue.html
2)简单介绍:
需要注意的地方就是,一个普通Thread创建时是没有Looper对象和它关联的,我们必须在线程的创建中进行关联,具体做法就是在Thread的创建时调用Looper.prepare()进行绑定,调用Looper.loop()使得与线程绑定的Looper对象开始工作。Looper中有一个巨好用的方法,Looper.getMainLooper(),这个方法直接返回当前应用的UI线程的Looper对象,有了Looper对象就可以往主线程发消息了,一会我在示例中会用到这样方法。
关于MessageQueue,其实在线程通信中我们并不直接使用它,只需知道我们通过Handler发送出去的消息都是放在它里的就行了,它是一个”第层次“的对象,我们也不能直接往它里添加消息。但对于理解整个线程通信过程还是很重要的。
5.实践——示例
说了这么多,是时候用实践检验了!先说说我打算怎么做吧!我打算从UI线程向非UI线程(是不是叫主线程和子线程更好?)发一个消息,然后在非UI线程中处理这个消息(这里我只是打印一下日志),然后从非UI线程向主线程发送一个消息,然后在UI线程中处理这个消息(也是简单的打印一下)。好像有些偷懒,但真正使用也大致是这样的,就是把打印换成具体的任务。好了,开始吧!
先给出布局吧!
<?xml version="1.0" encoding="utf-8"?>
<RelativeLayout
    xmlns:android="http://schemas.android.com/apk/res/android"
    xmlns:tools="http://schemas.android.com/tools"
    android:layout_width="match_parent"
    android:layout_height="match_parent"
    android:paddingBottom="@dimen/activity_vertical_margin"
    android:paddingLeft="@dimen/activity_horizontal_margin"
    android:paddingRight="@dimen/activity_horizontal_margin"
    android:paddingTop="@dimen/activity_vertical_margin"
    tools:context=".MainActivity">
    <TextView
        android:layout_width="wrap_content"
        android:layout_height="wrap_content"
        android:layout_alignParentTop="true"
        android:layout_centerHorizontal="true"
        android:text="Thread和Handler"/>
    <Button
        android:id="@+id/send_message"
        android:layout_width="match_parent"
        android:layout_height="wrap_content"
        android:layout_alignParentBottom="true"
        android:text="发送消息"/>
    <Button
        android:id="@+id/startThread"
        android:layout_width="match_parent"
        android:layout_height="wrap_content"
        android:layout_above="@id/send_message"
        android:text="开启子线程"/>
</RelativeLayout>
布局很简单,就是一个textview和两个button,一个button开启线程,并接受来自子线程的信息,另一个从主线程发出消息给子线程。
下面给出代码逻辑:
第一部分是子线程的代码:
package comfallblank.github.threadandhandler;
import android.os.Handler;
import android.os.Looper;
import android.os.Message;
import android.util.Log;
/**
 * Created by fallb on 2015/10/7.
 */
public class MyThread extends Thread {
    public static final int MSG_WORKER_THREAD = 100;
    private static final  String TAG = "MyThread";
    private Handler mWorkerHandler;
    private Handler mMainHandler;
    public MyThread(Handler handler) {
        mMainHandler = handler;
        mWorkerHandler = new Handler(){
            @Override
            public void handleMessage(Message msg) {
                if(msg.what == MainActivity.MSG_MAIN){
                    Log.d(TAG,"Message:"+msg.obj);
                }
            }
        };
    }
    @Override
    public void run() {
        Looper.prepare();
        Message msg = mMainHandler.obtainMessage();
        msg.what = MyThread.MSG_WORKER_THREAD;
        msg.obj="子线程发出的消息";
        mMainHandler.sendMessage(msg);
        Looper.loop();
    }
    public Handler getWorkerHandler() {
        return mWorkerHandler;
    }
}
第二份是主线程的:
package comfallblank.github.threadandhandler;
import android.os.Bundle;
import android.os.Handler;
import android.os.Message;
import android.support.v7.app.AppCompatActivity;
import android.util.Log;
import android.view.View;
import android.widget.Button;
public class MainActivity extends AppCompatActivity {
    public static final int MSG_MAIN = 100;
    private static final String TAG = "MainActivity";
    private Button mStartThread;
    private Button mSendMessage;
    private Handler mHandler = new MyHandler();
    @Override
    protected void onCreate(Bundle savedInstanceState) {
        super.onCreate(savedInstanceState);
        setContentView(R.layout.activity_main);
        final MyThread thread = new MyThread(mHandler);
        mStartThread = (Button) findViewById(R.id.startThread);
        mStartThread.setOnClickListener(new View.OnClickListener() {
            @Override
            public void onClick(View view) {
                Log.d(TAG, "开启线程");
                thread.start();
            }
        });
        mSendMessage = (Button) findViewById(R.id.send_message);
        mSendMessage.setOnClickListener(new View.OnClickListener() {
            @Override
            public void onClick(View view) {
                Handler workerHandler = thread.getWorkerHandler();
                Message msg = workerHandler.obtainMessage();
                msg.what = MSG_MAIN;
                msg.obj = "来自主线程的消息";
                workerHandler.sendMessage(msg);
            }
        });
    }
    class MyHandler extends Handler {
        @Override
        public void handleMessage(Message msg) {
            if (msg.what == MyThread.MSG_WORKER_THREAD) {
                Log.d(TAG,"Message:"+msg.obj);
            }
        }
    }
}
Logcat打印日志如下:
10-07 19:34:34.424 19671-19671/comfallblank.github.threadandhandler D/MainActivity: 开启线程
10-07 19:34:34.454 19671-19671/comfallblank.github.threadandhandler D/MainActivity: Message:子线程发出的消息
10-07 19:34:37.267 19671-19671/comfallblank.github.threadandhandler D/MyThread: Message:来自主线程的消息
6.关于Handler再说两句:
Handler对象除了发出消息外,还有一族方法,来发出一个Runnable对象,Handler.post(Runnable runnable)及时其中的一个,它向MessageQueue中添加这个Runnable对象,然后目的线程的MessageQueue会执行该方法。
下面App基本都有下拉刷新的功能,以前基本都使用XListView或者自己写一个下拉刷新,近期Google提供了一个官方的下拉刷新控件 SwipeRefreshLayout,我感觉还不错啊,见惯了传统的下拉刷新,这个反而给人耳目一新的感觉(貌似知乎的APP已经使用这种下拉刷新了)。
Google也在官方网站给出了V4的兼容包:

再来看看布局文件里的代码(我这里放的是一个ListView 当然也可以放其他控件 只要你高兴就好)
 <android.support.v4.widget.SwipeRefreshLayout
        android:id="@+id/main_srl_bloglist"
        android:layout_width="fill_parent"
        android:layout_height="fill_parent">
        <ListView
            android:id="@+id/main_lv_bolg_list"
            android:layout_width="fill_parent"
            android:layout_height="fill_parent"
            android:divider="#00000000"
            android:dividerHeight="5dp"></ListView>
    </android.support.v4.widget.SwipeRefreshLayout>
最后来看看Activiy里的代码吧(这里我用的AndroidAnnotations 所以没有写 findViewById 哈哈)
 //设置刷新时动画的颜色,可以设置4个
        mSwipeRefreshLayout.setColorSchemeResources(android.R.color.holo_blue_light, android.R.color.holo_red_light, android.R.color.holo_orange_light, android.R.color.holo_green_light);
        mSwipeRefreshLayout.setOnRefreshListener(new SwipeRefreshLayout.OnRefreshListener() {
            @Override
            public void onRefresh() {
                mIndex=1;
                mBlogList.clear();
                loadBlogData();
            }
        });
在onRefresh 里调用获取数据的方法就好了 数据获取完毕 别忘了 修改状态
mSwipeRefreshLayout.setRefreshing(false);
哈哈 以前要写成吨的代码 用SwipeRefreshLayout 就这几行代码 是不是很方便。
最近项目不是很忙,终于有时间写博客啦,趁这几天用Android的一些新特性重新写了金钱豹的框架,先上看图,和之前的原版相比不知道大家更喜欢哪种。

前几天Devin给我开通了vpn,作为Google脑残粉,晚上默默下载了各种最新的Tools,带着我对Material Design的喜爱,正式开始啃Google官网。吐槽下技术是永远学不完的,实际上两个月前,我已经学了些Material Design,我还没来得及使用,现在那部分内容已经是被淘汰、废弃掉的技术了……
Ok,这次就讲解下NavigationView的使用,这是Android Lolipop中Android Design Support Library带来的Material design Components中推出的,此次的Components中还包含floating labels for editing text, a floating action button, snackbar, tabs。
Google的解释:
The navigation drawer can be an important focal point for identity and navigation within
your app and consistency in the design here can make a considerable difference in how easy your app is to navigate, particularly for first time users.NavigationView makes this easier by providing the framework you need for the navigation drawer as well as the ability to inflate your navigation items through a menu resource.
此前,drawertoolge+actionbar是标配,例如Google自己的GooglePlay,而这次Google的意思是navigationbar更加简易使用,只需要填充menu资源即可实现,基本不需要考虑过多的逻辑了,google已经将Actionbar和废弃了,使用Toolbar来代替,这边顺便说一句经验,也是这几天遇到的一个bug,就是要关注Google废弃的东西,要保持警惕有准备,以前我觉得废弃一个API没什么大不了的,废弃了一样能用,但是在这次最新的更新中,Google废弃了Apache的一个Api,使得我一直使用的异步请求方式不能再使用,那天也算是运气好,正好读Google官方更新内容的时候提到了这个废弃Api和解决方案,否则这个bug根本不可能给解决了,因为这个问题实在太新了,直接搜索的话,基本不可能找到解决方案,只能换一种请求方式了,这也让我更理解为什么大牛们都推荐上Google找答案的原因,这个bug要在百度找到估计还得等个半年一年或者根本找不到。
言归正传,使用navigation需要搭配Drawerlayout一起配合使用
<android.support.v4.widget.DrawerLayout
xmlns:android="http://schemas.android.com/apk/res/android"
xmlns:app="http://schemas.android.com/apk/res-auto"
android:layout_width="match_parent"
android:layout_height="match_parent"
android:fitsSystemWindows="true">
<!-- your content layout -->
<android.support.design.widget.NavigationView
android:layout_width="wrap_content"
android:layout_height="match_parent"
android:layout_gravity="start"
app:headerLayout="@layout/drawer_header"
app:menu="@menu/drawer"/>
</android.support.v4.widget.DrawerLayout>
Header的布局和普通xml是一样的,主要就是menu_drawer的编写。
主要是两种方式:1、group内部填充item 2、item可以包含字item
下面是Google官方的示例:
The simplest drawer menus will be a collection of checkable menu items:
<group android:checkableBehavior="single">
<item
android:id="@+id/navigation_item_1"
android:checked="true"
android:icon="@drawable/ic_android"
android:title="@string/navigation_item_1"/>
<item
android:id="@+id/navigation_item_2"
android:icon="@drawable/ic_android"
android:title="@string/navigation_item_2"/>
</group>
The checked item will appear highlighted in the navigation drawer, ensuring the user knows which navigation item is currently selected.
选中的item会自动高亮提示用户。
<item
android:id="@+id/navigation_subheader"
android:title="@string/navigation_subheader">
<menu>
<item
android:id="@+id/navigation_sub_item_1"
android:icon="@drawable/ic_android"
android:title="@string/navigation_sub_item_1"/>
<item
android:id="@+id/navigation_sub_item_2"
android:icon="@drawable/ic_android"
android:title="@string/navigation_sub_item_2"/>
</menu>
</item>
监听:
OnNavigationItemSelectedListener using setNavigationItemSelectedListener(). This provides you with the MenuItem that was clicked, allowing you to handle selection events, changed the checked status, load new content, programmatically close the drawer, or any other actions you may want.
Navigationview的接口是写好的。设置setNavigationItemSelectedListener()的监听,传递参数后,会在OnNavigationItemSelected中将MenuItem传递给用户,在这边实现操作即可。
更多的内容我会在后期继续整理发布,只要时间允许,Google推出新的技术我也会第一时间学习并整理发布
核心的类是LruCache (此类在android-support-v4的包中提供) 。这个类非常适合用来缓存图片,它的主要算法原理是把最近使用的对象用强引用存储在 LinkedHashMap 中,并且把最近最少使用的对象在缓存值达到预设定值之前从内存中移除。先分析内存缓存是如何实现的,开始进入正题。
BitmapUtils内存缓存的核心类LruMemoryCache,LruMemoryCache代码和v4包的LruCache一样,只是加了一个存储超期的处理,这里分析LruCache源码。LRU即Least Recently Used,近期最少使用算法。也就是当内存缓存达到设定的最大值时将内存缓存中近期最少使用的对象移除,有效的避免了OOM的出现。
讲到LruCache不得不提一下LinkedHashMap,因为LruCache中Lru算法的实现就是通过LinkedHashMap来实现的。LinkedHashMap继承于HashMap,它使用了一个双向链表来存储Map中的Entry顺序关系,这种顺序有两种,一种是LRU顺序,一种是插入顺序,这可以由其构造函数public LinkedHashMap(int initialCapacity,float loadFactor, boolean accessOrder)指定。所以,对于get、put、remove等操作,LinkedHashMap除了要做HashMap做的事情,还做些调整Entry顺序链表的工作。LruCache中将LinkedHashMap的顺序设置为LRU顺序来实现LRU缓存,每次调用get(也就是从内存缓存中取图片),则将该对象移到链表的尾端。调用put插入新的对象也是存储在链表尾端,这样当内存缓存达到设定的最大值时,将链表头部的对象(近期最少用到的)移除。关于LinkedHashMap详解请前往http://www.111cn.net/jsp/J2ME/94612.htm。
下面看下LruCache的源码,我都注释的很详细了。
/*
 * Copyright (C) 2011 The Android Open Source Project
 *
 * Licensed under the Apache License, Version 2.0 (the "License");
 * you may not use this file except in compliance with the License.
 * You may obtain a copy of the License at
 *
 *      http://www.apache.org/licenses/LICENSE-2.0
 *
 * Unless required by applicable law or agreed to in writing, software
 * distributed under the License is distributed on an "AS IS" BASIS,
 * WITHOUT WARRANTIES OR CONDITIONS OF ANY KIND, either express or implied.
 * See the License for the specific language governing permissions and
 * limitations under the License.
 */
package android.support.v4.util;
import java.util.LinkedHashMap;
import java.util.Map;
/**
 * Static library version of {@link android.util.LruCache}. Used to write apps
 * that run on API levels prior to 12. When running on API level 12 or above,
 * this implementation is still used; it does not try to switch to the
 * framework's implementation. See the framework SDK documentation for a class
 * overview.
 */
public class LruCache<K, V> {
    private final LinkedHashMap<K, V> map;
    /** Size of this cache in units. Not necessarily the number of elements. */
    private int size;    //当前cache的大小
    private int maxSize; //cache最大大小
    private int putCount;       //put的次数
    private int createCount;    //create的次数
    private int evictionCount;  //回收的次数
    private int hitCount;       //命中的次数
    private int missCount;      //未命中次数
    /**
     * @param maxSize for caches that do not override {@link #sizeOf}, this is
     *     the maximum number of entries in the cache. For all other caches,
     *     this is the maximum sum of the sizes of the entries in this cache.
     */
    public LruCache(int maxSize) {
        if (maxSize <= 0) {
            throw new IllegalArgumentException("maxSize <= 0");
        }
        this.maxSize = maxSize;
        //将LinkedHashMap的accessOrder设置为true来实现LRU
        this.map = new LinkedHashMap<K, V>(0, 0.75f, true);
    }
    /**
     * Returns the value for {@code key} if it exists in the cache or can be
     * created by {@code #create}. If a value was returned, it is moved to the
     * head of the queue. This returns null if a value is not cached and cannot
     * be created.
     * 通过key获取相应的item,或者创建返回相应的item。相应的item会移动到队列的尾部,
     * 如果item的value没有被cache或者不能被创建,则返回null。
     */
    public final V get(K key) {
        if (key == null) {
            throw new NullPointerException("key == null");
        }
        V mapValue;
        synchronized (this) {
            mapValue = map.get(key);
            if (mapValue != null) {
                //mapValue不为空表示命中,hitCount+1并返回mapValue对象
                hitCount++;
                return mapValue;
            }
            missCount++;  //未命中
        }
        /*
         * Attempt to create a value. This may take a long time, and the map
         * may be different when create() returns. If a conflicting value was
         * added to the map while create() was working, we leave that value in
         * the map and release the created value.
         * 如果未命中,则试图创建一个对象,这里create方法返回null,并没有实现创建对象的方法
         * 如果需要事项创建对象的方法可以重写create方法。因为图片缓存时内存缓存没有命中会去
         * 文件缓存中去取或者从网络下载,所以并不需要创建。
         */
        V createdValue = create(key);
        if (createdValue == null) {
            return null;
        }
        //假如创建了新的对象,则继续往下执行
        synchronized (this) {
            createCount++;
            //将createdValue加入到map中,并且将原来键为key的对象保存到mapValue
            mapValue = map.put(key, createdValue);
            if (mapValue != null) {
                // There was a conflict so undo that last put
                //如果mapValue不为空,则撤销上一步的put操作。
                map.put(key, mapValue);
            } else {
                //加入新创建的对象之后需要重新计算size大小
                size += safeSizeOf(key, createdValue);
            }
        }
        if (mapValue != null) {
            entryRemoved(false, key, createdValue, mapValue);
            return mapValue;
        } else {
            //每次新加入对象都需要调用trimToSize方法看是否需要回收
            trimToSize(maxSize);
            return createdValue;
        }
    }
    /**
     * Caches {@code value} for {@code key}. The value is moved to the head of
     * the queue.
     *
     * @return the previous value mapped by {@code key}.
     */
    public final V put(K key, V value) {
        if (key == null || value == null) {
            throw new NullPointerException("key == null || value == null");
        }
        V previous;
        synchronized (this) {
            putCount++;
            size += safeSizeOf(key, value);  //size加上预put对象的大小
            previous = map.put(key, value);
            if (previous != null) {
                //如果之前存在键为key的对象,则size应该减去原来对象的大小
                size -= safeSizeOf(key, previous);
            }
        }
        if (previous != null) {
            entryRemoved(false, key, previous, value);
        }
        //每次新加入对象都需要调用trimToSize方法看是否需要回收
        trimToSize(maxSize);
        return previous;
    }
    /**
     * @param maxSize the maximum size of the cache before returning. May be -1
     *     to evict even 0-sized elements.
     * 此方法根据maxSize来调整内存cache的大小,如果maxSize传入-1,则清空缓存中的所有对象
     */
    private void trimToSize(int maxSize) {
        while (true) {
            K key;
            V value;
            synchronized (this) {
                if (size < 0 || (map.isEmpty() && size != 0)) {
                    throw new IllegalStateException(getClass().getName()
                            + ".sizeOf() is reporting inconsistent results!");
                }
                //如果当前size小于maxSize或者map没有任何对象,则结束循环
                if (size <= maxSize || map.isEmpty()) {
                    break;
                }
                //移除链表头部的元素,并进入下一次循环
                Map.Entry<K, V> toEvict = map.entrySet().iterator().next();
                key = toEvict.getKey();
                value = toEvict.getValue();
                map.remove(key);
                size -= safeSizeOf(key, value);
                evictionCount++;  //回收次数+1
            }
            entryRemoved(true, key, value, null);
        }
    }
    /**
     * Removes the entry for {@code key} if it exists.
     *
     * @return the previous value mapped by {@code key}.
     * 从内存缓存中根据key值移除某个对象并返回该对象
     */
    public final V remove(K key) {
        if (key == null) {
            throw new NullPointerException("key == null");
        }
        V previous;
        synchronized (this) {
            previous = map.remove(key);
            if (previous != null) {
                size -= safeSizeOf(key, previous);
            }
        }
        if (previous != null) {
            entryRemoved(false, key, previous, null);
        }
        return previous;
    }
    /**
     * Called for entries that have been evicted or removed. This method is
     * invoked when a value is evicted to make space, removed by a call to
     * {@link #remove}, or replaced by a call to {@link #put}. The default
     * implementation does nothing.
     *
     * <p>The method is called without synchronization: other threads may
     * access the cache while this method is executing.
     *
     * @param evicted true if the entry is being removed to make space, false
     *     if the removal was caused by a {@link #put} or {@link #remove}.
     * @param newValue the new value for {@code key}, if it exists. If non-null,
     *     this removal was caused by a {@link #put}. Otherwise it was caused by
     *     an eviction or a {@link #remove}.
     */
    protected void entryRemoved(boolean evicted, K key, V oldValue, V newValue) {}
    /**
     * Called after a cache miss to compute a value for the corresponding key.
     * Returns the computed value or null if no value can be computed. The
     * default implementation returns null.
     *
     * <p>The method is called without synchronization: other threads may
     * access the cache while this method is executing.
     *
     * <p>If a value for {@code key} exists in the cache when this method
     * returns, the created value will be released with {@link #entryRemoved}
     * and discarded. This can occur when multiple threads request the same key
     * at the same time (causing multiple values to be created), or when one
     * thread calls {@link #put} while another is creating a value for the same
     * key.
     */
    protected V create(K key) {
        return null;
    }
    private int safeSizeOf(K key, V value) {
        int result = sizeOf(key, value);
        if (result < 0) {
            throw new IllegalStateException("Negative size: " + key + "=" + value);
        }
        return result;
    }
    /**
     * Returns the size of the entry for {@code key} and {@code value} in
     * user-defined units.  The default implementation returns 1 so that size
     * is the number of entries and max size is the maximum number of entries.
     *
     * <p>An entry's size must not change while it is in the cache.
     * 用来计算单个对象的大小,这里默认返回1,一般需要重写该方法来计算对象的大小
     * xUtils中创建LruMemoryCache时就重写了sizeOf方法来计算bitmap的大小
     * mMemoryCache = new LruMemoryCache<MemoryCacheKey, Bitmap>(globalConfig.getMemoryCacheSize()) {
     *       @Override
     *       protected int sizeOf(MemoryCacheKey key, Bitmap bitmap) {
     *           if (bitmap == null) return 0;
     *           return bitmap.getRowBytes() * bitmap.getHeight();
     *       }
     *   };
     *
     */
    protected int sizeOf(K key, V value) {
        return 1;
    }
    /**
     * Clear the cache, calling {@link #entryRemoved} on each removed entry.
     * 清空内存缓存
     */
    public final void evictAll() {
        trimToSize(-1); // -1 will evict 0-sized elements
    }
    /**
     * For caches that do not override {@link #sizeOf}, this returns the number
     * of entries in the cache. For all other caches, this returns the sum of
     * the sizes of the entries in this cache.
     */
    public synchronized final int size() {
        return size;
    }
    /**
     * For caches that do not override {@link #sizeOf}, this returns the maximum
     * number of entries in the cache. For all other caches, this returns the
     * maximum sum of the sizes of the entries in this cache.
     */
    public synchronized final int maxSize() {
        return maxSize;
    }
    /**
     * Returns the number of times {@link #get} returned a value.
     */
    public synchronized final int hitCount() {
        return hitCount;
    }
    /**
     * Returns the number of times {@link #get} returned null or required a new
     * value to be created.
     */
    public synchronized final int missCount() {
        return missCount;
    }
    /**
     * Returns the number of times {@link #create(Object)} returned a value.
     */
    public synchronized final int createCount() {
        return createCount;
    }
    /**
     * Returns the number of times {@link #put} was called.
     */
    public synchronized final int putCount() {
        return putCount;
    }
    /**
     * Returns the number of values that have been evicted.
     */
    public synchronized final int evictionCount() {
        return evictionCount;
    }
    /**
     * Returns a copy of the current contents of the cache, ordered from least
     * recently accessed to most recently accessed.
     */
    public synchronized final Map<K, V> snapshot() {
        return new LinkedHashMap<K, V>(map);
    }
    @Override public synchronized final String toString() {
        int accesses = hitCount + missCount;
        int hitPercent = accesses != 0 ? (100 * hitCount / accesses) : 0;
        return String.format("LruCache[maxSize=%d,hits=%d,misses=%d,hitRate=%d%%]",
                maxSize, hitCount, missCount, hitPercent);
    }
}
Android 关于使用LruCache缓存你想缓存的数据.
相信大家做开发的时候都知道请求网络数据的重要,但是有一些只用请求一次就过时性的消息比如某些新闻信息,如果我们每次进入新闻界面就从新从网络上获取势必会给用户带来不好的体验,所以我们需要缓存技术来帮我们解决这一问题。
1,LruCache介绍
核心的类是LruCache (此类在android-support-v4的包中提供) 。这个类非常适合用来缓存图片,它的主要算法原理是把最近使用的对象用强引用存储在 LinkedHashMap 中,并且把最近最少使用的对象在缓存值达到预设定值之前从内存中移除。
在过去,我们经常会使用一种非常流行的内存缓存技术的实现,即软引用或弱引用 (SoftReference or WeakReference)。但是现在已经不再推荐使用这种方式了,因为从 Android 2.3 (API Level 9)开始,垃圾回收器会更倾向于回收持有软引用或弱引用的对象,这让软引用和弱引用变得不再可靠。另外,Android 3.0 (API Level 11)中,图片的数据会存储在本地的内存当中,因而无法用一种可预见的方式将其释放,这就有潜在的风险造成应用程序的内存溢出并崩溃。
2,LruCache使用
下面我们就来写一个简单的demo来学习LruCache,效果也是每次请求一次第二次直接从缓存中提取出来不用再次请求网络
/**
 * 缓存json数据
 */
private LruCache<integer, string=""> mJsonCache;
/**
 * 缓存图片信息
 */
private LruCache<integer, bitmap=""> mBitmapCache;
public Util() {
    mJsonCache = new LruCache<integer, string="">(1 * 1024 * 1024);
    mBitmapCache = new LruCache<integer, bitmap="">(2 * 1024 * 1024);
}
/**
 * 添加进入缓存列表
 *
 * @param key
 * @param value
 */
public void addJsonLruCache(Integer key, String value) {
    mJsonCache.put(key, value);
}
public void addBitmapLruCache(Integer key, Bitmap value) {
    mBitmapCache.put(key, value);
}
/**
 * 从缓存列表中拿出来
 *
 * @param key
 * @return
 */
public String getJsonLruCache(Integer key) {
    return mJsonCache.get(key);
}
public Bitmap getBitmapLruCache(Integer key) {
    return mBitmapCache.get(key);
}</integer,></integer,></integer,></integer,>
可以看到我们准备缓存Bitmap与String,只需要拿到信息的时候put进缓存中,需要的时候get出来,是不是非常简单,我们为我们String分配了1m为我们的Bitmap分配了2m空间,这只是我们的demo为了简单这样使用,实际上我们应该更加详细的考虑到底应该为缓存分配多大的空间
// 获取到可用内存的最大值,使用内存超出这个值会引起OutOfMemory异常。
// LruCache通过构造函数传入缓存值,以KB为单位。
int maxMemory = (int) (Runtime.getRuntime().maxMemory() / 1024);
一般来说最大值的1/8左右就可以了。
public class MainActivity extends Activity implements OnItemClickListener {
    private static final String LIST_DATA = http://api.yi18.net/top/list;
    private ListView mListView;
    private ArrayAdapter<string> mAdapter;
    private ArrayList<integer> mListId;
    private Util util;

    protected void onCreate(Bundle savedInstanceState) {
        super.onCreate(savedInstanceState);
        setContentView(R.layout.activity_main);
        util = new Util();
        mListView = (ListView) findViewById(R.id.list);
        mListId = new ArrayList<integer>();
        mAdapter = new ArrayAdapter<string>(this,
                android.R.layout.simple_list_item_1);
        mListView.setAdapter(mAdapter);
        mListView.setOnItemClickListener(this);
        new DownLoadJson().execute(LIST_DATA);
    }</string></integer></integer></string>

这一段就是普通的请求数据添加到ListView中。

private void getJsonData(String json) {
        try {
            JSONObject jsonObject = new JSONObject(json);
            if (jsonObject.getBoolean(success)) {
                JSONArray jsonArray = jsonObject.getJSONArray(yi18);
                for (int i = 0; i < jsonArray.length(); i++) {
                    JSONObject jsonObject2 = (JSONObject) jsonArray.opt(i);
                    if (i < 5) {
                        mAdapter.add(jsonObject2.getString(title));
                        mListId.add(jsonObject2.getInt(id));
                    }
                }
            }
        } catch (JSONException e) {
            // TODO Auto-generated catch block
            e.printStackTrace();
        }
    }

    class DownLoadJson extends AsyncTask<string, string=""> {

        @Override
        protected String doInBackground(String... params) {
            return util.downLoadJson(params[0]);
        }

        @Override
        protected void onPostExecute(String result) {
            if (result != null) {
                getJsonData(result);
            }
        }

    }</string,>
我们就简单的取了前五条数据用来模拟我们的新闻,用的是热点热词的Api。
3,缓存
@Override
    public void onItemClick(AdapterView<!--?--> arg0, View arg1, int arg2, long arg3) {
        // TODO Auto-generated method stub
        String message = util.getJsonLruCache(mListId.get(arg2));
        Bitmap bitmap = util.getBitmapLruCache(mListId.get(arg2));

        if (message != null) {
            intentNewsInfo(arg2, message, bitmap);
        } else {
            intentNewsInfo(arg2, null, null);
        }

    }

    public void intentNewsInfo(int arg2, String message, Bitmap bitmap) {
        Intent intent = new Intent(MainActivity.this, NewsinfoActivity.class);
        intent.putExtra(message, message);
        intent.putExtra(bitmap, bitmap);
        intent.putExtra(index, arg2);
        intent.putExtra(id, mListId.get(arg2));
        startActivityForResult(intent, 100);
    }
可以看到我们这里先是查找缓存中是否存在数据如果存在直接传给新闻详情界面,如果没有则在第二个界面获取再传回来。
public class NewsinfoActivity extends Activity {

    private String NEWS_INFO = http://api.yi18.net/top/show?id=;
    private String imageRes[] = {
            http://d.hiphotos.baidu.com/image/h%3D360/sign=405b763459afa40f23c6c8db9b65038c/562c11dfa9ec8a13508c96e6f403918fa0ecc026.jpg,
            http://c.hiphotos.baidu.com/image/h%3D360/sign=798b4f82caea15ce5eeee60f86013a25/9c16fdfaaf51f3dece3f986397eef01f3a297923.jpg,
            http://f.hiphotos.baidu.com/image/h%3D360/sign=20a94e03940a304e4d22a6fce1c9a7c3/ac4bd11373f082028719ab3848fbfbedab641b29.jpg,
            http://b.hiphotos.baidu.com/image/h%3D360/sign=3a1af7349145d688bc02b4a294c37dab/4b90f603738da977c0f5b82cb351f8198718e3db.jpg,
            http://d.hiphotos.baidu.com/image/h%3D360/sign=75e596560f33874483c5297a610ed937/55e736d12f2eb9381891b2f4d6628535e5dd6f3c.jpg };
    private Intent intent;
    private Util util;
    private int newId, index;
    private ImageView imageView;
    private TextView textView;
    private Bitmap bitmap;
    private String message;

    protected void onCreate(Bundle savedInstanceState) {
        super.onCreate(savedInstanceState);
        setContentView(R.layout.activity_newsinfo);
        intent = getIntent();
        util = new Util();
        imageView = (ImageView) findViewById(R.id.image);
        textView = (TextView) findViewById(R.id.message);
        newId = intent.getExtras().getInt(id);
        index = intent.getExtras().getInt(index);
        if (intent.getExtras().getString(message) != null) {
            message = intent.getExtras().getString(message);
            bitmap = intent.getParcelableExtra(bitmap);
            textView.setText(Html.fromHtml(message));
            imageView.setImageBitmap(bitmap);
            Toast.makeText(this, 没有访问网络哦, 2000).show();
        } else {
            new DownLoadJson().execute(NEWS_INFO + newId);
            new DownLoadBitmap().execute(imageRes[index]);
            Toast.makeText(this, 访问网络哦, 2000).show();
        }

    }

    @Override
    public void onBackPressed() {
        Intent dataIntent = new Intent();
        dataIntent.putExtra(message, message);
        dataIntent.putExtra(bitmap, bitmap);
        dataIntent.putExtra(newId, newId);
        setResult(20, dataIntent);
        finish();
        super.onBackPressed();
    }

    private void getJsonData(String json) {
        try {
            JSONObject jsonObject = new JSONObject(json);
            if (jsonObject.getBoolean(success)) {
                JSONObject jsonObject2 = new JSONObject(
                        jsonObject.getString(yi18));
                message = jsonObject2.getString(message);
                textView.setText(Html.fromHtml(jsonObject2.getString(message)));
            }
        } catch (JSONException e) {
            // TODO Auto-generated catch block
            e.printStackTrace();
        }
    }

    class DownLoadJson extends AsyncTask<string, string=""> {

        @Override
        protected String doInBackground(String... params) {
            return util.downLoadJson(params[0]);
        }

        @Override
        protected void onPostExecute(String result) {
            if (result != null) {
                getJsonData(result);
            }
        }

    }

    class DownLoadBitmap extends AsyncTask<string, bitmap=""> {

        @Override
        protected Bitmap doInBackground(String... params) {
            // TODO Auto-generated method stub
            return util.downLoadBitmap(params[0]);
        }

        @Override
        protected void onPostExecute(Bitmap result) {
            if (result != null) {
                bitmap = result;
                imageView.setImageBitmap(result);
            }
        }
    }

}</string,></string,>
这就比较清晰明白了,每次我们都把这个界面获取到的信息存到LruCache里面。
@Override
protected void onActivityResult(int requestCode, int resultCode, Intent data) {
    int newId = data.getExtras().getInt(newId);
    String message = data.getExtras().getString(message);
    Bitmap bitmap = data.getParcelableExtra(bitmap);
    util.addJsonLruCache(newId, message);
    util.addBitmapLruCache(newId, bitmap);
    super.onActivityResult(requestCode, resultCode, data);
}
4,效果 
一、概述
Android下的 猎豹清理大师的内存开口圆环比例进度 挺不错的,于是反编译了猎豹清理大师的app,原来是有两张图,于是想了一下思路,利用上下两张图,旋转上面张图以及使用 PorterDuffXfermode 来设置合适的渲染模式,就可以达到效果。下面看看咱们的效果吧
二、效果图

三、Xfermode渲染模式简介:
xfermode影响在Canvas已经有的图像上绘制新的颜色的方式
* 正常的情况下,在图像上绘制新的形状,如果新的Paint不是透明的,那么会遮挡下面的颜色.
* 如果新的Paint是透明的,那么会被染成下面的颜色
下面的Xfermode子类可以改变这种行为:
AvoidXfermode 指定了一个颜色和容差,强制Paint避免在它上面绘图(或者只在它上面绘图)。
PixelXorXfermode 当覆盖已有的颜色时,应用一个简单的像素XOR操作。
PorterDuffXfermode 这是一个非常强大的转换模式,使用它,可以使用图像合成的16条Porter-Duff规则的任意一条来控制Paint如何与已有的Canvas图像进行交互。
这里不得不提到那个经典的图:
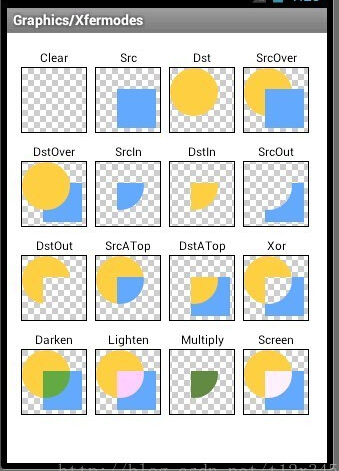
上面的16种模式的说明如下:
从上面我们可以看到PorterDuff.Mode为枚举类,一共有16个枚举值:
1.PorterDuff.Mode.CLEAR
所绘制不会提交到画布上。
2.PorterDuff.Mode.SRC
显示上层绘制图片
3.PorterDuff.Mode.DST
显示下层绘制图片
4.PorterDuff.Mode.SRC_OVER
正常绘制显示,上下层绘制叠盖。
5.PorterDuff.Mode.DST_OVER
上下层都显示。下层居上显示。
6.PorterDuff.Mode.SRC_IN
取两层绘制交集。显示上层。
7.PorterDuff.Mode.DST_IN
取两层绘制交集。显示下层。
8.PorterDuff.Mode.SRC_OUT
取上层绘制非交集部分。
9.PorterDuff.Mode.DST_OUT
取下层绘制非交集部分。
10.PorterDuff.Mode.SRC_ATOP
取下层非交集部分与上层交集部分
11.PorterDuff.Mode.DST_ATOP
取上层非交集部分与下层交集部分
12.PorterDuff.Mode.XOR
异或:去除两图层交集部分
13.PorterDuff.Mode.DARKEN
取两图层全部区域,交集部分颜色加深
14.PorterDuff.Mode.LIGHTEN
取两图层全部,点亮交集部分颜色
15.PorterDuff.Mode.MULTIPLY
取两图层交集部分叠加后颜色
16.PorterDuff.Mode.SCREEN
取两图层全部区域,交集部分变为透明色
四、自定义开口圆环View的实现
1、初始化绘制所需的画笔,字体颜色、大小等变量
public XCArcProgressBar(Context context, AttributeSet attrs,
        int defStyleAttr) {
    super(context, attrs, defStyleAttr);
    // TODO Auto-generated constructor stub


    degrees =  0;
    paint  =  new Paint();
    //从attrs.xml中获取自定义属性和默认值
    TypedArray typedArray  = context.obtainStyledAttributes(attrs, R.styleable.XCRoundProgressBar);
    textColor  =typedArray.getColor(R.styleable.XCRoundProgressBar_textColor, Color.RED);
    textSize = typedArray.getDimension(R.styleable.XCRoundProgressBar_textSize, 15);
    max = typedArray.getInteger(R.styleable.XCRoundProgressBar_max, 100);
    isDisplayText  =typedArray.getBoolean(R.styleable.XCRoundProgressBar_textIsDisplayable, true);
    typedArray.recycle();

}
2、在onDraw()中绘制出来
在onDraw()方法中利用PorterDuffXfermode渲染模式绘制两张开口圆环Bitmap,并计算前景图的旋转角度,从而达到效果图效果。
首先先绘制底部背景图,然后绘制进度前景图,最后利用PorterDuffXfermode的渲染模式和旋转角度比例来进行前景图和背景图的遮罩处理。
@Override
protected void onDraw(Canvas canvas) {
    // TODO Auto-generated method stub
    super.onDraw(canvas);
    int width = getWidth();
    int height = getHeight();
    int centerX = getWidth() / 2;// 获取中心点X坐标
    int centerY = getHeight() / 2;// 获取中心点Y坐标
    Bitmap bitmap = Bitmap.createBitmap(width, height, Config.ARGB_8888);
    Canvas can = new Canvas(bitmap);
    // 绘制底部背景图
    bmpTemp = Utils.decodeCustomRes(getContext(), R.drawable.arc_bg);
    float dstWidth = (float) width;
    float dstHeight = (float) height;
    int srcWidth = bmpTemp.getWidth();
    int srcHeight = bmpTemp.getHeight();
    can.setDrawFilter(new PaintFlagsDrawFilter(0, Paint.ANTI_ALIAS_FLAG
            | Paint.FILTER_BITMAP_FLAG));// 抗锯齿
    Bitmap bmpBg = Bitmap.createScaledBitmap(bmpTemp, width, height, true);
    can.drawBitmap(bmpBg, 0, 0, null);
    // 绘制进度前景图
    Matrix matrixProgress = new Matrix();
    matrixProgress.postScale(dstWidth / srcWidth, dstHeight / srcWidth);
    bmpTemp = Utils.decodeCustomRes(getContext(), R.drawable.arc_progress);
    Bitmap bmpProgress = Bitmap.createBitmap(bmpTemp, 0, 0, srcWidth,
            srcHeight, matrixProgress, true);
    degrees = progress * 270 / max - 270;
    //遮罩处理前景图和背景图
    can.save();
    can.rotate(degrees, centerX, centerY);
    paint.setAntiAlias(true);
    paint.setXfermode(new PorterDuffXfermode(Mode.SRC_ATOP));
    can.drawBitmap(bmpProgress, 0, 0, paint);
    can.restore();

    if ((-degrees) >= 85) {
        int posX = 0;
        int posY = 0;
        if ((-degrees) >= 270) {
            posX = 0;
            posY = 0;
        } else if ((-degrees) >= 225) {
            posX = centerX / 2;
            posY = 0;
        } else if ((-degrees) >= 180) {
            posX = centerX;
            posY = 0;
        } else if ((-degrees) >= 135) {
            posX = centerX;
            posY = 0;
        } else if ((-degrees) >= 85) {
            posX = centerX;
            posY = centerY;
        }

        if ((-degrees) >= 225) {
            can.save();
            Bitmap dst = bitmap
                    .createBitmap(bitmap, 0, 0, centerX, centerX);
            paint.setAntiAlias(true);
            paint.setXfermode(new PorterDuffXfermode(Mode.SRC_ATOP));
            Bitmap src = bmpBg.createBitmap(bmpBg, 0, 0, centerX, centerX);
            can.drawBitmap(src, 0, 0, paint);
            can.restore();
            can.save();
            dst = bitmap.createBitmap(bitmap, centerX, 0, centerX, height);
            paint.setAntiAlias(true);
            paint.setXfermode(new PorterDuffXfermode(Mode.SRC_ATOP));
            src = bmpBg.createBitmap(bmpBg, centerX, 0, centerX, height);
            can.drawBitmap(src, centerX, 0, paint);
            can.restore();
        } else {
            can.save();
            Bitmap dst = bitmap.createBitmap(bitmap, posX, posY, width
                    - posX, height - posY);
            paint.setAntiAlias(true);
            paint.setXfermode(new PorterDuffXfermode(Mode.SRC_ATOP));
            Bitmap src = bmpBg.createBitmap(bmpBg, posX, posY,
                    width - posX, height - posY);
            can.drawBitmap(src, posX, posY, paint);
            can.restore();
        }
    }
    //绘制遮罩层位图
    canvas.drawBitmap(bitmap, 0, 0, null);

    // 画中间进度百分比字符串
    paint.reset();
    paint.setStrokeWidth(0);
    paint.setColor(textColor);
    paint.setTextSize(textSize);
    paint.setTypeface(Typeface.DEFAULT_BOLD);
    int percent = (int) (((float) progress / (float) max) * 100);// 计算百分比
    float textWidth = paint.measureText(percent + "%");// 测量字体宽度,需要居中显示
    if (isDisplayText && percent != 0) {
        canvas.drawText(percent + "%", centerX - textWidth / 2, centerX
                + textSize / 2 - 25, paint);
    }
    //画底部开口处标题文字
    paint.setTextSize(textSize/2);
    textWidth = paint.measureText(title);
    canvas.drawText(title, centerX-textWidth/2, height-textSize/2, paint);
}
3、设置比例进度的同步接口方法,主要供刷新进度比例用。
/**
 * 设置进度,此为线程安全控件,由于考虑多线的问题,需要同步
 * 刷新界面调用postInvalidate()能在非UI线程刷新
 * @author caizhiming
 */
public synchronized void setProgress(int progress) {
    if(progress < 0){
        throw new IllegalArgumentException("progress must more than 0");
    }
    if(progress > max){
        this.progress = progress;
    }
    if(progress <= max){
        this.progress = progress;
        postInvalidate();
    }
}
最后,自己试玩着感觉良好,可以直接应用到实际项目中
相关文章
iPhone6怎么激活?两种苹果iPhone6激活教程图文详解
iPhone6新机需要激活后才可以正常使用,那么对于小白用户来说,iPhone6如何激活使用呢?针对此问题,本文就为大家分别介绍Wifi无线网络激活以及iPhone6连接电脑激活这两种有效的方法,希望本文能够帮助到大家...2022-09-14- 今天小编在这里就来给Painter的这一款软件的使用者们来说一说绘制红衣喝酒男水粉画效果的教程,各位想知道具体绘制步骤的使用者,那么下面就快来跟着小编一起看一看教程...2016-09-14
- 今天小编在这里就来给各位photoshop的这一款软件的使用者们来说下制作雨中野外孤独行走的一头牛海报的教程,各位想知道具体制作方法的使用者们,大家就快来看一看小编给...2016-09-14
- 今天小编在这里就来给Painter的这一款软件的使用者们来说一下绘制帅气卡通魔法王子漫画的具体教程,各位想知道绘制步骤的使用者,那么下面就快来跟着小编一起看一看教程...2016-09-14
- 支付宝支付在国内算是大家了,我们到处都可以使用支付宝了,下文整理介绍的是在安卓app应用中使用支付宝进行支付的开发例子。 之前讲了一篇博客关与支付宝集成获取...2016-09-20
- 今天小编在这里就来给各位Illustrator的这一款软件的使用者们来说说鼠绘堆雪人的孩童矢量插画的教程,各位想知道具体绘制方法的使用者们,那么各位就快来跟着小编来看看...2016-09-14
- 今天小编在这里就来给llustrator的这一款软件的使用者们来说一说绘制扁平化风格卡通警察护士空姐肖像的教程,各位想知道具体绘制步骤的使用者们,那么下面就快来跟着小编...2016-09-14
- 今天小编在这里就来给美图秀秀的这一款软件的使用者们来说下究竟该怎么给照片天空加蓝天白云的教程,各位想知道具体制作步骤的,那么下面就来跟着小编一起看看吧。 ...2016-09-14
- 今天小编在这里就来给Illustrator的这一款软件的使用者们来说一下绘制一个方形的录音机图标的教程,各位想知道具体绘制方法的使用者们,那么下面就来看一下小编给大家分...2016-09-14
- 今天小编在这里就来给美图秀秀的这一款软件的使用者们来说一下让你胸丰满起来的处理教程,各位想知道具体处理步骤的,那么下面就快来跟着小编一起看一下教程吧。 给...2016-09-14
- 今天小编在这里就来给各位photoshop的这一款软件的使用者们来说说给手绘画调色变换场景的后期教程,各位想知道具体后期处理步骤的使用者们,那么大家就快来跟着小编来看...2016-10-02
- 下面我们来看一篇关于Android子控件超出父控件的范围显示出来方法,希望这篇文章能够帮助到各位朋友,有碰到此问题的朋友可以进来看看哦。 <RelativeLayout xmlns:an...2016-10-02
- 今天小编在这里就来给Painter的这一款软件的使用者们来说一下绘制雷神传插画的教程,各位想知道具体绘制步骤的使用者,那么下面就快来跟着小编一起看看绘制方法吧。 ...2016-09-14
- 今天小编在这里就来给photoshop的这一款软件的使用者们来说一说简单制作一个搞笑的换脸表情包的教程,各位想知道具体制作方法的使用者们,那么大家就快来看一看教程吧。...2016-09-14
Android开发中findViewById()函数用法与简化
findViewById方法在android开发中是获取页面控件的值了,有没有发现我们一个页面控件多了会反复研究写findViewById呢,下面我们一起来看它的简化方法。 Android中Fin...2016-09-20- 如果我们的项目需要做来电及短信的功能,那么我们就得在Android模拟器开发这些功能,本来就来告诉我们如何在Android模拟器上模拟来电及来短信的功能。 在Android模拟...2016-09-20
- 夜神android模拟器如何设置代理呢?对于这个问题其实操作起来是非常的简单,下面小编来为各位详细介绍夜神android模拟器设置代理的方法,希望例子能够帮助到各位。 app...2016-09-20
- 联合索引又叫复合索引。对于复合索引:Mysql从左到右的使用索引中的字段,一个查询可以只使用索引中的一部份,但只能是最左侧部分。例如索引是key index (a,b,c). 可以支持a | a,b| a,b,c 3种组合进行查找,但不支持 b,c进...2015-11-24
- 为了增强android应用的用户体验,我们可以在一些Button按钮上自定义动态的设置一些样式,比如交互时改变字体、颜色、背景图等。 今天来看一个通过重写Button来动态实...2016-09-20
- 这篇文章主要给大家介绍的是关于Lua语言新手入门的简单教程,文中通过示例代码一步步介绍的非常详细,对各位新手们的入门提供了一个很方便的教程,需要的朋友可以参考借鉴,下面随着小编来一起学习学习吧。...2020-06-30