Python基础之面向对象进阶详解
面向对象三大特征介绍
封装(隐藏):隐藏对象的属性和实现细节,知对外提供必要的方法。
继承:让子类拥有父类特征,提高了代码的重用性。从设计上是一种增量进化,原有父类设计不变的情况下,可以增加新的功能,或者改进 已有的算法。
多态:一个方法调用由于对象不同会产生不同的行为。
继承
继承是代码复用的一个非常重要的手段,已有的类,我们称为“父类或者基类”,新的类,我们称为“子类或者派生类”。

语法格式
Python 支持多重继承,一个子类可以继承多个父类。继承的语法格式如下:
class 子类类名(父类 1[,父类 2,…]):
类体
如果在类定义中没有指定父类,则默认父类是 object 类。也就是说,object 是所有类的父 类,里面定义了一些所有类共有的默认实现,比如:new()。
定义子类时,必须在其构造函数中调用父类的构造函数。调用格式如下:
父类名.init(self, 参数列表)
# 测试继承的基本使用
class Person():
    def __init__(self, name, age):
        self.name = name
        self.__age = age #私有属性
    def print_name(self):
        print(self.name)
class Student(Person):
    def __init__(self, name, age, id):
        Person.__init__(self, name, age)
        self.id = id
stu = Student('sherry',24,'2017')
stu.print_name()
print(Student.mro()) #查看类的继承层次结构
print(dir(stu))  # 打印所有方法和属性
print(stu._Person__age) #继承于父类的私有属性的访问
输出:
sherry
[<class '__main__.Student'>, <class '__main__.Person'>, <class 'object'>]
['_Person__age', '__class__', '__delattr__', '__dict__', '__dir__', '__doc__', '__eq__', '__format__', '__ge__', '__getattribute__', '__gt__', '__hash__', '__init__', '__init_subclass__', '__le__', '__lt__', '__module__', '__ne__', '__new__', '__reduce__', '__reduce_ex__', '__repr__', '__setattr__', '__sizeof__', '__str__', '__subclasshook__', '__weakref__', 'id', 'name', 'print_name']
24
1.类成员的继承和重写 成员继承:子类继承了父类除构造方法之外的所有成员,包括方法,属性,私有方法,私有属性,只不过私有方法和属性不能直接访问。
2.方法重写:子类可以重新定义父类中的方法,这样就会覆盖父类的方法,也称为“重写”
# 重写父类方法的测试
class Person():
    def __init__(self, name, age):
        self.name = name
        self.__age = age #私有属性
    def print_name(self):
        print(self.name)
class Student(Person):
    def __init__(self, name, age, id):
        Person.__init__(self, name, age)
        self.id = id
    def print_name(self):
        '''重写了父类的方法'''
        print('my name is ', self.name)
stu = Student('sherry',24,'2017')
stu.print_name()
输出:
my name is  sherry
查看类的继承层次结构
通过类的方法 mro()或者类的属性__mro__可以输出这个类的继承层次结构。
class Person():
    def __init__(self, name, age):
        self.name = name
        self.__age = age #私有属性
    def print_name(self):
        print(self.name)
class Student(Person):
    def __init__(self, name, age, id):
        Person.__init__(self, name, age)
        self.id = id
    def print_name(self):
        '''重写了父类的方法'''
        print('my name is ', self.name)
# stu = Student('sherry',24,'2017')
print(Student.mro())
输出:
[<class '__main__.Student'>, <class '__main__.Person'>, <class 'object'>]
object根类
object 类是所有类的父类,因此所有的类都有 object 类的属性和方法。
dir()查看对象属性
# 测试继承的基本使用
class Person():
    def __init__(self, name, age):
        self.name = name
        self.__age = age #私有属性
    def print_name(self):
        print(self.name)
class Student(Person):
    def __init__(self, name, age, id):
        Person.__init__(self, name, age)
        self.id = id
    def print_name(self):
        '''重写了父类的方法'''
        print('my name is ', self.name)
obj = object()
stu = Student('sherry',24,'2017')
print(dir(obj))
print(dir(stu))
输出:
['__class__', '__delattr__', '__dir__', '__doc__', '__eq__', '__format__', '__ge__', '__getattribute__', '__gt__', '__hash__', '__init__', '__init_subclass__', '__le__', '__lt__', '__ne__', '__new__', '__reduce__', '__reduce_ex__', '__repr__', '__setattr__', '__sizeof__', '__str__', '__subclasshook__']
['_Person__age', '__class__', '__delattr__', '__dict__', '__dir__', '__doc__', '__eq__', '__format__', '__ge__', '__getattribute__', '__gt__', '__hash__', '__init__', '__init_subclass__', '__le__', '__lt__', '__module__', '__ne__', '__new__', '__reduce__', '__reduce_ex__', '__repr__', '__setattr__', '__sizeof__', '__str__', '__subclasshook__', '__weakref__', 'id', 'name', 'print_name']
str()方法的重写
object 有一个__str__()方法,用于返回一个对于“对象的描述”,对应于内置函数 str()。经常用于 print()方法,帮助我们查看对象的信息。str()可以重写。
class Person():
    def __init__(self, name, age):
        self.name = name
        self.__age = age #私有属性
    def print_name(self):
        print(self.name)
    def __str__(self):
        return 'name:{0} age:{1}'.format(self.name, self.__age)
p = Person('sherry', 24)
print(p)
输出:
name:sherry age:24
多重继承
Python 支持多重继承,一个子类可以有多个“直接父类”。这样,就具备了“多个父 类”的特点。但是由于,这样会被“类的整体层次”搞的异常复杂,尽量避免使用。(java不支持多重继承)
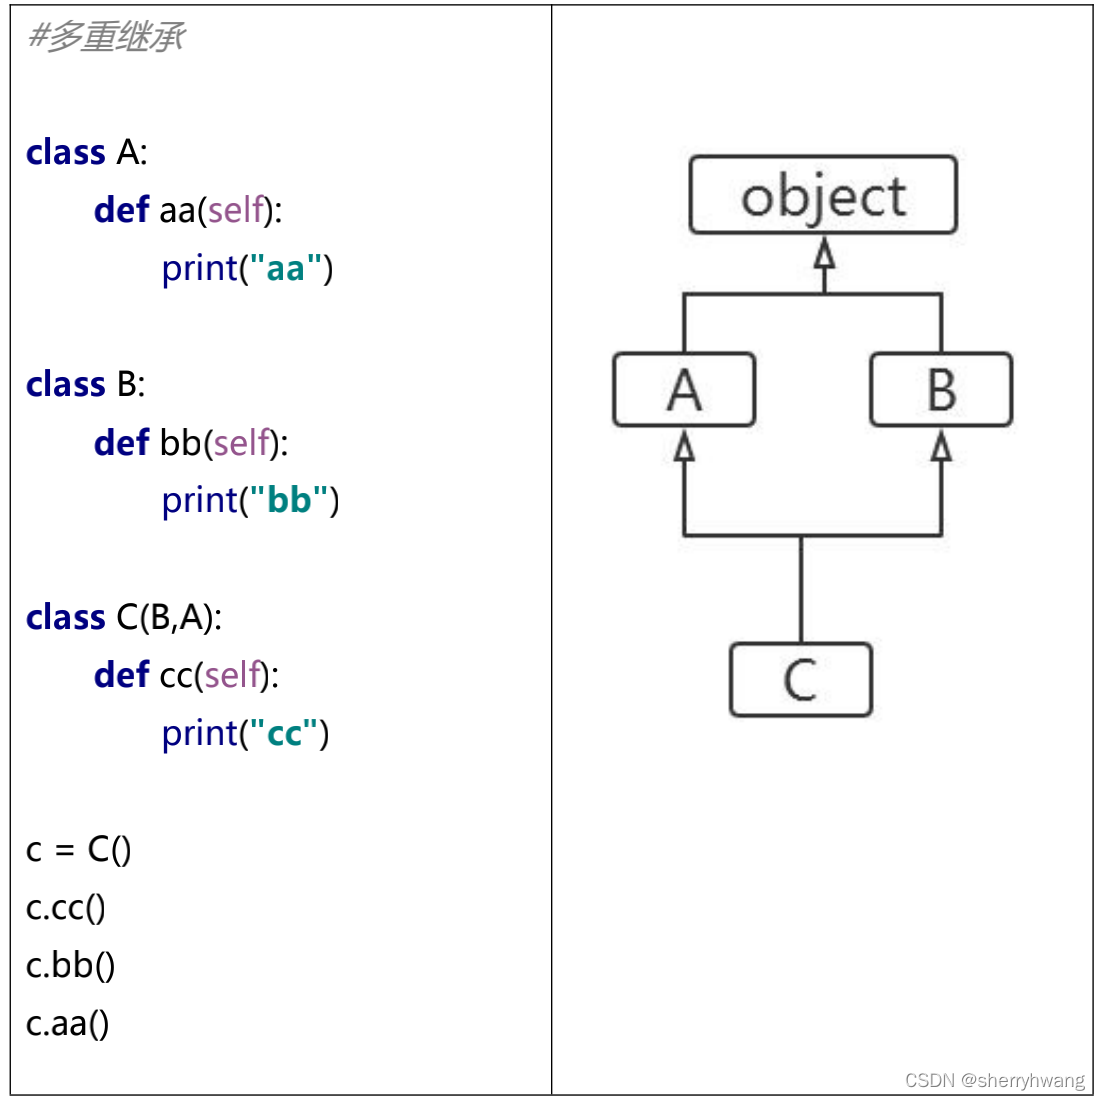
class A():
    pass
class B():
    pass
class C(A,B):
    pass
print(C.mro())
输出:
[<class '__main__.C'>, <class '__main__.A'>, <class '__main__.B'>, <class 'object'>]
MRO()
Python 支持多继承,如果父类中有相同名字的方法,在子类没有指定父类名时,解释器将 “从左向右”按顺序搜索。
class A():
    pass
class B():
    pass
class C(A,B):
    pass
print(C.mro())
输出:
[<class '__main__.C'>, <class '__main__.A'>, <class '__main__.B'>, <class 'object'>]
super()获得父类定义
在子类中,如果想要获得父类的方法时,我们可以通过 super()来做。super()获得父类的定义(不是获得父类的对象)。
# 测试super()
class A():
    def say(self):
        print('aa')
class B(A):
    def say(self):
        super().say()  #调用父类方法
        A.say(self)		#调用父类方法
        print('bb')
b = B()
b.say()
输出:
aa
aa
bb
多态
多态(polymorphism)是指同一个方法调用由于对象不同可能会产生不同的行为。
关于多态要注意以下 2 点:
1.多态是方法的多态,属性没有多态。
2.多态的存在有 2 个必要条件:继承、方法重写。
# 多态
class Man():
    def eat(self):
        print('eat!')
class Chinese(Man):
    def eat(self):
        print('eat with chopsticks')
class English(Man):
    def eat(self):
        print('eat with fork')
class Indian(Man):
    def eat(self):
        print('eat with hand')
def manEat(m):
    if isinstance(m,Man):
        m.eat()
    else:
        print('can not eat!')
manEat(Man())
manEat(Chinese())
manEat(English())
manEat(Indian())
输出:
eat!
eat with chopsticks
eat with fork
eat with hand
特殊方法和重载运算符
python重的运算符实际上是通过调用对象的特殊方法实现的。
a = 20
b = 30
print(a+b)
print(a.__add__(b))
输出:
50
50
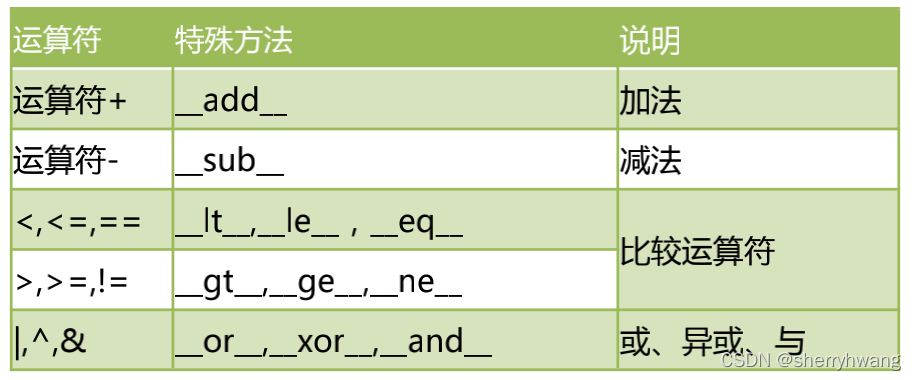
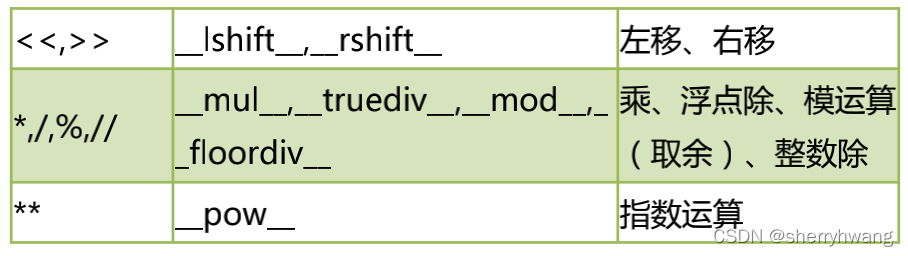
常见的特殊方法:
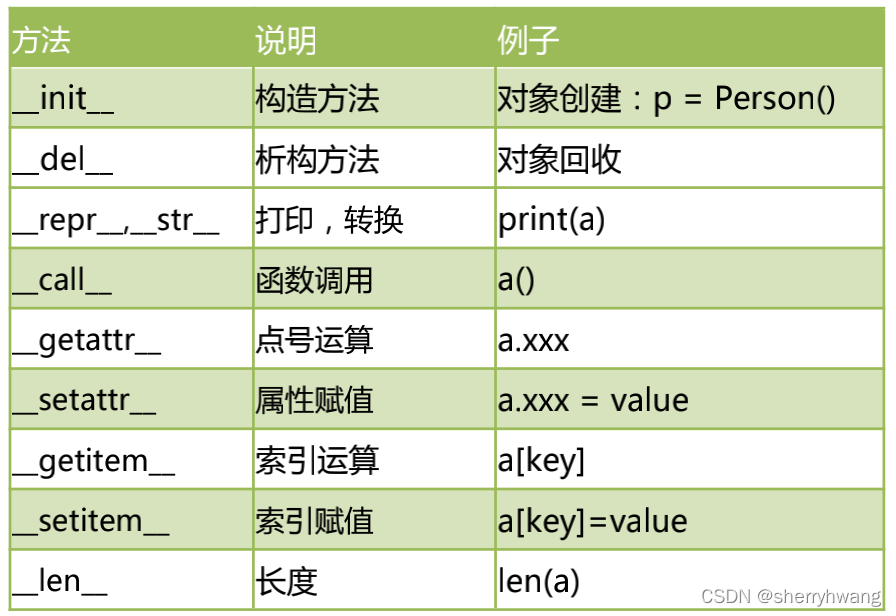
每个运算符实际上都对应了相应的方法:
# 测试运算符重载
class Person():
    def __init__(self, name):
        self.name = name
    def __add__(self, other):
        if isinstance(other, Person):
            return '{0}-{1}'.format(self.name, other.name)
    def __mul__(self, other):
        if isinstance(other, int):
            return self.name * other
p1 = Person('Sherry')
p2 = Person('Lily')
print(p1 + p2)
print(p1*10)
输出:
Sherry-Lily
SherrySherrySherrySherrySherrySherrySherrySherrySherrySherry
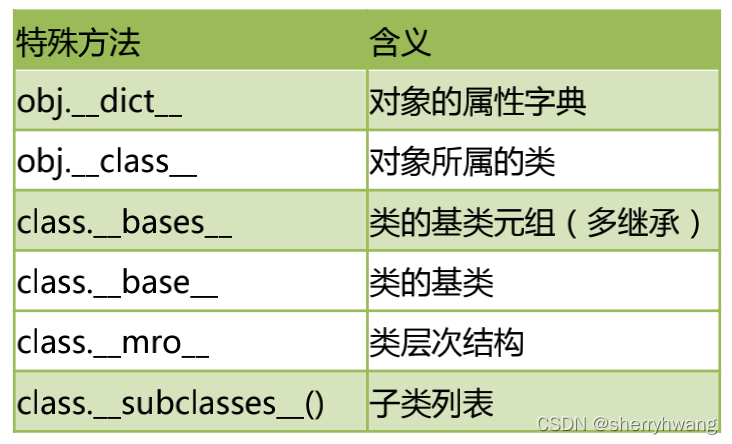
特殊属性
python中包含了很多双下划线开始和结束的属性,这些是特殊属性,有特殊用法。这里列出常见的特殊属性:
#测试特殊属性
class A():
    def say(self):
        print('aa')
class B():
    def say(self):
        print('bb')
class C(B,A):
    def __init__(self,name):
        super().__init__()
        self.name = name
c = C('sherry')
print(c.__dict__) #c对象的属性列表
print(c.__class__) #c对象的类
print(C.__bases__) #C类的基类
print(C.__mro__)	#C类的继承关系
print(C.__subclasses__)#C类的子类
输出:
{'name': 'sherry'}
<class '__main__.C'>
(<class '__main__.B'>, <class '__main__.A'>)
(<class '__main__.C'>, <class '__main__.B'>, <class '__main__.A'>, <class 'object'>)
<built-in method __subclasses__ of type object at 0x7fefdacc8dd0>
对象的浅拷贝和深拷贝
- 变量的赋值操作
只是形成两个变量,实际还是指向同一个对象。
- 浅拷贝Python
拷贝一般都是浅拷贝。拷贝时,对象包含的子对象内容不拷贝。因此,源对象 和拷贝对象会引用同一个子对象。
- ·深拷贝使用
使用copy 模块的 deepcopy 函数,递归拷贝对象中包含的子对象。源对象和拷贝对象 所有的子对象也不同。
# 测试浅拷贝和深拷贝
import copy
class MobilePhone():
    def __init__(self, cpu, screen):
        self.cpu = cpu
        self.screen = screen
class CPU():
    def caculate(self):
        print('cpu:\t', self)
class Screen():
    def show(self):
        print('screen:\t',self)
m1 = MobilePhone(CPU(), Screen())
print('测试赋值----')
m0 = m1
print('m1:\t',m1)
m1.cpu.caculate()
m1.screen.show()
print('m0:\t',m0)
m0.cpu.caculate()
m0.screen.show()
print('测试浅复制----')
m2 = copy.copy(m1)
print('m1:\t',m1)
m1.cpu.caculate()
m1.screen.show()
print('m2:\t',m2)
m2.cpu.caculate()
m2.screen.show()
print('测试深复制----')
m3 = copy.deepcopy(m1)
print('m1:\t',m1)
m1.cpu.caculate()
m1.screen.show()
print('m3:\t',m3)
m3.cpu.caculate()
m3.screen.show()
输出:
测试赋值----
m1:      <__main__.MobilePhone object at 0x7f8b0d6ed190>
cpu:     <__main__.CPU object at 0x7f8b0d6ed130>
screen:  <__main__.Screen object at 0x7f8b0d6ed100>
m0:      <__main__.MobilePhone object at 0x7f8b0d6ed190>
cpu:     <__main__.CPU object at 0x7f8b0d6ed130>
screen:  <__main__.Screen object at 0x7f8b0d6ed100>
测试浅复制----
m1:      <__main__.MobilePhone object at 0x7f8b0d6ed190>
cpu:     <__main__.CPU object at 0x7f8b0d6ed130>
screen:  <__main__.Screen object at 0x7f8b0d6ed100>
m2:      <__main__.MobilePhone object at 0x7f8b0d6a9940>
cpu:     <__main__.CPU object at 0x7f8b0d6ed130>
screen:  <__main__.Screen object at 0x7f8b0d6ed100>
测试深复制----
m1:      <__main__.MobilePhone object at 0x7f8b0d6ed190>
cpu:     <__main__.CPU object at 0x7f8b0d6ed130>
screen:  <__main__.Screen object at 0x7f8b0d6ed100>
m3:      <__main__.MobilePhone object at 0x7f8b0d6ed280>
cpu:     <__main__.CPU object at 0x7f8b0d6ede20>
screen:  <__main__.Screen object at 0x7f8b0d6edd30>
组合
“is-a”关系,我们可以使用“继承”。从而实现子类拥有的父类的方法和属性。“is-a” 关系指的是类似这样的关系:狗是动物,dog is animal。狗类就应该继承动物类。
“has-a”关系,我们可以使用“组合”,也能实现一个类拥有另一个类的方法和属性。” has-a”关系指的是这样的关系:手机拥有 CPU。 MobilePhone has a CPU。
设计模式_工厂模式实现
设计模式是面向对象语言特有的内容,是我们在面临某一类问题时候固定的做法,设计 模式有很多种,比较流行的是:GOF(Goup Of Four)23 种设计模式。当然,我们没有 必要全部学习,学习几个常用的即可。
对于初学者,我们学习两个最常用的模式:工厂模式和单例模式。
工厂模式实现了创建者和调用者的分离,使用专门的工厂类将选择实现类、创建对象进行统一的管理和控制。
#测试工厂模式
class CarFactory():
    def creatCar(self, brand):
        if brand == '奔驰':
            return Benz()
        elif brand == '宝马':
            return BMW()
        elif brand == '比亚迪':
            return BYD()
        else:
            print('can not create!')
class Benz():
    pass
class BMW():
    pass
class BYD():
    pass
factory = CarFactory()
c1 = factory.creatCar('奔驰')
c2 = factory.creatCar('宝马')
c3 = factory.creatCar('比亚迪')
设计模式_单例模式实现
单例模式(Singleton Pattern)的核心作用是确保一个类只有一个实例,并且提供一个访问该实例的全局访问点。
单例模式只生成一个实例对象,减少了对系统资源的开销。当一个对象的产生需要比较 多的资源,如读取配置文件、产生其他依赖对象时,可以产生一个“单例对象”,然后永久 驻留内存中,从而极大的降低开销。
# 测试单例模式
class MySingleton():
    __obj = None
    __init_flag = True
    def __new__(cls, *args, **kwargs):
        if cls.__obj == None:
            cls.__obj = object.__new__(cls)  # __obj对象只创建一次  obj对象就是Mysingleton对象
        return cls.__obj
    def __init__(self, name):
        if self.__init_flag == True:
            print('init....')
            self.name = name
            self.__init_flag = False
a = MySingleton('aa')
b = MySingleton('bb')
c = MySingleton('cc')
print(a)
print(a.name)
print(b)
print(b.name)
print(c)
print(c.name)
输出:
init....
<__main__.MySingleton object at 0x7fce0f6e8130>
aa
<__main__.MySingleton object at 0x7fce0f6e8130>
aa
<__main__.MySingleton object at 0x7fce0f6e8130>
aa
工厂模式和单例模式的整合使用
# 测试工厂模式和单例模式的混合使用
class CarFactory():
    __obj = None
    __init_flag = True
    def __new__(cls, *args, **kwargs):
        if cls.__obj == None:
            cls.__obj = object.__new__(cls)
        return cls.__obj
    def __init__(self):
        if self.__init_flag:
            print('init factory')
            self.__init_flag = False

    def creatCar(self, brand):
        if brand == '奔驰':
            return Benz()
        elif brand == '宝马':
            return BMW()
        elif brand == '比亚迪':
            return BYD()
        else:
            print('can not create!')
class Benz():
    pass
class BMW():
    pass
class BYD():
    pass
factory = CarFactory()
c1 = factory.creatCar('奔驰')
c2 = factory.creatCar('宝马')
c3 = factory.creatCar('比亚迪')
factory2 = CarFactory()
print(factory)
print(factory2)
输出:
init factory
<__main__.CarFactory object at 0x7fd286eecc10>
<__main__.CarFactory object at 0x7fd286eecc10>
总结
本篇文章就到这里了,希望能够给你带来帮助,也希望您能够多多关注猪先飞的更多内容!
原文出处:https://blog.csdn.net/sherryhwang/article/details/122900015
相关文章
- 这篇文章主要介绍了python-opencv-画外接矩形框的实例代码,代码简单易懂,对大家的学习或工作具有一定的参考借鉴价值,需要的朋友可以参考下...2021-09-04
Python astype(np.float)函数使用方法解析
这篇文章主要介绍了Python astype(np.float)函数使用方法解析,文中通过示例代码介绍的非常详细,对大家的学习或者工作具有一定的参考学习价值,需要的朋友可以参考下...2020-06-08- 2022虎年新年即将来临,小编为大家带来了一个利用Python编写的虎年烟花特效,堪称全网最绚烂,文中的示例代码简洁易懂,感兴趣的同学可以动手试一试...2022-02-14
- 在本篇文章里小编给大家分享的是一篇关于python中numpy.empty()函数实例讲解内容,对此有兴趣的朋友们可以学习下。...2021-02-06
python-for x in range的用法(注意要点、细节)
这篇文章主要介绍了python-for x in range的用法,具有很好的参考价值,希望对大家有所帮助。一起跟随小编过来看看吧...2021-05-10- 这篇文章主要介绍了Python 图片转数组,二进制互转操作,具有很好的参考价值,希望对大家有所帮助。一起跟随小编过来看看吧...2021-03-09
- 这篇文章主要介绍了Python中的imread()函数用法说明,具有很好的参考价值,希望对大家有所帮助。一起跟随小编过来看看吧...2021-03-16
- 这篇文章主要介绍了python如何实现b站直播自动发送弹幕,帮助大家更好的理解和学习使用python,感兴趣的朋友可以了解下...2021-02-20
python Matplotlib基础--如何添加文本和标注
这篇文章主要介绍了python Matplotlib基础--如何添加文本和标注,帮助大家更好的利用Matplotlib绘制图表,感兴趣的朋友可以了解下...2021-01-26- 这篇文章主要介绍了解决python 使用openpyxl读写大文件的坑,具有很好的参考价值,希望对大家有所帮助。一起跟随小编过来看看吧...2021-03-13
- 今天小编就为大家分享一篇python 计算方位角实例(根据两点的坐标计算),具有很好的参考价值,希望对大家有所帮助。一起跟随小编过来看看吧...2020-04-27
- 这篇文章主要为大家详细介绍了python实现双色球随机选号,文中示例代码介绍的非常详细,具有一定的参考价值,感兴趣的小伙伴们可以参考一下...2020-05-02
- 在本篇文章里小编给大家整理的是一篇关于python中使用np.delete()的实例方法,对此有兴趣的朋友们可以学习参考下。...2021-02-01
- 这篇文章主要介绍了使用Python的pencolor函数实现渐变色功能,本文通过实例代码给大家介绍的非常详细,对大家的学习或工作具有一定的参考借鉴价值,需要的朋友可以参考下...2021-03-09
- 这篇文章主要介绍了python自动化办公操作PPT的实现,文中通过示例代码介绍的非常详细,对大家的学习或者工作具有一定的参考学习价值,需要的朋友们下面随着小编来一起学习学习吧...2021-02-05
Python getsizeof()和getsize()区分详解
这篇文章主要介绍了Python getsizeof()和getsize()区分详解,文中通过示例代码介绍的非常详细,对大家的学习或者工作具有一定的参考学习价值,需要的朋友们下面随着小编来一起学习学习吧...2020-11-20- 这篇文章主要介绍了解决python 两个时间戳相减出现结果错误的问题,具有很好的参考价值,希望对大家有所帮助。一起跟随小编过来看看吧...2021-03-12
- 这篇文章主要为大家详细介绍了python实现学生通讯录管理系统,文中示例代码介绍的非常详细,具有一定的参考价值,感兴趣的小伙伴们可以参考一下...2021-02-25
- 这篇文章主要介绍了PyTorch一小时掌握之迁移学习篇,本文给大家介绍的非常详细,对大家的学习或工作具有一定的参考借鉴价值,需要的朋友可以参考下...2021-09-08
- 这篇文章主要介绍了Python绘制的爱心树与表白代码,本文通过实例代码给大家介绍的非常详细,对大家的学习或工作具有一定的参考借鉴价值,需要的朋友可以参考下...2021-04-06