php怎么安装sockets扩展?linux下开启php的sockets扩展支持实例
下个相同版本的php源码,进行编译安装,再按照上面步骤搞,生成的so。copy到rpm装的那个,修改php.ini进行扩展就行了,
或者到网上找相同版本,相同系统 的编译好的so文件。
在linux下给PHP安装socket扩展,参考方法如下:
#cd /usr/soft/php/ext/sockets (进入原php安装文件下的sockets目录)
#/usr/local/php/bin/phpize (运行安装后的php安装文件下的phpize)
#./configure --prefix=/usr/local/php/lib --with-php-config=/user/local/php/bin/php-config --enable-sockets
#make
#make install
再修改/usr/local/php/etc/php.ini文件
#extension_dir = "/usr/local/php/lib/php/extensions/no-debug-non-zts-20090626/" (php5.4版本以上不用加扩展路径)
extension=sockets.so
(若不想修改extension_dir路径或改路径下还有别的.so文件,亦可直接写:
extension=/usr/local/php/lib/php/extensions/no-debug-non-zts-20090626/sockets.so)
重启apache或者nginx等进程,完成。
小编分享的这篇文章介绍了Zend Studio中安装emmet插件的方法,不会安装的同学可以参考一下本文。
本人的Zend Studio版本是Zend Studio 10.0.0。
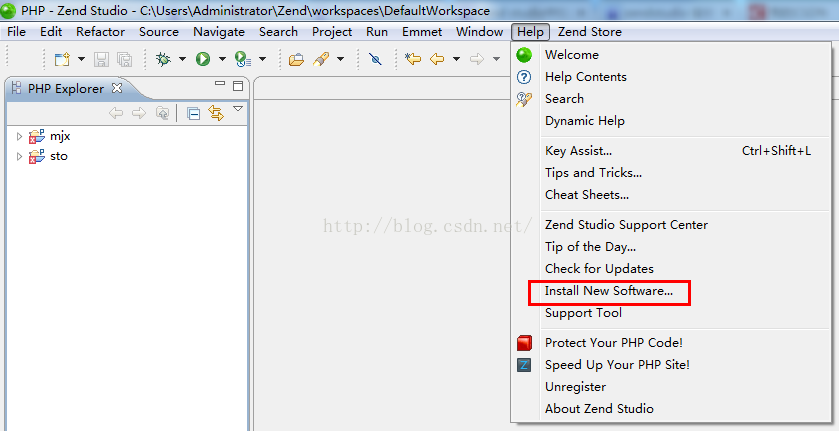
1. 打开Zend Studio,点击 Help --> Install New Software,如下图:
2. 在Work With中填入如下地址:http://emmet.io/eclipse/updates/ ,回车,选择某个版本的emmet,如下图,点击 Next
(由于我的Zend Studio版本不是最新的,故我也没有选择最新版本的emmet,因为无法安装成功,故我这里选择的是较旧版本的emmet)

3. 之后,就很简单了。 I agree --> Finish,就可以看到emmet插件的安装进度界面,执行安装的过程中,如果有警告弹窗,点击OK继续安装。
4. 如果提示安装成功让你重启Zend Studio,则说明安装成功了。重启Zend Studio后,emmet插件方可生效。
php怎么安装模块?本文详细介绍了安装PHP模块的方法,不会的同学可以参考一下本文,按照文中步骤即可轻松安装php模块。首先进行相关的说明
a.安装PHP时,有些模块是php自带的(如shmop,curl,mhash,mcrypt,iconv不需要另外下载这些模块就可以直接安装,php自身包含这些模块的源码,但是有可能需要下载依赖包,比如libiconv),有些不是php自带的(如eAccelerator,APC,memcache,这些模块则需要从网上下载后然后再安装,此时一般用DSO方式安装(phpize))
比如安装php时有个配置选项./configure --with-iconv-dir=/usr/local,这句话的意思是在/usr/local目录查找lib子目录及include子目录,因为要需要用到那两个目录下面的库文件(lib目录)及头文件(include目录)
[root@CentOS_Test_Server ext]# ls /usr/local/lib/*iconv*
/usr/local/lib/libiconv.la /usr/local/lib/libiconv.so.2 /usr/local/lib/preloadable_libiconv.so
/usr/local/lib/libiconv.so /usr/local/lib/libiconv.so.2.5.0
虽然在php的源代码目录下有iconv的子目录,但是仍然要依赖其它的库函数及头文件,如果没有,则必须提前安装
[root@CentOS_Test_Server ext]# pwd
/home/software/php-5.2.8/ext
[root@CentOS_Test_Server ext]# ll iconv/
total 324
-rw-r--r-- 1 1002 1002 4601 Mar 1 2007 config.m4
-rw-r--r-- 1 1002 1002 749 Nov 23 2004 config.w32
-rw-r--r-- 1 1002 1002 52 Feb 5 2003 CREDITS
-rw-r--r-- 1 1002 1002 73004 Dec 31 2007 iconv.c
-rw-r--r-- 1 1002 1002 4687 Jan 17 2004 iconv.dsp
-rw-r--r-- 1 root root 305 Apr 30 20:55 iconv.lo
-rw-r--r-- 1 root root 101304 Apr 30 20:55 iconv.o
-rw-r--r-- 1 root root 1 Apr 30 20:49 php_have_bsd_iconv.h
-rw-r--r-- 1 root root 27 Apr 30 20:49 php_have_glibc_iconv.h
-rw-r--r-- 1 root root 1 Apr 30 20:49 php_have_ibm_iconv.h
-rw-r--r-- 1 root root 21 Apr 30 20:49 php_have_iconv.h
-rw-r--r-- 1 root root 1 Apr 30 20:49 php_have_libiconv.h
-rw-r--r-- 1 1002 1002 95 Aug 5 2004 php_iconv.def
-rw-r--r-- 1 1002 1002 3631 Dec 31 2007 php_iconv.h
-rw-r--r-- 1 root root 31 Apr 30 20:49 php_iconv_supports_errno.h
-rw-r--r-- 1 root root 54 Apr 30 20:49 php_php_iconv_h_path.h
-rw-r--r-- 1 root root 31 Apr 30 20:49 php_php_iconv_impl.h
drwxr-xr-x 2 1002 1002 4096 Dec 8 2008 tests
下面的php手册上的相关说明
To use shmop you will need to compile PHP with the --enable-shmop parameter in your configure line.
To use PHP's cURL support you must also compile PHP --with-curl[=DIR] where DIR is the location of the directory containing the lib and include directories. In the "include" directory there should be a folder named "curl" which should contain the easy.h and curl.h files. There should be a file named libcurl.a located in the "lib" directory. Beginning with PHP 4.3.0 you can configure PHP to use cURL for URL streams --with-curlwrappers.
php的扩展模块目录是怎么规则的呢,我想应该是跟phpize命令有些关系,phpize命令的输出中有20060613,也就是执行phpize命令的时间,然后我们看到生成的扩展模块目录中含有20060613
[root@localhost memcache-2.2.5]# /usr/local/webserver/php/bin/phpize
Configuring for:
PHP Api Version: 20041225
Zend Module Api No: 20060613
Zend Extension Api No: 220060519
Installing shared extensions: /usr/local/webserver/php/lib/php/extensions/no -debug-non-zts-20060613/
手工修改:查找/usr/local/webserver/php/etc/php.ini中的extension_dir = "./"
修改为extension_dir = "/usr/local/webserver/php/lib/php/extensions/no-debug-non-zts-20060613/"
b.安装php前,如果这些依赖包没有,则必须先安装这些依赖包,例如,你要在php中安装mhash模块,要视情况安装mhash的依赖包,再安装php,否则配置php时会报错
c.php扩展模块一般在安装完php以后,再安装php扩展模块,扩展模块一般是编译成.so文件,动态加载,不编译到php自身,如果编译到php自身,则每次需要新增加一个新的模块时就必须对整个php进行编译一次,比较耽误时间。
下面来说说几种常见的安装方法
1.用--with-xx或--enable-xx安装
就是在配置的时候加上相应的模块即可,如
./configure --enable-shmop --with-curl --enable-xml
然后make && make install即可
通过这种方式安装的模块不会生成.so文件,因此也不需要在php.ini中添加extension = "extname.so"的配置
Typically an extension that does not require external libraries uses --enable(如果configure中是使用--enable开头的模块,则这些模块一般不需要另外的函数库)
2.直接用PECL命令安装
$pecl install extname
这条命令将自动下载扩展extname的源代码,然后编译安装extname.so你的目录extension_dir中(php.ini中有设置)
This will download the source for extname, compile, and install extname.so into your extension_dir. extname.so may then be loaded via php.ini
By default, the pecl command will not install packages that are marked with the alpha or beta state. If no stable packages are available, you may install a beta package using the following command:
$ pecl install extname-beta
You may also install a specific version using this variant:
$ pecl install extname-0.1
Note: After enabling the extension in php.ini, restarting the web service is required for the changes to be picked up.
然后在php.ini中加入一行extension = "extname.so",重启web服务器让改变生效。
3.phpize安装(DSO方式安装)
首先下载要安装的php模块,然后解压缩,然后再执行下面几步即可
$ cd extname
$ phpize
$ ./configure
$ make
$ make install
然后在php.ini中加入一行extension = "extname.so",重启web服务器让改变生效。
4.通过php的源代码包编译(静态编译)
php手册上面写得比较全面,就直接引用手册上面的内容了
Compiling PECL extensions statically into PHP
You might find that you need to build a PECL extension statically into your PHP binary. To do this, you'll need to place the extension source under the php-src/ext/ directory and tell the PHP build system to regenerate its configure script.
$ cd /your/phpsrcdir/ext
$ pecl download extname
$ gzip -d < extname.tgz | tar -xvf -
$ mv extname-x.x.x extname
This will result in the following directory:
/your/phpsrcdir/ext/extname
From here, force PHP to rebuild the configure script, and then build PHP as normal:
$ cd /your/phpsrcdir
$ rm configure
$ ./buildconf --force
$ ./configure --help
$ ./configure --with-extname --enable-someotherext --with-foobar
$ make
$ make install
Note: To run the 'buildconf' script you need autoconf 2.13 and automake 1.4+ (newer versions of autoconf may work, but are not supported).
Whether --enable-extname or --with-extname is used depends on the extension. Typically an extension that does not require external libraries uses --enable. To be sure, run the following after buildconf:
$ ./configure --help | grep extname
这种方法安装php模块时就不需要在php.ini里面添加extension = "extname.so"了,因为模块已经编译到php里面了,是静态编译。
上面说的是在Linux下面安装php模块,在windows下面安装模块主要有如下的方法
1.直接加载
如果是php自带的模块(也就是php的扩展目录下面已经存在相应的dll文件),则在php.ini中直接将模块前面的;去掉,重启web服务器即可
例如要启用gd的功能,则将;extension=php_gd2.dll修改为extension=php_gd2.dll即可
2.在pecl网站上面下载已经编译好的dll文件,然后在php.ini中加入一行即可
例如在要windows上面安装memcache的模块,则从网上下载memcache的dll文件php_memcache.dll,然后把它复制到php的扩展目录,例如我的电脑上php扩展目录的路径为;e:/www/php5/ext
Directory in which the loadable extensions (modules) reside.
extension_dir = "e:/www/php5/ext"
3.把模块编译到php里面(也就是通过源代码编译)
简单点说,就是用vc来进行编译
说细看此页面
4.编译一个独立的dll文件
简单点说,就是用vc来进行编译,可以是别人开发好的php扩展,或者是你自己开发的也可以
说细看windows下开发并编译PHP扩展(步骤说明),这篇文章写得比较清楚,我在此恕不多言了。
引用php手册上的一段话
Installing a PHP extension
On Windows, you have two ways to load a PHP extension: either compile it into PHP, or load the DLL. Loading a pre-compiled extension is the easiest and preferred way.
To load an extension, you need to have it available as a ".dll" file on your system. All the extensions are automatically and periodically compiled by the PHP Group (see next section for the download).
To compile an extension into PHP, please refer to building from source documentation.
To compile a standalone extension (aka a DLL file), please refer to building from source documentation. If the DLL file is available neither with your PHP distribution nor in PECL, you may have to compile it before you can start using the extension.
相关文章
- 由于要使用mikoomi mongodb plugin插件,所以需要php对mongodb的扩展支持,默认通过源安装的php并没有mongodb的扩展支持,具体可以通过php -m|grep mongo 验证 。这里就结...2016-11-25
- 编译安装非常的简单了我们现在的php版本已经到了php7了,下文小编来为各位介绍一篇关于PHP7快速编译安装的步骤,希望文章能够帮助到各位。 一、安装必要一些依赖 yum...2016-11-25
- 这篇文章主要介绍了Rstudio中安装package出现的问题及解决方案,具有很好的参考价值,希望对大家有所帮助。一起跟随小编过来看看吧...2021-05-06
- 安装curl扩展支持https是非常的重要现在许多的网站都使用了https了,下面我们来看一篇关于PHP安装curl扩展支持https例子吧。 问题: 线上运行的lamp服务器,默认yu...2016-11-25
- PHP-FPM我们相信各位用高版本的php经常使用到了,下面整理了一些关于PHP-FPM的笔记,有兴趣的可进来看看。 今天赶上了123System OPenVZ VPS全场半价的机会,购入了一...2016-11-25
安装和使用percona-toolkit来辅助操作MySQL的基本教程
一、percona-toolkit简介 percona-toolkit是一组高级命令行工具的集合,用来执行各种通过手工执行非常复杂和麻烦的mysql和系统任务,这些任务包括: 检查master和slave数据的一致性 有效地对记录进行归档 查找重复的索...2015-11-24Linux安装Pytorch1.8GPU(CUDA11.1)的实现
这篇文章主要介绍了Linux安装Pytorch1.8GPU(CUDA11.1)的实现,文中通过示例代码介绍的非常详细,对大家的学习或者工作具有一定的参考学习价值,需要的朋友们下面随着小编来一起学习学习吧...2021-03-25- 这篇文章主要介绍了vscode安装git及项目开发过程,本文通过图文并茂的形式给大家介绍的非常详细,对大家的学习或工作具有一定的参考借鉴价值,需要的朋友可以参考下...2021-05-19
- 这篇文章主要为大家详细介绍了Visual Studio 2015下载和安装图文教程,具有一定的参考价值,感兴趣的小伙伴们可以参考一下...2021-09-22
- 现在我们介绍一种在Node下检查简单错误的JS代码验证工具JSHint。 JSHint的具体介绍参考http://www.jshint.com/about/,说直白点儿,JSHint就是一个检查JS代码规范与否的工具,它可以用来检查任何(包括server端和client端...2014-05-31
Centos中彻底删除Mysql(rpm、yum安装的情况)
我用的centos6,mysql让我整出了各种问题,我想重装一个全新的mysql,yum remove mysql-server mysql之后再install并不能得到一个干净的mysql,原来的/etc/my.cnf依然没变,datadir里面的数据已没有任何变化,手动删除/etc/my.cn...2015-03-15- 这篇文章主要介绍了c# socket网络编程,server端接收,client端发送数据,大家参考使用吧...2020-06-25
- PHP是一种解释型的语言,对于用户而言,我们精心的控制内存意味着easier prototyping和更少的崩溃!当我们深入到内核之后,所有的安全防线都已经被越过,最终还是要依赖于真正有责任心的软件工程师来保证系统的稳定运行。1、线...2015-11-08
Ubuntu20.04安装cuda10.1的步骤(图文教程)
这篇文章主要介绍了Ubuntu20.04安装cuda10.1的步骤(图文教程),文中通过示例代码介绍的非常详细,对大家的学习或者工作具有一定的参考学习价值,需要的朋友们下面随着小编来一起学习学习吧...2020-07-30- 这篇文章主要介绍了在PyCharm中安装PaddlePaddle的方法,本文给大家介绍的非常想详细,对大家的学习或工作具有一定的参考借鉴价值,需要的朋友可以参考下...2021-02-05
- 这篇文章主要介绍了JS WebSocket断开原因和心跳机制,对websocket感兴趣的同学,可以参考下...2021-05-08
- 这篇文章主要介绍了C#实现Socket通信的解决方法,需要的朋友可以参考下...2020-06-25
- 本篇文章主要介绍了C# Socket异步通信,小编觉得挺不错的,现在分享给大家,也给大家做个参考。一起跟随小编过来看看吧...2020-06-25
Postman安装与使用详细教程 附postman离线安装包
这篇文章主要介绍了Postman安装与使用详细教程 附postman离线安装包,本文给大家介绍的非常详细,对大家的学习或工作具有一定的参考借鉴价值,需要的朋友可以参考下...2021-03-05- 这篇文章主要介绍了linux服务器快速卸载安装node环境(简单上手),文中通过示例代码介绍的非常详细,对大家的学习或者工作具有一定的参考学习价值,需要的朋友们下面随着小编来一起学习学习吧...2021-02-22