PHP缩略图生成和图片水印制作的方法
1.开始
在网站上传图片过程,经常用到缩略图功能。这里我自己写了一个图片处理的Image类,能生成缩略图,并且可以添加水印图。
2.如何生成缩略图
生成缩略图,关键的是如何计算缩放比率。
这里,我根据图片等比缩放,宽高的几种常见变化,得出一个算缩放比率算法是,使用新图(即缩略图)的宽高,分别除以原图的宽高,看哪个值大,就取它作为缩放比率:
缩放比率 = Max( { 新图高度 / 原图高度 , 新图宽度 / 原图宽度 } )
也就是:
If ( (新图高度 / 原图高度) > (新图宽度 / 原图宽度 ) ) {
缩放比率 = 新图高度 / 原图高度;
}ELSE {
缩放比率 = 新图宽度 / 原图宽度;
}
这里列出场景的图片缩放场景,及处理方法:
e.g
场景1,原图比新图大的情况, 缩放比率 = 新图宽度 / 原图宽度 :

场景2,原图比新图大的情况,b. 缩放比率 = 新图高度 / 原图高度 :
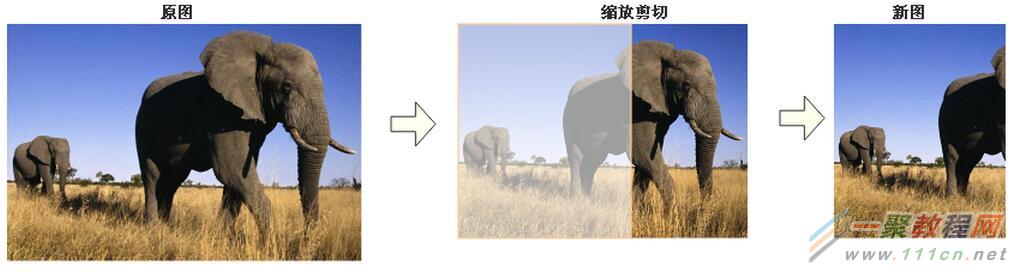
场景3,原图比新图大的情况,而且新图宽高相等,即新图形状是正方形,那么上面的缩放算法也是适用的。
场景4,如果 “新图宽度 >= 原图宽度” ,同时 “新图高度 >= 原图高度”,那么不缩放图片,也不放大图片,保持原图。

场景5,如果 “新图宽度 < 原图宽度”,同时 “新图高度 >= 原图高度” ,那么先设置 “新图高度= 原图高度”,再剪切。

场景6,如果 “新图高度 < 原图高度”,同时 “新图宽度 >= 原图宽度” ,那么先设置 “新图宽度= 原图宽度”,再剪切。
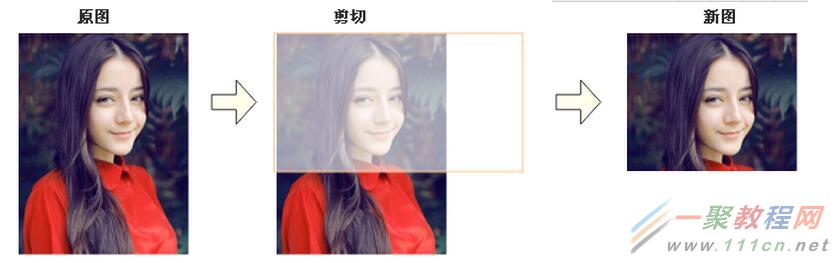
3.如何添加水印图片
添加水印很容易,我这里没考虑那么复杂,主要是控制水印位置在图片的右下角,和控制水印在图片中的大小。如,当目标图片与水印图大小接近,那么需要先等比缩放水印图片,再添加水印图片。

左边两幅图,上面是原图,下面是水印图,右边的缩放后加水印的新图。
4.类图

5.PHP代码
5.1. 构造函数 __construct()
在Image类中,除了构造函数__construct()是public,其它函数都为private.也就是在函数__construct()中,直接完成了生成缩略图和添加水印图的功能。如果,只生成缩略图而不需要添加水印,那么直接在__construct()的参数$markPath,设置为null即可。
其中,“$this->quality = $quality ? $quality : 75;” 控制输出为JPG图片时,控制图片质量(0-100),默认值为75;
|
/**
* Image constructor.
* @param string $imagePath 图片路径
* @param string $markPath 水印图片路径
* @param int $new_width 缩略图宽度
* @param int $new_height 缩略图高度
* @param int $quality JPG图片格输出质量
*/
publicfunction__construct(string$imagePath,
string$markPath= null,
int$new_width= null,
int$new_height= null,
int$quality= 75)
{
$this->imgPath =$_SERVER['DOCUMENT_ROOT'] .$imagePath;
$this->waterMarkPath =$markPath;
$this->newWidth =$new_width?$new_width:$this->width;
$this->newHeight =$new_height?$new_height:$this->height;
$this->quality =$quality?$quality: 75;
list($this->width,$this->height,$this->type) =getimagesize($this->imgPath);
$this->img =$this->_loadImg($this->imgPath,$this->type);
//生成缩略图
$this->_thumb();
//添加水印图片
if(!empty($this->waterMarkPath))$this->_addWaterMark();
//输出图片
$this->_outputImg();
}
|
Note: 先生成缩略图,再在新图上添加水印 图片。
5.2. 生成缩略图函数_thumb()
|
/**
* 缩略图(按等比例,根据设置的宽度和高度进行裁剪)
*/
privatefunction_thumb()
{
//如果原图本身小于缩略图,按原图长高
if($this->newWidth >$this->width)$this->newWidth =$this->width;
if($this->newHeight >$this->height)$this->newHeight =$this->height;
//背景图长高
$gd_width=$this->newWidth;
$gd_height=$this->newHeight;
//如果缩略图宽高,其中有一边等于原图的宽高,就直接裁剪
if($gd_width==$this->width ||$gd_height==$this->height) {
$this->newWidth =$this->width;
$this->newHeight =$this->height;
}else{
//计算缩放比率
$per= 1;
if(($this->newHeight /$this->height) > ($this->newWidth /$this->width)) {
$per=$this->newHeight /$this->height;
}else{
$per=$this->newWidth /$this->width;
}
if($per< 1) {
$this->newWidth =$this->width *$per;
$this->newHeight =$this->height *$per;
}
}
$this->newImg =$this->_CreateImg($gd_width,$gd_height,$this->type);
imagecopyresampled($this->newImg,$this->img, 0, 0, 0, 0,$this->newWidth,$this->newHeight,$this->width,$this->height);
}
|
生成缩略图函数_thumb() ,是按照前面的分析来进行编码。
5.3. 添加水印图片函数 _addWaterMark()
|
/**
* 添加水印
*/
privatefunction_addWaterMark()
{
$ratio= 1 / 5;//水印缩放比率
$Width= imagesx($this->newImg);
$Height= imagesy($this->newImg);
$n_width=$Width*$ratio;
$n_height=$Width*$ratio;
list($markWidth,$markHeight,$markType) =getimagesize($this->waterMarkPath);
if($n_width>$markWidth)$n_width=$markWidth;
if($n_height>$markHeight)$n_height=$markHeight;
$Img=$this->_loadImg($this->waterMarkPath,$markType);
$Img=$this->_thumb1($Img,$markWidth,$markHeight,$markType,$n_width,$n_height);
$markWidth= imagesx($Img);
$markHeight= imagesy($Img);
imagecopyresampled($this->newImg,$Img,$Width-$markWidth- 10,$Height-$markHeight- 10, 0, 0,$markWidth,$markHeight,$markWidth,$markHeight);
imagedestroy($Img);
}
|
在添加水印图片中,用到一个_thumb1()函数来缩放水印图片:
|
/**
* 缩略图(按等比例)
* @param resource $img 图像流
* @param int $width
* @param int $height
* @param int $type
* @param int $new_width
* @param int $new_height
* @return resource
*/
privatefunction_thumb1($img,$width,$height,$type,$new_width,$new_height)
{
if($width<$height) {
$new_width= ($new_height/$height) *$width;
}else{
$new_height= ($new_width/$width) *$height;
}
$newImg=$this->_CreateImg($new_width,$new_height,$type);
imagecopyresampled($newImg,$img, 0, 0, 0, 0,$new_width,$new_height,$width,$height);
return$newImg;
}
|
5.4. 完整代码:
|
<?php
/**
* 图片处理,生成缩略图和添加水印图片
* Created by PhpStorm.
* User: andy
* Date: 17-1-3
* Time: 上午11:55
*/
classImage
{
//原图
private$imgPath;//图片地址
private$width; //图片宽度
private$height;//图片高度
private$type; //图片类型
private$img; //图片(图像流)
//缩略图
private$newImg;//缩略图(图像流)
private$newWidth;
private$newHeight;
//水印图路径
private$waterMarkPath;
//输出图像质量,jpg有效
private$quality;
/**
* Image constructor.
* @param string $imagePath 图片路径
* @param string $markPath 水印图片路径
* @param int $new_width 缩略图宽度
* @param int $new_height 缩略图高度
* @param int $quality JPG图片格输出质量
*/
publicfunction__construct(string$imagePath,
string$markPath= null,
int$new_width= null,
int$new_height= null,
int$quality= 75)
{
$this->imgPath =$_SERVER['DOCUMENT_ROOT'] .$imagePath;
$this->waterMarkPath =$markPath;
$this->newWidth =$new_width?$new_width:$this->width;
$this->newHeight =$new_height?$new_height:$this->height;
$this->quality =$quality?$quality: 75;
list($this->width,$this->height,$this->type) =getimagesize($this->imgPath);
$this->img =$this->_loadImg($this->imgPath,$this->type);
//生成缩略图
$this->_thumb();
//添加水印图片
if(!empty($this->waterMarkPath))$this->_addWaterMark();
//输出图片
$this->_outputImg();
}
/**
*图片输出
*/
privatefunction_outputImg()
{
switch($this->type) {
case1:// GIF
imagegif($this->newImg,$this->imgPath);
break;
case2:// JPG
if(intval($this->quality) < 0 ||intval($this->quality) > 100)$this->quality = 75;
imagejpeg($this->newImg,$this->imgPath,$this->quality);
break;
case3:// PNG
imagepng($this->newImg,$this->imgPath);
break;
}
imagedestroy($this->newImg);
imagedestroy($this->img);
}
/**
* 添加水印
*/
privatefunction_addWaterMark()
{
$ratio= 1 / 5;//水印缩放比率
$Width= imagesx($this->newImg);
$Height= imagesy($this->newImg);
$n_width=$Width*$ratio;
$n_height=$Width*$ratio;
list($markWidth,$markHeight,$markType) =getimagesize($this->waterMarkPath);
if($n_width>$markWidth)$n_width=$markWidth;
if($n_height>$markHeight)$n_height=$markHeight;
$Img=$this->_loadImg($this->waterMarkPath,$markType);
$Img=$this->_thumb1($Img,$markWidth,$markHeight,$markType,$n_width,$n_height);
$markWidth= imagesx($Img);
$markHeight= imagesy($Img);
imagecopyresampled($this->newImg,$Img,$Width-$markWidth- 10,$Height-$markHeight- 10, 0, 0,$markWidth,$markHeight,$markWidth,$markHeight);
imagedestroy($Img);
}
/**
* 缩略图(按等比例,根据设置的宽度和高度进行裁剪)
*/
privatefunction_thumb()
{
//如果原图本身小于缩略图,按原图长高
if($this->newWidth >$this->width)$this->newWidth =$this->width;
if($this->newHeight >$this->height)$this->newHeight =$this->height;
//背景图长高
$gd_width=$this->newWidth;
$gd_height=$this->newHeight;
//如果缩略图宽高,其中有一边等于原图的宽高,就直接裁剪
if($gd_width==$this->width ||$gd_height==$this->height) {
$this->newWidth =$this->width;
$this->newHeight =$this->height;
}else{
//计算缩放比率
$per= 1;
if(($this->newHeight /$this->height) > ($this->newWidth /$this->width)) {
$per=$this->newHeight /$this->height;
}else{
$per=$this->newWidth /$this->width;
}
if($per< 1) {
$this->newWidth =$this->width *$per;
$this->newHeight =$this->height *$per;
}
}
$this->newImg =$this->_CreateImg($gd_width,$gd_height,$this->type);
imagecopyresampled($this->newImg,$this->img, 0, 0, 0, 0,$this->newWidth,$this->newHeight,$this->width,$this->height);
}
/**
* 缩略图(按等比例)
* @param resource $img 图像流
* @param int $width
* @param int $height
* @param int $type
* @param int $new_width
* @param int $new_height
* @return resource
*/
privatefunction_thumb1($img,$width,$height,$type,$new_width,$new_height)
{
if($width<$height) {
$new_width= ($new_height/$height) *$width;
}else{
$new_height= ($new_width/$width) *$height;
}
$newImg=$this->_CreateImg($new_width,$new_height,$type);
imagecopyresampled($newImg,$img, 0, 0, 0, 0,$new_width,$new_height,$width,$height);
return$newImg;
}
/**
* 加载图片
* @param string $imgPath
* @param int $type
* @return resource
*/
privatefunction_loadImg($imgPath,$type)
{
switch($type) {
case1:// GIF
$img= imagecreatefromgif($imgPath);
break;
case2:// JPG
$img= imagecreatefromjpeg($imgPath);
break;
case3:// PNG
$img= imagecreatefrompng($imgPath);
break;
default://其他类型
Tool::alertBack('不支持当前图片类型.'.$type);
break;
}
return$img;
}
/**
* 创建一个背景图像
* @param int $width
* @param int $height
* @param int $type
* @return resource
*/
privatefunction_CreateImg($width,$height,$type)
{
$img= imagecreatetruecolor($width,$height);
switch($type) {
case3://png
imagecolortransparent($img, 0);//设置背景为透明的
imagealphablending($img, false);
imagesavealpha($img, true);
break;
case4://gif
imagecolortransparent($img, 0);
break;
}
return$img;
}
}
|
6.调用
调用非常简单,在引入类后,直接new 并输入对应参数即可:
e.g.
new Image($_path, MARK, 400, 200, 100);
7.小结
这个Image 类能够生成缩略图,不出现黑边,添加水印图,能根据图片的大小缩放水印图。当然有个缺点,就是不能缩放GIF的动画,因为涉及到帧的处理,比较麻烦。
本篇文章主要介绍了Python守护进程和脚本单例运行,小编觉得挺不错的,现在分享给大家,也给大家做个参考。一起跟随小编过来看看吧
一、简介
守护进程最重要的特性是后台运行;它必须与其运行前的环境隔离开来,这些环境包括未关闭的文件描述符、控制终端、会话和进程组、工作目录以及文件创建掩码等;它可以在系统启动时从启动脚本/etc/rc.d中启动,可以由inetd守护进程启动,也可以有作业规划进程crond启动,还可以由用户终端(通常是shell)执行。
Python有时需要保证只运行一个脚本实例,以避免数据的冲突。
二、Python守护进程
1、函数实现
| 代码如下 | 复制代码 |
|
#!/usr/bin/env python
#coding: utf-8
importsys, os
'''将当前进程fork为一个守护进程
注意:如果你的守护进程是由inetd启动的,不要这样做!inetd完成了
所有需要做的事情,包括重定向标准文件描述符,需要做的事情只有chdir()和umask()了
'''
defdaemonize (stdin='/dev/null', stdout='/dev/null', stderr='/dev/null'):
#重定向标准文件描述符(默认情况下定向到/dev/null)
try:
pid=os.fork()
#父进程(会话组头领进程)退出,这意味着一个非会话组头领进程永远不能重新获得控制终端。
ifpid >0:
sys.exit(0) #父进程退出
exceptOSError, e:
sys.stderr.write ("fork #1 failed: (%d) %s\n"%(e.errno, e.strerror) )
sys.exit(1)
#从母体环境脱离
os.chdir("/")#chdir确认进程不保持任何目录于使用状态,否则不能umount一个文件系统。也可以改变到对于守护程序运行重要的文件所在目录
os.umask(0) #调用umask(0)以便拥有对于写的任何东西的完全控制,因为有时不知道继承了什么样的umask。
os.setsid() #setsid调用成功后,进程成为新的会话组长和新的进程组长,并与原来的登录会话和进程组脱离。
#执行第二次fork
try:
pid=os.fork()
ifpid >0:
sys.exit(0) #第二个父进程退出
exceptOSError, e:
sys.stderr.write ("fork #2 failed: (%d) %s\n"%(e.errno, e.strerror) )
sys.exit(1)
#进程已经是守护进程了,重定向标准文件描述符
forfinsys.stdout, sys.stderr: f.flush()
si=open(stdin,'r')
so=open(stdout,'a+')
se=open(stderr,'a+',0)
os.dup2(si.fileno(), sys.stdin.fileno()) #dup2函数原子化关闭和复制文件描述符
os.dup2(so.fileno(), sys.stdout.fileno())
os.dup2(se.fileno(), sys.stderr.fileno())
#示例函数:每秒打印一个数字和时间戳
defmain():
importtime
sys.stdout.write('Daemon started with pid %d\n'%os.getpid())
sys.stdout.write('Daemon stdout output\n')
sys.stderr.write('Daemon stderr output\n')
c=0
whileTrue:
sys.stdout.write('%d: %s\n'%(c, time.ctime()))
sys.stdout.flush()
c=c+1
time.sleep(1)
if__name__=="__main__":
daemonize('/dev/null','/tmp/daemon_stdout.log','/tmp/daemon_error.log')
main()
| |
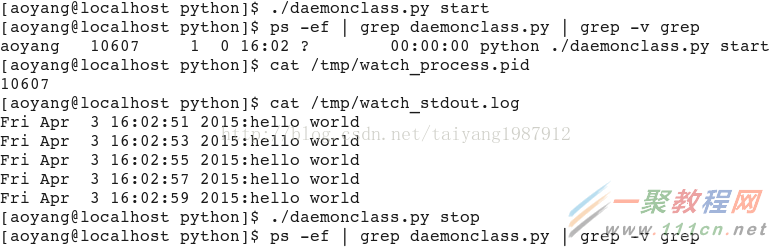
可以通过命令ps -ef | grep daemon.py查看后台运行的继承,在/tmp/daemon_error.log会记录错误运行日志,在/tmp/daemon_stdout.log会记录标准输出日志。

2、类实现
| 代码如下 | 复制代码 |
|
#!/usr/bin/env python
#coding: utf-8
#python模拟linux的守护进程
importsys, os, time, atexit, string
fromsignalimportSIGTERM
classDaemon:
def__init__(self, pidfile, stdin='/dev/null', stdout='/dev/null', stderr='/dev/null'):
#需要获取调试信息,改为stdin='/dev/stdin', stdout='/dev/stdout', stderr='/dev/stderr',以root身份运行。
self.stdin=stdin
self.stdout=stdout
self.stderr=stderr
self.pidfile=pidfile
def_daemonize(self):
try:
pid=os.fork() #第一次fork,生成子进程,脱离父进程
ifpid >0:
sys.exit(0) #退出主进程
exceptOSError, e:
sys.stderr.write('fork #1 failed: %d (%s)\n'%(e.errno, e.strerror))
sys.exit(1)
os.chdir("/") #修改工作目录
os.setsid() #设置新的会话连接
os.umask(0) #重新设置文件创建权限
try:
pid=os.fork()#第二次fork,禁止进程打开终端
ifpid >0:
sys.exit(0)
exceptOSError, e:
sys.stderr.write('fork #2 failed: %d (%s)\n'%(e.errno, e.strerror))
sys.exit(1)
#重定向文件描述符
sys.stdout.flush()
sys.stderr.flush()
si=file(self.stdin,'r')
so=file(self.stdout,'a+')
se=file(self.stderr,'a+',0)
os.dup2(si.fileno(), sys.stdin.fileno())
os.dup2(so.fileno(), sys.stdout.fileno())
os.dup2(se.fileno(), sys.stderr.fileno())
#注册退出函数,根据文件pid判断是否存在进程
atexit.register(self.delpid)
pid=str(os.getpid())
file(self.pidfile,'w+').write('%s\n'%pid)
defdelpid(self):
os.remove(self.pidfile)
defstart(self):
#检查pid文件是否存在以探测是否存在进程
try:
pf=file(self.pidfile,'r')
pid=int(pf.read().strip())
pf.close()
exceptIOError:
pid=None
ifpid:
message='pidfile %s already exist. Daemon already running!\n'
sys.stderr.write(message%self.pidfile)
sys.exit(1)
#启动监控
self._daemonize()
self._run()
defstop(self):
#从pid文件中获取pid
try:
pf=file(self.pidfile,'r')
pid=int(pf.read().strip())
pf.close()
exceptIOError:
pid=None
ifnotpid: #重启不报错
message='pidfile %s does not exist. Daemon not running!\n'
sys.stderr.write(message%self.pidfile)
return
#杀进程
try:
while1:
os.kill(pid, SIGTERM)
time.sleep(0.1)
#os.system('hadoop-daemon.sh stop datanode')
#os.system('hadoop-daemon.sh stop tasktracker')
#os.remove(self.pidfile)
exceptOSError, err:
err=str(err)
iferr.find('No such process') >0:
ifos.path.exists(self.pidfile):
os.remove(self.pidfile)
else:
printstr(err)
sys.exit(1)
defrestart(self):
self.stop()
self.start()
def_run(self):
""" run your fun"""
whileTrue:
#fp=open('/tmp/result','a+')
#fp.write('Hello World\n')
sys.stdout.write('%s:hello world\n'%(time.ctime(),))
sys.stdout.flush()
time.sleep(2)
if__name__=='__main__':
daemon=Daemon('/tmp/watch_process.pid', stdout='/tmp/watch_stdout.log')
iflen(sys.argv)==2:
if'start'==sys.argv[1]:
daemon.start()
elif'stop'==sys.argv[1]:
daemon.stop()
elif'restart'==sys.argv[1]:
daemon.restart()
else:
print'unknown command'
sys.exit(2)
sys.exit(0)
else:
print'usage: %s start|stop|restart'%sys.argv[0]
sys.exit(2)
| |
运行结果:
它是当Daemon设计成一个模板,在其他文件中from daemon import Daemon,然后定义子类,重写run()方法实现自己的功能。
| 代码如下 | 复制代码 |
|
classMyDaemon(Daemon):
defrun(self):
whileTrue:
fp=open('/tmp/run.log','a+')
fp.write('Hello World\n')
time.sleep(1)
| |
不足:信号处理signal.signal(signal.SIGTERM, cleanup_handler)暂时没有安装,注册程序退出时的回调函数delpid()没有被调用。
然后,再写个shell命令,加入开机启动服务,每隔2秒检测守护进程是否启动,若没有启动则启动,自动监控恢复程序。
| 代码如下 | 复制代码 |
|
#/bin/sh
whiletrue
do
count=`ps-ef |grep"daemonclass.py"|grep-v"grep"`
if["$?"!="0"];then
daemonclass.py start
fi
sleep2
done
| |
三、python保证只能运行一个脚本实例
1、打开文件本身加锁
| 代码如下 | 复制代码 |
|
#!/usr/bin/env python
#coding: utf-8
importfcntl, sys, time, os
pidfile=0
defApplicationInstance():
globalpidfile
pidfile=open(os.path.realpath(__file__),"r")
try:
fcntl.flock(pidfile, fcntl.LOCK_EX | fcntl.LOCK_NB)#创建一个排他锁,并且所被锁住其他进程不会阻塞
except:
print"another instance is running..."
sys.exit(1)
if__name__=="__main__":
ApplicationInstance()
whileTrue:
print'running...'
time.sleep(1)
| |
注意:open()参数不能使用w,否则会覆盖本身文件;pidfile必须声明为全局变量,否则局部变量生命周期结束,文件描述符会因引用计数为0被系统回收(若整个函数写在主函数中,则不需要定义成global)。

2、打开自定义文件并加锁
| 代码如下 | 复制代码 |
|
#!/usr/bin/env python
#coding: utf-8
importfcntl, sys, time
pidfile=0
defApplicationInstance():
globalpidfile
pidfile=open("instance.pid","w")
try:
fcntl.lockf(pidfile, fcntl.LOCK_EX | fcntl.LOCK_NB)#创建一个排他锁,并且所被锁住其他进程不会阻塞
exceptIOError:
print"another instance is running..."
sys.exit(0)
if__name__=="__main__":
ApplicationInstance()
whileTrue:
print'running...'
time.sleep(1)
| |
3、检测文件中PID
| 代码如下 | 复制代码 |
|
#!/usr/bin/env python
#coding: utf-8
importtime, os, sys
importsignal
pidfile='/tmp/process.pid'
defsig_handler(sig, frame):
ifos.path.exists(pidfile):
os.remove(pidfile)
sys.exit(0)
defApplicationInstance():
signal.signal(signal.SIGTERM, sig_handler)
signal.signal(signal.SIGINT, sig_handler)
signal.signal(signal.SIGQUIT, sig_handler)
try:
pf=file(pidfile,'r')
pid=int(pf.read().strip())
pf.close()
exceptIOError:
pid=None
ifpid:
sys.stdout.write('instance is running...\n')
sys.exit(0)
file(pidfile,'w+').write('%s\n'%os.getpid())
if__name__=="__main__":
ApplicationInstance()
whileTrue:
print'running...'
time.sleep(1)
| |


4、检测特定文件夹或文件
| 代码如下 | 复制代码 |
|
#!/usr/bin/env python
#coding: utf-8
importtime, commands, signal, sys
defsig_handler(sig, frame):
ifos.path.exists("/tmp/test"):
os.rmdir("/tmp/test")
sys.exit(0)
defApplicationInstance():
signal.signal(signal.SIGTERM, sig_handler)
signal.signal(signal.SIGINT, sig_handler)
signal.signal(signal.SIGQUIT, sig_handler)
ifcommands.getstatusoutput("mkdir /tmp/test")[0]:
print"instance is running..."
sys.exit(0)
if__name__=="__main__":
ApplicationInstance()
whileTrue:
print'running...'
time.sleep(1)
| |
也可以检测某一个特定的文件,判断文件是否存在:
| 代码如下 | 复制代码 |
|
importos
importos.path
importtime
#class used to handle one application instance mechanism
classApplicationInstance:
#specify the file used to save the application instance pid
def__init__(self, pid_file ):
self.pid_file=pid_file
self.check()
self.startApplication()
#check if the current application is already running
defcheck(self):
#check if the pidfile exists
ifnotos.path.isfile(self.pid_file ):
return
#read the pid from the file
pid=0
try:
file=open(self.pid_file,'rt')
data=file.read()
file.close()
pid=int( data )
except:
pass
#check if the process with specified by pid exists
if0==pid:
return
try:
os.kill( pid,0) #this will raise an exception if the pid is not valid
except:
return
#exit the application
print"The application is already running..."
exit(0)#exit raise an exception so don't put it in a try/except block
#called when the single instance starts to save it's pid
defstartApplication(self):
file=open(self.pid_file,'wt')
file.write(str( os.getpid() ) )
file.close()
#called when the single instance exit ( remove pid file )
defexitApplication(self):
try:
os.remove(self.pid_file )
except:
pass
if__name__=='__main__':
#create application instance
appInstance=ApplicationInstance('/tmp/myapp.pid')
#do something here
print"Start MyApp"
time.sleep(5) #sleep 5 seconds
print"End MyApp"
#remove pid file
appInstance.exitApplication()
| |
上述os.kill( pid, 0 )用于检测一个为pid的进程是否还活着,若该pid的进程已经停止则抛出异常,若正在运行则不发送kill信号。
5、socket监听一个特定端口
| 代码如下 | 复制代码 |
|
#!/usr/bin/env python
#coding: utf-8
importsocket, time, sys
defApplicationInstance():
try:
globals
s=socket.socket()
host=socket.gethostname()
s.bind((host,60123))
except:
print"instance is running..."
sys.exit(0)
if__name__=="__main__":
ApplicationInstance()
whileTrue:
print'running...'
time.sleep(1)
| |
可以将该函数使用装饰器实现,便于重用(效果与上述相同):
| 代码如下 | 复制代码 |
|
#!/usr/bin/env python
#coding: utf-8
importsocket, time, sys
importfunctools
#使用装饰器实现
defApplicationInstance(func):
@functools.wraps(func)
deffun(*args,**kwargs):
importsocket
try:
globals
s=socket.socket()
host=socket.gethostname()
s.bind((host,60123))
except:
print('already has an instance...')
returnNone
returnfunc(*args,**kwargs)
returnfun
@ApplicationInstance
defmain():
whileTrue:
print'running...'
time.sleep(1)
if__name__=="__main__":
main()
| |
四、总结
(1)守护进程和单脚本运行在实际应用中比较重要,方法也比较多,可选择合适的来进行修改,可以将它们做成一个单独的类或模板,然后子类化实现自定义。
(2)daemon监控进程自动恢复避免了nohup和&的使用,并配合shell脚本可以省去很多不定时启动挂掉服务器的麻烦。
这篇文章介绍了golang调用php7详解及实例教程,有兴趣的同学可以参考一下执行php文件
|
func Test_exec(t *testing.T) {
engine.Initialize()
ctx := &engine.Context{
Output: os.Stdout,
}
err := engine.RequestStartup(ctx)
iferr != nil {
fmt.Println(err)
}
defer engine.RequestShutdown(ctx)
err = ctx.Exec("/tmp/index.php")
iferr != nil {
fmt.Println(err)
}
}
|
其中 /tmp/index.php 的内容为
|
<?php
echo("hello\n");
|
Eval,返回值
|
func Test_eval(t *testing.T) {
engine.Initialize()
ctx := &engine.Context{}
err := engine.RequestStartup(ctx)
iferr != nil {
fmt.Println(err)
}
defer engine.RequestShutdown(ctx)
val, err := ctx.Eval("return 'hello';")
iferr != nil {
fmt.Println(err)
}
defer engine.DestroyValue(val)
ifengine.ToString(val) !="hello"{
t.FailNow()
}
}
|
返回的value的生命周期所有权是golang程序,所以我们要负责DestroyValue
设置全局变量来传参
|
func Test_argument(t *testing.T) {
engine.Initialize()
ctx := &engine.Context{}
err := engine.RequestStartup(ctx)
iferr != nil {
fmt.Println(err)
}
defer engine.RequestShutdown(ctx)
err = ctx.Bind("greeting","hello")
iferr != nil {
fmt.Println(err)
}
val, err := ctx.Eval("return $greeting;")
iferr != nil {
fmt.Println(err)
}
defer engine.DestroyValue(val)
ifengine.ToString(val) !="hello"{
t.FailNow()
}
}
|
传递进去的参数的生命周期是php控制的,在request shutdown的时候内存会被释放。
PHP 回调 Golang
|
type greetingProvider struct {
greeting string
}
func (provider *greetingProvider) GetGreeting() string {
returnprovider.greeting
}
func newGreetingProvider(args []interface{})interface{} {
return&greetingProvider{
greeting: args[0].(string),
}
}
func Test_callback(t *testing.T) {
engine.Initialize()
ctx := &engine.Context{}
err := engine.RequestStartup(ctx)
iferr != nil {
fmt.Println(err)
}
defer engine.RequestShutdown(ctx)
err = engine.Define("GreetingProvider", newGreetingProvider)
iferr != nil {
fmt.Println(err)
}
val, err := ctx.Eval(`
$greetingProvider=newGreetingProvider('hello');
return$greetingProvider->GetGreeting();`)
iferr != nil {
fmt.Println(err)
}
defer engine.DestroyValue(val)
ifengine.ToString(val) !="hello"{
t.FailNow()
}
}
|
PHP 错误日志
|
func Test_log(t *testing.T) {
engine.PHP_INI_PATH_OVERRIDE ="/tmp/php.ini"
engine.Initialize()
ctx := &engine.Context{
Log: os.Stderr,
}
err := engine.RequestStartup(ctx)
iferr != nil {
fmt.Println(err)
}
defer engine.RequestShutdown(ctx)
_, err = ctx.Eval("error_log('hello', 4); trigger_error('sent from golang', E_USER_ERROR);")
iferr != nil {
fmt.Println(err)
}
}
|
其中 /tmp/php.ini 的内容为
|
error_reporting= E_ALL
error_log="/tmp/php-error.log"
|
错误会被输出到 /tmp/php-error.log。直接调用error_log会同时再输出一份到stderr
HTTP 输入输出
|
func Test_http(t *testing.T) {
engine.Initialize()
recorder := httptest.NewRecorder()
ctx := &engine.Context{
Request: httptest.NewRequest("GET","/hello", nil),
ResponseWriter: recorder,
}
err := engine.RequestStartup(ctx)
iferr != nil {
fmt.Println(err)
}
defer engine.RequestShutdown(ctx)
_, err = ctx.Eval("echo($_SERVER['REQUEST_URI']);")
iferr != nil {
fmt.Println(err)
}
body, err := ioutil.ReadAll(recorder.Result().Body)
iferr != nil {
fmt.Println(err)
}
ifstring(body) !="/hello"{
t.FailNow()
}
}
|
所有的PHP超级全局变量都会被初始化为传递进去的Request的值,包括
|
$_SERVER
$_GET
$_POST
$_FILE
$_COOKIE
$_ENV
|
echo的内容,http code和http header会被写回到传入的ResponseWriter
fastcgi_finish_request
PHP-FPM 很常用的一个功能是 fastcgi_finish_request ,用于在php里做一些异步完成的事情。这个特殊的全局函数必须支持
|
func Test_fastcgi_finish_reqeust(t *testing.T) {
engine.Initialize()
buffer := &bytes.Buffer{}
ctx := &engine.Context{
Output: buffer,
}
err := engine.RequestStartup(ctx)
iferr != nil {
fmt.Println(err)
}
defer engine.RequestShutdown(ctx)
ctx.Eval("ob_start(); echo ('hello');")
ifbuffer.String() !=""{
t.FailNow()
}
ctx.Eval("fastcgi_finish_request();")
ifbuffer.String() !="hello"{
t.FailNow()
}
}
|
实际的作用就是把output提前输出到 ResposneWriter 里去,让调用方知道结果。对于当前进程的执行其实是没有影响的,只是影响了output。
这篇文章介绍了WAF的正确bypass,有需要的同学可以参考一下前言 半年前的我,手握各种WAF的bypass,半年之后的我。就把思路分享出来了。别问我什么!问了我也不会告诉你,我是没事闲的!是不是好多人遇见WAF,就一阵头大呢~今天我就开车啦~大家快上车!
正文 测试环境
php:我使用的是 phpStudy
WAF:各种WAF的官网
测试思路 php的本地环境是用来检测sql语句是否可以执行。
WAF官网用来测试语句是否被拦截。
重点 :
1.HTTP数据包的认识。
2.充分利用数据库的注释功能。
3.有对WAF的构造思路。
测试代码 本地PHP存在注入漏洞的代码:
| 代码如下 | 复制代码 |
|
<?
php$id=$_GET['x'];
$conn= mysql_connect('127.0.0.1','root','Lyy1314...');
mysql_select_db('ceshi',$conn);
$sql="select * from user where id={$id}";
$cun= mysql_query($sql);
echo"< charset=utf-8>";while($row= mysql_fetch_array($cun))
{
echo"url:".$row['URL']."<br>";
echo"password:".$row['password']."<br>";
echo"<hr>";
}
mysql_close($conn);
echo"您当前执行的SQL语句:";
echourldecode($sql);
?>
| |
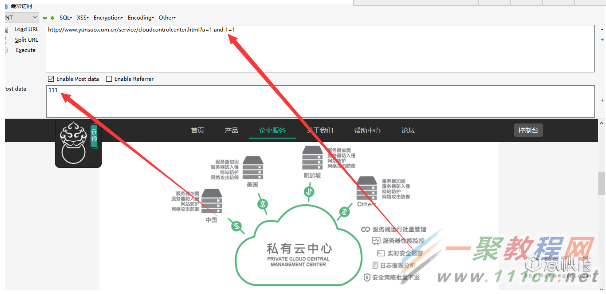
GET型注入测试 - 伪造HTTP数据包 GET型注入相对于POST注入来说,在某些方面是比POST注入bypass更轻松一些的。这是为什么呢?答案是因为POST数据包中也包含了GET包哦~我们可以通过伪造POST数据包的方式进行GET注入。
也就是说,GET的类型最少有三种,甚至更多的数据包类型可以进行注入。
如:POST、PUT、GET。
1.测试普通的GET型注入
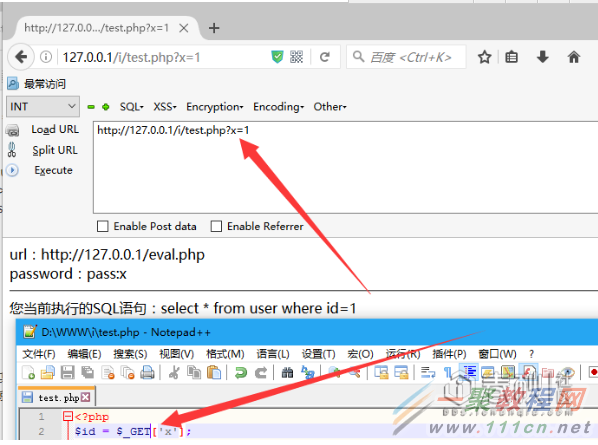
可以发现,上面成功接收到了GET数据包提交的数据。这是理所当然的!
2.测试POST提交的GET型注入

从上面可以看出,POST数据包种,确实包含了GET的数据包。所以,在有些时候进行Bypass测试时,适当的改下数据包类型,也是可以的哦。
在360主机卫士的之前版本中,POST提交只拦截POST的数据,当你利用POST数据包进行GET注入时,它是不会进行拦截的哦~ GET型注入测试绕过云锁 - 伪造HTTP数据包 首先,我们去云锁的官网进行Bypass测试! 我们在云锁官网的URL后面加入 and 1=1 进行测试。
当然,正如所料 100% 被拦截

一般情况,大家都会扭头就走~ 那我们现在来伪造个POST数据包,进行测试把~
正如我们期待的那样,伪造数据包后,WAF就被一棍子打死了~ 有时,即使我们伪造数据包后,仍过不了WAF,不要灰心,因为这个时候WAF的规则绝对比GET包的规则少哦~ GET型注入测试 - 合理构造HTTP数据包 - 思路 在http数据包中每个参数中间都会用&符连接,那么我们可不可以利用这个&符号呢? 下面我们先来进行本地测试!
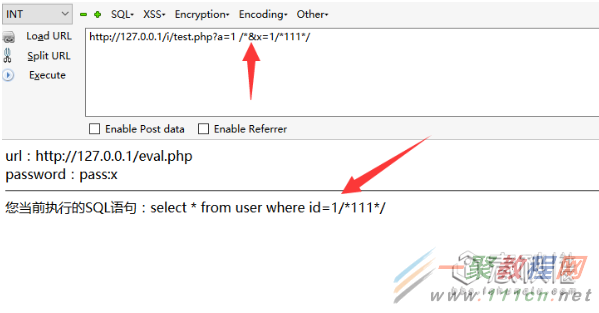
我们发现即使 &符后面的参数被 /* 包含住,这可以被接收到。并没有被注释掉! 那是因为, /* 被HTTP当成了参数a的值,而并不是当成了注释! 有时候,我们可以利用这个方法,加其他的方法来bypass。
后记 挖WAF的bypass时,一定要从多方面入手,编码,协议,语句等,甚至有时都会利用系统的截断!
推荐大家买一本关于 HTTP协议 方面的书籍进行阅读,因为,只有越接近底层,才能越了解它。最后从方方面面进行绕过。
有编程功底的,可以思考一下WAF的编写方式,哪里容易出现漏洞等~比如我们常常用来截断文件的%00,在安全狗中却能截断安全狗对HTTP协议的检测。比如菜刀过狗时,EVAL%00()是不会被杀的!不要只靠别人!思路是你自己的!你学到的知识也是属于你自己的!
相关文章
- 本文介绍两种使用 php 生成二维码的方法。 (1)利用google生成二维码的开放接口,代码如下: /** * google api 二维码生成【QRcode可以存储最多4296个字母数字类型的任意文本,具体可以查看二维码数据格式】 * @param strin...2015-10-21
- 这篇文章主要介绍了Java生成随机姓名、性别和年龄的实现示例,文中通过示例代码介绍的非常详细,对大家的学习或者工作具有一定的参考学习价值,需要的朋友们下面随着小编来一起学习学习吧...2020-10-01
- 这篇文章主要介绍了C#生成随机数功能,涉及C#数学运算与字符串操作相关技巧,具有一定参考借鉴价值,需要的朋友可以参考下...2020-06-25
- 下面小编就为大家带来一篇jQuery为动态生成的select元素添加事件的方法。小编觉得挺不错的,现在就分享给大家,也给大家做个参考。一起跟随小编过来看看吧...2016-09-01
- 经常制作开发不同的网站的后台,写过很多种不同的后台导航写法。 最终积累了这种最写法,算是最好的吧...2013-09-29
- 关于生成唯一数字ID的问题,是不是需要使用rand生成一个随机数,然后去数据库查询是否有这个数呢?感觉这样的话有点费时间,有没有其他方法呢?当然不是,其实有两种方法可以解决。 1. 如果你只用php而不用数据库的话,那时间戳+随...2015-11-24
- js生成随机数主要用到了内置的Math对象的random()方法。用法如:Math.random()。它返回的是一个 0 ~ 1 之间的随机数。有了这么一个方法,那生成任意随机数就好理解了。比如实际中我们可能会有如下的需要: (1)生成一个 0 - 1...2015-10-21
- 这篇文章主要介绍了c#生成高清缩略图的二个示例,需要的朋友可以参考下...2020-06-25
- 验证码是一个现在WEB2.0中常见的一个功能了,像注册、登录又或者是留言页面,都需要注册码来验证当前操作者的合法性,我们会看到有些网站没有验证码,但那是更高级的验证了,...2016-11-25
- 复制代码 代码如下:function getTagStyle(){ $minFontSize=8; //最小字体大小,可根据需要自行更改 $maxFontSize=18; //最大字体大小,可根据需要自行更改 return 'font-size:'.($minFontSize+lcg_value()*(abs($maxFo...2013-10-04
- 解决办法:$str=”QB”.str_pad(($maxid[0]["max(id)"]+1),5,”0″,STR_PAD_LEFT ); 其中$maxid[0]["max(id)"]+1) 是利用max函数从数据库中找也ID最大的一个值, ID为主键,不会重复。 str_pad() 函数把字符串填充为指...2013-10-04
- 下面小编就为大家带来一篇JS生成某个范围的随机数【四种情况详解】。小编觉得挺不错的,现在分享给大家,也给大家做个参考,一起跟随小编过来看看吧...2016-04-22
- 这篇文章主要介绍了C#生成Word文档代码示例,本文直接给出代码实例,需要的朋友可以参考下...2020-06-25
- 本文主要介绍了Vue组件文档生成工具库的方法,文中通过示例代码介绍的非常详细,具有一定的参考价值,感兴趣的小伙伴们可以参考一下...2021-08-11
- 这篇文章主要介绍了PHP简单实现生成txt文件到指定目录的方法,简单对比分析了PHP中fwrite及file_put_contents等函数的使用方法,需要的朋友可以参考下...2016-04-28
- 这款批量生成缩略图代码可以生成指定大小的小图哦,并且支持文件批量上传。 这款教程会用到php文件 view.php config.php funs.php index.php 功能: -------...2016-11-25
- 这篇文章主要介绍了C#实现为一张大尺寸图片创建缩略图的方法,涉及C#创建缩略图的相关图片操作技巧,需要的朋友可以参考下...2020-06-25
- 这篇文章主要介绍了史上最简洁C# 生成条形码图片思路及示例分享,需要的朋友可以参考下...2020-06-25
- if( isset($_FILES['upImg']) ) { if( $userGroup[$loginArr['group']]['upload'] == 0 ) { echo '{"error":"您所在的用户组无权上传图片!"}'; } else...2016-11-25
- $doc = new domdocument('1.0'); // we want a nice output $doc->formatoutput = true; 代码如下 复制代码 $root = $doc->createelement('bo...2016-11-25