php性能分析之php-fpm的慢执行日志slow log
众所周知,mysql有slow query log,根据慢查询日志,我们可以知道那些sql语句有性能问题。作为mysql的好搭档,php也有这样的功能。如果你使用php-fpm来管理php的话,你可以通过如下选项开启。
PHP 5.3.3 之前设置如下:
<value name=”request_slowlog_timeout”>5s</value>
<value name=”slowlog”>logs/php-fpm-slowlog.log</value>
PHP 5.3.3 之后设置以下如下:
request_slowlog_timeout = 5s
slowlog = /usr/local/php/log/php-fpm-slowlog.log
说明:
request_slowlog_timeout是脚本超过多长时间 就可以记录到日志文件
slowlog 是日志文件的路径
开启后,如果有脚本执行超过指定的时间,就会在指定的日志文件中写入类似如下的信息:
[19-Dec-2013 16:54:49] [pool www] pid 18575
script_filename = /home/admin/web/htdocs/sandbox_canglong/test/tt.php
[0x0000000003a00dc8] curl_exec() /home/admin/web/htdocs/sandbox_canglong/test/tt.php:2
[0x0000000003a00cd0] exfilter_curl_get() /home/admin/web/htdocs/sandbox_canglong/test/tt.php:6
日志说明:
script_filename 是入口文件
curl_exec() : 说明是执行这个方法的时候超过执行时间的。
exfilter_curl_get() :说明调用curl_exec()的方法是exfilter_curl_get() 。
每行冒号后面的数字是行号。
开启后,在错误日志文件中也有相关记录。如下:
[19-Dec-2013 15:55:37] WARNING: [pool www] child 18575, script ‘/home/admin/web/htdocs/sandbox_canglong/test/tt.php’ (request: “GET /test/tt.php”) executing too slow (1.006222 sec), logging
[19-Dec-2013 15:55:37] NOTICE: child 18575 stopped for tracing
[19-Dec-2013 15:55:37] NOTICE: about to trace 18575
[19-Dec-2013 15:55:37] NOTICE: finished trace of 18575
基本设置
创建一个简单的Doctrine实体类:
// src/Acme/DemoBundle/Entity/Document.php
namespace Acme\DemoBundle\Entity;

use Doctrine\ORM\Mapping as ORM;
use Symfony\Component\Validator\Constraints as Assert;

/**
 * @ORM\Entity
 */
class Document
{
    /**
     * @ORM\Id
     * @ORM\Column(type="integer")
     * @ORM\GeneratedValue(strategy="AUTO")
     */
    public $id;

    /**
     * @ORM\Column(type="string", length=255)
     * @Assert\NotBlank
     */
    public $name;

    /**
     * @ORM\Column(type="string", length=255, nullable=true)
     */
    public $path;

    public function getAbsolutePath()
    {
        return null === $this->path
            ? null
            : $this->getUploadRootDir().'/'.$this->path;
    }

    public function getWebPath()
    {
        return null === $this->path
            ? null
            : $this->getUploadDir().'/'.$this->path;
    }

    protected function getUploadRootDir()
    {
        // the absolute directory path where uploaded
        // documents should be saved
        return __DIR__.'/../../../../web/'.$this->getUploadDir();
    }

    protected function getUploadDir()
    {
        // get rid of the __DIR__ so it doesn't screw up
        // when displaying uploaded doc/image in the view.
        return 'uploads/documents';
    }
}
该document实体有一个名称与文件相关联。这个path属性存储一个文件的相对路径并且在数据库中存储。这个getAbsolutePath()会返回一个绝对路径,getWebPath()会返回一个web路径,用于模板加入上传文件链接。
如果你还没有这样做的话,你应该阅读http://symfony.com/doc/current/reference/forms/types/file.html首先了解基本的上传过程。
如果您使用注释来验证规则(如本例所示),请确保你启用了注释验证(见http://symfony.com/doc/current/book/validation.html#book-validation-configuration)。
在处理一个实际的文件上传时,使用一个“虚拟”的file字段。例如,如果你在controller中直接构建一个form,他可能是这样的:
public function uploadAction()
{
    // ...

    $form = $this->createFormBuilder($document)
        ->add('name')
        ->add('file')
        ->getForm();

    // ...
}
下一步,创建file这个属性到你的Document类中并且添加一些验证规则:
use Symfony\Component\HttpFoundation\File\UploadedFile;

// ...
class Document
{
    /**
     * @Assert\File(maxSize="6000000")
     */
    private $file;

    /**
     * Sets file.
     *
     * @param UploadedFile $file
     */
    public function setFile(UploadedFile $file = null)
    {
        $this->file = $file;
    }

    /**
     * Get file.
     *
     * @return UploadedFile
     */
    public function getFile()
    {
        return $this->file;
    }
}
annotations
Annotations
// src/Acme/DemoBundle/Entity/Document.php
namespace Acme\DemoBundle\Entity;

// ...
use Symfony\Component\Validator\Constraints as Assert;

class Document
{
    /**
     * @Assert\File(maxSize="6000000")
     */
    private $file;

    // ...
}
当你使用File约束,symfony会自动猜测表单字段输入的是一个文件上传。这就是当你创建表单(->add(‘file’))时,为什么没有在表单明确设置为文件上传的原因。
下面的控制器,告诉您如何处理全部过程:
// ...
use Acme\DemoBundle\Entity\Document;
use Sensio\Bundle\FrameworkExtraBundle\Configuration\Template;
use Symfony\Component\HttpFoundation\Request;
// ...

/**
 * @Template()
 */
public function uploadAction(Request $request)
{
    $document = new Document();
    $form = $this->createFormBuilder($document)
        ->add('name')
        ->add('file')
        ->getForm();

    $form->handleRequest($request);

    if ($form->isValid()) {
        $em = $this->getDoctrine()->getManager();

        $em->persist($document);
        $em->flush();

        return $this->redirect($this->generateUrl(...));
    }

    return array('form' => $form->createView());
}
以前的controller当提交name自动的存储Document实体,但是他不会做任何关于文件的事情并且path属性也将是空白。
处理文件上传一个简单的方法就是在entity持久化之前设置相应的path属性。在某一时刻处理文件上传时,要调用Document实体类一个upload()方法给path赋值。
if ($form->isValid()) {
    $em = $this->getDoctrine()->getManager();

    $document->upload();

    $em->persist($document);
    $em->flush();

    return $this->redirect(...);
}
这个upload()方法利用UploadedFile对象,是它提交后返回file字段:
public function upload()
{
    // the file property can be empty if the field is not required
    // 该file属性为空这个属性就不需要了
    if (null === $this->getFile()) {
        return;
    }

    // use the original file name here but you should
    // sanitize it at least to avoid any security issues
    //  这里你应该使用原文件名但是应该至少审核它避免一些安全问题
    // move takes the target directory and then the
    // target filename to move to
    // 将目标文件移动到目标目录
    $this->getFile()->move(
        $this->getUploadRootDir(),
        $this->getFile()->getClientOriginalName()
    );

    // set the path property to the filename where you've saved the file
    // 设置path属性为你保存文件的文件名
    $this->path = $this->getFile()->getClientOriginalName();

    // clean up the file property as you won't need it anymore
    // 清理你不需要的file属性
    $this->file = null;
}
 使用生命周期回调
生命周期回调是一种有限的技术,他有一些缺点。如果你想移除Document::getUploadRootDir()方法里的写死的编码__DIR__,最好的方法是开始使用Doctrine listeners。在哪里你将能够注入内核参数,如kernel.root_dir来建立绝对路径。
这种原理工作,他有一个缺陷:也就是说当entity持久化时会有什么问题呢?答:该文件已经转移到了它的最终位置,实体类下的path属性不能够正确的实体化。
(如果entity有持久化问题或者文件不能够移动,什么事情也没有发生)为了避免这些问题,你应该改变这种实现方式以便数据库操作和自动删除文件:
/**
 * @ORM\Entity
 * @ORM\HasLifecycleCallbacks
 */
class Document
{
}
接下来,利用这些回调函数重构Document类:
use Symfony\Component\HttpFoundation\File\UploadedFile;

/**
 * @ORM\Entity
 * @ORM\HasLifecycleCallbacks
 */
class Document
{
    private $temp;

    /**
     * Sets file.
     *
     * @param UploadedFile $file
     */
    public function setFile(UploadedFile $file = null)
    {
        $this->file = $file;
        // check if we have an old image path
        // 检查如果我们有一个旧的图片路径
        if (isset($this->path)) {
            // store the old name to delete after the update
            $this->temp = $this->path;
            $this->path = null;
        } else {
            $this->path = 'initial';
        }
    }

    /**
     * @ORM\PrePersist()
     * @ORM\PreUpdate()
     */
    public function preUpload()
    {
        if (null !== $this->getFile()) {
            // do whatever you want to generate a unique name
            // 去生成一个唯一的名称
            $filename = sha1(uniqid(mt_rand(), true));
            $this->path = $filename.'.'.$this->getFile()->guessExtension();
        }
    }

    /**
     * @ORM\PostPersist()
     * @ORM\PostUpdate()
     */
    public function upload()
    {
        if (null === $this->getFile()) {
            return;
        }

        // if there is an error when moving the file, an exception will
        // be automatically thrown by move(). This will properly prevent
        // the entity from being persisted to the database on error
        //当移动文件发生错误,一个异常move()会自动抛出异常。
        //这将阻止实体持久化数据库发生错误。
        $this->getFile()->move($this->getUploadRootDir(), $this->path);

        // check if we have an old image
        if (isset($this->temp)) {
            // delete the old image
            unlink($this->getUploadRootDir().'/'.$this->temp);
            // clear the temp image path
            $this->temp = null;
        }
        $this->file = null;
    }

    /**
     * @ORM\PostRemove()
     */
    public function removeUpload()
    {
        $file = $this->getAbsolutePath();
        if ($file) {
            unlink($file);
        }
    }
}
如果更改你的entity是由Doctrine event listener 或event subscriber处理,这个 preUpdate()回调函数必须通知Doctrine关于正在做的改变。有关preUpdate事件限制的完整参考请查看 http://docs.doctrine-project.org/projects/doctrine-orm/en/latest/reference/events.html#preupdate
现在这个类做了你需要的一切:他会在entity持久化之前生成一个唯一的文件名,持久化之后,移动文件,删除文件。
现在移动文件是entity自动完成,这个$document->upload()就应该从controller中移除了:
if ($form->isValid()) {
    $em = $this->getDoctrine()->getManager();

    $em->persist($document);
    $em->flush();

    return $this->redirect(...);
}
这个@ORM\PrePersist()和@ORM\PostPersist()事件回调:一个是在entity持久化到数据库之前触发,一个是在entity持久化到数据库之后触发。另一方面, @ORM\PreUpdate() 和 @ORM\PostUpdate()事件回调时当实体更新时触发。
当改变entity字段后进行持久化操作时,PreUpdate和PostUpdate回调才会被触发。这意味着,默认情况下,你只改变了$file属性,这些事件不会被触发,因为这个属性它自己不会持久化到Doctrine。有一个解决方法,就是创建一个updated字段把它持久化到Doctrine,并当文件改变时手动调整它。
使用ID作为文件名
如果要使用ID作为文件名,实现略有不同,您需要保存path属性为文件扩展名,而不是实际的文件名:
use Symfony\Component\HttpFoundation\File\UploadedFile;

/**
 * @ORM\Entity
 * @ORM\HasLifecycleCallbacks
 */
class Document
{
    private $temp;

    /**
     * Sets file.
     *
     * @param UploadedFile $file
     */
    public function setFile(UploadedFile $file = null)
    {
        $this->file = $file;
        // check if we have an old image path
        if (is_file($this->getAbsolutePath())) {
            // store the old name to delete after the update
            $this->temp = $this->getAbsolutePath();
        } else {
            $this->path = 'initial';
        }
    }

    /**
     * @ORM\PrePersist()
     * @ORM\PreUpdate()
     */
    public function preUpload()
    {
        if (null !== $this->getFile()) {
            $this->path = $this->getFile()->guessExtension();
        }
    }

    /**
     * @ORM\PostPersist()
     * @ORM\PostUpdate()
     */
    public function upload()
    {
        if (null === $this->getFile()) {
            return;
        }

        // check if we have an old image
        if (isset($this->temp)) {
            // delete the old image
            unlink($this->temp);
            // clear the temp image path
            $this->temp = null;
        }

        // you must throw an exception here if the file cannot be moved
        // so that the entity is not persisted to the database
        // which the UploadedFile move() method does
        $this->getFile()->move(
            $this->getUploadRootDir(),
            $this->id.'.'.$this->getFile()->guessExtension()
        );

        $this->setFile(null);
    }

    /**
     * @ORM\PreRemove()
     */
    public function storeFilenameForRemove()
    {
        $this->temp = $this->getAbsolutePath();
    }

    /**
     * @ORM\PostRemove()
     */
    public function removeUpload()
    {
        if (isset($this->temp)) {
            unlink($this->temp);
        }
    }

    public function getAbsolutePath()
    {
        return null === $this->path
            ? null
            : $this->getUploadRootDir().'/'.$this->id.'.'.$this->path;
    }
}
你会注意到,在这种情况下,你需要做一点工作,以删除该文件。在数据删除之前,你必须保存文件路径(因为它依赖于ID)。然后,一旦对象已经完全从数据库中删除,你就可以安全的删除文件(在数据删除之后)。
SplFixedArray主要是处理数组相关的主要功能,与普通php array不同的是,它是固定长度的,且以数字为键名的数组,优势就是比普通的数组处理更快。
看看我本机的Benchmark测试:
ini_set('memory_limit','12800M');
for($size = 10000; $size < 10000000; $size *= 4) {
echo PHP_EOL . "Testing size: $size" . PHP_EOL;
for($s = microtime(true), $container = Array(), $i = 0; $i < $size; $i++) $container[$i] = NULL;
echo "Array(): " . (microtime(true) - $s) . PHP_EOL;
for($s = microtime(true), $container = new SplFixedArray($size), $i = 0; $i < $size; $i++) $container[$i] = NULL;
echo "SplArray(): " . (microtime(true) - $s) . PHP_EOL;
}
结果如下:
Testing size: 10000
Array(): 0.004000186920166
SplArray(): 0.0019998550415039
Testing size: 40000
Array(): 0.017001152038574
SplArray(): 0.0090007781982422
Testing size: 160000
Array(): 0.050002098083496
SplArray(): 0.046003103256226
Testing size: 640000
Array(): 0.19701099395752
SplArray(): 0.16700983047485
Testing size: 2560000
Array(): 0.75704312324524
SplArray(): 0.67303895950317
通常情况下SplFixedArray要比php array快上20%~30%,所以如果你是处理巨大数量的固定长度数组,还是强烈建议使用。
SplFixedArray类摘要如下:
SplFixedArray implements Iterator , ArrayAccess , Countable {
/* 方法 */
public __construct ([ int $size = 0 ] )
public int count ( void )
public mixed current ( void )
public static SplFixedArray fromArray ( array $array [, bool $save_indexes = true ] )
public int getSize ( void )
public int key ( void )
public void next ( void )
public bool offsetExists ( int $index )
public mixed offsetGet ( int $index )
public void offsetSet ( int $index , mixed $newval )
public void offsetUnset ( int $index )
public void rewind ( void )
public int setSize ( int $size )
public array toArray ( void )
public bool valid ( void )
public void __wakeup ( void )
}
使用SplFixedArray:
$arr = new SplFixedArray(4);
$arr[0] = 'php';
$arr[1] = 1;
$arr[3] = 'python';
//遍历, $arr[2] 为null
foreach($arr as $v) {
echo $v . PHP_EOL;
}
//获取数组长度
echo $arr->getSize(); //4
//增加数组长度
$arr->setSize(5);
$arr[4] = 'new one';
//捕获异常
try{
echo $arr[10];
} catch (RuntimeException $e) {
echo $e->getMessage();
}
SplFixedArray和Array的性能测试
PHP文档专门说明:
The SplFixedArray class provides the main functionalities of array. The main differences between a SplFixedArray and a normal PHP array is that the SplFixedArray is of fixed length and allows only integers within the range as indexes. The advantage is that it allows a faster array implementation.
所以在处理大型的、以数字为索引的数组时,应该用SplFixedArray来代替普通Array。
下面是测试代码:
<?php
function pr() {
$params = func_get_args();
$env = php_sapi_name();
if ("cli" == $env) {
foreach ($params as $key => $value) {
echo $value;
}
} else {
foreach ($params as $key => $value) {
echo "<pre>";
print_r($value);
echo "</pre>";
}
}
} // 用来打印输出结果
<?php
require dirname(__FILE__)."/function.php";
for ($size=1000; $size<=50000000; $size*=2) {
pr(PHP_EOL . "Testing size: $size" . PHP_EOL);
for($s = microtime(true), $container = Array(), $i = 0; $i < $size; $i++) {
$container[$i] = NULL;
}
pr( "Array(): " . (microtime(true) - $s) . PHP_EOL);
for($s = microtime(true), $container = new SplFixedArray($size), $i = 0; $i < $size; $i++) {
$container[$i] = NULL;
}
pr("SplArray(): " . (microtime(true) - $s) . PHP_EOL);
}
但是在我的测试机器上,这段代码出现了非常诡异的结果:
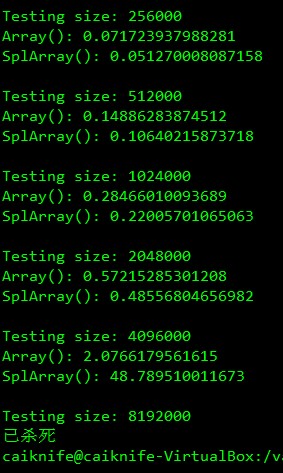
暂时想不出来是什么原因:难道是因为虚拟机内存太小,导致最后的SplFixedArray插入时需要不断GC才导致时间太长?
在PHP中,P默认的会话处理器是session.save_handler = files(即文件)。如果同一个客户端同时并发发送多个请求(如ajax在页面同时发送多个请求),且脚本执行时间较长,就会导致session文件阻塞,影响性能。因为对于每个请求,PHP执行session_start(),就会取得文件独占锁,只有在该请求处理结束后,才会释放独占锁。这样,同时多个请求就会引起阻塞。解决方案如下:
(1)修改会话变量后,立即使用session_write_close()来保存会话数据并释放文件锁。
session_start();

$_SESSION['test'] = 'test';
session_write_close();

//do something
(2)利用session_set_save_handler()函数是实现自定义会话处理。
function open($savePath, $sessionName)
{
    echo 'open is called';
    return true;
}

function close()
{
    echo 'close is called';
    return true;
}

function read($sessionId)
{
    echo 'read is called';
    return '';
}

function write($sessionId, $data)
{
    echo 'write is called';
    return true;
}

function destroy($sessionId)
{
    echo 'destroy is called';
    return true;
}

function gc($lifetime)
{
    echo 'gc is called';
    return true;
}

session_set_save_handler("open", "close", "read", "write", "destroy", "gc");
register_shutdown_function ( 'session_write_close' );

session_start();

$_SESSION['foo'] = "bar";
当然,在 php 5.4.0之后,你可以通过实现 SessionHandlerInterface 接口或继承 SessionHandler 类来使用。
class MySessionHandler extends SessionHandler  {

    public function __construct()
    {
    }

    public function open($save_path, $session_id)
    {
    }

    public function close()
    {

    }

    public function create_sid()
    {
    }

    public function read($id)
    {
    }

    public function write($id, $data)
    {
    }

    public function destroy($id)
    {
    }
}

$handler = new MySessionHandler();
//第2个参数将函数 session_write_close() 注册为 register_shutdown_function() 函数。
session_set_save_handler($handler, true);
你可以对上面的代码进行具体实现和封装,利用mysql或其它内存数据库来管理会话数据。还能解决使用集群时,session数据共享问题。
对于这个php自带的隐患,相信官方过一段时间会有很好的解决办法。
下面我们来看看两种php跨域提交form的方法
一,通过php curl
function curlPost($url,$params)
{
$postData = '';
foreach($params as $k => $v)
{
$postData .= $k . '='.$v.'&';
}
rtrim($postData, '&');
$ch = curl_init();
curl_setopt($ch,CURLOPT_URL,$url);
curl_setopt($ch,CURLOPT_RETURNTRANSFER,true);
curl_setopt($ch,CURLOPT_HEADER, false);
curl_setopt($ch, CURLOPT_POST, count($postData));
curl_setopt($ch, CURLOPT_POSTFIELDS, $postData);
$output=curl_exec($ch);
curl_close($ch);
return $output;
}
echo curlPost("http://test.com",array('name'=>"tank"));
以前很多人用curl来抓,邮箱的通讯录,不过现在已经不可以了。哈哈。
二,利用jquery form,ajax提交
1,下载jquery.form.js
2,js代码
$('#testform').submit(function() {
$(this).ajaxSubmit({
type: 'post', // 提交方式 get/post
dataType:"json",//数据类型
url: 'your url', // 需要提交的 url
success: function(data) { // data 保存提交后返回的数据,一般为 json 数据
// 此处可对 data 作相关处理
alert('提交成功!');
}
$(this).resetForm(); // 提交后重置表单
});
return false; // 阻止表单自动提交事件
});
3,php代码
header("Access-Control-Allow-Origin:*"); //跨域权限设置,允许所有
header("Access-Control-Allow-Origin:http://www.test.com"); //只允许test.com跨域提交数据
相关文章
Laravel 调试工具 laravel-debugbar 打印日志消息
laravel-debugbar 调试工具的教程小编整理了几篇不错的教程,今天我们来看一篇Laravel 调试工具 laravel-debugbar 打印日志消息例子,希望文章对各位有帮助。 其实不...2016-11-25- PHP-FPM我们相信各位用高版本的php经常使用到了,下面整理了一些关于PHP-FPM的笔记,有兴趣的可进来看看。 今天赶上了123System OPenVZ VPS全场半价的机会,购入了一...2016-11-25
php-fpm 启动报please specify user and group other than root, pool ‘default’
本文章来给大家介绍关于php-fpm 启动报please specify user and group other than root, pool ‘default’的解决办法。 安装PHP ,配置fpm 成功后启动发现报错: St...2016-11-25- 这篇文章主要介绍了Powershell 查询 Windows 日志的方法,需要的朋友可以参考下...2020-06-30
- MySQL日志主要包含:错误日志、查询日志、慢查询日志、事务日志、二进制日志;日志是mysql数据库的重要组成部分。日志文件中记录着mysql数据库运行期间发生的变化;也就是说用来记录mysql数据库的客户端连接状况、SQL语句...2015-11-24
- 20岁老牌网页程序语言PHP,最快将在10月底释出PHP 7新版,这是十年来的首次大改版,最大特色是在性能上的大突破,能比前一版PHP 5快上一倍,PHP之父Rasmus Lerdorf表示,甚至能比HHVM虚拟机下的PHP程序性能更快。HHVM 是脸书为自...2015-11-24
利用 Chrome Dev Tools 进行页面性能分析的步骤说明(前端性能优化)
这篇文章主要介绍了利用 Chrome Dev Tools 进行页面性能分析的步骤说明(前端性能优化),本文给大家介绍的非常想详细,对大家的学习或工作具有一定的参考借鉴价值,需要的朋友可以参考下...2021-02-24- 这篇文章主要介绍了JavaScript提高网站性能优化的建议(二)的相关资料,需要的朋友可以参考下...2016-07-29
- 这篇文章主要介绍了C#实现线程安全的简易日志记录方法,比较实用的功能,需要的朋友可以参考下...2020-06-25
- 这篇文章主要介绍了提升jQuery的性能需要做好的七件事,希望真的帮助大家提升jQuery性能,需要的朋友可以参考下...2016-01-14
- 这篇文章主要介绍了c# 用Dictionary实现日志数据批量插入的步骤,帮助大家更好的理解和使用c#中的Dictionary类,感兴趣的朋友可以了解下...2021-02-01
C#3.0使用EventLog类写Windows事件日志的方法
这篇文章主要介绍了C#3.0使用EventLog类写Windows事件日志的方法,以简单实例形式分析了C#写windows事件日志的技巧,具有一定参考借鉴价值,需要的朋友可以参考下...2020-06-25- 这篇文章主要介绍了Java SSM框架如何添加写日志功能,文中通过示例代码介绍的非常详细,对大家的学习或者工作具有一定的参考学习价值,需要的朋友可以参考下...2020-09-25
- 下面小编就为大家分享一篇c#快速写本地日志方法,具有很好的参考价值,希望对大家有所帮助。一起跟随小编过来看看吧...2020-06-25
- 这篇文章主要给大家介绍了关于sql server日志处理不当造成的隐患的相关资料,文中通过示例代码介绍的非常详细,对大家学习或者使用sql server具有一定的参考学习价值,需要的朋友们下面来一起学习学习吧...2020-07-11
- php测试性能代码 function microtime_float () { list ($usec, $sec) = explode(" ", microtime()); return ((float) $usec + (float) $sec); } functio...2016-11-25
- 这篇文章主要介绍了Nginx访问日志及错误日志参数说明,文中通过示例代码介绍的非常详细,对大家的学习或者工作具有一定的参考学习价值,需要的朋友可以参考下...2020-11-14
- 这篇文章主要介绍了springboot启动时没有日志的原因分析,具有很好的参考价值,希望对大家有所帮助。如有错误或未考虑完全的地方,望不吝赐教...2021-07-27
- 这篇文章主要介绍了C#写日志类,实现将日志信息写入文本文件的功能,非常具有实用价值,需要的朋友可以参考下...2020-06-25
- 文章介绍了css中空路径对页面性能影响的解决方案,这个可能很多美工朋友不会去注意这一点,下面我们来看看吧。 在写 CSS 的时候,用 background:url(#) 还是会对页面进...2017-07-06