PHP+AJAX实时检查帐号是否被注册代码
数据库部分:
CREATE TABLE `username_list` (

  `id` int(11) NOT NULL auto_increment,

  `username` varchar(60) character set latin1 NOT NULL,

  PRIMARY KEY  (`id`)

) ENGINE=MyISAM  DEFAULT CHARSET=utf8 COLLATE=utf8_unicode_ci AUTO_INCREMENT=1 ;
js代码
<script type="text/javascript">  $(document).ready(function() {      $("#username").keyup(function (e) {                //removes spaces from username          $(this).val($(this).val().replace(/s/g, ''));                    var username = $(this).val();          if(username.length < 4){$("#user-result").html('');return;}                    if(username.length >= 4){              $("#user-result").html('<img src="imgs/ajax-loader.gif" />');              $.post('check_username.php', {'username':username}, function(data) {                $("#user-result").html(data);              });          }      });   });
</script>
XML/HTML Code
<div id="registration-form">    <label for="username">输入帐号:    <input name="username" type="text" id="username" maxlength="15">    <span id="user-result"></span>    </label>    <br>输入的字符大于等于4才会检测
</div>
check_username.php
<?php

include_once("conn.php");


//check we have username post var

if(isset($_POST["username"]))

{

    //check if its ajax request, exit script if its not

    if(!isset($_SERVER['HTTP_X_REQUESTED_WITH']) AND strtolower($_SERVER['HTTP_X_REQUESTED_WITH']) != 'xmlhttprequest') {

        die();

    }


    //trim and lowercase username

    $username =  strtolower(trim($_POST["username"]));


    //sanitize username

    $username = filter_var($username, FILTER_SANITIZE_STRING, FILTER_FLAG_STRIP_LOW|FILTER_FLAG_STRIP_HIGH);


    //check username in db

    $results = mysql_query("SELECT id FROM username_list WHERE username='$username'");


    //return total count

    $username_exist = mysql_num_rows($results); //total records


    //if value is more than 0, username is not available

    if($username_exist) {

        die('<img src="imgs/not-available.png" />');

    }else{

        die('<img src="imgs/available.png" />');

    }


    //close db connection


}

?>
前面有介绍一个完整简单的PHP+AJAX实时检查帐号是否被注册,下文我们再整理一个更浅析简单的例子了,希望这个例子能够对各位有帮助。 带会员注册的网站都是需要会员在注册的时候检查数据库内是否已经存在这个会员了,并且提示给注册的用户,保持会员帐号的唯一性,否则就会乱套,这套代码收藏下来 比较适合大家用。

\
XML/HTML Code
<div class="both">

        <h4> "John" , "eliane" </h4><br clear="all" /><br clear="all" />

        <br clear="all" />

        <div>

            <label>User Name</label>

            <input id="username" name="username" type="text" value="" onblur="return check_username();" />

            <div id="Info"></div>

            <span id="Loading"><img src="loader.gif" alt="" /></span>

        </div>

    </div>
JavaScript Code
<script type="text/javascript">


$(document).ready(function() {

    $('#Loading').hide();

});


function check_username(){


    var username = $("#username").val();

    if(username.length > 2){

        $('#Loading').show();

        $.post("check_username_availablity.php", {

            username: $('#username').val(),

        }, function(response){

            $('#Info').fadeOut();

             $('#Loading').hide();

            setTimeout("finishAjax('Info', '"+escape(response)+"')", 450);

        });

        return false;

    }

}


function finishAjax(id, response){


  $('#'+id).html(unescape(response));

  $('#'+id).fadeIn(1000);

}


</script>
check_username_availablity.php
PHP Code
<?php

include('../../conn.php');

if($_REQUEST)

{

    $username   = $_REQUEST['username'];

    $query = "select * from username_list where username = '".strtolower($username)."'";

    $results = mysql_query( $query) or die('ok');


    if(mysql_num_rows(@$results) > 0) // not available

    {

        echo '<div id="Error">Already Taken</div>';

    }

    else

    {

        echo '<div id="Success">Available</div>';

    }


}?>
图片上传我们介绍过的教程非常的多了,今天我整理的这篇ajax图片上传主要有一个上传之后自动生成小图的功能并且还返回预览效果,下面我们来看看这段代码。
XML/HTML Code
 <div id="upload-wrapper">  <div align="center">    <form action="processupload.php" method="post" enctype="multipart/form-data" id="MyUploadForm">  <input name="ImageFile" id="imageInput" type="file" />  <input type="submit"  id="submit-btn" value="Upload" />  <img src="images/ajax-loader.gif" id="loading-img" style="display:none;" alt="Please Wait"/>  </form>  <div id="output"></div>  </div>
</div>
JavaScript Code
<script type="text/javascript">
$(document).ready(function() {
    var options = {
            target:   '#output',   // target element(s) to be updated with server response
            beforeSubmit:  beforeSubmit,  // pre-submit callback
            success:       afterSuccess,  // post-submit callback
            resetForm: true        // reset the form after successful submit
        };

     $('#MyUploadForm').submit(function() {
            $(this).ajaxSubmit(options);
            // always return false to prevent standard browser submit and page navigation
            return false;
        });
});

function afterSuccess()
{
    $('#submit-btn').show(); //hide submit button
    $('#loading-img').hide(); //hide submit button

}

//function to check file size before uploading.
function beforeSubmit(){
    //check whether browser fully supports all File API
   if (window.File && window.FileReader && window.FileList && window.Blob)
    {

        if( !$('#imageInput').val()) //check empty input filed
        {
            $("#output").html("Are you kidding me?");
            return false
        }

        var fsize = $('#imageInput')[0].files[0].size; //get file size
        var ftype = $('#imageInput')[0].files[0].type; // get file type


        //allow only valid image file types
        switch(ftype)
        {
            case 'image/png': case 'image/gif': case 'image/jpeg': case 'image/pjpeg':
                break;
            default:
                $("#output").html("<b>"+ftype+"</b> Unsupported file type!");
                return false
        }

        //Allowed file size is less than 1 MB (1048576)
        if(fsize>1048576)
        {
            $("#output").html("<b>"+bytesToSize(fsize) +"</b> Too big Image file! <br />Please reduce the size of your photo using an image editor.");
            return false
        }

        $('#submit-btn').hide(); //hide submit button
        $('#loading-img').show(); //hide submit button
        $("#output").html("");
    }
    else
    {
        //Output error to older unsupported browsers that doesn't support HTML5 File API
        $("#output").html("Please upgrade your browser, because your current browser lacks some new features we need!");
        return false;
    }
}

//function to format bites bit.ly/19yoIPO
function bytesToSize(bytes) {
   var sizes = ['Bytes', 'KB', 'MB', 'GB', 'TB'];
   if (bytes == 0) return '0 Bytes';
   var i = parseInt(Math.floor(Math.log(bytes) / Math.log(1024)));
   return Math.round(bytes / Math.pow(1024, i), 2) + ' ' + sizes[i];
}

</script>
processupload.php
PHP Code
<?php
if(isset($_POST))
{
    ############ Edit settings ##############
    $ThumbSquareSize        = 200; //Thumbnail will be 200x200
    $BigImageMaxSize        = 500; //Image Maximum height or width
    $ThumbPrefix            = "thumb_"; //Normal thumb Prefix
    $DestinationDirectory   = '../upload/'; //specify upload directory ends with / (slash)
    $Quality                = 90; //jpeg quality
    ##########################################

    //check if this is an ajax request
    if (!isset($_SERVER['HTTP_X_REQUESTED_WITH'])){
        die();
    }

    // check $_FILES['ImageFile'] not empty
    if(!isset($_FILES['ImageFile']) || !is_uploaded_file($_FILES['ImageFile']['tmp_name']))
    {
            die('Something wrong with uploaded file, something missing!'); // output error when above checks fail.
    }

    // Random number will be added after image name
    $RandomNumber   = rand(0, 9999999999);

    $ImageName      = str_replace(' ','-',strtolower($_FILES['ImageFile']['name'])); //get image name
    $ImageSize      = $_FILES['ImageFile']['size']; // get original image size
    $TempSrc        = $_FILES['ImageFile']['tmp_name']; // Temp name of image file stored in PHP tmp folder
    $ImageType      = $_FILES['ImageFile']['type']; //get file type, returns "image/png", image/jpeg, text/plain etc.

    //Let's check allowed $ImageType, we use PHP SWITCH statement here
    switch(strtolower($ImageType))
    {
        case 'image/png':
            //Create a new image from file
            $CreatedImage =  imagecreatefrompng($_FILES['ImageFile']['tmp_name']);
            break;
        case 'image/gif':
            $CreatedImage =  imagecreatefromgif($_FILES['ImageFile']['tmp_name']);
            break;
        case 'image/jpeg':
        case 'image/pjpeg':
            $CreatedImage = imagecreatefromjpeg($_FILES['ImageFile']['tmp_name']);
            break;
        default:
            die('Unsupported File!'); //output error and exit
    }

    //PHP getimagesize() function returns height/width from image file stored in PHP tmp folder.
    //Get first two values from image, width and height.
    //list assign svalues to $CurWidth,$CurHeight
    list($CurWidth,$CurHeight)=getimagesize($TempSrc);

    //Get file extension from Image name, this will be added after random name
    $ImageExt = substr($ImageName, strrpos($ImageName, '.'));
    $ImageExt = str_replace('.','',$ImageExt);

    //remove extension from filename
    $ImageName      = preg_replace("/\.[^.\s]{3,4}$/", "", $ImageName);

    //Construct a new name with random number and extension.
    $NewImageName = $ImageName.'-'.$RandomNumber.'.'.$ImageExt;

    //set the Destination Image
    $thumb_DestRandImageName    = $DestinationDirectory.$ThumbPrefix.$NewImageName; //Thumbnail name with destination directory
    $DestRandImageName          = $DestinationDirectory.$NewImageName; // Image with destination directory

    //Resize image to Specified Size by calling resizeImage function.
    if(resizeImage($CurWidth,$CurHeight,$BigImageMaxSize,$DestRandImageName,$CreatedImage,$Quality,$ImageType))
    {
        //Create a square Thumbnail right after, this time we are using cropImage() function
        if(!cropImage($CurWidth,$CurHeight,$ThumbSquareSize,$thumb_DestRandImageName,$CreatedImage,$Quality,$ImageType))
            {
                echo 'Error Creating thumbnail';
            }
        /*
        We have succesfully resized and created thumbnail image
        We can now output image to user's browser or store information in the database
        */
        echo '<table width="100%" border="0" cellpadding="4" cellspacing="0">';
        echo '<tr>';
        echo '<td align="center"><img src="../upload/'.$ThumbPrefix.$NewImageName.'" alt="Thumbnail"></td>';
        echo '</tr><tr>';
        echo '<td align="center"><img src="../upload/'.$NewImageName.'" alt="Resized Image"></td>';
        echo '</tr>';
        echo '</table>';

        /*
        // Insert info into database table!
        mysql_query("INSERT INTO myImageTable (ImageName, ThumbName, ImgPath)
        VALUES ($DestRandImageName, $thumb_DestRandImageName, 'uploads/')");
        */

    }else{
        die('Resize Error'); //output error
    }
}


// This function will proportionally resize image
function resizeImage($CurWidth,$CurHeight,$MaxSize,$DestFolder,$SrcImage,$Quality,$ImageType)
{
    //Check Image size is not 0
    if($CurWidth <= 0 || $CurHeight <= 0)
    {
        return false;
    }

    //Construct a proportional size of new image
    $ImageScale         = min($MaxSize/$CurWidth, $MaxSize/$CurHeight);
    $NewWidth           = ceil($ImageScale*$CurWidth);
    $NewHeight          = ceil($ImageScale*$CurHeight);
    $NewCanves          = imagecreatetruecolor($NewWidth, $NewHeight);

    // Resize Image
    if(imagecopyresampled($NewCanves, $SrcImage,0, 0, 0, 0, $NewWidth, $NewHeight, $CurWidth, $CurHeight))
    {
        switch(strtolower($ImageType))
        {
            case 'image/png':
                imagepng($NewCanves,$DestFolder);
                break;
            case 'image/gif':
                imagegif($NewCanves,$DestFolder);
                break;
            case 'image/jpeg':
            case 'image/pjpeg':
                imagejpeg($NewCanves,$DestFolder,$Quality);
                break;
            default:
                return false;
        }
    //Destroy image, frees memory
    if(is_resource($NewCanves)) {imagedestroy($NewCanves);}
    return true;
    }

}

//This function corps image to create exact square images, no matter what its original size!
function cropImage($CurWidth,$CurHeight,$iSize,$DestFolder,$SrcImage,$Quality,$ImageType)
{
    //Check Image size is not 0
    if($CurWidth <= 0 || $CurHeight <= 0)
    {
        return false;
    }

    //abeautifulsite.net has excellent article about "Cropping an Image to Make Square bit.ly/1gTwXW9
    if($CurWidth>$CurHeight)
    {
        $y_offset = 0;
        $x_offset = ($CurWidth - $CurHeight) / 2;
        $square_size    = $CurWidth - ($x_offset * 2);
    }else{
        $x_offset = 0;
        $y_offset = ($CurHeight - $CurWidth) / 2;
        $square_size = $CurHeight - ($y_offset * 2);
    }

    $NewCanves  = imagecreatetruecolor($iSize, $iSize);
    if(imagecopyresampled($NewCanves, $SrcImage,0, 0, $x_offset, $y_offset, $iSize, $iSize, $square_size, $square_size))
    {
        switch(strtolower($ImageType))
        {
            case 'image/png':
                imagepng($NewCanves,$DestFolder);
                break;
            case 'image/gif':
                imagegif($NewCanves,$DestFolder);
                break;
            case 'image/jpeg':
            case 'image/pjpeg':
                imagejpeg($NewCanves,$DestFolder,$Quality);
                break;
            default:
                return false;
        }
    //Destroy image, frees memory
    if(is_resource($NewCanves)) {imagedestroy($NewCanves);}
    return true;

    }

}
以上就是我们要介绍的ajax无刷新图片上传功能了,其实就是通过异步模式提交给php然后由php上传图片并且生成小图返回给指定的id的htm元素模块即可。
递归函数为自调用函数,在函数体内直接或间接自己调用自己,但需要设置自调用的条件,若满足条件,则调用函数本身,若不满足则终止本函数的自调用,然后把目前流程的主控权交回给上一层函数来执行,可能这样给大家讲解,还是很难明白,直接上例子
function test ($n){

echo $n.”  “;

if($n>0){

test($n-1);

}else{

echo “<?>”;

}

echo $n.”  ”

}

test(2)
这个例子最终的输出结果是2 1 0<?>0 1 2
我解释下 为何输出是这样的
第一步,执行test(2),echo 2,然后因为2>0,执行test(1), 后面还有没来得及执行的echo 2
第二步,执行test(1),echo 1,然后因为1>0,执行test(0),同样后面还有没来得及执行的 echo 1
第三步,执行test(0),echo 0,执行test(0),echo 0, 此时0>0的条件不满足,不在执行test()函数,而是echo “<?>”,并且执行后面的 echo 0
此时函数已经不再调用自己,开始将流程的主控权交回给上一层函数来执行,也就是开始执行刚刚所有test()函数没来得及输出的最后一个echo,0的一层是1也就是输出1 1的上一层是2 也就是输出2 2没有山一层 所以呢 输出的内容就是2 1 0<?>0 1 2
如何考虑用PHP递归算法来解决问题
例:求s=1+2+3+4+5+6+……+n本来这个问题我们过去常用循环累加的方法。而这里如要用递归的方法,必须考虑两点:
1) 能否把问题转化成递归形式的描述;
2) 是否有递归结束的边界条件。
显然递归的两个条件都有了:
1) s(n) =s(n-1)+n
2) s(1)=1
所以源程序为:
int progression(int n){

int res;

if (n=1 )res=1 else res=progression(n-1)+n;

return res;

}
中序遍历二叉树
void inorder (BinTree T){

if (T){

inorder(T->lchild);

printf(“%c”,T->data);

inorder(T->rchild);

}

}
Mysql
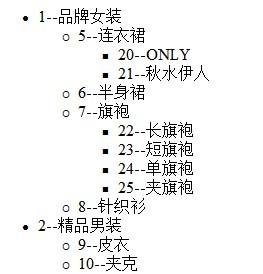
首先我们准备一张数据表class,记录商品分类信息。表中有三个字段,id:分类编号,主键自增长;title:分类名称;pid:所属上级分类id。
class表结构:
CREATE TABLE IF NOT EXISTS `class` (

  `id` mediumint(6) NOT NULL AUTO_INCREMENT,

  `title` varchar(30) NOT NULL,

  `pid` mediumint(6) NOT NULL DEFAULT '0',

  PRIMARY KEY (`id`)

) ENGINE=MyISAM  DEFAULT CHARSET=utf8;
插入数据后,如图:

根据不同的需求,我们提供两种不同格式的自定义函数,一种是返回字符串,一种是返回数组,两种函数都使用了递归方法。先看返回字符串格式的函数:
function get_str($id = 0) {

    global $str;

    $sql = "select id,title from class where pid= $id";

    $result = mysql_query($sql);//查询pid的子类的分类

    if($result && mysql_affected_rows()){//如果有子类

        $str .= '<ul>';

        while ($row = mysql_fetch_array($result)) { //循环记录集

            $str .= "<li>" . $row['id'] . "--" . $row['title'] . "</li>"; //构建字符串

            get_str($row['id']); //调用get_str(),将记录集中的id参数传入函数中,继续查询下级

        }

        $str .= '</ul>';

    }

    return $str;

}
以上函数get_str()通过递归,不断查询下级分类,并最终返回字符串,大家可以根据项目需求修改其中的str,最终生成一个无限分级列表:
include_once('connect.php'); //连接数据库,connect.php文件自己写一个啊

echo get_str(0); //输出无限级分类
效果如:
接着我们来看返回数组格式的函数,一样要使用递归:
function get_array($id=0){

    $sql = "select id,title from class where pid= $id";

    $result = mysql_query($sql);//查询子类

    $arr = array();

    if($result && mysql_affected_rows()){//如果有子类

        while($rows=mysql_fetch_assoc($result)){ //循环记录集

            $rows['list'] = get_array($rows['id']); //调用函数,传入参数,继续查询下级

            $arr[] = $rows; //组合数组

        }

        return $arr;

    }

}
函数get_array()返回了数组,这是我们期待的,所以笔者推荐使用get_array()得到数组,这样一来,我们可以对数组进行任意操作,比如我们可以将数组转换成json格式的数据传给前端页面,前端页面可以通过解析json数据灵活展示分类信息。比如树形结构的分类列表,下拉分类列表等。
include_once('connect.php'); //连接数据库

$list = get_array(0); //调用函数

print_r($list); //输出数组
如果要输出json格式的数据,则可使用:
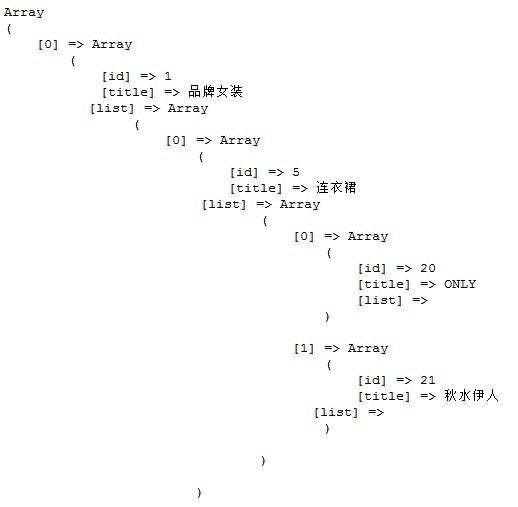
echo json_encode($list);
本文章为各位介绍解决yii webservice 提示:Procedure 'getSent' not present 错误方法,有兴趣的和小编一起看看。
其实根据常用的webservice清除缓存方法,在client端加入这样一句话:
ini_set("soap.wsdl_cache_enabled", "0");应该就可以了,但是处理了好久,在本地测试没问题,放到服务器上就不行,一直提示:Procedure 'getSent' not present
后来查看PHP的配置文件php.ini,找到这样一句话: soap.wsdl_cache_dir="/tmp"
然后进入对应目录,看到有这样子的文件:
wsdl-root-37c8f47f71a35a60f667be40ae619d0b
wsdl开头的文件,都是webservice的缓存文件,删掉这些文件,再试,一切正常了。
相关文章
- 有一种方法,可以不打开网站而直接查看到这个网站的源代码.. 这样可以有效地防止误入恶意网站... 在浏览器地址栏输入: view-source:http://...2016-09-20
- <?php require('path.inc.php'); header('content-Type: text/html; charset=utf-8'); $borough_id = intval($_GET['id']); if(!$borough_id){ echo ' ...2016-11-25
- 本文实例讲述了JS基于Mootools实现的个性菜单效果代码。分享给大家供大家参考,具体如下:这里演示基于Mootools做的带动画的垂直型菜单,是一个初学者写的,用来学习Mootools的使用有帮助,下载时请注意要将外部引用的mootools...2015-10-23
- 本文实例讲述了JS+CSS实现分类动态选择及移动功能效果代码。分享给大家供大家参考,具体如下:这是一个类似选项卡功能的选择插件,与普通的TAb区别是加入了动画效果,多用于商品类网站,用作商品分类功能,不过其它网站也可以用,...2015-10-21
- 本文实例讲述了JS实现自定义简单网页软键盘效果。分享给大家供大家参考,具体如下:这是一款自定义的简单点的网页软键盘,没有使用任何控件,仅是为了练习JavaScript编写水平,安全性方面没有过多考虑,有顾虑的可以不用,目的是学...2015-11-08
- php 取除连续空格与换行代码,这些我们都用到str_replace与正则函数 第一种: $content=str_replace("n","",$content); echo $content; 第二种: $content=preg_replac...2016-11-25
- php简单用户登陆程序代码 这些教程很对初学者来讲是很有用的哦,这款就下面这一点点代码了哦。 <center> <p> </p> <p> </p> <form name="form1...2016-11-25
- 公司一些wordpress网站由于下载的插件存在恶意代码,导致整个服务器所有网站PHP文件都存在恶意代码,就写了个简单的脚本清除。恶意代码示例...2015-10-23
- 本文实例讲述了JS实现双击屏幕滚动效果代码。分享给大家供大家参考,具体如下:这里演示双击滚屏效果代码的实现方法,不知道有觉得有用处的没,现在网上还有很多还在用这个特效的呢,代码分享给大家吧。运行效果截图如下:在线演...2015-10-30
- 其实挺简单的就是if(navigator.userAgent.indexOf('UCBrowser') > -1) {alert("uc浏览器");}else{//不是uc浏览器执行的操作}如果想测试某个浏览器的特征可以通过如下方法获取JS获取浏览器信息 浏览器代码名称:navigator...2015-11-08
- 一、日期减去天数等于第二个日期function cc(dd,dadd){//可以加上错误处理var a = new Date(dd)a = a.valueOf()a = a - dadd * 24 * 60 * 60 * 1000a = new Date(a)alert(a.getFullYear() + "年" + (a.getMonth() +...2015-11-08
- 微信支付,即便交了保证金,你还是处理测试阶段,不能正式发布。必须到你通过程序测试提交订单、发货通知等数据到微信的系统中,才能申请发布。然后,因为在微信中是通过JS方式调用API,必须在微信后台设置支付授权目录,而且要到...2014-05-31
- 本文实例讲述了PHP常用的小程序代码段。分享给大家供大家参考,具体如下:1.计算两个时间的相差几天$startdate=strtotime("2009-12-09");$enddate=strtotime("2009-12-05");上面的php时间日期函数strtotime已经把字符串...2015-11-24
- 小编分享了一段简单的php中文转拼音的实现代码,代码简单易懂,适合初学php的同学参考学习。 代码如下 复制代码 <?phpfunction Pinyin($_String...2017-07-06
- 本文介绍了如何延迟javascript代码的加载,加快网页的访问速度。 当一个网站有很多js代码要加载,js代码放置的位置在一定程度上将会影像网页的加载速度,为了让我们的网页加载速度更快,本文总结了一下几个注意点...2013-10-13
php导出csv格式数据并将数字转换成文本的思路以及代码分享
php导出csv格式数据实现:先定义一个字符串 存储内容,例如 $exportdata = '规则111,规则222,审222,规222,服2222,规则1,规则2,规则3,匹配字符,设置时间,有效期'."/n";然后对需要保存csv的数组进行foreach循环,例如复制代...2014-06-07- ecshop商品无限级分类代码 function cat_options($spec_cat_id, $arr) { static $cat_options = array(); if (isset($cat_options[$spec_cat_id]))...2016-11-25
- 这篇文章主要介绍了vue项目,代码提交至码云,iconfont的用法说明,具有很好的参考价值,希望对大家有所帮助。一起跟随小编过来看看吧...2020-07-30
- 这篇文章主要介绍了IDEA插件之快速删除Java代码中的注释,本文给大家介绍的非常详细,对大家的学习或工作具有一定的参考借鉴价值,需要的朋友可以参考下...2021-02-18
- 这篇文章主要介绍了C#超实用代码段合集,涉及C#针对图标、数学运算、拼音、日期、时间及文件夹等的相关操作技巧,需要的朋友可以参考下...2020-06-25