PHP生成唯一订单号的6种方法
做商城类项目经常需要生成唯一订单号,下面来个汇总!
方法一:
return date('Ymd') . str_pad(mt_rand(1, 99999), 5, '0', STR_PAD_LEFT);方法二: 正在使用。。。
/**

 *

 * uniqid - 官方是这样说的:

 * Gets a prefixed unique identifier based on the current time in microseconds.

 */

function build_order_no()

{

    return date('Ymd').substr(implode(NULL, array_map('ord', str_split(substr(uniqid(), 7, 13), 1))), 0, 8);

}
用uniqid获取一个基于当前的微秒数生成的唯一不重复的字符串(但是他的前7位貌似很久才会发生变动,所以不用考虑可删除),取其第8到13位。但是这个字符串里面有英文字母,咋办?
用ord获取他的ASCII码,所以就有了下一步:用str_split把这个字符串分割为数组,用array_map去操作(速度快点)。
然后返回的还是一个数组,KO,在用implode弄成字符串,但是字符长度不定,取前固定的几位,然后前面加上当前的年份和日期,这个方法生成的订单号,全世界不会有多少重复的。
当然,除非你把服务器时间往前调,但是调也不用怕,哥不相信他会在同一微秒内下两次订单,网络数据传输也要点时间的,即便你是在本地。
方法三:以前使用。。。
public function make_order($user_id)

 {

 return mt_rand(10,99)

 . sprintf('%010d',time() - 946656000)

 . sprintf('%03d', (float) microtime() * 1000)

 . sprintf('%03d', (int) $user_id % 1000);

 }
方法四:
$yCode = array('A', 'B', 'C', 'D', 'E', 'F', 'G', 'H', 'I', 'J');

$orderSn = $yCode[intval(date('Y')) - 2011] . strtoupper(dechex(date('m'))) . date('d') . substr(time(), -5) . substr(microtime(), 2, 5) . sprintf('%02d', rand(0, 99
));
方法五 生成24位唯一订单号码
//生成24位唯一订单号码,格式:YYYY-MMDD-HHII-SS-NNNN,NNNN-CC,其中:YYYY=年份,MM=月份,DD=日期,HH=24格式小时,II=分,SS=秒,NNNNNNNN=随机数,CC=检查码
  @date_default_timezone_set("PRC");
  while(true){
   //订购日期
   $order_date = date('Y-m-d');
   //订单号码主体(YYYYMMDDHHIISSNNNNNNNN)
   $order_id_main = date('YmdHis') . rand(10000000,99999999);
   //订单号码主体长度
   $order_id_len = strlen($order_id_main);
   $order_id_sum = 0;
   for($i=0; $i<$order_id_len; $i++){
    $order_id_sum += (int)(substr($order_id_main,$i,1));
   }
   //唯一订单号码(YYYYMMDDHHIISSNNNNNNNNCC)
   $order_id = $order_id_main . str_pad((100 - $order_id_sum % 100) % 100,2,'0',STR_PAD_LEFT);

   if($result = sqlite_query($db,"SELECT * FROM orders WHERE order_id='$order_id'")){
    if(sqlite_num_rows($result) == 0){
     break;
    }
   }
例子六
/**

* 生成16位纯数字订单号

* 最大支持时间到 2056-12-31 23:59:59

*

* @access public

* @return string

*/

public static function getOrderSN() {

return (date('y') + date('m') + date('d')) . str_pad((time() - strtotime(date('Y-m-d'))), 5, 0, STR_PAD_LEFT) . substr(microtime(), 2, 6) . sprintf('%03d', rand(0, 999));

}
目前在用的,基本保证不重复了,能用到2056年,觉得应该够了,以后有需求再扩展
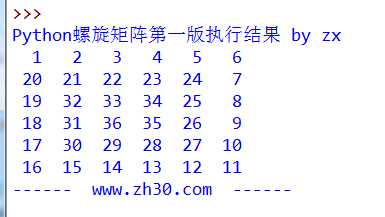
矩阵不管在php或python中它只是一种算法了,我们要做的就是利用我们所学的程序来实现这种算法即可达到我们的需求了,下面来看它们的实现方法。什么是螺旋矩阵? 螺旋矩阵是指一个呈螺旋状的矩阵,它的数字由第一行开始到右边不断变大,向下变大,向左变大,向上变大,如此循环。下图就是一个螺旋矩阵的示例: 郑晓在这里分别使用了Python和PHP来实现了数字的螺旋矩阵。其中的PHP版本写成了函数,更加灵活的对矩阵进行控制。写Python时由于是第一次写,有些生疏,分别用了两种方法来实现。。。下面上代码吧: Python螺旋矩阵的第一版(比较难以理解?!): #coding:gbk L = 6 #矩阵大小 result = [[0]*L for n in range(L)] row =0 #初始行 从左上角开始 col = 0 #初始列 从左上角开始 value = 1#初始值 direction = 'r' #初始方向 向右 circle = 1 #初始圈数 第一圈 while True: #向右走 if direction == 'r': result[row][col] = value if col>=L-circle: direction = 'd' continue col += 1 #向下走 if direction =='d': result[row][col] = value if row >= L-circle: direction = 'l' continue row += 1 #向左走 if direction == 'l': result[row][col] = value if col <= circle -1: direction = 'u' continue col -= 1 #向上走 if direction == 'u': result[row][col] = value if row-1 <= circle: direction = 'r' circle += 1 #continue row -= 1 value += 1 if value > L * L : break for R in result: for c in R: print "%3d" % (c) , print raw_input()
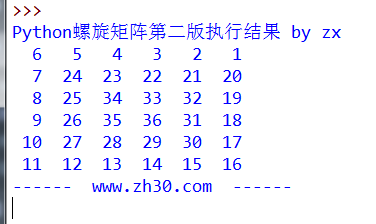
接下来是Python螺旋矩阵的第二版,其中使用了迭代器控制方向,代码量明显减少,而且更容易理解了。多次使用不同的起点生成的矩阵时,你会发现有个地方写的有点儿“问题”,找到问题了没有?
#coding:gbk
import itertools
#参数:矩阵宽(w)、高(h)、起始横坐标、起始纵坐标
def print_matrix(w, h, x = 0, y = 0):
    #方向移动时的操作
    op = [(1,0), (-1,0), (0,-1), (0,1)]
    #迭代器可无限迭代列表 每次要换方向时就next()
    direction = itertools.cycle(op)
    #根据行列生成所有坐标
    result = {(xx,yy):None for xx in range(w) for yy in range(h)}
    result[(x,y)] = 1
    _x, _y = direction.next()
    i = 1
    flag = 0
    while True:
            new_x = x + _x
            new_y = y + _y
            if (new_x, new_y) in result and result[(new_x, new_y)] is None:
                i = i + 1
                result[(new_x, new_y)] = i
                x = new_x
                y = new_y
                flag = 0
            else:
                _x, _y = direction.next()
                flag = flag + 1
            if flag>4: break
    #打印结果
    for y in range(h):
        for x in range(w):
            print "%3d" % (result[(x,y)]),
        print
#调用示例
print_matrix(6,6,5,0)
raw_input()
下面是PHP版的螺旋矩阵,思路和上面的Python是一样的(其实我是照着写的…)。
/* *
 * @param $w : 宽
 * @param $h : 高
 * @param $s : 起始数字
 * @param $x, $y : 起始位置坐标 只能从四顶点开始
 * @param $r :方向 默认顺时间 false为逆时针
 * @author : 郑晓
 * php5.6.11
 * 这是一个螺旋矩阵的PHP版本,由于之前在python下写过,有了一些经验,所以在php中也使用了SPL的一个迭代器,用于换向。算法编写时是使用的过程式,后来又改为了函数,加入了一些自定义参数,方便调用(然并卵)。输出中使用的是制表和换行符,请在浏览器源代码中查看运行结果。
 */
function print_matrix($w, $h, $s=1, $l=1, $x=0, $y=0, $r=true) {
    $R = array(array(1,0), array(0,1), array(-1,0), array(0,-1));
    !$r && $R = array_reverse($R);
    $iterator = new InfiniteIterator(new ArrayIterator($R)); //创建一个无限迭代器
    $iterator->rewind(); //指针指向第一元素
    list($_x, $_y) = $iterator->current();
    $result = [];
    $result[$x][$y] = $s;
    for($i = $s+1; $i < $s+$w * $h; $i++) {
        $new_x = $x + $_x;
        $new_y = $y + $_y;

        if(0<= $new_x && 0<= $new_y && $new_x < $w && $new_y < $h && !isset($result[$new_x][$new_y])) {
            $result[$new_x][$new_y] = $i;
            $x = $new_x;
            $y = $new_y;
        } else {
            $iterator->next();
            list($_x, $_y) = $iterator->current();
            $i--;
        }
    }
    //以下是打印矩阵结构
    for($i=0; $i< $h; $i++) {
        for($j=0; $j< $w; $j++) {
            echo $result[$j][$i], "\t";
        }
        echo "\n";
    }
}
//调用示例测试
print_matrix(5, 5); echo "\n";
print_matrix(7, 4); echo "\n";
print_matrix(5, 5, 1, 4, 0); echo "\n";
print_matrix(5, 5, 10, 0, 4, false); echo "\n";
下面是依次的运行结果:

带会员注册的网站都是需要会员在注册的时候检查数据库内是否已经存在这个会员了,并且提示给注册的用户,保持会员帐号的唯一性,否则就会乱套,这套代码收藏下来 比较适合大家用。

\
XML/HTML Code
<div class="both">

        <h4> "John" , "eliane" </h4><br clear="all" /><br clear="all" />

        <br clear="all" />

        <div>

            <label>User Name</label>

            <input id="username" name="username" type="text" value="" onblur="return check_username();" />

            <div id="Info"></div>

            <span id="Loading"><img src="loader.gif" alt="" /></span>

        </div>

    </div>
JavaScript Code
<script type="text/javascript">


$(document).ready(function() {

    $('#Loading').hide();

});


function check_username(){


    var username = $("#username").val();

    if(username.length > 2){

        $('#Loading').show();

        $.post("check_username_availablity.php", {

            username: $('#username').val(),

        }, function(response){

            $('#Info').fadeOut();

             $('#Loading').hide();

            setTimeout("finishAjax('Info', '"+escape(response)+"')", 450);

        });

        return false;

    }

}


function finishAjax(id, response){


  $('#'+id).html(unescape(response));

  $('#'+id).fadeIn(1000);

}


</script>
check_username_availablity.php
PHP Code
<?php

include('../../conn.php');

if($_REQUEST)

{

    $username   = $_REQUEST['username'];

    $query = "select * from username_list where username = '".strtolower($username)."'";

    $results = mysql_query( $query) or die('ok');


    if(mysql_num_rows(@$results) > 0) // not available

    {

        echo '<div id="Error">Already Taken</div>';

    }

    else

    {

        echo '<div id="Success">Available</div>';

    }


}?>
实时检查帐号是否被注册代码是现在WEB应用中用到非常多的一个功能,这样主要是为用户体验好了,不要等待用户提交数据时再告诉对方说已经被注册了,这样非常的不错了,我们可以在用户输入完之后就验证了,下面来看一个简单的例子。
数据库部分:
CREATE TABLE `username_list` (

  `id` int(11) NOT NULL auto_increment,

  `username` varchar(60) character set latin1 NOT NULL,

  PRIMARY KEY  (`id`)

) ENGINE=MyISAM  DEFAULT CHARSET=utf8 COLLATE=utf8_unicode_ci AUTO_INCREMENT=1 ;
js代码
<script type="text/javascript">  $(document).ready(function() {      $("#username").keyup(function (e) {                //removes spaces from username          $(this).val($(this).val().replace(/s/g, ''));                    var username = $(this).val();          if(username.length < 4){$("#user-result").html('');return;}                    if(username.length >= 4){              $("#user-result").html('<img src="imgs/ajax-loader.gif" />');              $.post('check_username.php', {'username':username}, function(data) {                $("#user-result").html(data);              });          }      });   });
</script>
XML/HTML Code
<div id="registration-form">    <label for="username">输入帐号:    <input name="username" type="text" id="username" maxlength="15">    <span id="user-result"></span>    </label>    <br>输入的字符大于等于4才会检测
</div>
check_username.php
<?php

include_once("conn.php");


//check we have username post var

if(isset($_POST["username"]))

{

    //check if its ajax request, exit script if its not

    if(!isset($_SERVER['HTTP_X_REQUESTED_WITH']) AND strtolower($_SERVER['HTTP_X_REQUESTED_WITH']) != 'xmlhttprequest') {

        die();

    }


    //trim and lowercase username

    $username =  strtolower(trim($_POST["username"]));


    //sanitize username

    $username = filter_var($username, FILTER_SANITIZE_STRING, FILTER_FLAG_STRIP_LOW|FILTER_FLAG_STRIP_HIGH);


    //check username in db

    $results = mysql_query("SELECT id FROM username_list WHERE username='$username'");


    //return total count

    $username_exist = mysql_num_rows($results); //total records


    //if value is more than 0, username is not available

    if($username_exist) {

        die('<img src="imgs/not-available.png" />');

    }else{

        die('<img src="imgs/available.png" />');

    }


    //close db connection


}

?>
图片上传我们介绍过的教程非常的多了,今天我整理的这篇ajax图片上传主要有一个上传之后自动生成小图的功能并且还返回预览效果,下面我们来看看这段代码。
XML/HTML Code
 <div id="upload-wrapper">  <div align="center">    <form action="processupload.php" method="post" enctype="multipart/form-data" id="MyUploadForm">  <input name="ImageFile" id="imageInput" type="file" />  <input type="submit"  id="submit-btn" value="Upload" />  <img src="images/ajax-loader.gif" id="loading-img" style="display:none;" alt="Please Wait"/>  </form>  <div id="output"></div>  </div>
</div>
JavaScript Code
<script type="text/javascript">
$(document).ready(function() {
    var options = {
            target:   '#output',   // target element(s) to be updated with server response
            beforeSubmit:  beforeSubmit,  // pre-submit callback
            success:       afterSuccess,  // post-submit callback
            resetForm: true        // reset the form after successful submit
        };

     $('#MyUploadForm').submit(function() {
            $(this).ajaxSubmit(options);
            // always return false to prevent standard browser submit and page navigation
            return false;
        });
});

function afterSuccess()
{
    $('#submit-btn').show(); //hide submit button
    $('#loading-img').hide(); //hide submit button

}

//function to check file size before uploading.
function beforeSubmit(){
    //check whether browser fully supports all File API
   if (window.File && window.FileReader && window.FileList && window.Blob)
    {

        if( !$('#imageInput').val()) //check empty input filed
        {
            $("#output").html("Are you kidding me?");
            return false
        }

        var fsize = $('#imageInput')[0].files[0].size; //get file size
        var ftype = $('#imageInput')[0].files[0].type; // get file type


        //allow only valid image file types
        switch(ftype)
        {
            case 'image/png': case 'image/gif': case 'image/jpeg': case 'image/pjpeg':
                break;
            default:
                $("#output").html("<b>"+ftype+"</b> Unsupported file type!");
                return false
        }

        //Allowed file size is less than 1 MB (1048576)
        if(fsize>1048576)
        {
            $("#output").html("<b>"+bytesToSize(fsize) +"</b> Too big Image file! <br />Please reduce the size of your photo using an image editor.");
            return false
        }

        $('#submit-btn').hide(); //hide submit button
        $('#loading-img').show(); //hide submit button
        $("#output").html("");
    }
    else
    {
        //Output error to older unsupported browsers that doesn't support HTML5 File API
        $("#output").html("Please upgrade your browser, because your current browser lacks some new features we need!");
        return false;
    }
}

//function to format bites bit.ly/19yoIPO
function bytesToSize(bytes) {
   var sizes = ['Bytes', 'KB', 'MB', 'GB', 'TB'];
   if (bytes == 0) return '0 Bytes';
   var i = parseInt(Math.floor(Math.log(bytes) / Math.log(1024)));
   return Math.round(bytes / Math.pow(1024, i), 2) + ' ' + sizes[i];
}

</script>
processupload.php
PHP Code
<?php
if(isset($_POST))
{
    ############ Edit settings ##############
    $ThumbSquareSize        = 200; //Thumbnail will be 200x200
    $BigImageMaxSize        = 500; //Image Maximum height or width
    $ThumbPrefix            = "thumb_"; //Normal thumb Prefix
    $DestinationDirectory   = '../upload/'; //specify upload directory ends with / (slash)
    $Quality                = 90; //jpeg quality
    ##########################################

    //check if this is an ajax request
    if (!isset($_SERVER['HTTP_X_REQUESTED_WITH'])){
        die();
    }

    // check $_FILES['ImageFile'] not empty
    if(!isset($_FILES['ImageFile']) || !is_uploaded_file($_FILES['ImageFile']['tmp_name']))
    {
            die('Something wrong with uploaded file, something missing!'); // output error when above checks fail.
    }

    // Random number will be added after image name
    $RandomNumber   = rand(0, 9999999999);

    $ImageName      = str_replace(' ','-',strtolower($_FILES['ImageFile']['name'])); //get image name
    $ImageSize      = $_FILES['ImageFile']['size']; // get original image size
    $TempSrc        = $_FILES['ImageFile']['tmp_name']; // Temp name of image file stored in PHP tmp folder
    $ImageType      = $_FILES['ImageFile']['type']; //get file type, returns "image/png", image/jpeg, text/plain etc.

    //Let's check allowed $ImageType, we use PHP SWITCH statement here
    switch(strtolower($ImageType))
    {
        case 'image/png':
            //Create a new image from file
            $CreatedImage =  imagecreatefrompng($_FILES['ImageFile']['tmp_name']);
            break;
        case 'image/gif':
            $CreatedImage =  imagecreatefromgif($_FILES['ImageFile']['tmp_name']);
            break;
        case 'image/jpeg':
        case 'image/pjpeg':
            $CreatedImage = imagecreatefromjpeg($_FILES['ImageFile']['tmp_name']);
            break;
        default:
            die('Unsupported File!'); //output error and exit
    }

    //PHP getimagesize() function returns height/width from image file stored in PHP tmp folder.
    //Get first two values from image, width and height.
    //list assign svalues to $CurWidth,$CurHeight
    list($CurWidth,$CurHeight)=getimagesize($TempSrc);

    //Get file extension from Image name, this will be added after random name
    $ImageExt = substr($ImageName, strrpos($ImageName, '.'));
    $ImageExt = str_replace('.','',$ImageExt);

    //remove extension from filename
    $ImageName      = preg_replace("/\.[^.\s]{3,4}$/", "", $ImageName);

    //Construct a new name with random number and extension.
    $NewImageName = $ImageName.'-'.$RandomNumber.'.'.$ImageExt;

    //set the Destination Image
    $thumb_DestRandImageName    = $DestinationDirectory.$ThumbPrefix.$NewImageName; //Thumbnail name with destination directory
    $DestRandImageName          = $DestinationDirectory.$NewImageName; // Image with destination directory

    //Resize image to Specified Size by calling resizeImage function.
    if(resizeImage($CurWidth,$CurHeight,$BigImageMaxSize,$DestRandImageName,$CreatedImage,$Quality,$ImageType))
    {
        //Create a square Thumbnail right after, this time we are using cropImage() function
        if(!cropImage($CurWidth,$CurHeight,$ThumbSquareSize,$thumb_DestRandImageName,$CreatedImage,$Quality,$ImageType))
            {
                echo 'Error Creating thumbnail';
            }
        /*
        We have succesfully resized and created thumbnail image
        We can now output image to user's browser or store information in the database
        */
        echo '<table width="100%" border="0" cellpadding="4" cellspacing="0">';
        echo '<tr>';
        echo '<td align="center"><img src="../upload/'.$ThumbPrefix.$NewImageName.'" alt="Thumbnail"></td>';
        echo '</tr><tr>';
        echo '<td align="center"><img src="../upload/'.$NewImageName.'" alt="Resized Image"></td>';
        echo '</tr>';
        echo '</table>';

        /*
        // Insert info into database table!
        mysql_query("INSERT INTO myImageTable (ImageName, ThumbName, ImgPath)
        VALUES ($DestRandImageName, $thumb_DestRandImageName, 'uploads/')");
        */

    }else{
        die('Resize Error'); //output error
    }
}


// This function will proportionally resize image
function resizeImage($CurWidth,$CurHeight,$MaxSize,$DestFolder,$SrcImage,$Quality,$ImageType)
{
    //Check Image size is not 0
    if($CurWidth <= 0 || $CurHeight <= 0)
    {
        return false;
    }

    //Construct a proportional size of new image
    $ImageScale         = min($MaxSize/$CurWidth, $MaxSize/$CurHeight);
    $NewWidth           = ceil($ImageScale*$CurWidth);
    $NewHeight          = ceil($ImageScale*$CurHeight);
    $NewCanves          = imagecreatetruecolor($NewWidth, $NewHeight);

    // Resize Image
    if(imagecopyresampled($NewCanves, $SrcImage,0, 0, 0, 0, $NewWidth, $NewHeight, $CurWidth, $CurHeight))
    {
        switch(strtolower($ImageType))
        {
            case 'image/png':
                imagepng($NewCanves,$DestFolder);
                break;
            case 'image/gif':
                imagegif($NewCanves,$DestFolder);
                break;
            case 'image/jpeg':
            case 'image/pjpeg':
                imagejpeg($NewCanves,$DestFolder,$Quality);
                break;
            default:
                return false;
        }
    //Destroy image, frees memory
    if(is_resource($NewCanves)) {imagedestroy($NewCanves);}
    return true;
    }

}

//This function corps image to create exact square images, no matter what its original size!
function cropImage($CurWidth,$CurHeight,$iSize,$DestFolder,$SrcImage,$Quality,$ImageType)
{
    //Check Image size is not 0
    if($CurWidth <= 0 || $CurHeight <= 0)
    {
        return false;
    }

    //abeautifulsite.net has excellent article about "Cropping an Image to Make Square bit.ly/1gTwXW9
    if($CurWidth>$CurHeight)
    {
        $y_offset = 0;
        $x_offset = ($CurWidth - $CurHeight) / 2;
        $square_size    = $CurWidth - ($x_offset * 2);
    }else{
        $x_offset = 0;
        $y_offset = ($CurHeight - $CurWidth) / 2;
        $square_size = $CurHeight - ($y_offset * 2);
    }

    $NewCanves  = imagecreatetruecolor($iSize, $iSize);
    if(imagecopyresampled($NewCanves, $SrcImage,0, 0, $x_offset, $y_offset, $iSize, $iSize, $square_size, $square_size))
    {
        switch(strtolower($ImageType))
        {
            case 'image/png':
                imagepng($NewCanves,$DestFolder);
                break;
            case 'image/gif':
                imagegif($NewCanves,$DestFolder);
                break;
            case 'image/jpeg':
            case 'image/pjpeg':
                imagejpeg($NewCanves,$DestFolder,$Quality);
                break;
            default:
                return false;
        }
    //Destroy image, frees memory
    if(is_resource($NewCanves)) {imagedestroy($NewCanves);}
    return true;

    }

}
以上就是我们要介绍的ajax无刷新图片上传功能了,其实就是通过异步模式提交给php然后由php上传图片并且生成小图返回给指定的id的htm元素模块即可。
相关文章
php 中file_get_contents超时问题的解决方法
file_get_contents超时我知道最多的原因就是你机器访问远程机器过慢,导致php脚本超时了,但也有其它很多原因,下面我来总结file_get_contents超时问题的解决方法总结。...2016-11-25- php如何实现抓取网页图片,相较于手动的粘贴复制,使用小程序要方便快捷多了,喜欢编程的人总会喜欢制作一些简单有用的小软件,最近就参考了网上一个php抓取图片代码,封装了一个php远程抓取图片的类,测试了一下,效果还不错分享...2015-10-30
- 相信很多站长都遇到过这样一个问题,访问页面时出现408错误,下面一聚教程网将为大家介绍408错误出现的原因以及408错误的解决办法。 HTTP 408错误出现原因: HTT...2017-01-22
- 下面我们来看一篇关于Android子控件超出父控件的范围显示出来方法,希望这篇文章能够帮助到各位朋友,有碰到此问题的朋友可以进来看看哦。 <RelativeLayout xmlns:an...2016-10-02
- ps软件是现在非常受大家喜欢的一款软件,有着非常不错的使用功能。这次文章就给大家介绍下ps把文字背景变透明的操作方法,喜欢的一起来看看。 1、使用Photoshop软件...2017-07-06
intellij idea快速查看当前类中的所有方法(推荐)
这篇文章主要介绍了intellij idea快速查看当前类中的所有方法,本文通过实例代码给大家介绍的非常详细,对大家的学习或工作具有一定的参考借鉴价值,需要的朋友可以参考下...2020-09-02- 1.在没有设置默认值的情况下: 复制代码 代码如下:SELECT userinfo.id, user_name, role, adm_regionid, region_name , create_timeFROM userinfoLEFT JOIN region ON userinfo.adm_regionid = region.id 结果:...2014-05-31
js导出table数据到excel即导出为EXCEL文档的方法
复制代码 代码如下: <!DOCTYPE html PUBLIC "-//W3C//DTD XHTML 1.0 Transitional//EN" "http://www.w3.org/TR/xhtml1/DTD/xhtml1-transitional.dtd"> <html xmlns="http://www.w3.org/1999/xhtml"> <head> <meta ht...2013-10-13- 批量更新mysql更新语句很简单,更新一条数据的某个字段,一般这样写:复制代码 代码如下:UPDATE mytable SET myfield = 'value' WHERE other_field = 'other_value';如果更新同一字段为同一个值,mysql也很简单,修改下where即...2013-10-04
- ps软件是一款非常不错的图片处理软件,有着非常不错的使用效果。这次文章要给大家介绍的是ps怎么制作倒影,一起来看看设计倒影的方法。 用ps怎么做倒影最终效果̳...2017-07-06
- 本文涉及的主题虽然很基础,在许多人看来属于小伎俩,但在JavaScript基础知识中属于一个综合性的话题。这里会涉及到对象属性的封装、原型、构造函数、闭包以及立即执行表达式等知识。公有方法 公有方法就是能被外部访问...2015-11-08
安卓手机wifi打不开修复教程,安卓手机wifi打不开解决方法
手机wifi打不开?让小编来告诉你如何解决。还不知道的朋友快来看看。 手机wifi是现在生活中最常用的手机功能,但是遇到手机wifi打不开的情况该怎么办呢?如果手机wifi...2016-12-21- 最近想自学PHP ,做了个验证码,但不知道怎么搞的,总出现一个如下图的小红叉,但验证码就是显示不出来,原因如下 未修改之前,出现如下错误; (1)修改步骤如下,原因如下,原因是apache权限没开, (2)点击打开php.int., 搜索extension=ph...2013-10-04
- 单个字符分割 string s="abcdeabcdeabcde"; string[] sArray=s.Split('c'); foreach(string i in sArray) Console.WriteLine(i.ToString()); 输出下面的结果: ab de...2020-06-25
- javascript控制页面控件隐藏显示的两种方法,方法的不同之处在于控件隐藏后是否还在页面上占位 方法一: 复制代码 代码如下: document.all["panelsms"].style.visibility="hidden"; document.all["panelsms"].style.visi...2013-10-13
连接MySql速度慢的解决方法(skip-name-resolve)
最近在Linux服务器上安装MySql5后,本地使用客户端连MySql速度超慢,本地程序连接也超慢。 解决方法:在配置文件my.cnf的[mysqld]下加入skip-name-resolve。原因是默认安装的MySql开启了DNS的反向解析。如果禁用的话就不能...2015-10-21- 本篇文章是对C#方法进行了详细的总结与介绍,需要的朋友参考下...2020-06-25
- 步骤:Window -> PHP -> Editor -> Templates,这里可以设置(增、删、改、导入等)管理你的模板。新建文件注释、函数注释、代码块等模板的实例新建模板,分别输入Name、Description、Patterna)文件注释Name: 3cfileDescriptio...2013-10-04
- EXCEL数据上传到SQL SERVER中的方法需要注意到三点!注意点一:要把EXCEL数据上传到SQL SERVER中必须提前把EXCEL传到服务器上.做法: 在ASP.NET环境中,添加一个FileUpload上传控件后台代码的E.X: 复制代码 代码如下: if...2013-09-23
- mysql锁定单个表的方法 复制代码 代码如下:mysql>lock table userstat read; mysql>unlock tables; 页级的典型代表引擎为BDB。 表级的典型代表引擎为MyISAM,MEMORY以及很久以前的ISAM。 行级的典型代表引擎为INN...2014-05-31